Last week we went over how to do audits using PowerShell (Link). Today we will use scheduled tasks with PowerShell to have the audit script run hour by hour. We do this because we don't want to be manually running the PowerShell script every hour. Let the computer handle all of that for us. We will go over how to manually build the Scheduled Task and the PowerShell way.
Manual Process - Scheduled Tasks
Lets take a look at the manual process. We are placing our AuditDisabledAccounts.ps1 script on the computer. I like placing things in the c:\scripts or c:\temp folder. Sometimes this is good, sometimes this is bad. It depends on the world you are working in.
Start Task Scheduler
Click Task Scheduler Library.
Right Click and select basic task
Name it accordingly. I am naming mine "Hourly Disabled AD Audit."
Under Triggers, I selected When the computer starts.
This scheduled task will repeat itself with another setting. It's best to get it started when the computer starts. This way if the system restarts, it will start again. It can become confusing over time.
Now we have a basic scheduled task setup. Next we want to have it trigger every hour. Sense we opened the properites you can now do just this.
On the general tab
Radio check: "Run whether the user is logged on or not."
If you need to change the user, this is where you will do that.
Click the Triggers tab.
You will see at startup, click edit
Under advanced Settings
Check Repeat task every
Select 1 hour
Duration: Indefinitely
Click ok
That's how you manually setup a Scheduled Task for PowerShell.
Powershell Method
Now we can do a Scheduled Tasks with PowerShell. We will be using the scheduledtask commands to create the task accordingly. Lets take a look at the script itself.
The first thing we do is setup. We want to have the script, the name, the out file for our audit report, our servers, and the hours back we want to go.
The first thing we want is the veriables. We want the path of the script. We want it's name. Where our CSV files will be dropped, the servers, how many hours back, usernames and passwords. Notice that the User is using a read-host and creds is using a secure string. This is to help stop shoulder surfers and powershell memory. This way you password isn't passed around. Basicly, we input the password as a secure string, and it becomes a veraible. Thus, if someone is looking through the powershell history, or is monitoring it with something like defender, then they will not see the password. Only the veraible from this point on.
Decoding Passwords as Veriables
Part of the Scheduled Tasks with PowerShell is we need to register the task later. This means that the password needs to be plain text. However, we don't want a password to ever exist in the shell visability. So we want to decode it directly into a Veriable.
The code above allows you to convert the secure string to normal text in Powershell 5. If you are using powershell 7, this isn't a problem. But most servers are still defaulting at 5. The new veriable name is UnsecurePassword which has the password as plain text for the register command.
Triggers - Scheduled Task for powershell
We need to start making the triggers. Unlike the gui, we can't setup a startup with a hourly repeat. Instead, the safeist way is to do an hourly thing for repeating the hour. We do this using the new-scheduledtasktrigger command.
Since we have 24 hours in a day, we want to repeate a foreach-object loop 24 times. We start at 0 and go to 23 which makes 24. Wow... Anyways, As we loop, the $_ will be the number. So we create a new trigger at that time and set it to daily. All of this will be dumped into the $triggers array.
Principal
Next we want to setup a user account. The command for this is.... Yep, you guessed it, New-ScheduledTaskPrincipal. Here we are setting the ID to the author, using our user flag, doing the logontype as password, and the runlevel is limited. We don't want it to have full access to anything since it's not doing anything on the local PC. Notice the ` symbol. This allows you to do mulitlple lines with one command. It's like break here and continue to the next line. It makes reading code so much easier.
Next we need to do our actions. AKA, what's it going to do. Using the New-scheduledTaskAction we want to execute with powershell and push our arguments in. Using our Veriables, we fill in the blanks. It's very straight forward. The secret sause here is the arguments will be like you did with the gui approach.
Next we need to make the task itself. We are going to use the New-ScheduledTask command. This part of the command creates a task object that will need to be registered. We give it the description we want. The Actions from above. The user inside the principal names and the triggers we built out.
Finally, we want to register the task in question. We are going to use "Register-scheduledTask" to do this. Notice that this is where we are using that password we used at the start. It's used as a variable, and thus it's never shown in the PowerShell history.
Additional Thoughts on Scheduled Tasks with PowerShell
This technique is very powerful. I built out a script that scanned the local network via Get-NetNeighbor. The script was a scheduled task and it grabbed all the devices. Imagine having admin rights, pushing out a script that scans the local network drops a scheduled task on another computer that scans that network. You could map out a whole network within a few minutes. This could be used as a worm and it's a good reason to block WMI on the network except from the machines that does the administration.
What can we learn as a person?
It's always a good idea to have routine. Having a Scheduled task in your life that you like tends to improve our lives. For example, I like going to a monthly meetup with my friends. It's something I look forward to. Having it on my calendar helps. This is why vacations are important. We need to have those things on our calendar. It's ok to have them on the calendar. So, find something you can look forward to, and put it on the calendar.
In the intricate ecosystem of IT support, the quality of communication in ticket submissions can significantly influence the efficiency of problem resolution. Imagine walking into a dense forest, each tree representing a different issue or ticket awaiting resolution. Just as a seasoned guide can navigate these woods with ease, providing clear paths and descriptions, a Subject Matter Expert (SME) in IT can illuminate the way to swift solutions with well-crafted tickets.
The Spectrum of Ticket Details
Venture into the thicket of daily IT support tickets, and you'll encounter a wide array of communication styles. On one end, there are tickets like faint, barely noticeable trails – vague, minimal details offered by users unsure of what information is pertinent. Bob from manufacturing, for example, might simply state, "My computer won't turn on," leaving the path to resolution obscured by underbrush.
Contrastingly, tickets from more technically adept users, like Jan from accounting, are akin to well-trodden paths through the forest, marked by signs and clear directions. Jan not only mentions reinserting cables and attempting to power on her computer but also notes the absence of the usual boot-up text, laying breadcrumbs for IT support to follow towards a solution.
Cafting a Map to Resolution
Subject Matter Experts (SMEs) stand as the rangers of this forest, armed with the knowledge and tools to guide others through even the densest undergrowth. Here's how they can effectively chart the course:
Know Your Audience: Just as a ranger alters their guidance based on the experience of the hikers, SMEs should tailor their ticket submissions to the technical level of the IT support team. This ensures that the instructions are neither too complex for general support staff nor too simplistic for specialists.
Use a Structured Format: A structured ticket is like a map, offering a clear overview of the terrain at a glance. By organizing the issue, steps taken, and potential solutions logically, SMEs create a guide that others can follow easily, avoiding unnecessary detours.
Prioritize Clarity and Brevity: In the dense forest of IT issues, clarity acts as a beacon, guiding the support team directly to the heart of the problem. SMEs should aim to illuminate the path with precise, concise language, ensuring no one gets lost in unnecessary details.
Offer Potential Solutions: Suggesting solutions or workarounds is akin to marking potential paths on a map. While not all may lead directly to the destination, they provide starting points, accelerating the journey towards resolution.
Include Visuals When Necessary: Sometimes, the most effective way to describe a landscape is through visuals. Diagrams, screenshots, and videos can serve as snapshots of the issue, offering immediate context and understanding.
Encourage Open Communication: Ending a ticket with an invitation for questions is like leaving a trail of markers for others to follow, ensuring that if the path becomes unclear, further guidance is just a call away.
Navigating the Forest Together
In the realm of IT, "Subject Matter Expert Tickets" are more than just requests for assistance; they're opportunities for SMEs to lead by example, demonstrating how detailed, well-structured communication can streamline the resolution process. It's about creating a collaborative environment where every ticket, like a trail in the forest, is clearly marked and navigable, leading to a more efficient, effective IT support system.
By adopting these strategies, SMEs not only enhance their own credibility but also contribute to a culture of clarity and cooperation, ensuring that the vast forest of IT support is a little easier for everyone to navigate.
While install the LB5034439 update, i received an error message of 0x80070643. Google failed me over and over. Every post I saw talked about using dism commands to repair the update. Which none of these resolved the issue. Finally microsoft dropped a useful article about the update. Inside the update, it stated that the update will fail if your recovery drive had less than 250mb of free space. Well, my recovery drive had only 500 mb of space and only 83 mb of free space. I will go over how to find that information. So, Resolving KB5034439 error was as simple as expanding the recovery drive.
Finding the Recovery Partition Size
So, to find the recovery partition size, I used a simple powershell script. The idea behind the script was to grab the drives, the partitions and do some simple math. Of course, this came from superuser. All I did was tweak it a little to reflect my needs.
What this script does is, it grabs the volumes on the machine that is not detachable, like a usb. Then we loop through each volume and grab the partitions that has an id associated with the volume. From there we just pull the data out and do basic math. Finally we display the information. The important part of this script is the recovery label. If your free space is less than 250mbs, we are going to have some work to do.
Clean up the Recovery Partition
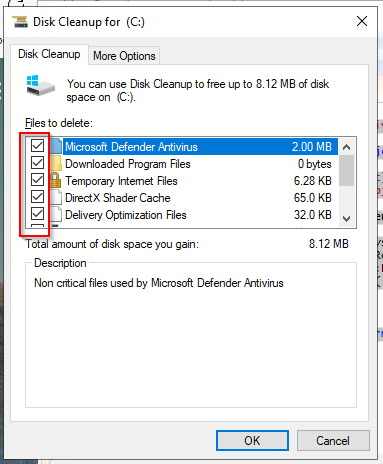
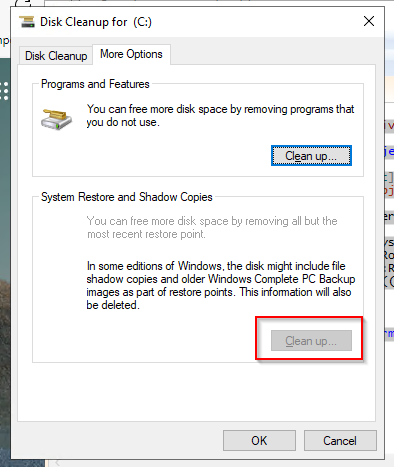
The first thing I tried to do is use the cleanmgr to clean up the recovery partition. Running it as an administrator will give you this option. Inside the disk cleanup software, select everything you can. Then in the "More Options" tab, you should be able to clean up the "System Restore and Shadow Copies". After doing these items, run the script again and see if you have enough space. In my case I did not. Cleaning the Recovery partition did not resolve the KB5034439 error.
Growing Recovery
So, the first thing I had to do is go into my partition manager in my server. The recovery partition in my case was at the end of the drive. The partition next to the recovery was thankfully my main partition. I shrank my main partition by a gb. That was the easy part. Now the hard part. I had to rebuild my recovery partition inside that shrinked space. These are the steps on how to do that.
Start CMD as administrator.
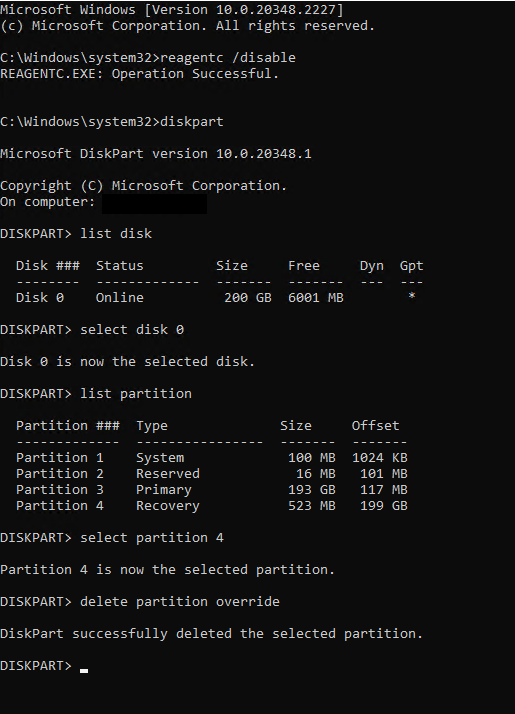
Run reagentc /disable to disable the recovery system.
run DiskPart
Run List Disk to find your disk.
Run Select Disk # to enter the disk you wish to edit.
Run List Partition to see your partitions. We want the Recovery partition.
Run select partition #. In my case, this is partition 4. The recovery partition.
Run delete partition override. This will delete the partition. If you don't have the right one selected, get your backups out.
Run list partition to confirm the partition is gone.
Now inside your partition manager, Click Action > Refresh
Select the Free space and select New Simple Voume
Inside the Assign Drive Letter or Path Window, Radio check "Do not assign a drive letter or drive path" and click Next
Inside the Format Partition Change the volume Label to Recovery and click Next
This will create the new partition. Navigate back to your command Prompt with Diskpart
Run list partition
Run select partition # to select your new partition.
The next command depends on the type of disk you are working with the first list disk shows a star under gpt if the disk was a gpt disk.
GPT Disk
Run set id=de94bba4-06d1-4d40-a16a-bfd50179d6ac
Run gpt attributes=0x8000000000000001
GPT Disk
Run set id=27
Run Exit to exit diskpart.
Run reagentc /enable to renable the recovery disk partition.
This command moves the .wim file that it created with the disable from the c:\windows\system32\recovery back into the recovery partition.
Finally, run your windows updates. Resolving KB5034439 error is a little scary if you have a server that is more complex. Thankfully it wans't that complex on my end. You will have to adapt your approach to match what is needed.
Yesterday I had to clear out a few users' google chrome cache. It was a little aggravating going computer by computer. We were doing this because recently a core web app was updated. The application left traces of itself in the Google Chrome Cache and it caused all kinds of problems. So the last few I looked for a way to do it with PowerShell. Long and behold you can Clear Google Cache with Powershell.
The Script
We are starting with the script, to begin with. We are doing this because the core of this script is wrapped around a remote template I use. I will cover the template later down the road.
Let's break down the script and see what is needed and how it is needed. The first thing you will notice is the computer and the user are both lists of strings. [String[]]. This means I will have to loop through each one. This is important because this means you can target a single user on multiple machines or multiple users on a single machine or both. The second thing I want to point out is the credentials. So, if you are not in admin mode, you can deploy the script with your admin creds, or with the local admin creds.
The Username is not a required item. Why did I do this? The simple answer is, if you don't put a username, then it will clear every user's google chrome cache. Notice in the "begin" area, we have if null is equal to username, then we want the username to be *. Later we ask, if the username is not equal to *, then we use the user. If not, we use the * which will go through all the users at once. Also notice in the do the user, we test if the user exists. If it doesn't we deploy an error, if it does, we do our work.
if ($null -eq $username) { $username = "*" }
if ($user-ne "*") { do the user
    if (Test-Path C:\Users\$user) { Its there, lets go for it.} else { Error will robison.}
} else {do everyone}
The Core
At the core of this script is the remove-item blurp. We are going through each user data area and clearing out the different types of cache. There is the default cache, code, media, storage, and script caches. Each of these folders will have folders inside of them. So we need to recurse. We want to force it and we don't care about the errors as some cache will not delete while chrome is active. Could I have added a kill chrome, yes, but why? if the end-user is working in chrome, this is going to be disruptive and force them to restart chrome. Lets look at the code.
That's all the code you will need. If you selected not to use username the $user will turn into * which will do every user, including default. if you have something like sccm, pdq, intune, ninja, pulse, etc, then just user this part of the code with * instead of user. This will clear the cache as needed.
We close it all up and send it as a job to the machine in question. This way we are not stuck on each computer. It speeds things up. With Powershell 7, you can loop with a number of objects that you want which would speed this up even more.
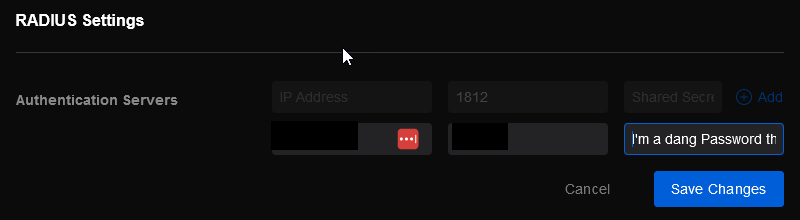
I was inside my unifi controller a while back and the new update had starred out the radius password. The documentation had yet to occur on the radius password. So, I used a simple HTML trick with my firefox to change the stars to clear text. This is how you can Uncover Starred-Out Passwords in firefox.
Developer Options
F12 will trigger the developer options. Inside Google Chrome, the developer window will appear on the right-hand side. In Firefox, the developer window will appear at the bottom of the window. These options allow you to change your current view of the site. If you want to change the background to hot pink, you can. if you want to change a password field to plain text, you can.
Developer Options in Firefox
What we are looking at
The view area.
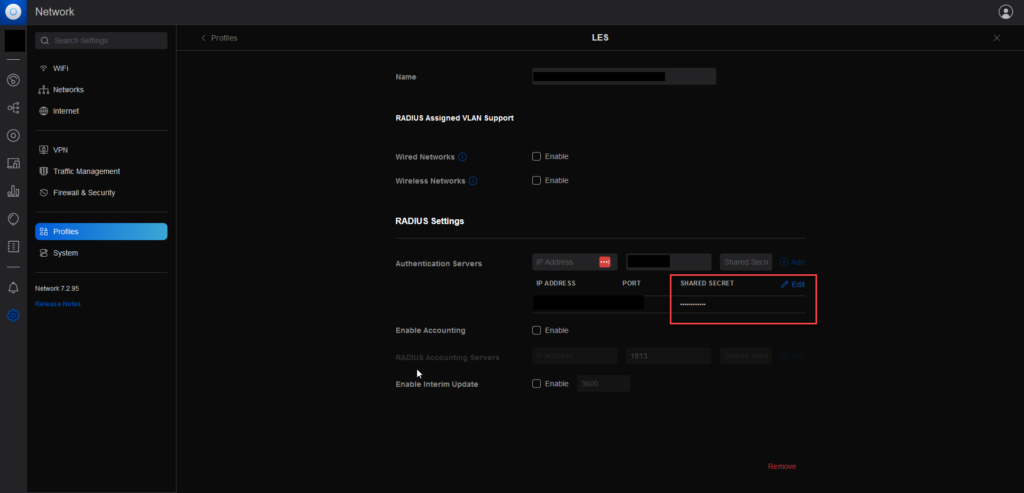
This is the page we are viewing. I want the starred-out shared secret that you see in the red box. Click the edit button to the right of the shared secret. Notice the password is still starred out. To get this information, we need to start the Developer options. Inside the developer options on the left-hand side, you will see a mouse cursor in a box, also known as an inspector. We still have Starred-Out Passwords
Once you click the inspector tool, you can move the mouse over the shared secret and click on it. Inside the developer options, you will see the HTML itself highlighted. Notice the highlighted HTML code is the input object. We are looking for the word "type". All we have to do is replace type="password" to type="text". Once you type in text, click enter. The password is now exposed.
That's pretty much it. The key secret is to make sure you are editing the input and not just the div. I you see div code instead of input code, then you do not have it set in edit mode. This process can be used for just about any website out there. This is how we Uncover Starred-Out Passwords.
Like in my last post, I have been in IT for many years. Every place I have worked at and even when I worked at an MSP, I have always seen the Active Directory Users and Computers take a really long time to load. Often times be very slow while on VPN. I was finally challenged to see why.
Reasons
There are hundreds of reasons apparently for it being slow. I have seen it slow on Global connect, Open VPN, Cisco's Anyconnect, WatchGuard, and more. Apparently, the issue is with how ADUC communicates via DNS.
Yes, it's a DNS problem.
The solutions for a slow ADUC on VPN
Point to the server's IP instead of the DNS name.
If you right click your ADUC in the start menu, you can click properties. Then from there, you can add /server="<Your Servers IP Address>" and this should resolve the issue. The load time went from 5 minutes to 10 seconds. I'm not all sure the back end fix, but this one worked well.
A registry fix
Here is a registry fix that seems to work on some machines. I tested this on windows 10 and 11. I was unable to test it on multiple network stacks, just my pfsense and untangled stacks. So, let me know if these keys work for you.
We use cookies to ensure that we give you the best experience on our website. If you continue to use this site we will assume that you are happy with it.