There has been a few times where I have needed to enable Remote Desktop Protocal on Remote computers. So, I built out a simple but powerful tool to help me with just this. It uses the Invoke-Command command to enable the RDP. So, lets dig in.
The Script - Enable RDP on a Remote Computer
function Enable-SHDComputerRDP {
    <#
    .SYNOPSIS
        Enables target computer's RDP
    .DESCRIPTION
        Enables taget Computer's RDP
    .PARAMETER Computername
        [String[]] - Target Computers you wish to enable RDP on.
    .PARAMETER Credential
        Optional credentials switch that allows you to use another credential.
    .EXAMPLE
        Enable-SHDComputerRDP -computername <computer1>,<computer2> -Credential (Get-credential)

        Enables RDP on computer1 and on computer 2 using the supplied credentials.
    .EXAMPLE
        Enable-SHDComputerRDP -computername <computer1>,<computer2>

        Enables RDP on computer1 and on computer 2 using the current credentials.
    .OUTPUTS
        [None]
    .NOTES
        Author: David Bolding
    .LINK
        https://therandomadmin.com
    #>
    [cmdletbinding()]
    param (
        [Parameter(
            ValueFromPipeline = $True,
            ValueFromPipelineByPropertyName = $True,
            HelpMessage = "Provide the target hostname",
            Mandatory = $true)][Alias('Hostname', 'cn')][String[]]$Computername,
        [Parameter(HelpMessage = "Allows for custom Credential.")][System.Management.Automation.PSCredential]$Credential
    )
    $parameters = @{
        ComputerName = $ComputerName
        ScriptBlock  = {
            Enable-NetFirewallRule -DisplayGroup 'Remote Desktop'
            Set-ItemProperty ‘HKLM:\SYSTEM\CurrentControlSet\Control\Terminal Server\‘ -Name “fDenyTSConnections” -Value 0
            Set-ItemProperty ‘HKLM:\SYSTEM\CurrentControlSet\Control\Terminal Server\WinStations\RDP-Tcp\‘ -Name “UserAuthentication” -Value 1
        }
    }
    if ($PSBoundParameters.ContainsKey('Credential')) { $parameters += @{Credential = $Credential } }
    Invoke-Command @parameters
}
The breakdown
Comments/Documentation
The first part of this tool is the in-house Documentation. Here is where you can give an overview, description, parameters, examples, and more. Using the command Get-help will produce the needed information above. On a personal level, I like adding the type inside the parameters. I also like putting the author and date inside the Notes field.
Parameters
We are using two parameters. A computer name parameter and a credential parameter. The ComputerName parameter contains a few parameter flags. The first is the Value from Pipeline flags. This allows us to pipe data to the function. The next is the Value From Pipeline by Property name. This allows us to pass the "ComputerName" Value. Thus we can pull from an excel spreadsheet or a list of computer names. Next, we have the Help Message which is just like it sounds. It's a small help message that can be useful to the end user. Finally, we have the Mandatory flag. As this command is dependent on that input, we need to make this mandatory. The next item in computername is the Alias. This allows us to use other names. In this example, we are using the hostname or the CN. This is just a little something that helps the end user. Finally, we have the type. This is a list of strings which means we can target more than one computer at a time.
The next parameter is the Credential Parameter. This one is unique. The only flag we have here is the Hel message. The type is a little different. The type is a System Management Automation PSCredential. And yes, it's complex. A simple run down is, use Get-Credentials here. This function is designed to be automated with this feature. If you are using a domain admin account, you may not need to use this. However, if you are working on computers in a different domain, and don't have rights, you can trigger this parameter.
Now we need to create the script block that will be used inside the invoke-command. We are going to build out a splat. We build splats with @{}. The Information will be inside here. When we push a splat into a command we need to add each flag from that command that is required. Here we are going to be adding the computer name and script block. The computer name flag is a list of strings for our invoke-command. Thus, we can drop the Computername into the ComputerName. Yeah, that's not confusing. The script block is where the action is.
Let's open up some knowledge. The first thing we need to do is enable the remote desktop firewall rules. This will allow the remote desktop through the firewall.
Now we have created the Parameter, it's time to add credentials when needed. We do this by asking if the parameter credentials was added. This is done through the PSBoundParameters variable. We search the Contains Key method and to see if Credential is set. If it is, Then we add the credentials.
if ($PSBoundParameters.ContainsKey('Credential')) { $parameters += @{Credential = $Credential } }
Finally, we invoke the command. We are using the splat which is the @parameters variable instead of the $parameter.
Invoke-Command @parameters
And that's how you can quickly Enable RDP on a Remote Computer using PowerShell within your domain.
During my in-house days, one of the things I had to do constantly was clear people's print jobs. So I learned to Clear Print Jobs with Powershell to make my life easier. It surely did. With PowerShell I could remotely clear the print jobs as most of my machines were on the primary domain. All you need to know was the server and the printer's name. The server could be the computer in question if it's a local printer. Or it could be the print server. Wherever the queue is being held.
The Script
function Clear-SHDPrintJobs {
    [cmdletbinding()]
    param (
        [parameter(HelpMessage = "Target Printer", Mandatory = $true)][alias('Name', 'Printername')][String[]]$name,
        [parameter(HelpMessage = "Computer with the printer attached.", Mandatory = $true)][alias('Computername', 'Computer')][string[]]$PrintServer
    )
    foreach ($Print in $PrintServer) {
        foreach ($N in $name) {
            $Printers = Get-Printer -ComputerName $Print -Name "*$N*"
            Foreach ($Printer in $Printers) {
                $Printer | Get-PrintJob | Remove-PrintJob
            }
        }
    }
}
The Breakdown
It's time to break down this code. The parameters are set to mandatory. As you need this information. Notice, both parameters are lists of strings. This means you can have the same printer name on multiple printers and trigger this command.
Parameters
We are using two parameters. The first is the name of the Printer. This parameter is a mandatory parameter. We are using the alias switch here as well. Basically, this switch gives different options to make the command easier to work with. The options are, Name and Printername. It is also a list of strings. This way we can import an array if need be. I'll go over why that's important later. Finally, we have a help message. This can be useful for the user to figure out what they need to do.
The next parameter is like the first. It is a Mandatory parameter with alias options. The options are "ComputerName" and "Computer". I set the name as "PrintServer" because I dealt with print servers most of the time. Once again we have a list of strings for multiple machines.
Foreach Loops
Next, we look at our function. This is where we Clear Print Jobs with PowerShell. There are three loops in total. The first foreach loop cycles through the print server list. So for each print server, we enter the next loop. The next loop consists of the Printer Names.
foreach ($Print in $PrintServer) {
    foreach ($N in $name) {
        #Do something
    }
}
Inside the Name loop, we use the get-printer command. We target the print server and ask for a printer that contains the name we requested. Thus, if you use a *, you can clear out all the print jobs from that device. This is a very powerful option.
After gathering the printers from the server, we start another loop. This loop will be foreach printer we have from this server. We pipe the output from the Printers to Get-PrintJob. This allows us to see the print jobs. Then we pipe that information into Remove-PrintJob. This clears the print job.
$Printer | Get-PrintJob | Remove-PrintJob
That's it for this function. It's a great little tool that will change how you clear print jobs of buggy print systems.
Conclusion
In conclusion, I have used this function a few hundred times in my day. The environment was the domain level. This does not work for cloud print options.
It's time to Set Users' MFA with a nice little function. This function is designed to gather information and set a user's MFA with the method you want. It even allows you to reset and disable MFA. We are going to break this blog up a little differently. We will go through each area of the function as the breakdown. Let's get started.
Function and Parameters
The first thing we are going to build out is the Function and the Parameters. The function command is like a wrapper for a script. This way you can add this to your PowerShell tool kit module.
Function Set-SHDUserMFA {
    [CmdletBinding()]
        param(
    )
}
Parameters
User Principal Name
The parameters are where people select items that they want. We have a few here. The First parameter is the User Principal Name. This is like an email address. This parameter is a List of strings. Basically, you are allowed to add more than one user name to this field. To make life easier we have set a Parameter set name. The PSN is called UPN. So the end user can either type UPN or UserPrincipalName for this parameter. This parameter is Mandatory.
Function Set-SHDUserMFA {
    [CmdletBinding()]
        param(
            [Parameter(Mandatory = $true, ParameterSetName = 'UPN', Position = 0),ValueFromPipeline = $true,ValueFromPipelineByPropertyName = $true,][string[]]$UserPrincipalName,
    )
}
Status
Afterward, The status parameter allows you to set the MFA status that you want. Here we have Enabled, Disable, Enforced, and Reset. The Enabled will enable MFA. Disable of course disables. Enforced will skip the text and go straight to the Apps. Finally, the reset will reset all the MFA token flags. This is how you Set Users' MFA. This parameter isn't mandatory.
Finally, we have the Info switch. This switch tells the script to produce an in-depth MFA report on the user. This parameter is not mandatory. We choose not to make it mandatory because we might not care.
Chiefly, I stated that we were targeting one section at a time. Here in the begin, we will check the environment that we are working with. The MSOnline module only runs in PowerShell 5 and not PowerShell 7. Thus we need to check. Thus, we use the PS Version Table variable. This will produce the PowerShell version number. We can test against that and end the script if the user is using PowerShell 7. In the below example, we are using the write-error to let the user know what's going on.
#Checks PS version
if ($PSVersionTable.psversion.major -ne 5) {
    Write-Error "Your Powershell Version is $($PSVersionTable.psversion.major). Msonline service only works on Powershell 5. Ending."
    end
}
Module Test
Aftward, we test the MSOnline module. The Get-InstalledModule tests the installation status of MSOnline. Running MSOnline command tests the status of the module load. Afterward, we either connect or error out.
#Checks to see if the module is installed if not, tells the end user to install.
if (Get-InstalledModule -name MSOnline -ErrorAction SilentlyContinue) {

    #Checks to see if the msolservice if it isn't connected, we connect
    if (-not (Get-MsolDomain -ErrorAction SilentlyContinue)) {
        Connect-MsolService
    }
} else {
    Write-Error "MSOnline Services are not installed. Please install the MSOnline services with the following command `n Install-module MSOnline `n"
}
Process - Set Users' MFA
Confirming the User
Next, we start the process section. The process is where most of the meat and potatoes are. Firstly we have the User Principal Name loop. This loop is very important. The parameter we created beforehand has multiple possible inputs. Thus, it's best to loop through those possible inputs. We are going to call the Internal variable UPN.
foreach ($UPN in $UserPrincipalName) {
    #Do Stuff Yall
}
After that, we will be building out a try/catch to test if the user exists. The try/catch will give us the ability to test the user without blowing up the script. Get-MsolUser is the command we will be using with an error action of "stop". The catch will contain the error write-out.
#Checks if the user exists, if not, ends the upn and writes an error.
try {
    $User = Get-MsolUser -UserPrincipalName $UPN -ErrorAction Stop
} catch {
    Write-Error $_.Exception.Message
}
The Switch
Now that we have the user verified, it's time to move forward. We start with the switch. The switch is a process of if statements but formatted nicely. In our case, we will be building the switch of the status parameter. If the user selected blah, then we take blah action. Here is the basic structure of a switch. It's switch and the parameters name. Then each possible answer to that parameter. The status is a "validate set" parameter. This means all the answers are inside the parameter.
The enabled will enable the MFA of a target user. We went over some of this code in a previous blog. Firstly, we want to create a new object. This object is a Microsoft Online Administration object that focuses on Strong authentication requirements. Once we create this object we will assign properties different values. Finally, we use the Set-Msoluser to set the user accordingly.
On the other hand, We have enforced. Enforced forces the user to use an authentication app. We will follow the same path as before. Create the object, and set the properties. Then set the object to the user with the set-msoluser command. Notice the sar.state property.
Before we created an object, this time we only need a command. We are using the Reset-Msolstrongauthenticationmethodbyupn. Don't even try saying the command without spaces. This is a beast of a command, but it works. What it does is it resets the methods that the user uses to login in. If the user selected an authentication app, this will allow the user to set another one up. Great command if a user lost their phone.
Finally, we have "disable". Unlike before methods we will be setting the strong authentication requirements to NOTHING! ABSOLUTELY NOTHING! (UHF reference).
Finally, the Info Flag piece. Here we are going to be gathering information about the user. It's at the end of the command because we want the information after we set the user's MFA. The first step we take is to grab user information. We do this with the Get-Msoluser command. "But couldn't we use the previous $user grab?" The answer is no because we want the most up-to-date. We want to reflect on the changes we have made beforehand.
#Grabs the user information
$User = Get-MsolUser -UserPrincipalName $UPN -ErrorAction Stop
Confirm Strong Authentication Requirements
Afterward, we want to test this data. The first test is, does the user have strong authentication requirements. "Strongauthenticationrequirements" property is our target. Since the property has data, we place that data into the "MFAState" parameter. However, if it doesn't, we put "Disabled" into this variable.
#If it has a strong authentication requirement we grab the state, if the state is blank, then we return disabled
if ($User.StrongAuthenticationRequirements) {
$MFAState = $User.StrongAuthenticationRequirements.State
} else {
$MFAState = 'Disabled'
}
Find the Default
Next, we want to grab the default method type. We do this with a where-object that searches for "isdefault". Then we expand the method types.
This will produce a string if there is a default. However, it will produce null if there is not. So we test to see if the $MethodType has data. Once we do that we start another switch. I like switches. Inside this switch we are comparing the unique names to real names. This makes life easier and allows non-admin answers they can understand. Here is a list of names and their translations.
OneWaySMS = SMS
TwoWayVoiceMobile = Phone call
PhoneAppOTP = TOTP
PhoneAppNotification = Authenticator App
However, it's none of these, we just say, disabled.
#if the methods are not blank, we find out which one is the right method. and make since of the code. If it is blank, we say disabled.
if ($MethodType) {
switch ($MethodType) {
'OneWaySMS' { $DefaultMethodType = 'SMS' }
'TwoWayVoiceMobile' { $DefaultMethodType = 'Call' }
'PhoneAppOTP' { $DefaultMethodType = 'TOTP' }
'PhoneAppNotification' { $DefaultMethodType = 'Authenticator App' }
}
} else {
$DefaultMethodType = 'Disabled'
}
PS Custom Object
Finally, the PS custom object. This is where we return the information the user wants. The PowerShell custom object will contain the following information, the username, display name, the mfa state, and the default method type.
The last thing we do is we null out the methodtypes. Sometimes PowerShell 5 will carry over these items in a loop.
#Nulls out the method type variable because we are in a loop.
$MethodType = $null
Conclusion
When you Set Users' MFA, you make people mad. However, life gets way more secure. This function is inside my tool belt and it helps me out almost every day. I can push hundreds of users through it quickly. I will leave you with the script itself.
The Script
Function Set-SHDUserMFA {
<#
.SYNOPSIS
Sets the MFA status of a user.
.DESCRIPTION
The script can grab the Status information of MFA of a user. It can set the users mfa to enabled, enforced, disabled, and even reset the mfa of a user.
.PARAMETER UserPrincipalName
A list of strings, the user principal names of the users you wish to preform the actions against.
.PARAMETER SetStatus
The action you wish to preform
Enabled: Enables MFA
Disable: Disables MFA
Reset: Resets MFA
Enforced: Enforces MFA
.PARAMETER Info
Grabs UPN, Displayname, The MFA state, and Default Method Type
.NOTES
Name: Set-SHDUserMFA
Author: therandomadmin
Version: 1.0
DateCreated: 8/3/2022
.LINK
#>
[CmdletBinding()]
param(
[Parameter(Mandatory = $true, ParameterSetName = 'UPN', Position = 0,ValueFromPipeline = $true,valueFromPipelineByPropertyName = $true,)][string[]]$UserPrincipalName,
[Parameter(Mandatory = $false)][validateset("Enabled", "Disable", "Enforced", "Reset")][string]$Status,
[Parameter()][Switch]$Info
)
BEGIN {
#Checks PS version
if ($PSVersionTable.psversion.major -ne 5) {
Write-Error "Your Powershell Version is $($PSVersionTable.psversion.major). Msonline service only works on Powershell 5. Ending."
end
}
#Checks to see if the module is installed if not, tells the end user to install.
if (Get-InstalledModule -name MSOnline -ErrorAction SilentlyContinue) {
#Checks to see if the msolservice if it isn't connected, we connect
if (-not (Get-MsolDomain -ErrorAction SilentlyContinue)) {
Connect-MsolService
}
}
else {
Write-Error "MSOnline Services are not installed. Please install the MSOnline services with the following command `n Install-module MSOnline `n"
}
}
PROCESS {
#Starts the UPN loop
foreach ($UPN in $UserPrincipalName) {
#Checks if the user exists, if not, ends the upn and writes an error.
try {
$User = Get-MsolUser -UserPrincipalName $UPN -ErrorAction Stop
}
catch {
Write-Error $_.Exception.Message
}
#Checks status
switch ($Status) {
#If enabled then we enable mfa
'Enabled' {
$sar = New-Object -TypeName Microsoft.Online.Administration.StrongAuthenticationRequirement
$sar.RelyingParty = "*"
$sar.State = "Enabled"
Set-MsolUser -UserPrincipalName $UPN -StrongAuthenticationRequirements $sar
}
#if enforced, we enforce mfa
'Enforced' {
$sar = New-Object -TypeName Microsoft.Online.Administration.StrongAuthenticationRequirement
$sar.RelyingParty = "*"
$sar.State = "Enforced"
Set-MsolUser -UserPrincipalName $UPN -StrongAuthenticationRequirements $sar
}
#if reset, resets mfa
'Reset' { Reset-MsolStrongAuthenticationMethodByUpn -UserPrincipalName $UPN }
#if disable, it removes mfa requirements
'Disable' { Set-MsolUser -UserPrincipalName $UPN -StrongAuthenticationRequirements @() }
}
#if you flip the flag for info we grab the info.
if ($Info) {
#Grabs the user information
$User = Get-MsolUser -UserPrincipalName $UPN -ErrorAction Stop
#If it has a strong authentication requirement we grab the state, if the state is blank, then we return disabled
if ($User.StrongAuthenticationRequirements) {
    $MFAState = $User.StrongAuthenticationRequirements.State
} else {
    $MFAState = 'Disabled'
}
#grabs the Strong authentication methods
$MethodType = $User.StrongAuthenticationMethods | Where-Object { $_.IsDefault -eq $true } | select-object -ExpandProperty MethodType
#if the methods are not blank, we find out which one is the right method. and make since of the code. If it is blank, we say disabled.
if ($MethodType) {
    switch ($MethodType) {
        'OneWaySMS' { $DefaultMethodType = 'SMS' }
        'TwoWayVoiceMobile' { $DefaultMethodType = 'Call' }
        'PhoneAppOTP' { $DefaultMethodType = 'TOTP' }
        'PhoneAppNotification' { $DefaultMethodType = 'Authenticator App' }
    }
} else {
    $DefaultMethodType = 'Disabled'
}
#creates a ps object and displays all the information collected
[PSCustomObject]@{
    UserPrincipalName = $User.UserPrincipalName
    DisplayName       = $User.DisplayName
    MFAState          = $MFAState
    DefaultMethodType = $DefaultMethodType
}
#Nulls out the method type variable because we are in a loop.
$MethodType = $null
}
}
}
END {}
}
Lets talk about Handle. Handle is an amazing program that allows you to see which program has access over a folder or file. This is a sysintel tool. Working with handle inside your powershell script is not a native thing. The first thing you will want to do is download handle.
We first create the folder we want handle to be downloaded in. In this case, the c:\temp folder will work. Notice we check first to see if it exists with the test path. We will continue this trend so we don't have to go through the download and creation process repetitively.
Now we test to see if handle has already been downloaded before. If not, we download it. We are going to be downloading the handled application from http://live.sysinternals.com/handle.exe All of the Sysinternals tools are on this website and you can programmatically download them at any time. We are going to save the handle.exe in our c:\temp folder we created a few seconds ago.
Now we have handle, it's time to get a handle on handle inside PowerShell. As command prompt program it needs to be called from the command prompt. We want to capture the output. Thus, using something like start-process is out of the question and here is why. Start process starts another processes. It does not keep the process in the current window. Thus you can not capture that data without doing some PowerShell magic which may or may not work. So, what we do instead is use the cmd.exe itself. We will use the /c flag and then the path to the handle software.
$ProcessHandles = cmd.exe /c C:\temp\handle.exe -a -u "$FilePath" -accepteula
Let's break this down a little more. We are starting the handle application with an -a. The A is dumping all the handle information. This is a ton of information. The -u shows the owning user name when searching for handles. So we are grabbing all the information and the user information. We want to do this because it gives us the programs as well. Then we give it the path of the folder we want. So we basically give it a target. Now we are pulling all the handle information from a target folder with the user name/process name. The final handle flag is -accepteula. This basically makes it more automated. We call the handle using the cmd.exe /c. This brings the command output into our terminal which we can capture by placing into the $processHandles. Bam, now we have a bunch of confusing string information. The next step is to parse this string. Here is what the string looks like:
Now we need to handle the handle strings. So we search each string for the file name or file path with a simple where-object. This should create an array of information.
In this case, we only have one, but we want to make sure it doesn't break if there is more than one. So we start a foreach loop. We loop through each handle in our handles. Each handle loops like this:
They are split apart by spaces. So, what we are going to do is use the split features. We are going to then search each line for an *.exe as most programs are .exe at the end of the day. We could expand upon this, but we will leave it here at this level. Once we have the .exe we want to remove that .exe with the replace command. Here is what the code will look like so far.
Notice how we pipe one command into another and then wrap it with the replace. Simple one-line power right there. From here we need to test if the $process is empty. We do this because if the file in question isn't locked down, we don't want to error out. So a simple, if null is not equal to process, is set. The goal is to push these items into a smart system that will kill the process. However, there is one item I have discovered over the years doing this that tends to get killed by going down this route and that's explorer.exe. I have killed it more than once. This is why I place an exclusion for explorer.exe. To do this we just check if the name matches with another if statement. So here is what the code looks like so far for this loop.
Now, here is the fun part. We can kill these tasks from the script itself. All we have to do is loop it through and stop each process with a stop-process. I placed a kill switch in the parameters just for this. So, if the kill switch is true, then we loop through each task killing it. If not, then we just display the processes. It's that simple. Here is what that code looks like:
if ($kill) {
        foreach ($Task in $tasks) {
            Stop-Process -name $Task -Force
        }
    } else {
        $Tasks
    }
It's that time, let's put it all together and make the script.
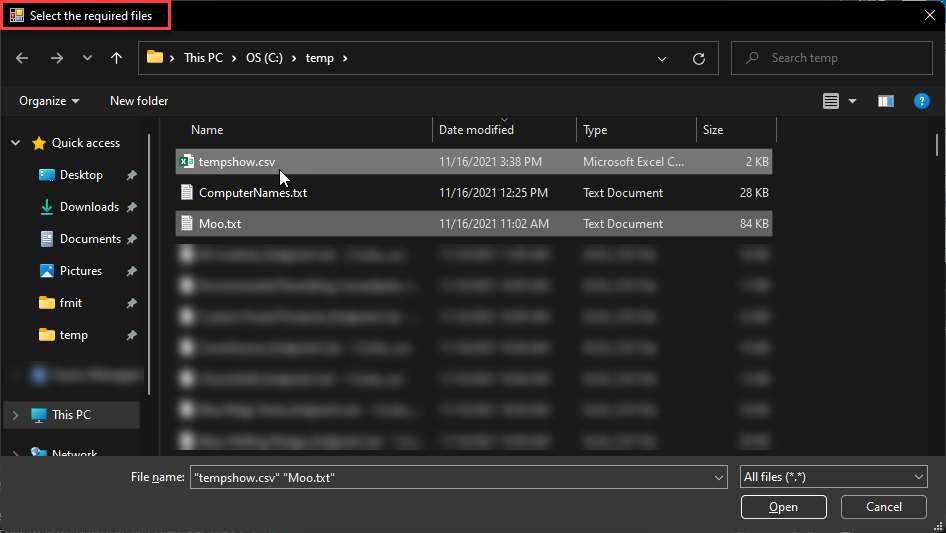
I was building a script for my manager the other day and inside the script, he wanted us to triple check the naming of a file path. He went as far as to have us copy the file path from the browser. Paste it, Then click rename on the file itself and copy that and paste it. It was extremely time-consuming and micromanagement. I finally got tired of it as it was about 5 file paths. Using the 80/20 rule, I made a function for this within the script that opened the file dialog box and allowed the user to select the file and have it programmatically push the names into the Variable.
Let us break down this script and explain it a little better. Our parameters are as the following:
InitialDirectory [string]- This is the directory we will open the Open Dialog in. By default we use the user's profile.
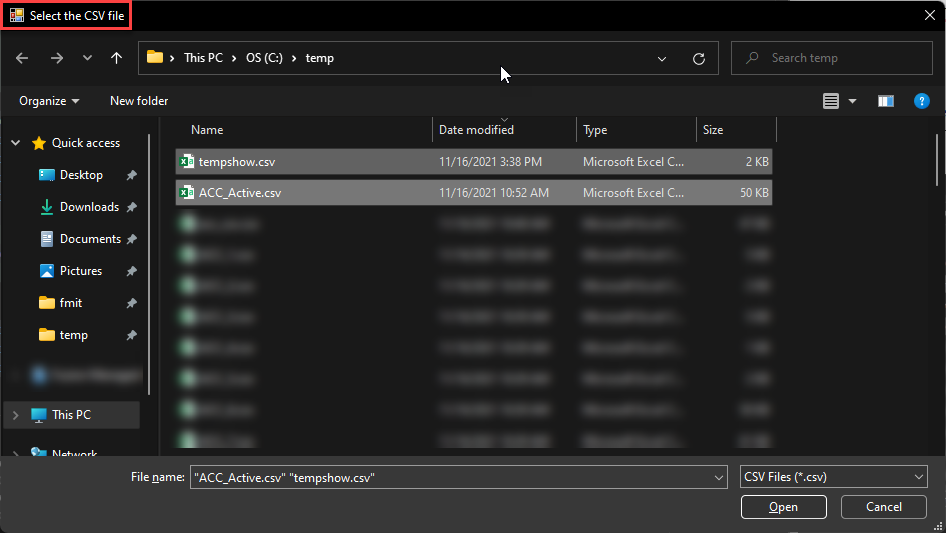
Title [string]- This will be the title on the Open Dialog box. We have this because when you execute the function mutiple times in a single script, this can give some direction.
Filter [string]- This is the filter that you will sort by. We have it defaulting to all files with all extensions. If you want to guide the user even more, you can change the filter to something like "XML Files (*.xml)| *.xml" for xml files.
Multiselect [switch]- This determines if you want to limit the system to a single file select, which is default or allow mulitple select. This way if you want to select 5 files at once, you can. This is more for the advanced user. If you want to guide the user, then don't flip this switch.
Now we have our parameters, it's time to build our assembly. We do this by adding the add-type command. We are loading the Forms assembly.
Add-Type -AssemblyName System.Windows.Forms
Now we have loaded the assembly, we need to create the dialog box. To do this we will create a new-object. System > Windows > Forms > OpenFileDialog. From there we build out the properties.
Now the object is created, we need to add the properties. The first three properties we are filling are from our parameters. The InitialDirectory, Filter, and Title.
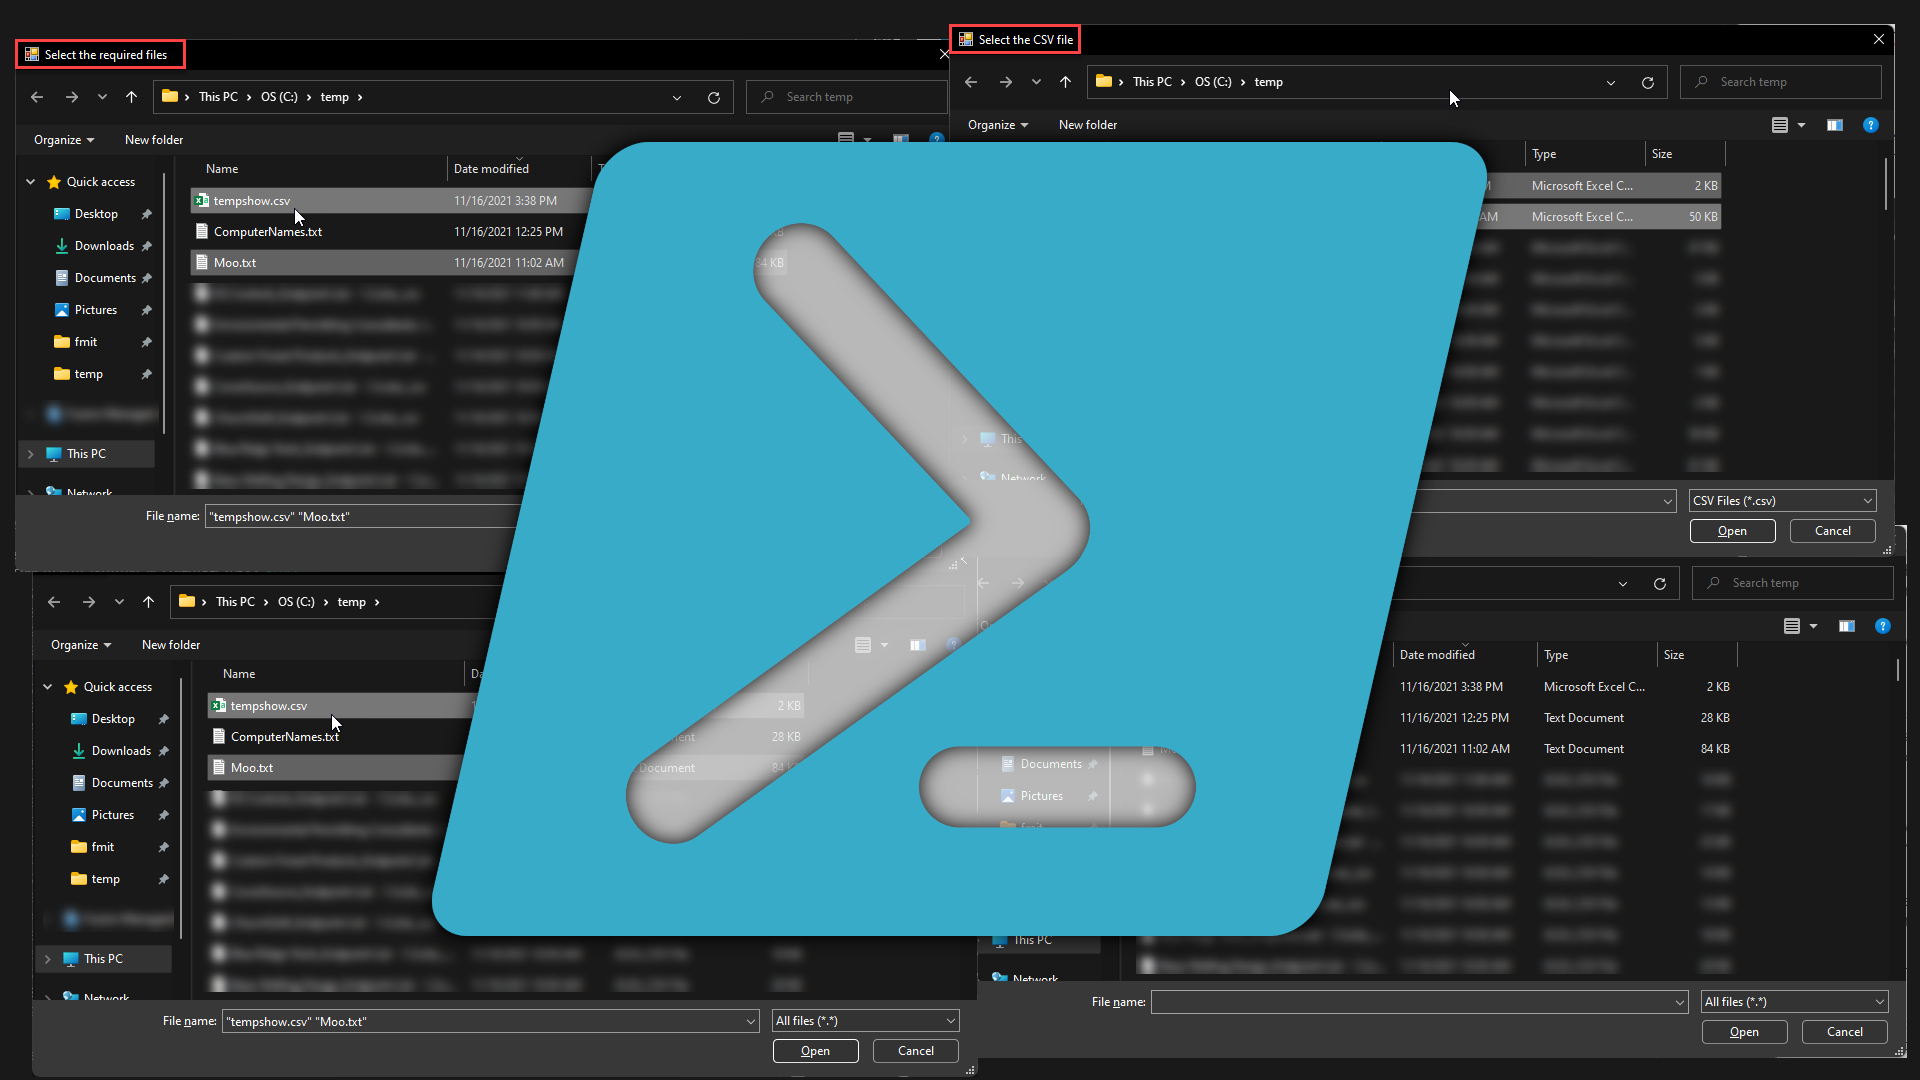
Next, we need to show the dialog box. One thing I ran into was the dialog box would open behind my VS code. In VB.net we set forms to TopMost. I tried a few variations of this with the open file dialog box, but this dialog box doesn't have the TopMost property. So, what we do is open a form inside the form to force the form to the front. The System > Windows > Forms > Form has the TopMost property. So, inside the showdialog method, we plop the new-object into it.
However, there is catch! This command outputs the button you click. So if you click cancel, you get a cancel as output, if you click a file and click ok, you get an OK and the file name as the next part of the array it produces. The way to resolve this is pipping the command into an out-null.
Now we have selected the file/files, we need to display them. The data is stored in the filenames property. So we use the $FileBrowser.Filenames to display that information.
$FileBrowser.Filenames
Finally, we need to dispose of the open file dialog. This way we don't have hundreds of invisible forms clogging up our system.
We use cookies to ensure that we give you the best experience on our website. If you continue to use this site we will assume that you are happy with it.