You built the tiers. Domain admins cant log into workstations anymore, the deny-logon GPOs are humming, and you feel pretty good. Then a red team drops a report showing they lifted a Tier 0 credential and replayed it from a jump box you forgot about. The tier model told the account where it couldnt log in. It never told Kerberos where the credential was allowed to come from. That gap is exactly what the Protected Users group and Authentication Policy Silos close.
This is the follow-up to the tiered AD model. Tiering draws the boundary. These two features weld it shut.
Two features, two different jobs
People lump these together, but they solve different halves of the same problem.
Protected Users hardens the credential itself. No caching, Kerberos only, short lifetime. It makes the credential hard to steal in the first place.
Authentication Policy Silos pin the credential to specific machines. Even a stolen credential wont authenticate from the wrong host, because Kerberos refuses it.
One makes the key hard to copy. The other makes the copied key useless anywhere but the right lock. Run them together and a leaked Tier 0 account stops being a company-ending event.
Protected Users: hardening the credential
Protected Users is a built-in global security group. Drop an account in it and Active Directory applies a set of protections you cant configure or turn off. Thats the point. Nobody, including a helpful admin under pressure, can weaken them.
When a member signs in, they get this treatment:
No NTLM, no Digest, no CredSSP credential delegation. Kerberos only.
No DES or RC4. The account uses AES, which means it actually needs AES keys.
No cached credentials and no cached verifier, so offline sign-in stops working for that account.
No Kerberos delegation, constrained or unconstrained.
A Kerberos TGT lifetime locked to four hours, non-renewable. After four hours, authenticate again.
Add a user through Active Directory Users and Computers, the Active Directory Administrative Center, or PowerShell with Add-ADGroupMember "Protected Users" -Members t0-jsmith. Your domain functional level needs to be 2012 R2 or higher.
The three ways people lock themselves out
This group bites back if you rush it. Watch these:
Never add computer or service accounts. Incoming authentication fails outright, and the password already lives on the host anyway, so it buys you nothing.
Reset the password after an account migration. An account without AES keys cant authenticate once its protected. Reset forces the AES hash.
Dont bulk-add Domain Admins on a Friday. Test first. A privileged account that relies on NTLM somewhere will break, and you'll be the one explaining why.
One more thing worth knowing. The built-in Administrator account, RID 500, is always exempt from authentication policies. Keep one as break-glass, outside all of this, in a safe.
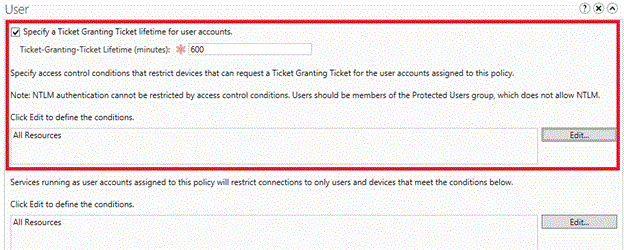
Authentication Policy Silos: pinning the credential to hosts
Protected Users shortens the fuse. Authentication Policy Silos decide where the account is even allowed to light it. A silo is a container you drop accounts into, and the policy attached to it sets two things: the Kerberos TGT lifetime, and access-control conditions for which devices the account can authenticate from.
Here's the use case that matters for a tiered environment. Create a Tier 0 silo. Assign your t0- admin accounts to it. Set a policy saying those accounts can only authenticate from domain controllers and Tier 0 privileged access workstations. Now a stolen Tier 0 credential typed on a random laptop gets rejected by the domain controller before it does anything. The credential is welded to its tier.
Creating an Authentication Policy Silo in Active Directory Administrative Center. Source: Microsoft Learn.
Building one, step by step
Open Active Directory Administrative Center and select Authentication.
Right-click Authentication Policy Silos, choose New, then Authentication Policy Silo.
Give it a display name, then under Permitted Accounts add your Tier 0 admin accounts.
Create the matching Authentication Policy, and set the access-control condition restricting which devices the AS exchange can come from.
Leave it in audit mode first. Do not enforce yet.
Restricting where initial authentication can come from. Source: Microsoft Learn.
Prefer PowerShell? The same thing in three commands:
Silos ship in audit mode on purpose. Nothing gets blocked, but the domain controller logs what it would have blocked. That is your dress rehearsal. Watch the Authentication logs under Applications and Services Logs, Microsoft, Windows, Authentication for a week or two.
Once the audit log is quiet and nothing legitimate is getting flagged, flip enforcement on with Set-ADAuthenticationPolicySilo -Identity "Tier0-Silo" -Enforce:$true. Enforce before you audit, and you will lock a real admin out of a real domain controller. Ask me how I know.
Putting it together
Protected Users makes the credential hard to steal, Kerberos-only and short-lived with nothing cached. Authentication Policy Silos make a stolen credential worthless anywhere but its home tier. Stack both on top of the tier model's deny-logon GPOs and you have three independent layers, each catching what the others miss. Add your Tier 0 admins to Protected Users, drop them in an enforced Tier 0 silo, keep a break-glass account out of both, and audit before you enforce. That's the whole lockdown.
What can we learn as a person
The part that got in my head is the no-caching rule. A Protected User never leaves a copy of their credential sitting on a machine after they walk away. Nothing cached, nothing lingering, nothing for someone to scrape out of memory later. When the session ends, its actually gone.
I leave versions of myself cached everywhere. A hard conversation from three years ago still runs in the background of how I talk to people now. An old rejection sits in memory and quietly authorizes a hundred smaller fears. I never set a TGT lifetime on any of it, so it just renews forever, and stuff that should have expired keeps getting used against me.
The silo idea lands the same way. My realest self doesnt need to authenticate from every room I walk into. Some of it belongs only in a couple of trusted places. So what are you leaving cached that should have expired hours ago? And where have you been letting your most valuable self sign in from hosts that never earned it?
Had someone ask me, half joking half not, "can my company see what I'm doing on my phone since IT installed that app on it." And I get why they asked like that, half joking. Because the honest answer is "kind of, but way less than you think, and also maybe way more than you think, depends what else they've bought." Not a great one liner, so lets actually break it down.
What Intune actually sees
Intune by itself is a device management tool, not a surveillance tool, and Microsoft is actually pretty explicit about this in their own privacy documentation. What it collects as standard, required data:
Device details, name, model, manufacturer, OS version
Compliance and enrollment status
App inventory, meaning the name and version of apps installed, not what you did inside them
Admin audit logs, meaning what your IT admin did in the console, not what you did on your device
Theres also optional stuff an admin can turn on if they want, and it has to be turned on, its not default:
Enhanced device inventory, non sensitive hardware details like CPU, disk, and memory info
Device query, for corporate owned Windows devices only, lets an admin query specific file names and file paths on demand
Location, and this one only applies to corporate owned devices, never personal ones, and even then its not constant tracking, its an on demand "locate this device" action, usually used for lost or stolen device scenarios
What Intune flat out never sees
This part is directly from Microsoft's own data collection documentation, not marketing spin. Regardless of what an admin turns on, Intune does not collect or allow an admin to see:
Calling or web browsing history
Personal email
Text messages
Contacts
Passwords to personal accounts
Calendar events
Photos, including your camera roll
On a personal device enrolled with just app protection policies, its even narrower than that, Intune is really only aware of the managed apps and their data, the personal side of the phone stays out of view entirely. Thats the whole point of app protection policies over full device enrollment for BYOD, it draws a line around the work container instead of the whole device.
Where it changes: when Purview or Defender is in the picture
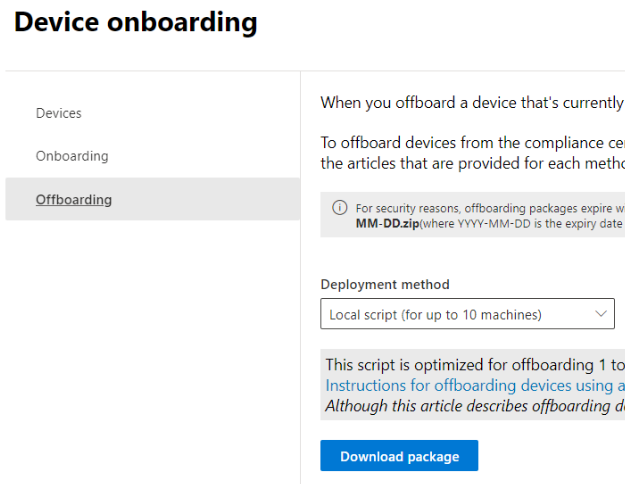
Heres the part people miss. Intune manages the device. It doesnt inspect the content flowing through it. Thats a completely different product, Microsoft Purview, and it only sees anything once a device is separately onboarded into it.
Onboarding happens through Microsoft Purview's device management center, deployed via a script, Group Policy, Configuration Manager, or yes, through Intune as the deployment mechanism. But being Intune managed doesnt automatically mean Purview onboarded, they're separate steps. If a device is already onboarded to Microsoft Defender for Endpoint, it shows up in Purview's managed device list automatically, you just have to turn on device monitoring to activate it for Endpoint DLP.
Onboarding a device into Microsoft Purview is a separate step from Intune enrollment. Source: Microsoft Learn.
Once a device is onboarded and device monitoring is turned on, this is where the visibility actually jumps. Endpoint data loss prevention can see and act on things like:
Copying sensitive content to USB drives
Printing sensitive documents
Uploading sensitive files to cloud apps through the browser
Pasting sensitive content into third party AI sites like ChatGPT through Edge for Business
And critically, once a device is onboarded, information about these audited activities starts flowing into Activity explorer even before an admin configures a single DLP policy. So enrollment into that layer alone increases visibility, before any rule is even written.
Activity explorer showing endpoint DLP events once a device is onboarded. Source: Microsoft Learn.
Stack Insider Risk Management on top of that and it goes further still, correlating signals across a 90 to 120 day window to flag anomalous behavior, like a departing employee suddenly copying a bunch of files somewhere they normally dont touch. Microsoft does pseudonymize users by default in that system and gates it behind role based access and audit logs, so its not a free for all, but its a genuinely different level of visibility than plain Intune.
Turning on device management is what brings telemetry into Purview solutions like Endpoint DLP and Insider Risk Management. Source: Microsoft Learn.
Putting it together
If someone asks "does Intune monitor my activity," the honest answer is Intune alone is closer to a management tool watching device health and app inventory, not a content watcher, and there's a documented list of things it flat out never touches regardless of settings. The real answer changes the moment you ask "what else has my org bought and turned on." Purview's Endpoint DLP and Insider Risk Management are the tools that actually look at content and behavior, and they require their own separate onboarding step, they dont just switch on because a device is Intune enrolled. If you want to know what's actually being watched at your org, the real question isnt "is this device managed," its "what security stack sits on top of Intune, and has anyone turned device monitoring on."
What can we learn as a person
I think the uncertainty is actually the honest part of this. I cant tell someone with total confidence "nobody is watching you" or "everybody is watching you," because it genuinely depends on layers I cant see from where I'm standing, what their org bought, what got turned on, what policy got written last month. And I think thats true of a lot of things in life too, not just IT. We want a clean yes or no answer about whether we're safe, whether we're being judged, whether something's being tracked or held against us, and a lot of the time the honest answer is "it depends on layers you cant fully see either." That uncertainty is uncomfortable, but pretending we have full visibility when we dont is worse, it just delays the discomfort instead of sitting with it.
So where in your life are you assuming a clean answer, safe or not safe, watched or not watched, when the honest truth is you genuinely dont have full visibility into it? What would it look like to just sit in that uncertainty instead of forcing a verdict?
Someone messaged me last week asking "what license do I actually need for this kiosk in the lobby" and I gave a confident answer that was wrong. Not because I dont know Intune, but because the licensing side of it is scattered across like four different Microsoft pages and none of them agree on vocabulary. So I went and actually sorted it out properly, and figured I'd write it down before I forget it again.
This is the "what license do I need" post. Not pricing, pricing changes constantly and I'm not going to lie to you about numbers that'll be wrong in six months. Just what each license actually covers and when you'd reach for it.
The three Intune plans
Underneath everything, Intune capability is split into three plans. Doesnt matter what bundle you bought, the docs and the admin center both talk in these terms:
Intune Plan 1, the base service. Device enrollment, compliance policies, app protection, config profiles. This covers most of what people think of as "Intune."
Intune Plan 2, additive on top of Plan 1. Adds things like Remote Help and Advanced Analytics.
Intune Suite, additive on top of Plan 1 as well, and it includes everything in Plan 2. This is the one with Cloud PKI, Endpoint Privilege Management, Enterprise Application Management, that kind of thing.
Most people never buy these three directly though. They come bundled.
How you actually get it
Realistically almost nobody buys "Intune Plan 1" as a standalone SKU on purpose. You get it through one of these:
Microsoft 365 E3, E5, or E7, commercial plans, Intune comes bundled at increasing plan levels
Enterprise Mobility + Security (EMS) E3 or E5, this was the original way to get Intune plus Entra ID P1 or P2 without buying full Microsoft 365
Microsoft 365 Business Premium, for the small and mid sized business crowd
Microsoft 365 Education A3 or A5, includes Intune for Education, more on that in a second
Microsoft 365 F1/F3, the frontline worker tiers, if your org has task workers who dont sit at a desk
If you're not sure which bundle your org has, Microsoft 365 admin center > Billing > Your products will tell you, and so will Intune admin center > Tenant administration > Tenant status > Tenant details, which shows total licensed users and total Intune licenses.
Commercial, education, and government arent the same product
Commercial is what almost everyone reading this is on. Standard Intune admin center, standard everything.
Intune for Education is a separate, simplified admin portal built for schools, at intuneeducation.portal.azure.com instead of the regular admin center. It's included with Microsoft 365 Education A3 or A5, and it trims down the enterprise-grade complexity into something a school IT person can actually manage without a full time job doing it. You can still use full Intune alongside it if you need the deeper features.
Government is its own thing entirely. GCC is actually the same commercial instance everyone else uses, just for state and local government tenants that need extra accreditation. GCC High and DoD are different, they run on a physically separate Azure Government Cloud datacenter (referred to as IL4 and IL5). You cant migrate a device between commercial and government clouds either, it has to unenroll and re-enroll clean.
Government cloud is a physically separate instance from commercial. Source: Microsoft Learn.
Assigning the license, step by step
Microsoft 365 admin center > Users > Active users
Pick the unlicensed user
Licenses and apps
Check the box for Intune, or for the EMS bundle if thats what you're assigning, then Save changes
Schools using School Data Sync can assign Intune for Education licenses right in the SDS profile setup instead of doing it user by user.
Assigning an Intune license to a user. Source: Microsoft Learn.
One thing worth knowing, admins dont always need their own Intune license just to manage the service. Tenants created after July 2021 support unlicensed admin access by default, up to 1000 unlicensed admins per security group. Older tenants can turn this on manually under Tenant administration > Roles > Administrator Licensing.
The one everyone forgets: device-only licenses
This is the one that actually started this whole post. If a device isnt tied to a specific person, kiosks, dedicated devices, phone room devices, digital signage, IoT type stuff, you dont necessarily need a full per-user license for it. Intune has a device-only subscription built exactly for this.
Device licenses apply when the device enrolls through one of these paths:
Windows Autopilot self-deploying mode
Apple Automated Device Enrollment without user affinity
Apple School Manager without user affinity
Apple Configurator without user affinity
Android Enterprise dedicated devices
Using a device enrollment manager account
Notice that last one. Device enrollment manager accounts and device-only licenses show up together a lot, because they're both built for the same problem, devices nobody personally owns.
The tradeoff is real though. A device enrolled on a device-only license doesnt get app protection policies, doesnt get Conditional Access, and loses user-based features like email and calendar. Thats fine for a lobby kiosk showing a product catalog. Its not fine if you were hoping to quietly save money by licensing a real employee's laptop this way, that device needs a proper user license because a person is actually using it day to day.
Putting it together
If someone asks you "which Intune license do I need," the real answer is: figure out what bundle your org already has first, because you probably already own Plan 1 through Microsoft 365 or EMS without realizing it. Then check if you're education (Intune for Education, A3/A5) or government (GCC High/DoD is a separate cloud, not just a setting). Then, separately, figure out which of your devices dont belong to a person at all, because those are candidates for a device-only license instead of burning a full user license on a wall-mounted kiosk.
What can we learn as a person
I keep coming back to the device-only license thing. Its basically Microsoft admitting that not everything needs the full package. A kiosk doesnt need email, doesnt need Conditional Access, doesnt need the whole suite, it just needs the bare minimum to do its one job safely. And I think a lot of us hand out the full package to things in our life that only needed the bare minimum. Full emotional investment in a situation that only needed logistics. Full attention on a problem that just needed fifteen minutes. We license everything at Plan 2 when most of it is a device-only situation.
So where in your week are you over licensing something. What's actually just a kiosk, needing the bare minimum from you, that you keep assigning your full user license to?
Last week I watched a junior admin reset a domain admin password from his regular workstation. The same machine he uses to check email, click sketchy DocuSign links, and play Solitaire on lunch. I didnt yell. I just stared at the screen, took a breath, and decided to build a tiered AD model before someone hands the whole domain to a phishing email.
If your AD is flat, this one's for you. If your domain admins log into print servers, also you. And if you've got one giant Admins group that does everything, oh boy, especially you. Here's the whole thing, tier by tier, and it stops the bleeding.
What a tiered AD model actually is
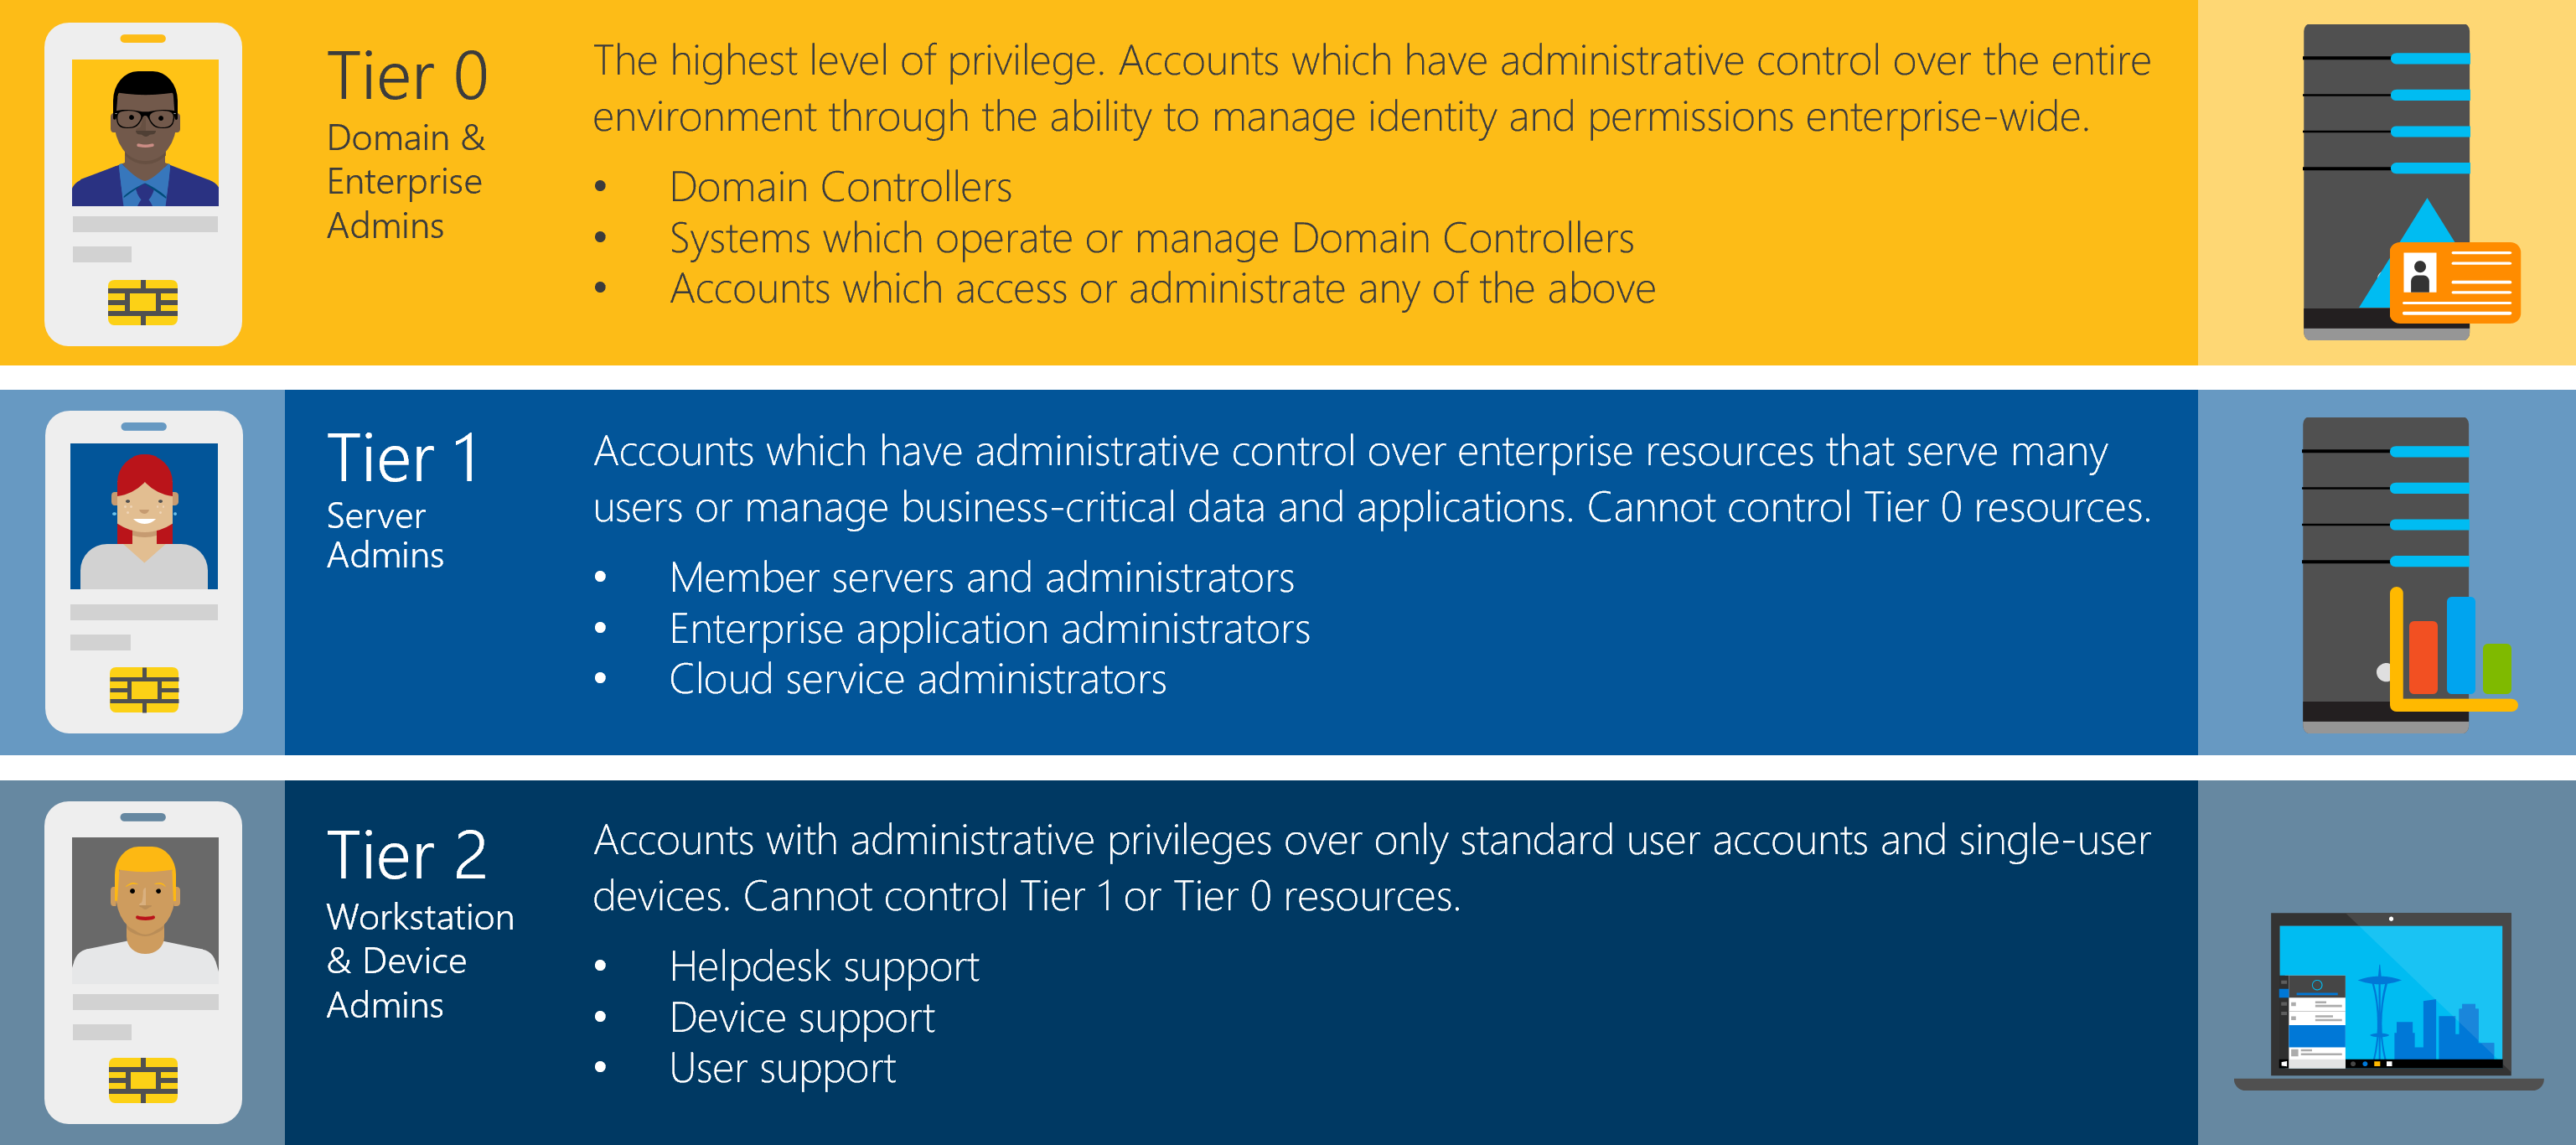
Microsoft's tier model splits your admin identities into three trust levels based on what they control. The whole point is containment. An attacker who owns a workstation should never be able to climb from there up to your domain controllers.
Tier 0 is the identity control plane. Domain controllers, AD CS, AD FS, Entra Connect, and the accounts that run them.
Tier 1 is every other server. File servers, SQL, Exchange, your line-of-business apps.
Tier 2 is workstations and the people who support them. Help desk, desktop support, end-user devices.
The three tiers and what each one controls. Source: Microsoft Learn.
The rule that makes it work is simple. Credentials never move down. A Tier 0 account never signs into a Tier 1 or Tier 2 box. A Tier 1 account never touches a workstation. Break that rule once and the whole model falls over.
The OU structure
Start with three top-level OUs, one per tier. Under each, split admin accounts, groups, and the machines that belong to that tier.
Tier 0 holds your domain controllers, Tier 0 admin accounts, and Tier 0 groups.
Tier 1 holds member servers, server admin accounts, and server admin groups.
Tier 2 holds workstations, help desk accounts, and workstation admin groups.
Your regular user accounts and department OUs sit off to the side in their own structure. Those are just people doing their jobs, not admins of anything.
The security groups
Every tier gets its own security group. Prefix them so nobody has to guess what they do. I use sg- for security group, then the tier, then the role.
sg-Tier0-Admins, full control over AD and domain controllers
sg-Tier1-ServerAdmins, local admin on member servers
sg-Tier2-WorkstationAdmins, local admin on workstations
sg-Tier2-HelpDesk, workstation support plus delegated password reset
Those groups get pushed to the local Administrators group on the right machines through Group Policy or Restricted Groups. A member server trusts sg-Tier1-ServerAdmins and nothing else. A workstation trusts sg-Tier2-WorkstationAdmins. Domain controllers trust only Tier 0.
Roles and how many accounts each person carries
This is where people groan, because it means carrying more than one login. Good. That groan is the sound of security working. Here's how the accounts break down by role.
The System Administrator: four accounts
Your full-stack sysadmin touches everything, so they need a foot in every tier plus a normal life.
A normal account for email, Teams, and daily work
t0-jsmith in sg-Tier0-Admins for domain controller work
t1-jsmith in sg-Tier1-ServerAdmins for servers
t2-jsmith in sg-Tier2-WorkstationAdmins for workstations
Four accounts, four scopes. The domain admin credential never rides along on the same machine where they read email.
The Server Admin: three accounts
Your server team doesnt need the keys to Active Directory. They manage servers and the workstations they sometimes sit at.
A normal account for daily work
t1-account in sg-Tier1-ServerAdmins for servers
t2-account in sg-Tier2-WorkstationAdmins for workstations
Notice the missing Tier 0 account. That's on purpose. A server admin who gets phished cant hand an attacker the domain, because that person was never holding it.
The Help Desk: two accounts and a delegation
Help desk lives in Tier 2. They fix laptops and reset passwords, nothing deeper.
A normal account for daily work
t2-account in sg-Tier2-HelpDesk for workstation support
The password reset piece isnt a tier privilege. It's a delegation. In Active Directory Users and Computers, right-click each department's user OU, choose Delegate Control, add sg-Tier2-HelpDesk, and grant "Reset user passwords and force password change at next logon." Scope it to the department OUs they actually support, not the whole domain. Help desk can unlock the sales team without ever seeing a server.
The part that makes it real: cross-tier logon deny GPOs
Groups without GPOs are just labels on a whiteboard. The enforcement comes from Group Policy denying higher-tier accounts the right to log into lower-tier machines. Without this step, nothing actually stops a Tier 0 account from signing into a workstation.
You build three deny policies, each linked to the OU one tier down. Every policy sets these User Rights Assignments under Computer Configuration > Policies > Windows Settings > Security Settings > Local Policies:
Deny log on locally
Deny log on through Remote Desktop Services
Deny log on as a batch job
Deny log on as a service
Deny access to this computer from the network
Link the first policy to your Tier 1 and Tier 2 OUs, denying the Tier 0 groups. Link the second to Tier 2, denying Tier 1 groups. The result is a one-way street. Credentials flow up when you deliberately elevate, never down by accident.
One warning. Test these against a pilot OU before you link them broadly. A deny right applied to the wrong group can lock real admins out of real machines, and that's a bad afternoon.
Why this setup is worth the extra logins
Attackers rarely land on a domain controller first. They land on a workstation, through a phished user or a bad download. From there they hunt for credentials sitting in memory, then hop machine to machine until they find a domain admin token. Security folks call this lateral movement, and it's how most ransomware actually spreads.
The kill chain the tier model is built to break. Source: Microsoft Learn.
Build a tiered AD model and you cut that chain. If a Tier 0 credential never touches a workstation, then owning the workstation gets an attacker nothing but the workstation. The domain admin token they were hunting for simply isnt there to steal. You shrink the blast radius of every single compromise.
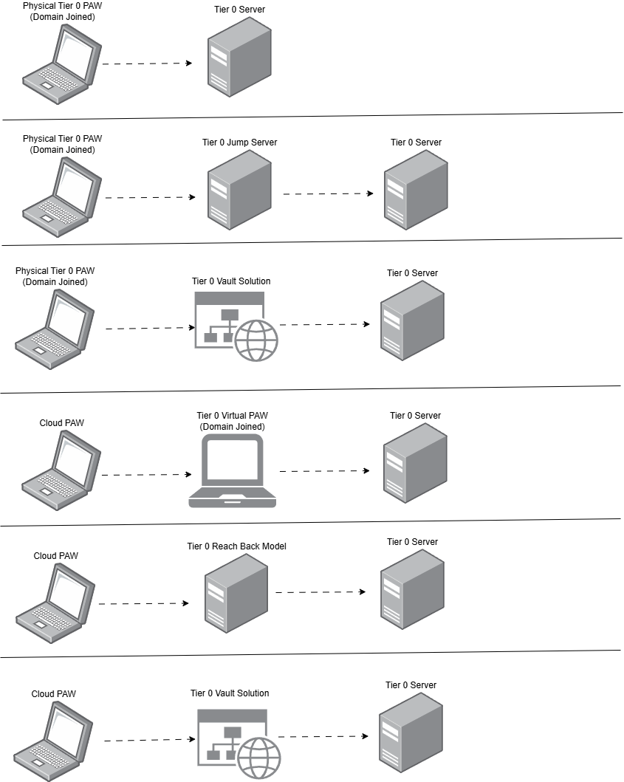
The other half of this is the clean keyboard. Microsoft calls them privileged access workstations, PAWs. The idea is that Tier 0 work happens from a hardened machine that never browses the web or reads email. Trust starts at the physical keyboard you sign in from, not the server you're reaching for.
Supported paths from a clean PAW up to a Tier 0 server. Source: Microsoft Learn.
Putting it together
Three tiers, three OUs, four sg- groups, and three deny-logon GPOs. Give your system admin four accounts, your server admins three, and your help desk two plus a scoped password reset delegation. Test the deny rights on a pilot before you go wide. That's the whole model, and it turns a single compromised laptop from a company-ending event into a Tuesday.
What can we learn as a person
The thing that stuck with me building this is that the whole model runs on one boundary. Credentials dont move down. That's it. Everything else is just enforcement of that one line.
I think about how much of my own stress used to come from having no tiers at all. Work stress logged straight into my home life. A bad day with one friend leaked into how I treated my kids. One compromised area, and the attacker moved laterally through everything I had, because I never denied the logon. I was one giant Admins group that did everything, and every problem had domain rights over my whole self.
Tiering my life didnt mean caring less. It meant the hard server day stays on the server, and doesnt get to sign into the parts of me that were supposed to be off-limits. So what in your life is running flat right now? And where do you need a deny-logon rule so one bad thing stops taking down all the others?
Had a client ask me last week "wait, why did MY personal phone just get a work profile pushed on it" and thats basically how this post started. They werent trying to break anything. They just enrolled a device because Intune let them. Nobody had ever told it not to.
So lets talk about who can actually enroll devices into Intune, where that gets decided, and the one setting most tenants forget even exists until something weird shows up in their device list.
The short answer
By default, in a brand new tenant, any licensed user can enroll a device into Intune. Windows, iOS, Android, macOS, doesnt matter. If they have a license that includes Intune and nobody has restricted anything, they can walk up to Settings on their phone, add a work account, and its managed.
That is rarely what you actually want. So there are two separate settings you need to know about, and people mix them up constantly.
Who's actually allowed in: MDM user scope
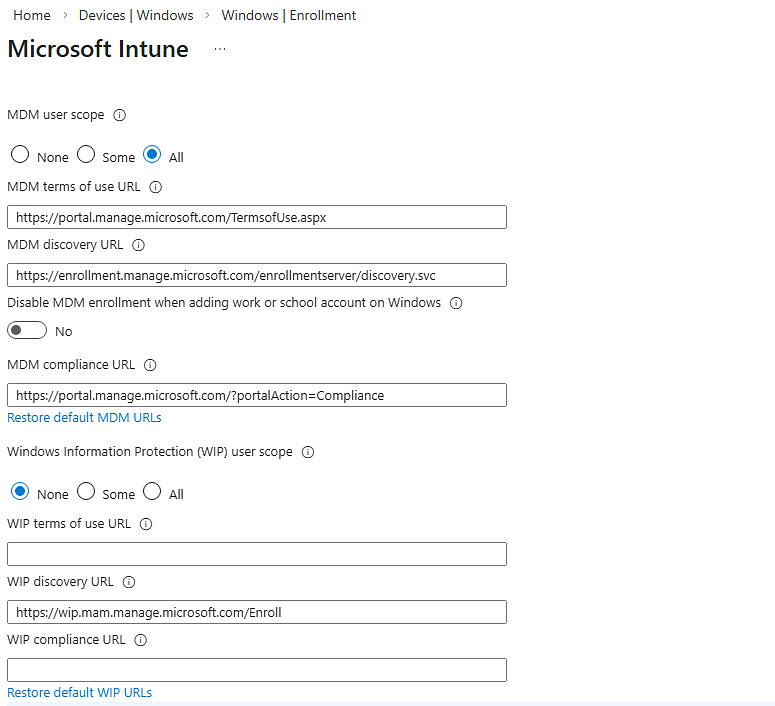
This one lives in Microsoft Entra, not Intune, which is why half the admins I talk to dont even know it exists. Go to Microsoft Entra admin center > Mobility (MDM and MAM) > Microsoft Intune. There you'll find MDM user scope, and it has three options: None, Some, and All.
None means nobody auto-enrolls or gets redirected to Intune when they try to add a work account. Enrollment is effectively off tenant-wide.
Some lets you pick specific security groups. Only members of those groups can enroll. This is what most orgs should be running, honestly.
All is the wide open default I mentioned above.
This setting decides whether a user is even allowed in the door. Everything else in Intune is fine tuning after that.
MDM user scope in the Microsoft Entra admin center. Source: Microsoft Learn.
Fine tuning who gets through: enrollment restrictions
Once someone is inside the MDM scope, Intune itself has its own restriction policies under Devices > Enrollment in the Intune admin center. Two kinds matter here.
Device platform restrictions control which operating systems and versions are allowed to enroll. Want to block personally owned Android devices but allow corporate ones? This is where that lives. Want to stop anyone showing up with an ancient iOS version? Same place.
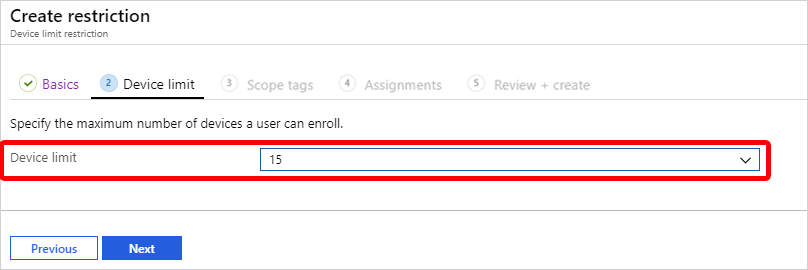
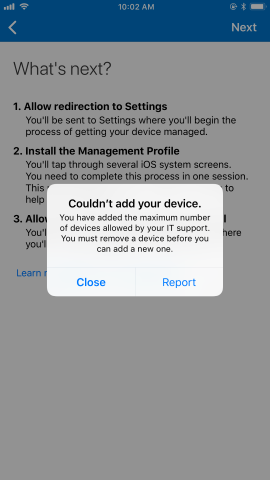
Device limit restrictions control how many devices one person can enroll, from 1 to 15. That default limit has bailed out more than one helpdesk when a user's kid enrolled three tablets under the family Microsoft account by mistake.
Setting a device limit restriction in the Intune admin center. Source: Microsoft Learn.
Both of these are assigned to groups and evaluated by priority order, lowest number wins, with the built in "All users" restriction sitting at the bottom as the fallback. So if you create a custom restriction for a group, give it a lower priority number so it actually gets applied before the default one steps in.
Changing these settings, step by step
For MDM user scope:
Microsoft Entra admin center > Mobility (MDM and MAM)
Select Microsoft Intune
Set MDM user scope to Some, then pick your group (or groups)
Save. Give it a few minutes, Entra caches this stuff sometimes and it doesnt always apply instantly
For enrollment restrictions:
Intune admin center > Devices > Enrollment
Pick either "Enrollment device platform restrictions" or "Enrollment device limit restrictions"
Create a new restriction, configure what you need, assign it to a group
Go back to the restriction list and reorder priority so your custom one sits above the default
Forgetting that last step is probably the most common mistake I see. You build a beautiful restriction, assign it, test it, and nothing changes because the default policy is still winning on priority.
What a user sees when they hit the device limit. Source: Microsoft Learn.
The part people actually ask me about: enrollment managers
This is the piece that trips people up when they're setting up kiosks, shared devices, digital signage, that kind of thing. Normally a device enrolls under a specific user's identity, and it counts against that user's device limit. Fine for a normal employee. Not fine when you're trying to enroll 40 lobby kiosks and none of them belong to a real person.
That's what the Device Enrollment Manager role is for. It's a special account, assigned in the Intune admin center under Devices > Enrollment > Device enrollment managers. An account with this role can enroll up to 1,000 devices without hitting the normal per-user device cap, and it isn't blocked by platform restrictions either.
The workflow usually looks like this: create a dedicated account, something like kiosk-enroll@yourtenant.com, dont give it a real mailbox or normal user permissions, just make it exist. Add it as a device enrollment manager. Then use that account to enroll all your shared kiosk hardware. Every device enrolled under it shows up tied to that account instead of a real person, which also makes cleanup way easier later when you're trying to figure out which devices are "real employee devices" versus "that thing bolted to the wall in the lobby."
A few things worth knowing before you go set this up:
Enrollment manager accounts still need an Intune license, same as any enrolled user
They're meant for shared and dedicated devices, not as a workaround for a regular employee who just hit their device limit
Devices enrolled this way still get whatever compliance and config policies you'd normally assign, nothing about being enrollment manager owned exempts them from policy
Dont delete the enrollment manager account once its enrolled devices, that breaks things for those devices
Putting it together
If you only remember one thing from this, remember there are two gates, not one. MDM user scope in Entra decides who gets in the building at all. Enrollment restrictions inside Intune decide what they're allowed to bring with them once they're in. And enrollment managers are the side door for devices that dont belong to any one person, like your kiosks.
Go check your MDM user scope setting today if you havent looked at it before. Theres a decent chance its still set to "All" from whenever the tenant was first stood up, and thats usually not a choice anyone actually made on purpose.
What can we learn as a person
I think about MDM user scope more than I probably should, because its really just a fancy way of answering "who gets access to me." Set to All, anyone with a login can walk in and start pushing things onto your device. Sound familiar? A lot of us run our own lives that way. Anyone with a phone number gets a work profile pushed straight onto our evenings. Anyone who asks gets a yes. We never set it to Some.
And then theres the enrollment manager thing, one dedicated account taking on the kiosk devices so it doesnt fall on fifteen different people's shoulders. I think thats a good model for life too honestly. Not everything needs to be YOUR device cap. Some stuff, the shared stuff, the repetitive stuff, is better handled by one clear owner instead of everybody carrying a little piece of it and nobody really owning it. That's usually where things fall through the cracks, when its everyone's job a little bit and nobody's job fully.
So what's your MDM user scope set to right now. Who's in it. And is there something in your week that really should have one clear owner instead of quietly being everyone's problem?
We use cookies to ensure that we give you the best experience on our website. If you continue to use this site we will assume that you are happy with it.