by David | May 27, 2024 | Information Technology, Resources
Reading Time: 7 minutes
Imagine waking up to an email full of alerts about unwanted access attempts. It is every administrator's nightmare. The truth is that many security incidents can be traced back to disabled accounts that were not properly reviewed. You might wonder, "What about disabled accounts? "Aren't they harmless?" Well, not quite. There are reasons we need to, Audit Disabled Accounts.
Disabled accounts in Active Directory (AD) are analogous to lost keys to your home. They may be out of sight, but they do exist. Those who look hard enough can find them. If you do not audit these accounts on a regular basis, you risk exposing your network to vulnerabilities. Neglected accounts may result in attacks or compliance difficulties.
I discovered this the hard way during my early days as a sysadmin. I believed I had things under control. One day, an audit found multiple disabled accounts that had been left neglected for months. It was a wakeup call. Since then, reviewing disabled accounts has been an important part of my routine.
Why should you consider auditing disabled accounts? It's not just about checking the compliance box. It is about ensuring a safe and well-managed environment. It is critical to keep your network secure from unauthorized access and breaches. In this post, I'll show you how to build up a PowerShell script to audit disabled accounts. We will also automate the process using a scheduled task. Believe me, it's easier than you think. Your future self will thank you for this.
Let us begin our path toward greater security and peace of mind.
The Why Audit Disabled Accounts?
Picture this: It's the middle of the day, when the CFO's account is abruptly deactivated. Chaos ensues. The support desk is frantic, and everyone is on edge. You are left wondering, "Who did this, and when?" It's a frustrating situation that could have been prevented with routine audits.
Auditing disabled accounts is more than just a boring process; it is critical for determining exactly when and by whom an account was disabled. Consider installing a surveillance camera on your network doors. You know precisely who locked which door and at what time. This level of visibility is critical for keeping control of your Active Directory (AD).
This PowerShell script was built in response to a particularly stressful occurrence. A help desk technician unintentionally shut down the CFO's account. The names were nearly identical: bholts for the CFO, and bsholts for a floor technician. One tiny error resulted in a major problem. The CFO was naturally furious, demanding to know who was to blame. That's when I realized I needed a solid technique to keep track of these actions.
Security is a significant reason for auditing disabled accounts. If an attacker acquires access to one of these accounts, they may be able to explore your network without detection. It's like leaving the front door wide open. Regular audits ensure that these accounts are appropriately managed and secured, preventing unwanted access.
Compliance
Compliance is another reason to keep track of disabled accounts. Many regulatory regimes impose severe controls on user accounts. GDPR, HIPAA, and other regulations need proper account management, including for disabled accounts. Failure to comply might result in costly fines and a tarnished reputation.
However, it is not simply about avoiding undesirable results. Regular auditing of disabled accounts is also excellent housekeeping. It keeps your Active Directory clean and orderly. An clean Active Directory makes it easier to manage active users and keeps your environment running smoothly.
In my early sysadmin days, I underestimated the necessity of auditing disabled accounts. That was until the incident with the CFO's account. Since then, auditing has been an essential component of my managerial routine. It's a modest step that provides significant peace of mind.
So take a time to reflect on your current practices. Do you periodically audit disabled accounts? If not, this is a great moment to start. It represents an investment in your network's security and efficiency. And believe me, it is worth every minute.
The Script
#Hourly
[cmdletbinding()]
param (
    [int]$HoursBack = 1,
    [string[]]$Servers,
    [string]$OutCSVfile
)
$StartTimeStamp = ((Get-Date).AddHours(-($HoursBack)))
$EndTimeStamp = (Get-Date)
$ReturnInfo = @()
$FilterTable = @{
        'StartTime' = $StartTimeStamp
        'EndTime' = $EndTimeStamp
        'LogName' = 'Security'
        'Id' = 4725
}
$Events = foreach ($Server in $Servers) {
    Get-WinEvent -ComputerName "$Server" -FilterHashtable $FilterTable -ErrorAction SilentlyContinue
}

foreach ($Event in $Events) {

    $ReturnInfo += [pscustomobject][ordered]@{
        Task = "Account Disabled"
        Time = $Event.TimeCreated
        DC = $Event.MachineName
        Name = (get-aduser -Identity "$($Event.Properties[0].Value)" -Properties DIsplayname).Displayname
        Username = $Event.Properties[0].Value
        Admin = $Event.Properties[4].Value
    }

}
$ReturnInfo | Export-Csv $OutCSVfile -NoClobber -NoTypeInformation -Append
The Breakdown
Let's dive into the heart of this guide: the PowerShell script that will help you audit disabled accounts in Active Directory. We'll break it down line by line, so you understand exactly how it works and how to customize it for your needs.
[cmdletbinding()]
param (
    [int]$HoursBack = 1,
    [string[]]$Servers,
    [string]$OutCSVfile
)
- Parameters and Initialization
- [cmdletbinding()]: This line makes the script act like an advanced function, providing more control over parameters and runtime behavior.
- param: Here, we define three parameters:
$HoursBack: The number of hours back to search for disabled accounts (default is 1).$Servers: An array of server names to query.$OutCSVfile: The file path to save the audit results.
$StartTimeStamp = ((Get-Date).AddHours(-($HoursBack)))
$EndTimeStamp = (Get-Date)
- Setting Up Timestamps
- $StartTimeStamp: Sets the start time for the search to one hour ago.
- $EndTimeStamp: Sets the end time to the current date and time.
$ReturnInfo = @()
$FilterTable = @{
    'StartTime' = $StartTimeStamp
    'EndTime' = $EndTimeStamp
    'LogName' = 'Security'
    'Id' = 4725
}
Grabbing the Events
- Filtering Events
- $ReturnInfo: Initializes an empty array to store the results. This allows us to collect the needed information for later.
- $FilterTable: Defines the criteria for filtering events:
StartTime and EndTime specify the time range. It's important not to grab to many logs because Powershell can't handle large amount of data. LogName is set to 'Security' to search in the Security log because that is where the disabled accounts live.Id is set to 4725, the event ID for account disablement.
$Events = foreach ($Server in $Servers) {
    Get-WinEvent -ComputerName "$Server" -FilterHashtable $FilterTable -ErrorAction SilentlyContinue
}
- Retrieving Events
- foreach ($Server in $Servers): Iterates through each server in the
$Servers list of strings. Remember, a list of strings is like an array but for strings. Reminds me of noodles before you cook them. Which my daughter made spaghetti the other day and I am proud of her.
- Get-WinEvent: Retrieves the events that match the criteria in
$FilterTable. -ErrorAction SilentlyContinue suppresses errors. I liken this command to the spaghetti after it has been cooked.
foreach ($Event in $Events) {

    $ReturnInfo += [pscustomobject][ordered]@{
        Task = "Account Disabled"
        Time = $Event.TimeCreated
        DC = $Event.MachineName
        Name = (get-aduser -Identity "$($Event.Properties[0].Value)" -Properties Displayname).Displayname
        Username = $Event.Properties[0].Value
        Admin = $Event.Properties[4].Value
    }

}
Processing and Exporting Events
- Processing Events
- foreach ($Event in $Events): Iterates through each retrieved event. We like to loop a lot with powershell.
- $ReturnInfo += [pscustomobject][ordered]: Adds a custom object to the
$ReturnInfo array, containing:
Task: Describes the task ("Account Disabled").Time: The time the event was created.DC: The domain controller where the event occurred.Name: The display name of the disabled account.Username: The username of the disabled account.Admin: The account of the administrator who performed the action.
$ReturnInfo | Export-Csv $OutCSVfile -NoClobber -NoTypeInformation -Append
- Exporting Results
- Export-Csv: Exports the
$ReturnInfo array to a CSV file specified by $OutCSVfile.
-NoClobber prevents overwriting existing files.-NoTypeInformation omits type information from the CSV. That's the crappy line that sucks at the top of csvs that powershell 5 likes to add. You don't ahve to do this if you are using powershell 7. -Append adds the results to the file without overwriting it.
By understanding each part of this script, you can tailor it to your specific needs. Whether you're dealing with multiple servers or need a different time range, you now have the tools to make those adjustments. From here, you can make scheduled tasks that points to the required devices and such. We will cover that next week.
In the end
Auditing disabled accounts in Active Directory is like keeping a vigilant eye on the silent guardians of your network. It’s a crucial step to ensure that your environment remains secure and compliant. With the PowerShell script we've walked through, you now have the tools to monitor when an account was disabled and by whom, saving you from potential security breaches and compliance headaches.
Remember the story of the help desk technician who accidentally disabled the CFO’s account? That incident was a wake-up call, highlighting the importance of regular audits. By setting up a scheduled task to run this script, you can prevent similar scenarios in the future. You’ll have clear, reliable records that can help you quickly identify and rectify mistakes, keeping your network safe and your users happy.
Regularly auditing disabled accounts isn't just about avoiding problems; it's about creating a culture of diligence and responsibility. It's about taking proactive steps to manage your AD environment effectively. Whether you're a seasoned sysadmin or new to the role, these practices are essential in maintaining a robust and secure network.
So, take a moment to implement these steps. Set up the script, configure the scheduled task, and rest easy knowing you’ve added a solid layer of protection to your network. Your future self, and your organization, will thank you.
What we can learn as a person?
Disabled accounts linger around and sometimes they can have emails and more attached to them. But they are not active. When I was working with the MSP, I often found ADs with a lot of these accounts and no documentation. Why were they disabled, and left there? Was it some compliance or something else?
Well, in our life, we have something like disabled accounts. They don't activly hurt us, but over time they can add up and cause issues. That's small truama. Some therapist call it death by a tousand paper cuts. By themselves, they are not damaging enough to cause PTSD or anything along those likes, but over time, they can cause major issues. A good example of this is, you get spanked each sunday because you fail asleep in church. Some people start seeing churchs as a place of abuse while others embrace the church as safty. By itself a simple spanking doesn't cause trauma, unless it's really ugly, but over time, it can cause all kinds of issues.
The shame child
The best way to handle these micro trauma's is to address the distorted emotions that are born from them. A good example of this is a child who was shamed for being evil at birth. Hearing this one time is nothing, but hearing this daily makes this child believe he is evil. This translates to shame. This shame can come out in many different forms. To heal, he has to come to the conculsion himself that he wasn't evil from birth and this belief is wrong.
It's time for him to delete those accounts of shame. Knowing where they come from is half the battle. If you don't kno where the emotion comes from, how do you find the emotion? It is a discovery process. It's a rough one too. Seek a licensed therapist for this and have a good community.
Additional reading

by David | Feb 19, 2024 | Deployments, Information Technology, Resources
Reading Time: 6 minutes
A few weeks ago, we built WordPress in Docker. Today I want to go deeper into the world of docker. We will be working with a single WordPress instance, but we will be able to expand this setup beyond what is currently there over time. Unlike last time we will be self-containerizing everything and adding plugins along with the LDAP php which doesn't natively come with the WordPress:Latest image. It's time to build an WordPress in Docker with LDAP.
Docker Files
As we all know docker uses compose.yml files for it's base configuration. This file processes the requested image based on the instructions in the compose. Last time we saw that we could mount the wp-content to our local file system to edit accordingly. The compose handles that. This time we are going about it a little differently. The compose file handles the configuration of basic items like mounting, volumes, networks, and more. However, it can't really do much in the line of editing a docker image or adding to it. The compose file has the ability to call upon a build command.
services:
  sitename_wp:
    build:
      context: .
      dockerfile: dockerfile
The build is always within the service that you want to work with. the Context here is the path of the build. This is useful if you have the build files somewhere else like a share. Then the dockerfile will be the name of the build. I kept it simple and went with docker file. This means there are now two files. the docker-compose.yml and this dockerfile.
What are the Dockerfile
The docker file takes an image and builds it out. It has some limitations. The dockerfile can add additional layers that adds to the over all size of the image. Non-persistence is the next problem, by it's ephemeral nature, it disappears after it's first use. The file can only do a single threaded execution. Thus, it can't handle multiple things at once. It's very liner in it's nature. If than, and other structures are not present in the docker file. This makes it hard for it to be a programing language. There are limits to versioning.
The docker file cannot work with networking or ports. There is no user management inside the dockerfile process. Complexity is a big problem with these files as the more complex, the harder it is to maintain. Never handle passwords inside the dockerfile. The docker file can't handle environmental variables. The thing that hit me the hardest, limited apt-get/yum commands. Build context is important as dockerfiles can slow down performance. Finally, dockerfile's may not work on all hosts.
With those items out of the way, docker files can do a lot of other good things like layering additional items to a docker image. The container treats these files as root and runs them during the build. This means you can install programs, move things around and more. It's time to look at our dockerfile for our WordPress in Docker with LDAP.
The Dockerfile
# Use the official WordPress image as a parent image
FROM wordpress:latest

# Update package list and install dependencies
RUN apt-get update && \
    apt-get install -y \
        git \
        nano \
        wget \
        libldap2-dev

# Configure and install PHP extensions
RUN docker-php-ext-configure ldap --with-libdir=lib/x86_64-linux-gnu/ && \
    docker-php-ext-install ldap

# Clean up
RUN rm -rf /var/lib/apt/lists/*

# Clone the authLdap plugin from GitHub
RUN git clone https://github.com/heiglandreas/authLdap.git /var/www/html/wp-content/plugins/authLdap

# Add custom PHP configuration
RUN echo 'file_uploads = On\n\
memory_limit = 8000M\n\
upload_max_filesize = 8000M\n\
post_max_size = 9000M\n\
max_execution_time = 600' > /usr/local/etc/php/conf.d/uploads.ini
The Breakdown
Right off the bat, our FROM calls down the wordpress:latest image. This is the image we will be using. This is our base layer. Then we want to RUN our first command. Run commands like to have the same commands. Remember, every command is ran as the container's root. The first RUN command will contain two commands. The APT-Get Update and the install. We are installing git, this way we can grab a plugin, nano, so we can edit files, wget, for future use and our php ldap.
apt-get update &&\
apt-get install -y git nano wget libldap2-dev
Please notice the && \. The \ means to treat the next line as part of this command. The && means and. The && allows you to run mulitple commands on the same line. Since each RUN is a single line, this is very important. The libldap2-dev is our ldap plugin for php. Our next RUN edits the docker php extension.
The Run Commands
RUN docker-php-ext-configure ldap --with-libdir=lib/x86_64-linux-gnu/ && \
docker-php-ext-install ldap
docker-php-ext- * is a built in scripts to our WordPress image. We tell the configure where our new libraries are located for the PHP. Then we tell php to install the ldap plugin. After we have it installed, we need to do some clean up with the next RUN command.
rm -rf /var/lib/apt/lists/*
At this point, we have WordPress in Docker with LDAP php modules. Now I want a cheap easy to use plugin for the ldap. I like the authldap plugin. We will use the git command that we installed above and clone the repo for this plugin. Then drop that lpugin into the WordPress plugin folder. This is our next RUN command.
git clone https://github.com/heiglandreas/authLdap.git /var/www/html/wp-content/plugins/authLdap
In our previous blog, we used a printf command to make a upload.ini file. Well, we don't need that. You can do this here. We trigger our final RUN command. This time it will be echo. Echo just says stuff. So we echo all the PHP settings into our uploads.ini within the image.
# Add custom PHP configuration
RUN echo 'file_uploads = On\n\
memory_limit = 8000M\n\
upload_max_filesize = 8000M\n\
post_max_size = 9000M\n\
max_execution_time = 600' > /usr/local/etc/php/conf.d/uploads.ini
Docker Compose
Now we have our Dockerfile built out. It's time to build out our new docker compose file. Here is the compose file for you to read.
version: '3.8'

services:
  sitename_wp:
    build:
      context: .
      dockerfile: dockerfile
    ports:
      - "8881:80"
      - "8882:443"
    environment:
      WORDPRESS_DB_HOST: sitename_db:3306
      WORDPRESS_DB_USER: ${WORDPRESS_DB_USER}
      WORDPRESS_DB_PASSWORD: ${WORDPRESS_DB_PASSWORD}
      WORDPRESS_DB_NAME: ${MYSQL_DATABASE}
      WORDPRESS_AUTH_KEY: ${WORDPRESS_AUTH_KEY}
      WORDPRESS_SECURE_AUTH_KEY: ${WORDPRESS_SECURE_AUTH_KEY}
      WORDPRESS_LOGGED_IN_KEY: ${WORDPRESS_LOGGED_IN_KEY}
      WORDPRESS_NONCE_KEY: ${WORDPRESS_NONCE_KEY}
      WORDPRESS_AUTH_SALT: ${WORDPRESS_AUTH_SALT}
      WORDPRESS_SECURE_AUTH_SALT: ${WORDPRESS_SECURE_AUTH_SALT}
      WORDPRESS_LOGGED_IN_SALT: ${WORDPRESS_LOGGED_IN_SALT}
      WORDPRESS_NONCE_SALT: ${WORDPRESS_NONCE_SALT}
    volumes:
      - sitename_wp_data:/var/www/html
    depends_on:
      - sitename_db
    networks:
      - sitename_net_wp

  sitename_db:
    image: mysql:5.7
    volumes:
      - sitename_wp_db:/var/lib/mysql
    environment:
      MYSQL_ROOT_PASSWORD: ${MYSQL_ROOT_PASSWORD}
      MYSQL_DATABASE: ${MYSQL_DATABASE}
      MYSQL_USER: ${MYSQL_USER}
      MYSQL_PASSWORD: ${MYSQL_PASSWORD}
    networks:
      - sitename_net_wp

networks:
  sitename_net_wp:
    driver: bridge

volumes:
  sitename_wp_data:
  sitename_wp_db:
The WordPress in Docker with LDAP breakdown
First thing first, Notice everywhere you see the name "sitename". To use this docker correctly, one must replace that information. This will allow you to build multiple sites within their own containers, networks and more. As stated before, the first thing we come accross is the build area. This is where we tell teh system where our dockerfile lives. Context is the path to the file in question and dockerfile is the file above.
Next, is the ports. We are working with port 8881:80. This is where you choose the ports that you want. The first number is the port your system will reach out to, the second number is the port that your container will understand. Our SSL port is 8882 which is the standard 443 on the containers side.
ports:
      - "8881:80"
      - "8882:443"
Next are the enviromental veriables. If you notice, some of the items have ${codename} instead of data. These are veriables that will pull the data externally. This approach prevents embedding the codes inside the compose file. The volume is the next part of this code. Instead of giving a physical location, we are giving it a volume. Which we will declare later. Next, we state the wordpress page is dependant on the mysql image. Finally, we select a network to tie this container to. The process is the same for the database side.
Finally, we declare our network with the networks. This network will have it's own unique name, as you see the sitename is within the network name. We set this network to bridge, allowing access from the outside world. Finally we declare our volumes as well.
The hidden enviromental file
The next file is the enviromental file. For every ${codename} inside the docker, we need an envorimental veriable to match it. Some special notes about the salts for WordPress. The unique symbols, such as a $ or an =, in the code injection cause the docker to break down. It is wise to use numbers and letters only. Here is an example:
WORDPRESS_DB_USER=sitename_us_wp_user
WORDPRESS_DB_PASSWORD=iamalooserdog
MYSQL_ROOT_PASSWORD=passwordsareforloosers
MYSQL_DATABASE=sitename_us_wp_db
MYSQL_USER=sitename_us_wp_user
MYSQL_PASSWORD=iamalooserdog
WORDPRESS_AUTH_KEY=4OHEG7ZKzXd9ysh5lr1gR66UPqNEmCtI5jjYouudEBrUCMtZiS1WVJtyxswfnlMG
WORDPRESS_SECURE_AUTH_KEY=m0QxQAvoTjk6jzVfOa8DexRyjAxRWoyq08h1fduVSHW0z2o4NU2q7SjKoUvC3cJz
WORDPRESS_LOGGED_IN_KEY=9LxfBFJ5HyAtbrzb0eAxFG3d9DNkSzODHmPaY6kKIsSQDiVvbkw0tC71J98mDdWe
WORDPRESS_NONCE_KEY=kKMXJdUTY0b6xZy0bLW9YALpuNHcZfow6lDZbRqqlaNPmsLQq45RhKdCNPt34fai
WORDPRESS_AUTH_SALT=IFt5xLir4ozifs9v8rsKTxZBFCNzVWHrpPZe8uG0CtZWTqEBhh9XLqya4lBIi9dQ
WORDPRESS_SECURE_AUTH_SALT=DjkPBxGCJ14XQP7KB3gCCvCjo8Uz0dq8pUjPB7EBFDR286XKOkdolPFihiaIWqlG
WORDPRESS_LOGGED_IN_SALT=aNYWF5nlIVWnOP1Zr1fNrYdlo2qFjQxZey0CW43T7AUNmauAweky3jyNoDYIhBgZ
WORDPRESS_NONCE_SALT=I513no4bd5DtHmBYydhwvFtHXDvtpWRmeFfBmtaWDVPI3CVHLZs1Q8P3WtsnYYx0
As always, grab your salts from an offical source if you can make it work, Here is the WordPress Official source site. You can also use powershell to give you a single password, take a look here. Of course, replace everything in this file with your own passwords you wish. If you have the scripting knowledge, you can auto-generate much of this.
Bring Docker to Life
Now we have all of our files created. It's finally time to bring our creation to life. Run the following command:
If you notice, there are additional information that appears. The dockerfile will run and you can watch it as it runs. if there are errors, you will see them here. Often times, the erros will be syntex issues. Docker is really good at showing you what is wrong. So, read the errors and try finding the answer online.
What can we learn as a person today?
Men are born soft and supple; dead, they are stiff and hard. Plants are born tender and pliant; dead, they are brittle and dry. Thus whoever is stiff and inflexible is a disciple of death. Whoever is soft and yielding is a disciple of life. The hard and stiff will be broken. The soft and supple will prevailLao Tzu
In seeking assistance from forums like the sysadmin subreddit or Discord channels, I often encounter rigid advice, with people insisting on a singular approach. This rigidity echoes Lao Tzu's words: "Men are born soft and supple; dead, they are stiff and hard... The hard and stiff will be broken. The soft and supple will prevail." In professional settings, flexibility and adaptability are crucial. Entering a new company with an open mindset, ready to consider various methods, enables us to navigate around potential obstacles effectively. Conversely, inflexibility in our career, adhering strictly to one method, risks stagnation and failure. Embracing adaptability is not just about avoiding pitfalls; it's about thriving amidst change. Lao Tzu's wisdom reminds us that being pliant and receptive in our careers, much like the living beings he describes, leads to resilience and success.

by David | Feb 2, 2024 | Help Desk, Information Technology, Resources
Reading Time: 4 minutes
While install the LB5034439 update, i received an error message of 0x80070643. Google failed me over and over. Every post I saw talked about using dism commands to repair the update. Which none of these resolved the issue. Finally microsoft dropped a useful article about the update. Inside the update, it stated that the update will fail if your recovery drive had less than 250mb of free space. Well, my recovery drive had only 500 mb of space and only 83 mb of free space. I will go over how to find that information. So, Resolving KB5034439 error was as simple as expanding the recovery drive.
Finding the Recovery Partition Size
So, to find the recovery partition size, I used a simple powershell script. The idea behind the script was to grab the drives, the partitions and do some simple math. Of course, this came from superuser. All I did was tweak it a little to reflect my needs.
$disksObject = @()
Get-WmiObject Win32_Volume -Filter "DriveType='3'" | ForEach-Object {
    $VolObj = $_
    $ParObj = Get-Partition | Where-Object { $_.AccessPaths -contains $VolObj.DeviceID }
    if ( $ParObj ) {
        $disksobject += [pscustomobject][ordered]@{
            DiskID = $([string]$($ParObj.DiskNumber) + "-" + [string]$($ParObj.PartitionNumber)) -as [string]
            Mountpoint = $VolObj.Name
            Letter = $VolObj.DriveLetter
            Label = $VolObj.Label
            FileSystem = $VolObj.FileSystem
            'Capacity(mB)' = ([Math]::Round(($VolObj.Capacity / 1MB),2))
            'FreeSpace(mB)' = ([Math]::Round(($VolObj.FreeSpace / 1MB),2))
            'Free(%)' = ([Math]::Round(((($VolObj.FreeSpace / 1MB)/($VolObj.Capacity / 1MB)) * 100),0))
        }
    }
}
$disksObject | Sort-Object DiskID | Format-Table -AutoSize
What this script does is, it grabs the volumes on the machine that is not detachable, like a usb. Then we loop through each volume and grab the partitions that has an id associated with the volume. From there we just pull the data out and do basic math. Finally we display the information. The important part of this script is the recovery label. If your free space is less than 250mbs, we are going to have some work to do.
Clean up the Recovery Partition
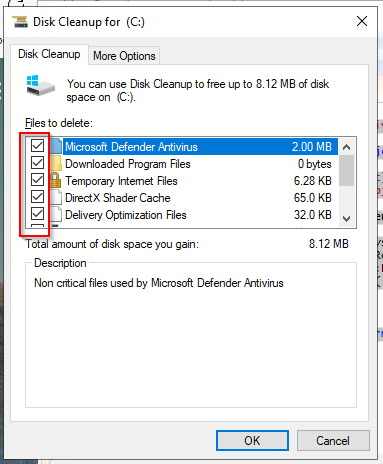
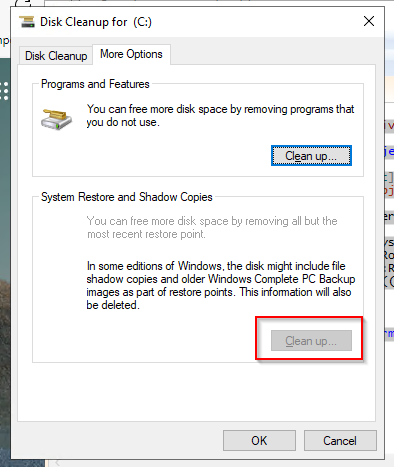
The first thing I tried to do is use the cleanmgr to clean up the recovery partition. Running it as an administrator will give you this option. Inside the disk cleanup software, select everything you can. Then in the "More Options" tab, you should be able to clean up the "System Restore and Shadow Copies". After doing these items, run the script again and see if you have enough space. In my case I did not. Cleaning the Recovery partition did not resolve the KB5034439 error.
Growing Recovery
So, the first thing I had to do is go into my partition manager in my server. The recovery partition in my case was at the end of the drive. The partition next to the recovery was thankfully my main partition. I shrank my main partition by a gb. That was the easy part. Now the hard part. I had to rebuild my recovery partition inside that shrinked space. These are the steps on how to do that.
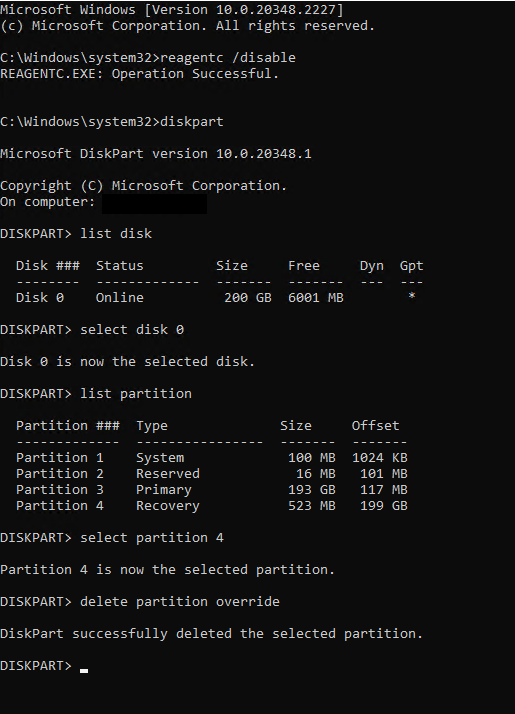
- Start CMD as administrator.
- Run reagentc /disable to disable the recovery system.
- run DiskPart
- Run List Disk to find your disk.
- Run Select Disk # to enter the disk you wish to edit.
- Run List Partition to see your partitions. We want the Recovery partition.
- Run select partition #. In my case, this is partition 4. The recovery partition.
- Run delete partition override. This will delete the partition. If you don't have the right one selected, get your backups out.
- Run list partition to confirm the partition is gone.
- Now inside your partition manager, Click Action > Refresh
- Select the Free space and select New Simple Voume
- Inside the Assign Drive Letter or Path Window, Radio check "Do not assign a drive letter or drive path" and click Next
- Inside the Format Partition Change the volume Label to Recovery and click Next
- This will create the new partition. Navigate back to your command Prompt with Diskpart
- Run list partition
- Run select partition # to select your new partition.
The next command depends on the type of disk you are working with the first list disk shows a star under gpt if the disk was a gpt disk.
GPT Disk
- Run set id=de94bba4-06d1-4d40-a16a-bfd50179d6ac
- Run gpt attributes=0x8000000000000001
- Run Exit to exit diskpart.
- Run reagentc /enable to renable the recovery disk partition.
- This command moves the .wim file that it created with the disable from the c:\windows\system32\recovery back into the recovery partition.
Finally, run your windows updates. Resolving KB5034439 error is a little scary if you have a server that is more complex. Thankfully it wans't that complex on my end. You will have to adapt your approach to match what is needed.

by David | Sep 1, 2023 | Information Technology, PowerShell, Resources
Reading Time: 2 minutes
Recently, I have been troubleshooting radius. Radius hasn't changed in decades. I say this lightingly too. The network policy server is a feature that helps with connecting things like unifi wifi and more. Each radius connection produces a reason code. Today we want to look through the radius logs and get as much useful information without screaming at the screen. Radius logs are a little daunting. This is why many people use an SQL server for the radius logs. However, if you are not one of those people who can do this, the traditional radius logging works wonders. So, we will read radius logs with PowerShell.
Radius Logging
Before we start, we need to know what we are dealing with. The standard location for readius logs is: C:\Windows\System32\LogFiles. You can change this location as you see fit. I personally changed my locations to a c:\logs\radius location. This helps me find it quicker and generally, I don't have trouble guessing what is what. You can set the radius log location by doing the following:
- Start Network Policy Server
- Click account
- Under Log File Properties click Change Log File Properties
- A box will pop up called "Log File Properties" Click on the "Log File" tab.
- This is where you can change your directory.
- Change your Format to DTS Compliant. As this script works best with it.
- I personally like smaller files when I am working with log searches. So I select the "When log file reaches this size:" I select 1 - 5 MB.
- Click ok
Now your log files will live wherever you told them. You will need to change the script around a little if you are using a different location than me.
The Script and Breakdown
$NPSLogs = Get-content -Path "C:\Logs\Radius\IN2308.log" | Select-Object -Last 6
foreach ($NPSLog in $NPSLogs) {
    [pscustomobject][ordered]@{
        TimeStamp = ([xml]$NPSLog).event.Timestamp.'#text'
        ComputerName = ([xml]$NPSLog).event.'Computer-Name'.'#text'
        Sources = ([xml]$NPSLog).event.'Event-Source'.'#text'
        Username = ([xml]$NPSLog).event.'User-Name'.'#text'
        CalledStationId = ([xml]$NPSLog).event.'Called-Station-Id'.'#text'
        CallingStationId = ([xml]$NPSLog).event.'Calling-Station-Id'.'#text'
        NasPortType = ([xml]$NPSLog).event.'NAS-Port-Type'.'#text'
        NasIdentifier = ([xml]$NPSLog).event.'NAS-Identifier'.'#text'
        NasPort = ([xml]$NPSLog).event.'NAS-Port'.'#text'
        ClientIPAddress = ([xml]$NPSLog).event.'Client-IP-Address'.'#text'
        ClientVendor = ([xml]$NPSLog).event.'Client-Vendor'.'#text'
        ClientFriendlyName = ([xml]$NPSLog).event.'Client-Friendly-Name'.'#text'
        ProxyPolicyName = ([xml]$NPSLog).event.'Proxy-Policy-Name'.'#text'
        ProviderType = ([xml]$NPSLog).event.'Provider-Type'.'#text'
        SamAccountName = ([xml]$NPSLog).event.'SAM-Account-Name'.'#text'
        FQUsername = ([xml]$NPSLog).event.'Fully-Qualifed-User-Name'.'#text'
        AuthType = ([xml]$NPSLog).event.'Authentication-Type'.'#text'
        Class = ([xml]$NPSLog).event.Class.'#text'
        PacketType = ([xml]$NPSLog).event.'Packet-Type'.'#text'
        ReasonCode = ([xml]$NPSLog).event.'Reason-Code'.'#text'
        TunnelClientEndpt = ([xml]$NPSLog).event.'Tunnel-Client-Endpt'.'#text'
    }
}
As you can tell, this script needs to be used on the server in question. However, You could wrap this script into a nice wrapper. That would allow you to execute on remote machines. The breakdown is very simple on this one as well. DTS is an XML format. Thus, you just need to use the [XML] before any of the lines. The XML is formatted with the event, it's name, and the text. It's a very simple setup. From there I select what I want and give it in a pscustom object. That's it. Its a very simple setup. That's why we should always read radius logs with Powershell.

by David | May 8, 2023 | Mental Health, Resources
Reading Time: 7 minutes
Values are the fundamental beliefs that guide our behaviors, decisions, and attitudes toward life. They are the principles that define our character, shape our perspective, and determine our priorities. We learn our default values through our community and families. As we grow, we change our values. Sometimes this is to match the communities we are in, sometimes we accept other values. We do this in a subconscious manner. Normally, this process is unintentional. There is a way to create value in our life though. Let's define how, or Values defined as my dyslexic brain likes to say.
Seven Steps overview
Here is the overview list of each step. These are understandable as they are, but I like to expand on them with the concept of loving yourself or valuing yourself. This method comes from the book "Values Clarification" by Simmon and Kirschenbaum.
- freely chosen
- chosen from a consideration of alternatives
- chosen with clear knowledge of the consequences
- prized and cherished
- publicly proclaimed
- acted on
- acted on repeatedly.
Freely Chosen
Firstly, if you wish for your value to stay throughout your life, you must willfully accept it. I grew up in a Christian home. My beliefs and values were given to me by my parents. At the time, I did not freely choose them. As I grew older though, I choose to accept things like, loving others, helping those in need, and more as part of my core values. However, my belief system stated I was a bad person from birth. This birthed a value of self-worthlessness. A sense of unlovability. This value was reinforced through physical and sexual abuse.
For years, I acted upon this core value. I choose not to follow my dreams and stayed in the same job I had in high school. I didn't believe I was worth more than scooping poop out of toilets. Many years later I started believing that I was worthy of love. Eventually, I broke down the religious dogma that taught me I was worthless. It was then I freely choose the value of self-love. This was the first step to integrating this self-love and care into me.
Other values I have chosen throughout my life are some of the core values of real Christianity. Treating others as equals and not less than. Being there for people. Raising my kids in love and not hate. Allowing anger to flow in a positive way. All of these I freely chose as a child, and as an adult, I still hold true to them.
Chosen from a Consideration of Alternatives
Growing up, you don't get a chance to consider the alternatives. As an adult, you get to. When creating a new value willfully, it's a must. Let's look at the value of isolationism. My Uncle was a strong Republican. When I was younger, he believed in isolationism. I was able to be part of the changing of this value. This is a value he was thought while growing up. Isolationism value states that only those born in the country should receive help from the government and/or be part of the government processes, like voting or holding governmental positions. The alternative to this is a melting pot and involvement.
He changed his view because of an Indian man challenged his political beliefs through his spiritual beliefs. He considered the man's spiritual standing and decided to consider the alternative to his value. The man was a critical thinker and helped my uncle reach that level of thinking. Using his critical thinking skills, he considered the idea of the Melting pot. He saw that the melting pot value would bring in new ideas and help the country grow. He was able to let go of his thought value for a value that he choose freely and considered himself.
We must weigh out the alternatives. By not doing so, we rob ourselves of the truth and longevity of our value. Now consider the alternatives to not loving yourself. What are they? Hating yourself, being indifferent to yourself, treating yourself less than, treating everyone greater than one? Each value has its own consequences.
Chosen with clear Knowledge of the Consequences
Knowing the alternatives is the first step. Knowing the consequences of your actions is the next part. If you value the diversity of animal life, global warming is painful to watch as destroys animal diversity. In my uncle's case, accepting the melting pot meant he had to accept people as people and not what he was raised to believe. He had to decode his brain and way of thinking. Undo years of training. Which he was successful at doing. This was a hard process for him as he lost friends and family members. When you share a value with someone else, and you change, it can cause conflict.
It's important to weigh out the consequences of the value that you choose. Lets look at self-love. The consequences of choosing to love yourself are somewhat painful but fulfilling. In self love, you must learn to say no, and set boundaries. This will push people away from you. As it is natural for people to take advantage of those who don't love themselves.
Another consequence of self-love is integrating yourself. No longer can you say, I'm just born that way. Instead, you have to face your hurts and work through them. If you are comfortable with your current life and don't want to grow, loving yourself is going to be hard as it forces you to grow.
However, loving yourself means you will grow. It means you will become whole. It means you will be happier with who you are. At one point or another, you will look in the mirror and not be disappointed to see yourself.
Value must be Prized and Cherished
Looking back at my Uncle. Before changing his values, he use to say something along the lines of, "all these people coming to our country stealing our jobs." After changing his values, he said "What a beautiful mosaic of people. This is how we grow together." To his deathbed, he cherished all races and people. He was excited when he heard of a governor for another country taking office. He would call them "Fresh Views" He went out of his way to help everyone equally.
In choosing to love yourself, You have to cherish moments where you do love yourself. For me, I cherish my front porch. I set a boundary of keeping it livable. Now, I sit on the porch each night and watch the sunset. I play with the kids on the front porch. School bus students have a place to sit and talk. I stand firm on my boundary as it is a way of self-love for me. You have to look at where your value brings you and what it does. Hold those to your heart. Remind yourself of them because it's easy to forget.
Publicly Proclaimed
Next, you must be public about your value. Going back to my uncle, he did this by how he voted. When he spoke with other members of his family, and how he lived his life. Yes, he lost friends, however, going public kept him accountable. Baptists use baptism for this purpose when someone accepts Jesus. They take a public dunking in water to show all their friends and family what they believe and the values attached to that belief. During the start of Christianity, this would get you killed. Now-a-day, people clap.
When it comes to self-love, setting things like setting boundaries shows people that you are treating yourself better. Being willing to say, "I'm going to take some time for myself" and meaning it, shows it publically. Other things like taking care of your hair, shaving, exercising, going to the doctor, and more all show it. With self-love, the act of acting upon it is your public proclamation.
Act-On Your Values
It's time to act on your values. If you value human life, you will help human life. A pro-life, states they love a child and want to see a child be born. It's not a true value if the person doesn't support adoption. It's not a value if the person wants to defund programs that help mothers take care of their children. Free day care and other items should fall into pro-life. However, we don't see it.
Acting upon your values is the meat and potato of the value. It gives the value, value. My uncle valued the melting pot. He Choose to vote and support those with good ideas, no matter what their nationality was. I saw him debate more than once with his former isolationists and even converted a few. He acted upon his value which enforced his value.
When it comes to self love, you have to act upon it. Taking care of your body is the start of self-love. When someone starts to value themselves, you will notice they will dress better. I started brushing my teeth each night. A family member chose to go to more social events and meet new people. There are many ways to act upon self-love. One way to proclaim it each morning. Try using the following statement:
I love myself. I will accept myself unconditionally.
Acting upon it over and over again
I am someone who likes to get projects off the ground and launch them into the sky. I'm an activator. If you want a dead project resurrected from its death, call me. However, I struggle with keeping it going once it was in the sky. This is very important. If you start reinforcing your chosen value, previous values will slip back in. As one man told me, it takes half the time to create a new habit when you are intentional than when you created the habit unintentionally.
To build the value, you must build the habit of that value. The action of acting on that value over and over again. It has to be drilled into your head. Especially if you have had values that are alternatives to your current values. Uncle would watch multiple news outlets instead of the same one. Always looking for fresh ideas and such. His actions reinforced his beliefs and values. Thus, at his funeral, he had a large crowd of people. The speaker said he had an open mind and it showed.
To love yourself, you have to take care of yourself daily. Brush your teeth each day. Take time for yourself each day. It's ok to take care of yourself.
Final thoughts
Taking our values at face level will at some point fail us. We have to reevaluate our values from time to time. We need to make sure they still hold true to us. If they don't, it's time to let them go or reup those values. It's not easy to make a new value. We are talking about the core of self when rebuilding a value. It takes time. There are no overnight changes in this world. As I have learned, there are three stages, initializing, processing, and defaulting. We have to initialize that change. We have to process it each day, sometimes multiple times a day, and then at some point, it becomes default behavior.
Continue Reading

by David | Sep 23, 2022 | Azure, Exchange, Information Technology, PowerShell, Resources
Reading Time: 8 minutes
While reading on Reddit, I found a common thread. People need a quick way to do a Share Point File Audit. I have a PowerShell function for this in my toolbox. This tool heavily uses the Search-UnifiedAuditLog command let. The most common items I tend to audit are file modifications and deletions. This function goes through, modified, moved, renamed, downloaded, uploaded, accessed, synced, malware detection, restored from trash, locked, and finally unlocked. The Search-UnifiedAuditLog is an exchange online command at the time of this writing. Thus, you need to connect to exchange online. In this function, I am using the switch command. I will follow that structure for the breakdown. Lets first jump in with the function.
The Function
function Invoke-SharePointFileAudit {
[cmdletbinding()]
param (
[Parameter(Mandatory = $true)][validateset("Deleted", "Modified", "Moved", "Renamed", "Downloaded", "Uploaded", "Synced", "Accessed", "MalwareDetected", "Restored", "Locked", "unLocked")][string]$Type,
[parameter(Mandatory = $false)][switch]$KeepAlive,
[switch]$SharePointOnline,
[switch]$OneDrive,
[Nullable[DateTime]]$StartDate,
[Nullable[DateTime]]$EndDate,
[string]$Outfile,
[int]$ResultSize = 5000
)
Begin {
$Module = Get-Module ExchangeOnlineManagement -ListAvailable
if ($Module.count -eq 0) {Install-Module ExchangeOnlineManagement -Repository PSGallery -AllowClobber -Force}
$getsessions = Get-PSSession | Select-Object -Property State, Name
$isconnected = (@($getsessions) -like '@{State=Opened; Name=ExchangeOnlineInternalSession*').Count -gt 0
If ($isconnected -ne "false") {
try {
Connect-ExchangeOnline
}
catch {
Write-Error "Exchange Online Failed. Ending"
end
}
}
#Auto Generates Start and Finish dates
if ($Null -eq $StartDate) { $StartDate = ((Get-Date).AddDays(-89)).Date }
if ($Null -eq $EndDate) { $EndDate = (Get-Date).Date }
#Tests if end date is before start date.
if ($EndDate -lt $StartDate) { $StartDate = ((Get-Date).AddDays(-89)).Date }
if ($EndDate -gt (Get-Date).Date) { $EndDate = (Get-Date).Date }
}
Process {
switch ($Type) {
"Deleted" {
$DeletedRecords = Search-UnifiedAuditLog -StartDate $StartDate -EndDate $EndDate -Operations "FileDeleted,FileDeletedFirstStageRecycleBin,FileDeletedSecondStageRecycleBin,FileVersionsAllDeleted,FileRecycled" -SessionId deleted -SessionCommand ReturnLargeSet -ResultSize 5000
$Return = foreach ($DeletedRecord in $DeletedRecords) {
$JSONInfo = $DeletedRecord.AuditData | convertfrom-json
[pscustomobject][ordered]@{
TimeStampe = ($JSONInfo.creationtime).tolocaltime()
UserName = $DeletedRecord.UserIds
ClientIP = $JSONInfo.ClientIP
Source = $JSONInfo.EventSource
Workload = $JSONInfo.Workload
Operation = $JSONInfo.Operation
SiteURL = $JSONInfo.SiteURL
RelativeURL = $JSONInfo.SourceRelativeUrl
FileName = $JSONInfo.SourceFileName
ObjectID = $JSONInfo.ObjectId
}
}
}
"Modified" {
$ModifiedRecords = Search-UnifiedAuditLog -StartDate $StartDate -EndDate $EndDate -Operations "FileModified,FileModifiedExtended" -SessionId Modified -SessionCommand ReturnLargeSet -ResultSize 5000
$Return = foreach ($ModifiedRecord in $ModifiedRecords) {
$JSONInfo = $ModifiedRecord.AuditData | convertfrom-json
[pscustomobject][ordered]@{
TimeStamp = ($JSONInfo.creationtime).tolocaltime()
UserName = $ModifiedRecord.UserIds
ClientIP = $JSONInfo.ClientIP
Source = $JSONInfo.EventSource
Workload = $JSONInfo.Workload
Operation = $JSONInfo.Operation
SiteURL = $JSONInfo.SiteURL
RelativeURL = $JSONInfo.SourceRelativeUrl
FileName = $JSONInfo.SourceFileName
ObjectID = $JSONInfo.ObjectId
}
}
}
"Moved" {
$MovedRecords = Search-UnifiedAuditLog -StartDate $StartDate -EndDate $EndDate -Operations "FileMoved" -SessionId Moved -SessionCommand ReturnLargeSet -ResultSize 5000
$Return = foreach ($MovedRecord in $MovedRecords) {
$JSONInfo = $MovedRecord.AuditData | convertfrom-json
[pscustomobject][ordered]@{
TimeStamp = ($JSONInfo.creationtime).tolocaltime()
UserName = $MovedRecord.UserIds
ClientIP = $JSONInfo.ClientIP
Source = $JSONInfo.EventSource
Workload = $JSONInfo.Workload
Operation = $JSONInfo.Operation
SiteURL = $JSONInfo.SiteURL
SourceRelativeURL = $JSONInfo.SourceRelativeUrl
DestinationRelativeURL = $JSONInfo.DestinationRelativeURL
FileName = $JSONInfo.SourceFileName
ObjectID = $JSONInfo.ObjectId
}
}
}
"Renamed" {
$RenamedRecords = Search-UnifiedAuditLog -StartDate $StartDate -EndDate $EndDate -Operations "FileRenamed" -SessionId Renamed -SessionCommand ReturnLargeSet -ResultSize 5000
$Return = foreach ($RenamedRecord in $RenamedRecords) {
$JSONInfo = $RenamedRecord.AuditData | convertfrom-json
[pscustomobject][ordered]@{
TimeStamp = ($JSONInfo.creationtime).tolocaltime()
UserName = $RenamedRecord.UserIds
ClientIP = $JSONInfo.ClientIP
Source = $JSONInfo.EventSource
Workload = $JSONInfo.Workload
Operation = $JSONInfo.Operation
SiteURL = $JSONInfo.SiteURL
SourceRelativeURL = $JSONInfo.SourceRelativeUrl
SourceFileName = $JSONInfo.SourceFileName
DestinationFileName = $JSONInfo.DestinationFileName
ObjectID = $JSONInfo.ObjectId
}
}
}
"Downloaded" {
$DownloadedRecords = Search-UnifiedAuditLog -StartDate $StartDate -EndDate $EndDate -Operations "FileDownloaded" -SessionId Downloaded -SessionCommand ReturnLargeSet -ResultSize 5000
$Return = foreach ($DownloadedRecord in $DownloadedRecords) {
$JSONInfo = $DownloadedRecord.AuditData | convertfrom-json
[pscustomobject][ordered]@{
TimeStamp = ($JSONInfo.creationtime).tolocaltime()
UserName = $DownloadedRecord.UserIds
ClientIP = $JSONInfo.ClientIP
Source = $JSONInfo.EventSource
Workload = $JSONInfo.Workload
Operation = $JSONInfo.Operation
SiteURL = $JSONInfo.SiteURL
SourceRelativeURL = $JSONInfo.SourceRelativeUrl
SourceFileName = $JSONInfo.SourceFileName
ObjectID = $JSONInfo.ObjectId
}
}
}
"Uploaded" {
$UploadedRecords = Search-UnifiedAuditLog -StartDate $StartDate -EndDate $EndDate -Operations "FileUploaded" -SessionId Uploaded -SessionCommand ReturnLargeSet -ResultSize 5000
$Return = foreach ($UploadedRecord in $UploadedRecords) {
$JSONInfo = $UploadedRecord.AuditData | convertfrom-json
[pscustomobject][ordered]@{
TimeStamp = ($JSONInfo.creationtime).tolocaltime()
UserName = $UploadedRecord.UserIds
ClientIP = $JSONInfo.ClientIP
Source = $JSONInfo.EventSource
Workload = $JSONInfo.Workload
Operation = $JSONInfo.Operation
SiteURL = $JSONInfo.SiteURL
SourceRelativeURL = $JSONInfo.SourceRelativeUrl
SourceFileName = $JSONInfo.SourceFileName
ObjectID = $JSONInfo.ObjectId
}
}
}
"Synced" {
$SyncedRecords = Search-UnifiedAuditLog -StartDate $StartDate -EndDate $EndDate -Operations "FileSyncDownloadedFull,FileSyncUploadedFull" -SessionId Synced -SessionCommand ReturnLargeSet -ResultSize 5000
$Return = foreach ($SyncedRecord in $SyncedRecords) {
$JSONInfo = $SyncedRecord.AuditData | convertfrom-json
[pscustomobject][ordered]@{
TimeStamp = ($JSONInfo.creationtime).tolocaltime()
UserName = $SyncedRecord.UserIds
ClientIP = $JSONInfo.ClientIP
Source = $JSONInfo.EventSource
Workload = $JSONInfo.Workload
Operation = $JSONInfo.Operation
SiteURL = $JSONInfo.SiteURL
SourceRelativeURL = $JSONInfo.SourceRelativeUrl
SourceFileName = $JSONInfo.SourceFileName
ObjectID = $JSONInfo.ObjectId
}
}
}
"Accessed" {
$AccessedRecords = Search-UnifiedAuditLog -StartDate $StartDate -EndDate $EndDate -Operations "FileAccessed,FileAccessedExtended" -SessionId Accessed -SessionCommand ReturnLargeSet -ResultSize 5000
$Return = foreach ($AccessedRecord in $AccessedRecords) {
$JSONInfo = $AccessedRecord.AuditData | convertfrom-json
[pscustomobject][ordered]@{
TimeStamp = ($JSONInfo.creationtime).tolocaltime()
UserName = $AccessedRecord.UserIds
ClientIP = $JSONInfo.ClientIP
Source = $JSONInfo.EventSource
Workload = $JSONInfo.Workload
Operation = $JSONInfo.Operation
SiteURL = $JSONInfo.SiteURL
SourceRelativeURL = $JSONInfo.SourceRelativeUrl
SourceFileName = $JSONInfo.SourceFileName
ObjectID = $JSONInfo.ObjectId
}
}
}
"MalwareDetected" {
$MalewareRecords = Search-UnifiedAuditLog -StartDate $StartDate -EndDate $EndDate -Operations "FileMalwareDetected" -SessionId MalewareRecords -SessionCommand ReturnLargeSet -ResultSize 5000
$Return = foreach ($MalewareRecord in $MalewareRecords) {
$JSONInfo = $MalewareRecord.AuditData | convertfrom-json
[pscustomobject][ordered]@{
TimeStamp = ($JSONInfo.creationtime).tolocaltime()
UserName = $MalewareRecord.UserIds
ClientIP = $JSONInfo.ClientIP
Source = $JSONInfo.EventSource
Workload = $JSONInfo.Workload
Operation = $JSONInfo.Operation
SiteURL = $JSONInfo.SiteURL
RelativeURL = $JSONInfo.SourceRelativeUrl
FileName = $JSONInfo.SourceFileName
ObjectID = $JSONInfo.ObjectId
}
}
}
"Restored" {
$RestoredRecords = Search-UnifiedAuditLog -StartDate $StartDate -EndDate $EndDate -Operations "FileRestored" -SessionId RestoredRecords -SessionCommand ReturnLargeSet -ResultSize 5000
$Return = foreach ($RestoredRecord in $RestoredRecords) {
$JSONInfo = $RestoredRecord.AuditData | convertfrom-json
[pscustomobject][ordered]@{
TimeStamp = ($JSONInfo.creationtime).tolocaltime()
UserName = $RestoredRecord.UserIds
ClientIP = $JSONInfo.ClientIP
Source = $JSONInfo.EventSource
Workload = $JSONInfo.Workload
Operation = $JSONInfo.Operation
SiteURL = $JSONInfo.SiteURL
RelativeURL = $JSONInfo.SourceRelativeUrl
FileName = $JSONInfo.SourceFileName
ObjectID = $JSONInfo.ObjectId
}
}
}
"Locked" {
$LockedRecords = Search-UnifiedAuditLog -StartDate $StartDate -EndDate $EndDate -Operations "LockRecord" -SessionId Locked -SessionCommand ReturnLargeSet -ResultSize 5000
$Return = foreach ($LockedRecord in $LockedRecords) {
$JSONInfo = $LockedRecord.AuditData | convertfrom-json
[pscustomobject][ordered]@{
TimeStamp = ($JSONInfo.creationtime).tolocaltime()
UserName = $LockedRecord.UserIds
ClientIP = $JSONInfo.ClientIP
Source = $JSONInfo.EventSource
Workload = $JSONInfo.Workload
Operation = $JSONInfo.Operation
SiteURL = $JSONInfo.SiteURL
RelativeURL = $JSONInfo.SourceRelativeUrl
FileName = $JSONInfo.SourceFileName
ObjectID = $JSONInfo.ObjectId
}
}
}
"unLocked" {
$unLockedRecords = Search-UnifiedAuditLog -StartDate $StartDate -EndDate $EndDate -Operations "UnlockRecord" -SessionId UnlockRecord -SessionCommand ReturnLargeSet -ResultSize 5000
$Return = foreach ($unLockedRecord in $unLockedRecords) {
$JSONInfo = $unLockedRecord.AuditData | convertfrom-json
[pscustomobject][ordered]@{
TimeStamp = ($JSONInfo.creationtime).tolocaltime()
UserName = $unLockedRecord.UserIds
ClientIP = $JSONInfo.ClientIP
Source = $JSONInfo.EventSource
Workload = $JSONInfo.Workload
Operation = $JSONInfo.Operation
SiteURL = $JSONInfo.SiteURL
RelativeURL = $JSONInfo.SourceRelativeUrl
FileName = $JSONInfo.SourceFileName
ObjectID = $JSONInfo.ObjectId
}
}
}
}
}
end {
if (!($SharePointOnline -and $OneDrive) -or ($SharePointOnline -and $OneDrive)) {
if ($PSBoundParameters.ContainsKey("OutFile")) {
$Return | Export-Csv ./$Outfile.CSV
}
else {
$Return
}
}
elseif ($SharePointOnline) {
if ($PSBoundParameters.ContainsKey("OutFile")) {
$Return | where-object { $_.workload -like "SharePoint" } | Export-Csv ./$Outfile.CSV
}
else {
$Return | where-object { $_.workload -like "SharePoint" }
}
}
elseif ($OneDrive) {
if ($PSBoundParameters.ContainsKey("OutFile")) {
$Return | where-object { $_.workload -like "OneDrive" } | Export-Csv ./$Outfile.CSV
}
else {
$Return | where-object { $_.workload -like "OneDrive" }
}
}
if (!($KeepAlive)) {
Disconnect-ExchangeOnline -Confirm:$false -InformationAction Ignore -ErrorAction SilentlyContinue
}
}
}
The Breakdown of Share Point File Audit
I'm glad you came to the breakdown. It means you want to know how the code works. This means you truly care about learning. Thank you. This code repeats itself a few times in different ways. So, I will call out the differences, but not the likes after the first time explaining something. The first section is our Parameters.
Parameters
We have 8 Parameters, and only one of them is mandatory. Firstly, we have the Type parameter. This mandatory validate set allows you to select from a list of commands we will be using in this function.
- Deleted
- Modified
- Created
- Moved
- Renamed
- Downloaded
- Uploaded
- Synced
- Accessed
- MalwareDetected
- Restored
- Locked
- UnLocked
Afterward, we have Keep Alive. This allows us to run the command multiple times without signing back into the system. So, if you want to keep your session alive, flip that flag. Next, we have two switches. The first Switch is to pull only items edited in SharePoint itself. The next is for one drive. They are named accordingly. After that, we have a start date and an end date. These values are nullable. Basically, you don't need them. The outfile is asking for just the name of the file. We are using the "./" to save it wherever you run the command from. Finally, we have the result size. If you want the max number of results, 5000. However, you can make this number smaller.
Begin
In our begin section, we want to test the Exchange Online Management Module. Secondly, we want to validate exchange connectivity. After that, we want to gather the date information for the start and end dates. Let's take a look at the exchange part first.
$Module = Get-Module ExchangeOnlineManagement -ListAvailable
The Get-Module command works with PowerShell 5.1. However, I have seen PowerShell flak with this command failing to pull the information. I am going to assume your PowerShell is up to date with your current version.
if ($Module.count -eq 0) {
    Install-Module ExchangeOnlineManagement -Repository PSGallery -AllowClobber -Force
}
Afterward, we want to install the exchange online management module if we don't detect the module. We are using the count to see how many objects are inside our module variable. If it's 0, it's time to install. We install it from the PSGallery.
$getsessions = Get-PSSession | Select-Object -Property State, Name
$isconnected = (@($getsessions) -like '@{State=Opened; Name=ExchangeOnlineInternalSession*').Count -gt 0
Now, we test exchange connections. We use the Get-PSSession to review the current connections. Next, we test if the connections with the name "ExchangeOnlineInternalSession" is greater than zero. "isconnected" will produce a true or false statement.
If ($isconnected -ne "false") {
    try {
        Connect-ExchangeOnline
    } catch {
        Write-Error "Exchange Online Failed. Ending"
        end
    }
}
After which, we can test with. False, we try to connect. However, if there is an error, we end the script and let the user know. We are not using a credential object to authenticate because MFA should always be a thing.
#Auto Generates Start and Finish dates
if ($Null -eq $StartDate) { $StartDate = ((Get-Date).AddDays(-89)).Date }
if ($Null -eq $EndDate) { $EndDate = (Get-Date).Date }
#Tests if end date is before start date.
if ($EndDate -lt $StartDate) { $StartDate = ((Get-Date).AddDays(-89)).Date }
if ($EndDate -gt (Get-Date).Date) { $EndDate = (Get-Date).Date }
Afterward, we need to get the dates right. If the start date is null, we are going to pull 90 days back. We do this by using the standard. We do the same with the end date. If it's null, we grab today's date. Now to prevent errors, we check the start date and end date. The end date can't be before the start date. This is similar to the end date. The end date can't be greater than the current date. We use the if statement to resolve this.
Process
We begin the process by looking directly at our "Type" variable by using a switch command. The switch allows us to go through each "Type" and run the commands accordingly. Let's look at one of the switch processes.
$DeletedRecords = Search-UnifiedAuditLog -StartDate $StartDate -EndDate $EndDate -Operations "FileDeleted,FileDeletedFirstStageRecycleBin,FileDeletedSecondStageRecycleBin,FileVersionsAllDeleted,FileRecycled" -SessionId deleted -SessionCommand ReturnLargeSet -ResultSize 5000
$Return = foreach ($DeletedRecord in $DeletedRecords) {
    $JSONInfo = $DeletedRecord.AuditData | convertfrom-json
    [pscustomobject][ordered]@{
        TimeStampe  = ($JSONInfo.creationtime).tolocaltime()
        UserName    = $DeletedRecord.UserIds
        ClientIP    = $JSONInfo.ClientIP
        Source      = $JSONInfo.EventSource
        Workload    = $JSONInfo.Workload
        Operation   = $JSONInfo.Operation
        SiteURL     = $JSONInfo.SiteURL
        RelativeURL = $JSONInfo.SourceRelativeUrl
        FileName    = $JSONInfo.SourceFileName
        ObjectID    = $JSONInfo.ObjectId
    }
}
The data that search-unifiedauditlog produces a section called "AuditData". This section has almost every piece of information you will need. The difference between each "Type" will be the Operations, and session id. The operations target the required logs. This creates the backbone of the Share Point File Audit. The graph below will show which operations I am using. Once you gather the operation information, we need to pull the AuditData. This data will be in JSON format. We start off by looping the records with a for each loop. Then we pull the auditdata and pipe it into convertfrom-json. Next, we create our PS Custom Object. Other than Moved, the output of the other logs contains almost the same information. See the script for the information.
Operation Filters
- Deleted
- FileDeleted
- FileDeletedFirstStageRecycleBin
- FileDeletedSecondStageRecycleBin
- FileVersionsAllDeleted
- FileRecycled
- Modified
- FileModified
- FileModifiedExtended
- Moved
- Renamed
- Downloaded
- Uploaded
- Synced
- FileSyncDownloadedFull
- FileSyncUploadedFull
- Accessed
- FileAccessed
- FileAccessedExtended
- MalwareDetected
- Restored
- Locked
- UnLocked
End
Finally, it's time for the end block. This is where we will present the data we have gathered. Firstly, we need to determine if the SharePoint or Onedrives were flipped or not.
if (!($SharePointOnline -and $OneDrive) -or ($SharePointOnline -and $OneDrive)) {
    if ($PSBoundParameters.ContainsKey("OutFile")) {
        $Return | Export-Csv ./$Outfile.CSV
    } else {
        $Return
    }
}
Here we checking if both flags are not checked or if both flags are checked. Then we check if the user gave us a filename. If they did, we export our report to a csv file wherever we are executing the function from. However, if the user didn't give us a filename, we just dump all the results.
elseif ($SharePointOnline) {
            if ($PSBoundParameters.ContainsKey("OutFile")) {
                $Return | where-object { $_.workload -like "SharePoint" } | Export-Csv ./$Outfile.CSV
            }
            else {
                $Return | where-object { $_.workload -like "SharePoint" }
            }
        }
        elseif ($OneDrive) {
            if ($PSBoundParameters.ContainsKey("OutFile")) {
                $Return | where-object { $_.workload -like "OneDrive" } | Export-Csv ./$Outfile.CSV
            }
            else {
                $Return | where-object { $_.workload -like "OneDrive" }
            }
        }
        if (!($KeepAlive)) {
            Disconnect-ExchangeOnline -Confirm:$false -InformationAction Ignore -ErrorAction SilentlyContinue
        }
Now, if the user selected either or, we present that information. We present those infos by using a where-object. Like before we ask if the user produced an outfile. Finally, we ask if keep alive was set. If it wasn't we disconnect from the exchange.
Conclusion
In conclusion, auditing shouldn't be difficult. We can quickly pull the info we need. I hope you enjoy this powerful little tools.