It's time to Set Users' MFA with a nice little function. This function is designed to gather information and set a user's MFA with the method you want. It even allows you to reset and disable MFA. We are going to break this blog up a little differently. We will go through each area of the function as the breakdown. Let's get started.
Function and Parameters
The first thing we are going to build out is the Function and the Parameters. The function command is like a wrapper for a script. This way you can add this to your PowerShell tool kit module.
Function Set-SHDUserMFA {
    [CmdletBinding()]
        param(
    )
}
Parameters
User Principal Name
The parameters are where people select items that they want. We have a few here. The First parameter is the User Principal Name. This is like an email address. This parameter is a List of strings. Basically, you are allowed to add more than one user name to this field. To make life easier we have set a Parameter set name. The PSN is called UPN. So the end user can either type UPN or UserPrincipalName for this parameter. This parameter is Mandatory.
Function Set-SHDUserMFA {
    [CmdletBinding()]
        param(
            [Parameter(Mandatory = $true, ParameterSetName = 'UPN', Position = 0),ValueFromPipeline = $true,ValueFromPipelineByPropertyName = $true,][string[]]$UserPrincipalName,
    )
}
Status
Afterward, The status parameter allows you to set the MFA status that you want. Here we have Enabled, Disable, Enforced, and Reset. The Enabled will enable MFA. Disable of course disables. Enforced will skip the text and go straight to the Apps. Finally, the reset will reset all the MFA token flags. This is how you Set Users' MFA. This parameter isn't mandatory.
Finally, we have the Info switch. This switch tells the script to produce an in-depth MFA report on the user. This parameter is not mandatory. We choose not to make it mandatory because we might not care.
Chiefly, I stated that we were targeting one section at a time. Here in the begin, we will check the environment that we are working with. The MSOnline module only runs in PowerShell 5 and not PowerShell 7. Thus we need to check. Thus, we use the PS Version Table variable. This will produce the PowerShell version number. We can test against that and end the script if the user is using PowerShell 7. In the below example, we are using the write-error to let the user know what's going on.
#Checks PS version
if ($PSVersionTable.psversion.major -ne 5) {
    Write-Error "Your Powershell Version is $($PSVersionTable.psversion.major). Msonline service only works on Powershell 5. Ending."
    end
}
Module Test
Aftward, we test the MSOnline module. The Get-InstalledModule tests the installation status of MSOnline. Running MSOnline command tests the status of the module load. Afterward, we either connect or error out.
#Checks to see if the module is installed if not, tells the end user to install.
if (Get-InstalledModule -name MSOnline -ErrorAction SilentlyContinue) {

    #Checks to see if the msolservice if it isn't connected, we connect
    if (-not (Get-MsolDomain -ErrorAction SilentlyContinue)) {
        Connect-MsolService
    }
} else {
    Write-Error "MSOnline Services are not installed. Please install the MSOnline services with the following command `n Install-module MSOnline `n"
}
Process - Set Users' MFA
Confirming the User
Next, we start the process section. The process is where most of the meat and potatoes are. Firstly we have the User Principal Name loop. This loop is very important. The parameter we created beforehand has multiple possible inputs. Thus, it's best to loop through those possible inputs. We are going to call the Internal variable UPN.
foreach ($UPN in $UserPrincipalName) {
    #Do Stuff Yall
}
After that, we will be building out a try/catch to test if the user exists. The try/catch will give us the ability to test the user without blowing up the script. Get-MsolUser is the command we will be using with an error action of "stop". The catch will contain the error write-out.
#Checks if the user exists, if not, ends the upn and writes an error.
try {
    $User = Get-MsolUser -UserPrincipalName $UPN -ErrorAction Stop
} catch {
    Write-Error $_.Exception.Message
}
The Switch
Now that we have the user verified, it's time to move forward. We start with the switch. The switch is a process of if statements but formatted nicely. In our case, we will be building the switch of the status parameter. If the user selected blah, then we take blah action. Here is the basic structure of a switch. It's switch and the parameters name. Then each possible answer to that parameter. The status is a "validate set" parameter. This means all the answers are inside the parameter.
The enabled will enable the MFA of a target user. We went over some of this code in a previous blog. Firstly, we want to create a new object. This object is a Microsoft Online Administration object that focuses on Strong authentication requirements. Once we create this object we will assign properties different values. Finally, we use the Set-Msoluser to set the user accordingly.
On the other hand, We have enforced. Enforced forces the user to use an authentication app. We will follow the same path as before. Create the object, and set the properties. Then set the object to the user with the set-msoluser command. Notice the sar.state property.
Before we created an object, this time we only need a command. We are using the Reset-Msolstrongauthenticationmethodbyupn. Don't even try saying the command without spaces. This is a beast of a command, but it works. What it does is it resets the methods that the user uses to login in. If the user selected an authentication app, this will allow the user to set another one up. Great command if a user lost their phone.
Finally, we have "disable". Unlike before methods we will be setting the strong authentication requirements to NOTHING! ABSOLUTELY NOTHING! (UHF reference).
Finally, the Info Flag piece. Here we are going to be gathering information about the user. It's at the end of the command because we want the information after we set the user's MFA. The first step we take is to grab user information. We do this with the Get-Msoluser command. "But couldn't we use the previous $user grab?" The answer is no because we want the most up-to-date. We want to reflect on the changes we have made beforehand.
#Grabs the user information
$User = Get-MsolUser -UserPrincipalName $UPN -ErrorAction Stop
Confirm Strong Authentication Requirements
Afterward, we want to test this data. The first test is, does the user have strong authentication requirements. "Strongauthenticationrequirements" property is our target. Since the property has data, we place that data into the "MFAState" parameter. However, if it doesn't, we put "Disabled" into this variable.
#If it has a strong authentication requirement we grab the state, if the state is blank, then we return disabled
if ($User.StrongAuthenticationRequirements) {
$MFAState = $User.StrongAuthenticationRequirements.State
} else {
$MFAState = 'Disabled'
}
Find the Default
Next, we want to grab the default method type. We do this with a where-object that searches for "isdefault". Then we expand the method types.
This will produce a string if there is a default. However, it will produce null if there is not. So we test to see if the $MethodType has data. Once we do that we start another switch. I like switches. Inside this switch we are comparing the unique names to real names. This makes life easier and allows non-admin answers they can understand. Here is a list of names and their translations.
OneWaySMS = SMS
TwoWayVoiceMobile = Phone call
PhoneAppOTP = TOTP
PhoneAppNotification = Authenticator App
However, it's none of these, we just say, disabled.
#if the methods are not blank, we find out which one is the right method. and make since of the code. If it is blank, we say disabled.
if ($MethodType) {
switch ($MethodType) {
'OneWaySMS' { $DefaultMethodType = 'SMS' }
'TwoWayVoiceMobile' { $DefaultMethodType = 'Call' }
'PhoneAppOTP' { $DefaultMethodType = 'TOTP' }
'PhoneAppNotification' { $DefaultMethodType = 'Authenticator App' }
}
} else {
$DefaultMethodType = 'Disabled'
}
PS Custom Object
Finally, the PS custom object. This is where we return the information the user wants. The PowerShell custom object will contain the following information, the username, display name, the mfa state, and the default method type.
The last thing we do is we null out the methodtypes. Sometimes PowerShell 5 will carry over these items in a loop.
#Nulls out the method type variable because we are in a loop.
$MethodType = $null
Conclusion
When you Set Users' MFA, you make people mad. However, life gets way more secure. This function is inside my tool belt and it helps me out almost every day. I can push hundreds of users through it quickly. I will leave you with the script itself.
The Script
Function Set-SHDUserMFA {
<#
.SYNOPSIS
Sets the MFA status of a user.
.DESCRIPTION
The script can grab the Status information of MFA of a user. It can set the users mfa to enabled, enforced, disabled, and even reset the mfa of a user.
.PARAMETER UserPrincipalName
A list of strings, the user principal names of the users you wish to preform the actions against.
.PARAMETER SetStatus
The action you wish to preform
Enabled: Enables MFA
Disable: Disables MFA
Reset: Resets MFA
Enforced: Enforces MFA
.PARAMETER Info
Grabs UPN, Displayname, The MFA state, and Default Method Type
.NOTES
Name: Set-SHDUserMFA
Author: therandomadmin
Version: 1.0
DateCreated: 8/3/2022
.LINK
#>
[CmdletBinding()]
param(
[Parameter(Mandatory = $true, ParameterSetName = 'UPN', Position = 0,ValueFromPipeline = $true,valueFromPipelineByPropertyName = $true,)][string[]]$UserPrincipalName,
[Parameter(Mandatory = $false)][validateset("Enabled", "Disable", "Enforced", "Reset")][string]$Status,
[Parameter()][Switch]$Info
)
BEGIN {
#Checks PS version
if ($PSVersionTable.psversion.major -ne 5) {
Write-Error "Your Powershell Version is $($PSVersionTable.psversion.major). Msonline service only works on Powershell 5. Ending."
end
}
#Checks to see if the module is installed if not, tells the end user to install.
if (Get-InstalledModule -name MSOnline -ErrorAction SilentlyContinue) {
#Checks to see if the msolservice if it isn't connected, we connect
if (-not (Get-MsolDomain -ErrorAction SilentlyContinue)) {
Connect-MsolService
}
}
else {
Write-Error "MSOnline Services are not installed. Please install the MSOnline services with the following command `n Install-module MSOnline `n"
}
}
PROCESS {
#Starts the UPN loop
foreach ($UPN in $UserPrincipalName) {
#Checks if the user exists, if not, ends the upn and writes an error.
try {
$User = Get-MsolUser -UserPrincipalName $UPN -ErrorAction Stop
}
catch {
Write-Error $_.Exception.Message
}
#Checks status
switch ($Status) {
#If enabled then we enable mfa
'Enabled' {
$sar = New-Object -TypeName Microsoft.Online.Administration.StrongAuthenticationRequirement
$sar.RelyingParty = "*"
$sar.State = "Enabled"
Set-MsolUser -UserPrincipalName $UPN -StrongAuthenticationRequirements $sar
}
#if enforced, we enforce mfa
'Enforced' {
$sar = New-Object -TypeName Microsoft.Online.Administration.StrongAuthenticationRequirement
$sar.RelyingParty = "*"
$sar.State = "Enforced"
Set-MsolUser -UserPrincipalName $UPN -StrongAuthenticationRequirements $sar
}
#if reset, resets mfa
'Reset' { Reset-MsolStrongAuthenticationMethodByUpn -UserPrincipalName $UPN }
#if disable, it removes mfa requirements
'Disable' { Set-MsolUser -UserPrincipalName $UPN -StrongAuthenticationRequirements @() }
}
#if you flip the flag for info we grab the info.
if ($Info) {
#Grabs the user information
$User = Get-MsolUser -UserPrincipalName $UPN -ErrorAction Stop
#If it has a strong authentication requirement we grab the state, if the state is blank, then we return disabled
if ($User.StrongAuthenticationRequirements) {
    $MFAState = $User.StrongAuthenticationRequirements.State
} else {
    $MFAState = 'Disabled'
}
#grabs the Strong authentication methods
$MethodType = $User.StrongAuthenticationMethods | Where-Object { $_.IsDefault -eq $true } | select-object -ExpandProperty MethodType
#if the methods are not blank, we find out which one is the right method. and make since of the code. If it is blank, we say disabled.
if ($MethodType) {
    switch ($MethodType) {
        'OneWaySMS' { $DefaultMethodType = 'SMS' }
        'TwoWayVoiceMobile' { $DefaultMethodType = 'Call' }
        'PhoneAppOTP' { $DefaultMethodType = 'TOTP' }
        'PhoneAppNotification' { $DefaultMethodType = 'Authenticator App' }
    }
} else {
    $DefaultMethodType = 'Disabled'
}
#creates a ps object and displays all the information collected
[PSCustomObject]@{
    UserPrincipalName = $User.UserPrincipalName
    DisplayName       = $User.DisplayName
    MFAState          = $MFAState
    DefaultMethodType = $DefaultMethodType
}
#Nulls out the method type variable because we are in a loop.
$MethodType = $null
}
}
}
END {}
}
Perch is an event log tracker that can catch a lot of useful information. I like perch because it captures failed login information. It's easy to sort and exportable. This is why many companies use the software. There are some gatchya's with perch installs though. If you are installing it on a server, some services don't auto start. Installing it from PowerShell also has a gatchya. This post is about how to install perch via PowerShell scripts. This method uses your token for the client's site. Let's Install Perch with PowerShell.
Let's break down the script. The first thing we do is create the download repo. I personally like to use the C:\Temp. Not all machines have a c:\. This is why I use the variable $Env:SystemDrive. If the OS drive is d, the code will add a D:\Temp. and so on and so forth.
The next line is the URL for the latest and greatest Perch installer. This keeps your download up to date. With that stated, this also means if they change something you will need to be able to catch that change. So you will need to stay up to date with their deployment. A good way to do that is by registering with their updates emails. I like to have a ticket every 3 to 6 months, randomly placed, to review deployments like this one. This is just a good habit.
Now we have the url, we want to create a path. Using the Env:SystemDrive we place the perch-log-shipper-latest.exe into the temp folder, our local repo. This will make the next command easier.
Now we invoke-webrequest this bad boy. Just like curl and wget, we are able to download the file. Using the PerchURL in the URI position and then the outfile will be the perchfullfilename. Of course, we use the basic parsing just in case it's an older version of PowerShell. At the time of this writing, the default PowerShell is 5.1 on windows 10.
Now we start the installation. We start-process. Using the PerchFullFileName as the target. See, using parameters helps. Our argument list is /qn for quiet. The output is going to be the token. Finally our token value, value is our token from perch's site.
Getting the token
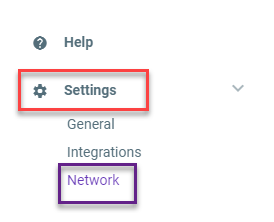
To get the token, you will need to log into your perch system. At the top, select the company you wish to get the token from.
Next, you will need to click on the settings icon on the bottom left-hand corner. Then click the Network icon.
Normally we want to add a -wait flag to the end of the installer. Things like google chrome do great with the -wait flag. However, in this case, we don't want to do that. The reason we create advanced checks is due to the multiple sub-processes inside of the perch install process. The wait flag only captures the first process.
Confirming Install Perch with Powershell
With all that, it's time to confirm the installation. The most simple way to do this is by watching the services. Perch installs 2 services. It installs perch-auditbeat and perch-winlogbeat. During the confirmation process, we wait. If a timeout occurs, we get the error. If the application installs, we get the results. At this point, we want to start our time-out timer. That's why we have a $timeout = 0. We then start a do until. Each time the system loops, we wait for 5 seconds. Then we add 5 to the timer. This effectively creates a timer for us. This process is repeated until the conditions are met. The services with the name perch* are greater than or equal to 2, or the time-out reaches 500.
If the services are installed or if the timeout is reached, we moved to the next step. By default, the auditbeat is set to manual. So we check to see if we have the two services. If we do, we then set the perch-auditbeat to automatic and start the service. If not, we throw an error saying the services did not install. This will alert the deployment engineer to dig deeper into this machine. From my experience, it's because another application is installed.
From time to time, you will be asked to create a web report with data that can only be easily obtained by PowerShell. There are hundreds of modules out there that can do this, which is very nice. This blog isn't about those modules, but instead some tricks I have learned over the years. When it comes to custom HTML reports, these are very customized from data sources like Azure, Active Directory, even SLQlite services. If all possible I like to use the Universal dashboard. But the UD doesn't translate to emails or IIS pages very well. Let's get started with the here string.
Here-String
$HereString =@"
Information
"@
A here-string is used to create a block of text. In the example above you see the variable HereString is equal to @""@. This is very important. The @ symbol indicates the start and stops of a here-string. You can place variables inside the here-string as well. This means you can build variables outside of the here-string and plump them into the string. Here is an example of our base for the website.
From this template, we can add CSS coding, powershell tables, lists and much more. The next important item we need to talk about is the convertto-html commandlet.
Convertto-html
This command is the heart of creating tables out of PowerShell information. For example, you want to pull all enabled users from the employees OU and display their displaynames, samaccountnames, department, and title in order. That's a simple get-aduser command.
Now we need to convert this array of data into a useable table. This is where convertto-html comes into place. We can tell the command to create a full website just for the tabled information or we can tell it to produce a single table using the as flag and the fragment flag.
Now we have a user table that we can drop into our Here-string from above. The Here-string is the last thing you will create during this custom process.
This is pretty much the basics of how you would create a site of all users and their user names. You export that site using the >> command. So it would look like this:
$HTML >> <Pathtohtml>.html
Going Deeper - Employee Directory With Images
Let's go a little deeper by making an employee Directory with pictures. In this scenario, we will assume that the active directory has thumbnail photos inside of it. This Scenario is going to be based on an IIS server and everything is set up for a basic HTML page. I will as
Requirements:
If a property is not present in the AD account, null or blank, do not display that property.
All users must have a photo or a placeholder.
The table must be in alphbetical order by the displayname.
Required Properities:
Photo
Display Name
Username
Job Title
Department
Mobile Phone
Office Phone
Fax
Manager
The first thing we need to do is grab the data that we need from the active directory. We do that with the get-aduser command.
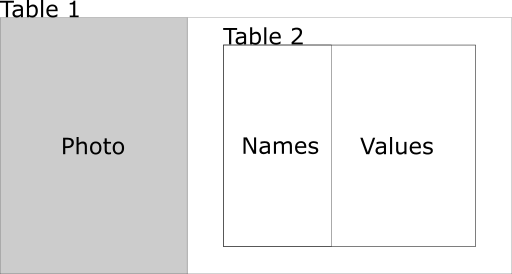
There will be two tables that we will be working with. The first table will be two columns and however many rows we will need. The first column will contain the 128x128 active directory thumbnail photo. The second column will contain the Users information. The second column will contain a table with two columns and 8 rows. The first column will be the name of the value and the second column will be the value itself.
I can do this in two ways. I can start the first table inside the here-string or I can create the table before the here-string. I'm going to create the table before the here-string. This way I have a clear image in my head of the table that I am inputting into the here-string. Notice the UserTable is a here-string as well. So we will refer to the Main HTML here-string as the HTML string from here on out.
Now we have a basic HTML table built. From here on out, we will be creating the rows for this table. Inside each row will be the two columns. The photo column and the data column. The data column will contain the table with the employee data on it. It's time to start looping through that user's object we created a while ago. We start off with a simple foreach loop. Inside the loop the logic will go as follows:
Grab the photo from the thumbnail property and save it to the image repo using the username.
Start the new row. Inside the first column of the new row, we check to see if that photo exists. If it does, then we we create an img tag of the file, if it doesn't then we target the general image file.
The second column we blank out the values for each item.
Then we create the table.
Then we create if statements that creates each row in table 2. if the users object has the property in question for that user, we set the value and create the <tr> accordingly.
Finally we close off the second table and the row.
Then after all of the rows on table 1 is created, we close off the table.
Phew. This is going to be crazy.
The first part is to download the photo in question. If the user's profile has a thumbnail photo we will download it from AD using the set-content command. (PS5)
The next step is to determine if the file exists. If it does, we want to create the Image URL towards the new user's image. If not, we want it to go to the placeholder image. All of this is still within the Loop in question.
Now we need to test these variables and fill them up with HTML code. Each one of these will be a row on the table2. The code below is the same for each of these. All you need to do is replace the <value> with the value in question. The one on the left is what you will replace. The one on the right is an example.
Once you create a value for each of these items, it's time to put it together into the User's table. AKA table2. We start off by using the $usertable from above combined with a here-string. Remember we are now entering the first table again and creating each row. Here is what the code will look like.
We are building this string. This is what you see the $usertable = $usertable + Here-String. All of this is the single row for the table in question. We loop through all of the users using this method and close out the Loop. Once the loop is closed out what we need to do next is close out the table. We do this by adding a final </table> to the end of the table in question.
$UserTable = $UserTable + "</table>"
The final part is placing this table inside an HTML website. It's as simple as slipping $UserTable between the two bodies.
Now we have an HTML site. We can further edit this and create a nice CSS code with some java-scripts, but I'm not going to get fancy here. The final thing we have to do is export this html page.
$HTML > <pathtosite>\index.html
This process is basically building inside out. We started by the image and then the data. We built accordingly. Now the script itself.
Recently the send-mailmessage was put to rest with good reason. It failed to do its job by securing the emails. It sent items via plain text and not SSL encrypted. Great for internal nothing fancy, but bad if you wanted to send data outside the world. So, I built an alternative that I use the mail message system inside windows. Let's Send Mail With Powershell.
The Script
function Send-SHDMailMessage {
    <#
    .SYNOPSIS
        Sends an email using custom SMTP settings.
    .DESCRIPTION
        Sends an email using custom SMTP settings.
    .PARAMETER From
        As string. Name of the Email address from which it will come from.
        Example: "David Bolding <admin@example.com>"
    .PARAMETER To
        As string. The email address too.
        Example: "Admin@example.com"
    .PARAMETER SMTPUsername
        As string. The Username for the SMTP service you will be using.
    .PARAMETER SMTPPassword
        As string. The Password in plain text for the smtp service you will be using.
    .PARAMETER SMTPServer
        As string. The server name of the SMTP service you will be using.
    .PARAMETER SMTPPort
        As string. The Server Port for the smtp serivce you will be using.
    .PARAMETER Subject
        As string. The subject line of the email.
    .PARAMETER Body
        As string. The body of the email as a string. Body takes default over BodyAsHtml
    .PARAMETER BodyAsHTML
        As string. The body of the email in html format.
    .PARAMETER PlainText
        Sends the email in plain text and not ssl.
    .PARAMETER Attachment
        As array of strings. A list of full file names for attachments. Example: "c:\temp\log.log"
    .PARAMETER CC
        Email address for a carbon copy to this email.
    .PARAMETER BCC
        Email address for a blind carbon copy of this email.
    .PARAMETER Priority
        A validate set for High, Normal, Low. By default it will send emails out with Normal.
    .EXAMPLE
        $Message = @{
            from = "HR <HumanResources@Example.com>"
            To = "Somebody@Example.com"
            SMTPUsername = "SMTP2GoUsername"
            SMTPPassword = "SMTP2GoPassword"
            SMTPServer = "mail.smtp2go.com"
            SMTPPort = "2525"
            Subject = "Test"
            Attachment = "C:\temp\JobOffer1.pdf","C:\temp\JobOffer2.pdf"
            BodyAsHtml = @"
            <html>
            <body>
                <center><h1>Congradulation</h1></center>
                <hr>
                <p>Attached is the job offers we discussed on the phone.</p>
                <br>
                Thank you,<br><br>
                Human Resources
            </body>
            </html>
        "@
        }
        Send-SHDMail @Message

        Sends an email using the required information with two attachments.
    .EXAMPLE
        $Message = @{
            from = "HR <HumanResources@Example.com>"
            To = "Somebody@Example.com"
            SMTPUsername = "SMTP2GoUsername"
            SMTPPassword = "SMTP2GoPassword"
            SMTPServer = "mail.smtp2go.com"
            SMTPPort = "2525"
            Subject = "Test"
            BodyAsHtml = @"
            <html>
            <body>
                <center><h1>Sorry, Not Sorry</h1></center>
                <hr>
                <p>Sorry you didn't get the job. Maybe next time show up with clothing on.</p>
                <br>
                Thank you,<br><br>
                Human Resources
            </body>
            </html>
        "@
        }
        Send-SHDMail @Message

        This will send out an email without any attachments.
    .EXAMPLE
        $Message = @{
            from = "HR <HumanResources@Example.com>"
            To = "Somebody@Example.com"
            SMTPUsername = "SMTP2GoUsername"
            SMTPPassword = "SMTP2GoPassword"
            SMTPServer = "mail.smtp2go.com"
            SMTPPort = "2525"
            Subject = "Test"
            Body = "Your Hired"
        }
        Send-SHDMail @Message

        Sends out a message using just a simple text in the body.
    .EXAMPLE
        $Message = @{
            from = "HR <HumanResources@Example.com>"
            To = "Somebody@Example.com"
            SMTPUsername = "SMTP2GoUsername"
            SMTPPassword = "SMTP2GoPassword"
            SMTPServer = "mail.smtp2go.com"
            SMTPPort = "2525"
            Subject = "Test"
            Attachment = "C:\temp\JobOffer1.pdf","C:\temp\JobOffer2.pdf"
        }
        Send-SHDMail @Message

        This will send out an email that is blank with attached items.
    .EXAMPLE
        $Message = @{
            from = "Notify <Notify@Example.com>"
            To = "Somebody@Example.com"
            SMTPUsername = "SMTP2GoUsername"
            SMTPPassword = "SMTP2GoPassword"
            SMTPServer = "mail.smtp2go.com"
            SMTPPort = "2525"
            Subject = "$SomethingWrong"
            PlainText = $true
        }
        Send-SHDMail @Message

        This will send out an unsecured email in plain text.
    .EXAMPLE
        $Message = @{
            from = "Notifiy <Notify@example.com>"
            To = "IT@example.com"
            SMTPUsername = "SMTPUser"
            SMTPPassword = "SMTPPassword"
            SMTPServer = "mail.example.com"
            SMTPPort = "2525"
            Subject = "Server Down"
            CC = "ITManagers@Example.com"
            BCC = "CFO@Example.com"
            PlainText = $True
            Priority = "High"
            BodyAsHTML = @"
            <html>
                <body>
                    <center><h1>SERVER DOWN!</h1></center>
                </body>
            </html>
        "@
        }
        Send-SHDMailMessage @Message
    .OUTPUTS
        no Output.
    .NOTES
        Author: David Bolding
        Date: 09/8/2021
    .LINK
    #>
    [cmdletbinding()]
    param (
        [parameter(Mandatory = $true)][String]$From,
        [parameter(Mandatory = $true)][String]$To,
        [parameter(Mandatory = $true)][String]$SMTPUsername,
        [parameter(Mandatory = $true)][String]$SMTPPassword,
        [parameter(Mandatory = $true)][String]$SMTPServer,
        [parameter(Mandatory = $true)][String]$SMTPPort,
        [parameter(Mandatory = $true)][String]$Subject,
        [Switch]$PlainText,
        [string]$Body,
        [String]$BodyAsHTML,
        [String[]]$Attachment,
        [string]$CC,
        [string]$BCC,
        [Validateset("High","Low","Normal")][String]$Priority
    )
    # Server Info
    $SmtpServer = $SmtpServer
    $SmtpPort = $SmtpPort

    # Creates the message object
    $Message = New-Object System.Net.Mail.MailMessage $From, $To

    If ($PSBoundParameters.ContainsKey("CC")) {
        $Message.CC.Add($CC)
    }
    If ($PSBoundParameters.ContainsKey("BCC")) {
        $Message.Bcc.Add($BCC)
    }
    If ($PSBoundParameters.ContainsKey("Priority")) {
        $Message.Priority = $Priority
    } else {
        $Message.Priority = "Normal"
    }
    # Builds the message parts

    $Message.Subject = $Subject

    if ($PSBoundParameters.ContainsKey("Body")) {
        $Message.IsBodyHTML = $false
        $Message.Body = $Body
    }
    elseif ($PSBoundParameters.ContainsKey("BodyAsHTML")) {
        $Message.IsBodyHTML = $true
        $Message.Body = $BodyAsHTML
    }
    else {
        $Message.IsBodyHTML = $false
        $Message.Body = ""
    }

    if ($PSBoundParameters.ContainsKey('Attachment')) {
        foreach ($attach in $Attachment) {
            $message.Attachments.Add("$Attach")
        }
    }

    # Construct the SMTP client object, credentials, and send
    $Smtp = New-Object Net.Mail.SmtpClient($SmtpServer, $SmtpPort)
    if ($PlainText) {
        $Smtp.EnableSsl = $true
    }
    else {
        $Smtp.EnableSsl = $true
    }
    $Smtp.Credentials = New-Object System.Net.NetworkCredential($SMTPUsername, $SMTPPassword)
    $Smtp.Send($Message)

    #Closes the message object and the smtp object.
    $message.Dispose()
    $Smtp.Dispose()
}
Examples
        $Message = @{
            from = "HR <HumanResources@Example.com>"
            To = "Somebody@Example.com"
            SMTPUsername = "SMTP2GoUsername"
            SMTPPassword = "SMTP2GoPassword"
            SMTPServer = "mail.smtp2go.com"
            SMTPPort = "2525"
            Subject = "Job Offers"
            Attachment = "C:\temp\JobOffer1.pdf","C:\temp\JobOffer2.pdf"
            BodyAsHtml = @"
            <html>
            <body>
                <center><h1>Congradulation</h1></center>
                <hr>
                <p>Attached is the job offers we discussed on the phone.</p>
                <br>
                Thank you,<br><br>
                Human Resources
            </body>
            </html>
        "@
        }
        Send-SHDMail @Message
In this example, I am using the SMTP2go service to send a job offer letter to a new employee. It contains the attachment flag with two offers. Each attachment is separated with a comma as this is a list of strings. The Body is an HTML using the BodyAsHTML flag. The BodyAsHTML has some custom formatting to make it look somewhat nice.
$Message = @{
    from = "HR <HumanResources@Example.com>"
    To = "Somebody@Example.com"
    SMTPUsername = "SMTP2GoUsername"
    SMTPPassword = "SMTP2GoPassword"
    SMTPServer = "mail.smtp2go.com"
    SMTPPort = "2525"
    Subject = "Thank you"
    BodyAsHtml = @"
            <html>
            <body>
                <center><h1>Sorry, Not Sorry</h1></center>
                <hr>
                <p>Sorry you didn't get the job. Maybe next time show up with clothing on.</p>
                <br>
                Thank you,<br><br>
                Human Resources
            </body>
            </html>
        "@
}
Send-SHDMail @Message
In this example, we are once again using the SMTP2Go to send a rejection letter. No attachments are present on this email. The bodyashtml string is set with a nice custom HTML page.
$Message = @{
    from = "Notify <Notify@Example.com>"
    To = "Somebody@Example.com"
    SMTPUsername = "SMTP2GoUsername"
    SMTPPassword = "SMTP2GoPassword"
    SMTPServer = "mail.smtp2go.com"
    SMTPPort = "2525"
    Subject = "Server Down"
    Body = "XYZ Server Is Down"
}
Send-SHDMail @Message
In this example, we are sending out a notification email using a different user than before. We are using the same smtp2go, but you can use any server with the username and password you like. The body is a basic string with no HTML formating.
In this example, we are sending a notification email without a body. We are using a custom variable for the subject line. We are also sending this without the SSL encryption as some legacy systems don't understand SSL encryption.
In this example, we are Sending a Carbon copy to the IT manager and a blind carbon copy of the email to the CFO with a high priority.
Notes
The Body and BodyAsHTML can conflict with each other. If you do both the Body and BodyAsHTML, by default, the body will be selected. If you do not put in a body or bodyashtml, it will send the email with a body of "".
This script requires you to have an SMTP service like SMTP2Go.
Conclusion
That my friends is how you Send Mail With Powershell.
My last weekly challenge to myself was to deploy google chrome with Powershell. This one was the hardest because it was hard to find the latest and greatest MSI 64 bit of google chrome. The coding wasn't too hard after that. How google chrome works, follows suit the same way as firefox did.
We first start off getting the latest enterprise edition of google chrome. This is the 64-bit version thus the most stable version on them all. This is the version I would install everywhere in a company if I had a choice.
That's it. Very simple very straightforward. If you need to uninstall before installing (My testing was a success with overlapping the installers) then you can do the following before Installing google chrome:
Need to deploy the latest version of firefox to 1000 machines, Here is a little powerhouse script that can do just that. It's similar to my last script (Gimp) as it downloads directly from the web. This time we don't have to parse out a website since Modzilla has it laid out before us.
The source is awesome. We are downloading directly from the site with their latest 64-bit product. This time we are going with the temporary file and then downloading the file with invoke-webrequest. Then we start the process of installing it with the /s flag which means silent. Since we are coming from the temp folder I threw in the runas flag to run it as the system. This way it installs for all users. Next, we set the wait flag to install the system. From everything I have read, we don't need to uninstall the previous version to install the newest version. We do however have to stop the process that's why we have a get process and stop process above. Finally, we remove the installer. That's it. A lot simpler than Gimp.
We use cookies to ensure that we give you the best experience on our website. If you continue to use this site we will assume that you are happy with it.