

Perch is an event log tracker that can catch a lot of useful information. I like perch because it captures failed login information. It’s easy to sort and exportable. This is why many companies use the software. There are some gatchya’s with perch installs though. If you are installing it on a server, some services don’t auto start. Installing it from PowerShell also has a gatchya. This post is about how to install perch via PowerShell scripts. This method uses your token for the client’s site. Let’s Install Perch with PowerShell.
The Script
if (!(Test-Path "$($env:SystemDrive)\Temp")) { New-Item -Path "$env:SystemDrive\" -Name Temp -ItemType Directory }
$PerchURL = "https://cdn.perchsecurity.com/downloads/perch-log-shipper-latest.exe"
$PerchFullFileName = "$($env:SystemDrive)\Temp\perch-log-shipper-latest.exe"
Invoke-WebRequest -Uri $PerchURL -Outfile $PerchFullFileName -UseBasicParsing
start-process -FilePath "$PerchFullFileName" -ArgumentList @("/qn", 'OUTPUT="TOKEN"', 'VALUE="Your Token"')
$Timeout = 0
do {
    $Timeout = $Timeout + 5
    start-sleep -Seconds 5
} Until (((Get-service -Name "Perch*" -ErrorAction SilentlyContinue).count -ge 2) -or ($Timeout -ge 500))

if ((Get-service -Name "Perch*" -ErrorAction SilentlyContinue).count -ge 2) {
    Get-Service -name perch-auditbeat | Set-Service -StartupType Automatic
    Get-Service -name perch-auditbeat | Start-Service
} else {
    Write-Error "Services did not install."
}
The Breakdown
Let’s break down the script. The first thing we do is create the download repo. I personally like to use the C:\Temp. Not all machines have a c:\. This is why I use the variable $Env:SystemDrive. If the OS drive is d, the code will add a D:\Temp. and so on and so forth.
The next line is the URL for the latest and greatest Perch installer. This keeps your download up to date. With that stated, this also means if they change something you will need to be able to catch that change. So you will need to stay up to date with their deployment. A good way to do that is by registering with their updates emails. I like to have a ticket every 3 to 6 months, randomly placed, to review deployments like this one. This is just a good habit.
Now we have the url, we want to create a path. Using the Env:SystemDrive we place the perch-log-shipper-latest.exe into the temp folder, our local repo. This will make the next command easier.
Now we invoke-webrequest this bad boy. Just like curl and wget, we are able to download the file. Using the PerchURL in the URI position and then the outfile will be the perchfullfilename. Of course, we use the basic parsing just in case it’s an older version of PowerShell. At the time of this writing, the default PowerShell is 5.1 on windows 10.
Now we start the installation. We start-process. Using the PerchFullFileName as the target. See, using parameters helps. Our argument list is /qn for quiet. The output is going to be the token. Finally our token value, value is our token from perch’s site.
Getting the token
To get the token, you will need to log into your perch system. At the top, select the company you wish to get the token from.

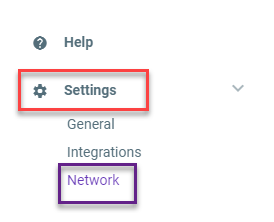
Next, you will need to click on the settings icon on the bottom left-hand corner. Then click the Network icon.

Normally we want to add a -wait flag to the end of the installer. Things like google chrome do great with the -wait flag. However, in this case, we don’t want to do that. The reason we create advanced checks is due to the multiple sub-processes inside of the perch install process. The wait flag only captures the first process.
Confirming Install Perch with Powershell
With all that, it’s time to confirm the installation. The most simple way to do this is by watching the services. Perch installs 2 services. It installs perch-auditbeat and perch-winlogbeat. During the confirmation process, we wait. If a timeout occurs, we get the error. If the application installs, we get the results. At this point, we want to start our time-out timer. That’s why we have a $timeout = 0. We then start a do until. Each time the system loops, we wait for 5 seconds. Then we add 5 to the timer. This effectively creates a timer for us. This process is repeated until the conditions are met. The services with the name perch* are greater than or equal to 2, or the time-out reaches 500.
If the services are installed or if the timeout is reached, we moved to the next step. By default, the auditbeat is set to manual. So we check to see if we have the two services. If we do, we then set the perch-auditbeat to automatic and start the service. If not, we throw an error saying the services did not install. This will alert the deployment engineer to dig deeper into this machine. From my experience, it’s because another application is installed.
Don’t forget to take a look at how you can install perch using intune.