The other day, I was showing a friend how to set up Intune deployments. Then it hit me: I have unique scripts for script detections and things like that here on therandomadmin.com. However, I haven't really gone through the detection rules for built-in items. I was like, well now I have to fix that. So here we are going to fix that with the Intune Detection Rules. Let's get started.
Types of Intune Detection Rules
There are three built-in detection types that we will go over today. They are the MSI, File, and Registry.
MSI is like the easy button, (no not the staples one from the commercials... did I just age myself?)
File is my least favorite one, but it works for legacy apps
Registry is my favorite one and it's the one that I will spend some time on for you all.
Other than the built-in items, there are scripted items which is unique in it's own rights. You can take a look at how these scripts work here. Andrew has a good tutorial on his blog as well. Today will be all about the built-in items.
The Built-In MSI Rule
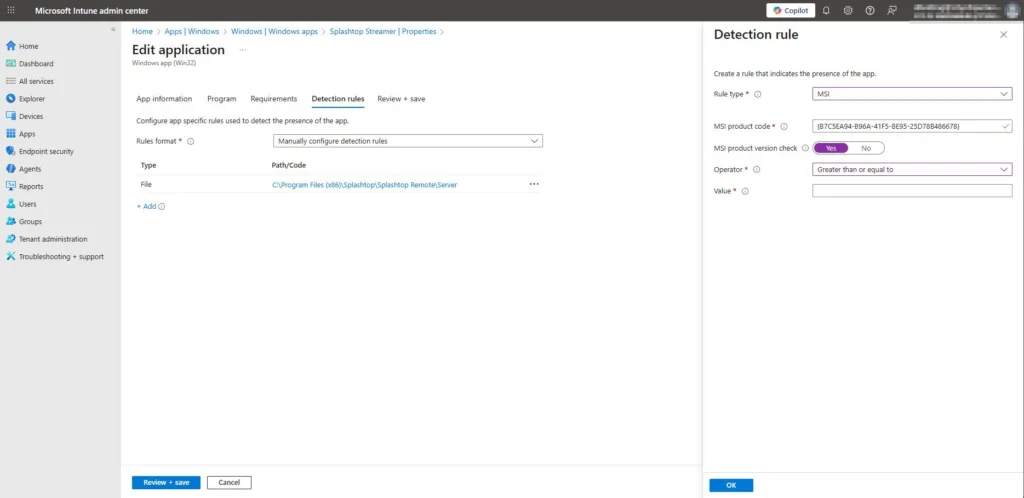
The MSI rule is the easy button of the detection scripts. If you are using an MSI, it will pull the information directly from the MSI. Once you get to the detection rule part you can follow these steps:
Click Add
Select MSI
And click save
Magic, right? The other thing you can do is select "MSI Product Version Check." Here you can select an operator like "greater than or equal to" and then give it the value. Which is the product version. This helps with auto-updated items. Which I always suggest using. Below is a screenshot.
File Detection Rule
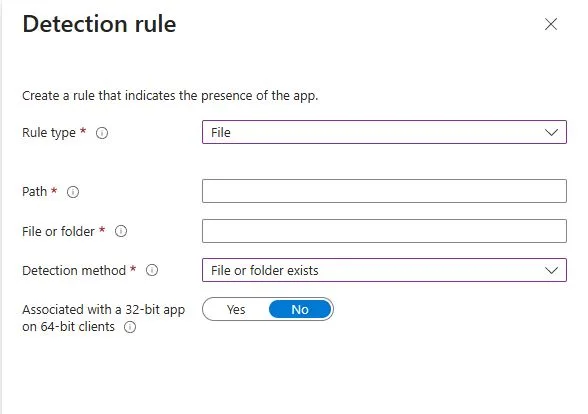
Our next built-in detection rule is for files. This is good if you have an app that doesn't install like normal apps. Older apps or more niche apps are like this. For example. We installed a special Creo app. It installed in the C:\PTC location, and it didn't add itself to the registry uninstall strings. It didn't come in an MSI; it was an EXE with custom everything. This app was a pain in the backstracher. So we used the File location rule. Here is how you can set it up.
Inside your detection rule, click Add.
Rule type: File
Path: The folder that you want to check. In this case it was C:\PTC
File or Folder: Here we wanted to see if the creo.exe existed. So, that's what I put here.
Detection Method: We used file or folder existed.
Greater than or equal to string
As you will learn, I am all about the version numbers. If you select the string (version), you will need to get that version number from the file you are pulling from. You can do this with PowerShell pretty quickly.
Once you have this information, you will then proceed to input it into the value section once you select the string (version) and greater than or equal to options.
Built-In Intune Detection Rule for Registry
The registry key is the most common and the most useful as well. Most apps install themselves in this method. The script below is going to be your best friend. What it does is give you the information you need. Lets break down what each item is so we can look at the script and make this happen. I'm giving this the most focus because it's the most common.
Registry Type: The type we are using.
Key Path: The path of the uninstall string that we will be using
Value Name: What we are looking for, this case we will be looking for displayversion
Detection Method: Version Comparison
Operator: Greater than or equal to
Value: What value we are looking for
Assocated: Is it a 32 or 64.
Script
So you will have to go digging into the registry for this information. However, this registry area is just confussing and really hard to manually dig through. So powershell is once again, our friend.
All you have to do is replace the app name. It will provide you with everything you need inside the built-in detection rule. This is the output that it provides:
RuleType         : Registry
KeyPath          : HKEY_LOCAL_MACHINE\Software\Microsoft\Windows\CurrentVersion\Uninstall\{6EB73F60-E858-3AF3-913A-0C1783656B42}
ValueName        : DisplayVersion
DetectionMethod  : Version comparison
Operator         : Greater than or equal to
Value            : 143.0.7499.170
AssociatedWith32 : False
This script really makes finding apps easier. If the app installs in another place, good hunting, my friends.
What we can learn as a person
I am still missing my keys. I have the backup fob for my car, but I have no idea where my normal keys are. So no house key right now. Sometimes, I need to backtrace what I have done to find where I am going. Which is ok. This is why I document so much because I don't have the brain space to remember everything I have done. This is also why this blog post exists. I realized I never once really did explain how to use the built-in tools. Now I have a place to come and get the script I need and anyone else needs. So that will be nice later down the road, and I will thank myself later. Giving myself the little micro successes in the future is what I am going for here. The keys, on the other hand, I didn't set up a space for them to go with the new desk I have. Thus, they are in the ether somewhere, and when I find them, they will go into my little cubby on my new desk. So, set yourself up for micro successes, whether you know it or not, in the future. This will reduce a lot of stress and anxiety in the future. Remember, 80% of life is the systems that you have put into place. So, let's make good systems. Then you can set up your own Intune detection rules for your life to detect when you gave yourself successes. Like, when I see the wallet inside the new cubby. I can give myself a little thanks.
Ever feel like you’re just guessing which Intune policy to use?
You go into Microsoft Intune thinking, “I just want to block copy/paste from Teams to a student’s phone,” and suddenly you're knee-deep in device configs, app restrictions, compliance policies, and something called MAM-WE (which sounds like a failed robot uprising).
If you've ever been stumped by the difference between Intune device vs app policies, you're not alone. And you’re not doing it wrong — the naming is genuinely confusing.
So, let’s break it down the way it actually clicks — using real-world scenarios instead of theory and tech jargon. If you know what you want to do, you'll know what to use. Lets dive into intune devices vs app policies.
The Three Intune Policy Buckets
Device Configuration Policies – You Own It, You Control It
Think of this like setting the house rules — but only for houses you own.
Device configuration policies give you OS-level control. You can push BitLocker, set PIN rules, enforce Delivery Optimization, apply VPN profiles, and more. But they only work if the device is enrolled in Intune — like, actually enrolled. Not “kinda managed.” Full enrollment.
Lets take a look at a real world senerio. Imagine you have 200 windows 11 laptops and want to enable delivery optimization for windows updates. This would be a Device Configuration Profile. Another example would be if you have 1000 windows 11 laptops that you want to encrypt their fixed drive with bit-locker. Once again, this is another device configuration profile.
If the deivce is apersonal and not enrolled, this policy type is off-limits. No Bitlocker, no VPN, nothing. You don't own it, you don't get a say.
App Protection Policies – Protecting the Data, Not the Device
This one is magic for BYOD situations. Think of it like zipping up your company's data in a fireproff pouch, even if it'son someone else's device. App protection polcies don't care who owns the device. They care about your data. These policies apply to managed apps. Things like outlook, teams, onedrive, and lets you do things like bloc copy and paste. Require PINs to open apps, wipe work data and more.
Lets take a look at a few real world senerios. Students are copying teams messagers and pasting them into discord on their phones. You can block this using App Protection Policy. Lets say you have truck drivers with ipads with outlook on them. You can force the user to enter a pin each time they check their email. That's a App Protection Policy.
App Configuration Policies – Pre-setting the Knobs
Here we are putting the settings into place for different apps. We are not locking down the device. So, if you need a pin for the device, you do this with a device configuration policy. If you need chrome to open on a set website, that's the App Configuration Policy. App configuratin policies let you predefine how apps behave. It's not about control, but it's about consistency. You can push bookmarks, force outlook to use only work accounts, set default browsers for teams, and more.
Lets look at a real world. You have 500 Android Zebra scanners, you need to make sure they all open chrome to a local site. This can be done through the App Configuration Policy. One thing we did for was setup auto updates with zebra on our scanners. We did this with a App configuration profile.
The problem with it is the BYOD. App Configuration policies only work with managed apps. This means, if a user installs outlook through the company portal via intune, then you can manage it. However, if you install outlook through the store app, it just doesn't work.
Why it gets confussing
Let's be real, the names don't help. "App Protection" and "App Configuration" sound way to similar. So here's a simple mental hack to seperating devices vs app policies.
Device Configuration = Control the device itself.
App Configuration = Setup how the app works.
App Protection = Lock down the data inside the app.
Lets test this thinking out with a few senerios.
Possible Answers
Device Configuration Policy
App Configuration Policy
App Protection Policy
You want to prevent employees from copying data from teams to another non-company app.
Your factory has 300 kiosk devices. You want to make sure that the devices can't be logged into by non-it users.
Doctors are using outlook on their personal phones. You need to prevent attachments from being saved locally.
Your compamy users Android enterprise, and you want to push bookmarks to chrome.
You want to rotate the local admin password on all of your windows 11 devices using windows LAPS
Force outlook to only use work accounts
Encrypt phones and force a pin lock on bring your own devices.
Here is a nice little chart to help with these.
Do I manage the entire device?
   ↳ Yes ➡ Device Configuration
   ↳ No ➡ Do I want to protect corporate data?
            ↳ Yes ➡ App Protection
            ↳ No ➡ Do I want to change how the app behaves?
                     ↳ Yes ➡ App Configuration
Here are the answers.
App Protection
Device Configuration
App Protection
App Configuration
Device Configuration
App Configuration
None of the above, Yep, I tricked you, maybe. If it wasn't a bring your own device, then you would be correct if you say device configruation profiles. Other than that, it's nothing really.
Final Thoughts – “You Know More Than You Think”
This stuff is confusing, and Microsoft doesn’t always make it easy. But now, you’ve got the mental framework:
Device Config = You own the device
App Protection = You own the data
App Config = You shape the experience
Don’t worry about getting it perfect on the first try. Intune is meant to be layered. Pilot first, then scale.
If you ever get stuck again, just ask: “What exactly am I trying to control here?” The answer will almost always tell you the policy you need.
You’ve got this, lets get those devices vs app policies.
What can we learn as a person
In IT, we have access to a lot. More than most people will ever know.
We can shut down Windows Hello, enforce biometric logins, or require ID badges scanned by a camera just to unlock a screen. As system administrators, we often hold keys to every digital door. I could, right now, grant myself full access to every mailbox in the company — all in the name of “making admin easier.” I could quietly assign myself as an owner on every user’s OneDrive and SharePoint site using policies that no one would even notice.
That level of control? It’s terrifying, if you’re honest about it.
Because with great power doesn’t just come great responsibility. It comes with weight. A psychological and emotional load that most people never talk about.
Knowing that you can access someone’s private data — and choosing not to — becomes a moral and mental burden. It sits on your nervous system like a background process you can’t kill. Over time, that mental load becomes stress. That stress becomes anxiety. That anxiety becomes burnout, or worse — panic attacks that don’t go away.
Let’s go back to those access examples:
If you make yourself owner of every mailbox, and something illegal ends up in one — say, child pornography in OneDrive — you’re now not just an admin. You’re a co-owner of that content. You’re legally implicated. That’s not just a technical decision. That’s jail time.
When you hold that kind of access, your body knows, even if your conscious mind tries to ignore it. It keeps a tally. And that tally eventually tips the scale — panic attacks, heart strain, and real, physical damage.
The Illusion of Total Control
I’ve seen brilliant people collapse under the pressure of trying to control everything — juggling complex networks, hybrid systems, countless endpoints, compliance rules, and impossible expectations.
They thought the job was about mastery. But really, it’s about boundaries.
Technology is growing faster than any one human can keep up with. We’re now expected to specialize and generalize. To know cloud, on-prem, security, devices, data — and also keep every system running 24/7 with no mistakes.
That pressure? It breaks people.
So What Can We Learn?
Here’s what I’ve learned — sometimes the hard way:
Control less. Not because you’re lazy — but because your health matters more than a perfect config.
Set boundaries. Just because you can access something doesn’t mean you should.
Say no to full access. Delegate. Distribute. Limit yourself.
Audit yourself. Regularly review what you have access to, and ask: Do I really need this?
Let go. Systems don’t have to be perfect. People don’t have to be flawless. Neither do you.
You’re not here to own everything. You’re here to protect what matters — and that includes you.
So the next time you feel the urge to control every setting, script every failover, and be the hero of the whole system… Pause. Breathe. And remember: the best admins don’t control everything. They know what not to control — and they sleep better because of it.
Upgrading Windows 11 across multiple machines is one of those tasks that sounds simple—until you realize you need to manually download the ISO, mount it, and run the upgrade for every single computer. If you're managing a fleet of devices, that’s a lot of clicking and waiting. Thankfully, PowerShell can help automate this process, saving IT admins from hours of repetitive work. So today, we will Automate Windows 11 Upgrade with PowerShell.
But before we jump in, there's one crucial step: Microsoft requires you to manually generate the download link for the Windows 11 ISO. That’s right—no direct API calls or magic URLs here. You’ll need to visit the Microsoft website and grab the link yourself. Don’t worry, we’ll walk you through that part.
And hey, if you’re wondering why Microsoft makes you do this manually… well, let's just say it’s like trying to convince a cat to use the expensive bed you bought instead of the random cardboard box it found in the corner. Some things just don’t make sense, but we roll with it anyway.
Alright, let’s dive in! First up: generating that all-important download link.
The Script
Write-Host "Go to: https://www.microsoft.com/en-us/software-download/windows11"
Write-Host "Select Windows 11 (multi-edition ISO for x64 devices)"
Write-Host "Click Download"
Write-Host "Select English (United States)"
Write-Host "Click Confirm"
Write-Host "Right Click '64-bit Download' and click 'Copy link'"

$DownloadURL = Read-Host "Enter the Windows 11 ISO download link (in quotes)"
$ComputerName = Read-Host "Enter the target Computer Name"

# Check if the computer is online
if ($null -ne (Test-Connection -ComputerName $ComputerName -Count 1 -Quiet)) {

    # Start a remote PowerShell session
    Enter-PSSession -ComputerName $ComputerName

    # Ensure C:\temp exists
    if (!(Test-Path C:\temp)) {New-Item -Path C:\ -Name temp -ItemType Directory -Force}

    # Set download path
    $DownloadPath = "C:\temp\win11.iso"

    # Download Windows 11 ISO
    Invoke-WebRequest -Uri $DownloadURL -OutFile $DownloadPath

    # Mount the ISO
    $DiskImage = Mount-DiskImage -ImagePath $DownloadPath -StorageType ISO -NoDriveLetter -PassThru
    $ISOPath = (Get-Volume -DiskImage $DiskImage).UniqueId

    # Create a PSDrive for the mounted ISO
    New-PSDrive -Name ISOFile -PSProvider FileSystem -Root $ISOPath
    Push-Location ISOFile:

    # Find and run Setup.exe with upgrade parameters
    $SetupExe = (Get-ChildItem | Where-Object {$_.Name -like "*Setup.exe*"}).FullName
    $Arguments = "/auto upgrade /DynamicUpdate Disable /quiet /eula accept /noreboot"
    Start-Process -Wait -FilePath $SetupExe -ArgumentList "$Arguments" -PassThru

    # Clean up: Unmount ISO and remove PSDrive
    Pop-Location
    Remove-PSDrive ISOFile
    Dismount-DiskImage -DevicePath $DiskImage.DevicePath

    # Ask for a restart decision
    $YN = Read-Host "Do you want to restart? (Y/N)"
    if ($YN -like "*Y*") {Restart-Computer -Force}
    elseif ($YN -like "*N*") {Write-Host "Ask the user to restart."}
    else {Write-Host "Ok, whatever, ask the user to restart."}

} else {
    Write-Host "The target computer is not reachable. Check the network or hostname and try again."
}
Step 1: Generate the Windows 11 ISO Download Link
Before we can automate the upgrade, we need the direct download link for the Windows 11 ISO. Microsoft doesn’t make this easy—there’s no simple API to fetch it. Instead, you have to manually grab the link from their website.
This step is non-negotiable because Microsoft generates a unique download link each time, which expires after 24 hours. So if you're thinking, "Can't I just reuse an old link?"—nope, Microsoft shut that door. But don’t worry, it’s a quick process:
Scroll down to ‘Download Windows 11 Disk Image (ISO)’
Select Windows 11 (multi-edition ISO for x64 devices) from the dropdown.
Click ‘Download’ and select English (United States) as the language.
Click ‘Confirm’—Microsoft will generate a download button.
Right-click ‘64-bit Download’ and select ‘Copy link’ (This is the direct ISO link).
You’ll need this URL when running the PowerShell script, so paste it somewhere handy.
Now that we have the link, let's move on to running the script!
Step 2: Running the PowerShell Script
Alright, you’ve got your Windows 11 ISO download link. Now it’s time to run the PowerShell script and start the upgrade. But before we do that, let’s talk about remote execution. This is part of the process to Automate Windows 11 Upgrade with PowerShell.
PowerShell remoting (aka WinRM) needs to be enabled on the target machine. If you’ve never set it up before, it’s kind of like getting a cat to sit still for a vet visit—it might resist at first, but once it’s done, life is easier.
Prerequisites for Running the Script
Make sure the following are true before running the script:
Your user account has admin privileges on both the local and remote machine.
WinRM (Windows Remote Management) is enabled on the target machine. Run this command on the remote PC to check:
winrm quickconfig
If WinRM isn’t enabled, you’ll need to set it up first.
PowerShell Execution Policy allows scripts to run. If needed, you can temporarily bypass restrictions with:
Set-ExecutionPolicy Bypass -Scope Process -Force
Running the Script
Once the prerequisites are in place, open PowerShell as Administrator on your local machine and run the script. When prompted:
Paste the Windows 11 ISO download link (from Step 1).
Enter the target computer’s name (the one you want to upgrade).
If all goes well, PowerShell will initiate a remote session, create a C:\temp folder, and start downloading the ISO to the remote machine.
Just like how a cat will eventually use the new bed if you keep putting treats in it, the script will do its job—as long as everything is set up correctly.
Next up: Downloading and Mounting the ISO!
Step 3: Downloading and Mounting the ISO
At this point, the PowerShell script is running, and the target computer is ready. Now comes the fun part—actually downloading and mounting the Windows 11 ISO.
If you’ve ever tried downloading a large file over a shaky network, you know it can be as frustrating as a cat deciding to sprint across the house at 3 AM for no reason. But don’t worry, the script handles it all automatically.
How the Script Handles the Download
Once you enter the download link and the computer name, the script:
Creates a C:\temp folder (if it doesn’t already exist).
Uses Invoke-WebRequest to download the ISO to C:\temp\win11.iso.
At this point, the Windows 11 setup files are accessible.
If you check File Explorer on the target computer, you should see a new virtual drive containing the ISO contents—like when a cat suddenly appears on your keyboard, except this time, it’s actually doing something useful.
Now that we have the ISO mounted, it’s time for the real action: starting the upgrade!
Step 4: Starting the Upgrade Process
Alright, the ISO is mounted, and we’re at the final stretch—actually running the Windows 11 upgrade. If everything has gone smoothly so far, congratulations! You’re officially ahead of the game.
Now, instead of manually clicking through the Windows setup (which is about as exciting as watching a cat stare at a wall for hours), PowerShell will automate the upgrade process using Setup.exe and a few command-line arguments.
Finding and Running Setup.exe
Since we mounted the ISO in the previous step, we now need to:
Find Setup.exe inside the mounted ISO
Run it with automation flags to start the upgrade silently
Here’s what each flag does when running Setup.exe:
/auto upgrade → Tells Windows to start an upgrade instead of a fresh install.
/DynamicUpdate Disable → Skips downloading the latest updates during the install (useful for speeding things up).
/quiet → Runs the installer in the background, so no annoying pop-ups.
/eula accept → Automatically accepts Microsoft’s End User License Agreement (because let’s be real, no one reads it).
/noreboot → Prevents an automatic restart so we can control when it happens.
What Happens Next?
Once this runs, the Windows 11 upgrade process kicks off in the background. There won’t be any flashy UI—just PowerShell doing its thing. You can check progress by looking at Task Manager on the target machine.
At this point, it’s like when a cat finally decides to nap on that expensive bed instead of the cardboard box—you’ve done all the hard work, and now it just has to finish on its own.
But there’s one last decision to make: When do we restart?
How are we feeling about Automate Windows 11 Upgrade with PowerShell so far?
Step 5: Restarting the Machine
At this point, the Windows 11 upgrade is in motion, but the installation won’t complete until the target machine restarts. Now, we could just force a reboot, but let’s be real—no one likes unexpected restarts (especially end users in the middle of something important).
So, instead of pulling the plug immediately, the script politely asks whether to restart now or later. Here’s how that works:
$YN = Read-Host "Do you want to restart"

if ($YN -like "*Y*") {
    Restart-Computer -Force
} elseif ($YN -like "*N*") {
    Write-Host "Ask the user to restart"
} else {
    Write-Host "Ok, whatever, ask the user to restart."
}
Breaking It Down
If the admin enters Y → The system restarts immediately.
If the admin enters N → A message reminds them to tell the user to restart manually.
If they enter anything else → The script shrugs and tells them to figure it out.
This gives IT teams a bit of flexibility, which is crucial in environments where timing matters—like avoiding a forced reboot during an important meeting (unless it’s for that one guy who never restarts his PC… then maybe it’s justified).
What Happens After Restart?
Once the machine reboots, Windows 11 will finish the upgrade process. The whole thing usually takes 30-90 minutes depending on the hardware. During this time, users will see the "Working on updates" screen—so if they call asking why their PC is taking forever, just tell them “It’s optimizing performance” (it sounds fancier than “it’s just installing”).
Final Thoughts
And that’s it! With this script, you can automate Windows 11 upgrades remotely with minimal effort. No more manual downloads, no more sitting through setup screens—just a smooth, scripted process. To Automate Windows 11 Upgrade with PowerShell makes life much easier.
Recap of the key steps:
Generate the ISO link manually from Microsoft’s website (because they make us).
Run the PowerShell script and provide the ISO link + target computer name.
Download and mount the ISO automatically.
Start the Windows 11 upgrade silently using Setup.exe.
Decide when to restart—now or later.
Now, go forth and upgrade with confidence! And if anything goes wrong, well… let’s just say this script is less stubborn than a cat, so it’s probably not the script’s fault.
What can we learn as a person?
Upgrading an operating system is a big change, but it’s the small steps that make it happen. You don’t just magically jump to Windows 11—first, you grab the ISO, then you run the script, then you mount the image, and finally, the upgrade takes place. One step at a time.
Turns out, our mental health works the same way.
A lot of us get caught up in the idea that improving our mood or reducing stress requires some huge effort—taking a long vacation, completely overhauling our routines, or mastering meditation overnight. But that’s just not how it works. Big upgrades don’t happen all at once.
Instead, try small upgrades for yourself, just like how we upgrade Windows in steps:
Clear out junk files → Declutter one small space
Just like a clean drive helps performance, tidying up one small area can help clear your mind.
Run a quick system check → Check in with yourself
Pause for a moment and ask: How am I feeling today? Just acknowledging your emotions can help.
Disable unnecessary background processes → Say "no" to one unnecessary thing
Reduce mental load by cutting out one thing that’s draining you—whether it’s skipping an unimportant meeting or ignoring a toxic group chat.
Reboot when needed → Take a short break
A quick restart helps a computer, and sometimes, five minutes away from your screen can work wonders for you too.
No Need for a Full Reinstall
You don’t need a full personality reboot or a total life upgrade to feel better. Small tweaks, small wins—they add up.
So while you’re waiting for that Windows 11 install to finish, maybe take just one small action for yourself. It doesn’t have to be big. Just enough to upgrade your mood one step at a time.
Last time we talked about how to get our Zebra scanners into Intune. Today we are going to talk about how to set this unit as a kiosk scanner with a web link and a store app. This setup will be in such a way that we control the wireless networks and access to the device all from one configuration policy. The configuration policy is where we will be making our Zebra Kiosk Mode.
Creating a web app
A web app is super easy to build out. Remember, the scanner should be able to access said app.
Navigate to intune.microsoft.com
On the left-hand side, click Apps
Click Android
Click the Add button.
Under Select app type, we will click Web link, which is under Other.
Then Click Select
This is where you can edit properties.
Name: The web link name
Description: I like to put the address of the web link here and what it's for. Some people don't. It's up to you.
Publisher: I put my company's name, unless I know for sure who it is.
App URL: This is where you will put your link. For example. https://therandomadmin.com
Require a managed browser to open this link:
This is special as it will require you to have edge or another managed browser like zebra's managed browser. In our case, this isn't a needed feature and can cause more issues down the road.
Doing a managed browser would force the user into a single tab. This is great for some apps, but others not so much. So, if you want a lockdown on the tabs, this is the way to go, and you will have to make sure you set the system defaults to that browser instead of Chrome.
Category: That's for you to choose
Show this as a featured app in the company portal: Once again, not really needed since these will be kiosk machines.
Information URL: If the site has an information URL, this is where it would go.
Privacy URL: Most websites have a privacy link; this is where you would put that.
Developer: Who built it? Maybe a link if you feel like it.
Owner: Who is the owner, once again, Maybe a link?
Notes: I don't use this personally, but I have seen where people will put who all should have it.
Logo: A good logo for the site; now I have seen a 512x512 PNG file work best for this.
Click Next
Assign your groups
Review and create.
That's all it takes to make a web link. It's nothing special.
This is where we will be doing our Zebra Kiosk Mode. Based on our Microsoft Managed Home Screen, we will create a device restriction, and this app will give us unique controls over the device.
Navigate to Intune.microsoft.com
Navigate to Devices > Android > Configuration
Create a new policy
Platform: Android Enterprise
Profile Type: Device Restrictions
Click Next
Name the policy and give it a good description. Then hit next
These are the settings I am using:
General
Default Permissions Policy (Work Profile Level) Auto Grant
System Update: Automatic
Skip first Use Hint: Enabled
Locate Device: Allow
System Error Warning: Allow
Enabled System Navigation Features: Home and overview buttons
System Notifications and Information: Show system notifications and information in device status bar
Device Experience
Device Experience Type: Kiosk Mode
Kiosk Mode: Multi App
Custom app layout: Enabled
This is where we will place items on the screen. I like having the main web link and the intune app. It looks real nice with a 3x4
Grid Size: 3 Columns x 4 rows
Home Screen.
Here you can click each plus button and add the app you want, and it will show up on the machine.
Lock Home Screen: Enabled
App Notification Badges: Enabled
I enable these because it lets the end user know what's happening with the device itself. This is important for updates and the like.
Leave Kiosk Mode: Enabled
Leave Kiosk Mode Code: Make a 4-6 digit pin.
Set a custom URL background:
This background for the MC9300 is 480x800.
The image must be accessible from the network on its own. If it is not, then we will have issues.
Shortcut to settings menu: Disabled
Quick access to the debug menu: Enable
Wi-fi Allow List
This is where you can put the SSID of the networks you want the scanner to connect to. If it's not in this list, they will not be able to connect to it while in kiosk mode.
Media Volume Controls: Enabled
I do this to allow them to control how loud the beeps are. Note that your DataWedge profile needs to be set to media to make this happen.
Quick Access to device information: enabled
This bad boy has saved me so many times. It has the device's serial number. The MC9300 serial numbers are printed on the back, but old eyes just can't read it. So, having this information at the user's fingertips really adds to troubleshooting.
Everything else in device restrictions is default.
Users and Accounts
This area is set to block. What that does is it forces the users to only be the kiosk user.
Add users: Block
User can configure credentials: block
User removal: block
personal google account: block
Account changes: block.
We don't want you to edit anything with this profile. Hand slap, please.
Customer Support Information
This is where you would place all the customer support information. Like your helpdesk number or emails. I like to have the contact for your IT admins at XYZ. The lock screen message is important because even though we didn't set it here, if you tell the system to lock via Intune, this message will appear.
Groups and why it's important
The next area is the groups. So, this is very important. You cannot have two device restriction policies that do kiosk items applied to the same machine! This is very important and can look very weird. So I'm going to give you a simple scenario for you to fully understand.
There are three policies.
Zebra_Default
Assigned Group: Zebra-MC9300-Default
Dynamic assignment of android zebra mc9300
Zebra_Redzone
Assigned Group: Zebra-RedZone
Static Assignment
Zebra_Bluezone
Assigned Group: Zebra-BlueZone
Static Assignment
If I have a scanner, and I assign it to group zebra-RedZone. It will get the red zone and the default. The default links the bluezone if it's assigned to a policy. Thus, now it gets two policies and starts conflicts. So what you have to do for each policy is place all other groups, excluding your default group into the exclude assignment. So, if you want the redzone, place the zebra-redzone inside the zebra_redzone policy assignment and place zebra-bluezone in zebras_redzone exclusion assignment. The Zebra_default will need to have the two zone groups added to it's exclusion list as well. This makes everyone happy.
Once you have everything assigned, click create. Add the scanner to your group that you want, and it will be applied. We have a few departments like this; by doing it this way, I can give out a passcode to an end user for troubleshooting and not effect any other departments. Plus, I can push out a password change for the kiosk without effecting other departments. I personally set each background to that department name. So they know when scanners float between departments. This has stopped so many fights.
What can we learn as a person?
There is a flow to things in this life. Whether it makes sense or not is a different story. The first time I set up these profiles, I was confused about why I kept getting just one icon. Instead of the four I selected. Then it locked down to the point where it was super Zebra Kiosk Mode and not a usable version. After tracking where things went, I finally figured it out. It was like watching a flow. Sometimes we have that in our lives. Things come up, and they leave you left in the what-happened mode.
I'll give a great example from my life: car keys. I come home late the night before and place my keys in front of my bed instead of on my nightstand. The next morning, I wake up late, and I'm rushing around. I pull everything out of the nightstand, but the keys are missing. This makes me freak out. Rather than searching frantically, I've learned to focus on the events of the previous day. What did I do when I got home? I follow each step until I find where I put my keys. Most of the time, the cat knocked it off. He likes my chest in front of the bed. It's always a good thing to stop and look at the flow. What's happening, and where did things go wrong? I hope you go with your flow. You deserve it.
For the past few months, I have been working with zebra scanners. MC9300 and MC9400 to be more excat. These scanners are unique in the fact that they do not have any cameras. These scanners are Android OS devices. That means they can go into intune without to many issues. Normally, you scan a QR code with your camera and then it takes you to Google Play. However, there is no camera and no app store on these scanners by default. The idea with these units is you use a program called stagenow and have stagenow enroll them into Intune. So, how do you do that? The Zebra documentation is nice, but it has some issues. Enrolling Zebra Scanners into Intune is not for the faint of heart.
So, why? Why not use other MDMs. Good question. I like punishment, maybe? In this case, this is the option management wanted. Thus, I followed orders and made it happen. There are some things you will need before we get started.
Admin access to your Intune with the proper licensing. If you have E5 licenses and a P2 plan, you should be golden.
A wireless network that has access to the stage now computer and to the interent. At this stagenow computer will be running an FTP service.
Creating the Enrollment
Before we start our first steps, we want to create a Kisok scanner device. This will have one or two apps on it. Thats' important to think about. We can create a large number of deployment types, and not all of them fit with our goals. These devices will be used to scan boxes and nothing else. So we will be using corporate-owned dedicated devices. The first step is to create the enrollment in Intune.
Description: This policy is to enroll zebra devices into corporate-owned dedicated devices
Token Type: Corporate-Owned Dedicated devices
Token expiration data: Input a reasonable date
Click Next
Click Create
We will be taken to the policy screen. From here, we need to go into our new policy. Here we will see all the information you just put in. Now we need to get that token.
Click on the policy
Manage > Token > Show Token
Using your cell phone and a QR app, scan the QR to gather its information.
I have a Samsung phone. I just use the scan QR code feature. Then select the show text.
Inside this text, you will see a variety of links and something called "Extra_Enrollment_Token" You will need the string of numbers that follows this. You will also see a CHECKSUM, you will need this hash. Finally, you will see something called Provisioning_Device_Admin_Package_Download_Location followed by a link. Click this link. It will download an APK. This APK is very import and cannot be renamed. You will want to transfer this app to your stage now machine.
Stage Now Setup
Now that we have created the enrollment, downloaded our app and gotten our token, it's time to make the stage now profile. The stage now profile is going to consist of the following configurations.
Stager now Network
Wifi
FileMgr
AppMgr
Intent
Start your stage now application and log into the admin portal. You will need the average MX version of your zebra scanners. On average, I have seen a range from 8.4 all the way to 13.1 in my environment. Thus, we must select our lowest version. In my case, it will be 8.4. I will post a blog post in the future on how to standardize our MX versions with Intune.
Click Create New Profile
Click Xpert Mode
Name the policy. I like to have the mx version in the name and what it's doing. So for our example, I used "Enroll_Intune_8.4" Notice, no spaces.
Now we are sent to the add/edit window. Click Wizard.
Scroll down until you see the "StageNow Network" and click the plus sign. You will notice that it is added to the right-hand menu.
Click the settings tab
Add Wifi, Filemgr, AppMgr and Intent
Click ok
Now we will start creating the profile itself. We are thrilled with the first item in our list, "stageNow Network.". Here we will have drop-downs and other options. So follow along.
Connect a network
Drop Down: The devices I wish to provision are currently not connected to a network. I will define a network with this profile that can be used for staging.
Click Continue
Network Type > Drop Down: WiFi
Certificate Management: No
Please note that if your network uses a cert, you will need to set it up here.
Disconnect Networks: No
We select No because the next section disconnects the networks for us.
Disalbe Network: Yes
This will disconnect from all of the other networks
Click Continue
Add Network: Yes
SSID: Your SSID
Security Mode: Personal
In this example, we are going to use a basic wifi setup with a password.
WPA Mode: WPA/WPA2
Encryption Type: Do not change
We don't change because by default it is aes-ccmp/tkip
Key Type: Passphrase
Protected Key: Checked
Passphrase: <Enter your passphrase>
Use DHCP: Check
Keep everything else as default.
Click continue.
Connect Network: Confirm everything here and click continue
Wifi
After you click the continue button, you are brought to review. Let's click the StageNow Config button at the top. To get back into the configuration window. This is the network we will use for Enrolling Zebra Scanners into Intune. We are doing this here to change some basic settings. Like, is the wifi enabled? Is there a sleep policy? Stuff like that. We want to make sure we can get as much possible out of the way now before we deal with it later.
Target OS: Android
Wi-Fi Enable: Enabled
Sleep Policy: Never Sleep
Network Notification: Use Network Notifications
Enable Wi-Fi Verbose Logging: Do not change
If you want this feature, you can set it; however, it eats resources on the scanner.
Configure Country: Check
Country: USA
Notes: By leaving it unchecked, it will perform an auto setup. This can be a problem if you have scanners around the world.
RF Band: Unchanged
This is something you will need to communicate with your network team. Some places use 2.4, some use 5. You can tell it which channels to work with as well. This is a very advanced system for the most part.
Leave all the other settings the way they are.
The network action is do nothing because you are already connected to your staging network from the previous set.
FileMGR
The file manager area is import for us our Enrolling Zebra Scanners into Intune as it allows us to get the intune onto the device itself. After we click continue on the wifi, we will come into the new settings.
File Actions: Transfer/Copy File
Target Access Method: File in the device file system
Target Path and File Name: /sdcard/AndroidDevicePolicy.apk
Source Access Method: File on a remote server
Source File URL:
Click the three dots
Search for the file and add it.
Continue
AppMGR
Now the app is on the scanner from the stage now profile, it's time to install the app. We are going to select upgrade as upgrade is install and upgrade at the same time.
Action: Upgrade
APK Path and Name: /sdcard/AndroidDSevicePolicy.apk
Protected list action: Do nothing
Here you can add this app to the protected list, thus making it unchangeable. This could cause Intune to fail. You can also remove it from said list.
Access to app information action: Do nothing
Click Continue
Intent
This final stage joins it to intune. We will be creating a json file before we continue. Remember that code we got from the qr code. This is where we are going to be using it. This json is our butter for Enrolling Zebra Scanners into Intune. Here is the json.
{
"android.app.extra.PROVISIONING_DEVICE_ADMIN_COMPONENT_NAME":"com.google.android.apps.work.clouddpc/.receivers.CloudDeviceAdminReceiver",
"android.app.extra.PROVISIONING_DEVICE_ADMIN_SIGNATURE_CHECKSUM": "<Oh a has code from ealier.> ",
"android.app.extra.PROVISIONING_DEVICE_ADMIN_PACKAGE_DOWNLOAD_LOCATION":"https://play.google.com/managed/downloadManagingApp?identifier=setup",
"android.app.extra.PROVISIONING_LEAVE_ALL_SYSTEM_APPS_ENABLED": true,
"android.app.extra.PROVISIONING_ADMIN_EXTRAS_BUNDLE":{"com.google.android.apps.work.clouddpc.EXTRA_ENROLLMENT_TOKEN":"<YourTokenYall>"}
}
Remember we grabbed the check sum and the token from before? Well, this is where we are going to use it. Replace where I have the <> and you should be good to go with the file. Make sure to save this in the same folder on the stagenow computer as the app from before and save the file as a.json file.
Class Name: com.google.android.apps.work.clouddpc.receivers.CloudDeviceAdminReceiver
Json Value: Json File
Json File:
Click the three dots and navigate to your newly created json file.
Click continue
Final steps of stage now
Once you click the stage now button, you will be set to the review screen. Here you can make sure all of your settings are correct by clicking the expand button. By default, the bar codes are encrypted. If you don't want that, this is where you can change it. I always suggest encryption. Once you have everything the way you want, all you have to do is click complete profile.
Now here is the next important aspect of the whole setup. Creating the barcodes to scan. After you click the Complete Profile, you will be taken to the bar code window. There will be options for linear and PDF417 barcodes. The linear is going to give you a lot of bar codes. So pick the PDF417.
CATCH! Android 11 and down use PDF417, for Android 13 and above, use JS PDF417.
So we want to click the StageNow client check for what we want to use. Then I like to test. You can click the test to generate the barcodes. Finally, you can click publish to publish the profile.
Using the barcodes
Once you have the bar codes, Enrolling Zebra Scanners into Intune is so much easier. From a recently wiped scanner, open stage now and scan the bar codes. The scanner will connect to your wifi of choice. Then, if the stage is now up and running, it will download the file. Then it will install the app. Finally, if the network is running correctly, it will join intune. From there, intune takes over and stage now is no longer needed.
Import gotchas at this stage is stagenow has to be active with this setup. The reason is because each time the application is active, it spins up an FTP. The FTP username and password are embedded into the QR code from where you encrypted it. So, if your network can't reach this server, this means it will not work as well. So make sure the network team is good to go.
What can we learn as a person?
Things don’t always go as planned, no matter how much we prepare. I spent six months perfecting an MDM transition while managing my regular duties. My Intune setup was nearly flawless: scanners were configured in under 30 minutes, upgraded to the optimal OS for our company (not Android 13), and everything seemed ready. I created detailed instructions and videos for end users, tested the process with multiple people, and received praise for how well it worked.
The rollout began smoothly at our northern office, where everything connected as expected. Then things unraveled. At other locations, wireless networks failed due to improperly configured DHCP, incomplete AP broadcasting, poisoned ARP tables on switches, and more. It felt like every fix led to another failure. Users blamed me since I handled the transition, but the root issue was network-related—something I had no access to or control over.
Despite my setup being perfect, it failed because of factors outside my control. And that’s okay. Failure doesn’t define us, even when others assign blame. IT is a team effort, and sometimes you must navigate challenges with colleagues who may not be as invested or responsive.
In this case, waiting for the network admin to confirm readiness and documenting everything (CYA!) saved me. It’s a reminder that our worth isn’t tied to mistakes—ours or others'. Sometimes, patience and accountability are the real wins.
Last month, I had an app that had some issues for a single end user. I wasn't sure why it was causing issues, but one of the troubleshooting steps we needed to do was uninstall it and have Intune reinstall it. We uninstalled the application. However, Intune, being Intune, sat there. We forced a sync, and nothing. I wish there was a redeploy option in the Intune interface, but there isn't. So what can you do? Well, there is a small secret. Intune has registry keys that keep track of the deployments on the machine itself. These linger even after uninstalling the app. So, removing them is the gravey. So today we are going to force Intune apps to redeploy.
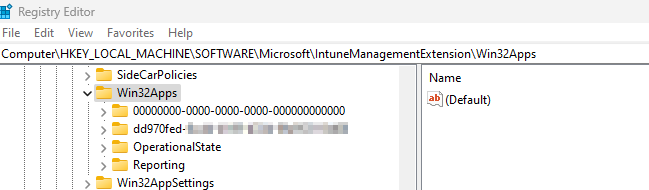
Intune Registry Keys / App ID Number
Intune's registry keys are located in the Local Machine > Software > Microsoft > IntuneManagementExtension > Win32App. Let me tell you what now. My southern is going to come out some yall. This is where we can see the users. The system has it's own user, which is the all zeros, but each other user has it's own code.
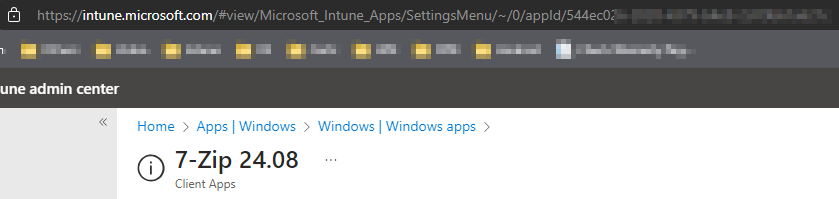
When you open this folder, you will be taken to a beautiful list of what? Yeah, it's a mess. You need to know some things about this list in order to force intune apps to redeploy. You will need to have the app's ID number. To get this number, you will need to navigate to your Intune. We will be heading to the app you want to uninstall. I'm doing my 7zip today as an example. At the end of the url, you will see the appID. That's what you will need.
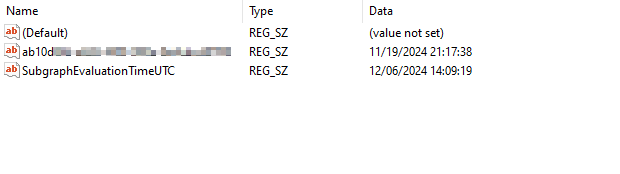
Once you have that code, you will be ready. What you will need to do now is delete the folder with that code. Then navigate to the GRS folder. It will have a bunch of hashes. No, not the drug, but math code. Wait, is hash still what people call it now days? I feel old. Anyway, you have two options here. One, you can go to the logs and search the logs for the hash. This can take a while, and shockingly, it is not reliable as logs get deleted. The other way is to go through this registry folder, folder by folder, until you find the key, as seen below. I prefer PowerShell. Once you delete the required registry keys, all you have to do is restart the Microsoft Intune Management Extension service.
Powershell To the Rescue
If you have read this blog long enough, you know PowerShell is coming somehow. Today's script will save you a crap ton of time. Let's dive right in.
There are many versions online for this script. Most use the logs, and that's cool. This script doesn't use the logs, and for a good cause. In my case, the logs were deleted. Why were they deleted, you shall ask? Humans, that's always going to be my answer until it's AI.
The break down
Let's break this bad boy down, shall we? The first part of the script is the path we are going to be playing with, followed by the code of the app. You will have to grab this from your intune.
Next, we want to grab all the users. So, remember I said the system uses all zeros. Well, we want to exclude those. However, users use the hypens. It's the Fantastic 4, hypens, not the Marvel characters. Using a basic where object, we sort through all of the ones that have our hypens and are not the system and drop their ID numbers into the users variable.
Now we start our loop. Everyone should like a good loop. Each user will have it's own path. The first thing we run into is that the above command gave us HKEY_Local_Machine instead of a searchable HKLM. So we change them using the replace. Then we grab the userID for later. Finally, we grab all the applications. Notice the name is the new name we made. It's important to have the HKLM: because without it, you will get an error with get-childitem. No candy was stolen from any children while writing this blog post.
Notice we are looking for the appid at the end. Sometimes, there will be more than one entry like this. To force Intune apps to redeploy, we must remove all of them. I liken them to bed bugs. Burn them all. With that said, we start our loop. For each App inside the applications. We will get the app name and then remove it. Once again, we used get-childitem. Goodness, I need to stop still items from kids. So we need to convert the name like we did before changing the HKEY_Local_machine to HKLM: with a nice replace. Once we have it, we delete the path and everything inside by force.
Now we need to handle the GRS side. The GRS keeps the datetime stamps. Like I said before, most people use the logs. Today we will navigate through the registry. The first thing we are going to do is set the path and get the kids on that path. This is where the UserID we made at the start of this big loop comes into play.
Now we have the children's items. We start our looping. The first thing we get is our GRS properties with the get-itemproperty commands. Now here is the magic. A standard check has only 1 or maybe 2 items inside the folder. While more advanced items will have more than that. So, if we convert the properties into a Powershell object, we can count them.
Yes, the second line works. You can pretty much convert anything into a PowerShell object. All we have to do now is count how many counts per object are there. When we convert the item property into a powershell object, we gain a few extra items. So, anything past 5 in this case will be our special stuff. So, if it is past 5, we get to work.
We first look at the keys, looking for our fantastic 4. We will do this by calling the psobject.properties.name because it will be the name of the property. Then we will compare it to the appid. If they are the same, we correct the hkey_local_machine and drop our nuke, remove-item. Nested ifs are fun, but can get complex quick if you don't watch out.
After the large loop of Fantastic Four, we have to restart the intune extension. So, using get service, we pipe it into restart service. Then we are done! Right? Well, kind of.
After the script has done it's thing and stolen candy for kids and nuked stuff, you will need to resync the computer. You can do this via the Accounts setting, or you can do this via Intune. In my case, the application we were redeploying was our remote application. So, I had to do it via Intune.
Navigate to the device under Windows > Device Name and hit the sync button. Now you are done. Force Intune apps to redeploy, check.
What can we learn as a person?
Restarting is sometimes the only option. Taking a step back, clearing things away, and starting new is good, whether you're troubleshooting an Intune app deployment or dealing with a hard time in life.
When an app in Intune stops working, we don't just sit around and hope it gets fixed (at least for a while). After we empty the registry and do some troubleshooting, we gently push it to redeploy. Life is no different. When things don't work out the way you expected, that's okay; setbacks are inevitable. Starting over equalizes the situation; it's not a sign of surrender.
Restarts, in reality, are chances for growth. By doing so, they demonstrate our flexibility, competence, determination and insight to put things right. Our fantasic four. When something feels stuck, whether it's an app or your thinking, don't be scared to reset. Do not be afraid, especially with our thinking. That's where real change happens.
We use cookies to ensure that we give you the best experience on our website. If you continue to use this site we will assume that you are happy with it.