The other day, I was showing a friend how to set up Intune deployments. Then it hit me: I have unique scripts for script detections and things like that here on therandomadmin.com. However, I haven't really gone through the detection rules for built-in items. I was like, well now I have to fix that. So here we are going to fix that with the Intune Detection Rules. Let's get started.
Types of Intune Detection Rules
There are three built-in detection types that we will go over today. They are the MSI, File, and Registry.
MSI is like the easy button, (no not the staples one from the commercials... did I just age myself?)
File is my least favorite one, but it works for legacy apps
Registry is my favorite one and it's the one that I will spend some time on for you all.
Other than the built-in items, there are scripted items which is unique in it's own rights. You can take a look at how these scripts work here. Andrew has a good tutorial on his blog as well. Today will be all about the built-in items.
The Built-In MSI Rule
The MSI rule is the easy button of the detection scripts. If you are using an MSI, it will pull the information directly from the MSI. Once you get to the detection rule part you can follow these steps:
Click Add
Select MSI
And click save
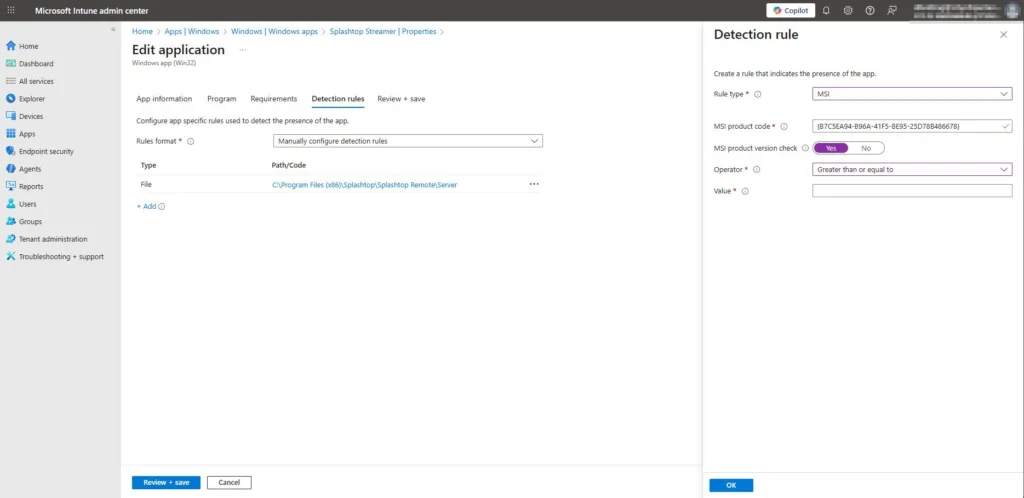
Magic, right? The other thing you can do is select "MSI Product Version Check." Here you can select an operator like "greater than or equal to" and then give it the value. Which is the product version. This helps with auto-updated items. Which I always suggest using. Below is a screenshot.
File Detection Rule
Our next built-in detection rule is for files. This is good if you have an app that doesn't install like normal apps. Older apps or more niche apps are like this. For example. We installed a special Creo app. It installed in the C:\PTC location, and it didn't add itself to the registry uninstall strings. It didn't come in an MSI; it was an EXE with custom everything. This app was a pain in the backstracher. So we used the File location rule. Here is how you can set it up.
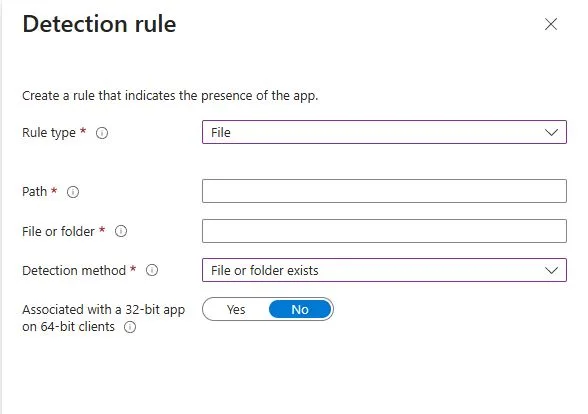
Inside your detection rule, click Add.
Rule type: File
Path: The folder that you want to check. In this case it was C:\PTC
File or Folder: Here we wanted to see if the creo.exe existed. So, that's what I put here.
Detection Method: We used file or folder existed.
Greater than or equal to string
As you will learn, I am all about the version numbers. If you select the string (version), you will need to get that version number from the file you are pulling from. You can do this with PowerShell pretty quickly.
Once you have this information, you will then proceed to input it into the value section once you select the string (version) and greater than or equal to options.
Built-In Intune Detection Rule for Registry
The registry key is the most common and the most useful as well. Most apps install themselves in this method. The script below is going to be your best friend. What it does is give you the information you need. Lets break down what each item is so we can look at the script and make this happen. I'm giving this the most focus because it's the most common.
Registry Type: The type we are using.
Key Path: The path of the uninstall string that we will be using
Value Name: What we are looking for, this case we will be looking for displayversion
Detection Method: Version Comparison
Operator: Greater than or equal to
Value: What value we are looking for
Assocated: Is it a 32 or 64.
Script
So you will have to go digging into the registry for this information. However, this registry area is just confussing and really hard to manually dig through. So powershell is once again, our friend.
All you have to do is replace the app name. It will provide you with everything you need inside the built-in detection rule. This is the output that it provides:
RuleType         : Registry
KeyPath          : HKEY_LOCAL_MACHINE\Software\Microsoft\Windows\CurrentVersion\Uninstall\{6EB73F60-E858-3AF3-913A-0C1783656B42}
ValueName        : DisplayVersion
DetectionMethod  : Version comparison
Operator         : Greater than or equal to
Value            : 143.0.7499.170
AssociatedWith32 : False
This script really makes finding apps easier. If the app installs in another place, good hunting, my friends.
What we can learn as a person
I am still missing my keys. I have the backup fob for my car, but I have no idea where my normal keys are. So no house key right now. Sometimes, I need to backtrace what I have done to find where I am going. Which is ok. This is why I document so much because I don't have the brain space to remember everything I have done. This is also why this blog post exists. I realized I never once really did explain how to use the built-in tools. Now I have a place to come and get the script I need and anyone else needs. So that will be nice later down the road, and I will thank myself later. Giving myself the little micro successes in the future is what I am going for here. The keys, on the other hand, I didn't set up a space for them to go with the new desk I have. Thus, they are in the ether somewhere, and when I find them, they will go into my little cubby on my new desk. So, set yourself up for micro successes, whether you know it or not, in the future. This will reduce a lot of stress and anxiety in the future. Remember, 80% of life is the systems that you have put into place. So, let's make good systems. Then you can set up your own Intune detection rules for your life to detect when you gave yourself successes. Like, when I see the wallet inside the new cubby. I can give myself a little thanks.
For the past few months, I have been working with zebra scanners. MC9300 and MC9400 to be more excat. These scanners are unique in the fact that they do not have any cameras. These scanners are Android OS devices. That means they can go into intune without to many issues. Normally, you scan a QR code with your camera and then it takes you to Google Play. However, there is no camera and no app store on these scanners by default. The idea with these units is you use a program called stagenow and have stagenow enroll them into Intune. So, how do you do that? The Zebra documentation is nice, but it has some issues. Enrolling Zebra Scanners into Intune is not for the faint of heart.
So, why? Why not use other MDMs. Good question. I like punishment, maybe? In this case, this is the option management wanted. Thus, I followed orders and made it happen. There are some things you will need before we get started.
Admin access to your Intune with the proper licensing. If you have E5 licenses and a P2 plan, you should be golden.
A wireless network that has access to the stage now computer and to the interent. At this stagenow computer will be running an FTP service.
Creating the Enrollment
Before we start our first steps, we want to create a Kisok scanner device. This will have one or two apps on it. Thats' important to think about. We can create a large number of deployment types, and not all of them fit with our goals. These devices will be used to scan boxes and nothing else. So we will be using corporate-owned dedicated devices. The first step is to create the enrollment in Intune.
Description: This policy is to enroll zebra devices into corporate-owned dedicated devices
Token Type: Corporate-Owned Dedicated devices
Token expiration data: Input a reasonable date
Click Next
Click Create
We will be taken to the policy screen. From here, we need to go into our new policy. Here we will see all the information you just put in. Now we need to get that token.
Click on the policy
Manage > Token > Show Token
Using your cell phone and a QR app, scan the QR to gather its information.
I have a Samsung phone. I just use the scan QR code feature. Then select the show text.
Inside this text, you will see a variety of links and something called "Extra_Enrollment_Token" You will need the string of numbers that follows this. You will also see a CHECKSUM, you will need this hash. Finally, you will see something called Provisioning_Device_Admin_Package_Download_Location followed by a link. Click this link. It will download an APK. This APK is very import and cannot be renamed. You will want to transfer this app to your stage now machine.
Stage Now Setup
Now that we have created the enrollment, downloaded our app and gotten our token, it's time to make the stage now profile. The stage now profile is going to consist of the following configurations.
Stager now Network
Wifi
FileMgr
AppMgr
Intent
Start your stage now application and log into the admin portal. You will need the average MX version of your zebra scanners. On average, I have seen a range from 8.4 all the way to 13.1 in my environment. Thus, we must select our lowest version. In my case, it will be 8.4. I will post a blog post in the future on how to standardize our MX versions with Intune.
Click Create New Profile
Click Xpert Mode
Name the policy. I like to have the mx version in the name and what it's doing. So for our example, I used "Enroll_Intune_8.4" Notice, no spaces.
Now we are sent to the add/edit window. Click Wizard.
Scroll down until you see the "StageNow Network" and click the plus sign. You will notice that it is added to the right-hand menu.
Click the settings tab
Add Wifi, Filemgr, AppMgr and Intent
Click ok
Now we will start creating the profile itself. We are thrilled with the first item in our list, "stageNow Network.". Here we will have drop-downs and other options. So follow along.
Connect a network
Drop Down: The devices I wish to provision are currently not connected to a network. I will define a network with this profile that can be used for staging.
Click Continue
Network Type > Drop Down: WiFi
Certificate Management: No
Please note that if your network uses a cert, you will need to set it up here.
Disconnect Networks: No
We select No because the next section disconnects the networks for us.
Disalbe Network: Yes
This will disconnect from all of the other networks
Click Continue
Add Network: Yes
SSID: Your SSID
Security Mode: Personal
In this example, we are going to use a basic wifi setup with a password.
WPA Mode: WPA/WPA2
Encryption Type: Do not change
We don't change because by default it is aes-ccmp/tkip
Key Type: Passphrase
Protected Key: Checked
Passphrase: <Enter your passphrase>
Use DHCP: Check
Keep everything else as default.
Click continue.
Connect Network: Confirm everything here and click continue
Wifi
After you click the continue button, you are brought to review. Let's click the StageNow Config button at the top. To get back into the configuration window. This is the network we will use for Enrolling Zebra Scanners into Intune. We are doing this here to change some basic settings. Like, is the wifi enabled? Is there a sleep policy? Stuff like that. We want to make sure we can get as much possible out of the way now before we deal with it later.
Target OS: Android
Wi-Fi Enable: Enabled
Sleep Policy: Never Sleep
Network Notification: Use Network Notifications
Enable Wi-Fi Verbose Logging: Do not change
If you want this feature, you can set it; however, it eats resources on the scanner.
Configure Country: Check
Country: USA
Notes: By leaving it unchecked, it will perform an auto setup. This can be a problem if you have scanners around the world.
RF Band: Unchanged
This is something you will need to communicate with your network team. Some places use 2.4, some use 5. You can tell it which channels to work with as well. This is a very advanced system for the most part.
Leave all the other settings the way they are.
The network action is do nothing because you are already connected to your staging network from the previous set.
FileMGR
The file manager area is import for us our Enrolling Zebra Scanners into Intune as it allows us to get the intune onto the device itself. After we click continue on the wifi, we will come into the new settings.
File Actions: Transfer/Copy File
Target Access Method: File in the device file system
Target Path and File Name: /sdcard/AndroidDevicePolicy.apk
Source Access Method: File on a remote server
Source File URL:
Click the three dots
Search for the file and add it.
Continue
AppMGR
Now the app is on the scanner from the stage now profile, it's time to install the app. We are going to select upgrade as upgrade is install and upgrade at the same time.
Action: Upgrade
APK Path and Name: /sdcard/AndroidDSevicePolicy.apk
Protected list action: Do nothing
Here you can add this app to the protected list, thus making it unchangeable. This could cause Intune to fail. You can also remove it from said list.
Access to app information action: Do nothing
Click Continue
Intent
This final stage joins it to intune. We will be creating a json file before we continue. Remember that code we got from the qr code. This is where we are going to be using it. This json is our butter for Enrolling Zebra Scanners into Intune. Here is the json.
{
"android.app.extra.PROVISIONING_DEVICE_ADMIN_COMPONENT_NAME":"com.google.android.apps.work.clouddpc/.receivers.CloudDeviceAdminReceiver",
"android.app.extra.PROVISIONING_DEVICE_ADMIN_SIGNATURE_CHECKSUM": "<Oh a has code from ealier.> ",
"android.app.extra.PROVISIONING_DEVICE_ADMIN_PACKAGE_DOWNLOAD_LOCATION":"https://play.google.com/managed/downloadManagingApp?identifier=setup",
"android.app.extra.PROVISIONING_LEAVE_ALL_SYSTEM_APPS_ENABLED": true,
"android.app.extra.PROVISIONING_ADMIN_EXTRAS_BUNDLE":{"com.google.android.apps.work.clouddpc.EXTRA_ENROLLMENT_TOKEN":"<YourTokenYall>"}
}
Remember we grabbed the check sum and the token from before? Well, this is where we are going to use it. Replace where I have the <> and you should be good to go with the file. Make sure to save this in the same folder on the stagenow computer as the app from before and save the file as a.json file.
Class Name: com.google.android.apps.work.clouddpc.receivers.CloudDeviceAdminReceiver
Json Value: Json File
Json File:
Click the three dots and navigate to your newly created json file.
Click continue
Final steps of stage now
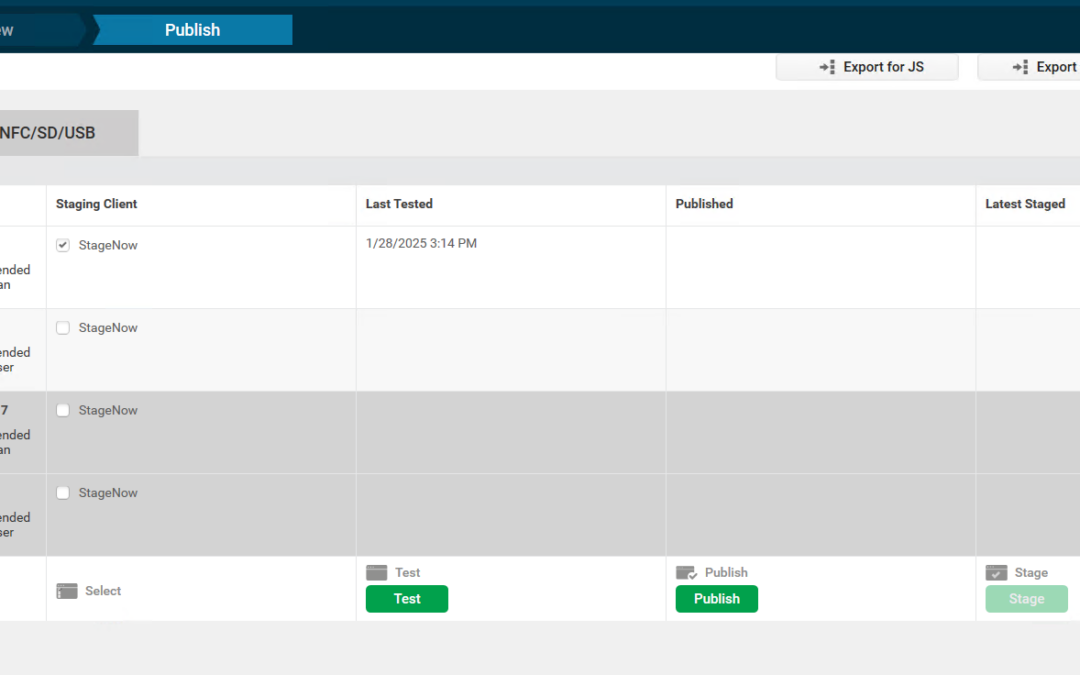
Once you click the stage now button, you will be set to the review screen. Here you can make sure all of your settings are correct by clicking the expand button. By default, the bar codes are encrypted. If you don't want that, this is where you can change it. I always suggest encryption. Once you have everything the way you want, all you have to do is click complete profile.
Now here is the next important aspect of the whole setup. Creating the barcodes to scan. After you click the Complete Profile, you will be taken to the bar code window. There will be options for linear and PDF417 barcodes. The linear is going to give you a lot of bar codes. So pick the PDF417.
CATCH! Android 11 and down use PDF417, for Android 13 and above, use JS PDF417.
So we want to click the StageNow client check for what we want to use. Then I like to test. You can click the test to generate the barcodes. Finally, you can click publish to publish the profile.
Using the barcodes
Once you have the bar codes, Enrolling Zebra Scanners into Intune is so much easier. From a recently wiped scanner, open stage now and scan the bar codes. The scanner will connect to your wifi of choice. Then, if the stage is now up and running, it will download the file. Then it will install the app. Finally, if the network is running correctly, it will join intune. From there, intune takes over and stage now is no longer needed.
Import gotchas at this stage is stagenow has to be active with this setup. The reason is because each time the application is active, it spins up an FTP. The FTP username and password are embedded into the QR code from where you encrypted it. So, if your network can't reach this server, this means it will not work as well. So make sure the network team is good to go.
What can we learn as a person?
Things don’t always go as planned, no matter how much we prepare. I spent six months perfecting an MDM transition while managing my regular duties. My Intune setup was nearly flawless: scanners were configured in under 30 minutes, upgraded to the optimal OS for our company (not Android 13), and everything seemed ready. I created detailed instructions and videos for end users, tested the process with multiple people, and received praise for how well it worked.
The rollout began smoothly at our northern office, where everything connected as expected. Then things unraveled. At other locations, wireless networks failed due to improperly configured DHCP, incomplete AP broadcasting, poisoned ARP tables on switches, and more. It felt like every fix led to another failure. Users blamed me since I handled the transition, but the root issue was network-related—something I had no access to or control over.
Despite my setup being perfect, it failed because of factors outside my control. And that’s okay. Failure doesn’t define us, even when others assign blame. IT is a team effort, and sometimes you must navigate challenges with colleagues who may not be as invested or responsive.
In this case, waiting for the network admin to confirm readiness and documenting everything (CYA!) saved me. It’s a reminder that our worth isn’t tied to mistakes—ours or others'. Sometimes, patience and accountability are the real wins.
Last month, I had an app that had some issues for a single end user. I wasn't sure why it was causing issues, but one of the troubleshooting steps we needed to do was uninstall it and have Intune reinstall it. We uninstalled the application. However, Intune, being Intune, sat there. We forced a sync, and nothing. I wish there was a redeploy option in the Intune interface, but there isn't. So what can you do? Well, there is a small secret. Intune has registry keys that keep track of the deployments on the machine itself. These linger even after uninstalling the app. So, removing them is the gravey. So today we are going to force Intune apps to redeploy.
Intune Registry Keys / App ID Number
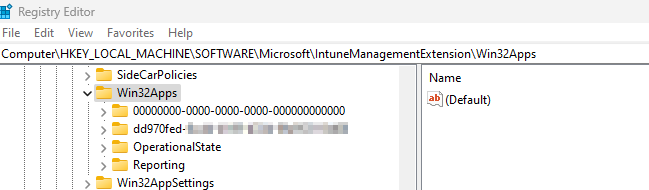
Intune's registry keys are located in the Local Machine > Software > Microsoft > IntuneManagementExtension > Win32App. Let me tell you what now. My southern is going to come out some yall. This is where we can see the users. The system has it's own user, which is the all zeros, but each other user has it's own code.
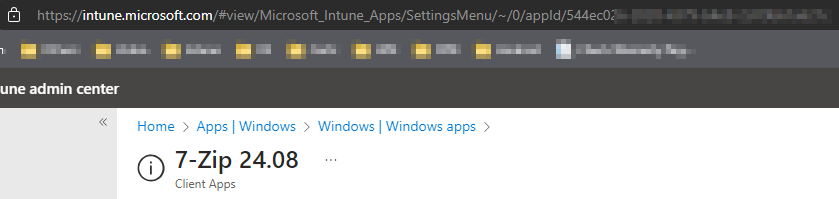
When you open this folder, you will be taken to a beautiful list of what? Yeah, it's a mess. You need to know some things about this list in order to force intune apps to redeploy. You will need to have the app's ID number. To get this number, you will need to navigate to your Intune. We will be heading to the app you want to uninstall. I'm doing my 7zip today as an example. At the end of the url, you will see the appID. That's what you will need.
Once you have that code, you will be ready. What you will need to do now is delete the folder with that code. Then navigate to the GRS folder. It will have a bunch of hashes. No, not the drug, but math code. Wait, is hash still what people call it now days? I feel old. Anyway, you have two options here. One, you can go to the logs and search the logs for the hash. This can take a while, and shockingly, it is not reliable as logs get deleted. The other way is to go through this registry folder, folder by folder, until you find the key, as seen below. I prefer PowerShell. Once you delete the required registry keys, all you have to do is restart the Microsoft Intune Management Extension service.
Powershell To the Rescue
If you have read this blog long enough, you know PowerShell is coming somehow. Today's script will save you a crap ton of time. Let's dive right in.
There are many versions online for this script. Most use the logs, and that's cool. This script doesn't use the logs, and for a good cause. In my case, the logs were deleted. Why were they deleted, you shall ask? Humans, that's always going to be my answer until it's AI.
The break down
Let's break this bad boy down, shall we? The first part of the script is the path we are going to be playing with, followed by the code of the app. You will have to grab this from your intune.
Next, we want to grab all the users. So, remember I said the system uses all zeros. Well, we want to exclude those. However, users use the hypens. It's the Fantastic 4, hypens, not the Marvel characters. Using a basic where object, we sort through all of the ones that have our hypens and are not the system and drop their ID numbers into the users variable.
Now we start our loop. Everyone should like a good loop. Each user will have it's own path. The first thing we run into is that the above command gave us HKEY_Local_Machine instead of a searchable HKLM. So we change them using the replace. Then we grab the userID for later. Finally, we grab all the applications. Notice the name is the new name we made. It's important to have the HKLM: because without it, you will get an error with get-childitem. No candy was stolen from any children while writing this blog post.
Notice we are looking for the appid at the end. Sometimes, there will be more than one entry like this. To force Intune apps to redeploy, we must remove all of them. I liken them to bed bugs. Burn them all. With that said, we start our loop. For each App inside the applications. We will get the app name and then remove it. Once again, we used get-childitem. Goodness, I need to stop still items from kids. So we need to convert the name like we did before changing the HKEY_Local_machine to HKLM: with a nice replace. Once we have it, we delete the path and everything inside by force.
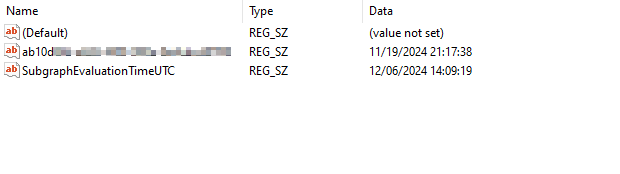
Now we need to handle the GRS side. The GRS keeps the datetime stamps. Like I said before, most people use the logs. Today we will navigate through the registry. The first thing we are going to do is set the path and get the kids on that path. This is where the UserID we made at the start of this big loop comes into play.
Now we have the children's items. We start our looping. The first thing we get is our GRS properties with the get-itemproperty commands. Now here is the magic. A standard check has only 1 or maybe 2 items inside the folder. While more advanced items will have more than that. So, if we convert the properties into a Powershell object, we can count them.
Yes, the second line works. You can pretty much convert anything into a PowerShell object. All we have to do now is count how many counts per object are there. When we convert the item property into a powershell object, we gain a few extra items. So, anything past 5 in this case will be our special stuff. So, if it is past 5, we get to work.
We first look at the keys, looking for our fantastic 4. We will do this by calling the psobject.properties.name because it will be the name of the property. Then we will compare it to the appid. If they are the same, we correct the hkey_local_machine and drop our nuke, remove-item. Nested ifs are fun, but can get complex quick if you don't watch out.
After the large loop of Fantastic Four, we have to restart the intune extension. So, using get service, we pipe it into restart service. Then we are done! Right? Well, kind of.
After the script has done it's thing and stolen candy for kids and nuked stuff, you will need to resync the computer. You can do this via the Accounts setting, or you can do this via Intune. In my case, the application we were redeploying was our remote application. So, I had to do it via Intune.
Navigate to the device under Windows > Device Name and hit the sync button. Now you are done. Force Intune apps to redeploy, check.
What can we learn as a person?
Restarting is sometimes the only option. Taking a step back, clearing things away, and starting new is good, whether you're troubleshooting an Intune app deployment or dealing with a hard time in life.
When an app in Intune stops working, we don't just sit around and hope it gets fixed (at least for a while). After we empty the registry and do some troubleshooting, we gently push it to redeploy. Life is no different. When things don't work out the way you expected, that's okay; setbacks are inevitable. Starting over equalizes the situation; it's not a sign of surrender.
Restarts, in reality, are chances for growth. By doing so, they demonstrate our flexibility, competence, determination and insight to put things right. Our fantasic four. When something feels stuck, whether it's an app or your thinking, don't be scared to reset. Do not be afraid, especially with our thinking. That's where real change happens.
In a previous blog, we discussed doing a speed test on a computer using PowerShell. Let's take that script and expand on it with three lines of code and some prep time. This will allow us to update items inside our Ninja One RMM tool. So we can push a Speedtest To Ninja One.
What's Ninja One?
Ninja One is an amazing RMM tool. I have used many different ones over the years and Ninja one blows my mind. it has a strong community behind it and it keeps growing. It's the only rmm tool that isn't afraid to make mistakes and grow. When in used continuum, I saw many times, largely requested items went to the void. While in ninja, It never goes to the void. So, if you are looking for a Good RMM, Ninja One is amazing. With that said, let's go deep into custom fields and how to set them up for script inputs.
Ninja One Custom Fields
There are currently two ways to make a custom field for a computer. The first is global. This means all companies, roles, and devices will have them. The other way is through the roles. Both options live under the Administration > Devices. Today we are going to setup a Role Custom Field. We are going this route because we don't want the isp speed check information for internal servers and such.
Click Administration
Click Devices
Click Role Custom Fields
Click The Add Button
Click Fields
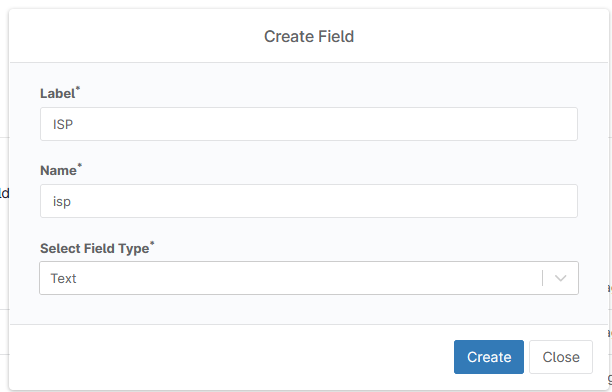
This next part is important. The label is the text that you will read. The Name is what will be used to call the field later. The field type is what you will make it. For example, multi text, text, date, etc... The first custom field will be the following:
Label: ISP
Name: isp
Type: text
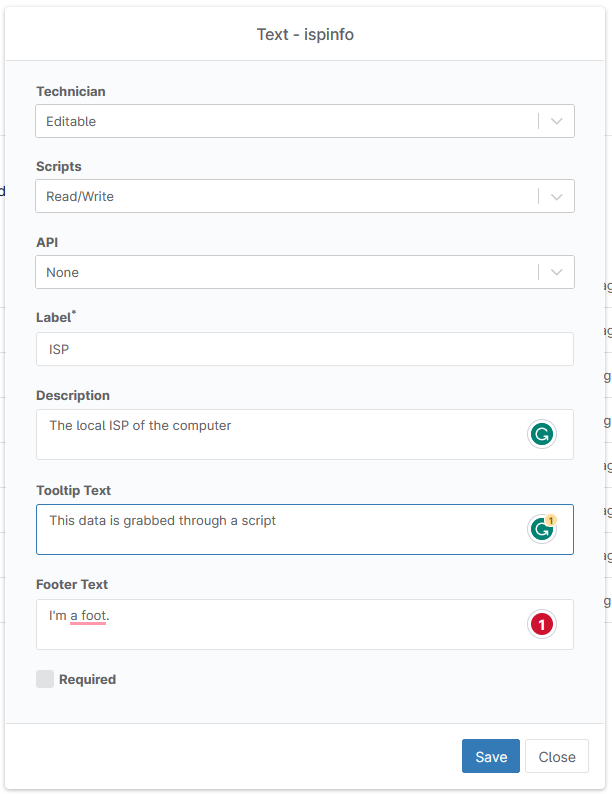
When you click create, the next window will appear. This window is more important. This is where you can choose to allow scripts, APIs and more. If you are planning to allow your technicians to edit this field, then set the technician to editable. The next is script. This is where the script comes into play. This allows the Ninja command line interface to push the Speedtest to Ninja. It has to be at least write for it to work. Next, is the API option. If you are planning to do some special API stuff, this is where you give your field permissions for the APIs. The label is just a label, the description is just a description, the tooltip allows you to give context, the footer text is just that, footer text and finally, you can make it required.
Speedtest to Ninja One
Follow the same steps to create the DownloadSpeed, and UploadSpeed fields. You want them both to be text and you want the script to be at least write. Now, if you have done all that, you are ready to add the ninja command line to the speed test script. This is going to be shockingly easy. The first step is to put your return into a return variable.
Once you have a returnable variable, let's pass them into the Ninja One command line interface. First notice the PowerShell module name is NJCLiPSh. The commands all start with Ninja. If you want to dig deeper, you can read up on the Ninja One documentation. I will place additional resources at the end.
The command we are going to be using to update our custom fields is "Ninja-Property-Set". This command will allow us to set any "script" enabled property. It's as simple as stating the name and value. The auth from the computer will confirm everything is right and update only that device's property. It's amazingly simple.
There are many more things you can do with this script. After building out the Speedtest script, I found out someone else did it better. Which is normal and ok. Check out Mikey O'Toole's exploring into custom fields, here. He goes through different ways to address the custom fields.
We use cookies to ensure that we give you the best experience on our website. If you continue to use this site we will assume that you are happy with it.