So, here I am looking down at a project to create a new domain and migrate users. Normally this isn't a bad process. You clone the user on the other domain and have them sign in. Use a tool like Profwiz or ADMT (assuming it works). Then I realize, they are AD synced to Entra/Identity. Oh, this is going to be interesting. So, I pulled out my Diet Dr Pepper and got to work. It's time to find the Entra ID source anchor attribute.
ms-DS-ConsistencyGuid is the Entra ID source anchor attribute
This little guy is the magic sauce that you are looking for. Back in the day, the syncing attribute was the object guid. This was a problem as many companies had more than one domain with the same account names. So, this little consistency guid matches the Immutable ID in entra. Lets take a look at these two.
On-prem AD user:
Attribute: ms-DS-ConsistencyGuid
Type: GUID stored as binary
Entra ID user:
Attribute: immutableId
Type: Base64-encoded version of that GUID
As long as these values never change, your hybrid identity stays the same. Change it the wrong way, your sync gets ugly. Here is how you can get the information from AD.
If it's $null, nothing is using it yet, it not, then something is using it.
It’s a GUID field, perfect for unique identity.
It doesn’t change when you move users between OUs.
In the right design, you keep it stable even across forests and migrations.
Microsoft now recommends it specifically as the Entra ID source anchor attribute.
This is important to understand. if these don't match, you don't have a sync going on. Lets write a powershell that will check both.
Confirm with powershell
This powershell grabs both and lets us know if they match, if they don't it tells us.
<#
.SYNOPSIS
    Compare on-prem ms-DS-ConsistencyGuid with Entra/Azure AD ImmutableId.

.DESCRIPTION
    For each user:
      - Reads ms-DS-ConsistencyGuid from AD
      - Converts it to Base64 (what ImmutableId should be)
      - Gets the cloud ImmutableId by UPN
      - Outputs if they match

    NOTE: This script is READ-ONLY. It does NOT change anything.
#>

Import-Module ActiveDirectory
Import-Module MSOnline

Write-Host "Connecting to Entra/Azure AD..."
Connect-MsolService

Write-Host "Getting AD users..."
$adUsers = Get-ADUser -Filter * -Properties userPrincipalName, ms-DS-ConsistencyGuid |
           Where-Object { $_.UserPrincipalName -ne $null }

$result = @()

foreach ($user in $adUsers) {

    $upn = $user.UserPrincipalName

    # Get ms-DS-ConsistencyGuid from AD
    $consistencyBytes = $user.'ms-DS-ConsistencyGuid'
    $consistencyGuid  = $null
    $adAnchorBase64   = $null

    if ($consistencyBytes) {
        $consistencyGuid = [Guid]$consistencyBytes
        $adAnchorBase64  = [Convert]::ToBase64String($consistencyBytes)
    }

    # Get cloud ImmutableId by UPN
    $cloudUser      = Get-MsolUser -UserPrincipalName $upn -ErrorAction SilentlyContinue
    $immutableId    = $null
    $matchStatus    = "Unknown"

    if ($cloudUser) {
        $immutableId = $cloudUser.ImmutableId
    }

    # Work out match status
    if ($adAnchorBase64 -and $immutableId) {
        if ($adAnchorBase64 -eq $immutableId) {
            $matchStatus = "Match"
        } else {
            $matchStatus = "Mismatch"
        }
    }
    elseif ($adAnchorBase64 -and -not $immutableId) {
        $matchStatus = "No ImmutableId in Entra"
    }
    elseif (-not $adAnchorBase64 -and $immutableId) {
        $matchStatus = "No ConsistencyGuid in AD"
    }
    else {
        $matchStatus = "Neither Set"
    }

    $result += [PSCustomObject]@{
        UserPrincipalName   = $upn
        ConsistencyGuid     = $consistencyGuid
        ADSourceAnchorB64   = $adAnchorBase64
        EntraImmutableId    = $immutableId
        MatchStatus         = $matchStatus
    }
}

# Show on screen
$result | Sort-Object MatchStatus, UserPrincipalName | Format-Table -AutoSize

# Optional: save to CSV for review
#$result | Export-Csv .\AnchorComparison.csv -NoTypeInformation
This script will give you a list of all the users and if it matches. Here is a script that will force the user to the immutableid. The check gives you info, and if you don't check it will set it.
function Set-MsDsConsistencyGuidFromImmutableId {
    <#
    .SYNOPSIS
        Set ms-DS-ConsistencyGuid from Entra/Azure AD ImmutableId for one user.

    .DESCRIPTION
        Given a samAccountName:
          - Look up the on-prem AD user
          - Read ms-DS-ConsistencyGuid
          - Look up the Entra/Azure AD user by UPN
          - If ms-DS-ConsistencyGuid is empty and ImmutableId exists,
            set ms-DS-ConsistencyGuid to the ImmutableId value (decoded from Base64)

        Use -Check to only show what would happen, without making changes.

    .PARAMETER SamAccountName
        The on-prem AD samAccountName of the user.

    .PARAMETER Check
        If supplied, only checks and reports. No changes are made.
    #>

    [CmdletBinding()]
    param(
        [Parameter(Mandatory = $true)]
        [string]$SamAccountName,

        [switch]$Check
    )

    # Make sure AD module is available
    if (-not (Get-Module ActiveDirectory -ListAvailable)) {
        Write-Error "ActiveDirectory module not found. Install RSAT / AD tools first."
        return
    }
    Import-Module ActiveDirectory -ErrorAction Stop

    # Make sure MSOnline module is available
    if (-not (Get-Module MSOnline -ListAvailable)) {
        Write-Error "MSOnline module not found. Install-Module MSOnline first."
        return
    }
    Import-Module MSOnline -ErrorAction Stop

    # Get on-prem user
    $adUser = Get-ADUser -Identity $SamAccountName -Properties userPrincipalName, ms-DS-ConsistencyGuid -ErrorAction SilentlyContinue

    if (-not $adUser) {
        Write-Error "No AD user found with samAccountName '$SamAccountName'."
        return
    }

    $upn = $adUser.UserPrincipalName
    if (-not $upn) {
        Write-Error "User '$SamAccountName' does not have a UPN. Cannot match to Entra."
        return
    }

    # Current AD ConsistencyGuid
    $currentConsistencyBytes = $adUser.'ms-DS-ConsistencyGuid'
    $currentConsistencyGuid  = $null
    $currentConsistencyB64   = $null

    if ($currentConsistencyBytes) {
        try {
            $currentConsistencyGuid = [Guid]$currentConsistencyBytes
            $currentConsistencyB64  = [Convert]::ToBase64String($currentConsistencyBytes)
        }
        catch {
            Write-Warning "Failed to interpret existing ms-DS-ConsistencyGuid as GUID/Base64: $_"
        }
    }

    # Get cloud user and ImmutableId
    $cloudUser = Get-MsolUser -UserPrincipalName $upn -ErrorAction SilentlyContinue
    if (-not $cloudUser) {
        Write-Error "No Entra/Azure AD user found with UPN '$upn'."
        return
    }

    $immutableId = $cloudUser.ImmutableId

    # Decide what to do
    $action = "None"
    $result = "No change"

    if ($currentConsistencyBytes) {
        # Already has a ConsistencyGuid
        $action = "None"
        $result = "ms-DS-ConsistencyGuid already set. Nothing to do."
    }
    elseif (-not $immutableId) {
        $action = "None"
        $result = "Cloud user has no ImmutableId. Cannot set ms-DS-ConsistencyGuid from it."
    }
    else {
        # We CAN set ms-DS-ConsistencyGuid from ImmutableId
        $action = "Set ms-DS-ConsistencyGuid from ImmutableId"

        try {
            $newBytes = [Convert]::FromBase64String($immutableId)
            $newGuid  = [Guid]$newBytes

            if ($Check) {
                $result = "CHECK ONLY: Would set ms-DS-ConsistencyGuid to $newGuid from ImmutableId."
            }
            else {
                Set-ADUser -Identity $adUser.DistinguishedName -Replace @{ 'ms-DS-ConsistencyGuid' = $newBytes }
                $currentConsistencyGuid = $newGuid
                $currentConsistencyB64  = [Convert]::ToBase64String($newBytes)
                $result = "UPDATED: ms-DS-ConsistencyGuid set to $newGuid from ImmutableId."
            }
        }
        catch {
            $action = "Error"
            $result = "Failed to convert ImmutableId '$immutableId' to GUID/bytes: $_"
        }
    }

    # Output a simple summary object
    [PSCustomObject]@{
        SamAccountName            = $SamAccountName
        UserPrincipalName         = $upn
        CurrentConsistencyGuid    = $currentConsistencyGuid
        CurrentConsistencyGuidB64 = $currentConsistencyB64
        CloudImmutableId          = $immutableId
        Action                    = $action
        Result                    = $result
        CheckMode                 = [bool]$Check
    }
}
Notes
if you have two domains, and the Entra ID source anchor attribute is the same in a synced area in both, you will get odd little accounts out of no where. Once you remove one of those into a unsynced ou, this will resolve the issue.
You can force a user to become someone else using the Entra ID source anchor attribute ms-ds-consistencyguid. This isn't a great thing, but it's a hack around. So, if you want bob to become philip's entra account, just change his anchor.
What can we learn as a person
In Entra, the anchor says “this is who I am, no matter where you move me.” In real life, we’ve got those too—just without the GUID. They’re the moments, labels, and stories that quietly tell us who we are: the kid who “wasn’t smart,” the one who always had to fix everything, the person who “always messes things up.” Those anchors don’t sit in a database, but they still decide what we “sync” with: what relationships we accept, what jobs we go for, what kind of treatment we think we deserve.
The tricky part is that a lot of those anchors were never chosen on purpose. They just happened, and we started believing, “This is just who I am.” But an anchor in your life is not a prison; it’s a reference point you’re allowed to outgrow. You might not be able to change what happened, but you can change what it means. “I failed” can become “I learned what I need to avoid next time.” “I grew up in chaos” can become “No wonder I get anxious when things change—and I can still learn how to calm myself and ask for what I need.” Same history, different interpretation.
So it’s worth asking yourself: What have I been using as my anchor? And if you could pick one on purpose, what would it be instead? Maybe something like “I’m learning,” or “I’m allowed to grow,” or “I deserve basic respect, even when I screw up.” In identity systems, once the anchor is stable and correct, all the sync errors start to calm down. In life, when your inner anchor shifts from shame to self-respect, a lot of emotional “sync errors” start to calm down too. The past doesn’t vanish—but it stops being the only thing that gets to name you.
The VPN tunnel was solid. We had split-tunnel traffic, per-user group policies, and MFA layered on Azure AD sign-ins. Nothing fancy, just a Meraki firewall and a bunch of cloud-native users on laptops.
Then someone asked for Wi-Fi to authenticate via RADIUS.
Not Wi-Fi on laptops, Wi-Fi for the office printers and a couple of older VOIP phones. Devices that didn’t speak SAML, didn’t join Azure AD, and couldn’t use certificates without a management headache. Just a plain old SSID with LDAP-backed RADIUS.
That’s when the obvious hole showed up: we didn’t have an LDAP source. Azure AD, by itself, doesn’t expose LDAP or Kerberos. And we had no on-prem domain controller.
At first, we thought Meraki might support SAML auth directly. It doesn’t, not for VPN or Wi-Fi. It does support RADIUS, but that assumes your RADIUS server has an actual directory to talk to.
We weren’t going to roll out on-prem AD just to get LDAP. That would mean a domain controller, backups, patches, and joining devices, all the things we’d intentionally avoided by going full Azure AD in the first place.
What we needed was LDAP, not Active Directory in the traditional sense. Just something that could respond to a bind request and validate passwords that already existed in Azure AD. That pointed us to Azure AD Domain Services. So, what is Azure's AD DS?
What is Azure AD Domain Services?
Azure AD Domain Services (Azure AD DS) is Microsoft’s way of giving you the parts of Active Directory that legacy systems still expect without forcing you to build or maintain domain controllers.
When you enable it, Microsoft stands up two managed domain controllers inside your chosen Azure virtual network. You can’t RDP into them, patch them, or change their schema. They just exist, quietly providing LDAP, Kerberos, and NTLM.
That’s the entire draw: a read-only, managed domain that syncs from your Azure AD tenant. When a user resets their password in Azure AD, that hash syncs down to Azure AD DS so older systems can authenticate it.
It’s not the same thing as Azure AD. Azure AD DS exposes the traditional domain protocols that cloud-only Azure AD never had. You can bind to it with LDAP, join Windows VMs to the domain, and even apply Group Policy Objects.
But there are limits worth knowing early. You can’t extend the schema. You can’t create or edit users directly with ADUC, the objects are synchronized one-way from Azure AD. Forest and domain trusts are unsupported, so it stands alone. Replication is handled entirely by Microsoft and runs on their schedule, not yours.
If you’re thinking of it as “Active Directory in the cloud,” that’s close enough for function but wrong in control. It’s closer to “a read-only mirror of Azure AD that speaks old protocols.”
For teams like ours, that was perfect. We didn’t want the overhead of managing AD. We just needed LDAP to exist long enough for the Meraki RADIUS server to point at something that could actually answer.
Why a cloud-native org might still need it
If you start in the cloud, Active Directory sounds like something you escaped from. You’ve got Azure AD for identity, Entra ID for MFA, and Intune for device management, everything’s tidy until you run into gear that doesn’t understand any of it.
That’s where the problem hides. Legacy protocols didn’t retire when we moved to the cloud. Printers, VPN clients, even network appliances like Meraki still expect LDAP or Kerberos to confirm a user exists. Azure AD doesn’t provide either. It speaks modern OAuth and SAML, great for browsers, useless for RADIUS.
In our case, the Meraki firewall was doing its job. It could handle RADIUS authentication, but it needed a directory to check against. We pointed it at Azure AD and got nothing. Meraki expected LDAP; Azure AD offered tokens. Different worlds.
Azure AD Domain Services bridged that gap neatly. Once it was running, we could bind the Meraki RADIUS server directly to the managed domain using LDAP over SSL. No extra domain controllers. No sync tools. Just credentials that matched the same users already living in Azure AD.
The benefit wasn’t only the VPN fix. Azure AD DS opened up old SMB file shares, on-prem accounting apps, and one ancient label printer server that refused to die. Anything that needed to see “DOMAIN\username” finally had somewhere to look.
We didn’t bring Active Directory back from the dead, we just gave the ghosts of LDAP and NTLM a place to live that didn’t need babysitting.
Setup decisions and things that stalled us
When we decided to spin up Azure AD Domain Services, the wizard made it look easy, pick a resource group, choose a network, and wait. The waiting part wasn’t optional.
Azure AD DS takes a while to build. About forty-five minutes after deployment, the domain name resolved, but LDAP wasn’t answering yet. Microsoft handles replication behind the scenes, so all you can do is watch the portal and drink coffee. The service eventually wakes up, but it’s a quiet kind of delay that catches people off guard.
We tied it into an existing virtual network where our jump host lived. That vNet had subnets for servers and management tools, but no DNS server configured. Azure AD DS creates its own DNS, and here’s the catch: every VM that needs to talk to it must use its private IPs as DNS. Ours were 10.x.x.4 and 10.x.x.5, automatically assigned inside the vNet. Forgetting that step means your domain join will hang forever at “locating domain controller.”
The next tripwire was password hashes. Azure AD doesn’t store NTLM hashes unless you enable that sync for Domain Services. When you first turn on AD DS, users need to reset their passwords before they can authenticate through LDAP or Kerberos. The portal explains this in one small note, which most people skim. We learned the hard way, nobody could log in until they changed passwords.
Once DNS was right and passwords synced, domain join worked like it used to. From the jump box:
No special parameters, no magic. The VM rebooted, grabbed a GPO, and joined the managed domain.
One last surprise: Azure AD DS doesn’t live on public IPs. Everything that touches it, servers, RADIUS, management VMs, must exist inside or be peered to the same vNet. That meant moving our RADIUS instance closer, network-wise, to keep LDAP traffic private and fast.
It wasn’t hard work, but it reminded us how much “simple” depends on wiring things the right way first.
What’s different about managing it
Once the domain started answering pings and LDAP binds, the real question was: how do you manage something you don’t control?
Azure AD Domain Services feels familiar at first. You can open Active Directory Users and Computers (ADUC), Group Policy Management Console (GPMC), and even AD Sites and Services from a domain-joined VM. But the difference shows up fast, it’s all read-only from Azure AD’s point of view.
You can’t make new users or edit synced ones inside ADUC. The data comes one way: Azure AD → Azure AD DS. Any changes flow down automatically, not up. The right place to create a new account is still the Entra (Azure AD) portal. The managed domain just receives a copy when synchronization runs.
Group Policy still works, but it’s scoped to the AADDC Computers and AADDC Users containers. There’s no organizational unit hierarchy beyond what Microsoft provides. You can create your own OUs under those if you need custom policies, but it’s best to keep it minimal. GPO replication is slower than you’d expect, usually a few minutes rather than seconds. Enough to wonder if it applied, not long enough to panic.
DNS management is handled inside the Azure portal. The domain creates an internal zone matching your AD DS domain name. You can add or modify records, but Microsoft owns the root of that zone. If you need conditional forwarders or split-brain setups, you handle that in your own DNS server, not theirs.
From a backup and uptime standpoint, it’s completely hands-off. Microsoft maintains two domain controllers behind the service, replicating automatically across zones in the selected region. There’s no RDP access, no snapshots, and no patch windows to plan. You give up visibility in exchange for reliability, and for most small or hybrid environments, that’s a fair deal.
The adjustment was mostly mental. After years of scripting our own domain controllers, it felt odd to trust a directory we couldn’t touch. But the logs told the truth: LDAP binds were succeeding, Kerberos tickets were valid, and RADIUS requests from the Meraki box were authenticating just fine.
Sometimes the best kind of admin work is the one that doesn’t need you anymore.
Why this didn’t mean ‘going back on-prem’
After Azure AD DS was running and the RADIUS server finally answered a test request, someone joked that we’d rebuilt Active Directory in the cloud. It wasn’t wrong, but it missed the point.
We didn’t resurrect on-prem AD. We just rented the only pieces we still needed: LDAP and Kerberos. No domain controllers to patch, no replication errors, no SYSVOL eating itself on a Friday. Microsoft runs the plumbing, we just point systems at it.
That small distinction mattered. The Meraki VPN clients could now use the same usernames and passwords that Azure AD handled for everything else. The accounting share mounted without a service account buried in a batch file. Legacy systems got to stay alive while we planned their replacements.
For a company that started cloud-first, Azure AD Domain Services wasn’t a step backward, it was a bridge. It gave the network just enough “old” behavior to keep RADIUS and LDAP-bound devices working, without dragging a full domain back into maintenance.
There’s still a line between the new world and the old one, but now it’s clean. The VPN connects. The logs stay quiet. And nobody’s asked for a physical domain controller since.
What can we learn as a person
So, I have 7 Doom boxes. What's a doom box you ask? It's a box that you throw something into and you forget about it. They are not cool. They build up over time and then you take a weekend to clean them out. This is kind of how servers can be over time. I have seen environments with 3000 servers but only needed 7 of them. While I have seen some with 300 and needed all 300. Knowing what to keep and what not to keep is so important, especially for our mental health. The Ad ds takes the load of active directory off of us and takes it to the cloud where it's more manageable. We have so many things in our life that we should do that with. But what are they? What is your AD DS? What should you be off loading to others?
Last month, I had an app that had some issues for a single end user. I wasn't sure why it was causing issues, but one of the troubleshooting steps we needed to do was uninstall it and have Intune reinstall it. We uninstalled the application. However, Intune, being Intune, sat there. We forced a sync, and nothing. I wish there was a redeploy option in the Intune interface, but there isn't. So what can you do? Well, there is a small secret. Intune has registry keys that keep track of the deployments on the machine itself. These linger even after uninstalling the app. So, removing them is the gravey. So today we are going to force Intune apps to redeploy.
Intune Registry Keys / App ID Number
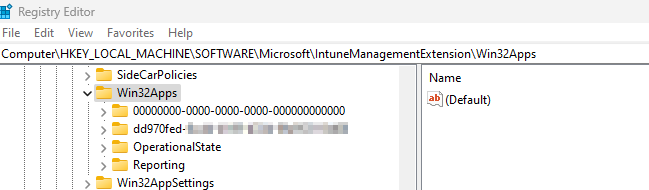
Intune's registry keys are located in the Local Machine > Software > Microsoft > IntuneManagementExtension > Win32App. Let me tell you what now. My southern is going to come out some yall. This is where we can see the users. The system has it's own user, which is the all zeros, but each other user has it's own code.
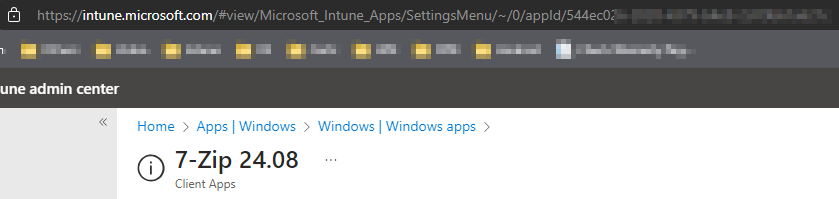
When you open this folder, you will be taken to a beautiful list of what? Yeah, it's a mess. You need to know some things about this list in order to force intune apps to redeploy. You will need to have the app's ID number. To get this number, you will need to navigate to your Intune. We will be heading to the app you want to uninstall. I'm doing my 7zip today as an example. At the end of the url, you will see the appID. That's what you will need.
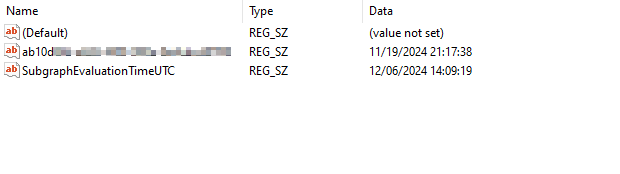
Once you have that code, you will be ready. What you will need to do now is delete the folder with that code. Then navigate to the GRS folder. It will have a bunch of hashes. No, not the drug, but math code. Wait, is hash still what people call it now days? I feel old. Anyway, you have two options here. One, you can go to the logs and search the logs for the hash. This can take a while, and shockingly, it is not reliable as logs get deleted. The other way is to go through this registry folder, folder by folder, until you find the key, as seen below. I prefer PowerShell. Once you delete the required registry keys, all you have to do is restart the Microsoft Intune Management Extension service.
Powershell To the Rescue
If you have read this blog long enough, you know PowerShell is coming somehow. Today's script will save you a crap ton of time. Let's dive right in.
There are many versions online for this script. Most use the logs, and that's cool. This script doesn't use the logs, and for a good cause. In my case, the logs were deleted. Why were they deleted, you shall ask? Humans, that's always going to be my answer until it's AI.
The break down
Let's break this bad boy down, shall we? The first part of the script is the path we are going to be playing with, followed by the code of the app. You will have to grab this from your intune.
Next, we want to grab all the users. So, remember I said the system uses all zeros. Well, we want to exclude those. However, users use the hypens. It's the Fantastic 4, hypens, not the Marvel characters. Using a basic where object, we sort through all of the ones that have our hypens and are not the system and drop their ID numbers into the users variable.
Now we start our loop. Everyone should like a good loop. Each user will have it's own path. The first thing we run into is that the above command gave us HKEY_Local_Machine instead of a searchable HKLM. So we change them using the replace. Then we grab the userID for later. Finally, we grab all the applications. Notice the name is the new name we made. It's important to have the HKLM: because without it, you will get an error with get-childitem. No candy was stolen from any children while writing this blog post.
Notice we are looking for the appid at the end. Sometimes, there will be more than one entry like this. To force Intune apps to redeploy, we must remove all of them. I liken them to bed bugs. Burn them all. With that said, we start our loop. For each App inside the applications. We will get the app name and then remove it. Once again, we used get-childitem. Goodness, I need to stop still items from kids. So we need to convert the name like we did before changing the HKEY_Local_machine to HKLM: with a nice replace. Once we have it, we delete the path and everything inside by force.
Now we need to handle the GRS side. The GRS keeps the datetime stamps. Like I said before, most people use the logs. Today we will navigate through the registry. The first thing we are going to do is set the path and get the kids on that path. This is where the UserID we made at the start of this big loop comes into play.
Now we have the children's items. We start our looping. The first thing we get is our GRS properties with the get-itemproperty commands. Now here is the magic. A standard check has only 1 or maybe 2 items inside the folder. While more advanced items will have more than that. So, if we convert the properties into a Powershell object, we can count them.
Yes, the second line works. You can pretty much convert anything into a PowerShell object. All we have to do now is count how many counts per object are there. When we convert the item property into a powershell object, we gain a few extra items. So, anything past 5 in this case will be our special stuff. So, if it is past 5, we get to work.
We first look at the keys, looking for our fantastic 4. We will do this by calling the psobject.properties.name because it will be the name of the property. Then we will compare it to the appid. If they are the same, we correct the hkey_local_machine and drop our nuke, remove-item. Nested ifs are fun, but can get complex quick if you don't watch out.
After the large loop of Fantastic Four, we have to restart the intune extension. So, using get service, we pipe it into restart service. Then we are done! Right? Well, kind of.
After the script has done it's thing and stolen candy for kids and nuked stuff, you will need to resync the computer. You can do this via the Accounts setting, or you can do this via Intune. In my case, the application we were redeploying was our remote application. So, I had to do it via Intune.
Navigate to the device under Windows > Device Name and hit the sync button. Now you are done. Force Intune apps to redeploy, check.
What can we learn as a person?
Restarting is sometimes the only option. Taking a step back, clearing things away, and starting new is good, whether you're troubleshooting an Intune app deployment or dealing with a hard time in life.
When an app in Intune stops working, we don't just sit around and hope it gets fixed (at least for a while). After we empty the registry and do some troubleshooting, we gently push it to redeploy. Life is no different. When things don't work out the way you expected, that's okay; setbacks are inevitable. Starting over equalizes the situation; it's not a sign of surrender.
Restarts, in reality, are chances for growth. By doing so, they demonstrate our flexibility, competence, determination and insight to put things right. Our fantasic four. When something feels stuck, whether it's an app or your thinking, don't be scared to reset. Do not be afraid, especially with our thinking. That's where real change happens.
Recently I was working with a company that gave me a really locked down account. I wasn't use to this as I have always had some level of read only access in each system. I was unable to create a graph API application either. So, I was limited to just my account. This was a great time to use the newer command lines for graph Api as when you connect to Graph API using the PowerShell module, you inherit the access your account has. So today we will Get Intune Devices with PowerShell and Graph API.
The Script
Function Get-IntuneComputer {
    [cmdletbinding()]
    param (
        [string[]]$Username,
        [switch]$Disconnect
    )
    begin {

        #Connects to Graph API

        #Installs the Module
        if ($null -eq (Get-Module Microsoft.Graph.Intune)) {Install-module Microsoft.Graph.Intune}

        #Imports module
        Import-Module Microsoft.Graph.Intune

        #Tests current Connection with a known computer
        $test = Get-IntuneManagedDevice -Filter "deviceName eq 'AComputer'"

        #If the test is empty, then we connect
        if ($null -eq $test) {Connect-MSGraph}
    }
    process {

        #Checks to see if the username flag was used
        if ($PSBoundParameters.ContainsKey('Username')) {
            #if it was used, then we go through each username get information
            $ReturnInfo = foreach ($User in $Username) {
                Get-IntuneManagedDevice -Filter "userPrincipalName eq '$User'" | select-object deviceName,lastSyncDateTime,manufacturer,model,isEncrypted,complianceState
            }
        } else {

            #Grabs all of the devices and simple common information.
            $ReturnInfo = Get-IntuneManagedDevice | Get-MSGraphAllPages | select-object deviceName,lastSyncDateTime,manufacturer,model,isEncrypted,complianceState,userDisplayName,userPrincipalName
        }
    }
    end {

        #Returns the information
        $ReturnInfo

        #Disconnects if we want it.
        if ($Disconnect) {Disconnect-MgGraph}
    }
}
The Breakdown
Parameters
We enter the script with the common parameters. Command let binding flag. This gives us additional parameters like verbose. Next, we have a list of strings called Username. We are using a list of strings to allow us to have multiple inputs. Doing this, we should be able to use a list of usernames and get their Intune Device information. Note that this is a multiple input parameter, thus, you will need to deal with it with a loop later. Next is the Disconnect switch. It's either true or not. By default, this script will keep connected to Intune.
Connecting to Intune
Next we will connect to the Intune system. First, we need to check and install the module. We check the install by using the get-module command. We are looking for the Microsoft.Graph.Intune module. If it doesn't exist, we want to install it.
if ($null -eq (Get-Module Microsoft.Graph.Intune)) {Install-module Microsoft.Graph.Intune}
If the module does exist, we will simply skip the install and move to the import. We will be using the importing the same module
Import-Module Microsoft.Graph.Intune
Afterwards, We want to test the connection to Microsoft Intune. The best way to do this is to test a command. You can do it however you want. I am testing against a device that is in Intune.
We will be using this command later. Notice the filter. We are filter the deviceName here. Replace the 'AComputer' with whatever you want. If you want to use another command, feel free. This was the fastest command that tested. The above command will produce a null response if you are not connect. Thus, we can test, $test with an if statement. If it comes back with information, we are good, but if it is null, we tell it to connect.
if ($null -eq $test) {Connect-MSGraph}
Get Intune Devices with PowerShell
Now it's time to Get Intune Devices with PowerShell. The first thing we check to see is if we used a username parameter. We didn't make this parameter mandatory to give the script flexibility. Now, we need to code for said flexibility. If the command contained the Username flag, we want to honor that usage. We do this with the PowerShell Bound Parameters. The PowerShell Bound Parameters is the - that come after the command. We are looking to see if it contains a key of username. If it does, we want to grab the needed information with the username. While if it doesn't, we grab everything.
if ($PSBoundParameters.ContainsKey('Username')) {
    #Grab based on username
} else {
    #get every computer
}
As we spoke about the list of string parameter needing a loop, this is where we are going to do that. We first create a foreach loop of users for the username. Here, the we will dump the gathered information into a Return variable of $ReturnInfo. Inside our loop, we gather the requried information. The Get-IntuneManagedDevice command filter will need to use the userPrincipalName. These filters are string filters and not object filters. Thus, the term like will cause issues. This is why we are using the equal term.
Now, if we are not searching the Username, we want to grab all the devices on the network. This way if you run the command without any flags, you will get information. Here, we use the Get-IntuneManagedDevice followed by the Get-MSGraphAllPages to capture all the pages in question.
Now it's time to end the script. We want to return the information gathered. I want to know some basic information. The commands presented produces a large amount of data. In this case we will be selecting the following:
Finally, we test to see if we wanted to disconnect. A simple if statement does this. If we choose to disconnect we run the Disconnect-MgGraph command.
if ($Disconnect) {Disconnect-MgGraph}
What can we learn as a person
In PowerShell, we can stream line the output that we get. Often times commands like these produce a lot of useless but useful information. It's not useful at the moment. This is like our work enviroment. I use to be a big advacate of duel, and not more screens. I would often have 5 things going on at once. My desk use to have everything I needed to quickly grab and solve a personal problem. For example, my chapstick sat on my computer stand. My water bottle beside the monitor. Papers, sticky notes, and more all scattered accross my desk. I wondered why I couldn't focus. Our brains are like batteries. How much focus is the charge. Our brains take in everything. Your brain notices the speck of dirt on the computer monitor and the sticky note, without your password on it, hanging from your monitor. This takes your charge.
Having two monitors is great and I still use two. However, I have a focused monitor and a second monitor for when I need to connect to something else. At some point I will get a larger wider monitor and drop the second one all together. Having less allows your brain to grab more attention on one or two tasks. Someone like myself, I have more than one task going at any moment. That's ok with my brain. Let's use our Select-object command in real life and remove the distractions from our desks.
I was working with a client a few months ago, and they needed me to set up auto licensing. The idea is that the helpdesk right-clicks on a user and clicks copy. That user will get all the groups inside the template user. This also includes licensing for O365. Believe it or not, this is super easy to do.
The client's structure was as such, They had a local active directory that uses ad connect to sync all the user information. The ad sync occurred every 30 minutes.
Local AD
The first step is to create the licensing groups in local AD. In this case, I named them "Microsoft Office 365 E3" and "Microsoft Office 365 F3". This way it's super clear. These will be security groups. I have them in an OU that is synced with AD Connect.
Only users that will get E3 will be in the E3 group and the ones getting F3 will be in the F3 group. Once again, very clear.
Now I have created the groups, I complete an AD sync or I wait for the ADSync to be completed. To force an ad sync, you will need to log into the AD sync server. Normally this is a DC, it doesn't have to be, but normally from my experience, it is.
Start-ADSyncSyncCycle -PolicyType Initial
You can view your sync by loading the Synchronization Service Manager and watching the sync. Once the sync is complete, move to the next step, Azure AD.
Azure AD Licensing Assignments.
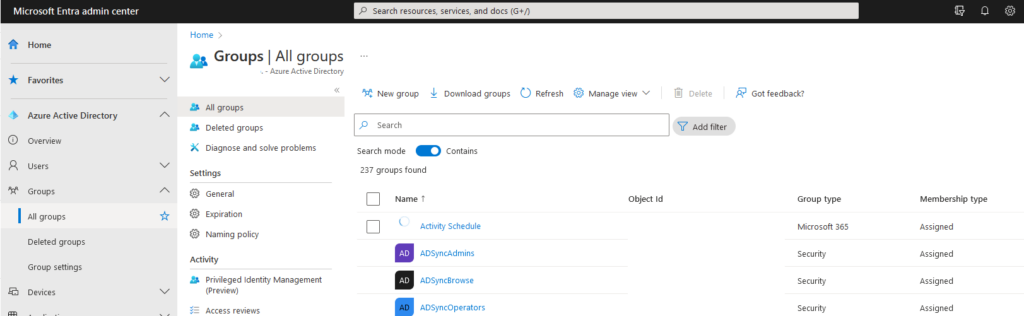
Log into azure ad at https://entra.microsoft.com. On the left side, You will see Groups. Expand Groups and Click all Groups. Then search for the group you are looking for. In this case we want the Microsoft Office 365 E3 Group.
Now its time to add the license for anyone who joins this group.
Click on the Group
Under Manage click Licenses
In The middle Click Assignment
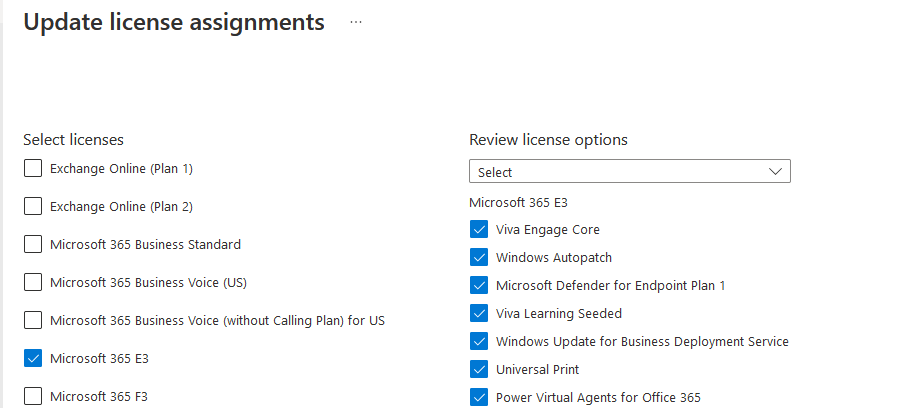
Add the desired licenses and applications associated with the licenses, See the image below.
Click Save.
The final step is to add users accordingly. After they sync, they will receive the licensing accordingly. Now you have a fully automated method of assigning licenses.
Today I was trying to sync a user's account to the cloud and I received an error code that was new to me. Access denied, Unauthorized! I was using a domain admin account. I should have full access and rights. It threw me off as I have never seen such a thing. Why was I getting the "Azure AD Connect Unauthorized error"? This is what the error message looked like:
Retrieving the COM class factory for remote component with CLSID {xxxxxxxx-xxxx-xxxx-xxxx-xxxxxxxxxxx}
from machine DC-01 failed due to the following error: 80070005 DC-01.
    + CategoryInfo          : WriteError: (Microsoft.Ident...ADSyncSyncCycle:StartADSyncSyncCycle)
      [Start-ADSyncSyncCycle], UnauthorizedAccessException
    + FullyQualifiedErrorId : Retrieving the COM class factory for remote component with CLSID
      {835BEE60-8731-4159-8BFF-941301D76D05} from machine DC-01 failed due to the following error:
      80070005 DC-01.,Microsoft.IdentityManagement.PowerShell.Cmdlet.StartADSyncSyncCycle
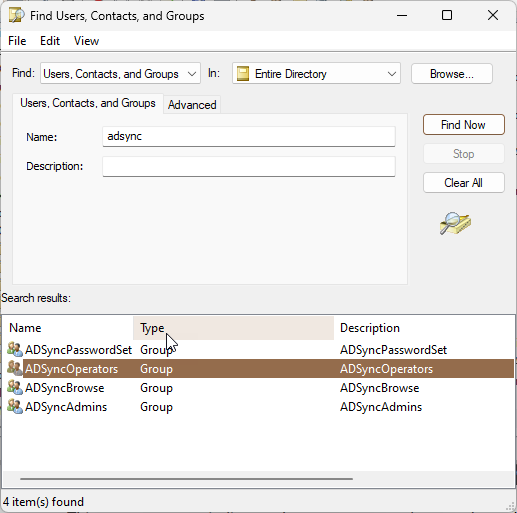
I was lost for a second. After looking into ad for the ADSync groups and found that no user had access to any of the groups. There were 4 groups found: the Password Set, Operators, Browse, and admins.
I added the domain admins to the ADSync Admins. Once I logged out of the server and logged back into the server. Then I was able to complete an ADSync Cycle. This resolved the Azure AD Connect Unauthorized error message for me. Why were domain admins not present? I don't know, but now I know where to look if I see this error again.
We use cookies to ensure that we give you the best experience on our website. If you continue to use this site we will assume that you are happy with it.