Got asked in a meeting "so is Intune MDM or MAM, just pick one". I said "yes" and the guy actually got a little annoyed at me. Fair reaction honestly, it sounds like a dodge. But its not a dodge, its the actual answer. Intune runs both, at the same time, and they do genuinely different jobs. So lets split this into two halves and actually look at each one.
The short answer
MDM, mobile device management, manages the whole device. MAM, mobile application management, manages just the work apps and the data inside them. Leaving the rest of the device alone. Intune does both, independently or together, and which one you lean on depends on whose device it is and what you're actually trying to protect.
Part one: what MDM actually does
MDM is the "the company owns this device and manages the whole thing" side. A device gets enrolled, either the user does it themselves through Company Portal, or its automatic through Windows Autopilot, Apple Automated Device Enrollment, or Android Enterprise. Once its enrolled, Intune can see and manage settings, security, and apps across the entire device. Lost or stolen, you can wipe the whole thing.
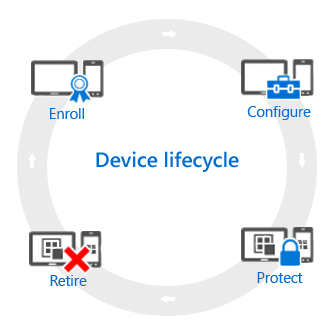
The MDM side generally moves through a lifecycle:
Enroll, get the device registered so it can be managed
Configure, device configuration profiles, Wi-Fi and VPN settings, password requirements, camera restrictions, that kind of thing
Protect, multi-factor authentication, Windows Hello for Business, compliance policies
Retire, wipe or remove the device from management when its done, lost, or reassigned
The MDM device lifecycle. Source: Microsoft Learn.
MDM is what you reach for when users need corporate Wi-Fi or VPN profiles pushed automatically, when a set of apps needs to land on the device without the user hunting for them, or when you're under a regulatory requirement that specifically calls out device level controls like encryption.
Worth knowing, Intune isnt the only MDM out there, and it doesnt have to be. Jamf and Omnissa Workspace ONE are common alternatives, especially in Apple heavy or frontline device shops. A device can only be enrolled in one MDM at a time, but plenty of orgs run Intune for most of the fleet and a different MDM for a specific pool of shared or kiosk devices. If you go that route, Intune partner compliance can still fold third party MDM managed devices into your Conditional Access decisions.
Part two: what MAM actually does
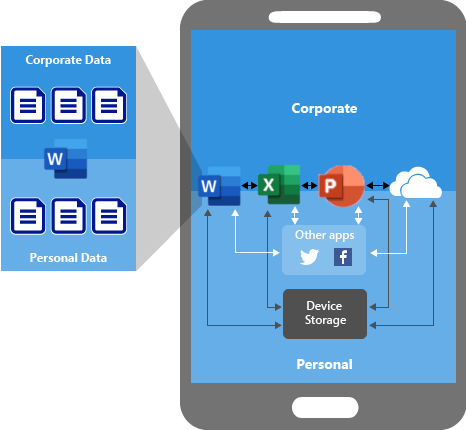
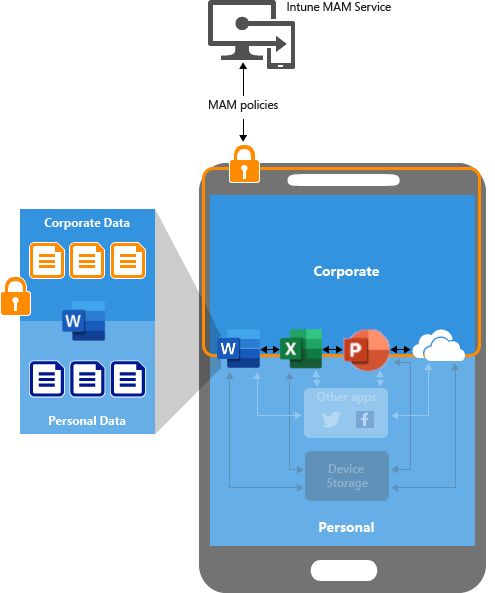
MAM is the "I dont own this device, but I still need to protect my data on it" side. Instead of managing the whole phone, Intune wraps app protection policies around specific apps, Outlook, Teams, the Microsoft 365 apps, and a long list of other supported apps. It controls things like requiring a PIN to open the app, blocking copy and paste out of it into personal apps, and preventing company data from saving to personal storage.
Without any protection in place, data just moves wherever the user drags it, work file into a personal cloud drive, company email pasted into a personal notes app, no real boundary.
Data movement with no app protection policies. Source: Microsoft Learn.
There are two flavors of MAM worth knowing apart:
MAM without device enrollment, the device isnt managed at all, maybe its personal, maybe its enrolled in a totally different MDM. Intune only ever touches the managed apps. You lose some things this way, you cant push apps to the device automatically, cant provision certificate profiles, cant hand out Wi-Fi or VPN settings, the user has to grab apps from the store themselves.
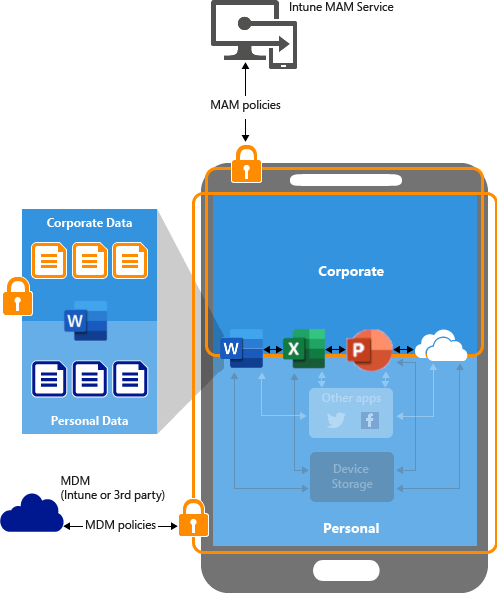
MAM with device management, commonly called MAM plus MDM. The device is already Intune enrolled, and app protection policies get layered on top as an extra safeguard for the apps handling the most sensitive stuff.
MAM layered on top of MDM. Source: Microsoft Learn.MAM without any MDM enrollment at all. Source: Microsoft Learn.
MAM is what you reach for on BYOD, when someone's using their own tablet and absolutely does not want IT managing their whole personal device, and honestly you shouldnt want that responsibility either. Its centered on user identity rather than the device itself, so the same MAM policy applies to that user regardless of what device they picked up.
Just like MDM has alternatives, MAM policies also work alongside Conditional Access to actually enforce things at sign in time, and there are other MAM approaches out there too, though Intune's is the one most tightly wired into Microsoft 365 apps specifically.
Putting it together
Corporate owned device, single user, needs the full set of policies including Wi-Fi, certs, and remote wipe, thats MDM. Personal device, BYOD, and all you actually care about is the company data inside a handful of apps, thats MAM without enrollment. Corporate device that also handles especially sensitive data in one or two apps, thats MDM with MAM stacked on top for that extra layer. Most real orgs end up running a mix of all three depending on who's holding the device.
What can we learn as a person
A computer thinks in ones and zeros. On or off, true or false, MDM or MAM, pick one. And I think a lot of us try to run our own heads the same way, because its simpler, good or bad, safe or dangerous, this person is trustworthy or they're not. But Intune itself doesnt actually work that way even though its running on machines built entirely out of ones and zeros underneath. It holds two different modes at once, applies different rules depending on context, and lets the same device be "managed" in one sense and "not managed" in another, at the same time, without anything breaking.
Reality just doesnt sort into binary as cleanly as we want it to, even the tools built entirely on binary dont actually work that way once you zoom out. Most of the stuff that stresses us out, is this relationship good or bad, was that decision right or wrong, am I doing okay or not, its almost never a clean one or a clean zero. Its usually both, in different contexts, at the same time.
So where are you forcing a one or a zero onto something that's actually running both at once? What would it look like to let it be MDM and MAM instead of picking a side?
I opened the Domain Admins group at a new client last month and counted fourteen accounts. Nobody in the room could explain more than five of them. There was a service account, a former employee who left in 2022, and one called temp-admin that had been temporary since the Obama administration. That's the moment you realize you need to audit Domain Admins, because the group that owns your entire domain had turned into a junk drawer. My junk drawer has cookies beside the glue sticks. Might not want to eat those cookies.
This is the assessment side of the tiered AD model. Before you lock the door, you should know who already has a key.
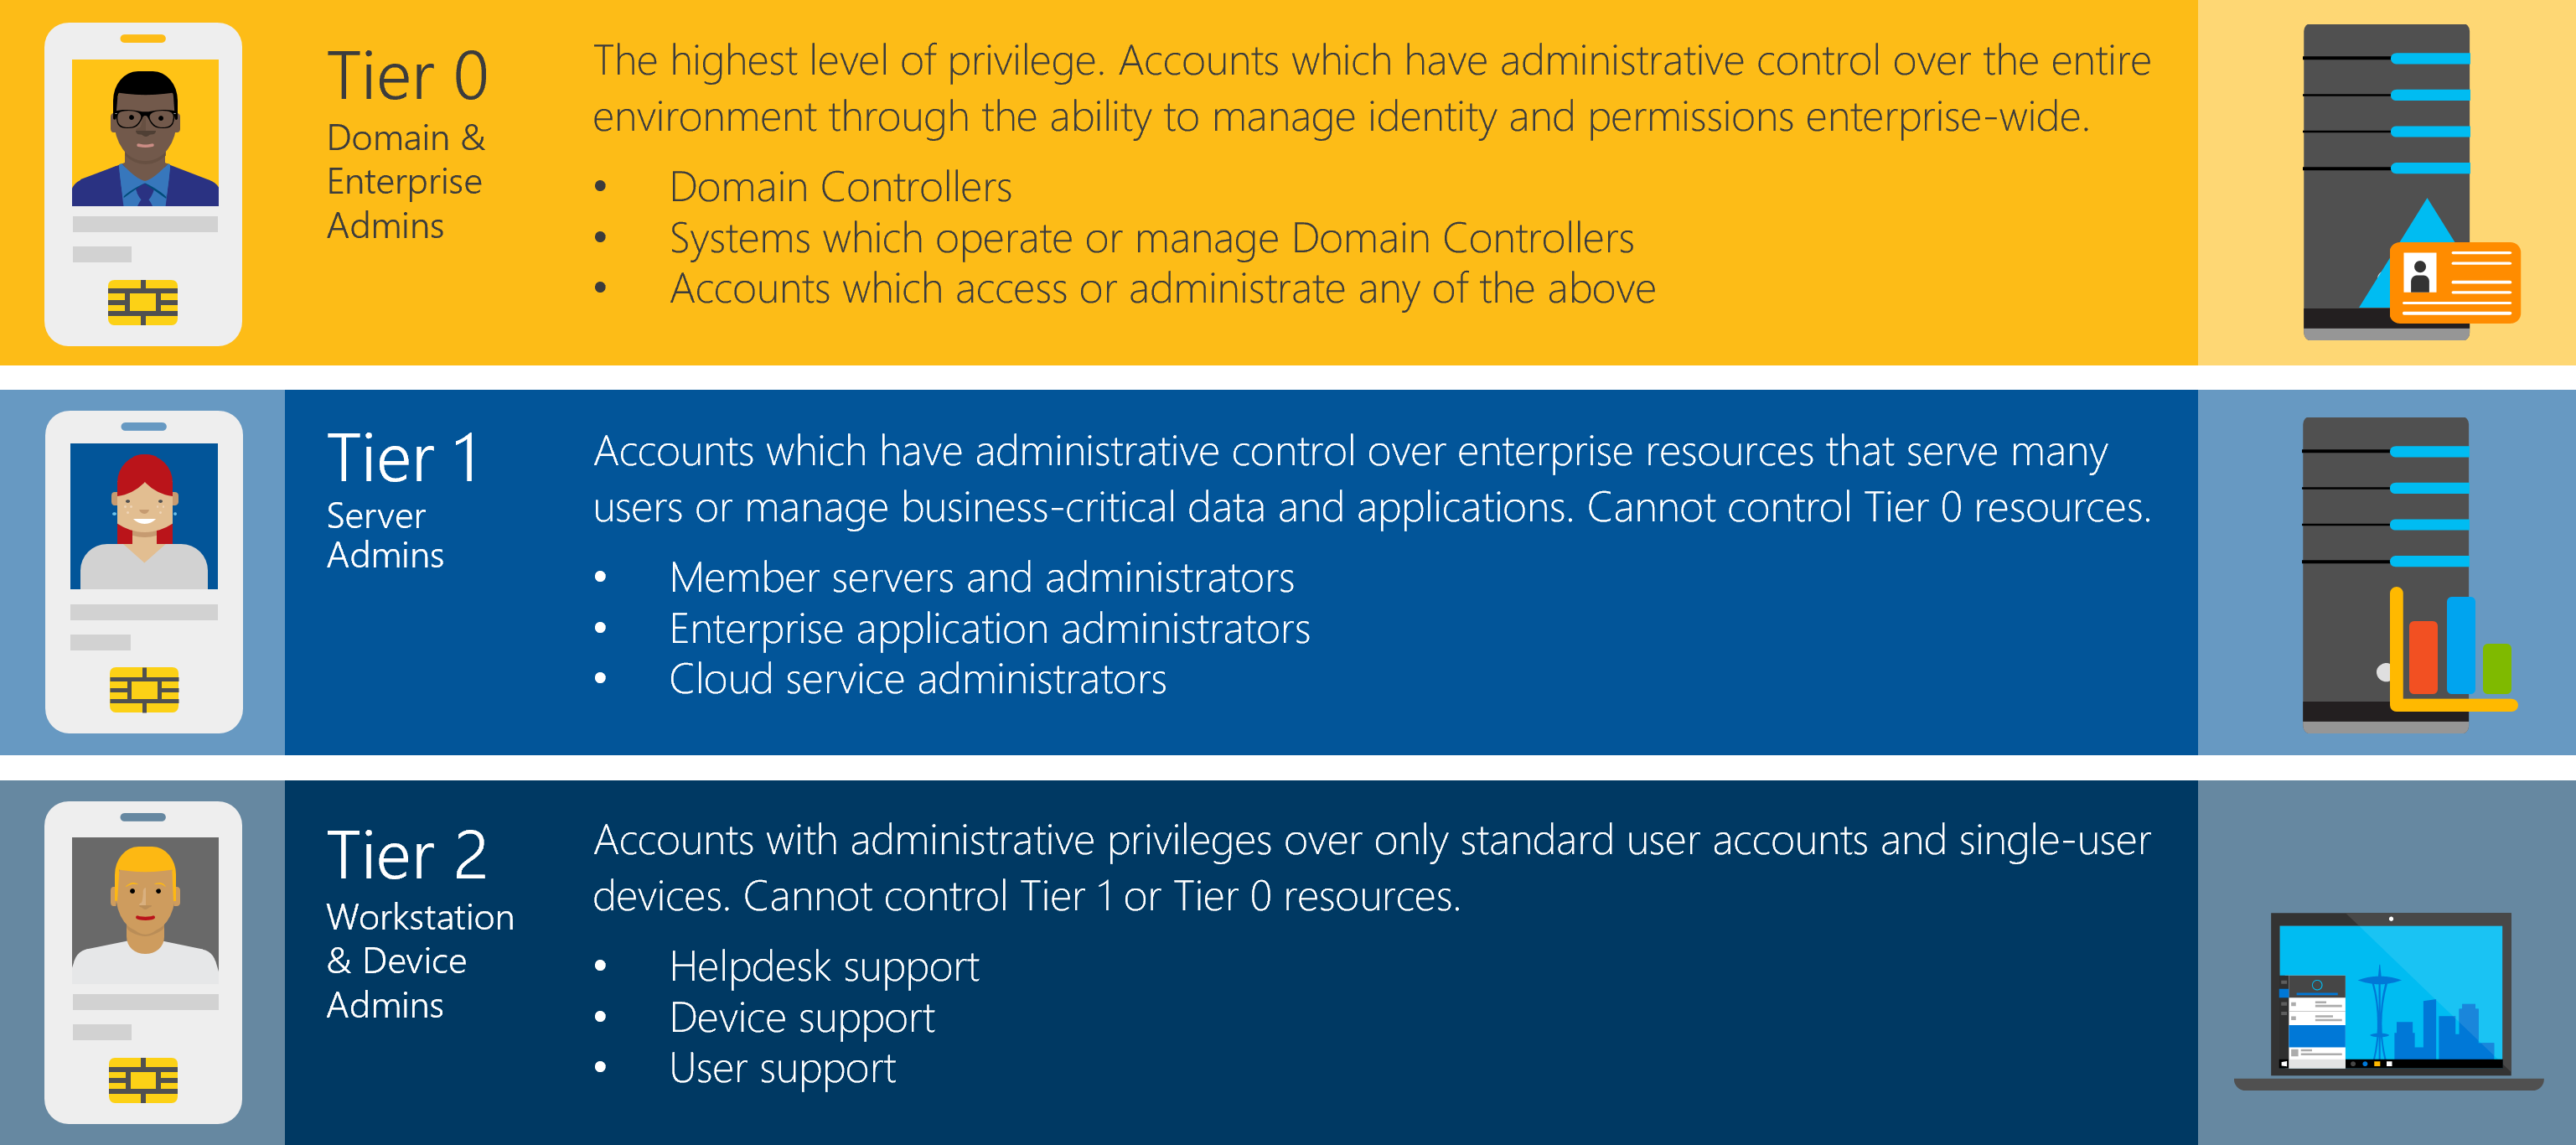
Why Domain Admins is the account attackers actually want
Domain Admins isnt just another group. By default, its members become local administrators on every member server and every workstation in the domain. Own one DA account and you effectively own every machine that trusts the domain. That's why it sits at Tier 0, the identity control plane, right next to your domain controllers.
Domain Admins lives at Tier 0, with reach over everything below it. Source: Microsoft Learn.
Every extra account in that group is another credential an attacker can phish, another password that can leak, another laptop that becomes a path to the whole environment. Microsoft's own guidance is blunt about it. Day to day, Domain Admins should be empty, with membership added only for a build or a disaster recovery.
How to audit Domain Admins and see who's really in it
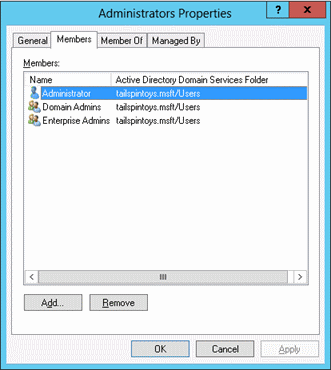
The click path is easy. Open Active Directory Users and Computers, find the Domain Admins group, and open the Members tab. That shows you the direct members.
The Members tab shows direct members, but not the whole story. Source: Microsoft Learn.
Here's the trap though. That command only shows direct members. If someone nested a group inside Domain Admins, its members inherit DA rights while hiding one level down where the Members tab wont show them plainly. Always run it recursively:
Nesting is exactly how a real attacker hides. They dont add their account to Domain Admins where you'd notice. They slip an innocent-looking group in instead, and that group carries the keys.
The privileged groups people forget to check
Domain Admins gets the attention, but it isnt the only group with dangerous reach. Several others grant Tier 0 or near-Tier 0 power, and they rarely get looked at.
Enterprise Admins, forest-wide control, should be empty except during forest-level work
Schema Admins, can rewrite the structure of the directory itself
Administrators (BUILTIN), the domain-level admin group that DA and EA nest into
Account Operators, Server Operators, Print Operators, Backup Operators, legacy groups with more power than their names suggest
DnsAdmins, historically a path to code execution on domain controllers
Group Policy Creator Owners, can create and edit GPOs that hit your whole fleet
Audit them all in one pass instead of clicking through each:
The orphans nobody talks about: adminCount and AdminSDHolder
This is the part that separates a real audit from a quick glance. Active Directory protects privileged accounts with a background process called SDProp. Every hour it stamps adminCount=1 on members of protected groups and locks down their permissions to match a template object named AdminSDHolder.
Here's the catch. When you remove someone from Domain Admins, that stamp doesnt come off. Their adminCount stays at 1, inheritance stays disabled, and the account keeps carrying a privileged-shaped security descriptor long after the privilege is gone. You end up with accounts that look normal but behave like leftovers from an access level they no longer hold.
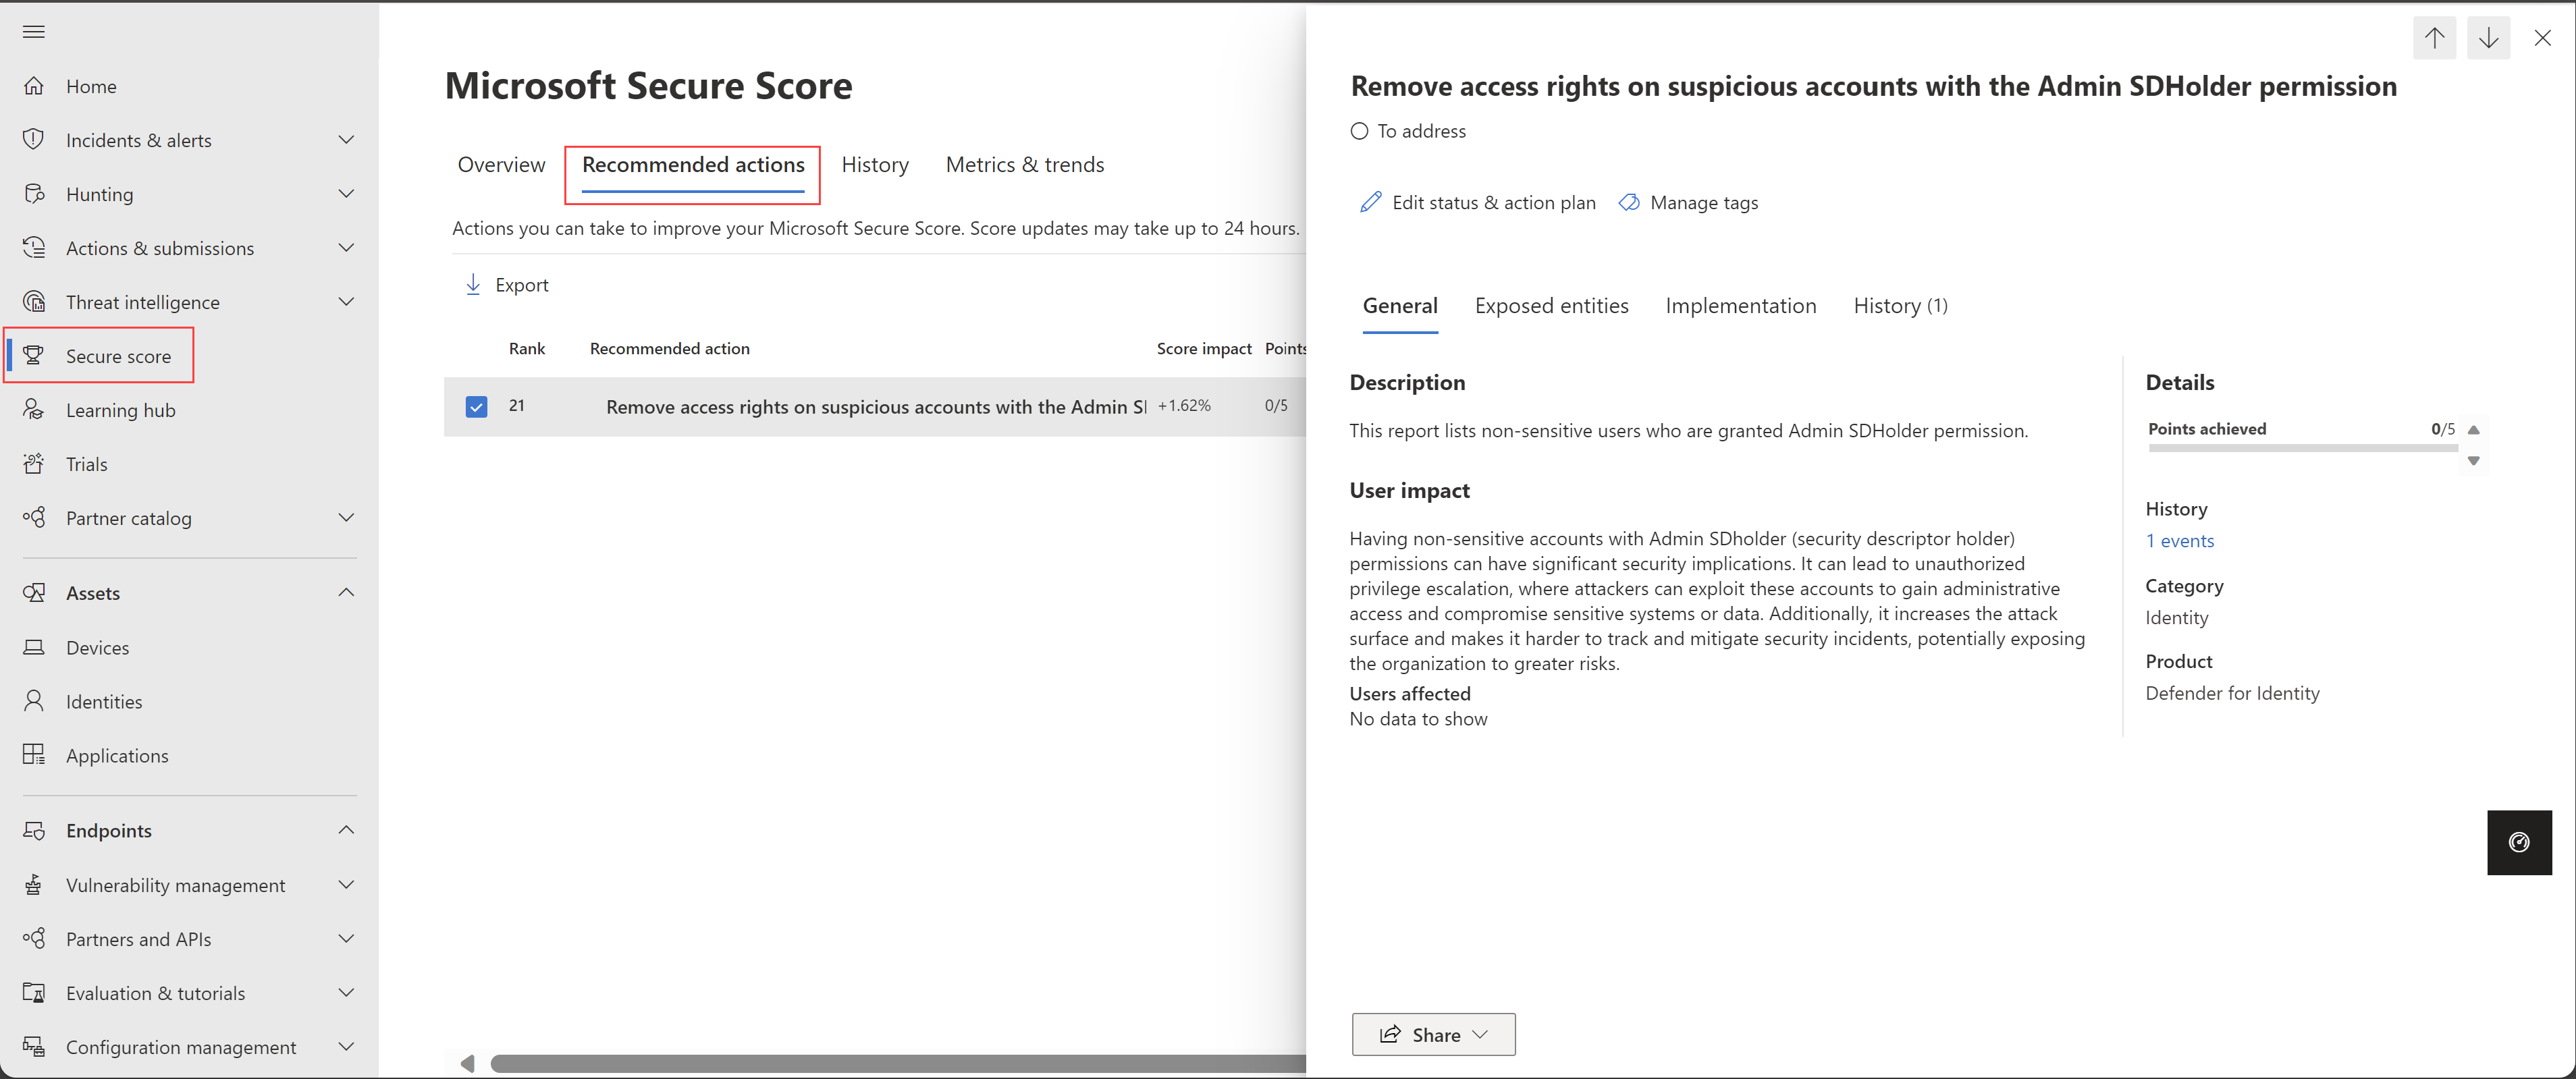
Cross-check that list against who's actually in your privileged groups right now. Anyone with adminCount=1 who isnt currently a member of a protected group is an orphan worth investigating. If you run Microsoft Defender for Identity, its secure score flags suspicious AdminSDHolder permissions for you.
Defender for Identity surfaces suspicious AdminSDHolder access rights. Source: Microsoft Learn.
What to do once you know who's in there
Empty the group. Aim for zero standing members in Domain Admins and Enterprise Admins. Elevate only when a task genuinely needs it, then remove the account.
Keep one break-glass account. The built-in Administrator, secured and stored somewhere safe, is your recovery path if everything else fails.
Use time-bound elevation. A PIM or PAM tool adds someone for the change window and pulls them back out automatically.
Alert on membership changes. Any add to a Tier 0 group should page the AD and security teams, every time.
Clean up the orphans. For confirmed leftovers, reset adminCount and re-enable inheritance so the object behaves like the normal account it now is.
To audit Domain Admins properly, look past the Members tab. Run the check recursively so nested groups cant hide, sweep the other privileged groups in the same pass, and hunt the adminCount orphans that outlived their access. Then cut membership to as close to zero as your operations allow. The goal isnt a tidy list. Its a group so small and so watched that turning it into a junk drawer again would be almost impossible.
What can we learn as a person
The temp-admin account is what stuck with me. Somebody granted it access for one afternoon years ago, and it just never got revoked. The access outlived the reason for it by half a decade, and nobody noticed until it became a liability.
I carry a few of those. People I handed a level of trust to during one hard season, who still have it long after the season ended. Old resentments I granted temporary rent in my head that quietly became permanent residents. And the adminCount orphans hit even harder. Those are the roles I dont hold anymore that still shape how people treat me, and how I treat myself, a status stamped on years ago that nobody ever came back to clear.
Maybe the healthiest thing any of us can run is a membership audit on ourselves. So who still has standing access to you that they earned for a moment and kept by default? And what old adminCount is still stamped on you that nobody ever came back to reset?
Got a ticket that just said "my Android phone wont enroll" with zero other detail. My first question back was "enroll as what." Not being difficult here. Intune actually has five different ways to enroll an Android device. Each one behaves completely differently depending on who owns the phone. So this post is the real answer to how to enroll Android devices in Intune. Its broken down by method, not one generic walkthrough that only fits half the readers.
How to enroll Android devices in Intune: the short version
Personal phone with work stuff on it, user enrolls it themselves, thats a work profile
Company owned phone, one person, work only, admin sets most of it up, thats fully managed
Company owned phone that also allows personal use, thats corporate owned work profile
A stack of shared devices to push through fast, thats where a device enrollment manager account comes in
BYOD: enroll a personal Android device with a work profile
Most enrollment tickets come from this scenario. Someone's using their own personal Android phone and needs email, Teams, whatever else. Intune creates a separate work profile on the device. Its a genuinely separate container with its own icon badge, so personal apps and work apps never mix. IT can see and manage the work side. IT cannot see personal texts, photos, or apps on the other side, and thats not a courtesy, its architecturally separate.
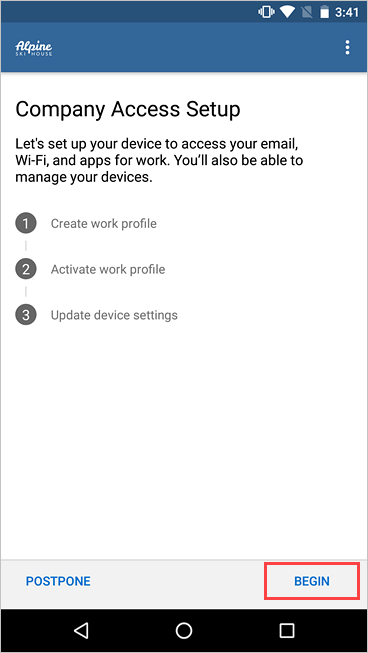
Heres how the end user actually enrolls the device:
Install the Intune Company Portal app from Google Play, or follow the redirect from Outlook or Teams if your org requires enrollment before app access
Open Company Portal and sign in with work credentials
On the Company Access Setup screen, tap Begin
Review the privacy screen showing what the org can and cant see, then tap Continue
Accept Google's terms for creating a work profile
Wait a few minutes while Intune builds the work profile
Sign in again when prompted, this step activates the work profile
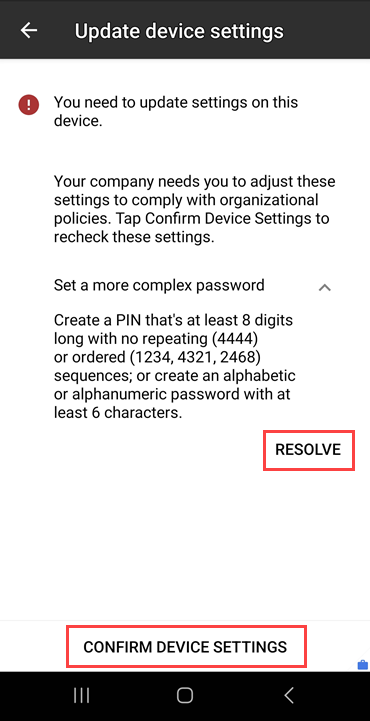
Resolve any device settings Company Portal flags, then tap Confirm Device Settings
Starting BYOD work profile enrollment in Company Portal. Source: Microsoft Learn.
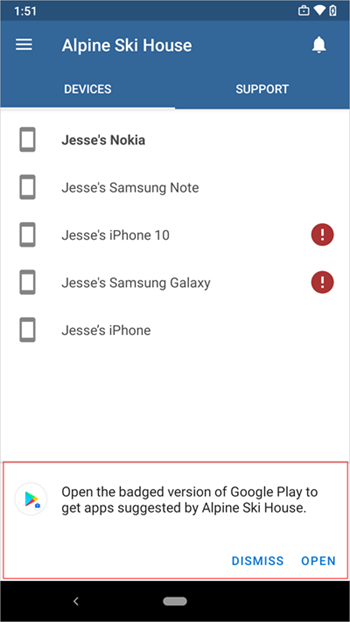
Company Portal prompts the user to check out suggested work apps from a badged version of Google Play once enrollment finishes. They can also grab apps later from the Get Apps menu instead.
Resolving required device settings near the end of BYOD enrollment. Source: Microsoft Learn.Grabbing work apps once the work profile is active. Source: Microsoft Learn.
Worth knowing, this method is genuinely user driven. Admins only restrict it indirectly, usually through Conditional Access requiring enrollment before someone opens Outlook or Teams. Every button press during setup belongs to the end user.
Corporate owned Android devices: three more ways to enroll
These three enrollment types all cover company owned devices, and IT sets each one up before it reaches the user. How much the user does at that point depends entirely on which method you picked.
Fully managed
One person uses the device, work only, no personal use allowed. IT controls the entire device, including blocking uninstalls and factory resets.
Corporate owned with a work profile
The company owns the device, but personal use is still fine. This method separates work and personal data the same way BYOD does, except IT still owns and manages the hardware itself.
Dedicated devices
No user ties to the device at all. Think kiosks, digital signage, ticket printers, inventory scanners, anything shared or standing in a lobby somewhere.
Setting up the enrollment profile
Admins handle the groundwork before any device ships out:
Set MDM authority to Intune, a one time tenant setup
Connect your Intune tenant to your Managed Google Play account
Create an enrollment profile under Devices > Enrollment > Android, and pick the device type
Intune generates a token for that profile, both as a text string and a QR code
Pass the enrollment method along to whoever is setting the device up
How the user actually finishes enrollment
Whoever holds the device, an end user or IT staging it first, completes enrollment through one of these:
QR code, tap the first OOBE screen repeatedly to launch a QR reader, then scan the code. Microsoft recommends this as the default for most scenarios.
Token entry, on the Google sign in screen, type afw#setup instead of a Gmail address, install the Android Device Policy app, then enter the token string by hand. This works well when QR or NFC arent available.
NFC, tap the device against a pre programmed NFC tag.
Google Zero Touch, the closest thing Android has to Windows Autopilot. Provisioning starts the moment the device powers on, no manual code entry at all, but it requires buying devices through an authorized zero touch reseller ahead of time.
Samsung Knox Mobile Enrollment, Samsung's own bulk enrollment path through the Knox Admin Portal.
One gotcha to flag for anyone setting up fully managed or corporate work profile devices. Dont restart the device mid enrollment. Restarting during that window can leave the device looking enrolled in the admin center while it silently misses every policy you assigned.
Kiosks and shared devices: bring in a device enrollment manager
A device enrollment manager account earns its keep on dedicated devices, or really any batch of shared Android hardware. Standard user or admin accounts hit a device cap fast, and things get messy administratively well before you reach real scale. A DEM account skips that problem entirely. Its a dedicated, non personal account whose only job is enrolling devices. It can handle up to 1,000 without touching normal per user limits.
Say you're rolling out 40 dedicated ticket printers or lobby kiosks. You wouldnt enroll each one under a random employee's identity, and you definitely wouldnt use your own personal admin account either. Instead, create something like kiosk-enroll@yourtenant.com, assign it the device enrollment manager role, and hand its credentials to whoever's enrolling the batch. Every device ties back to that one account instead of a real person. That makes cleanup and auditing dramatically easier down the line.
Putting it together
A personal phone gets a work profile through Company Portal, with the user doing everything themselves. A company owned phone used for work only gets fully managed. An admin builds the enrollment profile, and the user just scans a code or types a token. Personal use alongside company ownership calls for corporate owned work profile instead. Nobody owning the device at all means dedicated. A pile of those devices means handing the job to a device enrollment manager account instead of anyone's personal identity.
What can we learn as a person
What sticks with me about the work profile is that the separation isnt something you bolt on after the fact. Intune builds it in from the start. Its a genuinely separate container from day one instead of everything mixing together and getting sorted out later. I think a lot of us handle our own boundaries the opposite way. We let everything blend first, work stress into home life, one relationship's problems into another. Then we try to untangle it after it's already a mess. The work profile only works because the separation happens up front, before anything gets a chance to bleed into the other side.
Where in your life are you letting things share one profile that honestly need their own separate container? What would it look like to build that separation in at the start instead of sorting it out after everything's already tangled together?
Years ago onboarding a new hire meant somebody on IT physically imaging a laptop, installing the fifteen apps by hand, joining it to domain, then shipping it or hand delivering it. Took most of a day per machine if nothing went wrong, which something always did. Now the box just shows up at the person's house, they open it, sign in, and by the time they've cracked open a Dr Pepper the thing is already domain joined and pulling down apps on its own. Thats Autopilot, and its genuinely one of the better tricks Microsoft has pulled off in this space.
What Autopilot actually is
Windows Autopilot is a zero touch deployment system. The device ships straight from the OEM to the end user, no IT hands ever touch it, no custom image gets built. It uses whatever Windows install the manufacturer already put on it. All the actual configuration happens automatically the moment the user turns it on and connects to a network.
From the user's side, this is genuinely almost nothing:
Unbox it, plug it in, turn it on
Pick language, locale, and keyboard if needed
Connect to Wi-Fi or plug in ethernet
Sign in with their work account
Everything after that is automated. The device joins Microsoft Entra ID, enrolls in Intune, and starts pulling down whatever apps and policies you've assigned to it.
How the device even knows what to do
Every device has a hardware hash, basically a fingerprint generated from its hardware. Autopilot registration is just getting that hash into your tenant so Intune recognizes the device the moment it shows up on the network. There are two common ways this happens:
OEM registration, the reseller or manufacturer registers the hash for you at time of purchase. This is the actual zero touch version, you buy it, it ships, its already known before it even arrives.
Manual registration, you run the Get-WindowsAutopilotInfo PowerShell script against the device, which uploads the hash directly, or exports it to a CSV you import into the Intune admin center yourself under Devices > Enrollment > Windows Autopilot > Devices.
Once the hash is in and a deployment profile is assigned to the group that device belongs to, Autopilot has everything it needs.
Setting up a deployment profile
The deployment profile is what actually defines the OOBE experience, this is the part people usually mean when they say "set up Autopilot."
Intune admin center > Devices > Windows > Enrollment > Deployment Profiles
Create Profile > Windows PC
Name it, give it a description
On the Out-of-box experience page, pick your Deployment mode, User-driven for devices tied to a specific person, Self-deploying for devices with no user, like a kiosk, which skips the sign in step entirely
Choose whether the device joins Microsoft Entra ID or Microsoft Entra hybrid join
Configure the OOBE screens, hide or show the EULA, hide or show privacy settings, set the user account type to Standard or Administrator
Assign it to the device group that contains your registered hardware hashes
Choosing deployment mode and OOBE settings for an Autopilot profile. Source: Microsoft Learn.Assigning the profile to a device group. Source: Microsoft Learn.
That name template setting is worth calling out specifically. You can set device names automatically during enrollment using macros, %SERIAL% for the hardware serial number, or %RAND:4% for a random four digit string. Saves you from a fleet of laptops all named DESKTOP-7F3K9X2.
The part that installs the company app and sets up the account: the Enrollment Status Page
This is the piece people are usually actually picturing when they imagine Autopilot, a progress screen that shows apps and settings landing on the machine before the user is let loose on it. Thats the Enrollment Status Page, ESP.
ESP runs in two phases:
Device ESP phase, Windows configures itself and installs anything assigned to the device itself, before any user signs in
User ESP phase, once the person signs in with their own account, whatever's assigned to that user, their specific apps, their specific config, gets applied
To set it up:
Intune admin center > Devices > Windows > Enrollment > Enrollment Status Page
Select Default, or create a new profile
Turn on Show app and profile installation progress
Decide if you want Block device use until all apps and profiles are installed, this is the setting that actually stops the user from bailing out to the desktop before your company app finishes installing
Assign it, same as any other profile
The Enrollment Status Page during OOBE. Source: Microsoft Learn.
So the actual flow a new hire experiences: box arrives, they power it on, connect to Wi-Fi, sign in with their work email. Device phase runs quietly for a minute. Then the user phase kicks in, the ESP shows a progress bar while your company app installs and their account gets fully configured. When it hits 100 percent, they're sitting at a working desktop with everything already there. No helpdesk ticket, no IT visit, no imaging.
Worth knowing before you flip it on
Self-deploying mode requires specific hardware, TPM 2.0 and a few other things, since theres no user around to authenticate
Assignment isnt instant, Intune periodically checks assigned groups and it can genuinely take a while depending on group membership and hash sync timing, dont panic if a brand new device doesnt pick up its profile in the first five minutes
If you're going the manual registration route instead of OEM registration, that PowerShell script needs to run either during OOBE itself via Shift+F10 for a command prompt, or from an already set up device
Putting it together
Autopilot is really three pieces working together. The hardware hash tells Intune this device exists and belongs to you. The deployment profile tells it what the OOBE screens should look like and whether a user is involved at all. And the Enrollment Status Page is what actually holds the user back long enough for your company app and their account to finish setting up before they get free rein on the machine. Get those three pieces right and shipping a laptop straight to someone's house stops being a leap of faith.
What can we learn as a person
What gets me about Autopilot is that the device doesnt need anyone standing over it to become useful. It just needs to be registered ahead of time, know where its supposed to end up, and be given a little patience while the pieces land in the right order. Nobody's hovering, nobody's babysitting each step, it just quietly becomes what its supposed to be if you set the groundwork up front.
I think a lot of us wait for someone to hand deliver us fully configured too, wait for a mentor, a plan, someone to walk us through every screen personally, before we believe we can actually become anything. But most of the time the groundwork was already there. We were already registered, so to speak. We just needed to turn on and give the process room to run instead of white knuckling every single step ourselves.
So whats the deployment profile you've already got sitting there, ready to go, that you just havent powered on for yet?
You built the tiers. Domain admins cant log into workstations anymore, the deny-logon GPOs are humming, and you feel pretty good. Then a red team drops a report showing they lifted a Tier 0 credential and replayed it from a jump box you forgot about. The tier model told the account where it couldnt log in. It never told Kerberos where the credential was allowed to come from. That gap is exactly what the Protected Users group and Authentication Policy Silos close.
This is the follow-up to the tiered AD model. Tiering draws the boundary. These two features weld it shut.
Two features, two different jobs
People lump these together, but they solve different halves of the same problem.
Protected Users hardens the credential itself. No caching, Kerberos only, short lifetime. It makes the credential hard to steal in the first place.
Authentication Policy Silos pin the credential to specific machines. Even a stolen credential wont authenticate from the wrong host, because Kerberos refuses it.
One makes the key hard to copy. The other makes the copied key useless anywhere but the right lock. Run them together and a leaked Tier 0 account stops being a company-ending event.
Protected Users: hardening the credential
Protected Users is a built-in global security group. Drop an account in it and Active Directory applies a set of protections you cant configure or turn off. Thats the point. Nobody, including a helpful admin under pressure, can weaken them.
When a member signs in, they get this treatment:
No NTLM, no Digest, no CredSSP credential delegation. Kerberos only.
No DES or RC4. The account uses AES, which means it actually needs AES keys.
No cached credentials and no cached verifier, so offline sign-in stops working for that account.
No Kerberos delegation, constrained or unconstrained.
A Kerberos TGT lifetime locked to four hours, non-renewable. After four hours, authenticate again.
Add a user through Active Directory Users and Computers, the Active Directory Administrative Center, or PowerShell with Add-ADGroupMember "Protected Users" -Members t0-jsmith. Your domain functional level needs to be 2012 R2 or higher.
The three ways people lock themselves out
This group bites back if you rush it. Watch these:
Never add computer or service accounts. Incoming authentication fails outright, and the password already lives on the host anyway, so it buys you nothing.
Reset the password after an account migration. An account without AES keys cant authenticate once its protected. Reset forces the AES hash.
Dont bulk-add Domain Admins on a Friday. Test first. A privileged account that relies on NTLM somewhere will break, and you'll be the one explaining why.
One more thing worth knowing. The built-in Administrator account, RID 500, is always exempt from authentication policies. Keep one as break-glass, outside all of this, in a safe.
Authentication Policy Silos: pinning the credential to hosts
Protected Users shortens the fuse. Authentication Policy Silos decide where the account is even allowed to light it. A silo is a container you drop accounts into, and the policy attached to it sets two things: the Kerberos TGT lifetime, and access-control conditions for which devices the account can authenticate from.
Here's the use case that matters for a tiered environment. Create a Tier 0 silo. Assign your t0- admin accounts to it. Set a policy saying those accounts can only authenticate from domain controllers and Tier 0 privileged access workstations. Now a stolen Tier 0 credential typed on a random laptop gets rejected by the domain controller before it does anything. The credential is welded to its tier.
Creating an Authentication Policy Silo in Active Directory Administrative Center. Source: Microsoft Learn.
Building one, step by step
Open Active Directory Administrative Center and select Authentication.
Right-click Authentication Policy Silos, choose New, then Authentication Policy Silo.
Give it a display name, then under Permitted Accounts add your Tier 0 admin accounts.
Create the matching Authentication Policy, and set the access-control condition restricting which devices the AS exchange can come from.
Leave it in audit mode first. Do not enforce yet.
Restricting where initial authentication can come from. Source: Microsoft Learn.
Prefer PowerShell? The same thing in three commands:
Silos ship in audit mode on purpose. Nothing gets blocked, but the domain controller logs what it would have blocked. That is your dress rehearsal. Watch the Authentication logs under Applications and Services Logs, Microsoft, Windows, Authentication for a week or two.
Once the audit log is quiet and nothing legitimate is getting flagged, flip enforcement on with Set-ADAuthenticationPolicySilo -Identity "Tier0-Silo" -Enforce:$true. Enforce before you audit, and you will lock a real admin out of a real domain controller. Ask me how I know.
Putting it together
Protected Users makes the credential hard to steal, Kerberos-only and short-lived with nothing cached. Authentication Policy Silos make a stolen credential worthless anywhere but its home tier. Stack both on top of the tier model's deny-logon GPOs and you have three independent layers, each catching what the others miss. Add your Tier 0 admins to Protected Users, drop them in an enforced Tier 0 silo, keep a break-glass account out of both, and audit before you enforce. That's the whole lockdown.
What can we learn as a person
The part that got in my head is the no-caching rule. A Protected User never leaves a copy of their credential sitting on a machine after they walk away. Nothing cached, nothing lingering, nothing for someone to scrape out of memory later. When the session ends, its actually gone.
I leave versions of myself cached everywhere. A hard conversation from three years ago still runs in the background of how I talk to people now. An old rejection sits in memory and quietly authorizes a hundred smaller fears. I never set a TGT lifetime on any of it, so it just renews forever, and stuff that should have expired keeps getting used against me.
The silo idea lands the same way. My realest self doesnt need to authenticate from every room I walk into. Some of it belongs only in a couple of trusted places. So what are you leaving cached that should have expired hours ago? And where have you been letting your most valuable self sign in from hosts that never earned it?
Had someone ask me, half joking half not, "can my company see what I'm doing on my phone since IT installed that app on it." And I get why they asked like that, half joking. Because the honest answer is "kind of, but way less than you think, and also maybe way more than you think, depends what else they've bought." Not a great one liner, so lets actually break it down.
What Intune actually sees
Intune by itself is a device management tool, not a surveillance tool, and Microsoft is actually pretty explicit about this in their own privacy documentation. What it collects as standard, required data:
Device details, name, model, manufacturer, OS version
Compliance and enrollment status
App inventory, meaning the name and version of apps installed, not what you did inside them
Admin audit logs, meaning what your IT admin did in the console, not what you did on your device
Theres also optional stuff an admin can turn on if they want, and it has to be turned on, its not default:
Enhanced device inventory, non sensitive hardware details like CPU, disk, and memory info
Device query, for corporate owned Windows devices only, lets an admin query specific file names and file paths on demand
Location, and this one only applies to corporate owned devices, never personal ones, and even then its not constant tracking, its an on demand "locate this device" action, usually used for lost or stolen device scenarios
What Intune flat out never sees
This part is directly from Microsoft's own data collection documentation, not marketing spin. Regardless of what an admin turns on, Intune does not collect or allow an admin to see:
Calling or web browsing history
Personal email
Text messages
Contacts
Passwords to personal accounts
Calendar events
Photos, including your camera roll
On a personal device enrolled with just app protection policies, its even narrower than that, Intune is really only aware of the managed apps and their data, the personal side of the phone stays out of view entirely. Thats the whole point of app protection policies over full device enrollment for BYOD, it draws a line around the work container instead of the whole device.
Where it changes: when Purview or Defender is in the picture
Heres the part people miss. Intune manages the device. It doesnt inspect the content flowing through it. Thats a completely different product, Microsoft Purview, and it only sees anything once a device is separately onboarded into it.
Onboarding happens through Microsoft Purview's device management center, deployed via a script, Group Policy, Configuration Manager, or yes, through Intune as the deployment mechanism. But being Intune managed doesnt automatically mean Purview onboarded, they're separate steps. If a device is already onboarded to Microsoft Defender for Endpoint, it shows up in Purview's managed device list automatically, you just have to turn on device monitoring to activate it for Endpoint DLP.
Onboarding a device into Microsoft Purview is a separate step from Intune enrollment. Source: Microsoft Learn.
Once a device is onboarded and device monitoring is turned on, this is where the visibility actually jumps. Endpoint data loss prevention can see and act on things like:
Copying sensitive content to USB drives
Printing sensitive documents
Uploading sensitive files to cloud apps through the browser
Pasting sensitive content into third party AI sites like ChatGPT through Edge for Business
And critically, once a device is onboarded, information about these audited activities starts flowing into Activity explorer even before an admin configures a single DLP policy. So enrollment into that layer alone increases visibility, before any rule is even written.
Activity explorer showing endpoint DLP events once a device is onboarded. Source: Microsoft Learn.
Stack Insider Risk Management on top of that and it goes further still, correlating signals across a 90 to 120 day window to flag anomalous behavior, like a departing employee suddenly copying a bunch of files somewhere they normally dont touch. Microsoft does pseudonymize users by default in that system and gates it behind role based access and audit logs, so its not a free for all, but its a genuinely different level of visibility than plain Intune.
Turning on device management is what brings telemetry into Purview solutions like Endpoint DLP and Insider Risk Management. Source: Microsoft Learn.
Putting it together
If someone asks "does Intune monitor my activity," the honest answer is Intune alone is closer to a management tool watching device health and app inventory, not a content watcher, and there's a documented list of things it flat out never touches regardless of settings. The real answer changes the moment you ask "what else has my org bought and turned on." Purview's Endpoint DLP and Insider Risk Management are the tools that actually look at content and behavior, and they require their own separate onboarding step, they dont just switch on because a device is Intune enrolled. If you want to know what's actually being watched at your org, the real question isnt "is this device managed," its "what security stack sits on top of Intune, and has anyone turned device monitoring on."
What can we learn as a person
I think the uncertainty is actually the honest part of this. I cant tell someone with total confidence "nobody is watching you" or "everybody is watching you," because it genuinely depends on layers I cant see from where I'm standing, what their org bought, what got turned on, what policy got written last month. And I think thats true of a lot of things in life too, not just IT. We want a clean yes or no answer about whether we're safe, whether we're being judged, whether something's being tracked or held against us, and a lot of the time the honest answer is "it depends on layers you cant fully see either." That uncertainty is uncomfortable, but pretending we have full visibility when we dont is worse, it just delays the discomfort instead of sitting with it.
So where in your life are you assuming a clean answer, safe or not safe, watched or not watched, when the honest truth is you genuinely dont have full visibility into it? What would it look like to just sit in that uncertainty instead of forcing a verdict?
We use cookies to ensure that we give you the best experience on our website. If you continue to use this site we will assume that you are happy with it.