Last week I watched a junior admin reset a domain admin password from his regular workstation. The same machine he uses to check email, click sketchy DocuSign links, and play Solitaire on lunch. I didnt yell. I just stared at the screen, took a breath, and decided to build a tiered AD model before someone hands the whole domain to a phishing email.
If your AD is flat, this one's for you. If your domain admins log into print servers, also you. And if you've got one giant Admins group that does everything, oh boy, especially you. Here's the whole thing, tier by tier, and it stops the bleeding.
What a tiered AD model actually is
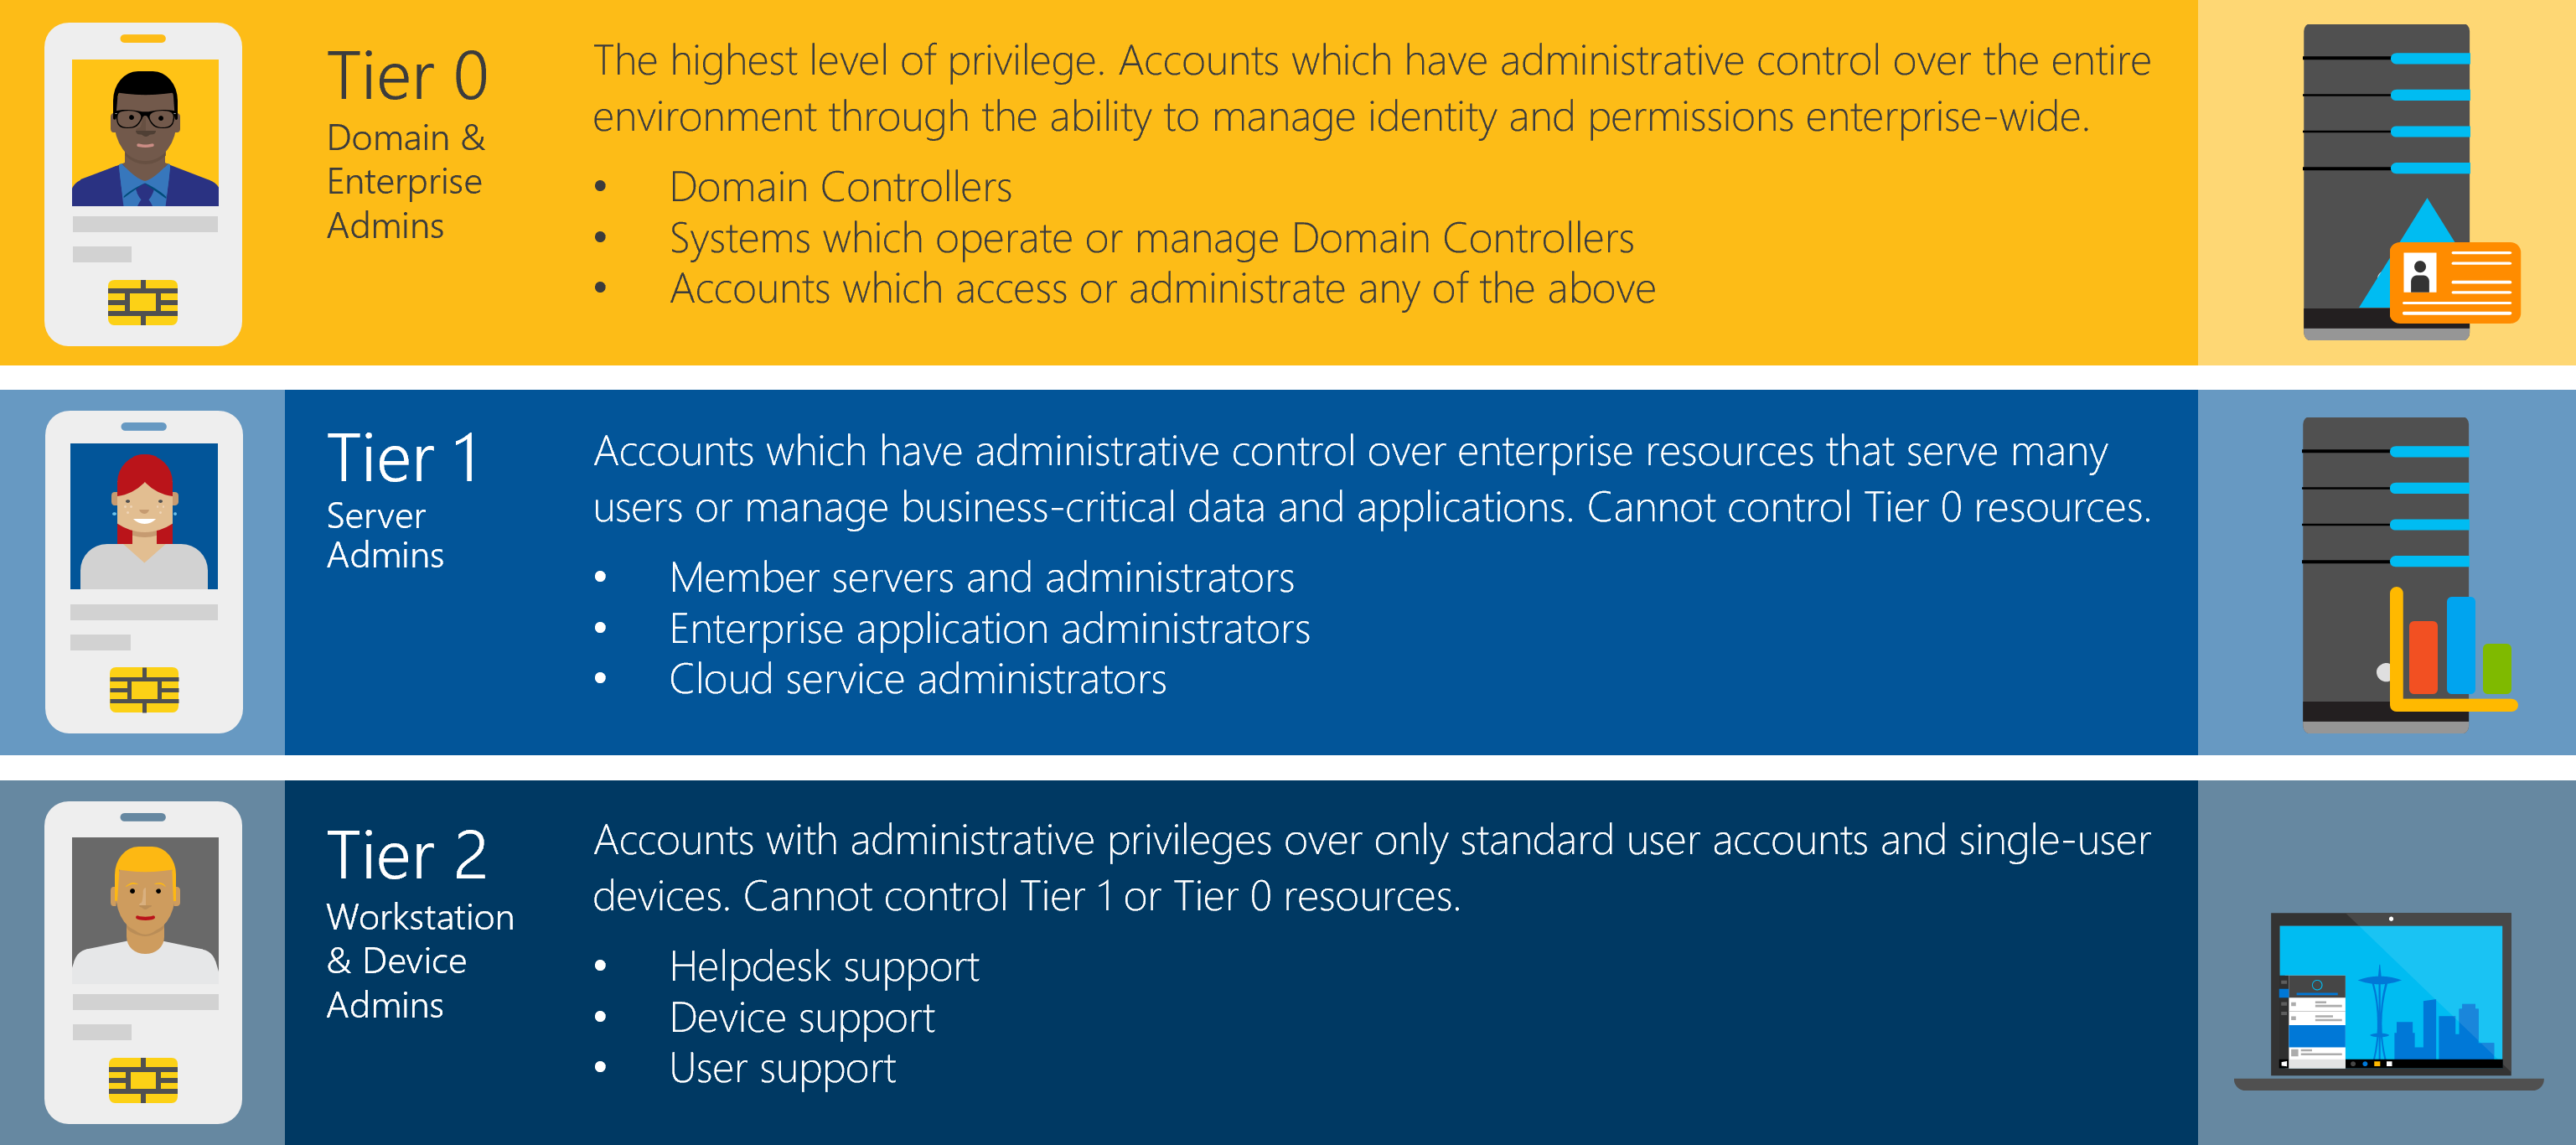
Microsoft's tier model splits your admin identities into three trust levels based on what they control. The whole point is containment. An attacker who owns a workstation should never be able to climb from there up to your domain controllers.
Tier 0 is the identity control plane. Domain controllers, AD CS, AD FS, Entra Connect, and the accounts that run them.
Tier 1 is every other server. File servers, SQL, Exchange, your line-of-business apps.
Tier 2 is workstations and the people who support them. Help desk, desktop support, end-user devices.
The three tiers and what each one controls. Source: Microsoft Learn.
The rule that makes it work is simple. Credentials never move down. A Tier 0 account never signs into a Tier 1 or Tier 2 box. A Tier 1 account never touches a workstation. Break that rule once and the whole model falls over.
The OU structure
Start with three top-level OUs, one per tier. Under each, split admin accounts, groups, and the machines that belong to that tier.
Tier 0 holds your domain controllers, Tier 0 admin accounts, and Tier 0 groups.
Tier 1 holds member servers, server admin accounts, and server admin groups.
Tier 2 holds workstations, help desk accounts, and workstation admin groups.
Your regular user accounts and department OUs sit off to the side in their own structure. Those are just people doing their jobs, not admins of anything.
The security groups
Every tier gets its own security group. Prefix them so nobody has to guess what they do. I use sg- for security group, then the tier, then the role.
sg-Tier0-Admins, full control over AD and domain controllers
sg-Tier1-ServerAdmins, local admin on member servers
sg-Tier2-WorkstationAdmins, local admin on workstations
sg-Tier2-HelpDesk, workstation support plus delegated password reset
Those groups get pushed to the local Administrators group on the right machines through Group Policy or Restricted Groups. A member server trusts sg-Tier1-ServerAdmins and nothing else. A workstation trusts sg-Tier2-WorkstationAdmins. Domain controllers trust only Tier 0.
Roles and how many accounts each person carries
This is where people groan, because it means carrying more than one login. Good. That groan is the sound of security working. Here's how the accounts break down by role.
The System Administrator: four accounts
Your full-stack sysadmin touches everything, so they need a foot in every tier plus a normal life.
A normal account for email, Teams, and daily work
t0-jsmith in sg-Tier0-Admins for domain controller work
t1-jsmith in sg-Tier1-ServerAdmins for servers
t2-jsmith in sg-Tier2-WorkstationAdmins for workstations
Four accounts, four scopes. The domain admin credential never rides along on the same machine where they read email.
The Server Admin: three accounts
Your server team doesnt need the keys to Active Directory. They manage servers and the workstations they sometimes sit at.
A normal account for daily work
t1-account in sg-Tier1-ServerAdmins for servers
t2-account in sg-Tier2-WorkstationAdmins for workstations
Notice the missing Tier 0 account. That's on purpose. A server admin who gets phished cant hand an attacker the domain, because that person was never holding it.
The Help Desk: two accounts and a delegation
Help desk lives in Tier 2. They fix laptops and reset passwords, nothing deeper.
A normal account for daily work
t2-account in sg-Tier2-HelpDesk for workstation support
The password reset piece isnt a tier privilege. It's a delegation. In Active Directory Users and Computers, right-click each department's user OU, choose Delegate Control, add sg-Tier2-HelpDesk, and grant "Reset user passwords and force password change at next logon." Scope it to the department OUs they actually support, not the whole domain. Help desk can unlock the sales team without ever seeing a server.
The part that makes it real: cross-tier logon deny GPOs
Groups without GPOs are just labels on a whiteboard. The enforcement comes from Group Policy denying higher-tier accounts the right to log into lower-tier machines. Without this step, nothing actually stops a Tier 0 account from signing into a workstation.
You build three deny policies, each linked to the OU one tier down. Every policy sets these User Rights Assignments under Computer Configuration > Policies > Windows Settings > Security Settings > Local Policies:
Deny log on locally
Deny log on through Remote Desktop Services
Deny log on as a batch job
Deny log on as a service
Deny access to this computer from the network
Link the first policy to your Tier 1 and Tier 2 OUs, denying the Tier 0 groups. Link the second to Tier 2, denying Tier 1 groups. The result is a one-way street. Credentials flow up when you deliberately elevate, never down by accident.
One warning. Test these against a pilot OU before you link them broadly. A deny right applied to the wrong group can lock real admins out of real machines, and that's a bad afternoon.
Why this setup is worth the extra logins
Attackers rarely land on a domain controller first. They land on a workstation, through a phished user or a bad download. From there they hunt for credentials sitting in memory, then hop machine to machine until they find a domain admin token. Security folks call this lateral movement, and it's how most ransomware actually spreads.
The kill chain the tier model is built to break. Source: Microsoft Learn.
Build a tiered AD model and you cut that chain. If a Tier 0 credential never touches a workstation, then owning the workstation gets an attacker nothing but the workstation. The domain admin token they were hunting for simply isnt there to steal. You shrink the blast radius of every single compromise.
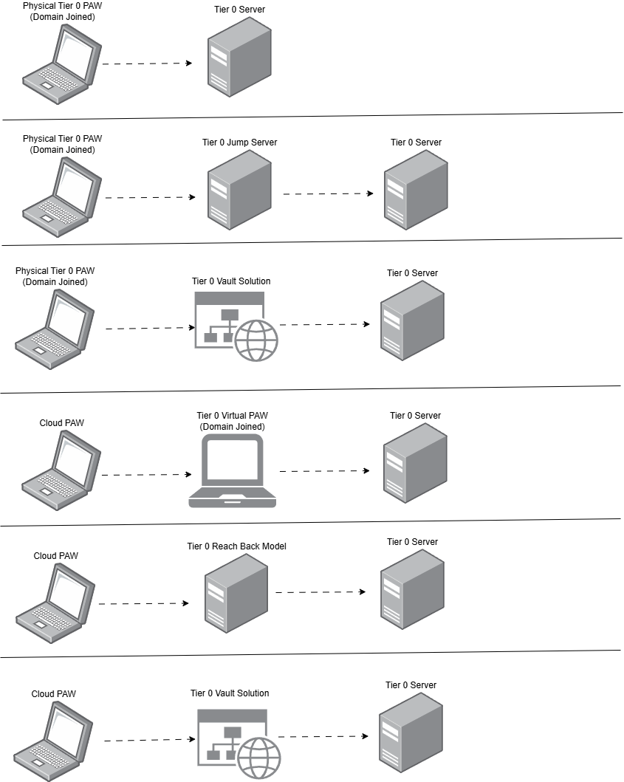
The other half of this is the clean keyboard. Microsoft calls them privileged access workstations, PAWs. The idea is that Tier 0 work happens from a hardened machine that never browses the web or reads email. Trust starts at the physical keyboard you sign in from, not the server you're reaching for.
Supported paths from a clean PAW up to a Tier 0 server. Source: Microsoft Learn.
Putting it together
Three tiers, three OUs, four sg- groups, and three deny-logon GPOs. Give your system admin four accounts, your server admins three, and your help desk two plus a scoped password reset delegation. Test the deny rights on a pilot before you go wide. That's the whole model, and it turns a single compromised laptop from a company-ending event into a Tuesday.
What can we learn as a person
The thing that stuck with me building this is that the whole model runs on one boundary. Credentials dont move down. That's it. Everything else is just enforcement of that one line.
I think about how much of my own stress used to come from having no tiers at all. Work stress logged straight into my home life. A bad day with one friend leaked into how I treated my kids. One compromised area, and the attacker moved laterally through everything I had, because I never denied the logon. I was one giant Admins group that did everything, and every problem had domain rights over my whole self.
Tiering my life didnt mean caring less. It meant the hard server day stays on the server, and doesnt get to sign into the parts of me that were supposed to be off-limits. So what in your life is running flat right now? And where do you need a deny-logon rule so one bad thing stops taking down all the others?
Every AD environment I've inherited has had the same problem. Hundreds of GPOs, half of them doing nothing, and nobody willing to delete any of them because nobody knows which ones are actually in use. So they sit there. They slow down gpresult, or They confuse the next admin. They make troubleshooting a mess because you can't tell at a glance which policies matter.
I've stopped trying to clean these up by hand. PowerShell handles it in about thirty seconds, and the safest first move isn't deletion. It's renaming. I prefix anything suspect with Review - and let the rename sit for a quarter. If nothing screams, then I delete.
Here's how I do it.
What counts as a candidate
Two categories I go after first.
Empty GPOs. No user settings, no computer settings. Someone created them, never configured them, and walked away. These are pure noise.
Unlinked GPOs. They have settings, but they aren't linked to any OU, site, or domain. They don't apply to anything. Sometimes these were intentionally unlinked during an incident and never cleaned up. Sometimes they were duplicates created during a migration. Either way, if nothing is linked to them, they aren't doing work.
I do not lump these together in the rename. I want to know which is which when I review later.
What you need
The GroupPolicy module, which ships with RSAT. Run from a domain-joined machine with rights to read and modify GPOs. I usually do this from a jump box rather than a DC, but either works.
Import-Module GroupPolicy
If that fails, install RSAT first. On Windows 11 it's under Optional Features, RSAT: Group Policy Management Tools.
Finding empty GPOs
The trick here is that Get-GPO doesn't tell you whether a GPO has settings. You have to look at the XML report and check the user and computer extension data. If both are empty, the GPO has no settings.
The ExtensionData node only exists when something is actually configured under that side of the policy. If both come back null, the GPO is empty.
Run it once and review the list before you do anything else. I always find at least one GPO in the list that I created myself months ago and forgot about, which is humbling.
Finding unlinked GPOs
Same approach, different XML node. The LinksTo property tells you where a GPO is linked. If it's null, nothing points at the GPO.
One thing to watch for. A GPO can be linked but disabled at the link level. That's a different state, and I don't treat those as unlinked. They were intentionally turned off, usually for a reason. If you want to catch those too, the XML has an Enabled attribute on each LinksTo entry. But for a first pass, I leave them alone.
Renaming, not deleting
This is the part that matters. Don't delete.
I learned this the hard way years ago. Deleted what I thought was a dead GPO, found out two weeks later it was applying a registry setting to a single workstation that nobody had documented, and spent an afternoon rebuilding it from a backup. Now I rename and wait.
I use Review - with a space, hyphen, space because it sorts cleanly in GPMC. Everything you flag bunches together at the top of the list, which makes it obvious at a glance what's pending review.
I don't add a date or my initials in the rename. The GPO already tracks modification time, and you can see who last touched it in the change history. Adding metadata to the display name just makes it harder to read.
If a GPO is both empty and unlinked, my script renames it twice and you end up with Review - Review - GPO Name. Worth deduplicating before the loop if you care:
$candidates = ($emptyGPOs + $unlinkedGPOs) | Sort-Object Id -Unique
Back up before you rename
This should be obvious but I'll say it anyway. Back up every GPO you're about to rename. The rename itself is reversible, but if you're going to come back later and delete, you want the backups ready.
Each backup gets its own folder under the dated parent, and Restore-GPO can pull any of them back if you need to.
The review window
After the rename, I leave it alone for about 90 days. Long enough to catch monthly and quarterly processes. If something breaks because a renamed GPO was actually doing work, I'll hear about it, and the GPO is still there with its settings intact.
At the 90-day mark, I pull the list of Review - GPOs:
Anything still on that list with no complaints attached gets backed up one more time and deleted. Anything that did get flagged during the window gets renamed back to its original name (or a better one) and properly documented this time.
Why this works
The rename approach gives you a passive audit. You aren't asking anyone to confirm whether a GPO is in use, because nobody will know, and the people who do know are usually gone. You're letting the environment tell you. If nothing breaks for a quarter, the GPO wasn't doing anything that mattered.
It also makes the cleanup defensible. When someone asks why you deleted a GPO six months later, you can point to the rename date, the review window, and the backup. That's a much better conversation than I thought it was dead.
I run this whole workflow about once a year on environments I own. The first run usually catches 20 to 40 dead GPOs in a medium-sized environment. After that it's smaller, but it's never zero. Stuff accumulates.
Tying it back
In my last post I wrote about working inside the structure the company gives you instead of fighting it. This is what that looks like at the keyboard. I'm not pitching a new product to solve GPO sprawl, or asking for budget. I am not building a case for a third-party tool that does the same thing in a prettier UI. I'm using PowerShell, which is already on the box, against AD, which is already running, with a workflow that's reversible at every step.
That's most of the job, honestly. The improvements that actually stick come from understanding what you already own and making it work better. Renaming a dead GPO doesn't make for a great war story, and you won't get a Slack shoutout for it. But the next admin who inherits this environment will be able to read the GPMC console without squinting, and that's worth more than most of the bigger projects I've been asked to pitch.
Work inside the structure. Use the tools you have. Document what you changed. The rest takes care of itself.
While working with Group Policy this month, I ran across an oddity I have never seen before, "Extra Registry Settings" These were inside the default domain policy and I had no idea why they were there. So, I did some research.
What are they?
These keys come from when you have had an ADM or an ADMX installed. Then you create a policy. Later down the road, the ADM or ADMX is removed. These keys will be left behind. So, it's a tattoo. More like a tattoo on the tattoo artist. You can read more about GPO tattooing here. The main difference between a normal tattoo and this tattoo is one happens on the end user's computer, while the other happens on both the Group Policy and the end user's computer.
This is one of those things that can go Very deep. To keep things simple, I will keep it general.
How do you remove it?
Inside the Group Policy Management Module that is installed with Rstat, you have a remove-GPRegistryValue command that can do what you are looking for. You will need the following, The Name of the policy and the key. Please note, these keys live in the HKEY_Local_Machine. Thus, you will need to add such to the command. Your registry might live in the Current users. Do a little research. Here is the code that I used to remove these two items:
Once you remove the Extra Registry keys, you can reload your Group Policy Management and remove the policy. Or you can replace Remove with Get. This will try to get the value, but if it doesn't exist anymore, PowerShell will present an error.
Documentation is a big deal in the world of IT. There are different levels of documentation. I want to go over in-place documentation for group policy. Comments in Group Policy are in-place documentation.
How to comment on a Group Policy
This process is not straightforward by any stretch of the imagination. The first and foremost way to add comments to a Group Policy is to use the GUI.
Open Group Policy Management Console
Select the policy you wish to comment
Right-click the policy in question and click edit
Inside the group policy management editor, right-click the policy name and click properties
Click the comment tab
Now enter your comment.
click Apply and Ok
The second way to add a comment in group policy is by using PowerShell. The Description of a policy is where the comment lives. Thus using the command Get-GPO will produce the comment. We will dig more into that later.
Get-GPO -name "Control Panel Access"
Using the Get-Member command we can pipe our Get-GPO command and see what is doable. You will be treated to a list of member types and what they are capable of. The description has a get and a set method to it. This means, you can set the description, aka comment.
(Get-GPO -name "Control Panel Access").Description = "This is my comment"
Suggestions
Here are a few suggestions for documenting the policy like this.
Use the(Get-date).ToString("yyyy-MM-dd_hh_mm_ss") at the beginning to setup your date time.
Then, I would add the author of the policy/comment
A quick description of the policy
Whether it's a user or computer policy.
Any WMI filters.
More information here helps the next person or even yourself months down the road. Don't go overboard as it can cause issues later. Using the '`n' will create a new line which can be helpful as well.
Pulling Comments with PowerShell
Now that we have all the policies documented, we can pull the information from the in-place documentation. We do this by using the GPO-Get -All command. One way to do this is by using the select-object command and passing everything into a csv. I personally don't like that, but it works.
I would like to go deeper into In-Place Documentation as it is very useful down the road. Powershell uses the #, other programs use different methods as well. If you get a chance to place in place documentation, life becomes easier when you are building out the primary documentation as you have a point of reference to look back at.
Whenever we get a new client, one of the first things we do is create a new folder on the root of C called temp. If that client has a group policy we create a policy just for that. This guide is a simple one, it's how to create a folder with group policy. This post will build on other posts. Let's get started.
Creating the Policy
Start Group Policy.
Expand to your Group Policy Objects
Right Click and Select new Policy.
Name the Policy. I suggest, "Folder - Temp"
Right Click the "Folder - Temp" Policy and click edit
Naviage to Computer Configuration > Preferences > Windows Settings > Folders.
Right Click in the right plane
Click New > Folder
In the Path location, enter the path you want. In this case it will be c:\temp.
Click OK.
Now we have the policy made, we need to decide who is getting the policy. We want every computer to get this policy. Closeout the edit group policy and click on the policy. Then click on the delegation tab. Here we see our delegations. Right now every user and computer will execute this policy. We want to change that.
Delegating the Policy
Click on the policy in question "Folder - Temp"
Click the delegation tab.
Click Authenticated users
Click advanced
Click autenticated users in this window.
Uncheck apply group policy.
Click the add button
Search for Domain Computers
Give Domain computers Read and Apply by checking the check box on read and apply group policy.
Click Apply
Click Ok.
Linking the policy
Now the policy will only apply to Domain Computers inside whatever OU you link it to. Now we need to link it to an OU. Since we are doing this to all computers on the domain, we can link it at the top level. We do this by right-clicking the domain and clicking the Link existing gpo object. We search for the GPO in question and click it. Then we click ok. Within the next few days, the c:\temp folder will be created.
That is how you create a folder on all computers in your domain. If you have any questions, feel free to reach out.
This one was a fun one that really threw me for a loop. DNS is an issue no matter where you go. Recently facebook showed the world how DNS can take everything down. DNS in your domain is very important to keep alive and healthy. Having items sit in your DNS is deadly to your org. That is why something called DNS Scavenging exists. This story is a story about DNS and how it directly affected group policy.
Scenario - Wrong Server!
A client called and stated that group policy wasn't applied to a single machine. He said he couldn't even log into the machine with new accounts, just accounts that were on there from the day before. He went as far as to say that a user that just changed his password had to use his old password. Very interesting combo of items.
Who, What, Where, When, How
Who: Anyone using this computer. Users who never signed into the machine, and users who has signed in but changed their passwords recently.
What: Login with thier current passwords, Login, Group Policy not applying.
Where: This single machine, later on discovered another.
When: One week before the issue started. (After DHCP was edited)
How: When they log in.
When I first came in, I looked at the machine in question. I ran an IPconfig /all on the machine to get basic information. I marked down the IP, subnet, mac address, DNS servers, and the DHCP server. I then ran the gpresult /r and the command errored out saying the group policy server did not respond. Hum... I pinged the DNS I noted and the ping came back. I ran NSLookup on the dns server's IP address to get a hostname. The hostname came back as "xxx-bobsmacbook". Well now, that's not the DNS server. I asked the client for the DNS server information. He gladly gave it to me. I RDPed into the DNS server. The DNS server was also the DHCP server and the AD server. All the fsmo roles were on this machine. Sigh... Ok, other than that, I deep-dived into DNS because the NSLookup came back as someone's mac book. Sure enough, there was an entry into DNS from about 2 years before for bobsmacbook at the IP address the machine believed was the DNS server. Infact, every IP address in the subnet was inside there. Most of them were years old.
I looked at the client and asked why their DNS was so full of old records. He replied with, that's our archive. It took everything in me not to facepalm. I mean, my hand moved instinctively to my face. After explaining the importance of DNS to the client, the client agreed to enable DNS Scavenging. Wouldn't you know it, after the first rotation, the entire company started to move much quicker. Requests to the IIS server took only seconds instead of minutes. Copying files across the network just generally did better. NSlookup worked. The computer in question group policy was updated correctly. When DNS breaks, everything suffers. In this case, DNS was a young man covered in trash bags.
How to enable DNS Scavenging
DNS Scavenging is an windows feature that finds old stale records and removes them. This ensures environments with DHCP do not detect multiple devices based on bad/multiple DNS entries for the same device. Here are the steps to enable it.
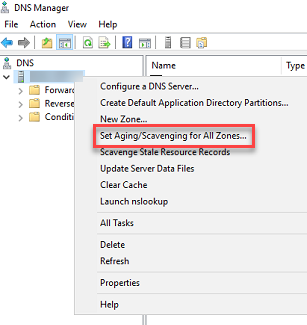
Start > Programs > Administrative tools > DNS > DNS Manager.
Right click the DNS Server
Click set Aging/Scavenging for all zones.
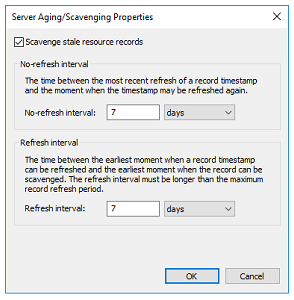
Check box the "Scavenge Stale Resources Records
Select the No-refresh and Refresh intervals totals combined equals to or is less than the DHCP lease. If the lease is 8 days, set the rates at 4 each.
Click Ok.
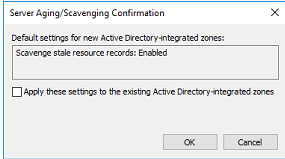
On the Server Aging/Scavenging Confirmation screen, check box the "Apply these settings to existing active directory intergrated zones."
Click ok
(Optional) Right click the DNS server and click the "Scavenage State Resource Records" to start the process.
There you have it. The DNS records will be purged when the time comes. This allows DHCP to issue IP addresses with no problems and DNS stays clean.
As always, if you have any questions, feel free to ask.
We use cookies to ensure that we give you the best experience on our website. If you continue to use this site we will assume that you are happy with it.