

While install the LB5034439 update, i received an error message of 0x80070643. Google failed me over and over. Every post I saw talked about using dism commands to repair the update. Which none of these resolved the issue. Finally microsoft dropped a useful article about the update. Inside the update, it stated that the update will fail if your recovery drive had less than 250mb of free space. Well, my recovery drive had only 500 mb of space and only 83 mb of free space. I will go over how to find that information. So, Resolving KB5034439 error was as simple as expanding the recovery drive.
Finding the Recovery Partition Size
So, to find the recovery partition size, I used a simple powershell script. The idea behind the script was to grab the drives, the partitions and do some simple math. Of course, this came from superuser. All I did was tweak it a little to reflect my needs.
$disksObject = @()
Get-WmiObject Win32_Volume -Filter "DriveType='3'" | ForEach-Object {
    $VolObj = $_
    $ParObj = Get-Partition | Where-Object { $_.AccessPaths -contains $VolObj.DeviceID }
    if ( $ParObj ) {
        $disksobject += [pscustomobject][ordered]@{
            DiskID = $([string]$($ParObj.DiskNumber) + "-" + [string]$($ParObj.PartitionNumber)) -as [string]
            Mountpoint = $VolObj.Name
            Letter = $VolObj.DriveLetter
            Label = $VolObj.Label
            FileSystem = $VolObj.FileSystem
            'Capacity(mB)' = ([Math]::Round(($VolObj.Capacity / 1MB),2))
            'FreeSpace(mB)' = ([Math]::Round(($VolObj.FreeSpace / 1MB),2))
            'Free(%)' = ([Math]::Round(((($VolObj.FreeSpace / 1MB)/($VolObj.Capacity / 1MB)) * 100),0))
        }
    }
}
$disksObject | Sort-Object DiskID | Format-Table -AutoSize
What this script does is, it grabs the volumes on the machine that is not detachable, like a usb. Then we loop through each volume and grab the partitions that has an id associated with the volume. From there we just pull the data out and do basic math. Finally we display the information. The important part of this script is the recovery label. If your free space is less than 250mbs, we are going to have some work to do.
Clean up the Recovery Partition
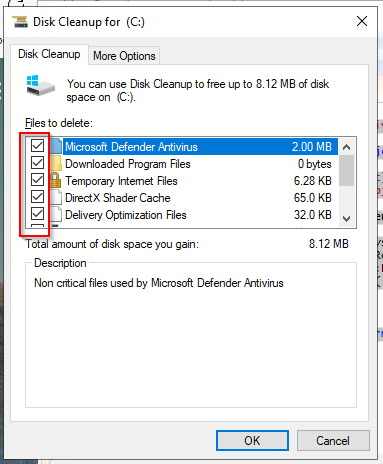
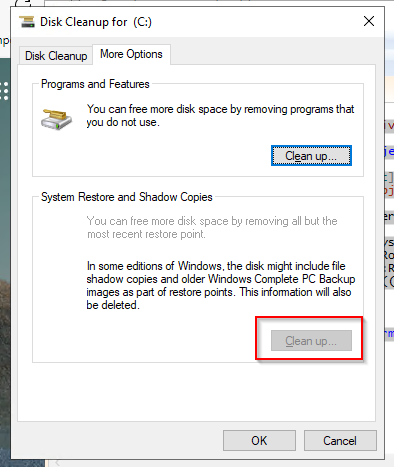
The first thing I tried to do is use the cleanmgr to clean up the recovery partition. Running it as an administrator will give you this option. Inside the disk cleanup software, select everything you can. Then in the "More Options" tab, you should be able to clean up the "System Restore and Shadow Copies". After doing these items, run the script again and see if you have enough space. In my case I did not. Cleaning the Recovery partition did not resolve the KB5034439 error.
Growing Recovery
So, the first thing I had to do is go into my partition manager in my server. The recovery partition in my case was at the end of the drive. The partition next to the recovery was thankfully my main partition. I shrank my main partition by a gb. That was the easy part. Now the hard part. I had to rebuild my recovery partition inside that shrinked space. These are the steps on how to do that.
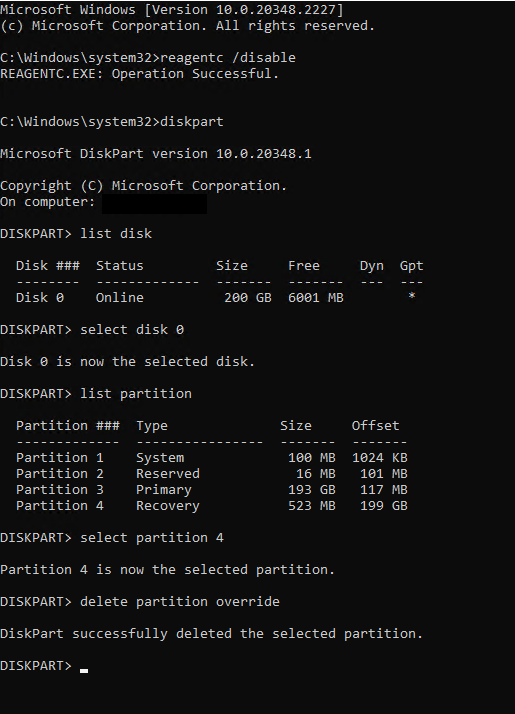
- Start CMD as administrator.
- Run reagentc /disable to disable the recovery system.
- run DiskPart
- Run List Disk to find your disk.
- Run Select Disk # to enter the disk you wish to edit.
- Run List Partition to see your partitions. We want the Recovery partition.
- Run select partition #. In my case, this is partition 4. The recovery partition.
- Run delete partition override. This will delete the partition. If you don't have the right one selected, get your backups out.
- Run list partition to confirm the partition is gone.
- Now inside your partition manager, Click Action > Refresh
- Select the Free space and select New Simple Voume
- Inside the Assign Drive Letter or Path Window, Radio check "Do not assign a drive letter or drive path" and click Next
- Inside the Format Partition Change the volume Label to Recovery and click Next
- This will create the new partition. Navigate back to your command Prompt with Diskpart
- Run list partition
- Run select partition # to select your new partition.
The next command depends on the type of disk you are working with the first list disk shows a star under gpt if the disk was a gpt disk.
GPT Disk
- Run set id=de94bba4-06d1-4d40-a16a-bfd50179d6ac
- Run gpt attributes=0x8000000000000001
GPT Disk
- Run set id=27

- Run Exit to exit diskpart.
- Run reagentc /enable to renable the recovery disk partition.
- This command moves the .wim file that it created with the disable from the c:\windows\system32\recovery back into the recovery partition.
Finally, run your windows updates. Resolving KB5034439 error is a little scary if you have a server that is more complex. Thankfully it wans't that complex on my end. You will have to adapt your approach to match what is needed.