I have been in IT for a little over 10 years and have tried various browsers and plugs/extensions. Some are extremely useful, and some, are not so. I abandoned Firefox for a while because it was not compatible with the required software. Recently I have returned back to firefox because of Multi-Account Containers.
Firefox has a unique extension that only it has. This extension is called the multi-account container. What it does is allows you to open a tab in a container of its own. Link
What is Multi-Account Containers
The extension has containers. These containers hold all of the cached items inside of it. For example, if you log into o365 in one container, you will be able to log into a different o365 in another container. Unlike incognito mode, you will be able to work with items that need to cache on your computer like exchange online.
If you are in the MSP world? This is a game-changer. You can have a container for each of your clients and solely work out of that container for that client. For in-house IT, it allows you to test as a normal user vs an IT admin. Even in your home life, the added layer of security helps with your banking and personal items. This way Facebook doesn't leak into your bank account's cache.
My favorite feature
When firefox starts, you have a screen full of tabs of previously opened sites or most visited sites. Each one of these you can right-click and open in a different container. I can do this with links, and even the + for a new tab. I can dedicate a tab just for my company and a tab just for personal. This way my o365 doesn't affect a client's o365.
And yes, This beast is only available on firefox and firefox off shoots. So, long live firefox!
As always, if you have any questions feel free to ask.
A few of my clients use something called LAPS. Laps change the local administrator password on a computer and then store the information inside Active Directory. Since I don't dive deep into this client's computers often, I needed something to quickly type the first letter of the computer in question to pull up the LAPS password. Basically, I needed a list of computer names from the command itself. This is fully possible with Dynamic Parameters. So, today we will be grabbing the LAPS password with PowerShell.
Where Does LAPS Password live?
Most companies that set up LAPS do so with Active Directory. By default, Active Directory saves the password into an attribute called "ms-Mcs-AdmPwd" and LAPS also stores the expiration date in "ms-Mcs-AdmPwdExpirationTime" Thus, all you have to do is call a get-adcomputer command and pull out the information.
Now the "ms-Mcs-AdmPwdExpirationTime" is unique and needs to be parsed into something more readable. We can use the m method called [datetime] to do this.
There you have it, That's how you get the LAPS password, But I want to take this one step further. I don't know all the computer names. I want that information at my fingertips while I type out the command. So, I want to type something like Get-LAPS -ComputerName <here populate a name where I can tab> and bamn, it gives it to me when I hit enter. That's where we will dive into dynamic parameters next.
Adding Dynamic Computer Name Parameters
In a previous article, we went over how to make a dynamic parameter. I want to help refresh memories by doing a single parameter and show you how it can be done with this function.
The first thing we need to do is create our form. This form allows us to use the dynamic parameters and gives us spots to pull data. This is more of a road map than anything else, but it is required for dynamics.
function Get-LapsPassword {
    [cmdletbinding()]
    Param()
    DynamicParam {}
    Begin {}
    Process {}
    End {}
}
The first part of our Dynamics is we want to name the parameter template. From there, we want to create a new object. This object will be the system collections object model for collections. AKA system attributes. Then we want to make an attribute object to add to that object later.
The ParameterAttribute will be where we add the flags like mandatory and position. We add those by dropping them directly into the ParamterAttribute object. A fun little fact, you can tab through and see what other items are available for this object. Things like the help message, the value from the pipeline, and more are hidden here. Today we only care about the mandatory and position.
After we build out our parameter Attribute object, we need to add it to the Attribute Collection we made at the start. We do this by using the ".add()" function of objects.
$AttributeCollection.Add($ParameterAttribute)
Now we need to create another object. This will be the Runtime Parameter Directory. Basically, what they will be looking through. This is a system management automation object called runtime defined parameter directory. Say that 10 times fast...
Now we need to make our Validate Set. We will create an array of devices using the Get-adcomputer command. Here we will push (Get-adcomputer -filter {enabled -eq "true"}).name into a variable. Now we will have a list of active computers. Notice that we filter out all other information by using the ".name" call.
Next, we need to create another object. This object is the system management automation validate set attribute object. We can feed this object our Parameter Validate Set.
Afterward, it's time to feed the Validate Set attribute to the attribute collection from the beginning. We can accomplish this by using the ".add()" method.
$AttributeCollection.Add($ValidateSetAttribute)
Next, it's time to bring our Attribute collection into the command line. It's time to make the run-time parameter. Once again, a new object. This time it's the Run time Defined Parameter object. Like the last object, we can place our data directly into it. We will want the parameter's name, the type, a string in this case, and the validate set.
Afterward, we take the above parameter and place it into our directory with the ".add()" method. We need the parameter Template and the Run time Parameter.
Finally, in the dynamic parameter block, we return our directory.
return $RuntimeParameterDictionary
Beginning
We are almost done. It's time to bring the dynamic parameter into the function and make it useable. We do this in the beginning section. We shove the PSBoundParameters of our template name into a variable.
$MemberName = $PSBoundParameters[$paramTemplate]
Then from there, we call the $memberName in our Get-adcomputer command.
The Script
It's that time, it's time to put it all together, so you can copy and past it into your toolbox. It's time To Grab LAPS Password With PowerShell.
function Get-LapsPassword {
[cmdletbinding()]
Param()
DynamicParam {
# Need dynamic parameters for Template, Storage, Project Type
# Set the dynamic parameters' name
$paramTemplate = 'ComputerName'
# Create the collection of attributes
$AttributeCollection = New-Object System.Collections.ObjectModel.Collection[System.Attribute]
# Create and set the parameters' attributes
$ParameterAttribute = New-Object System.Management.Automation.ParameterAttribute
$ParameterAttribute.Mandatory = $true
$ParameterAttribute.Position = 1
# Add the attributes to the attributes collection
$AttributeCollection.Add($ParameterAttribute)
# Create the dictionary
$RuntimeParameterDictionary = New-Object System.Management.Automation.RuntimeDefinedParameterDictionary
# Generate and set the ValidateSet
$ParameterValidateSet = (Get-ADComputer -Filter { enabled -eq "true" }).name
$ValidateSetAttribute = New-Object System.Management.Automation.ValidateSetAttribute($ParameterValidateSet)
# Add the ValidateSet to the attributes collection
$AttributeCollection.Add($ValidateSetAttribute)
# Create and return the dynamic parameter
$RuntimeParameter = New-Object System.Management.Automation.RuntimeDefinedParameter($paramTemplate, [string], $AttributeCollection)
$RuntimeParameterDictionary.Add($paramTemplate, $RuntimeParameter)
return $RuntimeParameterDictionary
} # end DynamicParam
BEGIN {
$MemberName = $PSBoundParameters[$paramTemplate]
} # end BEGIN
Process {
$ComputerInfo = Get-ADComputer -Filter { name -like $MemberName } -Properties *
}
End {
$ComputerInfo | select-object Name, @{l = "AdminPassword"; e = { $_."ms-Mcs-AdmPwd" } }, @{l = "AdminPasswordExpireTime"; e = { [datetime]::FromFileTime(($_."ms-Mcs-AdmPwdExpirationTime")) } }
}
}
Last October, I ran across a client with a broken radius. I want to go through the process I used to troubleshoot the issue. The goal of this to bring you a level of understanding of the troubleshooting processes. Not every process is the same for each It related item. Getting exposed to different steps from different people helps out.
Scenario
Here is the scenario. The client called and stated that no one is able to connect to the wifi. I looked at the device and saw that they were connecting via Radius. Radius allows you to use your username and password for the domain to login into the wifi. It's one of the more secure ways to setup wifi. I had no documentation to fall back on. Thus, I knew nothing about the radius setup. However, I did know about the wifi controller. It was an Unifi controller.
Troubleshooting Radius - Discovery
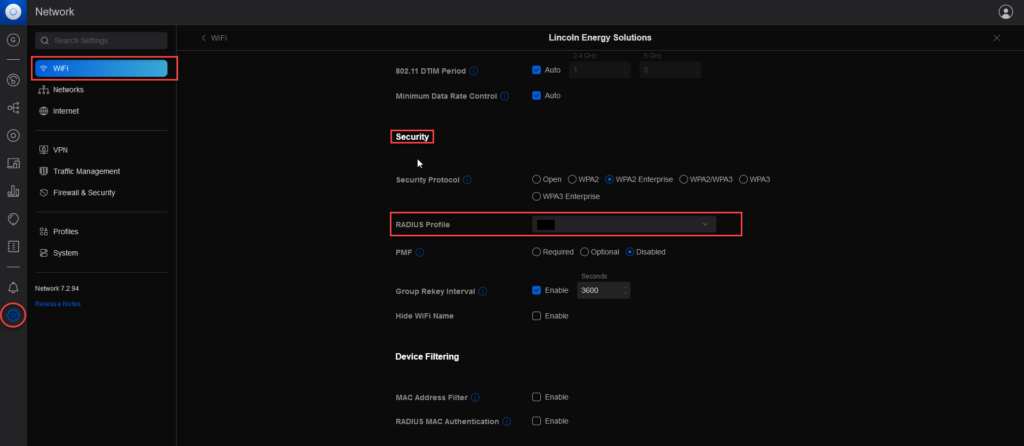
Since we know that the devices are connecting to the wifi that is controlled through the Unifi controller, the first logical step is to go to the Unifi controller. I logged into the Controller and went to the settings button at the bottom of the left-hand side of the menu. From there I clicked on the WiFi menu option. I want to look at the wifi profile of the Corporate wifi. The one they are trying to connect to. Next, I scrolled down to the Security area.
Under the Security area, You will see the Radius Profile. Take note of this name. We will call our bob. Once you have that name, Click the profile on the left-hand side of the screen.
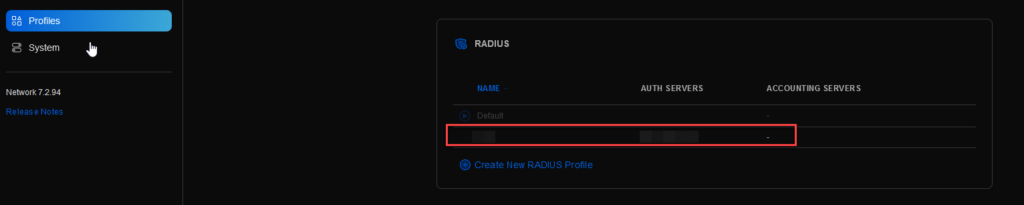
At this point, we have discovered the Radius Profile Name. Next, we need to dig into the Profile itself. More information the better when troubleshooting radius. Once you click on the Profile, scroll down to the Radius Section. From here, I found the name of the profile from before and clicked it.
Here we could see the Authentication servers' IP addresses and ports. Now we know which server Radius is living on. From here, I go to the devices and find the Device they are trying to connect to. Thankfully, the device was named correctly. If it isn't, then that's a whole other ball game. I noted the IP address and mac address of the device. The device was active with no connections.
Troubleshooting Radius on the Server
I used RDP to access the IP address with success. I am thankful because sometimes the radius can be setup using compliance of some sort. Next, I connected to the Network Policy Server. After that, I connected to the Radius clients. Looking over the Friendly names, and IP addresses from the Unifi controller and the Radius Server, the problem was clear.
DHCP change occurred on the access points. This meant the NPS radius client IPs were wrong. To correct this, all I have to do is update the NPS Radius client's IP addresses. However, I don't want this to happen again. So, here are the steps I took.
Changed all the Access Points to Static instead of DHCP
Change the NPS Radius Client IP addresses to match.
Once I did this, The client was able to reconnect to their wifi using their windows domain credentials.
Today I would like to go over how to get client information from your Unifi Controller. We will first connect to our Unifi Controller with Powershell using the Unifi API. Then from there we will pull each site and create a list of different sites. Finally, we will use the site information to pull the client information from the controller.
Powershell and API the Unifi Controller
The first step is to create a connection with our PowerShell. We will need a few items:
User Account that Has at least read access
The IP address of our controller
The API port.
An Unifi Controller that is configured correctly. (Most are now)
Ask your system administrator to create an account with read access. Check your configuration for the IP addresses and the Port numbers. By default, the API port is 8443. Now we have those pieces of information, its time to discuss what is needed.
Connecting to the API
To connect to the Unifi controller API, you need a Cookie. This is not like how we connected to the Graph API in our previous blog. To get this cookie, we will need to execute a post. The API URL is the IP address followed by the port number, API and login. Very standard.
$uri = "https://$($IPAddress):8443/api/login"
We will need to create a header that accepts jsons. To do this we simply say accept equal application/json.
$headers = @{'Accept' = 'application/json' }
Now we will create our Parameters for the body. Since this is going to be a Post command, we have to have a body. This is where we will place our Username and Password. We are going to build out a Hashtable and then convert that into a json since the API is expecting a json. We will use the convertto-json command to accomplish this step.
Now we have our Body built out, it's time to create a session. We will use the invoke-restmethod command to do this. We feed the URI we made a few steps back. The body will be the body we just built out. The content type will be 'application/json'. Our headers will be the header we made a few steps back. We will skip the certificate check unless we are using a cert. Most of the time we are not. Finally, the secret sauce. We want a session. Thus, we use the Session Variable and give it a session name. Let's go with S for the session.
Now we have our Session cookie, its' time to grab some information. We will use the same headers but this time we will use the Session Name, S. The URL for sites is /api/Self/Sites.
This URL will get the sites from your Unifi Controller. Once again we will use the Invoke-RestMethod to pull the data down. This time we are using a get method. The same Content type and headers will be used. Along with the skip certificate check. The Session Variable is going to be the Web Session and we will use the $S this time.
The Sites variable will contain two items. a meta and a data variable. Everything we will need is inside the Data variable. To access it we can use the $sites.data to see all the data.
Here is an example of what the data will look like for the sites.
_id          : 5a604378614b1b0c6c3ef9a0
desc         : A descriptoin
name         : Ziipk5tAk
anonymous_id : 25aa6d32-a165-c1d5-73a0-ace01b433c14
role         : admin
Get Client Information from your Unifi Controller
Now that we have the sites, we can go one at a time and pull all the clients from that site. We will do this using a Foreach loop. There is something I want to point out first. Remember, the data that is returned is two variables, two arrays. The first one is Meta. Meta is the metadata of the session itself. It's something we don't need. We do need the Data. For our foreach loop, we will pull directly from the data array. We want to push everything in this loop into a variable. This way we can parse out useful data, sometime to much data is pointless.
$Clients = Foreach ($Site in $Sites.Data) {
    #Do something
}
Without using the $Sites.Data we will have to pull the data from the command itself. This can cause issues later if you want to do more complex things.
The URL we will be using is the /api/s/{site name}/stat/sta. We will be replacing the Site name with our $site.name variable and pushing all that into another Uri.
Then we will execute another invoke-restmethod. Same as before, we use the same headers, content type, and web session. The only difference is we wrap up the command inside preferences. This way we can pull the data directly while the command executes. Less code that way.
Each time the command runs, it will release the data that we need and that will all drop into the $Clients variable. From here, we pull the information we want. The information that the client's produce includes, the match addresses, times, IP addresses, possible names, IDs and more. So, it's up to you at this point to pick and choose what you want.
The Script
The final script is different because I wanted to add site names and data to each output. But here is how I built it out. I hope you enjoy it.
Today I was trying to sync a user's account to the cloud and I received an error code that was new to me. Access denied, Unauthorized! I was using a domain admin account. I should have full access and rights. It threw me off as I have never seen such a thing. Why was I getting the "Azure AD Connect Unauthorized error"? This is what the error message looked like:
Retrieving the COM class factory for remote component with CLSID {xxxxxxxx-xxxx-xxxx-xxxx-xxxxxxxxxxx}
from machine DC-01 failed due to the following error: 80070005 DC-01.
    + CategoryInfo          : WriteError: (Microsoft.Ident...ADSyncSyncCycle:StartADSyncSyncCycle)
      [Start-ADSyncSyncCycle], UnauthorizedAccessException
    + FullyQualifiedErrorId : Retrieving the COM class factory for remote component with CLSID
      {835BEE60-8731-4159-8BFF-941301D76D05} from machine DC-01 failed due to the following error:
      80070005 DC-01.,Microsoft.IdentityManagement.PowerShell.Cmdlet.StartADSyncSyncCycle
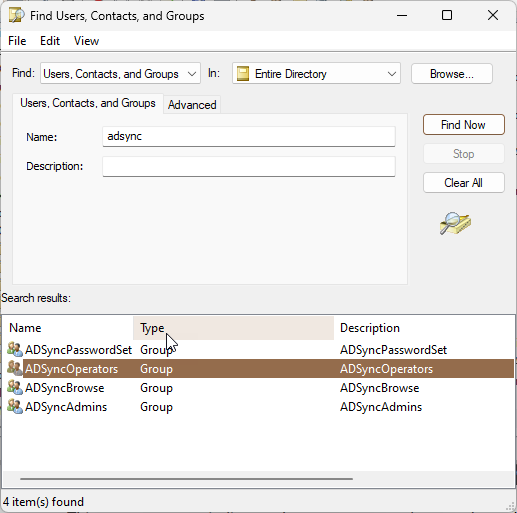
I was lost for a second. After looking into ad for the ADSync groups and found that no user had access to any of the groups. There were 4 groups found: the Password Set, Operators, Browse, and admins.
I added the domain admins to the ADSync Admins. Once I logged out of the server and logged back into the server. Then I was able to complete an ADSync Cycle. This resolved the Azure AD Connect Unauthorized error message for me. Why were domain admins not present? I don't know, but now I know where to look if I see this error again.
During my in-house days, one of the things I had to do constantly was clear people's print jobs. So I learned to Clear Print Jobs with Powershell to make my life easier. It surely did. With PowerShell I could remotely clear the print jobs as most of my machines were on the primary domain. All you need to know was the server and the printer's name. The server could be the computer in question if it's a local printer. Or it could be the print server. Wherever the queue is being held.
The Script
function Clear-SHDPrintJobs {
    [cmdletbinding()]
    param (
        [parameter(HelpMessage = "Target Printer", Mandatory = $true)][alias('Name', 'Printername')][String[]]$name,
        [parameter(HelpMessage = "Computer with the printer attached.", Mandatory = $true)][alias('Computername', 'Computer')][string[]]$PrintServer
    )
    foreach ($Print in $PrintServer) {
        foreach ($N in $name) {
            $Printers = Get-Printer -ComputerName $Print -Name "*$N*"
            Foreach ($Printer in $Printers) {
                $Printer | Get-PrintJob | Remove-PrintJob
            }
        }
    }
}
The Breakdown
It's time to break down this code. The parameters are set to mandatory. As you need this information. Notice, both parameters are lists of strings. This means you can have the same printer name on multiple printers and trigger this command.
Parameters
We are using two parameters. The first is the name of the Printer. This parameter is a mandatory parameter. We are using the alias switch here as well. Basically, this switch gives different options to make the command easier to work with. The options are, Name and Printername. It is also a list of strings. This way we can import an array if need be. I'll go over why that's important later. Finally, we have a help message. This can be useful for the user to figure out what they need to do.
The next parameter is like the first. It is a Mandatory parameter with alias options. The options are "ComputerName" and "Computer". I set the name as "PrintServer" because I dealt with print servers most of the time. Once again we have a list of strings for multiple machines.
Foreach Loops
Next, we look at our function. This is where we Clear Print Jobs with PowerShell. There are three loops in total. The first foreach loop cycles through the print server list. So for each print server, we enter the next loop. The next loop consists of the Printer Names.
foreach ($Print in $PrintServer) {
    foreach ($N in $name) {
        #Do something
    }
}
Inside the Name loop, we use the get-printer command. We target the print server and ask for a printer that contains the name we requested. Thus, if you use a *, you can clear out all the print jobs from that device. This is a very powerful option.
After gathering the printers from the server, we start another loop. This loop will be foreach printer we have from this server. We pipe the output from the Printers to Get-PrintJob. This allows us to see the print jobs. Then we pipe that information into Remove-PrintJob. This clears the print job.
$Printer | Get-PrintJob | Remove-PrintJob
That's it for this function. It's a great little tool that will change how you clear print jobs of buggy print systems.
Conclusion
In conclusion, I have used this function a few hundred times in my day. The environment was the domain level. This does not work for cloud print options.
We use cookies to ensure that we give you the best experience on our website. If you continue to use this site we will assume that you are happy with it.