Chaos greeted my Tuesday before coffee. Tickets screamed from three dashboards. A file server blinked like a sleepy raccoon. Meetings overlapped, because of course they did. Prompts to Chat GPT 5 sounded rushed and vague. Results came back scattered and oddly confident. Google failed me right when nerves felt loud. One deep breath changed the tempo of everything. The F.L.A.R.E.prompt framework slid back into memory. Focus, Logic, Action, Reflection, Expansion sat like anchors. Stress eased once a plan appeared on paper. Prompts became shorter and strangely more exact. Outcomes turned sharper, faster, and less hand-wavy. Scope tightened, and noise fell to the floor.
Confidence returned like a charger clicking into place. The cat was amazing, asleep on command. Tiny wins multiplied while adrenaline cooled its jets. Boundaries around tasks made thinking feel safer. Emotions regulated once structure started doing work. Frameworks can feel rigid during wild days. This one felt more like rails on ice. Words found direction without losing necessary nuance. Work moved again, and so did relief. Prompts behaved, which felt like a small miracle. That morning convinced me to teach this. Tuesdays should not depend on caffeine alone. They should depend on repeatable, human-friendly scaffolding. That is what F.L.A.R.E. quietly delivers.
Why F.L.A.R.E. Matters for Chat GPT 5
Prompts act like API calls for your brain. Clear inputs create reliable, useful outputs every time. F.L.A.R.E. gives prompts a lean, durable backbone. Focus defines the single, measurable goal with clarity. Logic sets structure, comparisons, and meaningful constraints around delivery. Action requests a tangible format and useful artifact. Reflection invites critique, risks, and honest trade-offs. Expansion explores alternatives, deeper angles, and fresh next steps. Together, those pieces guide layered reasoning on demand. Strategic planning benefits from that added mental scaffolding.
Brainstorming picks up speed without losing useful depth. Technical analysis gains comparisons that expose hidden assumptions. Creative writing lands with shape and ethical texture. Chat GPT 5 acronyms can feel like alphabet soup. This one translates directly into saved minutes and sanity. L3 to L5 reasoning loves explicit lanes and constraints. GPT-4 and GPT-5 reward that structure with clarity. Even GPT-3.5 improves when the rails exist. Admins need repeatable prompts under genuine time pressure. Writers need reliable depth without drowning the reader. Managers need pros and cons before decisions land. Humans need calm when alerts start stacking high. F.L.A.R.E. gives you calm that scales with complexity.
What the F.L.A.R.E. Prompt Framework Is
The F.L.A.R.E.prompt framework is a simple but powerful way to shape prompts for Chat GPT 5. It helps you get answers that are not just accurate, but also layered, insightful, and creative. The acronym stands for Focus, Logic, Action, Reflection, and Expansion. Some people swap the last part for “Expression,” but in this guide, we’ll use “Expansion” because it’s about pushing ideas further.
Each part of F.L.A.R.E. serves a purpose:
Focus defines the single, clear goal for your prompt.
Logic adds structure, constraints, or comparisons.
Action tells the model exactly what to produce.
Reflection invites analysis, critique, or evaluation.
Expansion requests alternatives, deeper insights, or extra ideas.
The magic of F.L.A.R.E. is that it encourages multi-layered thinking. Instead of getting a single, surface-level answer, you receive output that’s organized, reasoned, and broadened. This makes it especially useful for strategic planning, technical analysis, and creative work.
It’s not for every task, though. If you just need a quick fact or a simple conversion, F.L.A.R.E. might be overkill. But when the problem requires more depth, it gives Chat GPT 5 a “map” to follow.
You can also adapt F.L.A.R.E. depending on the model. GPT-4 and GPT-5 excel at handling all five parts. GPT-3.5 benefits from a simplified version where Reflection is lighter and Expansion is shorter. Either way, the framework’s structure guides the model toward clarity and depth — and that’s exactly what busy admins, managers, and writers need.
F — Focus
Why Focus Comes First
The F.L.A.R.E.prompt framework starts with Focus for a good reason. It gives your prompt a single destination before anything moves. Clarity at the start prevents wandering, hedging, and wasted cycles. Busy admins need that guardrail on chaotic days. Chat GPT 5 responds best to clear targets. Ambiguity invites broad, generic answers that require editing. A sharp focus line trims noise and reduces decision fatigue. Think of it like a firewall rule for language. Permit only the traffic that serves the goal. Everything else gets dropped without drama. Mood steadies when scope feels contained and workable.
Workflows also speed up because choices shrink. Teams align faster when the north star is explicit. Stakeholders read the same sentence and nod. That alignment saves meetings and prevents rework. Among Chat GPT 5 acronyms, F.L.A.R.E. wins on clarity. Focus also helps mental bandwidth through hectic mornings. Small decisions stay small when goals stay crisp. Your future self will thank present you. Less noise, more momentum, and fewer do-overs. Tension drops because the model stops guessing your intent. That single win can calm an overloaded nervous system.
How to Write a Strong Focus Line
Start with one outcome stated in a single sentence. Name the system, audience, and relevant constraints. Those details change tone, scope, and technical depth. Keep verbs decisive to guide action and evaluation. Avoid stacking multiple goals into one overloaded line. Short prompts can still carry serious clarity. Here is a clean template to reuse daily. Focus: Create a six-month plan to improve internal communication. That sentence sets direction without prescribing every step. Add audience when tone or risk appetite matters. For example, write for a cautious leadership team.
Or target frontline engineers who need concrete playbooks. Context prevents the model from guessing your expectations. Constraints also help, but keep them light. Choose a timeframe, budget hint, or tool boundary. Say what must be included, not everything possible. You can deepen detail later in Logic. Two more examples show the pattern in action. Focus: Design a basic server uptime monitor for small Linux fleets. Focus: Draft a one-page rollout plan for MFA in remote teams. Notice the verbs lead directly to deliverables. Domains define the playing field clearly. They still leave room for creative, useful solutions. Write your focus last if scope feels fuzzy. Sometimes thinking becomes clear after listing constraints. Either order works if the line stays crisp. Commit to one goal, and everything else stabilizes.
Pitfalls to Avoid and Quick Fixes
Common mistakes creep in when days get hectic. Multiple goals land inside one sentence without warning. That pattern splits the model’s attention immediately. Results drift and feel strangely generic or noisy. Fix it by separating goals into sequential prompts. Each outcome deserves its own crisp focus line. Another trap hides in unstated audiences and domains. The model then guesses tone, risk, and vocabulary. Outcomes wobble because assumptions differ across roles. Prevent this by naming the reader or decision maker. State the system, platform, or business context up front.
Missing constraints also cause subtle scope creep. Vagueness invites scope to expand without end. Set one boundary like time, budget, or tool family. You can always elaborate later during Logic. Overloaded metrics create a different problem entirely. Metrics belong, but not in a huge cluster. Pick one or two that express success simply. Clarity beats volume when guiding early reasoning. Copy length also matters during stressful moments. Rambling focus lines burn cognitive energy fast. Trim adjectives and aim for direct, active verbs. Another gentle fix involves reading the line aloud.
Mouth feel reveals awkward clauses and hidden tangents. If breath runs out, the sentence probably does too. Rewrite until it sounds clean and confident. Good focus reads like a precise ticket title. Your team should recognize the goal immediately. They should also understand the boundary of effort. That shared understanding prevents meetings and rework. Calm follows when everyone sees the same target.
L — Logic
Why Logic Is the Backbone of F.L.A.R.E.
Logic is where the F.L.A.R.E.prompt framework stops being an idea and starts becoming a plan. It gives structure to your request and prevents the model from wandering. Chat GPT 5 works best when it has boundaries and a clear route to follow. Without logic, you’re asking it to drive without a map — and yes, it will get somewhere, but you may not like the neighborhood.
Logic sets up the sequence of steps, the criteria for success, and any comparisons you want made. It can also highlight constraints like timeframes, budgets, or available tools. These guardrails help the model think like you do, only faster. In high-pressure work, this is the difference between a guess and a decision-ready output.
When you combine a strong Focus with solid Logic, you’re basically giving GPT a blueprint. That blueprint ensures the end result fits your exact needs — no surprises, no missing steps, and no wasted time.
How to Build Strong Logic Into Your Prompt
Start by deciding how you want the information organized. Do you need phases? A checklist? A side-by-side comparison? Tell the model exactly what shape you expect.
Example: Logic: Use three phases, list key actions and potential risks, and compare Slack with Microsoft Teams.
Notice this example doesn’t just say “plan the project.” It gives the number of phases, the type of content for each, and the tools to evaluate. That’s enough detail to keep Chat GPT 5 structured while leaving room for creativity.
You can also include metrics, risk thresholds, or dependencies. These make the output more actionable in real-world situations. For technical requests, logic might involve naming programming languages, libraries, or specific system requirements.
Common Logic Mistakes and How to Avoid Them
A frequent issue is being too vague. If you say “make a plan” without stating how it should be broken down, you might get a wall of text. Another mistake is overloading your logic with every possible requirement. That can cause the model to get bogged down and produce overly complex results.
The fix is balance — enough structure to guide the answer without choking creativity. Think of Logic as the skeleton: strong enough to hold the shape, flexible enough to move. In the Chat GPT 5 acronyms toolkit, this step is where efficiency lives.
A — Action
Why Action Turns Plans Into Results
Action is where the F.L.A.R.E.prompt framework stops thinking and starts shipping. A plan might feel satisfying, but only an actual deliverable will close a ticket, meet a deadline, or satisfy a stakeholder. Chat GPT 5 responds best when you tell it exactly what to produce. Without that clarity, you risk getting a long, thoughtful lecture instead of something you can actually use.
When you define the action clearly, you remove guesswork. Specific formats, lengths, and structures keep the output focused and easy to integrate into your workflow. It’s like the build step in a CI pipeline — a moment where a concept turns into something tangible. For busy admins, managers, or writers, this is where the win happens. Clarity here saves time, prevents rework, and keeps teams aligned on expectations.
The beauty of Action is its versatility. You can request roadmaps, tables, scripts, checklists, or even creative pieces — all tailored to your audience and needs. Adding details such as the required tone, the level of depth, or the acceptance criteria makes it even easier to get a result you can immediately deploy. Among the Chat GPT 5 acronyms, this step is where insight becomes something real and ready.
How to Write Precise Action Lines
Start by naming the exact deliverable you want. Follow that with the structure, length, and any relevant constraints. If the audience matters — such as executives needing summaries or engineers needing technical depth — mention it. For technical work, specify the language or formatting. For narrative tasks, request headings, sections, or word counts.
Here are a few strong examples:
Action: Produce a phase roadmap with owners, timeline, and risks.
Action: Draft a one-page SOP with steps, checks, and rollback plan.
Action: Provide Python code with comments, tests, and a README.
Action: Create a table summarizing pros, cons, and estimated costs.
Action: Output a checklist ready to paste into Jira.
Notice how each example starts with the deliverable, then adds the format and constraints. This rhythm ensures expectations are visible and outcomes are predictable. When you get Action right, you turn planning into tangible results — and save yourself the headache of chasing clarity later.
R — Reflection
Why Reflection Sharpens Decisions
Reflection is the checkpoint that stops confident nonsense from sliding past. It asks the model to critique its own work. Pros and cons appear, along with risks and trade-offs you might miss. Hidden assumptions surface, which saves time and rework later. Strategic planning gains clarity when weak paths get flagged early. Brainstorming improves because ideas meet friction before resources move. Technical analysis benefits from comparisons that expose blind spots and bias. Creative writing deepens when themes, stakes, and ethics get examined. Admins love this because it reveals failure modes and mitigations. Stakeholders appreciate confidence levels and clear caveats attached to claims.
The F.L.A.R.E.prompt framework bakes this discipline into every complex task. L3 works for structured evaluation when speed matters. L4 adds head-to-head comparisons that guide choices under pressure. L5 synthesizes insights and uncovers patterns you did not expect. GPT-4 and GPT-5 handle these layers with steady focus. GPT-3.5 can still help with a lighter touch. Reflection also regulates stress on hectic days. A short pause creates calm and confidence before execution.
How to Ask for Reflection in Prompts
Start by naming the lens you want applied. Request comparisons, trade-offs, and the criteria behind each judgment. Ask for pros, cons, risks, and mitigations as discrete sections. Invite a confidence score with a sentence on why. Require the model to list assumptions that shaped its answer. Include early warning signals for the top failure modes. Direct it to compare options across cost, risk, and effort. Specify a scoring scale to prevent squishy language and hedging. Encourage short tables when scanning speed beats narrative. Keep depth aligned with L3, L4, or L5 reasoning.
Example prompts work well inside the Chat GPT 5 acronyms toolkit. “Compare Slack and Teams on security, governance, cost, and adoption. Score one to five.” Another good line is, “List three failure modes with early signals and mitigations.” Creative projects can ask, “Which theme lands harder, and why.” Close with a brief retro that names next steps. Reflection, requested clearly, trades guesswork for grounded choices.
E — Expansion (or Expression)
Why Expansion Unlocks Extra Value
Expansion is where strong answers grow richer. The F.L.A.R.E.prompt framework uses this step to widen perspective. Alternatives appear, and depth increases without losing focus. Strategy benefits because options reduce decision risk. Technical work improves through scalable patterns and edge cases. Creative writing deepens with themes, echoes, and fresh angles. Chat GPT 5 handles this breadth with impressive control. Among Chat GPT 5 acronyms, F.L.A.R.E. shines here most. Reflection catches risks, while Expansion supplies better routes. Both together create insight that actually ships.
Teams feel calmer when choices are visible. Anxiety drops because the path no longer feels singular. Leaders see trade-offs and can stage experiments responsibly. Admins get quick wins and stretch goals in one pass. That balance protects schedules and budgets during busy quarters. Busy brains appreciate structure that still invites creativity. L3 reasoning handles quick breadth without heavy synthesis. L4 adds comparisons that support disciplined choices. L5 pushes into novel combinations and bold proposals. GPT-4 and GPT-5 manage L5 with steady focus.
Even short prompts gain value from Expansion. A single paragraph can request three alternatives. A second line can ask for next-step experiments. The F.L.A.R.E.prompt framework keeps everything orderly and tight. Depth arrives without drowning the reader in noise. Momentum continues because options fit the original goal. That is the quiet power of Expansion. Ideas multiply while clarity stays intact. Calm follows when you know more than one way works.
How to Use Expansion and Expression
Use Expansion when you want breadth with purpose. Ask for alternatives that still honor the Focus. Request two or three additional approaches, not twenty. Push for stretch goals that extend the baseline plan. Invite deeper dives where risk or payoff looks high. Direct the model to surface edge cases and failure modes. Ask for adjacent ideas that share tooling and people. Encourage small experiments that prove value quickly. Specify resources, effort, and expected impact for each idea. That detail supports planning without endless meetings later.
Expression is a sibling that tunes voice and style. Request tone changes for different audiences or channels. Ask for executive crispness, or friendly help-desk warmth. Direct the model to keep facts while shifting language. That move saves time when repackaging deliverables. The F.L.A.R.E.prompt framework makes this handoff very clean. Expansion grows ideas, and Expression readies them for humans.
Concrete prompts keep Expansion efficient and sane. Try asking for “three alternatives with pros, cons, and effort.” Consider adding “rank by impact and risk tolerance.” You can include “name quick wins and stretch bets.” Creative teams might request “two thematic variations with moral weight.” Technical teams could ask “scalable paths for 10x growth.” Those lines stay short, but they unlock depth. Options arrive shaped, scored, and ready to discuss. That is Expansion working exactly as designed.
When to Use F.L.A.R.E. vs Skipping It
When F.L.A.R.E. Shines
Complex work deserves the F.L.A.R.E.prompt framework. Strategy sessions, roadmaps, and change plans need layered thinking. Brainstorming benefits from breadth without devolving into chaos. Technical analysis gains structure, comparisons, and measurable constraints. Creative writing lands deeper themes with clear arcs and options. Cross-team projects also thrive with explicit structure and deliverables. Vendor evaluations improve when pros, cons, and risks surface early. Migration planning needs phases, owners, and rollback paths. Incident postmortems want critiques, lessons, and next steps. Decision memos benefit from options scored by impact and risk.
That is where Chat GPT 5 acronyms actually pay rent. F.L.A.R.E. turns fuzzy goals into clear, reviewable artifacts. Reflection catches weak paths before they burn time or budget. Expansion proposes alternatives that protect timelines under pressure. L3 fits structured planning with moderate depth and speed. L4 adds comparisons that guide choices with less debate. L5 synthesizes patterns and proposes bold but defensible moves. GPT-4 and GPT-5 handle those layers beautifully. Busy admins and managers feel calmer with that scaffolding. Writers appreciate clarity that still leaves room for voice. Teams move faster because the path is visible and stable. Use F.L.A.R.E. whenever outcomes depend on sound reasoning and options.
When Skipping F.L.A.R.E. Is Smarter
Not every task needs the full F.L.A.R.E.prompt framework. Quick facts, definitions, and unit conversions require speed. Simple CRUD tasks do not benefit from layered reasoning. Renaming files or reformatting text demands direct instructions. Short shell or PowerShell snippets should stay lean. A single Action line often beats a full framework there. Focus plus Action can deliver perfect brevity under load. Over-structuring small asks wastes time and attention. Mechanical work wants predictable, minimal prompts every time. Daily standups and tiny updates rarely need Reflection sections. Expansion also adds overhead to very narrow jobs. Save it for features, risks, or strategy discussions.
Consider partial F.L.A.R.E. for medium complexity tickets. Try Focus, Logic, and Action without the rest. Add Reflection only when choices or risks appear. Request Expansion when options would actually change decisions. GPT-3.5 prefers trimmed Reflection and shorter Expansion. Older tools sometimes struggle with heavy prompt scaffolds. Choose the smallest prompt that meets the moment. That habit preserves energy for real thinking later. Skipping pieces is not failure or laziness. It is good prompt hygiene and better time management.
Reasoning Depth L3–L5, and Choosing the Right Lane
What the Levels Mean
Reasoning depth sets how hard the model thinks. The F.L.A.R.E.prompt framework makes this choice explicit and useful. L3 delivers structured reasoning with solid organization and modest depth. Plans appear with phases, owners, and light risks. Comparisons are brief and practical. This level suits roadmaps, SOPs, and short memos. L4 adds sharper analysis and clear head-to-head comparisons. Trade-offs surface with criteria and simple scoring. Risks connect to mitigations and early warning signs. You get balanced views without academic detours. L5 goes deep on synthesis and creativity. Patterns merge, and novel ideas appear with real nuance. Multiple models and frameworks get woven together. This level shines for strategy, architecture, and invention.
Time and attention act like budgets here. L3 is fast and predictable. L4 costs more cycles but saves debate. L5 consumes the most time yet often pays off big. Chat GPT 5 handles all three lanes confidently. GPT-4 does well on complex L4 and many L5 asks. GPT-3.5 benefits from trimmed scopes and lighter Reflection. Among Chat GPT 5 acronyms, F.L.A.R.E. makes these choices visible. That visibility reduces stress and sets clear expectations. Teams know the destination and the thinking depth. Editors know where to challenge or accept. Decisions then land with less noise and fewer surprises.
How to Choose the Right Lane
Start with stakes and timeline before picking depth. High stakes with short timelines favor L4 over L5. Moderate stakes and tight calendars prefer L3 clarity. Novel problems reward L5 synthesis when time allows. Familiar territory with process debt leans toward L3. Audience matters as much as difficulty. Executives often want L3 or lean L4 summaries. Engineers may request L4 comparisons and concise tables. Creative teams can handle L5 exploration with options. State the lane directly in your prompt. Try “Use L4 reasoning with brief comparisons.” That line sets expectations and editing effort.
Constraints also guide the choice smartly. Fixed budgets and compliance push toward L4. Undefined scope invites L5, paired with a cap. Limited telemetry or data leans toward L3 structure. Model selection matters, too. GPT-5 handles layered prompts with steady control. GPT-4 does great with L3 and L4 depth. GPT-3.5 performs best with trimmed Reflection and Expansion. The F.L.A.R.E.prompt framework supports partial mixes as needed. Start at L3, then request L4 comparisons if gaps appear. Escalate to L5 only when the payoff justifies it. That cadence protects calendar sanity without dulling insight.
Compatibility Notes: GPT-4, GPT-5, and Adapting to 3.5
GPT-4 and GPT-5 with F.L.A.R.E.
GPT-4 and GPT-5 carry real weight when prompts get layered. The F.L.A.R.E.prompt framework suits their strengths beautifully. Focus lands cleanly, and Logic stays stable under revision. Action turns into structured outputs with fewer odd tangents. Reflection produces balanced comparisons instead of noisy hedging. Expansion adds options without drifting from the original goal. Teams feel the improvement during planning and review cycles. Editors also see clearer trade-offs and stronger evidence. L3 reasoning runs fast and very consistent on both models. L4 delivers thoughtful comparisons with light scoring and criteria. L5 shines for synthesis, architecture, and inventive routes. Complex roadmaps benefit from phased structure and clear risks. Technical analysis improves through explicit constraints and benchmarks.
Creative writing gains depth without losing momentum or clarity. Stakeholders get artifacts ready for meetings and decisions. Busy admins get shippable checklists, scripts, and tables. Confidence grows because outputs feel predictable and repeatable. Among Chat GPT 5 acronyms, F.L.A.R.E. rewards these models most. GPT-5 especially handles Expansion with calm breadth. Large alternatives appear without bloating the final deliverable. Governance concerns also receive clearer treatment during Reflection. Those wins compound during fast quarters and tight budgets. Use these models when layered thinking actually decides outcomes.
Adapting F.L.A.R.E. for GPT-3.5
GPT-3.5 can still benefit from F.L.A.R.E. with trims. Scope should be smaller, and structure should be lighter. Focus must stay crisp and unambiguous from the start. Logic deserves fewer constraints and simpler comparisons. Action works best with short, very concrete formats. Reflection should request brief pros and cons, not essays. Expansion needs two options, not a sprawling menu. Tone guidance helps reduce guesswork and extra edits. L3 is the sweet spot for most daily tasks. L4 can work when comparisons remain narrow and clear. L5 usually overextends attention and runtime on 3.5.
Technical requests should name languages and libraries upfront. Narrative tasks should include headings and word targets. Tables often beat paragraphs for scanning and accuracy. Confidence scores help flag shaky assumptions quickly. Error handling deserves a line in Action requests. Short checklists also improve reliability during handoffs. The F.L.A.R.E.prompt framework still provides needed rails here. Trimmed prompts keep throughput high during busy mornings. Savings appear as fewer rewrites and faster approvals. When stakes rise, escalate the task to GPT-4 or GPT-5. Those models handle layered Reflection and Expansion with ease. Choose the smallest tool that meets the moment cleanly.
Step-by-Step Usage Checklist
Prepare the Focus, Logic, and Action
Start with calm, not speed. One clean Focus line sets the destination before anything churns. State the single outcome, the audience, and the domain. A tiny constraint keeps scope from ballooning under stress. Example goals might target a roadmap, SOP, or short analysis. Clear goals prevent the model from guessing your intent. Teams also align faster when that line feels undeniable. Next comes Logic, which turns wishes into a working blueprint. Choose phases, comparisons, and measurable criteria that matter. Timeframes, risks, and dependencies belong here, not everywhere. Structure should guide, not suffocate exploration or clarity. Consider lightweight metrics that show progress without busywork.
Comparisons need stated lenses, like cost, risk, or adoption. Those lenses keep debates from drifting into personality contests. With structure ready, move into Action for the artifact. Name the deliverable, the format, and the length. Audience and tone belong in this instruction as well. Acceptance criteria tell everyone what “done” actually means. Technical tasks deserve languages, libraries, and packaging requests. Narrative tasks benefit from headings and tidy sections. Tables enable scanning during reviews and standups. Checklists travel best inside tickets and project boards. Action, finally, is where anxiety drops and production begins. The F.L.A.R.E.prompt framework feels light when used this way. Clear inputs produce reliable outputs that ship on time.
Add Reflection, Expansion, and Reasoning Depth
Now install quality brakes with Reflection. Ask for pros, cons, and explicit trade-offs tied to criteria. Confidence levels help when stakes and timelines feel sharp. Assumptions should be listed so weak spots become visible. Early warning signals prevent small risks from becoming incidents. Comparisons across tools or patterns expose hidden costs. Short tables can accelerate scanning during hectic reviews. After critique, request Expansion to widen the map responsibly. Ask for alternatives that still honor your original Focus. Two or three options usually beat a giant menu. Quick wins belong next to well-labeled stretch goals. Edge cases keep plans durable when pressure spikes later.
Adjacent ideas can reuse existing teams and tooling. Expression is the style lever for different audiences. Tone shifts repack the same truth for new rooms. Round out the checklist with Reasoning Depth selection. L3 suits structured work with modest complexity and time. L4 adds comparisons that guide decisions under pressure. L5 invites synthesis and bold proposals when time exists. GPT-4 and GPT-5 handle layered prompts with calm control. GPT-3.5 prefers trimmed Reflection and shorter Expansion. Among Chat GPT 5 acronyms, this framework stays practical. The cadence protects energy while keeping outcomes strong.
Three In-Depth Example Prompts You Can Copy
Technical: Server Uptime Monitor With Comparisons
Technical work loves structure with room to breathe. The F.L.A.R.E.prompt framework gives you both. This prompt targets a simple uptime monitor with sane guardrails. It asks for clear deliverables and helpful comparisons. It also invites next steps without drowning you in theory. Keep sentences short and expectations visible. That helps under pressure and inside tickets. Among Chat GPT 5 acronyms, F.L.A.R.E. delivers real leverage here. It’s planning, execution, and thoughtful critique in one pass.
Copyable prompt: Focus: Design a basic Python service that monitors server uptime. Logic: Trigger an alert when downtime exceeds five minutes. Include retry strategy and backoff. Compare requests and httpx for HTTP checks. Action: Provide commented code, a README, and a minimal config file. Include a systemd unit example. Reflection: Give pros and cons for each library. Add failure modes with early warning signals. Include confidence and key assumptions. Expansion: Suggest a plan for scaling to 500 endpoints. Propose resilience ideas for network jitter and rate limits. L4 reasoning. Output: Use bullets and one table for comparisons.
Why this works: Focus narrows the target and prevents drift. Logic supplies thresholds, comparisons, and reliability concerns. Action demands artifacts that ship without rework. Reflection catches blind spots before on-call pain arrives. Expansion extends the design toward realistic growth. The model now thinks like a helpful engineer. You get code, docs, and a next-step path. Calm replaces guesswork, which is the real win.
Mental Health: Burnout Recovery Plan for a Sysadmin
Busy admins need care as much as clusters do. The F.L.A.R.E.prompt framework can shape support without fluff. This prompt treats burnout with practicality and compassion. It is not medical advice and should stay general. It still delivers structure, reflection, and safe experiments. Short sentences help when the brain feels loud. Clarity reduces decision fatigue and guilt. That matters during hard weeks more than we admit.
Copyable prompt: Focus: Create a seven-day burnout recovery plan for a stressed sysadmin. Logic: Include morning, mid-day, and evening actions. Respect work limits and realistic energy levels. Compare short mindfulness and CBT-style thought records. Action: Produce a simple schedule, two micro-practices, and a boundary script. Add a one-page reflection worksheet. Reflection: Explain trade-offs between the two methods. List early signs of improvement and red flags. Offer a confidence rating and assumptions. Expansion: Suggest three community supports and two workplace tweaks. Include a gentle relapse plan and a tiny reward. L3 reasoning. Output: Use friendly tone and short checklists.
Why this works: Focus names the life context without judgment. Logic sets humane constraints and useful comparisons. Action gives tools you can actually use today. Reflection adds safety rails and honest expectations. Expansion offers options when energy rises again. The result respects humans and calendars. Calm becomes more likely, which helps real recovery.
Legal: One-Page NDA for a Small Tech Vendor
Legal tasks benefit from clarity and clear limits. The F.L.A.R.E.prompt framework keeps risk visible and scoped. This prompt requests a simple NDA starting point. It is not legal advice and needs attorney review. It still saves time by shaping a workable draft. Short sections help stakeholders scan quickly. Trade-offs land cleanly without heated debates. That keeps projects moving with fewer delays.
Copyable prompt: Focus: Draft a one-page mutual NDA for a small tech vendor. Logic: Keep plain language and U.S. law assumptions. Include term, exclusions, and permitted disclosures. Add a notice clause and governing law placeholder. Action: Provide the NDA text and a redline checklist. Include signature blocks and a definition table. Reflection: Explain pros and cons of mutual versus unilateral NDAs. Note risks for startups and common negotiation points. Provide confidence and key assumptions. Expansion: Suggest two shorter fallback clauses for stubborn negotiations. Offer guidance for remote signing and storage. L4 reasoning. Output: Clear headings and a brief summary box.
Why this works: Focus narrows scope to a mutual NDA. Logic defines clauses and boundaries without bloat. Action creates a draft plus a practical checklist. Reflection surfaces negotiation friction before meetings start. Expansion equips you with lighter fallback language. The deliverable becomes faster to review and approve. That is real value from Chat GPT 5 acronyms in practice.
Pro Tips for Admins and Creators
Practical Prompting Habits
Strong prompts begin with calm, not speed. The F.L.A.R.E.prompt framework rewards slow starts and sharp finishes. Clear focus lines shrink choices and reduce edits. Logic then adds rails without smothering creativity or nuance. Action converts thoughts into shippable artifacts with deadlines. Reflection exposes blind spots before they burn sprint time. Expansion adds options that respect scope and budgets. Short sentences help brains overloaded by alerts and pings. Varying tone for audience prevents accidental friction during reviews. Tables beat paragraphs when scanning time is tight. Checklists travel well inside tickets and change plans. Word targets control bloat and protect attention.
Confidence scores flag soft spots for quick follow-up. Assumptions lists invite useful challenges from teammates. L3 works for routine planning with modest stakes. L4 suits choices that need head-to-head comparisons. L5 helps when invention or synthesis actually decides outcomes. GPT-4 and GPT-5 handle these lanes with ease. GPT-3.5 prefers trimmed Reflection and smaller Expansion. Prompts improve when you recycle winning templates. Namespacing prompt snippets keeps teams consistent and fast. A tiny library saves hours across busy quarters. Version prompts just like code and policy. Notes on results help future you avoid pitfalls. Small rituals drive reliability when stress runs high.
Operational Guardrails That Save Time
Good guardrails create calm during noisy weeks. Scope caps prevent sprawling answers that stall delivery. Timeboxes keep meetings from dissolving into rabbit holes. Comparison lenses should be named upfront and clearly. Cost, risk, effort, and adoption usually cover essentials. Acceptance criteria define “done” before anyone argues. File formats matter for handoffs and automation steps. JSON, YAML, and Markdown plug into real workflows. Tables support decision memos and stakeholder summaries. Code requests deserve tests, comments, and a README. Failure modes belong in Reflection with early warning signals. Confidence levels focus review energy where needed most.
Assumptions lists reduce blame and improve fixes. Output limits protect attention and reduce skimming fatigue. A short “next steps” line keeps momentum alive. Role targeting prevents tone mismatches and confusion. Executives need crisp summaries with clear trade-offs. Engineers need specifics, not vague promises or vibes. Help desks need scripts and safe rollback notes. Governance needs audit points and retention reminders. The F.L.A.R.E.prompt framework supports all of that gracefully. Chat GPT 5 acronyms may seem cute, yet they help. Rails make speed possible without risking chaos. Consistency also strengthens trust across teams and quarters. Calm grows when results feel predictable and usable.
Make Outputs Easy to Use
Usability decides whether work ships or stalls. Prompts should request formats that fit real hands. Roadmaps belong as bullets with owners and timelines. SOPs work best with numbered steps and checks. Decision memos benefit from tables with simple scores. Technical outputs need code blocks and clear packaging. Narrative pieces deserve headings and tight sections. Summaries should lead, with details tucked beneath. Readers scan first, then dive when needed. Audience targeting finishes the job with less friction. Executives want impact, risk, and cost in plain terms. Engineers want constraints, examples, and edge cases named. Creatives need theme, tone, and pacing guidance.
Accessibility matters for teams moving fast together. Short sentences help everyone track meaning under pressure. The F.L.A.R.E.prompt framework keeps that structure humane. Reflection adds caveats that protect hard schedules. Expansion offers quick wins and clean stretch goals. Expression can retune tone for different rooms. Templates reduce decision fatigue during crunch weeks. Reuse wins because meetings shrink and shipping speeds up. Calm follows when outputs drop straight into work.
PowerShell Helper to Generate F.L.A.R.E. Prompts
Why a PowerShell helper saves real time
Templates reduce friction when days get loud. The F.L.A.R.E.prompt framework works best with repeatable scaffolds. A tiny PowerShell function gives you that scaffold on demand. You fill five fields, and a clean prompt appears. No more hunting old docs or half-finished notes. This matters when tasks pile up before coffee. Admins need speed without losing structure or nuance. Writers need shape that still allows voice and tone. Managers need consistent asks that land the first time.
Consistency improves results across teams and quarters. Standard fields enforce Focus, Logic, and Action every time. Reflection and Expansion arrive without extra brain load. Reasoning depth also becomes an explicit choice. That makes expectations clear before anyone reviews. CI for prompts sounds funny, yet it works. Fewer surprises means fewer meetings and edits. Calm grows when outputs feel predictable and usable. Among Chat GPT 5 acronyms, F.L.A.R.E. benefits most from tooling. A small helper provides leverage you can feel fast. Scripts also travel well inside repos and wikis. Teams share the same rails with almost no overhead. That is how structure becomes kindness during crunch weeks.
PowerShell: generate F.L.A.R.E. prompts fast
Drop this function into your profile or a tools module. Use it in PowerShell 5.1 or PowerShell 7. The output pastes cleanly into ChatGPT. Fields map directly to the F.L.A.R.E.prompt framework. You can also copy to the clipboard with a switch.
function New-FLAREPrompt {
    [CmdletBinding()]
    param(
        [Parameter(Mandatory=$true)][string]$Focus,
        [Parameter(Mandatory=$true)][string]$Logic,
        [Parameter(Mandatory=$true)][string]$Action,
        [Parameter(Mandatory=$true)][string]$Reflection,
        [Parameter(Mandatory=$true)][string]$Expansion,
        [ValidateSet('L3','L4','L5')][string]$ReasoningDepth = 'L4',
        [switch]$CopyToClipboard
    )

    $prompt = @"
Use the FLARE prompt framework to answer.
Reasoning Depth: $ReasoningDepth

Focus: $Focus
Logic: $Logic
Action: $Action
Reflection: $Reflection
Expansion: $Expansion

Output format: concise bullets or tables where helpful.
"@

    if ($CopyToClipboard) { $prompt | Set-Clipboard }
    return $prompt
}

# Example
# New-FLAREPrompt -Focus "Improve patching for 200 laptops" `
#   -Logic "Phased plan, KPIs, 90-day timeline" `
#   -Action "Roadmap with owners and weekly checklist" `
#   -Reflection "Compare Intune and PDQ with risks" `
#   -Expansion "Three quick wins and three stretch goals" `
#   -ReasoningDepth L3 -CopyToClipboard
Will this PowerShell script work for the topic? Yes. It builds a F.L.A.R.E. -formatted prompt for immediate use. The helper keeps prompts short, structured, and reusable. That is speed without sacrificing clarity or care.
What can we learn as a person - The human side of structure.
Why Structure Feels Like Kindness
Chaos makes small tasks feel enormous. A clear framework shrinks them back to size. The F.L.A.R.E.prompt framework does more than tidy words. It regulates attention when alarms keep buzzing. Boundaries give your brain fewer doors to check. Decisions stop ricocheting and start landing. That shift feels like kindness on a rough day. People often fear structure will box them in. The opposite happens when it is humane and light. Constraints remove junk choices that drain energy. Creativity then shows up with surprising ease. Confidence follows because progress becomes visible again. You can see the next safe step clearly. Teams notice the calmer tempo during reviews.
Meetings shorten because expectations already match. Reflection, especially, acts like a seatbelt for momentum. It slows the car just enough to see the curve. Risks reveal themselves without dramatic detours. Trade-offs appear as adult conversations, not firefights. The model mirrors that calm with better answers. Among Chat GPT 5 acronyms, F.L.A.R.E. earns trust here. Tools help, but the human feels the win. You get clarity plus self-respect, not just output. That is why structure reads as care, not control. Work turns back into work, not a panic sport. Tuesdays stop eating your lunch and your nerves.
How to Practice Reflection Without Burning Out
Start with small rituals that survive busy weeks. Ask three questions after each important deliverable. What worked, what failed, and what surprised you. Keep answers short to protect attention. Add one mitigation you will actually try. Name one assumption that deserves a test. The F.L.A.R.E.prompt framework supports this with honest lenses. Request pros, cons, and a confidence note every time. Ask for early warning signals you can watch. Invite a comparison table when choices look close. Choose L3 depth when time feels tight. Move to L4 if trade-offs need scoring. Save L5 for strategy and invention sprints. GPT-4 and GPT-5 handle those layers smoothly.
GPT-3.5 prefers lighter Reflection and fewer branches. Personalize the ritual so it feels friendly. A calm tone matters when energy runs low. Use checklists to keep guilt out of learning. Celebrate one tiny improvement before closing the loop. That habit rewires stress into traction. Among Chat GPT 5 acronyms, F.L.A.R.E. makes reflection portable. You get a built-in brake that never shames. I lean on that when meetings stack high. It reminds me progress is a series of gentle course corrections. Not a heroic leap, just steady, human steps.
It's a new day and a new shiny toy for us homelabers. Last month, the processor on my old laptop finally breathed its last. It was a good laptop, but it was ready to pass on. However, what made this crappy is my little Dell gave up as well. I had to rethink how I was going to do some of my services. So, I started looking. I wanted something small that could run one or two small Dockers. So let's start finding nimo.
Nimo MPL2B
This little bad boy has made my day. My old laptop was a quad cord with 16 gb of ram. It ran my books and my search engine. Lets talk a little about this guy. Here are the stats
Intel 12th Gen N100 Processor
16 GB LPDDR5 Ram
512 GB Samsung hard drive.
2 HDMI, 3 usb, sd card, usb c, Ethernet port, and audio jack.
Windows 11 Pro (Yes Pro)
The stats are not super powerful, but I only paid 160 USD for it on a amazon sale. Now, what I like about this device is a little more than just what the device itself, but the company behind the device. This small computer has a metal shell, uses a real samsung hard drive. It's put together very well. On top of all of that, it's primary focus is education. They give big discounts to college students. So, lets set this bad boy up.
The setup
Alright, so first things first… we’re not rocking Windows 11 on this cute little box. Nope. We’re tossing that out and going full Linux. I mean, we’re homelabbers, right? This is the part where things got fun (and slightly annoying). But let’s make this easy for you, so you don’t spend your morning yelling at your BIOS screen like I did.
Step 1: Smack That F2 Key
Power that baby on and start slapping the F2 key like you’re trying to skip a YouTube ad. This gets you into the BIOS. For the Nimo MPL2B, that’s the magic key. Inside the BIOS, scroll around until you find the boot order section. You want to move USB to the top. If you don’t, it’s going to ignore your pretty flash drive like it owes it money. Save with F10 (usually), and let it reboot.
Step 2: Build That Boot Stick
Now you need to make your Ubuntu USB.
Head over to ubuntu.com and snag the latest Desktop ISO (I used 24.04 LTS because I like things that don’t break).
Fire up balenaEtcher (or Rufus or whatever you use).
Burn that ISO onto a USB stick like it’s 2005 and you’re making a mix CD.
Step 3: Boot and Install
Plug in the stick, boot the Nimo, and it should go into the Ubuntu install menu. If not, go back and double-check that boot order. Trust me, I’ve done that loop.
Choose “Install Ubuntu”
When asked about how to install it, pick Erase disk and install Ubuntu. I don’t dual boot—either we’re Linux or we’re not.
Choose your region, user name, and let Ubuntu do its thing.
Step 4: Reboot and Celebrate
When it’s all done, yank the USB out, hit Enter, and let it reboot into a clean Ubuntu desktop. This is where the magic begins.
OS Setup
Alright, let’s give your fresh Nimo MPL2B some love. We’re going to:
Update Ubuntu (because the install image is already out of date)
Install Tailscale so you can SSH into this little beast from anywhere, even grandma’s house.
We’ll do it step-by-step, and yes, you’re getting the PowerShell/terminal copy-paste magic too.
Step 1: Update and Upgrade Ubuntu
Open Terminal (Ctrl+Alt+T or just click that little black square of doom). Paste this in:
sudo apt update && sudo apt upgrade -y
This fetches the latest package list and updates anything that needs it. The -y flag answers “yes” to all prompts like a good little automaton.
Step 2: Install Tailscale (aka VPN Magic)
Tailscale lets you connect to this mini-PC like it’s on your local network—even if you’re 2 states over, crying in a Starbucks.
First, add the Tailscale repo and key:
curl -fsSL https://pkgs.tailscale.com/stable/ubuntu/$(lsb_release -cs).noarmor.gpg | sudo tee /usr/share/keyrings/tailscale-archive-keyring.gpg >/dev/null
curl -fsSL https://pkgs.tailscale.com/stable/ubuntu/$(lsb_release -cs).tailscale.list | \
  sudo tee /etc/apt/sources.list.d/tailscale.list
Then update apt again and install Tailscale:
sudo apt update && sudo apt install tailscale -y
Now enable and start it:
sudo tailscale up
That command will open a URL in your terminal. Copy it, paste it in your browser, and sign in to link the device to your Tailscale network. Boom. Your Nimo is now part of the mesh.
Install Docker & Docker Compose
Now open a terminal and paste the code below. This will setup docker and set you as a user for the docker.
Save and exit (Ctrl+X, then Y, then Enter). Now we can run it.
docker compose up -d
You can access it by going to your IP address on port 8080 or your tailscale ip. So, it should be like, http://localhost:8080.
There we have it. Your home lab with a search engine as the starting point. It's not much, but it will grow. This little Nimo can't run a corporate system, or a deep advanced AI, but It holds what I like to use. Since I'm the main user, I get to tell the user what I want to do with it. Even when sometimes that user can be overzealous. Don't forget, you can get around the gnat using this setup as well if you have an external machine somewhere.
What can we learn as a person.
Alright. Let’s take a breather.
This little Nimo box? It’s cool, it’s compact; it’s cheap. And yeah, it runs Docker like a champ most of the time. But here’s where the wheels can start to wobble: expectations.
See, I caught myself doing it. I wanted this $160 mini-PC to replace my old laptop, my Pi-hole box, my local dev stack, and maybe cure my ADHD while it was at it. Did you know that bats arn't blind? Wait wrong thing. Dang, no ADHD cure yet.
And that’s the trap. The Slow Burn of Expectation
It’s not always the big crashes that break us. Sometimes it’s the micro-disappointments. You expect your container to run. It doesn't. You expect it to stay cool. It doesn’t. You expect it to be perfect—and suddenly, you’re annoyed at a tiny piece of metal because you needed it to be more than what it is.
That adds up. Day by day. Task by task. And eventually, those micro letdowns become something heavier: dread, frustration, that creeping “what’s even the point?” feeling that whispers depression.
The AA Folks Were Onto Something
There’s this line in the Serenity Prayer:
“Accepting the world as it is, not as I would have it.”
That hits. Hard. We can't change the laws of thermals. We can't make N100 CPUs act like Xeons. And no, we can't Docker our way out of emotional burnout. Even though that would be amazing. Like the time i found a cold diet dr pepper in the back of the fridge, I mean, it was ice cold. Like Amazing... Anyways, squirrel.
But we can manage our expectations. We can say, “This box does this thing. And that’s good enough.” You get way more peace out of that than you do out of pushing it to failure. This is true for your friends, family, coworkers, politicians, even.... YOURSELF. Dumb ass brain, you hear me! wait can brains hear? Ghall my adhd won again. Nimo you failed me on this adhd stuff.
Let the Box Be a Box
Let this little Nimo machine be what it is: a budget-friendly, tinker-happy toy for nerds like us. It’s not your therapist. It’s not your fix. This Nimo just a cool piece of gear that does its job. if you don’t ask it to carry your whole mental load.
And just like the box, you should let You be you. We have expectations that people put on us, but some of us put expectations on ourselves that just are not realistic. So, look at your expectations, are they realistic? Or are you hoping to cure you... please insert 25 cents to continue... problems with something simple. We are humans, our problems tend to be more complex than running a docker command.
It started like most of my learning sessions do. I cracked open a cold Dr Pepper and decided to poke around Microsoft 365 Explorer just to see how it really works. Not trying to solve a ticket or check alerts, just digging through the Security & Compliance Center to see what kind of metadata I could pull from email traffic. That’s when I saw it. A Teams meeting link. Right there in the email metadata. Not the email body. Not some phishing attempt. Just... a clean, clickable Teams URL, and that’s where the Global Reader role security concerns really hit me.
See, I didn’t have access to the email content. That part is locked down like it should be. But the URLs? Totally visible. Which means any Teams meeting link that comes through email can technically be seen and opened by someone with Global Reader rights. No secret sauce. No elevated permissions. Just the system doing exactly what it was told to do. I didn’t click it. But I could’ve. That’s what stuck with me.
Nobody talks about this kind of thing. We throw these roles around, Global Reader, Security Reader, assuming they’re “read-only” and safe. But safe for who? Because when that read-only view includes working meeting links, especially the ones that don’t require authentication, you’ve got more than just visibility. You’ve got access. Quiet access. That’s not a broken system. It’s just... something we didn’t think all the way through.
What Explorer Actually Shows You
So for anyone who hasn’t wandered into it before, Explorer lives inside Microsoft 365 Defender at https://security.microsoft.com. You head over to Email & Collaboration, click on Explorer, and boom, you’re staring at mail flow. What came in, who it went to, who clicked what, and when it all happened. It's surprisingly deep.
Now, I didn’t expect much when I first started messing with it. I thought it would show headers, basic sender and recipient info, that kind of thing. But once I started looking closer, I noticed the URLs section. These aren’t just logs. They’re functional. You see the real URLs from real emails. And if one of those is a Teams meeting? Yep, you can open it. And this is with the Global Reader role. You don’t need to be an Exchange Admin or have a bunch of elevated rights. Just Global Reader. That’s where the Global Reader role security concerns really start to matter.
The assumption is that "read-only" means "safe." But URLs aren’t static. They’re doorways. And if that doorway leads to a Teams meeting, and the meeting doesn’t require you to be on the invite or authenticate, then yeah; you’re walking into places you probably shouldn't be. So now I’m sitting here thinking... how many people have this role in our org? And how many of them know what they're really looking at?
When Metadata Becomes a Backdoor
Let’s be real, this isn’t some obscure flaw buried deep in the Microsoft 365 stack. It’s just... there. Working as designed.
When Explorer pulls up an email trace, you can click into the message summary and find a list of all the URLs Microsoft scraped from that email. They’re broken down under the “URLs” section and logged for security scanning. This is great for catching phishing links. But not so great when those URLs are to internal resources.
Clean. Clickable. No auth required, depending on how the meeting was set up. Some orgs have meetings open by default. So yeah, I could’ve joined. Muted my mic, changed my name to “System,” and just lurked. Not that I did. But again, the option was right there. And it’s not just meetings.
I’ve seen password reset URLs, temporary sign-in links, private SharePoint shares, direct file download links. All kinds of things that don’t need full message content to be risky. These links are meant for the recipient, but they’re exposed in the metadata. And the kicker? This isn’t some “Exchange Admin has all the power” situation. This is happening with Global Reader role permissions. Read-only, sure, but reading live, sensitive URLs that can sometimes skip authentication entirely.
That’s where Global Reader role security concerns stop being hypothetical and start being real risk. This is metadata turning into a potential access path. Not because the system is broken, but because it's quietly giving away more than we think.
What You Can Do About It
Let’s say you’ve just realized what I did—that Global Reader isn’t exactly as harmless as it sounds. The good news? You can do something about it. The bad news? Most orgs don’t, because they assume “read-only” is low risk.
First things first. You need to know who actually has this role. It’s not always obvious in the portal, especially if folks got assigned via nested groups or role assignments that were done years ago. PowerShell to the rescue:
This will pull a list of users with any role containing “Global” in the name. Look out for Global Reader, Global Admin, and anything custom that might have full visibility. Once you know who’s got the keys, ask the hard question: Do they still need it? If the answer is no, yank it. If they only need it occasionally, roll out Privileged Identity Management (PIM) and require just-in-time access. Make them activate it, justify it. Then make it expire.
Another overlooked option is role-specific access. Instead of giving someone full tenant visibility with Global Reader, give them Security Reader, Compliance Viewer, or another scoped role that aligns with their actual job. You don’t give someone a master key to your building just because they need to water a plant in one office. Same idea.
Also, while you’re at it, check your Teams meeting policies. Make sure unauthenticated users can’t just join meetings by URL. A lot of companies leave this wide open because it’s the default. Finally, start the culture shift. Just because someone can see a URL doesn’t mean they know what that link leads to. And if it leads to sensitive content or a live session? That’s a problem waiting to happen.
What Can We Learn as a Person
Let’s be honest. Most of us in IT have had that moment. You see something you weren’t supposed to see—an email subject, a calendar event, a shared file name and suddenly your brain starts filling in the blanks. It’s rarely something major. It’s usually a half-story. A piece of a conversation. Just enough to spark a thought like, “Huh, that’s interesting...”
This is where gossip starts. And this is where it can wreck people. Not just the person you’re looking at, but you too. When you’ve got a role like Global Reader, it’s incredibly easy to see things you shouldn’t. Even if you never touch the actual email content, those metadata breadcrumbs can pile up quick. Meeting titles, URLs, file names, sender names. Your brain builds a story whether you want it to or not.
And the worst part? You don’t even have the full picture.
That’s where the danger really is. Partial visibility creates false narratives. It makes you assume things. It can mess with how you view coworkers, how you talk about them, and how you carry yourself as an admin. I’ve caught myself starting to spiral into “what if” scenarios based on a Teams meeting name I wasn’t supposed to see. It’s not healthy. And it’s not professional.
The power to see isn’t just technical. It’s emotional. And if you don’t check yourself, it’ll eat at your mental health before you realize it. So what can we learn? That being trusted with access means being trusted with restraint. That curiosity can turn toxic if it isn’t managed. And that sometimes, the most responsible thing you can do as an admin... is look away.
Not much takes me by Suprise, but this little tool has really done just that. I want to do a Deepsite Review in today's post. Deepsite is a unique AI tool that builds websites. Unlike chat gpt, you don't have to feed it a complex prompt to make one page look decent. I am going to give you some examples of what I was able to make with it and the prompts used.
So what is deep site. Deep site is a hugging face tool made by enzostvs. https://enzostvs-deepsite.hf.space/. It uses deepseek's AI to help create fairly simple sites to complex sits. I have made everything from flappy bird games to sites about possums. If it can be done inside a browser, deepsite can do it. When you first come to deepsite, this is what you get. A simple prompt, and a page. The HTML will be generated in the side. So lets look at some examples.
It took about 5 minutes and wrote each line of code. You can play this clone at CyberFlap - Cyberpunk Flappy Bird. Is it perfect, no, but is it dang amazing, yes. This would have taken me a full day or two to code. It only took 5 minutes and it was a single file. So no copying and pasting multiple files and folder structing.
Prompt: Create a website for a company called one and two liberty square. Here is the content (content from the previous site).
What amazed me here is it got most of the content together. It's not the best layout, but it's useable. The downside can be seen here. The longer the site, the harder it takes to make the site be creatively clean. It did poorly on the dots and sounds the same in a lot of places. That's where the human charm comes into play.
What I would do to improve this site is change the menu to go to each building. I would also flip the images from one side to another. Then make a section for the corporate partners for it's own.
One big thing to remember, this can only create the surface level. So, you see that contact us? Yeah, that doesn't work. So, if your backend guy doesn't know how to do the back end stuff, good luck.
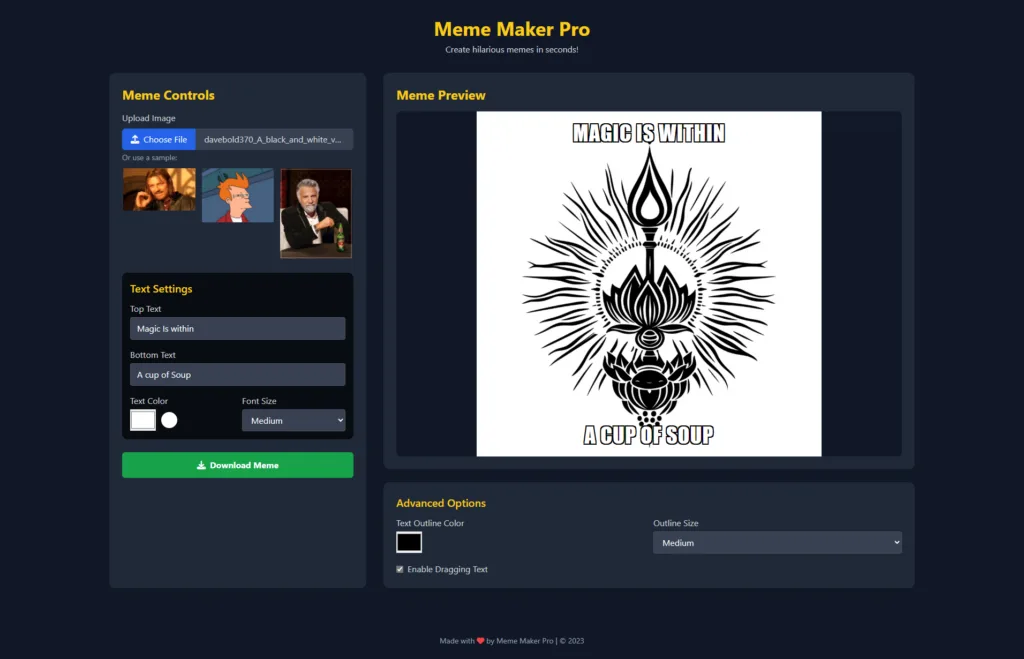
Prompt: Create a dark themed meme generator where I can upload a picture and add text to the top and bottom and save it to my computer.
So, This was pretty cool. It made it within 5 minutes and only had 1 problem and it still does. It can't save the three memes it shows in the left hand window because they are not in memory. However, you upload something and add your text, and click save, bam. Quick and easy. Some of the protriat shaped images will have odd text, but for the most part, it works.
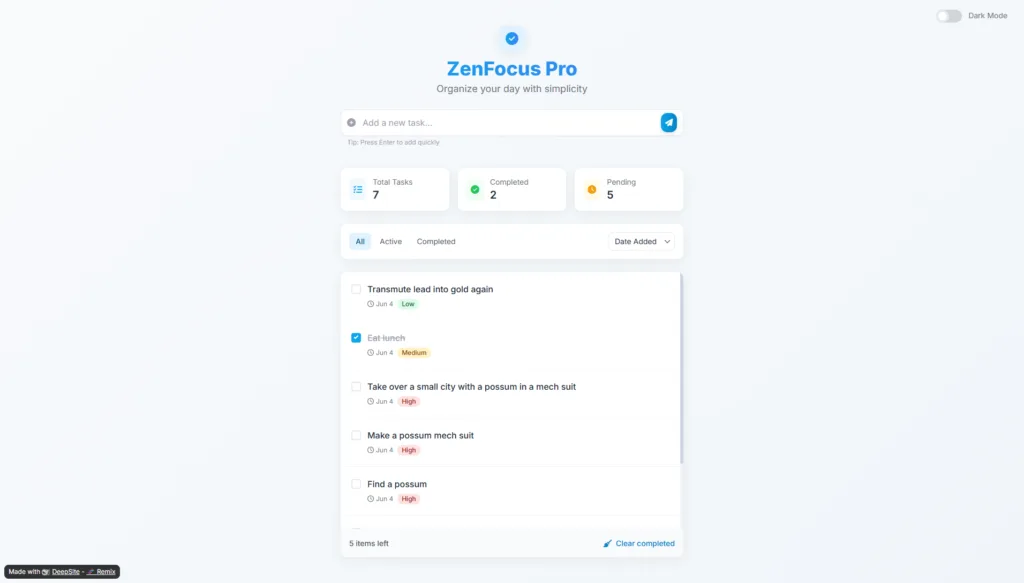
Prompt: Make a Zen focus task manager with a dark mode.
Guess what, it will keep as long as you keep your cache. After that it forgets, and the dark mode sucks. So, if you clear your cache or move to a different browser, your stuff will not be there.
Deepsite Review
Pros
Create a basic website in seconds with little interaction
HTML code is split up the site using sections. Which allows for easy editing
The system users tailwindcss.com
Can create unique games with a simple command
Keeps standard praticies
Single html site file.
System will response
Cons
Creates a basic site, but nothing bigger
Keeps standard practices but not best practices
Odd formatting.
No backend
Final thoughts
This tool is great for simple sites and nothing more. If you want more than one page, this tool can't do that. If you want a fully functioning back and front end product. This isn't for you. However, front end development, is a yeppers. I personally like making cool 404 pages with this tool. I don't do reviews often and the main reason why I wanted to bring this tool up is because it's the beginning. If AI doesn't eat itself and die, we will see the end of an industry. My last blog post was me asking questions to gpt and it giving me a response. I just told it to make it a blog post and bam, it did it. Which took the fun out of blogging. These tools are powerful and deepsite is just the beginning of replacing front end development. That's my thinking on this Deepsite Review.
What we can learn as a person
When I was a child, I was told I will never have a calculator. I had to learn the division, exponets, square roots, and more by hand. (Yes, I know I just dated myself). I'm greatful for learning those things. Now when I am working with complex problems, I use the same structures and a lot of times the same formulas. Over the past 20 years, I have used my phone's calculator. I am noticing a decline in my ability to preform simple maths. More I use chat gpt, I notice a skill drain.
Technology can replace our need to have a skill set over time. Is this a good thing? Sometimes, however, sometimes it's not. I use AI in my daily life for a lot of things. But I don't lean 100% into it like many of my peers do. The reason why is because I love to discover what I learn. I enjoy making the mistakes and correcting them. At the end of the day, i want the brain tingles. When I'm in my 70s, that love will keep my brain on track. I have seen a decline as I have gotten older. We all know that one day we will not be able to think like we did when we were 25 and that's ok.
Two keeps to success
I have learned in this life there are two keys to success. Adaptability and Work. We have the adapt to the world around us. If it takes me 1 hour to code a deployment, but AI takes 5 seconds, might as well use the ai, but make sure I understand the ai's code. So I can fix it later when it breaks. Adapting is imporatnt, but putting in the work is also as importatnt. Like this Deepsite Review, I could have had gpt do it, but I wanted to figure it out. So, I can see the full scope of what deepsite could do for me. If you don't work at what you have in life, it doesn't happen. Sometimes that means we have to work at being adaptable as well. That could mean a 15k paycut to escape a trauma inducing job. Other times it's using a weed eater instead of a push mower. It means different things for different situations.
So, learn how to adapt. Work at what you do and enjoy. I find joy in work. It's a simple concept. Seeing a clean room knowing I just did that, is a simple joy. It's like putting back into myself. It's worth it and so are you.
Ever feel like you’re just guessing which Intune policy to use?
You go into Microsoft Intune thinking, “I just want to block copy/paste from Teams to a student’s phone,” and suddenly you're knee-deep in device configs, app restrictions, compliance policies, and something called MAM-WE (which sounds like a failed robot uprising).
If you've ever been stumped by the difference between Intune device vs app policies, you're not alone. And you’re not doing it wrong — the naming is genuinely confusing.
So, let’s break it down the way it actually clicks — using real-world scenarios instead of theory and tech jargon. If you know what you want to do, you'll know what to use. Lets dive into intune devices vs app policies.
The Three Intune Policy Buckets
Device Configuration Policies – You Own It, You Control It
Think of this like setting the house rules — but only for houses you own.
Device configuration policies give you OS-level control. You can push BitLocker, set PIN rules, enforce Delivery Optimization, apply VPN profiles, and more. But they only work if the device is enrolled in Intune — like, actually enrolled. Not “kinda managed.” Full enrollment.
Lets take a look at a real world senerio. Imagine you have 200 windows 11 laptops and want to enable delivery optimization for windows updates. This would be a Device Configuration Profile. Another example would be if you have 1000 windows 11 laptops that you want to encrypt their fixed drive with bit-locker. Once again, this is another device configuration profile.
If the deivce is apersonal and not enrolled, this policy type is off-limits. No Bitlocker, no VPN, nothing. You don't own it, you don't get a say.
App Protection Policies – Protecting the Data, Not the Device
This one is magic for BYOD situations. Think of it like zipping up your company's data in a fireproff pouch, even if it'son someone else's device. App protection polcies don't care who owns the device. They care about your data. These policies apply to managed apps. Things like outlook, teams, onedrive, and lets you do things like bloc copy and paste. Require PINs to open apps, wipe work data and more.
Lets take a look at a few real world senerios. Students are copying teams messagers and pasting them into discord on their phones. You can block this using App Protection Policy. Lets say you have truck drivers with ipads with outlook on them. You can force the user to enter a pin each time they check their email. That's a App Protection Policy.
App Configuration Policies – Pre-setting the Knobs
Here we are putting the settings into place for different apps. We are not locking down the device. So, if you need a pin for the device, you do this with a device configuration policy. If you need chrome to open on a set website, that's the App Configuration Policy. App configuratin policies let you predefine how apps behave. It's not about control, but it's about consistency. You can push bookmarks, force outlook to use only work accounts, set default browsers for teams, and more.
Lets look at a real world. You have 500 Android Zebra scanners, you need to make sure they all open chrome to a local site. This can be done through the App Configuration Policy. One thing we did for was setup auto updates with zebra on our scanners. We did this with a App configuration profile.
The problem with it is the BYOD. App Configuration policies only work with managed apps. This means, if a user installs outlook through the company portal via intune, then you can manage it. However, if you install outlook through the store app, it just doesn't work.
Why it gets confussing
Let's be real, the names don't help. "App Protection" and "App Configuration" sound way to similar. So here's a simple mental hack to seperating devices vs app policies.
Device Configuration = Control the device itself.
App Configuration = Setup how the app works.
App Protection = Lock down the data inside the app.
Lets test this thinking out with a few senerios.
Possible Answers
Device Configuration Policy
App Configuration Policy
App Protection Policy
You want to prevent employees from copying data from teams to another non-company app.
Your factory has 300 kiosk devices. You want to make sure that the devices can't be logged into by non-it users.
Doctors are using outlook on their personal phones. You need to prevent attachments from being saved locally.
Your compamy users Android enterprise, and you want to push bookmarks to chrome.
You want to rotate the local admin password on all of your windows 11 devices using windows LAPS
Force outlook to only use work accounts
Encrypt phones and force a pin lock on bring your own devices.
Here is a nice little chart to help with these.
Do I manage the entire device?
   ↳ Yes ➡ Device Configuration
   ↳ No ➡ Do I want to protect corporate data?
            ↳ Yes ➡ App Protection
            ↳ No ➡ Do I want to change how the app behaves?
                     ↳ Yes ➡ App Configuration
Here are the answers.
App Protection
Device Configuration
App Protection
App Configuration
Device Configuration
App Configuration
None of the above, Yep, I tricked you, maybe. If it wasn't a bring your own device, then you would be correct if you say device configruation profiles. Other than that, it's nothing really.
Final Thoughts – “You Know More Than You Think”
This stuff is confusing, and Microsoft doesn’t always make it easy. But now, you’ve got the mental framework:
Device Config = You own the device
App Protection = You own the data
App Config = You shape the experience
Don’t worry about getting it perfect on the first try. Intune is meant to be layered. Pilot first, then scale.
If you ever get stuck again, just ask: “What exactly am I trying to control here?” The answer will almost always tell you the policy you need.
You’ve got this, lets get those devices vs app policies.
What can we learn as a person
In IT, we have access to a lot. More than most people will ever know.
We can shut down Windows Hello, enforce biometric logins, or require ID badges scanned by a camera just to unlock a screen. As system administrators, we often hold keys to every digital door. I could, right now, grant myself full access to every mailbox in the company — all in the name of “making admin easier.” I could quietly assign myself as an owner on every user’s OneDrive and SharePoint site using policies that no one would even notice.
That level of control? It’s terrifying, if you’re honest about it.
Because with great power doesn’t just come great responsibility. It comes with weight. A psychological and emotional load that most people never talk about.
Knowing that you can access someone’s private data — and choosing not to — becomes a moral and mental burden. It sits on your nervous system like a background process you can’t kill. Over time, that mental load becomes stress. That stress becomes anxiety. That anxiety becomes burnout, or worse — panic attacks that don’t go away.
Let’s go back to those access examples:
If you make yourself owner of every mailbox, and something illegal ends up in one — say, child pornography in OneDrive — you’re now not just an admin. You’re a co-owner of that content. You’re legally implicated. That’s not just a technical decision. That’s jail time.
When you hold that kind of access, your body knows, even if your conscious mind tries to ignore it. It keeps a tally. And that tally eventually tips the scale — panic attacks, heart strain, and real, physical damage.
The Illusion of Total Control
I’ve seen brilliant people collapse under the pressure of trying to control everything — juggling complex networks, hybrid systems, countless endpoints, compliance rules, and impossible expectations.
They thought the job was about mastery. But really, it’s about boundaries.
Technology is growing faster than any one human can keep up with. We’re now expected to specialize and generalize. To know cloud, on-prem, security, devices, data — and also keep every system running 24/7 with no mistakes.
That pressure? It breaks people.
So What Can We Learn?
Here’s what I’ve learned — sometimes the hard way:
Control less. Not because you’re lazy — but because your health matters more than a perfect config.
Set boundaries. Just because you can access something doesn’t mean you should.
Say no to full access. Delegate. Distribute. Limit yourself.
Audit yourself. Regularly review what you have access to, and ask: Do I really need this?
Let go. Systems don’t have to be perfect. People don’t have to be flawless. Neither do you.
You’re not here to own everything. You’re here to protect what matters — and that includes you.
So the next time you feel the urge to control every setting, script every failover, and be the hero of the whole system… Pause. Breathe. And remember: the best admins don’t control everything. They know what not to control — and they sleep better because of it.
If you've ever needed to extract specific information from a log file or validate user input in a PowerShell script, you've probably wished for a magic tool that could do the heavy lifting. Well, that’s exactly where regular expressions (regex) come in.
Regex is one of those tools that feels intimidating at first, but once you get the hang of it, you'll start seeing patterns everywhere. It’s like suddenly being able to read the Matrix, except instead of dodging bullets, you’re filtering out bad email addresses or pulling MAC addresses from a system log.
Why Use Regex in PowerShell?
PowerShell has built-in support for regex, making it an incredibly powerful tool for system administrators, developers, and anyone who works with structured or unstructured text. Whether you’re:
Validating user input (like email addresses in a script)
Extracting important data from logs (like MAC or IP addresses)
Searching for patterns in massive amounts of text
Regex allows you to do all of this with just a few carefully crafted expressions. It’s like having a Swiss Army knife for text processing.
What We'll Cover in This Guide
In this post, we'll walk through three practical PowerShell regex use cases:
Email Addresses – How to validate email input and extract emails from a document
MAC Addresses – How to validate MAC addresses and find them in logs
IP Addresses – How to check if an IP is valid and pull all IPs from a file
Before we dive into these examples, we’ll go over some regex basics, including common syntax and flags that make regex so powerful. By the end, you’ll not only understand how regex works in PowerShell but also feel confident using it in your own projects.
Let’s get started!
Understanding Regex Flags and Syntax
Regular expressions might look like a confusing mess of symbols at first, kind of like trying to understand a cat’s behavior. One minute it’s purring in your lap, the next it’s knocking your coffee off the table. But once you start recognizing the patterns—like how a tail flick means back away, human—it all starts to make sense.
Regex is the same way. At first glance, it looks like a secret code of slashes, dots, and brackets. But once you learn the building blocks, you start seeing patterns everywhere, and suddenly, text manipulation in PowerShell becomes effortless. PowerShell has native support for regex, meaning you can use it to search, validate, and extract information with just a few well-placed symbols—kind of like bribing a cat with treats to do what you want.
Character Classes: Defining What to Match
Character classes allow you to specify what kind of characters should match. Instead of listing every possibility, regex provides shorthand notations.
Common Character Classes in PowerShell Regex
Character Class
Description
Example Match
\d
Matches any digit (0-9)
123 in abc123
\w
Matches any word character (A-Z, a-z, 0-9, _)
hello in hello_123
\s
Matches any whitespace (space, tab, newline)
The space in "Hello World"
.
Matches any character (except newline)
H or ! in "Hi!"
Example in Powershell:
"This is a test 123" -match "\d+" # Matches "123"
Quantifiers: Controlling Repetitions
Quantifiers define how many times a pattern should repeat.
Common Quantifiers
Quantifier
Description
Example Match
*
Matches 0 or more times
aaa in "aaaaa"
+
Matches 1 or more times
abc in "abc"
?
Matches 0 or 1 time (optional)
a in "a" or empty string
{n}
Matches exactly n times
333 in "333"
{n,}
Matches at least n times
111 in "11111"
{n,m}
Matches between n and m times
55 in "5555" (if {2,3})
Example in PowerShell:
"This is 55555" -match "\d{2,3}" # Matches "555"
Anchors: Defining Position in Text
Anchors don’t match actual characters but instead define where a match should occur.
Common Anchors
Anchor
Description
Example Match
^
Matches the start of a string
Hello in "Hello world"
$
Matches the end of a string
world in "Hello world"
\b
Matches a word boundary
cat in "cat dog" but not "scatter"
Example in PowerShell:
"This is a test" -match "^This" # Matches "This"
Escaping Special Characters
Some characters in regex have special meanings (like . or *). If you want to match them literally, you need to escape them with a backslash \.
Common Special Characters That Need Escaping
. (dot) → Matches any character, so use \. to match a literal dot.
* (asterisk) → Use \* to match an actual asterisk.
? (question mark) → Use \? to match a literal question mark.
Example in PowerShell:
"This is version 1.0.1" -match "1\.0\.1" # Matches "1.0.1"
How to Use Regex in PowerShell
PowerShell provides multiple ways to work with regex:
-match Operator – Checks if a string matches a pattern.
-replace Operator – Replaces matched patterns in a string.
[regex]::matches() – Extracts all matches from a string.
Extracting and Validating Email Addresses with PowerShell
When working with PowerShell scripts, validating user input is crucial—especially when dealing with email addresses. You don’t want users submitting "notanemail@oops" or "hello@.com" and breaking your workflow. Thankfully, regex makes it easy to verify if an email address is properly formatted and even extract all emails from a document.
Before we get into validating and extracting emails, let’s break down the regex pattern that makes it all work.
Breaking Down the Email Regex
Email validation might seem simple at first—just look for an "@" symbol, right? But things get complicated fast. A valid email address follows these rules:
A username section, which can include letters, numbers, dots, dashes, and underscores.
An "@" symbol separating the username from the domain.
A domain name that includes letters and numbers.
A top-level domain (TLD) like .com, .net, .org, etc.
A regex pattern that matches most valid email addresses looks like this:
+ → Ensures one or more of these characters exist.
"@" Symbol: @
The @ is a literal character—every valid email must have it.
Domain Name: [\w\.-]+
Just like the username, the domain allows letters, numbers, dots, and dashes.
Top-Level Domain (TLD): \.\w+
\. → Matches a literal dot before the TLD.
\w+ → Ensures at least one letter (like .com or .net).
Example Matches:
user@example.com
john.doe123@company.co.uk
admin-test@my-site.net
Invalid Matches:
@example.com (No username)
user@.com (Invalid domain name)
user@domain (No TLD)
This regex is great for general email validation, but in PowerShell, we need to apply it properly. Next, we’ll use this pattern in a ValidateSet to enforce correct email input in scripts.
Using Regex for PowerShell ValidateSet
PowerShell has built-in ways to enforce valid input in scripts, and one way to do this is by using regex inside a function. The function below checks if an email matches our regex pattern. If it's valid, it returns $true; if not, it gives a reason why.
PowerShell Email Validation Function
function Test-EmailAddress {
    param (
        [string]$Email
    )

    $pattern = "^[\w\.-]+@[\w\.-]+\.\w+$"

    if (-not $Email) {
        return "False - No email provided."
    }

    if ($Email -match $pattern) {
        return "True"
    }

    # Now let's figure out why it failed
    if ($Email -notmatch "@") {
        return "False - Missing '@' symbol."
    }

    if ($Email -match "@\." -or $Email -match "@$") {
        return "False - Invalid placement of '@' or '.'"
    }

    if ($Email -notmatch "\.\w+$") {
        return "False - Missing top-level domain (e.g., .com, .net)."
    }

    return "False - Invalid email format."
}
How It Works
Checks if an email is provided – If the input is empty, it immediately returns a failure message.
Validates using regex – If the input matches the regex pattern, it returns True.
Identifies why the email is invalid – It checks for common issues like missing @, misplaced dots, or a missing TLD.
This function is useful for scripts that require valid emails before proceeding. Next, we'll explore how to extract all emails from a document using regex!
Finding All Email Addresses in a Document
If you’re working with logs, reports, or any large text files, regex is your best friend for extracting structured data like email addresses. Instead of manually scanning through lines of text, PowerShell can do the heavy lifting in seconds.
Here’s a script that:
Reads a file line by line.
Uses regex to find all email addresses.
Outputs the results to the console (or optionally saves them to another file).
PowerShell Script to Extract Emails from a File
function Get-EmailAddressesFromFile {
    param (
        [string]$FilePath
    )

    if (-not (Test-Path $FilePath)) {
        Write-Host "Error: File not found at path: $FilePath"
        return
    }

    $pattern = "[\w\.-]+@[\w\.-]+\.\w+"
    $emails = @()

    Get-Content $FilePath | ForEach-Object {
        $matches = [regex]::Matches($_, $pattern)
        if ($matches.Count -gt 0) {
            $emails += $matches.Value
        }
    }

    if ($emails.Count -eq 0) {
        Write-Host "No email addresses found in the file."
    } else {
        Write-Host "Found $($emails.Count) email addresses:"
        $emails | Sort-Object -Unique
    }
}

# **Example Usage**
Get-EmailAddressesFromFile -FilePath "C:\path\to\your\file.txt"
How It Works
Checks if the file exists – Avoids errors if the file path is incorrect.
Reads the file line by line – Prevents loading large files into memory at once.
Uses regex to find emails – Looks for matches in each line.
Stores and displays unique results – Avoids duplicates and outputs all found emails.
Example File (C:\path\to\your\file.txt)
Hello John, please contact us at support@example.com.
You can also reach admin@company.net for further assistance.
But we dont want to see a snail@the white house.
However, we might @ your friend .com
How about a cheesecake@cheesecakefactory.com?
Script Output
Found 3 email addresses:
admin@company.net
cheesecake@cheesecakefactory.com
support@example.com
This script is super useful for extracting emails from logs, reports, or even messy text files. Next up, we’ll apply these same techniques to MAC addresses!
Extracting andValidating MAC Addresses with PowerShell
MAC addresses (Media Access Control addresses) are unique hardware identifiers assigned to network interfaces. If you’re dealing with network logs, device configurations, or security audits, you may need to validate or extract MAC addresses.
A valid MAC address follows one of these formats:
Colon-separated:00:1A:2B:3C:4D:5E
Hyphen-separated:00-1A-2B-3C-4D-5E
No separator:001A2B3C4D5E
But Cisco devices often use a dot-separated format:
Cisco-style:001A.2B3C.4D5E
Now, let’s break down the regex pattern that will help us match MAC addresses.
Breaking Down the MAC Address Regex
MAC addresses consist of six groups of two hexadecimal digits (0-9 and A-F), separated by colons, hyphens, or nothing at all. Here’s a regex pattern that matches all common formats:
([A-Fa-f0-9]{2}[:-]?){5}[A-Fa-f0-9]{2} → Matches colon, hyphen, or no separator formats.
Second Half: Cisco’s Dot-Format
([A-Fa-f0-9]{4}\.){2}[A-Fa-f0-9]{4} → Matches two groups of four hex digits separated by dots.
Example Matches:
00:1A:2B:3C:4D:5E
00-1A-2B-3C-4D-5E
001A2B3C4D5E
001A.2B3C.4D5E(Cisco format!)
Invalid Matches:
00:1A:2B:3C:4D (Only five pairs)
00:1G:2B:3C:4D:5E (Invalid hex digit G)
00::1A:2B:3C:4D:5E (Double colon is not valid)
Using Regex for PowerShell ValidateSet (Including Cisco Format)
We’ll now create a PowerShell function that checks if a given MAC address is valid. If it’s valid, it returns True; if not, it returns False with a reason why.
Updated PowerShell MAC Address Validation Function
function Test-MacAddress {
    param (
        [string]$MacAddress
    )

    $pattern = "^([A-Fa-f0-9]{2}[:-]?){5}[A-Fa-f0-9]{2}$|^([A-Fa-f0-9]{4}\.){2}[A-Fa-f0-9]{4}$"

    if (-not $MacAddress) {
        return "False - No MAC address provided."
    }

    if ($MacAddress -match $pattern) {
        return "True"
    }

    # Identify why it failed
    if ($MacAddress -notmatch "^[A-Fa-f0-9]+$" -and $MacAddress -notmatch "[:-\.]") {
        return "False - Contains invalid characters."
    }

    if ($MacAddress -notmatch "([A-Fa-f0-9]{2}[:-]?){5}[A-Fa-f0-9]{2}" -and $MacAddress -notmatch "([A-Fa-f0-9]{4}\.){2}[A-Fa-f0-9]{4}") {
        return "False - Incorrect format. Should be XX:XX:XX:XX:XX:XX, XX-XX-XX-XX-XX-XX, XXXXXXXX, or XXXX.XXXX.XXXX (Cisco)."
    }

    return "False - Invalid MAC address format."
}
How It Works
Checks if a MAC address is provided – Ensures input isn’t empty.
Uses regex for validation – If the input matches the pattern, it's valid.
Identifies specific errors – Helps users understand why an input is invalid.
Now that we can validate a single MAC address, let's move on to extracting all MAC addresses from a file!
Finding All MAC Addresses in a Document
This next script scans a file and extracts all MAC addresses using regex. It works just like our email extraction script, but with a MAC address pattern.
PowerShell Script to Extract MAC Addresses from a File
function Get-MacAddressesFromFile {
    param (
        [string]$FilePath
    )

    if (-not (Test-Path $FilePath)) {
        Write-Host "Error: File not found at path: $FilePath"
        return
    }

    $pattern = "([A-Fa-f0-9]{2}[:-]?){5}[A-Fa-f0-9]{2}|([A-Fa-f0-9]{4}\.){2}[A-Fa-f0-9]{4}"
    $macAddresses = @()

    Get-Content $FilePath | ForEach-Object {
        $matches = [regex]::Matches($_, $pattern)
        if ($matches.Count -gt 0) {
            $macAddresses += $matches.Value
        }
    }

    if ($macAddresses.Count -eq 0) {
        Write-Host "No MAC addresses found in the file."
    } else {
        Write-Host "Found $($macAddresses.Count) MAC addresses:"
        $macAddresses | Sort-Object -Unique
    }
}

# **Example Usage**
Get-MacAddressesFromFile -FilePath "C:\path\to\your\file.txt"
How It Works
Checks if the file exists – Prevents errors if the file path is wrong.
Reads the file line by line – Efficient for large files.
Uses regex to extract MAC addresses – Searches each line for matches.
Stores and displays unique results – Removes duplicate addresses for cleaner output.
Found 3 MAC addresses:
00:1A:2B:3C:4D:5E
00-1A-2B-3C-4D-5E
001A.2B3C.4D5E
This script is super useful for network admins who need to extract MAC addresses from logs or reports. Next up, we’ll do the same for IP addresses!
Extracting and Validating IP Addresses with PowerShell
IP addresses are everywhere—logs, configs, audit reports—you name it. If you’re working with networking or security, you’ll often need to validate or extract IPs from text files.
We’re going to cover IPv4 and IPv6, because while IPv4 is still dominant, IPv6 is becoming more common.
What Makes an IP Address Valid?
IPv4 Format
Consists of four octets (groups of numbers) separated by dots: 192.168.1.1
Each octet must be between 0 and 255
IPv6 Format
Consists of eight groups of hexadecimal numbers (0-9, A-F), separated by colons: 2001:0db8:85a3:0000:0000:8a2e:0370:7334
Can contain compressed notation (e.g., :: represents consecutive zero blocks)
Breaking Down the IP Address Regex
To match both IPv4 and IPv6, we’ll use two separate regex patterns.
⚠️ This regex does not handle compressed IPv6 addresses (::), but we’ll take care of that in PowerShell logic!
Using Regex for PowerShell ValidateSet
Now, let's create a PowerShell function to validate both IPv4 and IPv6 addresses.
PowerShell IP Address Validation Function
function Test-IPAddress {
    param (
        [string]$IPAddress
    )

    $ipv4Pattern = "^(25[0-5]|2[0-4][0-9]|1[0-9]{2}|[1-9]?[0-9])(\.(25[0-5]|2[0-4][0-9]|1[0-9]{2}|[1-9]?[0-9])){3}$"
    $ipv6Pattern = "^([A-Fa-f0-9]{1,4}:){7}[A-Fa-f0-9]{1,4}$"

    if (-not $IPAddress) {
        return "False - No IP address provided."
    }

    if ($IPAddress -match $ipv4Pattern) {
        return "True (IPv4)"
    }

    if ($IPAddress -match $ipv6Pattern -or $IPAddress -match "^(::|([A-Fa-f0-9]{1,4}:){1,6}:?([A-Fa-f0-9]{1,4})?)$") {
        return "True (IPv6)"
    }

    return "False - Invalid IP address format."
}
How It Works
Checks for input – Ensures an IP address was provided.
Matches against IPv4 regex – If valid, returns True (IPv4).
Matches against IPv6 regex – If valid, returns True (IPv6).
Handles compressed IPv6 (::) – Using additional PowerShell logic.
Returns an error if invalid – Helps troubleshoot incorrect formats.
Now, let’s move on to extracting all IPs from a document!
Finding All IP Addresses in a Document
This script scans a file and extracts all IPv4 and IPv6 addresses.
PowerShell Script to Extract IP Addresses from a File
function Get-IPAddressesFromFile {
    param (
        [string]$FilePath
    )

    if (-not (Test-Path $FilePath)) {
        Write-Host "Error: File not found at path: $FilePath"
        return
    }

    $ipv4Pattern = "\b((25[0-5]|2[0-4][0-9]|1[0-9]{2}|[1-9]?[0-9])\.){3}(25[0-5]|2[0-4][0-9]|1[0-9]{2}|[1-9]?[0-9])\b"
    $ipv6Pattern = "\b([A-Fa-f0-9]{1,4}:){1,7}[A-Fa-f0-9]{1,4}\b"
    $ipAddresses = @()

    Get-Content $FilePath | ForEach-Object {
        $matchesIPv4 = [regex]::Matches($_, $ipv4Pattern)
        $matchesIPv6 = [regex]::Matches($_, $ipv6Pattern)

        if ($matchesIPv4.Count -gt 0) {
            $ipAddresses += $matchesIPv4.Value
        }
        if ($matchesIPv6.Count -gt 0) {
            $ipAddresses += $matchesIPv6.Value
        }
    }

    if ($ipAddresses.Count -eq 0) {
        Write-Host "No IP addresses found in the file."
    } else {
        Write-Host "Found $($ipAddresses.Count) IP addresses:"
        $ipAddresses | Sort-Object -Unique
    }
}
Example File (C:\path\to\your\file.txt)
Server 1: 192.168.1.1
Server 2: 255.255.255.255
Router: 2001:db8:85a3::8a2e:370:7334
Log Entry: Invalid IP -> 999.999.999.999
Script Output
Found 3 IP addresses:
192.168.1.1
255.255.255.255
2001:db8:85a3::8a2e:370:7334
Regex Exploration in PowerShell
At this point, you’ve seen how regex can validate, extract, and manipulate data in PowerShell. Whether it’s emails, MAC addresses (including Cisco formats), or IPs (both IPv4 and IPv6), you now have practical tools to handle real-world scenarios.
Why Keep Learning Regex?
Regex is one of those skills that pays off the more you use it. The same way a system admin gets better at troubleshooting networks over time, you’ll get faster at spotting patterns and writing efficient expressions.
Here are some great ways to keep sharpening your regex skills:
Practice on Real Logs – Take a firewall log, an Apache log, or an email report and extract useful data.
Use Online Regex Tools – Websites like regex101.com let you test regex patterns with real-time explanations.
Experiment with PowerShell – Try using -match, -replace, and [regex]::Matches() in your daily scripts.
Challenge Yourself – Create a script that finds phone numbers, dates, or even URLs in a document.
Regex is a skill, not magic. It may look complex at first, but like learning any new language, it becomes second nature with practice. The best way to improve? Find a problem and solve it with regex.
So, what’s your next PowerShell regex use case going to be?
What can we learn as a person today?
When a script fails, we don’t just throw our hands up and quit—we debug it. We check the logs, isolate the issue, and find a fix. But when our own minds start feeling overwhelmed, anxious, or burned out, we often just push through, hoping the problem resolves itself. What if we approached our mental health like we approach troubleshooting code? Debugging isn’t just for PowerShell scripts—it can work for stress, too.
Find the errors
The first step in debugging stress is identifying the error messages. In IT, a recurring issue in the logs might mean something deeper is wrong, and the same goes for mental health. Are you feeling exhausted every morning? Snapping at coworkers over small things? Losing focus even on tasks you usually enjoy? These could be your mind’s version of Event ID 1000: Application Crash. Instead of ignoring the warning signs, acknowledge them—just like you would in a system check.
Analyze the variables
Next, we analyze the variables. Just like a misconfigured setting can break a script, small changes in your routine can make or break your mental well-being. Are you sleeping enough? Eating well? Taking breaks? IT professionals are notorious for skipping meals, working through exhaustion, and staying up late chasing down problems. But just like an unstable system needs a reboot, your brain needs rest. Run a self-check—what’s missing from your routine that could improve stability?
Implement something
Finally, implement a fix and test the results. Maybe you start with a simple -replace—swapping out caffeine overload for proper hydration or scheduling actual breaks instead of "just five more minutes." Maybe you automate self-care reminders, like setting a PowerShell script to remind you every hour to step away from the screen. And if the issue persists? Just like with a stubborn bug, escalate it—talk to a friend, mentor, or even a therapist. There's no shame in calling in extra support when needed.
In IT, we don’t assume things will "just work"—we test, refine, and optimize. Treat your mental health the same way. Debug your stress, adjust your variables, and don’t be afraid to run an upgrade on your self-care routine. The best systems run smoothly when properly maintained—and that includes you.
We use cookies to ensure that we give you the best experience on our website. If you continue to use this site we will assume that you are happy with it.