

Over the years of Intune deployments, I have searched for a way to let my end users know that an application is being installed or uninstalled from their computer. I have used things ranging from notification bubbles to blanking a screen. All of these methodologies are poor at best. I found a few paid items that companies just didn't want to pay for due to the insanity of the pricing. For example, one company wanted us to pay 150 USD per deployment. Times that by 1500 devices, that adds up quickly. It wasn't until I found the PowerShell App Deployment Toolkit that I found what I was finally looking for.
What is the PowerShell App Deployment Toolkit?
This toolkit is an immensely powerful and amazingly simple setup. You can download the tool kit here. It provides a framework to install and uninstall applications using PowerShell through a signed application. This allows us to deploy complex and confusing deployments as a single package. A good example would be AutoCAD. Recently, I was tasked with standardizing AutoCAD in a single department. Some members used AutoCAD 2016, some used 2024. This was a problem as the 2024 files did not work with the 2016 AutoCAD. Thus, I needed to uninstall the previous versions of AutoCAD before I installed the current version. As all files are backed up, I didn't have to worry about them losing any files. The toolkit was perfect for this.
Key items I like of the toolkit
Simple packaging
Many application toolkits come with complex packaging. It's normally an application that wraps itself around another application that keeps doing this until it's all transparent. With the PowerShell App Deployment Toolkit, all you need to interact with is the deploy-application.ps1 file. That's assuming you are doing more than an a MSI file. If you are only using an MSI file, all you need to do is drop the file in.
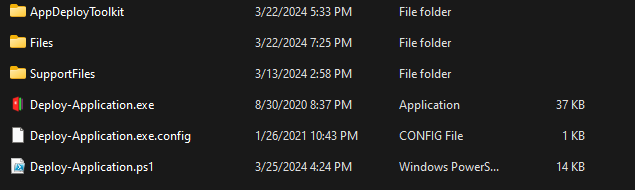
As you can see in the screen shot, this is the package. When you download the zip file, you will be greeted with this amazing structure. The Deploy-Application.ps1 is where our code will go. The Files folder is where the installer files would go. Following our auto cad example, the installer and updates would all be placed inside the Files folder.
Deploy-Application.ps1
This file has an amazing setup. It first has a wall of documentation inside the file itself. The file explains each step along the way. It is broken up into installation, uninstallation, and repair. Each section has a Pre, during and post process in each section. This is great if you need to kill some services, send a message or more. It's also helpful because it gives you a structure to work within.
The Commands
Inside this packaging there are many useful commands. As I stated in the intro, it's full of ways to communicate what you are doing with the end user. During an application install, you can show which applications needs to be turned off for the install to work by using the show-installationwelcome command.
Show-InstallationWelcome -CloseApps 'acad,adSSO,AutodeskDesktopApp,AdAppMgrSvc,AdskLicensingService,AdskLicensingAgent,FNPLicensingService' -CloseAppsCountdown 60
This example shows us it wants to close the applications and gives the user a 60 second window to do so. This isn't the only thing this command can do.
SYNTAX
    Show-InstallationWelcome [-CloseApps <String>] [-Silent] [-CloseAppsCountdown <Int32>] [-ForceCloseAppsCountdown
    <Int32>] [-PromptToSave] [-PersistPrompt] [-BlockExecution] [-AllowDefer] [-AllowDeferCloseApps] [-DeferTimes
    <Int32>] [-DeferDays <Int32>] [-DeferDeadline <String>] [-MinimizeWindows <Boolean>] [-TopMost <Boolean>]
    [-ForceCountdown <Int32>] [-CustomText] [<CommonParameters>]

    Show-InstallationWelcome [-CloseApps <String>] [-Silent] [-CloseAppsCountdown <Int32>] [-ForceCloseAppsCountdown
    <Int32>] [-PromptToSave] [-PersistPrompt] [-BlockExecution] [-AllowDefer] [-AllowDeferCloseApps] [-DeferTimes
    <Int32>] [-DeferDays <Int32>] [-DeferDeadline <String>] -CheckDiskSpace [-RequiredDiskSpace <Int32>]
    [-MinimizeWindows <Boolean>] [-TopMost <Boolean>] [-ForceCountdown <Int32>] [-CustomText] [<CommonParameters>]
Other commands like execute-process, will launch processes that you need from the file directory and more. All while logging what's going on. You can find a full help system for all the unique commands inside the tool kit. Navigate to the tool kit > AppDeployToolkit > AppDeployToolkithelp.ps1 will bring up a gui that allows you to read all about the commands.
Using the Toolkit with Intune
If you want the tool kit to work with the end user profile, then you will need to grab a unique little tool from MDT. We will need the ServiceUI.exe from the MDT software. You can download MDT here. Once you have the MDT installed. we need to pull the ServiceUI.exe out of the MDT install. Navigate to, C:\Program Files\Microsoft Deployment Toolkit\Templates\Distribution\Tools\x64 and copy the ServiceUI.exe file. Place this file in the home of your PowerShell App Deployment Toolkit file structure.
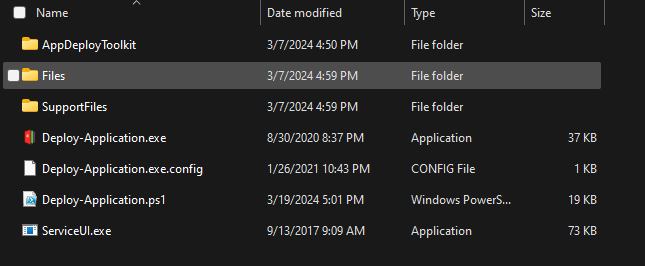
As you can see, the ServiceUI.exe is in the root folder. Now we need to create the package. We can create a win32 app package. I covered this here. This is the same concept.

- The folder would be the folder with your toolkit
- The setup file would be the Deploy-Application.exe
- The output file would be wherever you want the Intune app to be dumped.
- and we don't need to catalog the folder.
Once you have your application built, it's time to see how it works inside Intune. We start by building your application package. As stated in the previous blog, we start the application by uploading. The big difference here is our install and uninstall commands.

Understanding the commands
Our install command will be the using the ServiceUI.exe and the deploy-application.exe
- Install: ServiceUI.exe -process:explorer.exe Deploy-Application.exe
- Uninstall: ServiceUI.exe -process:explorer.exe Deploy-Application.exe -DeploymentType "Uninstall" -DeployMode "Interactive"
By default, the Deploy-application.exe will be interactive. There are two flags for the Deploy-Application and here are what they are.
- DeploymentType: (Super Straight forward)
- Install: Installs the application
- Uninstall: Uninstalls the application
- Repair: repairs the application.
- DeployMode:
- Interactive: Shows all of the prompts needed.
- NonInteractive: Only shows the required prompts.
- Silent: Shows no prompts.
We can translate the command above by using these flags. By default the Deploy-application.exe is install and interactive. So, we know that the application would be prompted and the end user will see the command. The uninstall command will uninstall and it will be interactive. The ServiceUI.exe allows you to run applications as the user in and the system at the same time. The biggest issue with the ServiceUI.exe is the application will not install until someone logs in. No flags are needed here.
Over all, PSappdeploytoolkit changes the ball game with deployments. I encourage anyone and everyone to dig deeper into it.
What can we learn as a person today?
I live in the south of United states. From time to time I will hear people battling over belief systems. In my life time I have come to an understanding of how these systems work. I liken "objective truth" as fish in a sea. Our belief systems is the net we use to capture those fish. Some nets are better than others. The water of the sea is useless, distracting, or misinformation. It only makes it harder to bring those pieces of the objective truth into ourselves. A good net can capture a lot of fish, and let the water out at the same time. A bad net, like a tarp, captures some but becomes unmanageable due to the water. This is the same way with our beliefs. We are only strong enough to lift so much at different points in our lives.
Premade Nets
I see organized religions as premade nets. Think of it like a tool kit. It's a format that is easy to use and allows you to do stuff with it. Does the toolkit work for everyone, no. Just like this PowerShell toolkit, it would be useless in a world without powershell. So chromeOS, this toolkit isn't useful. This is the same with some beliefs. They are useful where they are, but not useful in other places. Sometimes these toolkits/nets, are useful for some but not others. If you don't know PowerShell, this toolkit wouldn't be useful to you. If you are shame sensitive, some religions are not for you.
Everyone has their own tool set or net. No single tool set is inherently bad. It's how we use them and where we use them. If you take a net to a small pond, get ready to waste your time and damage your net. If you throw your net aggressively into a aggressive sea, get ready to lose that net.
Homemade Nets
Once someone understands how the nets are made and how to repair them, It's always best for them to start building their own nets using the techniques they have used on their previous nets. By having a net/toolset of your own, this allows you to have full knowledge and be able to repair quickly. This belief system would be uniquely yours and different from others. So, when it breaks, you can grow it, replace parts, and more without having any problems. It's yours and no one elses.
Let's build our own beliefs.