Last month, I had an app that had some issues for a single end user. I wasn't sure why it was causing issues, but one of the troubleshooting steps we needed to do was uninstall it and have Intune reinstall it. We uninstalled the application. However, Intune, being Intune, sat there. We forced a sync, and nothing. I wish there was a redeploy option in the Intune interface, but there isn't. So what can you do? Well, there is a small secret. Intune has registry keys that keep track of the deployments on the machine itself. These linger even after uninstalling the app. So, removing them is the gravey. So today we are going to force Intune apps to redeploy.
Intune Registry Keys / App ID Number
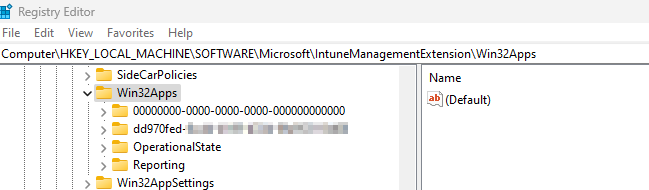
Intune's registry keys are located in the Local Machine > Software > Microsoft > IntuneManagementExtension > Win32App. Let me tell you what now. My southern is going to come out some yall. This is where we can see the users. The system has it's own user, which is the all zeros, but each other user has it's own code.
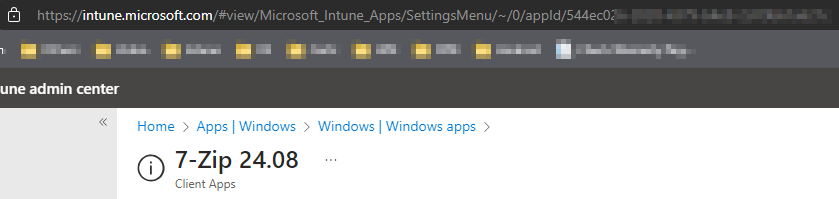
When you open this folder, you will be taken to a beautiful list of what? Yeah, it's a mess. You need to know some things about this list in order to force intune apps to redeploy. You will need to have the app's ID number. To get this number, you will need to navigate to your Intune. We will be heading to the app you want to uninstall. I'm doing my 7zip today as an example. At the end of the url, you will see the appID. That's what you will need.
Once you have that code, you will be ready. What you will need to do now is delete the folder with that code. Then navigate to the GRS folder. It will have a bunch of hashes. No, not the drug, but math code. Wait, is hash still what people call it now days? I feel old. Anyway, you have two options here. One, you can go to the logs and search the logs for the hash. This can take a while, and shockingly, it is not reliable as logs get deleted. The other way is to go through this registry folder, folder by folder, until you find the key, as seen below. I prefer PowerShell. Once you delete the required registry keys, all you have to do is restart the Microsoft Intune Management Extension service.
Powershell To the Rescue
If you have read this blog long enough, you know PowerShell is coming somehow. Today's script will save you a crap ton of time. Let's dive right in.
There are many versions online for this script. Most use the logs, and that's cool. This script doesn't use the logs, and for a good cause. In my case, the logs were deleted. Why were they deleted, you shall ask? Humans, that's always going to be my answer until it's AI.
The break down
Let's break this bad boy down, shall we? The first part of the script is the path we are going to be playing with, followed by the code of the app. You will have to grab this from your intune.
Next, we want to grab all the users. So, remember I said the system uses all zeros. Well, we want to exclude those. However, users use the hypens. It's the Fantastic 4, hypens, not the Marvel characters. Using a basic where object, we sort through all of the ones that have our hypens and are not the system and drop their ID numbers into the users variable.
Now we start our loop. Everyone should like a good loop. Each user will have it's own path. The first thing we run into is that the above command gave us HKEY_Local_Machine instead of a searchable HKLM. So we change them using the replace. Then we grab the userID for later. Finally, we grab all the applications. Notice the name is the new name we made. It's important to have the HKLM: because without it, you will get an error with get-childitem. No candy was stolen from any children while writing this blog post.
Notice we are looking for the appid at the end. Sometimes, there will be more than one entry like this. To force Intune apps to redeploy, we must remove all of them. I liken them to bed bugs. Burn them all. With that said, we start our loop. For each App inside the applications. We will get the app name and then remove it. Once again, we used get-childitem. Goodness, I need to stop still items from kids. So we need to convert the name like we did before changing the HKEY_Local_machine to HKLM: with a nice replace. Once we have it, we delete the path and everything inside by force.
Now we need to handle the GRS side. The GRS keeps the datetime stamps. Like I said before, most people use the logs. Today we will navigate through the registry. The first thing we are going to do is set the path and get the kids on that path. This is where the UserID we made at the start of this big loop comes into play.
Now we have the children's items. We start our looping. The first thing we get is our GRS properties with the get-itemproperty commands. Now here is the magic. A standard check has only 1 or maybe 2 items inside the folder. While more advanced items will have more than that. So, if we convert the properties into a Powershell object, we can count them.
Yes, the second line works. You can pretty much convert anything into a PowerShell object. All we have to do now is count how many counts per object are there. When we convert the item property into a powershell object, we gain a few extra items. So, anything past 5 in this case will be our special stuff. So, if it is past 5, we get to work.
We first look at the keys, looking for our fantastic 4. We will do this by calling the psobject.properties.name because it will be the name of the property. Then we will compare it to the appid. If they are the same, we correct the hkey_local_machine and drop our nuke, remove-item. Nested ifs are fun, but can get complex quick if you don't watch out.
After the large loop of Fantastic Four, we have to restart the intune extension. So, using get service, we pipe it into restart service. Then we are done! Right? Well, kind of.
After the script has done it's thing and stolen candy for kids and nuked stuff, you will need to resync the computer. You can do this via the Accounts setting, or you can do this via Intune. In my case, the application we were redeploying was our remote application. So, I had to do it via Intune.
Navigate to the device under Windows > Device Name and hit the sync button. Now you are done. Force Intune apps to redeploy, check.
What can we learn as a person?
Restarting is sometimes the only option. Taking a step back, clearing things away, and starting new is good, whether you're troubleshooting an Intune app deployment or dealing with a hard time in life.
When an app in Intune stops working, we don't just sit around and hope it gets fixed (at least for a while). After we empty the registry and do some troubleshooting, we gently push it to redeploy. Life is no different. When things don't work out the way you expected, that's okay; setbacks are inevitable. Starting over equalizes the situation; it's not a sign of surrender.
Restarts, in reality, are chances for growth. By doing so, they demonstrate our flexibility, competence, determination and insight to put things right. Our fantasic four. When something feels stuck, whether it's an app or your thinking, don't be scared to reset. Do not be afraid, especially with our thinking. That's where real change happens.
Hi there! Have you ever scratched your head and wondered if you loaded software the right way? You're not by yourself. This gives a lot of system administrators a headache. This is especially hard to do when handling programs like AutoCAD 2022 in a variety of settings. That is where Microsoft Intune really shines. The fact that you can use your own recognition scripts makes it very useful. A custom Intune detection script is key.
These scripts save my life a lot. They help you check every network gadget. This makes sure that not only is there an app, but it's also the right version for you. Today, we're going to look in detail at a PowerShell script that can find AutoCAD 2022. This guide will help make your business life a little easier, no matter how much you know about Intune or how new you are to it. Allow us to begin on our Intune detection script!
How do I make a Intune Detection Script?
First, what does a custom Intune recognition script really mean? It's just a script for your control tool for Microsoft Intune. It checks automatically to make sure that all of your devices have the same version of software loaded. What makes this cool? Because it takes care of one of the most boring jobs in IT management automatically. Imagine making sure that software is compliant and installations are correct without having to check each machine by hand. Not interested!
PowerShell is used to make custom scripts like the one we're talking about today. It is a strong programming language that can do a lot with just a few lines of code. These scripts can get into the Windows Registry, find loaded programs, and check out different versions of installed programs. It's not just about saving time; it's also about making sure that your software deployments work well and stay stable. We all hate those crazy support calls, but this cuts down on them.
The Breakdown
Getting into the nitty-gritty of our PowerShell script, let’s break it down line by line. This will help you understand exactly what each part does. Let's get our geek on!
Lets go line by line in our Intune Detection script and break it down.
Line 1-2: Define the Product
These two lines allow you to define the product you want to search for and the Version you wish to check for. The product name can take wild cards, but I don't suggest it as it can cause more conflicts than be helpful.
The next line is where we look in the registry for the uninstall strings and product information. These registry keys is what win32_product looks at to get information. Thus, it's much faster than using the win32_product.
Here, we're grabbing a list of all items in the paths defined earlier. It's akin to gathering all the potential treasure chests. We will use these magical coins later to get what we need.
$apps = Get-ChildItem -Path $RegPath
Lines 5 - 7: filter and test for the product
In these lines, we loop through each app and check if it matches our product name. If it does, we take a closer look at its properties. Here we are checking for our gold coins vs the silver coins. We take each of the products we want, and put it into our test varaible, or chest.
Assuming you have chosen a name that will only show up once, we now check to see if the version matches up. If it does, then we say, yep, it's installed and exit with a code of ZERO, the big 0. If it doesn't, then we exit with the error code of 1. This is important as Intune is looking for a string and an error code of 0 for success.
Intune's custom detection script deployment requires more than copying and pasting code. Ensure the script operates smoothly on all targeted devices. Step-by-step instructions:
The first step in script preparation is to test it locally. You shouldn't distribute something without testing on your own machines.
Put the script in Intune:
Enter the Microsoft Endpoint Manager admin center.
Select Windows 10 under Devices > Scripts > Add.
PowerShell script upload and settings. This involves choosing a system or user context for the script based on access level.
Assign script:
After uploading your script, assign it to device groups. You can choose groups by organizational units or other deployment parameters.
Monitor script deployment:
Monitor script execution on the script profile's Device Status and User Status tabs after deployment. This shows if the script is executing properly or if any devices are failing.
Update as needed:
Monitoring feedback may need script or deployment parameters changes. Maintaining compatibility with new system updates or IT environment changes may need regular updates.
Effective script deployment guarantees that all network devices meet software standards. Assuring all machine parts are well-oiled and working together.
Common Issues and Troubleshooting Tips for a Intune Detection Script
Even with the best preparation, things might not always go as planned. Here are some common issues you might face with custom Intune scripts and how to troubleshoot them:
Script Fails to Execute:
Check Execution Policy: Ensure that the script's execution policy allows it to run. This policy can sometimes block scripts if not set to an appropriate level.
Review Script Permissions: Make sure the script has the necessary permissions to access the registry paths or any other resources it uses.
Incorrect Script Output:
Verify Script Logic: Double-check your script’s logic. Look for typos in variable names or incorrect operators in conditions.
Test Locally: Always run the script locally on a test machine before deploying it to avoid simple errors.
Issues with Script Deployment:
Assignment Errors: Make sure the script is assigned to the correct device groups. Incorrect assignments can lead to the script not being run where it’s needed.
Check Intune Logs: Use the logs provided by Intune to identify what’s going wrong when the script runs.
Troubleshooting is an integral part of managing scripts in a large environment. It’s a little like detective work, where you need to keep a keen eye on clues and sometimes think outside the box.
What can we learn as a person today?
Even though we don't always mean it that way, we frequently execute "scripts" in our day-to-day lives, much like a PowerShell script checks for certain conditions before proclaiming success or failure. These are the things we do on a regular basis without thinking, like automated checks on a computer system; they help us evaluate and respond to the many opportunities and threats that life presents.
When we look for patterns in our own lives, we can see what's working and what isn't. By exercising first thing in the morning, for instance, you may find that you get more done that day. This would be an example of a positive pattern, like a script that verifies everything is going according to plan. In contrast, if you find yourself feeling low after a session of social networking, it's a sign that something needs to be changed, similar to a script fault.
It is essential to listen to environmental feedback in order to make modifications. Our emotional and physiological responses, the opinions of others around us, and the outcomes we attain can all serve as sources of this type of feedback. Like adjusting a screenplay that isn't working as planned, when our life's routines bring about less ideal consequences, it's a warning to halt and re-calibrate. Perhaps it necessitates reevaluating our current habits and deciding how much time is best spent on specific pursuits.
The idea is to embrace learning and refining as a process, just like scripts that are updated over time. There is no instruction manual for life, and sometimes the only way to learn is by making mistakes. Being self-aware and willing to make adjustments for the better is more important than striving for perfection.
Over the years of Intune deployments, I have searched for a way to let my end users know that an application is being installed or uninstalled from their computer. I have used things ranging from notification bubbles to blanking a screen. All of these methodologies are poor at best. I found a few paid items that companies just didn't want to pay for due to the insanity of the pricing. For example, one company wanted us to pay 150 USD per deployment. Times that by 1500 devices, that adds up quickly. It wasn't until I found the PowerShell App Deployment Toolkit that I found what I was finally looking for.
What is the PowerShell App Deployment Toolkit?
This toolkit is an immensely powerful and amazingly simple setup. You can download the tool kit here. It provides a framework to install and uninstall applications using PowerShell through a signed application. This allows us to deploy complex and confusing deployments as a single package. A good example would be AutoCAD. Recently, I was tasked with standardizing AutoCAD in a single department. Some members used AutoCAD 2016, some used 2024. This was a problem as the 2024 files did not work with the 2016 AutoCAD. Thus, I needed to uninstall the previous versions of AutoCAD before I installed the current version. As all files are backed up, I didn't have to worry about them losing any files. The toolkit was perfect for this.
Key items I like of the toolkit
Simple packaging
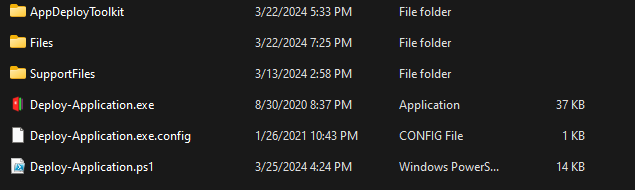
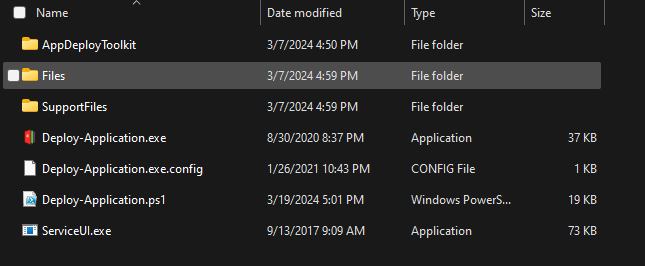
Many application toolkits come with complex packaging. It's normally an application that wraps itself around another application that keeps doing this until it's all transparent. With the PowerShell App Deployment Toolkit, all you need to interact with is the deploy-application.ps1 file. That's assuming you are doing more than an a MSI file. If you are only using an MSI file, all you need to do is drop the file in.
As you can see in the screen shot, this is the package. When you download the zip file, you will be greeted with this amazing structure. The Deploy-Application.ps1 is where our code will go. The Files folder is where the installer files would go. Following our auto cad example, the installer and updates would all be placed inside the Files folder.
Deploy-Application.ps1
This file has an amazing setup. It first has a wall of documentation inside the file itself. The file explains each step along the way. It is broken up into installation, uninstallation, and repair. Each section has a Pre, during and post process in each section. This is great if you need to kill some services, send a message or more. It's also helpful because it gives you a structure to work within.
The Commands
Inside this packaging there are many useful commands. As I stated in the intro, it's full of ways to communicate what you are doing with the end user. During an application install, you can show which applications needs to be turned off for the install to work by using the show-installationwelcome command.
This example shows us it wants to close the applications and gives the user a 60 second window to do so. This isn't the only thing this command can do.
Other commands like execute-process, will launch processes that you need from the file directory and more. All while logging what's going on. You can find a full help system for all the unique commands inside the tool kit. Navigate to the tool kit > AppDeployToolkit > AppDeployToolkithelp.ps1 will bring up a gui that allows you to read all about the commands.
Using the Toolkit with Intune
If you want the tool kit to work with the end user profile, then you will need to grab a unique little tool from MDT. We will need the ServiceUI.exe from the MDT software. You can download MDT here. Once you have the MDT installed. we need to pull the ServiceUI.exe out of the MDT install. Navigate to, C:\Program Files\Microsoft Deployment Toolkit\Templates\Distribution\Tools\x64 and copy the ServiceUI.exe file. Place this file in the home of your PowerShell App Deployment Toolkit file structure.
As you can see, the ServiceUI.exe is in the root folder. Now we need to create the package. We can create a win32 app package. I covered this here. This is the same concept.
The folder would be the folder with your toolkit
The setup file would be the Deploy-Application.exe
The output file would be wherever you want the Intune app to be dumped.
and we don't need to catalog the folder.
Once you have your application built, it's time to see how it works inside Intune. We start by building your application package. As stated in the previous blog, we start the application by uploading. The big difference here is our install and uninstall commands.
Understanding the commands
Our install command will be the using the ServiceUI.exe and the deploy-application.exe
By default, the Deploy-application.exe will be interactive. There are two flags for the Deploy-Application and here are what they are.
DeploymentType: (Super Straight forward)
Install: Installs the application
Uninstall: Uninstalls the application
Repair: repairs the application.
DeployMode:
Interactive: Shows all of the prompts needed.
NonInteractive: Only shows the required prompts.
Silent: Shows no prompts.
We can translate the command above by using these flags. By default the Deploy-application.exe is install and interactive. So, we know that the application would be prompted and the end user will see the command. The uninstall command will uninstall and it will be interactive. The ServiceUI.exe allows you to run applications as the user in and the system at the same time. The biggest issue with the ServiceUI.exe is the application will not install until someone logs in. No flags are needed here.
Over all, PSappdeploytoolkit changes the ball game with deployments. I encourage anyone and everyone to dig deeper into it.
What can we learn as a person today?
I live in the south of United states. From time to time I will hear people battling over belief systems. In my life time I have come to an understanding of how these systems work. I liken "objective truth" as fish in a sea. Our belief systems is the net we use to capture those fish. Some nets are better than others. The water of the sea is useless, distracting, or misinformation. It only makes it harder to bring those pieces of the objective truth into ourselves. A good net can capture a lot of fish, and let the water out at the same time. A bad net, like a tarp, captures some but becomes unmanageable due to the water. This is the same way with our beliefs. We are only strong enough to lift so much at different points in our lives.
Premade Nets
I see organized religions as premade nets. Think of it like a tool kit. It's a format that is easy to use and allows you to do stuff with it. Does the toolkit work for everyone, no. Just like this PowerShell toolkit, it would be useless in a world without powershell. So chromeOS, this toolkit isn't useful. This is the same with some beliefs. They are useful where they are, but not useful in other places. Sometimes these toolkits/nets, are useful for some but not others. If you don't know PowerShell, this toolkit wouldn't be useful to you. If you are shame sensitive, some religions are not for you.
Everyone has their own tool set or net. No single tool set is inherently bad. It's how we use them and where we use them. If you take a net to a small pond, get ready to waste your time and damage your net. If you throw your net aggressively into a aggressive sea, get ready to lose that net.
Homemade Nets
Once someone understands how the nets are made and how to repair them, It's always best for them to start building their own nets using the techniques they have used on their previous nets. By having a net/toolset of your own, this allows you to have full knowledge and be able to repair quickly. This belief system would be uniquely yours and different from others. So, when it breaks, you can grow it, replace parts, and more without having any problems. It's yours and no one elses.
This past month I was given a task to Uninstall a few applications in Intune. However, the app's uninstall feature did not work according to plan. However, a bunch of these worked with the cim methods of uninstall. Which I thought was funny. After writing a bunch of the same code over and over again, I decided to write a General Uninstaller for Intune. This also requires a custom Detection Script.
Here we have a general uninstaller for Intune. This script allows us to feed the product name as is or we can add wild cards to the name. We start off the script by grabbing the product names from the user. This will be done during the intune setup. When it deploys, the first thing this script does is grab all the applications inside the win32_product. If the application didn't register in this windows system, then this script is going to be pointless for you.
Once we have the products, we go through each Product Name. We first check to see if the product is on the system. If it isn't, we output success and exit with a unique exit code. This will be used later. However, if the product is on the machine, we grab the install location. Then we pipe the product into the uninstall method in the cim method command. Finally, we see if the install location exists inside the installed object. Some applications give us this information some don't. Some give us multiple locations while others don't.
To work around this, we check if install location property is null. If it isn't null, then we move on and start a loop. The loop is only because some install locations have more than one location. Then we test if the file path still exists. Sometimes, the applications uninstaller will remove the folder, sometimes, it doesn't and that's why we test. If the file location is there still, we remove it with a good old force and recurse. Finally, we exit with the unique exit code.
With any custom script installs or uninstalls, a custom detection script is necessary. The first step is to grab the product names. Just like before, it's a list of strings. So they can do more than one. Then we grab all the products with our cim instance and win32_product. Then we loop through each product name and see if the product exists still. If it does, we exit with a 1. This basically says, I failed! Intune needs a string and an exit code of 0 to be successful. The exit of 1 without the string ends the script and without that string, intune assumes failure. However, if we go through them all, and none trigger the exit, then we are safe to exit with a 0 and the beautiful word success.
Building it out in Intune.
Building the IntuneWin File
The first thing you will need to do is save your script into a folder and then download the WinIntuneApp, aka, Win32 Prep Tool, to package up the powershell script. Unpackage this tool and start up your command prompt. The application will guide you through the process of setting up a intunewin app.
General Uninstaller for Intune
Please specify the source folder: This is the folder that will have your script inside of it. If you wanted to create something more complex, this part would change your way of deployment. Future blog post coming.
Please Specify the setup file: This is going to be the powershell name. General-Uninstall.ps1
please specify the output folder: This is the folder that the intunewin file will be dropped.
Do you want to specify catalog folder (Y/N)? This one is for more advanced packages. We can say no to this option for this setup.
Setting Up Intune for Your Uninstaller
Now we have the IntuneWin file. It's time to setup the intune Deployment. This is where you will be able to add things like the productname to our General Uninstaller for Intune.
Navigate to Endpoint Manager
Click Apps
Click Windows
Click Add
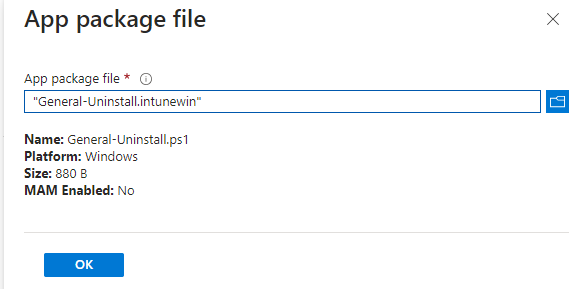
Click the Select App Package File.
Add the General-Uninstall.IntuneWin file.
Click ok
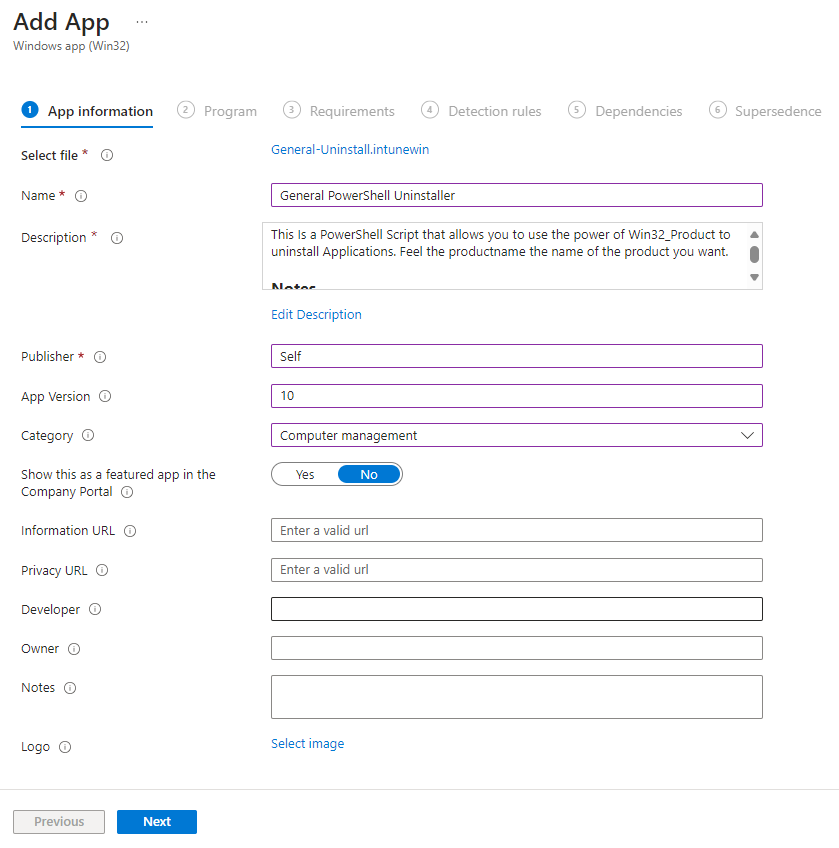
Change the Name
Click the edit Description and add a detailed description for other users. Make sure to provide instructions on what to do with the detection script.
The publisher can be your company or in my case self.
The gategory is going to be computer management as it is a general uninstaller.
Feel free to add any additional information. Link this blog post if you wish for the information URL.
The Uninstall command can be as simple as a removal file.
Device Restart Behavior: Determine behavior based on return codes
Return Codes: Remember that unique exit code we had in the script. This is where you would place that code. I have it as 1212 is a success.
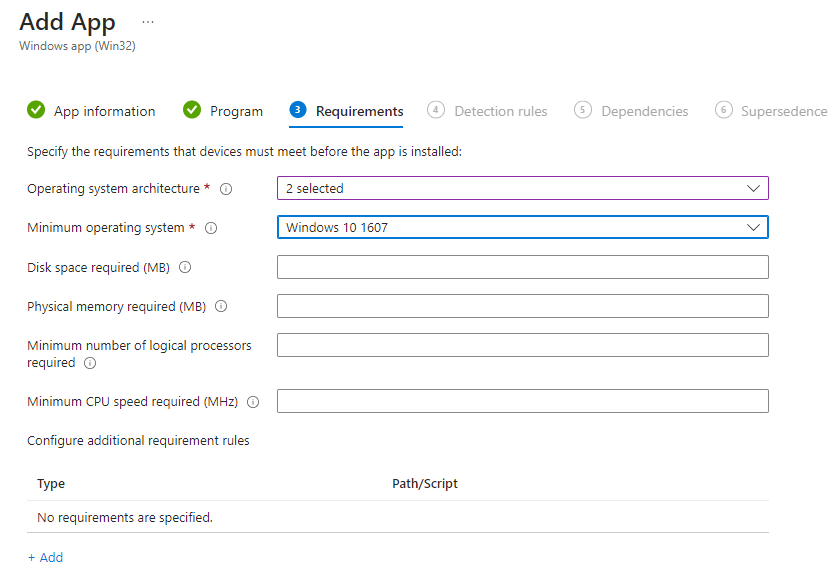
The next screen the requirement screen. We can do a lot with this screen, but we don't need to here.
Operating System Architecture:
32
64
Minimum Operating System: Windows 10 1607.
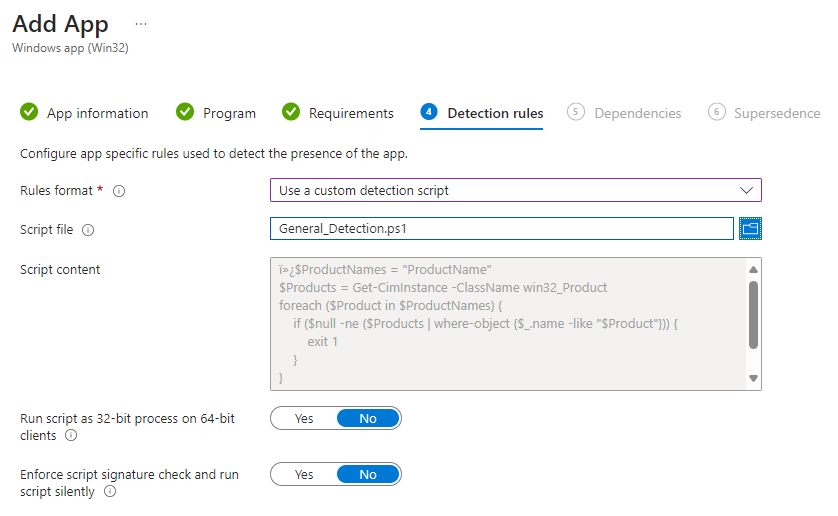
Now we need to setup the custom detection.
Select User A custom Detection Script
Validate your product names to be uninstalled.
Upload and click next.
Accept the defaults for Dependencies and Supersedences.
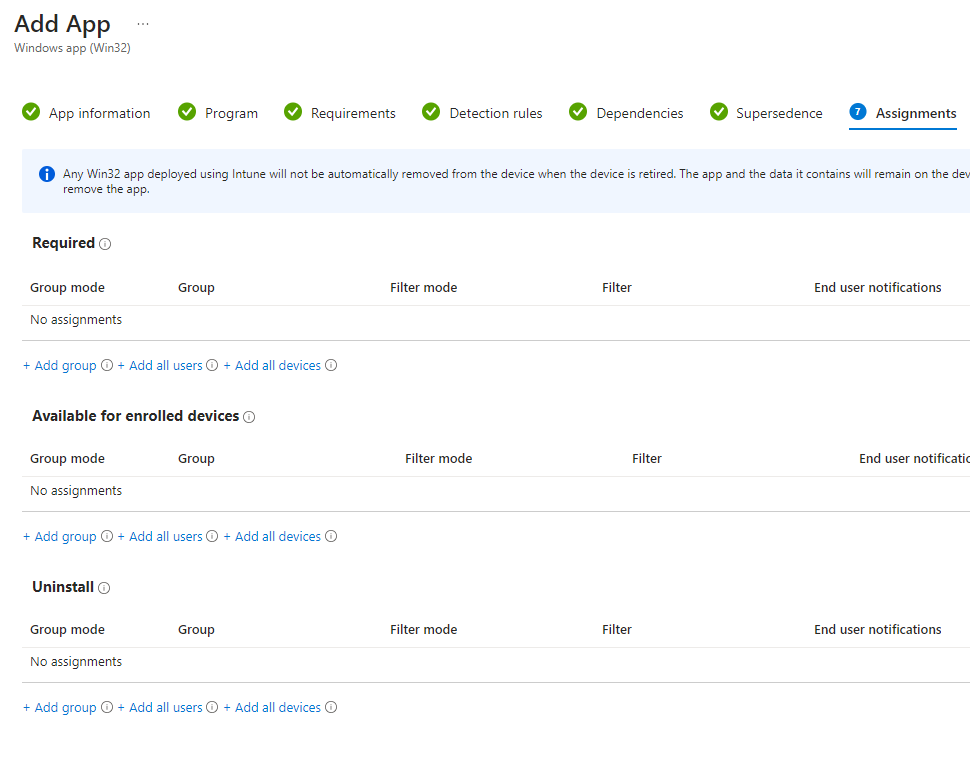
The final screen is where you are able to assign the script to people. There are three sections. Required, aviable for enrolled devices and uninstall. This is where you will select who is going to get what.
Testing, Monitoring, and deployment
The assignment area is where you assign the script to who you want. This is very important. Here is where you would want to test the users. Have a test group and apply it first. H
Deploy the uninstall app to the test device group.
Monitor the Intune deployment status for the app to ensure successful deployment to devices/users.
Test if the application is still on a target computer. This can be done with control pannel, powershell, and more options.
Redefine and correct any issues and restart the testing.
Deploy
What can we learn as a person today?
When was the last time you threw a rock? How about a rock in a lakes? The last time you did, did you notice the ripples? Just like a deployment like this can cause ripples in your company, removing things from your life can cause just as many ripples in yourself. Make sure you are ready to let go of that thing you are holding onto. It's always a good idea to test it out, or have a support group to help you. Those ripples can do some damage. So be ready to Uninstall parts of your life before you do it.
Recently I was working with a company that gave me a really locked down account. I wasn't use to this as I have always had some level of read only access in each system. I was unable to create a graph API application either. So, I was limited to just my account. This was a great time to use the newer command lines for graph Api as when you connect to Graph API using the PowerShell module, you inherit the access your account has. So today we will Get Intune Devices with PowerShell and Graph API.
The Script
Function Get-IntuneComputer {
    [cmdletbinding()]
    param (
        [string[]]$Username,
        [switch]$Disconnect
    )
    begin {

        #Connects to Graph API

        #Installs the Module
        if ($null -eq (Get-Module Microsoft.Graph.Intune)) {Install-module Microsoft.Graph.Intune}

        #Imports module
        Import-Module Microsoft.Graph.Intune

        #Tests current Connection with a known computer
        $test = Get-IntuneManagedDevice -Filter "deviceName eq 'AComputer'"

        #If the test is empty, then we connect
        if ($null -eq $test) {Connect-MSGraph}
    }
    process {

        #Checks to see if the username flag was used
        if ($PSBoundParameters.ContainsKey('Username')) {
            #if it was used, then we go through each username get information
            $ReturnInfo = foreach ($User in $Username) {
                Get-IntuneManagedDevice -Filter "userPrincipalName eq '$User'" | select-object deviceName,lastSyncDateTime,manufacturer,model,isEncrypted,complianceState
            }
        } else {

            #Grabs all of the devices and simple common information.
            $ReturnInfo = Get-IntuneManagedDevice | Get-MSGraphAllPages | select-object deviceName,lastSyncDateTime,manufacturer,model,isEncrypted,complianceState,userDisplayName,userPrincipalName
        }
    }
    end {

        #Returns the information
        $ReturnInfo

        #Disconnects if we want it.
        if ($Disconnect) {Disconnect-MgGraph}
    }
}
The Breakdown
Parameters
We enter the script with the common parameters. Command let binding flag. This gives us additional parameters like verbose. Next, we have a list of strings called Username. We are using a list of strings to allow us to have multiple inputs. Doing this, we should be able to use a list of usernames and get their Intune Device information. Note that this is a multiple input parameter, thus, you will need to deal with it with a loop later. Next is the Disconnect switch. It's either true or not. By default, this script will keep connected to Intune.
Connecting to Intune
Next we will connect to the Intune system. First, we need to check and install the module. We check the install by using the get-module command. We are looking for the Microsoft.Graph.Intune module. If it doesn't exist, we want to install it.
if ($null -eq (Get-Module Microsoft.Graph.Intune)) {Install-module Microsoft.Graph.Intune}
If the module does exist, we will simply skip the install and move to the import. We will be using the importing the same module
Import-Module Microsoft.Graph.Intune
Afterwards, We want to test the connection to Microsoft Intune. The best way to do this is to test a command. You can do it however you want. I am testing against a device that is in Intune.
We will be using this command later. Notice the filter. We are filter the deviceName here. Replace the 'AComputer' with whatever you want. If you want to use another command, feel free. This was the fastest command that tested. The above command will produce a null response if you are not connect. Thus, we can test, $test with an if statement. If it comes back with information, we are good, but if it is null, we tell it to connect.
if ($null -eq $test) {Connect-MSGraph}
Get Intune Devices with PowerShell
Now it's time to Get Intune Devices with PowerShell. The first thing we check to see is if we used a username parameter. We didn't make this parameter mandatory to give the script flexibility. Now, we need to code for said flexibility. If the command contained the Username flag, we want to honor that usage. We do this with the PowerShell Bound Parameters. The PowerShell Bound Parameters is the - that come after the command. We are looking to see if it contains a key of username. If it does, we want to grab the needed information with the username. While if it doesn't, we grab everything.
if ($PSBoundParameters.ContainsKey('Username')) {
    #Grab based on username
} else {
    #get every computer
}
As we spoke about the list of string parameter needing a loop, this is where we are going to do that. We first create a foreach loop of users for the username. Here, the we will dump the gathered information into a Return variable of $ReturnInfo. Inside our loop, we gather the requried information. The Get-IntuneManagedDevice command filter will need to use the userPrincipalName. These filters are string filters and not object filters. Thus, the term like will cause issues. This is why we are using the equal term.
Now, if we are not searching the Username, we want to grab all the devices on the network. This way if you run the command without any flags, you will get information. Here, we use the Get-IntuneManagedDevice followed by the Get-MSGraphAllPages to capture all the pages in question.
Now it's time to end the script. We want to return the information gathered. I want to know some basic information. The commands presented produces a large amount of data. In this case we will be selecting the following:
Finally, we test to see if we wanted to disconnect. A simple if statement does this. If we choose to disconnect we run the Disconnect-MgGraph command.
if ($Disconnect) {Disconnect-MgGraph}
What can we learn as a person
In PowerShell, we can stream line the output that we get. Often times commands like these produce a lot of useless but useful information. It's not useful at the moment. This is like our work enviroment. I use to be a big advacate of duel, and not more screens. I would often have 5 things going on at once. My desk use to have everything I needed to quickly grab and solve a personal problem. For example, my chapstick sat on my computer stand. My water bottle beside the monitor. Papers, sticky notes, and more all scattered accross my desk. I wondered why I couldn't focus. Our brains are like batteries. How much focus is the charge. Our brains take in everything. Your brain notices the speck of dirt on the computer monitor and the sticky note, without your password on it, hanging from your monitor. This takes your charge.
Having two monitors is great and I still use two. However, I have a focused monitor and a second monitor for when I need to connect to something else. At some point I will get a larger wider monitor and drop the second one all together. Having less allows your brain to grab more attention on one or two tasks. Someone like myself, I have more than one task going at any moment. That's ok with my brain. Let's use our Select-object command in real life and remove the distractions from our desks.
We use cookies to ensure that we give you the best experience on our website. If you continue to use this site we will assume that you are happy with it.