Welcome to another mental health Monday. I'm going to be talking to myself big time today. Here in South Carolina, springtime is often met with confusion and a sense of making up your mind. The older trees will stay dormant longer than the younger trees. This leaves us viewers with a unique chance to see the trees with leaves and without. We get to see a skeleton of the tree in sorts. As the tree grows, it moves in set patterns. Those patterns are amazing.
You can follow the tree from the base, up the branches, and through the smaller branches. Each break-off shows a different adaptation to the world around it and itself. The tree reaches up for the sunlight. Its figures stretch out and grow leaves to catch as much sunlight as possible. This is important because the tree lives off the sunlight and the soil it is in. Much like us. During the fall time the trees' leaves change color to catch the remaining sunlight, then it goes dormant during the winter months. Sunlight is the positive influence in the tree's life that helps it grow.
You as a tree
Now, think about yourself. See yourself as a tree. In what ways are you growing? Are your branches facing downwards away from the sun or are they growing upwards towards the sun? What areas of your life are you dormant? What voices are you listening to? Are you stuck in the darkness of your own mind or are you listening to uplifting voices?
When you take the sunlight away from a tree, the branches start to droop. This is the same way in our lives, when we stop focusing on the positive things and only focus on the must, our branches start drooping. Depression starts to come in, and over time, we can barely move forward. We become trapped thinking. "This is all we can do." We say this because all we can see is the ground. We can't see the sun. It's not until we start looking up do we see that sun. That positive influence in our lives.
However, always looking at the positive isn't healthy either. A younger tree will quickly sprout leaves, but then the cold snap happens and it loses those leaves. It loses all that energy. Thankfully, the older trees are there helping them along the path. See the old trees have learned something too.
It's ok to be dormant for a while. That's the same way in our lives. It's ok to go with the flow for a while, especially when the sun isn't around. We all go through that time in our lives, sadness. There is only so much energy in a single day. So instead of using it all at the first sight of light, the older trees wait until the light is consent and then start growing. At the end of the day, it still is looking up and not down. It's still waiting for that positivity to come back, that light. This is how we should be. A hope of good times. As the tree grows, so do we.
Applying to IT
Sometimes in the IT world all we see is problems. It's part of our jobs to see and fix problems. Most of us enjoys doing this. I know I love the puzzlingness of the human behavior. So, how do you look up when there is only problems in your face? Well, the best way I can describe this is like having a bee in your car while you are driving down the road. You can swat at the bee and put your focus on the bee, or you can drive your car. Rolling down the window makes the bee stay where it should be because of the wind. Instead of focusing on the problems in front of you that will always be there, look forward. Look past them. Look past the person yelling. They are yelling for a reason. Lets that big brain of ours see the world instead of the problems of the world.
The same can be said for a fence. A fence is in front of you, a boundary, or you can look past the fence and see the ladder waiting on the other side that you can pull through. The illusion of boundaries keeps us standing still. We stare at what we have been trained to stare at instead of whats past it. Keeping your mind on positive things will help grow you.
Final thoughts
It's ok not to have leaves right now. It's your winter time. There is nothing wrong with you. It's ok to be bare right now. On the same note, it's ok to be full of leaves. Everyone goes through seasons. Embrace that season, and keep your hope up for spring. Be patient and enjoy the world around you. Don't let that negative voice kill you. This is what I have to remind myself daily.
Yesterday I had to clear out a few users' google chrome cache. It was a little aggravating going computer by computer. We were doing this because recently a core web app was updated. The application left traces of itself in the Google Chrome Cache and it caused all kinds of problems. So the last few I looked for a way to do it with PowerShell. Long and behold you can Clear Google Cache with Powershell.
The Script
We are starting with the script, to begin with. We are doing this because the core of this script is wrapped around a remote template I use. I will cover the template later down the road.
Let's break down the script and see what is needed and how it is needed. The first thing you will notice is the computer and the user are both lists of strings. [String[]]. This means I will have to loop through each one. This is important because this means you can target a single user on multiple machines or multiple users on a single machine or both. The second thing I want to point out is the credentials. So, if you are not in admin mode, you can deploy the script with your admin creds, or with the local admin creds.
The Username is not a required item. Why did I do this? The simple answer is, if you don't put a username, then it will clear every user's google chrome cache. Notice in the "begin" area, we have if null is equal to username, then we want the username to be *. Later we ask, if the username is not equal to *, then we use the user. If not, we use the * which will go through all the users at once. Also notice in the do the user, we test if the user exists. If it doesn't we deploy an error, if it does, we do our work.
if ($null -eq $username) { $username = "*" }
if ($user-ne "*") { do the user
    if (Test-Path C:\Users\$user) { Its there, lets go for it.} else { Error will robison.}
} else {do everyone}
The Core
At the core of this script is the remove-item blurp. We are going through each user data area and clearing out the different types of cache. There is the default cache, code, media, storage, and script caches. Each of these folders will have folders inside of them. So we need to recurse. We want to force it and we don't care about the errors as some cache will not delete while chrome is active. Could I have added a kill chrome, yes, but why? if the end-user is working in chrome, this is going to be disruptive and force them to restart chrome. Lets look at the code.
That's all the code you will need. If you selected not to use username the $user will turn into * which will do every user, including default. if you have something like sccm, pdq, intune, ninja, pulse, etc, then just user this part of the code with * instead of user. This will clear the cache as needed.
We close it all up and send it as a job to the machine in question. This way we are not stuck on each computer. It speeds things up. With Powershell 7, you can loop with a number of objects that you want which would speed this up even more.
Recently I went over how to get information from the Unifi Controller. Now I want to show you how to grab information from the unifi device itself. In this example, we are going to use SSH with Powershell to pull some basic information from an unifi AP.
SSH with Powershell
The first thing you will need is to make an ssh connection. Most computers have open ssh installed and you can type in ssh username@ipaddress and access it after inputting passwords and such. However, I want to work with powershell and not whatever shell the unifi will present me. Thus, we will run through a module called POSH-SSH by darkoperator.
Install Posh-ssh
The first thing you will need to do, if you haven't already, is installing the module. This module lives in the standard repos, which makes life so much easier. Here is the command:
Install-Module -Name Posh-SSH
Once you have the command installed, that's when we import with the import module command.
Making a connection
The next step is to make the connection. The feel of this command is just the same as that of enter-pssession. We call the computer name, normally an IP address, and we add the credentials. The biggest difference is we add an acceptkey flag. You can also give your session an ID number, this is good if you are doing more than one at a time. Today we are only focusing on one connection. So it's not needed, but it becomes very useful with loops. Like always, these sessions start at 0.
This creates a session of 0 which we can send commands to later. Remember, each session connection adds another session number. So the next one will be 1 and so on so forth. if you need more information or become lost with which sessions you are using, get-sshsession will help resolve this question.
Invoking SSH commands with Powershell
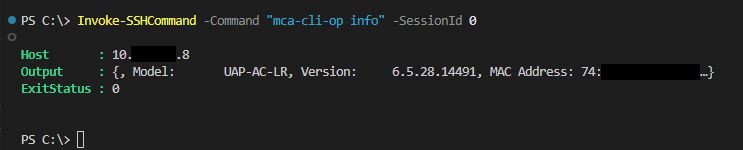
The next thing we need to do is invoke commands. What is the point of just connecting when we have the power of ssh and powershell? The command we can use is called invoke-sshcommand. When working with any system, you need to be mindful of that system's shell. Ssh gives you the connection, and that system determines what you can use. This took me a while to figure out. One of the commands inside the unifi devices is info. This gives you useful information. So when you are connected, typing info will telling you IP addresses, mac address, inform statuses, and more. However, with the SSHcommand, it produces nothing useful. As the image below shows.
So, what is needed to do from here is adding a flag to let it know you are coming from somewhere else. This flag is "mca-cli-op" followed by the command you want. However, as the image below suggests, it parses the output as a single object. We need to go deeper by selecting the output.
This is nice to know, however... It's a string. You will need to parse this data out accordingly. I do this by using select-string then from there working each item. When I select the string, for example, model. I take the output and select-string model. Then i convert that to a string as select string make it into an match info object. Which isn't as helpful as you would think. Then from there, I replace any spaces and split from the : to get the information I need. Below is the code.
From here you can change the inform, or other items using the flag and the command accordingly. Once you are finished with your session, make sure to remove it with the Remove-SSHSession command.
The Script
Here is the script. This script allows you to do more than one IP address.
I was working with a client a few months ago, and they needed me to set up auto licensing. The idea is that the helpdesk right-clicks on a user and clicks copy. That user will get all the groups inside the template user. This also includes licensing for O365. Believe it or not, this is super easy to do.
The client's structure was as such, They had a local active directory that uses ad connect to sync all the user information. The ad sync occurred every 30 minutes.
Local AD
The first step is to create the licensing groups in local AD. In this case, I named them "Microsoft Office 365 E3" and "Microsoft Office 365 F3". This way it's super clear. These will be security groups. I have them in an OU that is synced with AD Connect.
Only users that will get E3 will be in the E3 group and the ones getting F3 will be in the F3 group. Once again, very clear.
Now I have created the groups, I complete an AD sync or I wait for the ADSync to be completed. To force an ad sync, you will need to log into the AD sync server. Normally this is a DC, it doesn't have to be, but normally from my experience, it is.
Start-ADSyncSyncCycle -PolicyType Initial
You can view your sync by loading the Synchronization Service Manager and watching the sync. Once the sync is complete, move to the next step, Azure AD.
Azure AD Licensing Assignments.
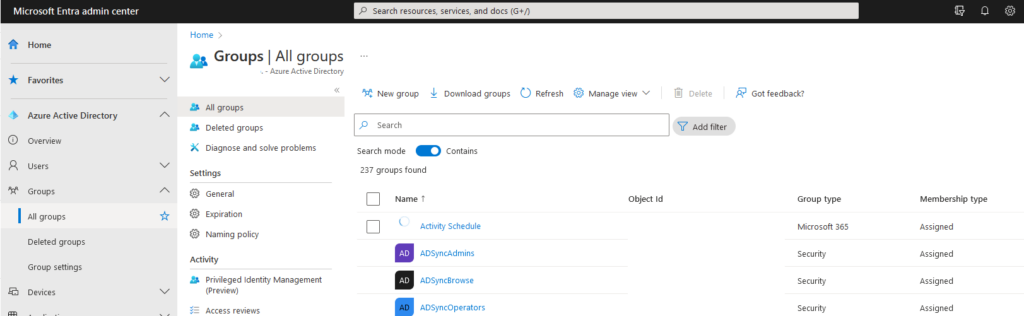
Log into azure ad at https://entra.microsoft.com. On the left side, You will see Groups. Expand Groups and Click all Groups. Then search for the group you are looking for. In this case we want the Microsoft Office 365 E3 Group.
Now its time to add the license for anyone who joins this group.
Click on the Group
Under Manage click Licenses
In The middle Click Assignment
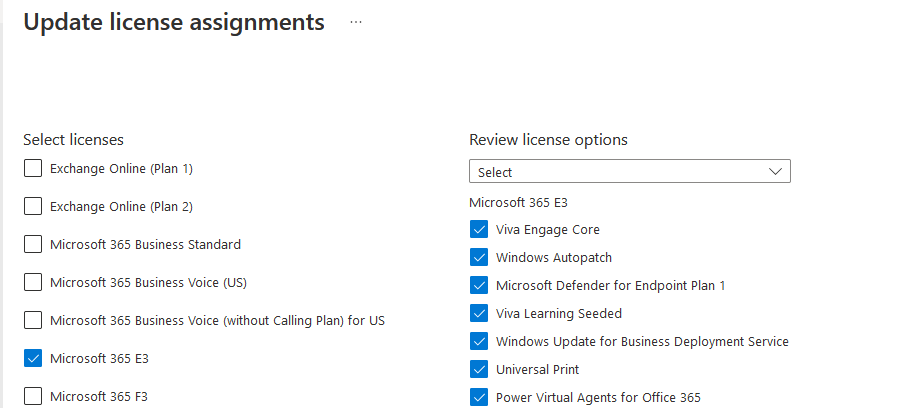
Add the desired licenses and applications associated with the licenses, See the image below.
Click Save.
The final step is to add users accordingly. After they sync, they will receive the licensing accordingly. Now you have a fully automated method of assigning licenses.
Our American society is driven to force people to mask up and be something else. This is very true in IT. In IT, we are told we need to have a decade of rust experience, even though it isn't a decade old. Impossible standards are always around us, forcing us to believe that we must match those standards to be a valid person or employee.
This is not the case. You are valid. No one can do everything. It's not possible. I wouldn't trust brain surgery to my fellow coworkers. I wouldn't trust grandpa to build a complex security structure with the latest ai technology. It's just not logical. We are a more powerful group together than apart.
When you try to do everything yourself, you push others away. There is a ton of reasons why we do this. It can range from past trauma, shame, upbringing, pride, and more. By pushing people away, you will face burnout. Thus letting people in is the only way to avoid burnout.
Lets take a look at why it's ok to be you.
How do I be myself?
Spend time with yourself. We humans, especially us IT people, oftentimes fill our schedule with everything but time for us. We think sleep is time for us. Sleep is a basic requirement, not dedicated time for yourself. Set priorities for your own time. This is a requirement. There is no option. Boredom is good. It forces you to sit with yourself.
Try new hobbies. Once again, it's ok to branch out and discover new things. If you always enjoyed being outside and playing with the dirt as a child, try out gardening. I always, loved water as a child, so why not swim? The key is to look at what you enjoyed as a child and translate that as an adult. I always enjoyed building new things and making new things. So, I take scraps and try to make something. Most of the time it's a failure, but sometimes it's something cool. I personally like "chasing" the dopamine. I like getting my hands on many different things. My joy of teaching is the reason this blog exists. That's why I blog. It is relaxing for me.
Spend time with Old Friends
If it is safe, spend time with old friends. These memories will show you who you are under that layer of "Worker." Often times when I am with my friends we talk about goofy stuff our kids are doing or about an anime we just watched. Sometimes we break out the mtg cards and play an old-style game. This brings me back to my core self, my authentic self. Also often times being around others, even though I'm an introvert, helps me see others as they are and not as I want them to be. This is very important for us in IT because of the impossible standards. When the standards are higher than reality, this fosters an attitude that we can be better than others. So being around others will show us, we are equal.
It's Ok to be you
Being you is not a bad thing. Being someone else is a bad thing. Accepting who you are is the first step of true and lasting growth. Don't deny yourself of yourself. That's painful. It's like a wond of the self. Over time, it will destroy you. So, be ok with being you.
We use cookies to ensure that we give you the best experience on our website. If you continue to use this site we will assume that you are happy with it.