Recently I have had to come to a new level of understanding about myself. For years I have been attracted to the potential of others. I have picked my closest friends through this viewpoint; it worked for many years. However, as we get older, things change, and people change. This view of the world no longer works. Instead, it flipped and it led to more pain than good. I wanted to break down what I call Potential Trauma Lensing for yall and maybe it will help shine a light on some of the darker places and bring understanding.
Trauma Lensing
As a child, I was sexually abused by a babysitter and other family members. My parents didn't know how to handle such a thing and thus, I was often beaten. I will admit, I wasn't an easy child to raise. I grew up with extreme ADHD and I was one of four. One of my survival skills during this time was to see the good more than the bad.
I choose to see my mom as a loving and caring person, which was only part of the truth at the time. The truth was, she was scared. She was hurting, angry, and oftentimes felt like she was a failure. She was also physically abusive. The lens I choose to see her through my whole life was that of a caring and loving mother. It wasn't until after she died did I see the full picture. Let me give you an example.
When we were younger, my mother use to take her thumbnail and grab the soft tissue part of our ears and drive us to the ground. It was very painful. While doing this to my brother one day, he decided to fight back. He had it. He broke free from her grip. While doing so, he hit her. As a child, I jumped to protect my mom. Which kid wouldn't want to protect their mom? A few minutes later, she did the same thing to me for jumping in.
I choose only to see the good in my mom. I choose to "forget" what she did to us. This helped me survive as a child. I call this Potential Trauma Lensing.
Effects of Potential Trauma Lensing
This lensing forces us to see the "Shiny" inside someone. This isn't necessarily a bad thing, but it will come to bite us in the long run. Often times I hear people bash the homeless, and I stop them pointing out the life of the homeless. There is a reason they are in the spot they are in and not all of them are bad. This gives many of the homeless I encounter a sense of being seen and human. Seeing the "shiny" in someone has brung about great healing in others. However, only seeing the shiny isn't true and has led me down some hurtful roads. We can see what's there, but we can't make what's their reality. The next story of a close friend in my life is how this Potential Trauma Lensing affected my life.
A close friend
I grew up with two extremely close friends. For the sake of privacy, I will call them Bob and Rob. I met Bob at school. When I met Bob, we both didn't have any expectations of each other. We didn't choose to see only good or bad. We saw each other as each other. Bob and I are still good friends and I often miss talking to him. While Rob on the other hand was another kid in the neighborhood. Growing up, we didn't really have expectations of each other. I saw him as a fun kid to play with. We played all kinds of imaginary worlds. I was able to be the kid I wasn't allowed to be around him.
As we grew up, he started going down different paths. Even though I saw warning signs, I choose to still see him as the friend I could be the kid I wasn't allowed to be. As I went to college, and he started his college life, we drifted apart more and more. I was always there to help. I always choose to see the good in him and he in me. This was the Potential Trauma Lensing at play. After his first marriage failed due to abuse, He changed. I continued looking for the good in people, while he started seeing the darker sides of people.
Married Life
After I married, my wife and I moved 2 hours away. I lived in some rough conditions. He imposed aspects of his failed marriage onto my marriage. He saw my wife as an abuser and often talked bad about her and my living conditions. I, however, choose to see the good in each situation. When I should have been seeing the truth. It was hell with some good things. When we moved back to my hometown, things got better between us. It was nice for a while. We often played games and had game nights. Keeping true to our child-like states. He was there for my kids' births and I was there for his kids' birth. It was nice. I choose to keep seeing that side of our relationship.
The downfall
After my parents died, my view of the world was destroyed. No longer could I see my life growing up as fluffy and happy. The clouds I grew up with turned into the truth and it didn't turn into truth that made sense. Complex PTSD showed its ugly head and it was ugly. The good fun part of me died. At this point in my life, I was just trying to survive. Instead of seeing the truth, I was suffering, He choose to look through the potential lensing like I was with him. However, the realisim was there. He was stuck between the two. I needed him to be the fun friend. I needed him to be my supporting friend. That wasn't how he was.
The Potential Trauma Lensing
I choose to keep seeing him as a supportive friend. He chooses to still keep seeing me as his childhood friend. We both had the same lensing going on. He went as far as to take me to a mountaintop and threaten to leave me there if I didn't wake up. He didn't because of a storm. After being clean for a month of my addiction, We hung out, I was so excited I allowed my addiction to control the interaction. It was my fault. I longed for him to stop me, but he did not.
He moved away for work. I choose to still see him in the light of a good supportive friend instead of seeing that our relationship was split apart. During our time apart I learned to draw boundaries on myself. A while ago, he stated he was coming into town and wanted to grab lunch. I was excited, but I also drew a boundary, mainly on myself asking him to call me out.
The day before the meetup, I messaged him to confirm and He stated he was canceling. He later told me that he "didn't want me to relapse". Which was a lie. That's when the lensing broke and I was able to see things as truth. We were at two different points in our lives. He couldn't be a supportive friend because He was still stuck in the hurt of a past relationship. I couldn't be the fun friend because I was trying to rebuild my inner child.
Holding onto Potentials
When you hold onto the "Shiny" aspect of people, we fail to see the consistency when they show us they are not that shiny. They are not the potential that we need from them. As you can see in the story, we both hurt each other over and over again. He took me to a mountain top with full intention of leaving me there. I choose to see the good in him. I held on tight to that view and he did with me.
What are you holding onto in people?
Breaking The lensing
Accepting Reality
The first step in breaking free of Potential Trauma Lensing is accepting reality as it is. When someone repeatedly shows us who they are, we should trust and believe them. We shouldn't constantly try to see them in another light. It's up to us to accept this reality. It's a painful thing. The thing about this though, this new reality, might just be temporary. I may rebuild my inner child and be child-like again. I may become what he needs, and he may become what I need. We may become close friends again. However, at this moment, we are not. I have accepted this reality. I'm tired of hurting myself by rejecting this reality.
Self-Focus and Growth
Instead of using all that energy on someone else. I have chosen to invest in myself. At the core of the issue, we as humans want validation. That validation should come from within. At the end of the day, all we have is ourselves. If we are unable to be with ourselves, then how can we be with others? So, let's take the energy we are placing towards our expectations, and put it back into ourselves. Let go of the self-inflected hurts and move forward. We need to accept that people change.
Acceptance and Moving Forward
Instead of trying to make people in our own minds into something they are not, we should accept them as they are. Our mental well-being begs for this. Once we embrace this reality, this world as it is, and not how we would have it, there is a sense of peace. This means taking off those trauma glasses. It's ok to be hurt by others. It's not ok to keep looking at the world through that lens.
Accepting the world as it is is hard, but worth it in the long run. As always, Please seek professional help if you need it. The Trauma Lenses can be glued to our faces. A well-trained trauma therapist can help take those glasses off.
In a previous blog, we discussed doing a speed test on a computer using PowerShell. Let's take that script and expand on it with three lines of code and some prep time. This will allow us to update items inside our Ninja One RMM tool. So we can push a Speedtest To Ninja One.
What's Ninja One?
Ninja One is an amazing RMM tool. I have used many different ones over the years and Ninja one blows my mind. it has a strong community behind it and it keeps growing. It's the only rmm tool that isn't afraid to make mistakes and grow. When in used continuum, I saw many times, largely requested items went to the void. While in ninja, It never goes to the void. So, if you are looking for a Good RMM, Ninja One is amazing. With that said, let's go deep into custom fields and how to set them up for script inputs.
Ninja One Custom Fields
There are currently two ways to make a custom field for a computer. The first is global. This means all companies, roles, and devices will have them. The other way is through the roles. Both options live under the Administration > Devices. Today we are going to setup a Role Custom Field. We are going this route because we don't want the isp speed check information for internal servers and such.
Click Administration
Click Devices
Click Role Custom Fields
Click The Add Button
Click Fields
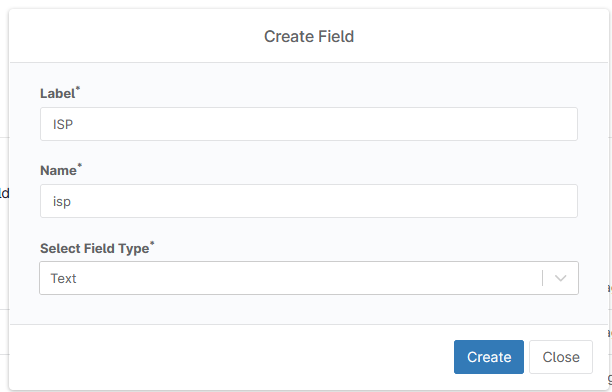
This next part is important. The label is the text that you will read. The Name is what will be used to call the field later. The field type is what you will make it. For example, multi text, text, date, etc... The first custom field will be the following:
Label: ISP
Name: isp
Type: text
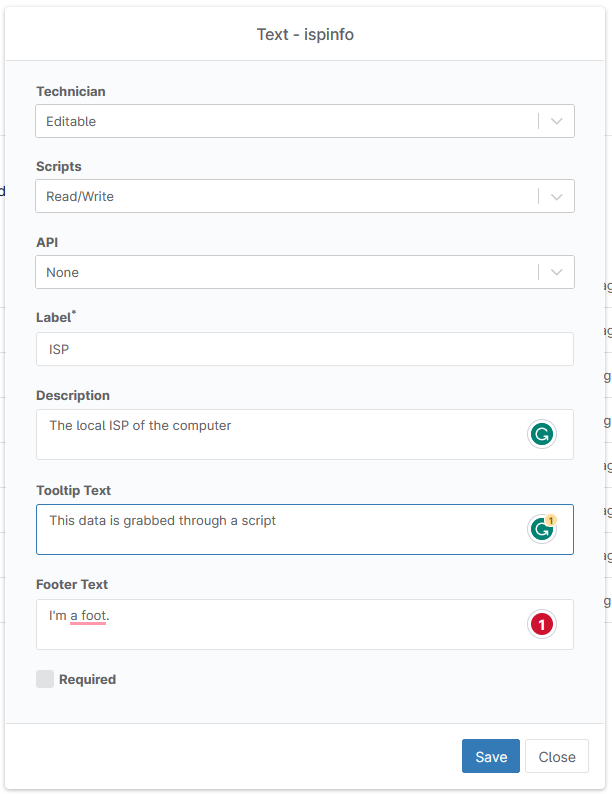
When you click create, the next window will appear. This window is more important. This is where you can choose to allow scripts, APIs and more. If you are planning to allow your technicians to edit this field, then set the technician to editable. The next is script. This is where the script comes into play. This allows the Ninja command line interface to push the Speedtest to Ninja. It has to be at least write for it to work. Next, is the API option. If you are planning to do some special API stuff, this is where you give your field permissions for the APIs. The label is just a label, the description is just a description, the tooltip allows you to give context, the footer text is just that, footer text and finally, you can make it required.
Speedtest to Ninja One
Follow the same steps to create the DownloadSpeed, and UploadSpeed fields. You want them both to be text and you want the script to be at least write. Now, if you have done all that, you are ready to add the ninja command line to the speed test script. This is going to be shockingly easy. The first step is to put your return into a return variable.
Once you have a returnable variable, let's pass them into the Ninja One command line interface. First notice the PowerShell module name is NJCLiPSh. The commands all start with Ninja. If you want to dig deeper, you can read up on the Ninja One documentation. I will place additional resources at the end.
The command we are going to be using to update our custom fields is "Ninja-Property-Set". This command will allow us to set any "script" enabled property. It's as simple as stating the name and value. The auth from the computer will confirm everything is right and update only that device's property. It's amazingly simple.
There are many more things you can do with this script. After building out the Speedtest script, I found out someone else did it better. Which is normal and ok. Check out Mikey O'Toole's exploring into custom fields, here. He goes through different ways to address the custom fields.
Often times I need to run a speed test on a remote machine. Doing a speed test tends to help you understand what's going on with the end user's computer. For example, currently, my ISP is having issues. I am getting around 6mbps down and 75 Mbps up. If I called in and said I couldn't watch training videos... that's why. so it's essential to know the speeds. That's why we want to do a speed test with Powershell.
As we enter this script, you can see my laziness already. The first thing I do is make a string called ctemp for the "c:\temp". This way I don't have to type "c:\temp" repeatedly. Next, we test the path to see if c:\temp exists. If it doesn't, we make it. We do this with the new-item command with the name as temp and the item type as a directory. We do the same thing with c:\temp\speedtest for later. If you really want to get fancy, you can replace the C: with an $env:systemdrive.
The next step is to download the speed test application from ookla. We need the URL and where it's going to be downloaded. That's why the URL has the URL needed. We want to call the file speedtest.zip. Next, we test to see if we already downloaded it. If we didn't, we download the file using the invoke web request and the out file tags.
Once we have the file downloaded, we need to extract the Speed test files. We use the expand archive command to force the download to the c:\temp\speedtest folder that we made at the beginning. I use the force flag here to overwrite anything just in case the file was already there.
Expanding the drive
#Expand the Zip File
Expand-Archive $DownloadPath -DestinationPath "$CTemp\Speedtest" -Force
Next, we run the Speed test with PowerShell. In PowerShell, you can run apps directly inside the shell and input that data directly into the shell by using the & sign. With this software, we need to accept the license if we want to do this script without human interaction. Finally, we want to push its output into a variable. Since it's a test, let us call it a test.
The variable $test contains a few strings with the information we need. It's time to work with those strings. The string contains the server, isp, download, upload, and jitter information. Here is an example output of what this little program produces:
Speedtest by Ookla

     Server: Piedmont Redacted
        ISP: Spectrum Business
    Latency:    22.46 ms   (0.12 ms jitter)

   Download:   166.84 Mbps (data used: 217.5 MB)

     Upload:   194.09 Mbps (data used: 224.6 MB)
Packet Loss:     0.0%
 Result URL: redacted
The first item I want to extract is the download. The code is a little complex so lets start from the inside. We start off with our $test variable. We want to find the string line that contains "Download:" and then trim that up.
Next, we need to wrap this inside a regex match. We are using the .net structure here using the [regex]:match. Don't use matches, it will give you additional information. The match uses our variable and the regex to match with. The regex is the hardest part. So let's take it apart.
The Regex
'[0-9]+\.?[0-9]*'
The first part [0-9] is searching for characters 0 - 9. However, it only looks at the first digit. The + looks for the rest until we reach a ".". The "\" is before the "." because "." is a used variable in regex. If we stop here, we only get the first part of the download speed. We don't get anything past the ".". So we add the "?". Once we do this it allows us to continue. At this point, we look for another [0-9]. Once again, it's just the first character. We want everything past that so we add the "*". Now we have the first match. This is the download speed. Once we have the regex information we ask for only the value. We do this with the upload speed as well.
Now, we need to work with The ISP. We search for the "ISP:" inside our test variable. Like before, we trim up the string. This removes the spaces at the start and end. Then we split this string with the ":". The split is here because it makes sense. We select the second object from that split as it contains the text. The first, which is also 0, doesn't contain the text. Now we have the string, we once again trim it up. There you go. That's the ISP. We do the same thing with the server as the ISP. The results URL is a little different. We split the space and then select the third object.
Displaying the information
Finally, we create a PS custom object and place each piece of useful information into it. When you launch the script, this information will return and you can see it inside your rmm feedback. From here, you can add this information to your RMM tool in custom fields if you wish. Since I use Ninja at the moment, I will go over that later.
That's it, Speed Test with PowerShell is at your fingertips. I hope you enjoy it.
That's right, you Don't Need Superpowers. Today I bring you a blog post near and dear to my heart. I grew up reading DC and Marvel comic books. Watching Superhero tv shows and movies. The idea that someone could fly, and run faster than a speeding bullet was amazing. I personally loved how Batman was human, but he was able to beat even the biggest and most powerful villain. Every one of these characters had one thing in common. They were more than human. More than me.
I grew up in an environment that told me I could never measure up. My parents trained me on how to fail standardized testing. I also experienced a lot of physical abuse growing up. At an early age, I was told that Creator God, the most powerful being in all existence, hated me from birth because of what someone else did and that I would suffer in extreme pain forever. I believed this for most of my life. Only more recently did I learn, You Don't Need Superpowers.
Shame
At the core of my upbringing, I was taught my parent's shame cycles. I believed that I was less than and I needed to work to be more. I was raised in the upper-lower class. In school, I was taught that hard work made good things happen to you. The harder you worked, the better your life would be. I was also taught in school that I was dumber than others. This created a lot of Shame inside of me. It was painful to look in the mirror.
The Split
What do you do when you look in the mirror and see a monster? Let's rephrase the question. What do you do when you are walking down the street and you see a crazed gunman shooting at people? I personally would run away and get help. I know my limits. So, when you see yourself in the mirror and see a monster, most people run. How do you run away from yourself tho?
This is where the split comes into play. It's easier to create an object and live with that than to live with the monster. It would be easier to have the crazed gunman as a statue in your living room instead of having the gunman in your house shooting it up. This is the same way we treat ourselves. This could look different from person to person.
This split creates an alienation inside yourself. Let's take a look at Frank's life for a second. Frank grew up in a very traditional home. Showing any form of extreme emotions was frowned upon. As a man, Frank was to be in complete control of his emotions at all times like his father and grandfather. If he received punishment, if he expressed any emotions, the punishments would last longer. Fast forward a few decades. Frank is now a dad of 3 girls. Every time his girls express emotions, Frank immediately feels out of place. He starts to feel two ways, his daughters are broken and he was broken for feeling like this. This part of him is alienated from himself. He projects this part of himself in every relationship He is in.
Greater Than Vs Less Than
These exposures to our ugly statues; our shamed self is painful. There are many things people do to escape this hurt. In the end, this statue of self is either less than or more thanhuman. Here are some examples of less than:
A slob
Family Scapegoat
Alcoholic
Here are some examples of more than:
Perfectionist
Family Hero
Celibate false man of God
As time moves on, these lies become truths in people's lives. I believed the lies and became both the family scapegoat and the family hero. The less than makes me wormlike while the greater than disables my will, or grandiosity, bigger than life. This is where the need for superpowers comes into play.
Why did I want superpowers?
Looking back at my childhood, I can see why I was drawn to comic books. I was taught I was born less than everyone else. I believed I had to work hard for anyone to even notice me. As the middle boy, this was partially true. If I had superpowers people would notice me. In the comics, people would look up at Superman as he flew over. All eyes were on his greatness, not his weakness. Only the bad guys saw Superman's weakness to Kryptonite. I wanted that power. The power for people to notice greatness beyond any other human standards. I knew I couldn't be Superman, but that didn't stop me from trying.
The will wills what can’t be willed.Healing the shame that binds you - John Bradshaw
I am a product of this will wanting to will what cant be will and an idea of being wormlike or less than. The feeling of being wormlike was always painful and I wanted to escape at all costs. I studied magic, body language, emotional intelligence, and more. If I could see the bad coming, I would be able to handle it. I didn't have to fear the boot of people stepping on me like a warm.
This concept bled into my work life. I would work extra hard without breaks and go much longer than others. I was called upon to complete work others would never do, couldn't do, or will not do. A backup battery landed on my leg at my first IT job damaging my back. I didn't take care of my back, and now I suffer. I had to prove my worth more than taking care of myself.
Why You Don't Need Superpowers
Our Culture tells us, to work harder and get more rewards. This culture tells us we are bad (ineffective) if we don't perform at our peak potential at all times. This concept repeats itself from generation to generation. The need to control has been present since the dawn of man. The act of using shame to control others is nothing new. This need to control is, in of itself, a form of shame.
You are Human
The truth is You Are Human. You have limits. Being human means, you have limits. Over the years, Superman went from jumping tall buildings to flying. He struggled with electricity. He also struggled with limits that were realistic. As the character developed, the need to be more and more grew. This was people's need to feel like they were more than their limits. To make Superman more relatable, DC comics gave him a weakness of kryptonite. They gave him a limit because he reached a point where he was no longer relatable.
Don't be Superman
See, we are not Superman, and let's face it, we will never be. That's a beautiful thing. Think about life being perfect and all-powerful, that would be boring. There is a real need for community. This need is because we all have different limits and skills. It's beautiful and OK. I have no hands-on skills when it comes to doing any kind of repair work in my house. However, I am good with technology. I can sit here and tell myself, I am weak for not being able to patch the hole in my ceiling by myself, or I can speak with friends and family who can. By asking for help, I show my strength of being human. Its OK.
I recently heard an analogy about if everyone dug a ditch together for water in the same space, all we would have is a big hole and lots of hurt feelings. However, if everyone dug in their respective spaces, we would have a ditch big enough for water to flow.
Culture
Our culture tells us to run on all cylinders. Learn everything that ever was and even more. The thing about these concepts is they are impossible. These things are not human. Like myself, I hurt my back by picking up a heavy backup battery. I was trying to be more than my limits because that is what I believed I should be.
A young man recently told me he was struggling to learn every programming language for a potential programming job. It takes time to learn a language. It's impossible to learn them all. This is what he was trying to do. He was led to believe, the more programming languages he knew, the more jobs he will get. Of course, this is a lie. The truth is, the more programming languages you learn well, opens more doors. The key is well. It's impossible to learn all programming languages, so how would you learn them well?
It's ok not to know everything. That's simply impossible. It's ok to take breaks and not push at 100% at all times. That's how burnout happens. Did you know that the majority of millennials are burned out? Suicide rates have greatly increased in the past 20 years. Mental health issues keep climbing. A large percentage of Americans are on anti-depressants. All of this is because culture teaches us we have to be more than human or we are trash.
Breaking Free
Know yourself
How do we break free? The first step would be to realize you have a limit. Discover what those limits are. If you can't seem to study for 7 hours at a clip, then don't. Find a healthy threshold and do that. Respect your limits. There is nothing wrong with them.
Knowing yourself is the beginning of all wisdom.Aristotle
Boundaries
The next step is to set boundaries for yourself and others. I grew up believing that if you had boundaries, you didn't love anyone. This translated to being a bad person. It wasn't until later did I realize this was a lie to control me. Think of boundaries like doors. Do you want strangers in your home when you are not there? I don't. The door is a boundary. The lock is you inforcing that boundary. The door is a good way to keep danger at bay. So are boundaries you set in your life.
Ever had a job that worked you 60 hours a week, but only paid for 40? That's a boundary problem. This behavior is a refusal to respect you. At a previous job, I was expected to take on all the coding, the helpdesk, and projects all at the same time without the access needed to complete these tasks. I often found myself working 60 hours because I didn't respect my time or my family. My boundaries were weak.
Breaking the statues
Those statues you have all over the place. Aspects you have frozen and beaten down over the years. Those aspects of yourself live inside those statues. You didn't kill them. They are still there. It's time to smash those statues and let those parts of you out. See them, address them, know them. Find why you feel like a bad person for getting angry. Discover why you feel less than when you don't know something you shouldn't know. Bring those parts back into yourself so you can be whole. This is the hardest part as there are so many of them. Free your gargoyles by shining love and care on them. I suggest a licensed therapist for this process. However, Don't go gargoyle smashing alone.
Basic Maintenance
In the book, boundaries for your soul, the author speaks about what is healthy and not. She points out that when exploring yourself, if you feel toxic shame, then it's time to address that part of yourself. This is a lifelong process. The culture we live in encourages us to make statues instead of breaking them. When I catch myself fantasizing about superpowers, I remind myself, You Don't Need Superpowers. Then I review the day to see where the stressor came from. In the book Indistractable, Nir teaches that every distraction happens because of a trigger. Grabbing your phone could be triggered by boredom and so on and so forth. Find the shame signal and break yet another statue.
Please note, I am not a therapist. I have just lived through a lot in my life and want to share my experiences and knowledge. if you experience any issues while reading this blog, please speak to a licensed therapist.
Last week we discussed sending emails with Graph API. You can read about it here. Today we will be taking that script and making it so it can be automated. On the backend, you will need to create an Azure App. You can read about how to do that here. The following code only works in Powershell 7 and above. Automating with Graph API works best in PowerShell 7. You will need to set up your App with Users.Read.All and Mail.Send as the minimal. levels.
The Script
import-module Microsoft.Graph.Users
Import-module Microsoft.Graph.Users.Actions

$EmailToSend = "A Cloud Email @ your domain"
$EmailToReceive = "Any Email"
$AppID = "This is your App ID"
$SecuredPassword = "This is your Password"
$tenantID = "This is your tenant ID"

$SecuredPasswordPassword = ConvertTo-SecureString -String $SecuredPassword -AsPlainText -Force
$ClientSecretCredential = New-Object -TypeName System.Management.Automation.PSCredential -ArgumentList $AppID, $SecuredPasswordPassword

Connect-MgGraph -TenantId $tenantID -ClientSecretCredential $ClientSecretCredential

#Connect-MgGraph -Scopes "User.Read.All, Mail.Send"
$users = Get-MgUser -filter "accountenabled eq false"
$ReturnString = ""
foreach ($user in $users) {
    if ($null -ne (Get-MgUserLicenseDetail -UserId $user.Id)) {
        [pscustomobject][ordered]@{
            UPN      = $user.UserPrincipalName
            Licenses = (Get-MgUserLicenseDetail -UserId $user.id).SkuPartNumber -join ", "
        }
        $ReturnString = $ReturnString + "$($user.UserPrincipalName): $((Get-MgUserLicenseDetail -UserId $user.id).SkuPartNumber -join ", ")`n"
    }
}

$body = @"
<html>
<header>Licenses</header>
<body>
<center>
<h1>Disabled Users</h1>
<h2>With Licenses</h2>
</center>
$ReturnString
</body>
</html>
"@
$params = @{
    message = @{
        subject = "Disabled Users with Licenses"
        body = @{
            contentType = "HTML"
            content = $body
        }
        toRecipients = @(
            @{
                emailAddress = @{
                    address = $EmailToReceive
                }
            }
        )
    }
    saveToSentItems = "false"
}

# A UPN can also be used as -UserId.
Send-MgUserMail -UserId $EmailToSend -BodyParameter $params
The Breakdown
This script is the same as last week's except for how it connects and how you feed the email addresses. We are using the Client Secret Credential flag, which is only available in Powershell 7, to trigger the connect command. You need some basic information first. This information will allow Automating with Graph API to work.
$AppID = "This is your App ID"
$SecuredPassword = "This is your Password"
$tenantID = "This is your tenant ID"
The App is the application ID from the azure app you created. the tenant ID is also the tenant ID of the azure app you created. Remember, I stated to keep the secret key value. This is where you will use it. Place it in the Secure Password area. Next, we need to convert this information into a secure object.
Now, we need to convert the plain text to a secure string. We do this with the convertto-securestring command. We enter the string and force it with the force tag. Once we have done that, we want to create a credential object. We use the new-object command to create an automation pscredential object. We feed it the appID and the password we created above. This gives us the ps object that we will use for the next part.
Using the connect-mggraph command we connect to our tenant and pass the app id and password as a single object. This will connect us directly to Graph API. Later we will run this script through the task scheduler. The remainder of the script will stay the same. Finally, we supply the email addresses. Automating with Graph API couldn't be easier. So Enjoy!
We use cookies to ensure that we give you the best experience on our website. If you continue to use this site we will assume that you are happy with it.