The other day, I was showing a friend how to set up Intune deployments. Then it hit me: I have unique scripts for script detections and things like that here on therandomadmin.com. However, I haven’t really gone through the detection rules for built-in items. I was like, well now I have to fix that. So here we are going to fix that with the Intune Detection Rules. Let’s get started.
Types of Intune Detection Rules
There are three built-in detection types that we will go over today. They are the MSI, File, and Registry.
MSI is like the easy button, (no not the staples one from the commercials… did I just age myself?)
File is my least favorite one, but it works for legacy apps
Registry is my favorite one and it’s the one that I will spend some time on for you all.
Other than the built-in items, there are scripted items which is unique in it’s own rights. You can take a look at how these scripts work here. Andrew has a good tutorial on his blog as well. Today will be all about the built-in items.
The Built-In MSI Rule
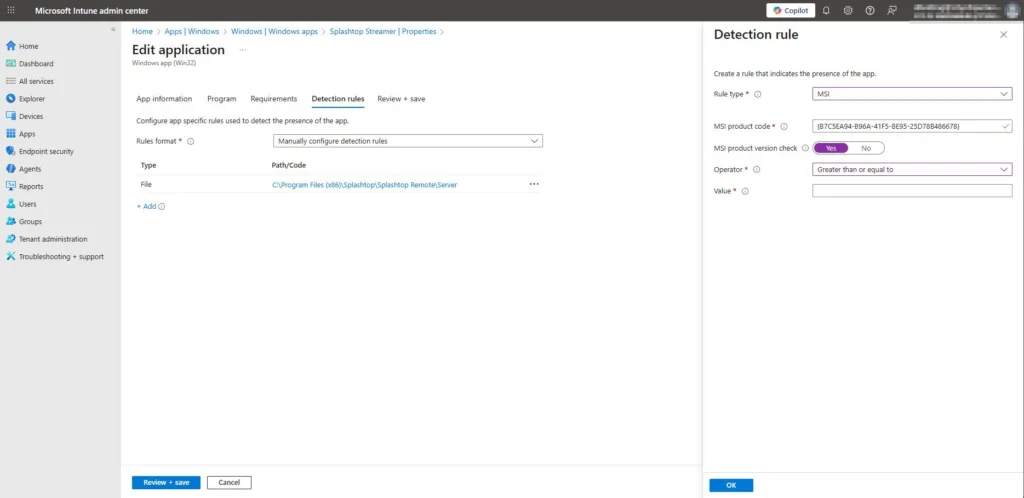
The MSI rule is the easy button of the detection scripts. If you are using an MSI, it will pull the information directly from the MSI. Once you get to the detection rule part you can follow these steps:
Click Add
Select MSI
And click save
Magic, right? The other thing you can do is select “MSI Product Version Check.” Here you can select an operator like “greater than or equal to” and then give it the value. Which is the product version. This helps with auto-updated items. Which I always suggest using. Below is a screenshot.
File Detection Rule
Our next built-in detection rule is for files. This is good if you have an app that doesn’t install like normal apps. Older apps or more niche apps are like this. For example. We installed a special Creo app. It installed in the C:\PTC location, and it didn’t add itself to the registry uninstall strings. It didn’t come in an MSI; it was an EXE with custom everything. This app was a pain in the backstracher. So we used the File location rule. Here is how you can set it up.
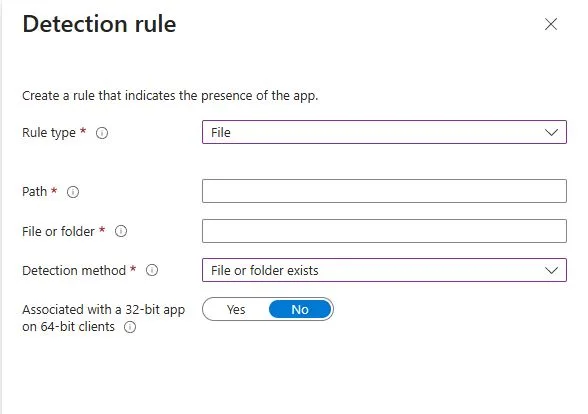
Inside your detection rule, click Add.
Rule type: File
Path: The folder that you want to check. In this case it was C:\PTC
File or Folder: Here we wanted to see if the creo.exe existed. So, that’s what I put here.
Detection Method: We used file or folder existed.
Greater than or equal to string
As you will learn, I am all about the version numbers. If you select the string (version), you will need to get that version number from the file you are pulling from. You can do this with PowerShell pretty quickly.
Once you have this information, you will then proceed to input it into the value section once you select the string (version) and greater than or equal to options.
Built-In Intune Detection Rule for Registry
The registry key is the most common and the most useful as well. Most apps install themselves in this method. The script below is going to be your best friend. What it does is give you the information you need. Lets break down what each item is so we can look at the script and make this happen. I’m giving this the most focus because it’s the most common.
Registry Type: The type we are using.
Key Path: The path of the uninstall string that we will be using
Value Name: What we are looking for, this case we will be looking for displayversion
Detection Method: Version Comparison
Operator: Greater than or equal to
Value: What value we are looking for
Assocated: Is it a 32 or 64.
Script
So you will have to go digging into the registry for this information. However, this registry area is just confussing and really hard to manually dig through. So powershell is once again, our friend.
All you have to do is replace the app name. It will provide you with everything you need inside the built-in detection rule. This is the output that it provides:
RuleType         : Registry
KeyPath          : HKEY_LOCAL_MACHINE\Software\Microsoft\Windows\CurrentVersion\Uninstall\{6EB73F60-E858-3AF3-913A-0C1783656B42}
ValueName        : DisplayVersion
DetectionMethod  : Version comparison
Operator         : Greater than or equal to
Value            : 143.0.7499.170
AssociatedWith32 : False
This script really makes finding apps easier. If the app installs in another place, good hunting, my friends.
What we can learn as a person
I am still missing my keys. I have the backup fob for my car, but I have no idea where my normal keys are. So no house key right now. Sometimes, I need to backtrace what I have done to find where I am going. Which is ok. This is why I document so much because I don’t have the brain space to remember everything I have done. This is also why this blog post exists. I realized I never once really did explain how to use the built-in tools. Now I have a place to come and get the script I need and anyone else needs. So that will be nice later down the road, and I will thank myself later. Giving myself the little micro successes in the future is what I am going for here. The keys, on the other hand, I didn’t set up a space for them to go with the new desk I have. Thus, they are in the ether somewhere, and when I find them, they will go into my little cubby on my new desk. So, set yourself up for micro successes, whether you know it or not, in the future. This will reduce a lot of stress and anxiety in the future. Remember, 80% of life is the systems that you have put into place. So, let’s make good systems. Then you can set up your own Intune detection rules for your life to detect when you gave yourself successes. Like, when I see the wallet inside the new cubby. I can give myself a little thanks.
If you’ve ever needed to extract specific information from a log file or validate user input in a PowerShell script, you’ve probably wished for a magic tool that could do the heavy lifting. Well, that’s exactly where regular expressions (regex) come in.
Regex is one of those tools that feels intimidating at first, but once you get the hang of it, you’ll start seeing patterns everywhere. It’s like suddenly being able to read the Matrix, except instead of dodging bullets, you’re filtering out bad email addresses or pulling MAC addresses from a system log.
Why Use Regex in PowerShell?
PowerShell has built-in support for regex, making it an incredibly powerful tool for system administrators, developers, and anyone who works with structured or unstructured text. Whether you’re:
Validating user input (like email addresses in a script)
Extracting important data from logs (like MAC or IP addresses)
Searching for patterns in massive amounts of text
Regex allows you to do all of this with just a few carefully crafted expressions. It’s like having a Swiss Army knife for text processing.
What We’ll Cover in This Guide
In this post, we’ll walk through three practical PowerShell regex use cases:
Email Addresses – How to validate email input and extract emails from a document
MAC Addresses – How to validate MAC addresses and find them in logs
IP Addresses – How to check if an IP is valid and pull all IPs from a file
Before we dive into these examples, we’ll go over some regex basics, including common syntax and flags that make regex so powerful. By the end, you’ll not only understand how regex works in PowerShell but also feel confident using it in your own projects.
Let’s get started!
Understanding Regex Flags and Syntax
Regular expressions might look like a confusing mess of symbols at first, kind of like trying to understand a cat’s behavior. One minute it’s purring in your lap, the next it’s knocking your coffee off the table. But once you start recognizing the patterns—like how a tail flick means back away, human—it all starts to make sense.
Regex is the same way. At first glance, it looks like a secret code of slashes, dots, and brackets. But once you learn the building blocks, you start seeing patterns everywhere, and suddenly, text manipulation in PowerShell becomes effortless. PowerShell has native support for regex, meaning you can use it to search, validate, and extract information with just a few well-placed symbols—kind of like bribing a cat with treats to do what you want.
Character Classes: Defining What to Match
Character classes allow you to specify what kind of characters should match. Instead of listing every possibility, regex provides shorthand notations.
Common Character Classes in PowerShell Regex
Character Class
Description
Example Match
\d
Matches any digit (0-9)
123 in abc123
\w
Matches any word character (A-Z, a-z, 0-9, _)
hello in hello_123
\s
Matches any whitespace (space, tab, newline)
The space in "Hello World"
.
Matches any character (except newline)
H or ! in "Hi!"
Example in Powershell:
"This is a test 123" -match "\d+" # Matches "123"
Quantifiers: Controlling Repetitions
Quantifiers define how many times a pattern should repeat.
Common Quantifiers
Quantifier
Description
Example Match
*
Matches 0 or more times
aaa in "aaaaa"
+
Matches 1 or more times
abc in "abc"
?
Matches 0 or 1 time (optional)
a in "a" or empty string
{n}
Matches exactly n times
333 in "333"
{n,}
Matches at least n times
111 in "11111"
{n,m}
Matches between n and m times
55 in "5555" (if {2,3})
Example in PowerShell:
"This is 55555" -match "\d{2,3}" # Matches "555"
Anchors: Defining Position in Text
Anchors don’t match actual characters but instead define where a match should occur.
Common Anchors
Anchor
Description
Example Match
^
Matches the start of a string
Hello in "Hello world"
$
Matches the end of a string
world in "Hello world"
\b
Matches a word boundary
cat in "cat dog" but not "scatter"
Example in PowerShell:
"This is a test" -match "^This" # Matches "This"
Escaping Special Characters
Some characters in regex have special meanings (like . or *). If you want to match them literally, you need to escape them with a backslash \.
Common Special Characters That Need Escaping
. (dot) → Matches any character, so use \. to match a literal dot.
* (asterisk) → Use \* to match an actual asterisk.
? (question mark) → Use \? to match a literal question mark.
Example in PowerShell:
"This is version 1.0.1" -match "1\.0\.1" # Matches "1.0.1"
How to Use Regex in PowerShell
PowerShell provides multiple ways to work with regex:
-match Operator – Checks if a string matches a pattern.
-replace Operator – Replaces matched patterns in a string.
[regex]::matches() – Extracts all matches from a string.
Extracting and Validating Email Addresses with PowerShell
When working with PowerShell scripts, validating user input is crucial—especially when dealing with email addresses. You don’t want users submitting "notanemail@oops" or "hello@.com" and breaking your workflow. Thankfully, regex makes it easy to verify if an email address is properly formatted and even extract all emails from a document.
Before we get into validating and extracting emails, let’s break down the regex pattern that makes it all work.
Breaking Down the Email Regex
Email validation might seem simple at first—just look for an “@” symbol, right? But things get complicated fast. A valid email address follows these rules:
A username section, which can include letters, numbers, dots, dashes, and underscores.
An “@” symbol separating the username from the domain.
A domain name that includes letters and numbers.
A top-level domain (TLD) like .com, .net, .org, etc.
A regex pattern that matches most valid email addresses looks like this:
+ → Ensures one or more of these characters exist.
“@” Symbol: @
The @ is a literal character—every valid email must have it.
Domain Name: [\w\.-]+
Just like the username, the domain allows letters, numbers, dots, and dashes.
Top-Level Domain (TLD): \.\w+
\. → Matches a literal dot before the TLD.
\w+ → Ensures at least one letter (like .com or .net).
Example Matches:
user@example.com
john.doe123@company.co.uk
admin-test@my-site.net
Invalid Matches:
@example.com (No username)
user@.com (Invalid domain name)
user@domain (No TLD)
This regex is great for general email validation, but in PowerShell, we need to apply it properly. Next, we’ll use this pattern in a ValidateSet to enforce correct email input in scripts.
Using Regex for PowerShell ValidateSet
PowerShell has built-in ways to enforce valid input in scripts, and one way to do this is by using regex inside a function. The function below checks if an email matches our regex pattern. If it’s valid, it returns $true; if not, it gives a reason why.
PowerShell Email Validation Function
function Test-EmailAddress {
    param (
        [string]$Email
    )

    $pattern = "^[\w\.-]+@[\w\.-]+\.\w+$"

    if (-not $Email) {
        return "False - No email provided."
    }

    if ($Email -match $pattern) {
        return "True"
    }

    # Now let's figure out why it failed
    if ($Email -notmatch "@") {
        return "False - Missing '@' symbol."
    }

    if ($Email -match "@\." -or $Email -match "@$") {
        return "False - Invalid placement of '@' or '.'"
    }

    if ($Email -notmatch "\.\w+$") {
        return "False - Missing top-level domain (e.g., .com, .net)."
    }

    return "False - Invalid email format."
}
How It Works
Checks if an email is provided – If the input is empty, it immediately returns a failure message.
Validates using regex – If the input matches the regex pattern, it returns True.
Identifies why the email is invalid – It checks for common issues like missing @, misplaced dots, or a missing TLD.
This function is useful for scripts that require valid emails before proceeding. Next, we’ll explore how to extract all emails from a document using regex!
Finding All Email Addresses in a Document
If you’re working with logs, reports, or any large text files, regex is your best friend for extracting structured data like email addresses. Instead of manually scanning through lines of text, PowerShell can do the heavy lifting in seconds.
Here’s a script that:
Reads a file line by line.
Uses regex to find all email addresses.
Outputs the results to the console (or optionally saves them to another file).
PowerShell Script to Extract Emails from a File
function Get-EmailAddressesFromFile {
    param (
        [string]$FilePath
    )

    if (-not (Test-Path $FilePath)) {
        Write-Host "Error: File not found at path: $FilePath"
        return
    }

    $pattern = "[\w\.-]+@[\w\.-]+\.\w+"
    $emails = @()

    Get-Content $FilePath | ForEach-Object {
        $matches = [regex]::Matches($_, $pattern)
        if ($matches.Count -gt 0) {
            $emails += $matches.Value
        }
    }

    if ($emails.Count -eq 0) {
        Write-Host "No email addresses found in the file."
    } else {
        Write-Host "Found $($emails.Count) email addresses:"
        $emails | Sort-Object -Unique
    }
}

# **Example Usage**
Get-EmailAddressesFromFile -FilePath "C:\path\to\your\file.txt"
How It Works
Checks if the file exists – Avoids errors if the file path is incorrect.
Reads the file line by line – Prevents loading large files into memory at once.
Uses regex to find emails – Looks for matches in each line.
Stores and displays unique results – Avoids duplicates and outputs all found emails.
Example File (C:\path\to\your\file.txt)
Hello John, please contact us at support@example.com.
You can also reach admin@company.net for further assistance.
But we dont want to see a snail@the white house.
However, we might @ your friend .com
How about a cheesecake@cheesecakefactory.com?
Script Output
Found 3 email addresses:
admin@company.net
cheesecake@cheesecakefactory.com
support@example.com
This script is super useful for extracting emails from logs, reports, or even messy text files. Next up, we’ll apply these same techniques to MAC addresses!
Extracting andValidating MAC Addresses with PowerShell
MAC addresses (Media Access Control addresses) are unique hardware identifiers assigned to network interfaces. If you’re dealing with network logs, device configurations, or security audits, you may need to validate or extract MAC addresses.
A valid MAC address follows one of these formats:
Colon-separated:00:1A:2B:3C:4D:5E
Hyphen-separated:00-1A-2B-3C-4D-5E
No separator:001A2B3C4D5E
But Cisco devices often use a dot-separated format:
Cisco-style:001A.2B3C.4D5E
Now, let’s break down the regex pattern that will help us match MAC addresses.
Breaking Down the MAC Address Regex
MAC addresses consist of six groups of two hexadecimal digits (0-9 and A-F), separated by colons, hyphens, or nothing at all. Here’s a regex pattern that matches all common formats:
([A-Fa-f0-9]{2}[:-]?){5}[A-Fa-f0-9]{2} → Matches colon, hyphen, or no separator formats.
Second Half: Cisco’s Dot-Format
([A-Fa-f0-9]{4}\.){2}[A-Fa-f0-9]{4} → Matches two groups of four hex digits separated by dots.
Example Matches:
00:1A:2B:3C:4D:5E
00-1A-2B-3C-4D-5E
001A2B3C4D5E
001A.2B3C.4D5E(Cisco format!)
Invalid Matches:
00:1A:2B:3C:4D (Only five pairs)
00:1G:2B:3C:4D:5E (Invalid hex digit G)
00::1A:2B:3C:4D:5E (Double colon is not valid)
Using Regex for PowerShell ValidateSet (Including Cisco Format)
We’ll now create a PowerShell function that checks if a given MAC address is valid. If it’s valid, it returns True; if not, it returns False with a reason why.
Updated PowerShell MAC Address Validation Function
function Test-MacAddress {
    param (
        [string]$MacAddress
    )

    $pattern = "^([A-Fa-f0-9]{2}[:-]?){5}[A-Fa-f0-9]{2}$|^([A-Fa-f0-9]{4}\.){2}[A-Fa-f0-9]{4}$"

    if (-not $MacAddress) {
        return "False - No MAC address provided."
    }

    if ($MacAddress -match $pattern) {
        return "True"
    }

    # Identify why it failed
    if ($MacAddress -notmatch "^[A-Fa-f0-9]+$" -and $MacAddress -notmatch "[:-\.]") {
        return "False - Contains invalid characters."
    }

    if ($MacAddress -notmatch "([A-Fa-f0-9]{2}[:-]?){5}[A-Fa-f0-9]{2}" -and $MacAddress -notmatch "([A-Fa-f0-9]{4}\.){2}[A-Fa-f0-9]{4}") {
        return "False - Incorrect format. Should be XX:XX:XX:XX:XX:XX, XX-XX-XX-XX-XX-XX, XXXXXXXX, or XXXX.XXXX.XXXX (Cisco)."
    }

    return "False - Invalid MAC address format."
}
How It Works
Checks if a MAC address is provided – Ensures input isn’t empty.
Uses regex for validation – If the input matches the pattern, it’s valid.
Identifies specific errors – Helps users understand why an input is invalid.
Now that we can validate a single MAC address, let’s move on to extracting all MAC addresses from a file!
Finding All MAC Addresses in a Document
This next script scans a file and extracts all MAC addresses using regex. It works just like our email extraction script, but with a MAC address pattern.
PowerShell Script to Extract MAC Addresses from a File
function Get-MacAddressesFromFile {
    param (
        [string]$FilePath
    )

    if (-not (Test-Path $FilePath)) {
        Write-Host "Error: File not found at path: $FilePath"
        return
    }

    $pattern = "([A-Fa-f0-9]{2}[:-]?){5}[A-Fa-f0-9]{2}|([A-Fa-f0-9]{4}\.){2}[A-Fa-f0-9]{4}"
    $macAddresses = @()

    Get-Content $FilePath | ForEach-Object {
        $matches = [regex]::Matches($_, $pattern)
        if ($matches.Count -gt 0) {
            $macAddresses += $matches.Value
        }
    }

    if ($macAddresses.Count -eq 0) {
        Write-Host "No MAC addresses found in the file."
    } else {
        Write-Host "Found $($macAddresses.Count) MAC addresses:"
        $macAddresses | Sort-Object -Unique
    }
}

# **Example Usage**
Get-MacAddressesFromFile -FilePath "C:\path\to\your\file.txt"
How It Works
Checks if the file exists – Prevents errors if the file path is wrong.
Reads the file line by line – Efficient for large files.
Uses regex to extract MAC addresses – Searches each line for matches.
Stores and displays unique results – Removes duplicate addresses for cleaner output.
Found 3 MAC addresses:
00:1A:2B:3C:4D:5E
00-1A-2B-3C-4D-5E
001A.2B3C.4D5E
This script is super useful for network admins who need to extract MAC addresses from logs or reports. Next up, we’ll do the same for IP addresses!
Extracting and Validating IP Addresses with PowerShell
IP addresses are everywhere—logs, configs, audit reports—you name it. If you’re working with networking or security, you’ll often need to validate or extract IPs from text files.
We’re going to cover IPv4 and IPv6, because while IPv4 is still dominant, IPv6 is becoming more common.
What Makes an IP Address Valid?
IPv4 Format
Consists of four octets (groups of numbers) separated by dots: 192.168.1.1
Each octet must be between 0 and 255
IPv6 Format
Consists of eight groups of hexadecimal numbers (0-9, A-F), separated by colons: 2001:0db8:85a3:0000:0000:8a2e:0370:7334
Can contain compressed notation (e.g., :: represents consecutive zero blocks)
Breaking Down the IP Address Regex
To match both IPv4 and IPv6, we’ll use two separate regex patterns.
⚠️ This regex does not handle compressed IPv6 addresses (::), but we’ll take care of that in PowerShell logic!
Using Regex for PowerShell ValidateSet
Now, let’s create a PowerShell function to validate both IPv4 and IPv6 addresses.
PowerShell IP Address Validation Function
function Test-IPAddress {
    param (
        [string]$IPAddress
    )

    $ipv4Pattern = "^(25[0-5]|2[0-4][0-9]|1[0-9]{2}|[1-9]?[0-9])(\.(25[0-5]|2[0-4][0-9]|1[0-9]{2}|[1-9]?[0-9])){3}$"
    $ipv6Pattern = "^([A-Fa-f0-9]{1,4}:){7}[A-Fa-f0-9]{1,4}$"

    if (-not $IPAddress) {
        return "False - No IP address provided."
    }

    if ($IPAddress -match $ipv4Pattern) {
        return "True (IPv4)"
    }

    if ($IPAddress -match $ipv6Pattern -or $IPAddress -match "^(::|([A-Fa-f0-9]{1,4}:){1,6}:?([A-Fa-f0-9]{1,4})?)$") {
        return "True (IPv6)"
    }

    return "False - Invalid IP address format."
}
How It Works
Checks for input – Ensures an IP address was provided.
Matches against IPv4 regex – If valid, returns True (IPv4).
Matches against IPv6 regex – If valid, returns True (IPv6).
Handles compressed IPv6 (::) – Using additional PowerShell logic.
Returns an error if invalid – Helps troubleshoot incorrect formats.
Now, let’s move on to extracting all IPs from a document!
Finding All IP Addresses in a Document
This script scans a file and extracts all IPv4 and IPv6 addresses.
PowerShell Script to Extract IP Addresses from a File
function Get-IPAddressesFromFile {
    param (
        [string]$FilePath
    )

    if (-not (Test-Path $FilePath)) {
        Write-Host "Error: File not found at path: $FilePath"
        return
    }

    $ipv4Pattern = "\b((25[0-5]|2[0-4][0-9]|1[0-9]{2}|[1-9]?[0-9])\.){3}(25[0-5]|2[0-4][0-9]|1[0-9]{2}|[1-9]?[0-9])\b"
    $ipv6Pattern = "\b([A-Fa-f0-9]{1,4}:){1,7}[A-Fa-f0-9]{1,4}\b"
    $ipAddresses = @()

    Get-Content $FilePath | ForEach-Object {
        $matchesIPv4 = [regex]::Matches($_, $ipv4Pattern)
        $matchesIPv6 = [regex]::Matches($_, $ipv6Pattern)

        if ($matchesIPv4.Count -gt 0) {
            $ipAddresses += $matchesIPv4.Value
        }
        if ($matchesIPv6.Count -gt 0) {
            $ipAddresses += $matchesIPv6.Value
        }
    }

    if ($ipAddresses.Count -eq 0) {
        Write-Host "No IP addresses found in the file."
    } else {
        Write-Host "Found $($ipAddresses.Count) IP addresses:"
        $ipAddresses | Sort-Object -Unique
    }
}
Example File (C:\path\to\your\file.txt)
Server 1: 192.168.1.1
Server 2: 255.255.255.255
Router: 2001:db8:85a3::8a2e:370:7334
Log Entry: Invalid IP -> 999.999.999.999
Script Output
Found 3 IP addresses:
192.168.1.1
255.255.255.255
2001:db8:85a3::8a2e:370:7334
Regex Exploration in PowerShell
At this point, you’ve seen how regex can validate, extract, and manipulate data in PowerShell. Whether it’s emails, MAC addresses (including Cisco formats), or IPs (both IPv4 and IPv6), you now have practical tools to handle real-world scenarios.
Why Keep Learning Regex?
Regex is one of those skills that pays off the more you use it. The same way a system admin gets better at troubleshooting networks over time, you’ll get faster at spotting patterns and writing efficient expressions.
Here are some great ways to keep sharpening your regex skills:
Practice on Real Logs – Take a firewall log, an Apache log, or an email report and extract useful data.
Use Online Regex Tools – Websites like regex101.com let you test regex patterns with real-time explanations.
Experiment with PowerShell – Try using -match, -replace, and [regex]::Matches() in your daily scripts.
Challenge Yourself – Create a script that finds phone numbers, dates, or even URLs in a document.
Regex is a skill, not magic. It may look complex at first, but like learning any new language, it becomes second nature with practice. The best way to improve? Find a problem and solve it with regex.
So, what’s your next PowerShell regex use case going to be?
What can we learn as a person today?
When a script fails, we don’t just throw our hands up and quit—we debug it. We check the logs, isolate the issue, and find a fix. But when our own minds start feeling overwhelmed, anxious, or burned out, we often just push through, hoping the problem resolves itself. What if we approached our mental health like we approach troubleshooting code? Debugging isn’t just for PowerShell scripts—it can work for stress, too.
Find the errors
The first step in debugging stress is identifying the error messages. In IT, a recurring issue in the logs might mean something deeper is wrong, and the same goes for mental health. Are you feeling exhausted every morning? Snapping at coworkers over small things? Losing focus even on tasks you usually enjoy? These could be your mind’s version of Event ID 1000: Application Crash. Instead of ignoring the warning signs, acknowledge them—just like you would in a system check.
Analyze the variables
Next, we analyze the variables. Just like a misconfigured setting can break a script, small changes in your routine can make or break your mental well-being. Are you sleeping enough? Eating well? Taking breaks? IT professionals are notorious for skipping meals, working through exhaustion, and staying up late chasing down problems. But just like an unstable system needs a reboot, your brain needs rest. Run a self-check—what’s missing from your routine that could improve stability?
Implement something
Finally, implement a fix and test the results. Maybe you start with a simple -replace—swapping out caffeine overload for proper hydration or scheduling actual breaks instead of “just five more minutes.” Maybe you automate self-care reminders, like setting a PowerShell script to remind you every hour to step away from the screen. And if the issue persists? Just like with a stubborn bug, escalate it—talk to a friend, mentor, or even a therapist. There’s no shame in calling in extra support when needed.
In IT, we don’t assume things will “just work”—we test, refine, and optimize. Treat your mental health the same way. Debug your stress, adjust your variables, and don’t be afraid to run an upgrade on your self-care routine. The best systems run smoothly when properly maintained—and that includes you.
Upgrading Windows 11 across multiple machines is one of those tasks that sounds simple—until you realize you need to manually download the ISO, mount it, and run the upgrade for every single computer. If you’re managing a fleet of devices, that’s a lot of clicking and waiting. Thankfully, PowerShell can help automate this process, saving IT admins from hours of repetitive work. So today, we will Automate Windows 11 Upgrade with PowerShell.
But before we jump in, there’s one crucial step: Microsoft requires you to manually generate the download link for the Windows 11 ISO. That’s right—no direct API calls or magic URLs here. You’ll need to visit the Microsoft website and grab the link yourself. Don’t worry, we’ll walk you through that part.
And hey, if you’re wondering why Microsoft makes you do this manually… well, let’s just say it’s like trying to convince a cat to use the expensive bed you bought instead of the random cardboard box it found in the corner. Some things just don’t make sense, but we roll with it anyway.
Alright, let’s dive in! First up: generating that all-important download link.
The Script
Write-Host "Go to: https://www.microsoft.com/en-us/software-download/windows11"
Write-Host "Select Windows 11 (multi-edition ISO for x64 devices)"
Write-Host "Click Download"
Write-Host "Select English (United States)"
Write-Host "Click Confirm"
Write-Host "Right Click '64-bit Download' and click 'Copy link'"

$DownloadURL = Read-Host "Enter the Windows 11 ISO download link (in quotes)"
$ComputerName = Read-Host "Enter the target Computer Name"

# Check if the computer is online
if ($null -ne (Test-Connection -ComputerName $ComputerName -Count 1 -Quiet)) {

    # Start a remote PowerShell session
    Enter-PSSession -ComputerName $ComputerName

    # Ensure C:\temp exists
    if (!(Test-Path C:\temp)) {New-Item -Path C:\ -Name temp -ItemType Directory -Force}

    # Set download path
    $DownloadPath = "C:\temp\win11.iso"

    # Download Windows 11 ISO
    Invoke-WebRequest -Uri $DownloadURL -OutFile $DownloadPath

    # Mount the ISO
    $DiskImage = Mount-DiskImage -ImagePath $DownloadPath -StorageType ISO -NoDriveLetter -PassThru
    $ISOPath = (Get-Volume -DiskImage $DiskImage).UniqueId

    # Create a PSDrive for the mounted ISO
    New-PSDrive -Name ISOFile -PSProvider FileSystem -Root $ISOPath
    Push-Location ISOFile:

    # Find and run Setup.exe with upgrade parameters
    $SetupExe = (Get-ChildItem | Where-Object {$_.Name -like "*Setup.exe*"}).FullName
    $Arguments = "/auto upgrade /DynamicUpdate Disable /quiet /eula accept /noreboot"
    Start-Process -Wait -FilePath $SetupExe -ArgumentList "$Arguments" -PassThru

    # Clean up: Unmount ISO and remove PSDrive
    Pop-Location
    Remove-PSDrive ISOFile
    Dismount-DiskImage -DevicePath $DiskImage.DevicePath

    # Ask for a restart decision
    $YN = Read-Host "Do you want to restart? (Y/N)"
    if ($YN -like "*Y*") {Restart-Computer -Force}
    elseif ($YN -like "*N*") {Write-Host "Ask the user to restart."}
    else {Write-Host "Ok, whatever, ask the user to restart."}

} else {
    Write-Host "The target computer is not reachable. Check the network or hostname and try again."
}
Step 1: Generate the Windows 11 ISO Download Link
Before we can automate the upgrade, we need the direct download link for the Windows 11 ISO. Microsoft doesn’t make this easy—there’s no simple API to fetch it. Instead, you have to manually grab the link from their website.
This step is non-negotiable because Microsoft generates a unique download link each time, which expires after 24 hours. So if you’re thinking, “Can’t I just reuse an old link?”—nope, Microsoft shut that door. But don’t worry, it’s a quick process:
Scroll down to ‘Download Windows 11 Disk Image (ISO)’
Select Windows 11 (multi-edition ISO for x64 devices) from the dropdown.
Click ‘Download’ and select English (United States) as the language.
Click ‘Confirm’—Microsoft will generate a download button.
Right-click ‘64-bit Download’ and select ‘Copy link’ (This is the direct ISO link).
You’ll need this URL when running the PowerShell script, so paste it somewhere handy.
Now that we have the link, let’s move on to running the script!
Step 2: Running the PowerShell Script
Alright, you’ve got your Windows 11 ISO download link. Now it’s time to run the PowerShell script and start the upgrade. But before we do that, let’s talk about remote execution. This is part of the process to Automate Windows 11 Upgrade with PowerShell.
PowerShell remoting (aka WinRM) needs to be enabled on the target machine. If you’ve never set it up before, it’s kind of like getting a cat to sit still for a vet visit—it might resist at first, but once it’s done, life is easier.
Prerequisites for Running the Script
Make sure the following are true before running the script:
Your user account has admin privileges on both the local and remote machine.
WinRM (Windows Remote Management) is enabled on the target machine. Run this command on the remote PC to check:
winrm quickconfig
If WinRM isn’t enabled, you’ll need to set it up first.
PowerShell Execution Policy allows scripts to run. If needed, you can temporarily bypass restrictions with:
Set-ExecutionPolicy Bypass -Scope Process -Force
Running the Script
Once the prerequisites are in place, open PowerShell as Administrator on your local machine and run the script. When prompted:
Paste the Windows 11 ISO download link (from Step 1).
Enter the target computer’s name (the one you want to upgrade).
If all goes well, PowerShell will initiate a remote session, create a C:\temp folder, and start downloading the ISO to the remote machine.
Just like how a cat will eventually use the new bed if you keep putting treats in it, the script will do its job—as long as everything is set up correctly.
Next up: Downloading and Mounting the ISO!
Step 3: Downloading and Mounting the ISO
At this point, the PowerShell script is running, and the target computer is ready. Now comes the fun part—actually downloading and mounting the Windows 11 ISO.
If you’ve ever tried downloading a large file over a shaky network, you know it can be as frustrating as a cat deciding to sprint across the house at 3 AM for no reason. But don’t worry, the script handles it all automatically.
How the Script Handles the Download
Once you enter the download link and the computer name, the script:
Creates a C:\temp folder (if it doesn’t already exist).
Uses Invoke-WebRequest to download the ISO to C:\temp\win11.iso.
At this point, the Windows 11 setup files are accessible.
If you check File Explorer on the target computer, you should see a new virtual drive containing the ISO contents—like when a cat suddenly appears on your keyboard, except this time, it’s actually doing something useful.
Now that we have the ISO mounted, it’s time for the real action: starting the upgrade!
Step 4: Starting the Upgrade Process
Alright, the ISO is mounted, and we’re at the final stretch—actually running the Windows 11 upgrade. If everything has gone smoothly so far, congratulations! You’re officially ahead of the game.
Now, instead of manually clicking through the Windows setup (which is about as exciting as watching a cat stare at a wall for hours), PowerShell will automate the upgrade process using Setup.exe and a few command-line arguments.
Finding and Running Setup.exe
Since we mounted the ISO in the previous step, we now need to:
Find Setup.exe inside the mounted ISO
Run it with automation flags to start the upgrade silently
Here’s what each flag does when running Setup.exe:
/auto upgrade → Tells Windows to start an upgrade instead of a fresh install.
/DynamicUpdate Disable → Skips downloading the latest updates during the install (useful for speeding things up).
/quiet → Runs the installer in the background, so no annoying pop-ups.
/eula accept → Automatically accepts Microsoft’s End User License Agreement (because let’s be real, no one reads it).
/noreboot → Prevents an automatic restart so we can control when it happens.
What Happens Next?
Once this runs, the Windows 11 upgrade process kicks off in the background. There won’t be any flashy UI—just PowerShell doing its thing. You can check progress by looking at Task Manager on the target machine.
At this point, it’s like when a cat finally decides to nap on that expensive bed instead of the cardboard box—you’ve done all the hard work, and now it just has to finish on its own.
But there’s one last decision to make: When do we restart?
How are we feeling about Automate Windows 11 Upgrade with PowerShell so far?
Step 5: Restarting the Machine
At this point, the Windows 11 upgrade is in motion, but the installation won’t complete until the target machine restarts. Now, we could just force a reboot, but let’s be real—no one likes unexpected restarts (especially end users in the middle of something important).
So, instead of pulling the plug immediately, the script politely asks whether to restart now or later. Here’s how that works:
$YN = Read-Host "Do you want to restart"

if ($YN -like "*Y*") {
    Restart-Computer -Force
} elseif ($YN -like "*N*") {
    Write-Host "Ask the user to restart"
} else {
    Write-Host "Ok, whatever, ask the user to restart."
}
Breaking It Down
If the admin enters Y → The system restarts immediately.
If the admin enters N → A message reminds them to tell the user to restart manually.
If they enter anything else → The script shrugs and tells them to figure it out.
This gives IT teams a bit of flexibility, which is crucial in environments where timing matters—like avoiding a forced reboot during an important meeting (unless it’s for that one guy who never restarts his PC… then maybe it’s justified).
What Happens After Restart?
Once the machine reboots, Windows 11 will finish the upgrade process. The whole thing usually takes 30-90 minutes depending on the hardware. During this time, users will see the “Working on updates” screen—so if they call asking why their PC is taking forever, just tell them “It’s optimizing performance” (it sounds fancier than “it’s just installing”).
Final Thoughts
And that’s it! With this script, you can automate Windows 11 upgrades remotely with minimal effort. No more manual downloads, no more sitting through setup screens—just a smooth, scripted process. To Automate Windows 11 Upgrade with PowerShell makes life much easier.
Recap of the key steps:
Generate the ISO link manually from Microsoft’s website (because they make us).
Run the PowerShell script and provide the ISO link + target computer name.
Download and mount the ISO automatically.
Start the Windows 11 upgrade silently using Setup.exe.
Decide when to restart—now or later.
Now, go forth and upgrade with confidence! And if anything goes wrong, well… let’s just say this script is less stubborn than a cat, so it’s probably not the script’s fault.
What can we learn as a person?
Upgrading an operating system is a big change, but it’s the small steps that make it happen. You don’t just magically jump to Windows 11—first, you grab the ISO, then you run the script, then you mount the image, and finally, the upgrade takes place. One step at a time.
Turns out, our mental health works the same way.
A lot of us get caught up in the idea that improving our mood or reducing stress requires some huge effort—taking a long vacation, completely overhauling our routines, or mastering meditation overnight. But that’s just not how it works. Big upgrades don’t happen all at once.
Instead, try small upgrades for yourself, just like how we upgrade Windows in steps:
Clear out junk files → Declutter one small space
Just like a clean drive helps performance, tidying up one small area can help clear your mind.
Run a quick system check → Check in with yourself
Pause for a moment and ask: How am I feeling today? Just acknowledging your emotions can help.
Disable unnecessary background processes → Say “no” to one unnecessary thing
Reduce mental load by cutting out one thing that’s draining you—whether it’s skipping an unimportant meeting or ignoring a toxic group chat.
Reboot when needed → Take a short break
A quick restart helps a computer, and sometimes, five minutes away from your screen can work wonders for you too.
No Need for a Full Reinstall
You don’t need a full personality reboot or a total life upgrade to feel better. Small tweaks, small wins—they add up.
So while you’re waiting for that Windows 11 install to finish, maybe take just one small action for yourself. It doesn’t have to be big. Just enough to upgrade your mood one step at a time.
Last month, I had an app that had some issues for a single end user. I wasn’t sure why it was causing issues, but one of the troubleshooting steps we needed to do was uninstall it and have Intune reinstall it. We uninstalled the application. However, Intune, being Intune, sat there. We forced a sync, and nothing. I wish there was a redeploy option in the Intune interface, but there isn’t. So what can you do? Well, there is a small secret. Intune has registry keys that keep track of the deployments on the machine itself. These linger even after uninstalling the app. So, removing them is the gravey. So today we are going to force Intune apps to redeploy.
Intune Registry Keys / App ID Number
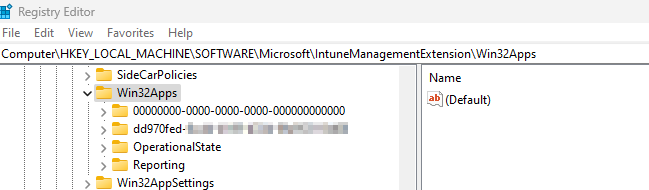
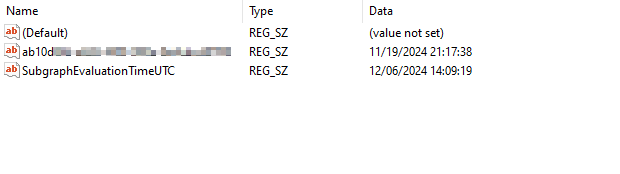
Intune’s registry keys are located in the Local Machine > Software > Microsoft > IntuneManagementExtension > Win32App. Let me tell you what now. My southern is going to come out some yall. This is where we can see the users. The system has it’s own user, which is the all zeros, but each other user has it’s own code.
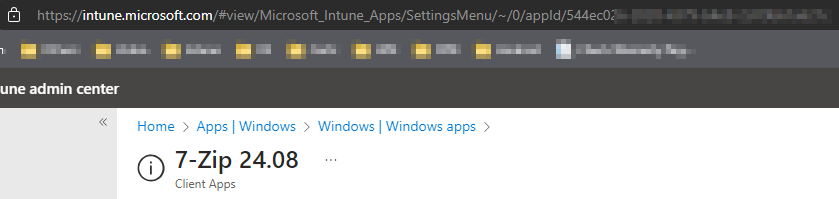
When you open this folder, you will be taken to a beautiful list of what? Yeah, it’s a mess. You need to know some things about this list in order to force intune apps to redeploy. You will need to have the app’s ID number. To get this number, you will need to navigate to your Intune. We will be heading to the app you want to uninstall. I’m doing my 7zip today as an example. At the end of the url, you will see the appID. That’s what you will need.
Once you have that code, you will be ready. What you will need to do now is delete the folder with that code. Then navigate to the GRS folder. It will have a bunch of hashes. No, not the drug, but math code. Wait, is hash still what people call it now days? I feel old. Anyway, you have two options here. One, you can go to the logs and search the logs for the hash. This can take a while, and shockingly, it is not reliable as logs get deleted. The other way is to go through this registry folder, folder by folder, until you find the key, as seen below. I prefer PowerShell. Once you delete the required registry keys, all you have to do is restart the Microsoft Intune Management Extension service.
Powershell To the Rescue
If you have read this blog long enough, you know PowerShell is coming somehow. Today’s script will save you a crap ton of time. Let’s dive right in.
There are many versions online for this script. Most use the logs, and that’s cool. This script doesn’t use the logs, and for a good cause. In my case, the logs were deleted. Why were they deleted, you shall ask? Humans, that’s always going to be my answer until it’s AI.
The break down
Let’s break this bad boy down, shall we? The first part of the script is the path we are going to be playing with, followed by the code of the app. You will have to grab this from your intune.
Next, we want to grab all the users. So, remember I said the system uses all zeros. Well, we want to exclude those. However, users use the hypens. It’s the Fantastic 4, hypens, not the Marvel characters. Using a basic where object, we sort through all of the ones that have our hypens and are not the system and drop their ID numbers into the users variable.
Now we start our loop. Everyone should like a good loop. Each user will have it’s own path. The first thing we run into is that the above command gave us HKEY_Local_Machine instead of a searchable HKLM. So we change them using the replace. Then we grab the userID for later. Finally, we grab all the applications. Notice the name is the new name we made. It’s important to have the HKLM: because without it, you will get an error with get-childitem. No candy was stolen from any children while writing this blog post.
Notice we are looking for the appid at the end. Sometimes, there will be more than one entry like this. To force Intune apps to redeploy, we must remove all of them. I liken them to bed bugs. Burn them all. With that said, we start our loop. For each App inside the applications. We will get the app name and then remove it. Once again, we used get-childitem. Goodness, I need to stop still items from kids. So we need to convert the name like we did before changing the HKEY_Local_machine to HKLM: with a nice replace. Once we have it, we delete the path and everything inside by force.
Now we need to handle the GRS side. The GRS keeps the datetime stamps. Like I said before, most people use the logs. Today we will navigate through the registry. The first thing we are going to do is set the path and get the kids on that path. This is where the UserID we made at the start of this big loop comes into play.
Now we have the children’s items. We start our looping. The first thing we get is our GRS properties with the get-itemproperty commands. Now here is the magic. A standard check has only 1 or maybe 2 items inside the folder. While more advanced items will have more than that. So, if we convert the properties into a Powershell object, we can count them.
Yes, the second line works. You can pretty much convert anything into a PowerShell object. All we have to do now is count how many counts per object are there. When we convert the item property into a powershell object, we gain a few extra items. So, anything past 5 in this case will be our special stuff. So, if it is past 5, we get to work.
We first look at the keys, looking for our fantastic 4. We will do this by calling the psobject.properties.name because it will be the name of the property. Then we will compare it to the appid. If they are the same, we correct the hkey_local_machine and drop our nuke, remove-item. Nested ifs are fun, but can get complex quick if you don’t watch out.
After the large loop of Fantastic Four, we have to restart the intune extension. So, using get service, we pipe it into restart service. Then we are done! Right? Well, kind of.
After the script has done it’s thing and stolen candy for kids and nuked stuff, you will need to resync the computer. You can do this via the Accounts setting, or you can do this via Intune. In my case, the application we were redeploying was our remote application. So, I had to do it via Intune.
Navigate to the device under Windows > Device Name and hit the sync button. Now you are done. Force Intune apps to redeploy, check.
What can we learn as a person?
Restarting is sometimes the only option. Taking a step back, clearing things away, and starting new is good, whether you’re troubleshooting an Intune app deployment or dealing with a hard time in life.
When an app in Intune stops working, we don’t just sit around and hope it gets fixed (at least for a while). After we empty the registry and do some troubleshooting, we gently push it to redeploy. Life is no different. When things don’t work out the way you expected, that’s okay; setbacks are inevitable. Starting over equalizes the situation; it’s not a sign of surrender.
Restarts, in reality, are chances for growth. By doing so, they demonstrate our flexibility, competence, determination and insight to put things right. Our fantasic four. When something feels stuck, whether it’s an app or your thinking, don’t be scared to reset. Do not be afraid, especially with our thinking. That’s where real change happens.
Recently, I was playing with Intune devices using graph API and managed devices. I was able to search for things like the device name with no issues, but when it came to the unique codes, I started having beautiful dyslexia issues. As I struggled, I asked myself how I could search this whole PowerShell object all at once, every value and every index. The first thought was to go property by property with a switch. But I asked myself, How can I reuse this function later? Let’s Search PowerShell Objects together.
The concept is that we feed the script the ps object we want to search in. This function will search the top level. Searching recursively is dangerous for weaker machines, but it’s fully doable with the above function. It’s time to break down this function.
Parameters
First, we want to look at the parameters. We need the Powershell object, then the string, and finally a nice little flag to give us more information. We are requiring the object and the search are both required because that’s what we need. The expand isn’t because we may not need everything.
The Search PowerShell Object Loop
This step is the meat and potato of the function. Here is how we are going to search the full object. We start off by looping the object. We want to use a foreach-object loop because of the beginning and simplicity of it all.
The foreach-object is treated like a function in some context. We have a beginning, process and ending flags. So we begin the loop with our index of zero. We do this to keep track of the index of the powershell object we are analizing. The process is where we begin.
The next step is to open the door of the PSobject. Once we crack the door we select the Properties information and start another loop through that.
$_.PSObject.Properties | ForEach-Object {}
This is where we can now search each object inside the object. At this point we are looking at a properity of an object that has been opened that is inside the main object. Confused yet, that’s ok. We are at the end of that trail. Next, we need to ask if the value of the current property is our search string. If it’s true, then we send back a ps object.
if ($_.Value -like "*$SearchString*") {
    [pscustomobject][ordered]@{
        Index = $index
        PropertyName = $_.Name
        Value = $_.Value
    }
}
Objects making objects, we are so in the .net work for sure.
What’s cool at this is the ps object is being returned to the Results. Finally, we do an index increase by using the index++.
$index++
Expanding
Now we have searched the powershell object, lets expand it. The code above grabs the index number. So we want to expand upon that. If you trigger the flag “Expand” we want to grab all the index number. First we take the results from the above and group them by group-object. We select the property of index. This will give us all of the options in a nice pretty package. So we then select the names. This will give us all the indexes for each item that was found and not multiple of the same. I
From there we start a for each loop. Here we display the objects index. We do this by having the main object with [#]. If expanding isn’t set, we just display the results.
Since this function does one level, you can use another powershell script that will search each level if it has an object. The only problem with this is, processing power. Powershell is not designed to be database software. So it’s best not to deep dive into an object like that.
What can we learn as a person?
It’s ok to find other solutions. Doing it the hard way only adds stress. But there is a point where you can spend more time automating than doing the work itself. So keep it balanced. You deserve that. Just like we search PowerShell objects, we should search for different ways to keep the balance in our life.
Ever found yourself tangled in the web of Exchange Online mailbox rules? Yeah, me too. It’s like trying to find a needle in a haystack, especially if you’re managing multiple mailboxes. Thankfully, I stumbled upon a nifty PowerShell script that makes this task a breeze. Let’s Get Mailbox Rules Using PowerShell.
Let’s Talk About Our Script
Before we jump into the script, let’s understand what it does. The PowerShell script Get-RASMailboxRules helps you retrieve mailbox rules for specific email addresses in Exchange Online. Whether you’re an IT admin juggling a dozen tasks or just someone who likes things neat and tidy, this script can save you a ton of time.
Breaking Down the Script
Here’s the full script for reference:
function Get-RASMailboxRules {
    [cmdletbinding()]
    param (
        [Parameter(
            ValueFromPipeline = $True,
            ValueFromPipelineByPropertyName = $True,
            HelpMessage = "Email Addresses",
            Mandatory = $true)][Alias('Mailbox','EmailAddress')][String[]]$Mailboxes
    )
    begin {
        # Checks if Exchange Online is connected
        if ($null -eq (Get-ConnectionInformation)) {Connect-ExchangeOnline}

        # Pulls all mailboxes from the $Mailboxes parameter and checks if they exist
        $Boxes = @()
        foreach ($box in $mailboxes) {
            Try {
                $Boxes += Get-Mailbox $box
            } catch {
                Write-Error "Error getting mailbox"
            }
        }
    }
    process {
        foreach ($mailbox in $Boxes) {
            $Rules = Get-InboxRule -Mailbox $mailbox.Name

            foreach ($Rule in $Rules) {
                $ruleDescription = $Rule.Description -join "`n"
                $Description = (($ruleDescription -split 'If the message:')[1] -split 'Take the following actions:')
                $ifMessage = ($Description[0].Trim() -replace "`t", "") -replace "\s*`n", ""
                $actions = ($Description[1].Trim() -replace "`t", "") -replace "\s*`n", ""

                [PSCustomObject]@{
                    MailboxName = $Mailbox.Name
                    Mailbox = $Mailbox.UserPrincipalName
                    RuleName = $Rule.Name
                    Enabled = $Rule.Enabled
                    ID = $Rule.RuleIdentity
                    IfMessage = $ifMessage
                    Actions = $actions
                }
            }
        }
    }
    end {
        Disconnect-ExchangeOnline -Confirm:$false
    }
}
What’s Happening Here?
Let’s break it down:
Parameters and Initialization:
The script takes email addresses as input through the $Mailboxes parameter.
It checks if Exchange Online is connected. If not, it connects using Connect-ExchangeOnline.
Fetching Mailboxes:
It loops through the provided mailboxes and tries to fetch their details using Get-Mailbox.
Any errors encountered during this process are caught and reported.
Processing Mailbox Rules:
For each mailbox, it retrieves the inbox rules using Get-InboxRule.
It parses the rules to extract the conditions (IfMessage) and actions (Actions).
Output:
It creates a custom PowerShell object for each rule, which includes details like mailbox name, rule name, enabled status, and more.
Finally, it disconnects from Exchange Online to clean up.
Key Points to Remember
Mandatory Parameter: The script requires at least one email address to be provided.
Error Handling: It gracefully handles errors when fetching mailbox details.
Custom Output: The output is a clean, readable list of mailbox rules with all the necessary details.
Wrapping up “Get Mailbox Rules using PowerShell”
And there you have it! A super handy PowerShell script to get mailbox rules using PowerShell in order. It’s efficient, straightforward, and takes the hassle out of managing mailbox rules. So next time you’re knee-deep in inbox rules, you know which script to pull out.
Happy scripting, folks! If you run into any issues or have questions, drop them in the comments below. Let’s keep the conversation going!
We use cookies to ensure that we give you the best experience on our website. If you continue to use this site we will assume that you are happy with it.