A new laptop boots up, the user signs in, and before they ever see a desktop Windows asks them to set up a PIN. Some of them think it is a scam. The rest type 1234 and get told no. That prompt is Windows Hello for Business, and Intune decides when it shows up and what the rules are.
What Windows Hello for Business is
Windows Hello lets people sign in with a PIN, their face, or a fingerprint instead of a password. Windows Hello for Business is the work version. It covers Entra ID and Active Directory accounts and adds the controls a company needs. The consumer version covers personal Microsoft accounts. Neither one works with local accounts.
People always ask why a short PIN is safer than a long password. The PIN only works on that one device. It never leaves the device and never gets stored on a server, so a stolen PIN is useless without the actual laptop. The TPM chip inside the laptop also locks things down after too many wrong guesses. Fingerprint and face data stay on the device too.
Every user needs a PIN, even if they only plan to use their face. The PIN is the fallback, and you cannot turn it off. Windows also rejects simple patterns like 1111, 1234, or 1357.
It is already on
Windows Hello for Business is turned on by default for Entra joined devices. That is why users get the PIN prompt even when nobody in IT configured anything.
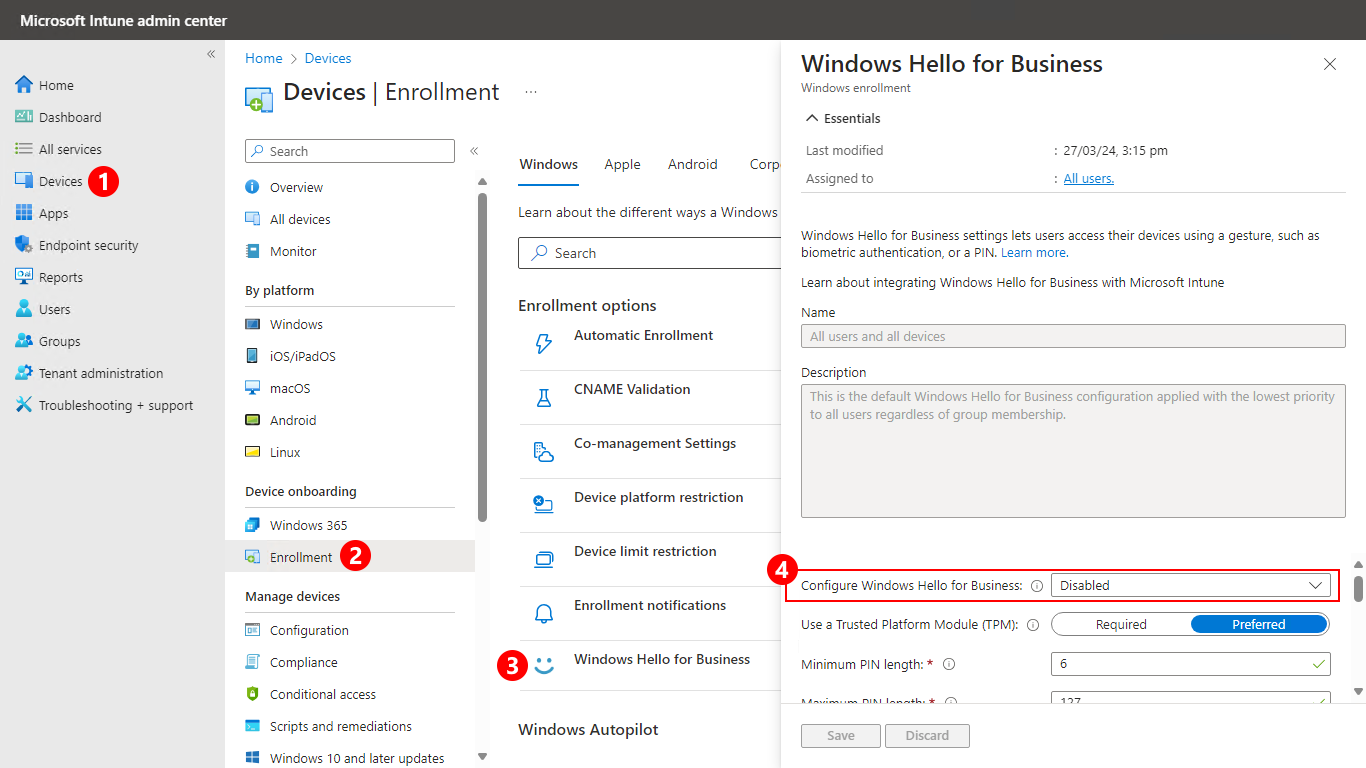
The tenant-wide setting lives in Intune admin center > Devices > Device onboarding > Enrollment. Stay on the Windows tab and click Windows Hello for Business. Configure Windows Hello for Business has three options:
Enabled: Turns it on and shows the PIN and biometric settings.
Disabled: Users cannot set up Windows Hello for Business during enrollment.
Not configured: Intune leaves whatever is already on the device alone.
The tenant-wide Windows Hello for Business setting under Devices > Enrollment > Windows. Source: Microsoft Learn.
This setting only applies when a device enrolls, so changing it later does nothing to devices you already have. It also hits every device that enrolls, no matter what group the user is in. Microsoft's own guidance is to leave this one Disabled and turn Windows Hello for Business on with a policy aimed at a group.
Turn it on with a policy
Intune admin center > Endpoint security > Account protection
Click Create Policy.
Set Platform to Windows and Profile to Account protection, then click Create.
Name it, set the Windows Hello for Business settings, and assign it to a group.
You can also build it in the settings catalog under the Windows Hello For Business category. Either way, these are the settings to look at:
Use Windows Hello For Business: Set to true to turn it on.
Require Security Device: Set to true to require a TPM chip.
Minimum PIN length: 6 by default, anywhere from 4 to 127.
Lowercase letters, uppercase letters, and special characters in the PIN: Each one can be allowed, required, or not allowed.
Allow biometric authentication and Use enhanced anti-spoofing, when available: These control face and fingerprint.
Enable Pin Recovery: Lets users reset a forgotten PIN without losing their keys.
A policy updates devices on the normal check-in schedule, which the tenant-wide setting never does. If you want the policy in place before a new user reaches the desktop, use the Enrollment Status Page. I walked through it in how Intune Autopilot works.
When settings collide
If a regular device passcode policy and a Windows Hello for Business policy both set PIN rules, the Windows Hello for Business policy wins. Mixing Group Policy and Intune for these settings is worse. When both exist, Group Policy wins and Windows ignores the Intune settings. The usual setting that makes Intune beat Group Policy does not apply here.
Hybrid joined devices and cloud Kerberos trust
You will see words like key trust, certificate trust, and cloud Kerberos trust. These only matter when people use Windows Hello for Business to reach on-premises Active Directory resources, like file shares. Cloud-only setups can skip this section.
For hybrid setups, Microsoft recommends cloud Kerberos trust. It is the only hybrid option that needs no certificates. Key trust and certificate trust both need a PKI, and certificate trust also needs AD FS. In the settings catalog, turn on Use Cloud Trust For On Prem Auth. The first time someone signs in with their PIN on a hybrid joined device, the device needs to reach a domain controller.
What the user sees
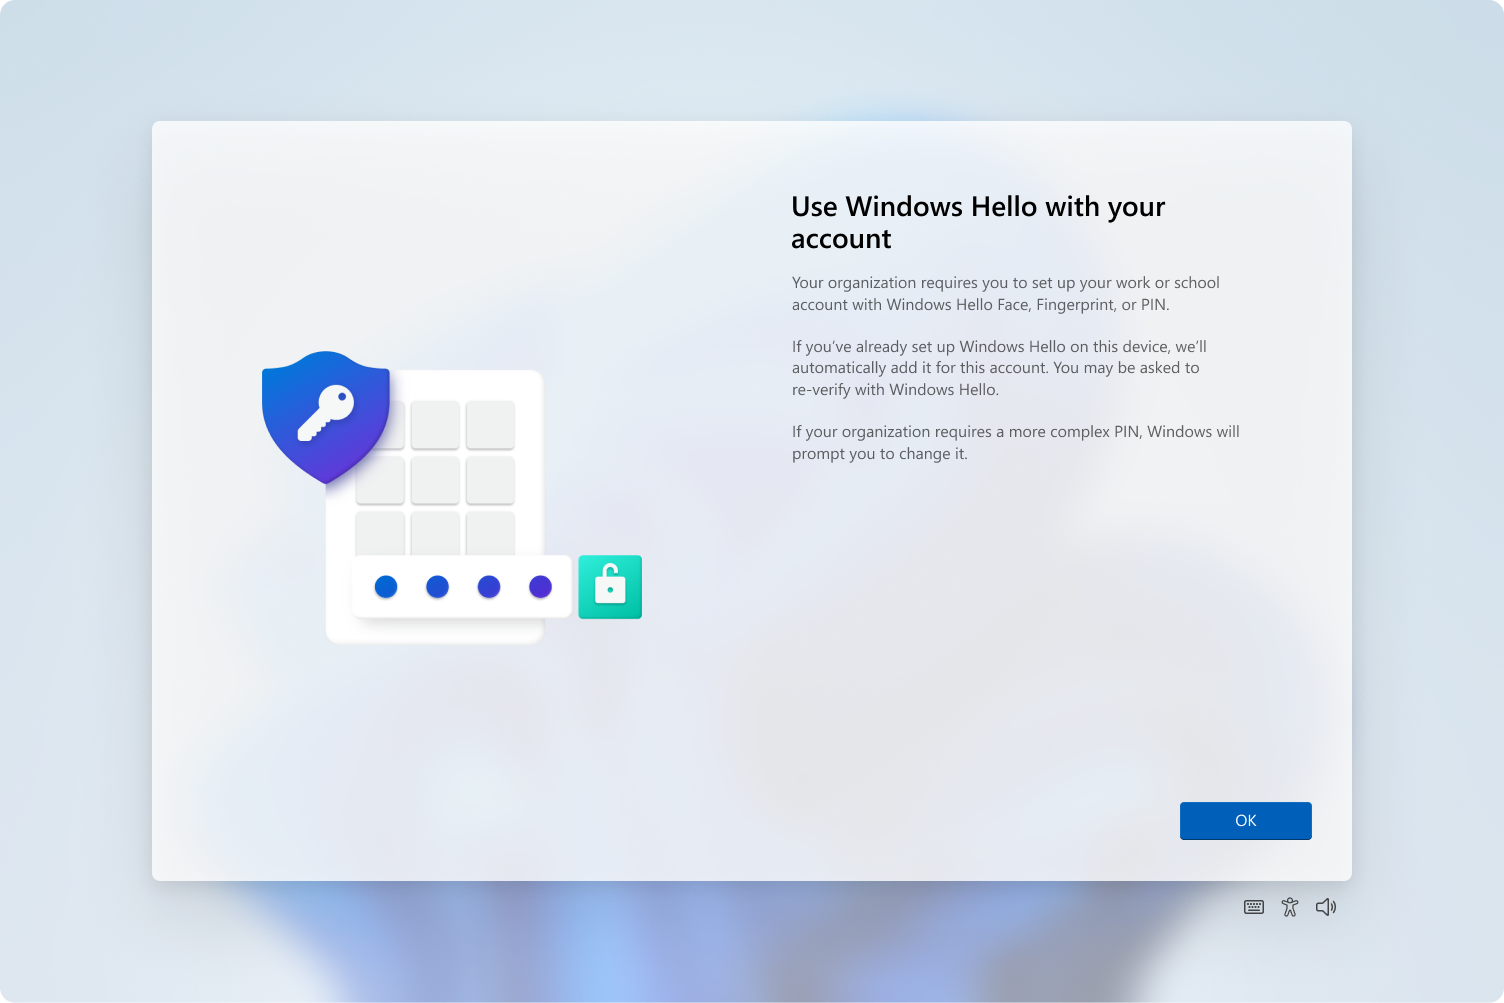
Setup starts right after the user profile loads and before the desktop shows up. Windows offers face or fingerprint first, which the user can skip. Then it shows the screen below, asks for multifactor authentication, and has them create the PIN.
The screen users see when their organization requires Windows Hello for Business. Source: Microsoft Learn.
The multifactor step is required. If the user never registered for MFA, Windows walks them through that first, so give new hires a heads-up.
Resetting a forgotten PIN
Users can do it from the lock screen by clicking Sign-in options, choosing the PIN option, and clicking I forgot my PIN. If they are already signed in, it is Settings > Accounts > Sign-in options > PIN (Windows Hello) > I forgot my PIN.
By default this is a destructive reset. Windows deletes the old PIN and keys and makes new ones. It works without any setup, but on a hybrid joined device it needs to reach a domain controller. A gentler reset that keeps the keys needs the Microsoft PIN Reset Service and the Enable Pin Recovery setting.
Troubleshooting Windows Hello for Business
Is it set up at all?
Run dsregcmd /status as the user and look under User State. NgcSet : YES means the user has a Windows Hello for Business key. If it says NO, look for the Ngc Prerequisite Check section. It lists IsDeviceJoined, PolicyEnabled, DeviceEligible, and SessionIsNotRemote, and the last line tells you whether Windows will try to set it up.
The prompt never shows up
Open Event Viewer and go to Applications and Services Logs > Microsoft > Windows > User Device Registration > Admin. Event 358 means setup will launch. Event 362 means it will not, and the event lists every check with a Yes or No so you can see which one failed. Setup never launches over Remote Desktop, so test while sitting at the actual machine.
Something went wrong
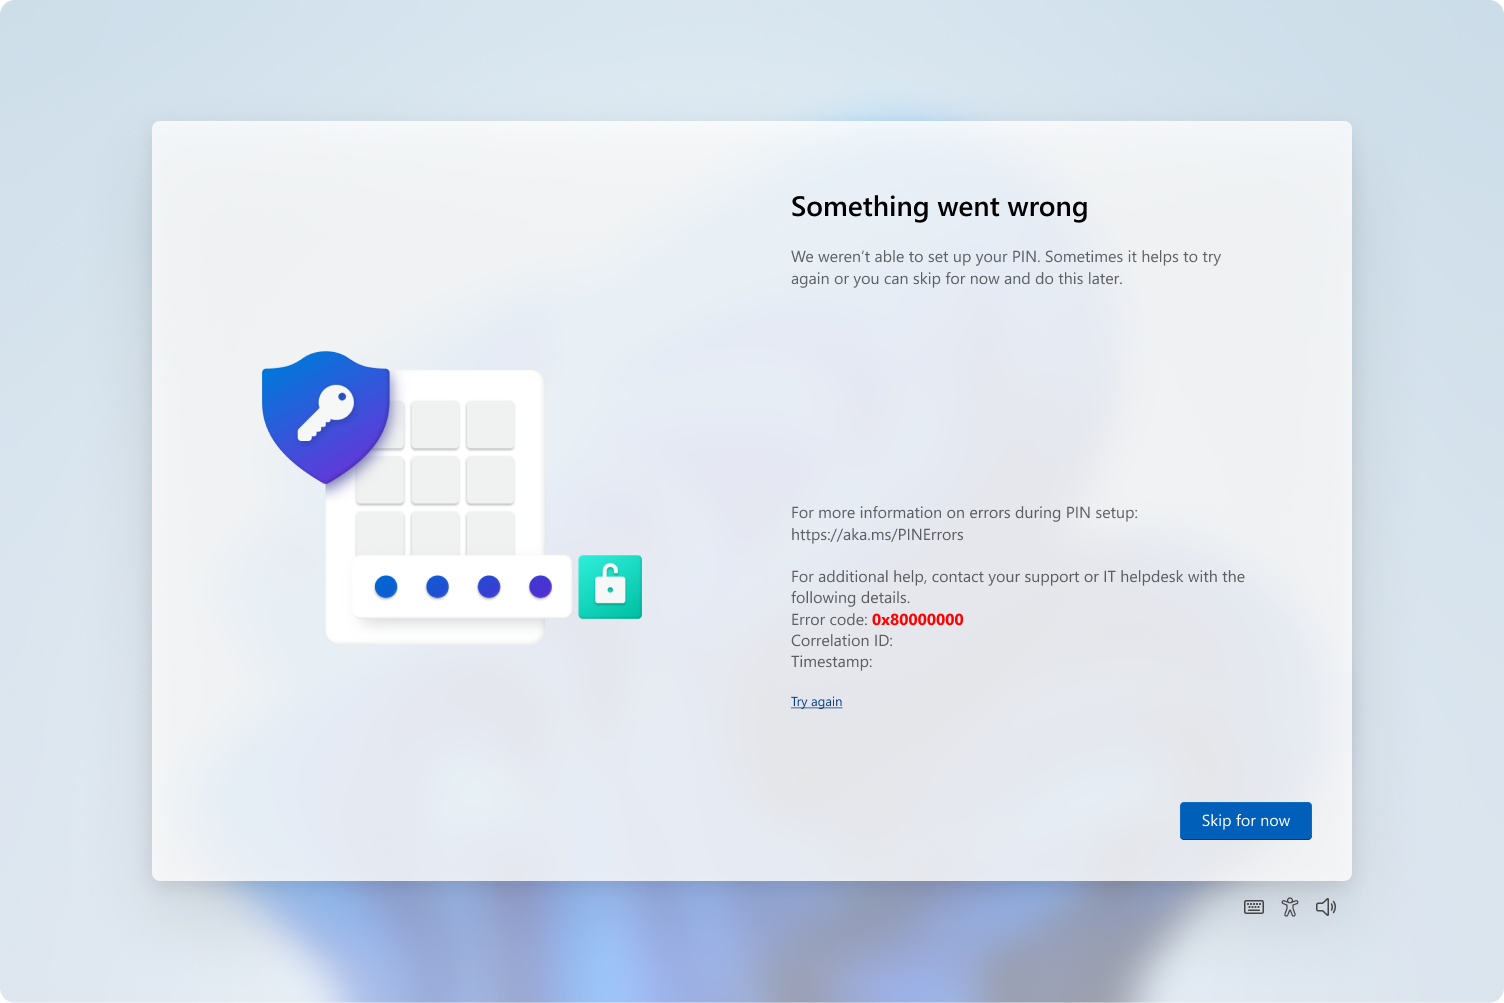
When setup fails, the user gets this screen with an error code. Have them send you a photo of it before they click anything.
The PIN setup error screen. The error code is the part you need. Source: Microsoft Learn.
0x80090029: The TPM is not set up on this device.
0x80090035: The policy requires a TPM and the device does not have one.
0x801C03ED: Multifactor authentication was required but did not happen.
0x801C000E: The user hit the device registration limit.
For anything else, try again, sign out and back in, and restart before you dig deeper.
Face or fingerprint not working
Enhanced sign-in security blocks external cameras and fingerprint readers, so a USB webcam may not be allowed. Enhanced anti-spoofing turns off face sign-in on cameras that do not support it. After too many failed tries, Windows disables the biometric until the user signs in another way. A restart does not bring it back.
The practical version
Set the tenant-wide Windows Hello for Business setting on purpose instead of living with the default, then turn it on with an Account protection policy in Intune for the groups that should have it. Use cloud Kerberos trust for hybrid devices. When a user has trouble, dsregcmd /status and the User Device Registration log will tell you why.
What can we learn as a person
You cannot turn off the PIN in Windows Hello for Business. Face and fingerprint are nice, but when the camera fogs up or the fingerprint reader decides it has never met you, Windows falls back to the PIN.
I have fancy options for bad days. A long walk, or a plan to journal that I follow about twice a year. They work great when everything else is working. When they fail, I find out I never set up a PIN. There is no simple, boring fallback I can reach for when I am too tired for the good stuff.
So what is your PIN? When the face and fingerprint version of you stops working, what is the plain thing you fall back on?
I once inherited a network with exactly one piece of documentation. A sticky note on a monitor that said the wifi password and nothing else. No IP scheme, no server list, no idea which of the four firewalls was actually live. I spent my first two weeks doing archaeology instead of work. That is the fear that made me systematic about this, so here is how to document a new environment in OneNote without it turning into another sticky note you lose.
Why OneNote for this
OneNote is free, it is already in your Microsoft 365 tenant, and it nests the way an environment actually nests. A notebook holds sections, sections hold pages, and pages hold your notes. That maps cleanly onto an environment that has categories, systems, and details. It also syncs through OneDrive or SharePoint, so the notebook is not trapped on your laptop where it dies with your laptop.
The search is the part you will love at 2am during an outage. Full text search across every page, including text inside pasted screenshots. You will find the one config note you wrote eight months ago by typing half a word.
Start a SharePoint site so the notebook has a shared home, not a personal one. Source: Microsoft Learn.
Put the notebook somewhere the team can reach
Before you type a single note, decide where the notebook lives. Not your personal OneDrive. If you get hit by a bus, or just quit, the documentation should not leave with you. Put it on a SharePoint site the team owns.
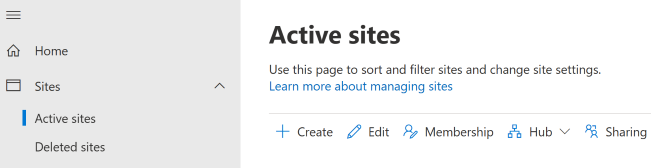
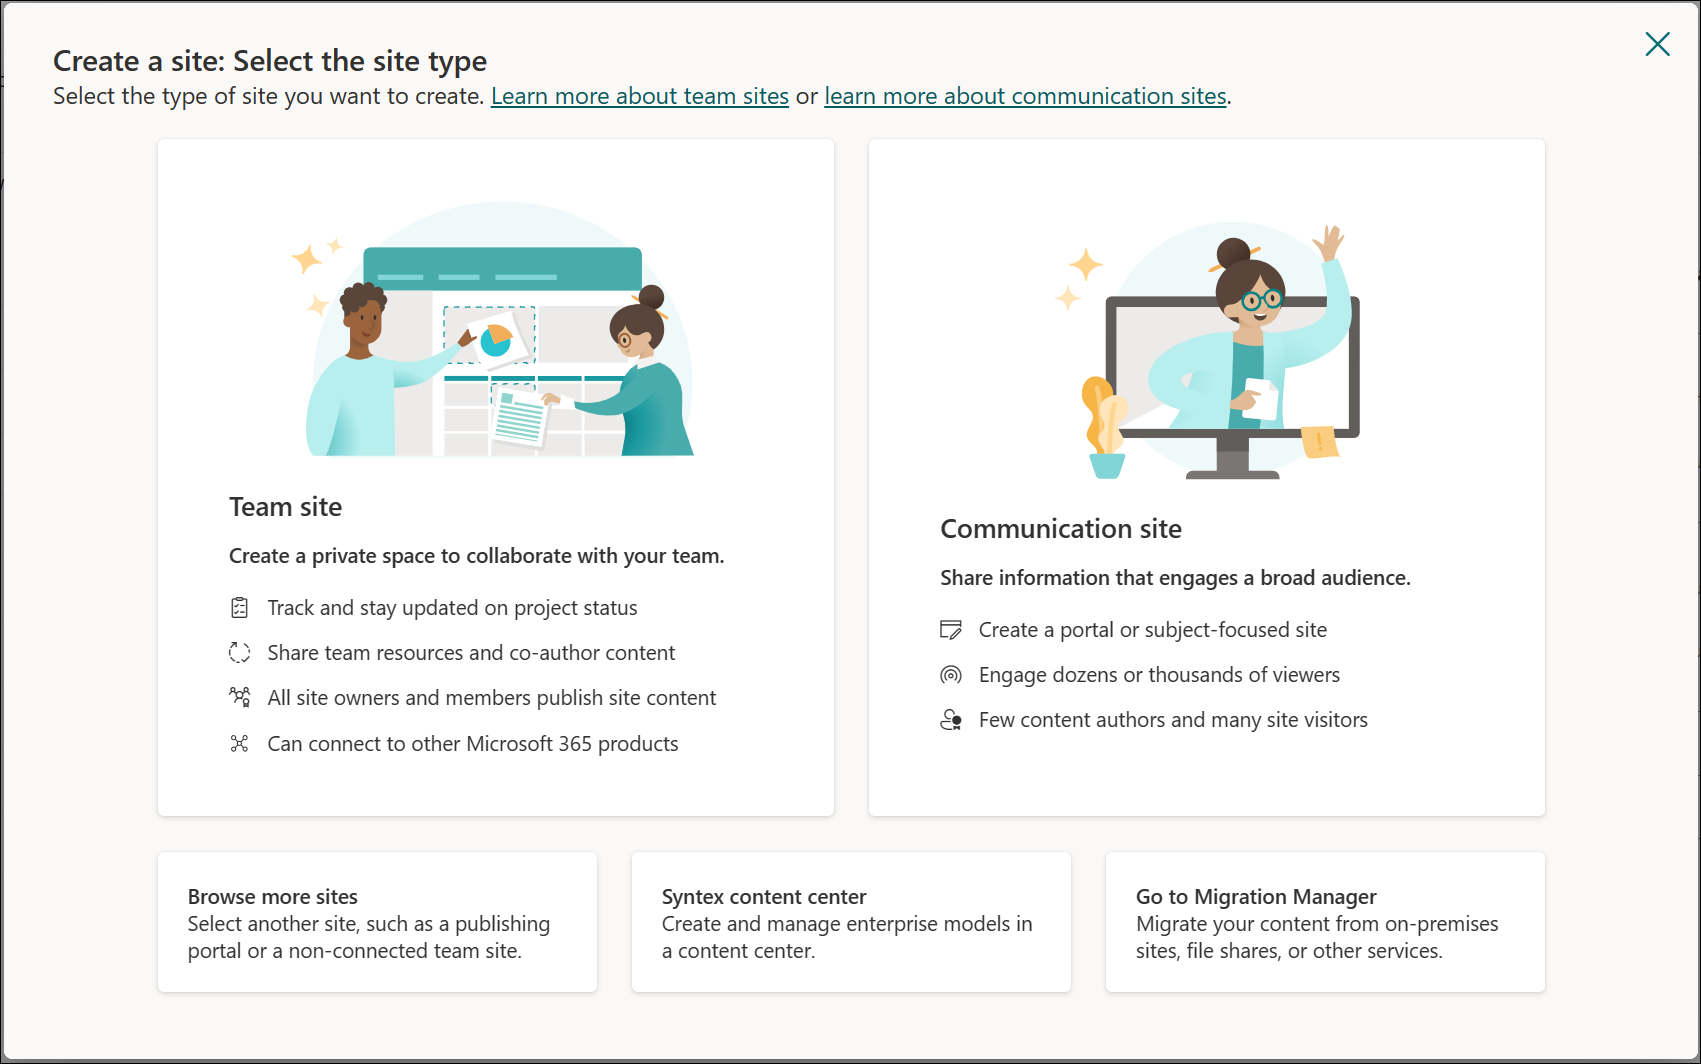
Make the site first. Go to the SharePoint admin center, open Active sites, select Create, and pick Team site. Name it something obvious like IT Documentation. Then in OneNote, choose Add notebook, and when it asks where to save, point it at that SharePoint site instead of your personal account. Now the whole team opens the same notebook, and permissions are controlled by the site, not by you emailing a file around.
A team site gives your documentation shared ownership and real permissions. Source: Microsoft Learn.
The sections you need to document a new environment
Sections are your categories. If you stare at a blank notebook you will freeze, so steal this starting set. Make each one a section, and add or drop as the environment tells you to.
Overview. Company contacts, site addresses, ISP and circuit info, main points of contact, and who to call when it is on fire.
Network. IP scheme, VLANs, subnets, DNS, DHCP scopes, firewall makes and models, VPN setup.
Identity. Domain name, domain controllers, Entra tenant, sync setup, admin accounts and how they are structured.
Servers. One page per server or VM. Role, OS, IP, host, what breaks if it goes down.
Endpoints. Intune or your MDM, imaging process, standard build, patching.
Applications. Line of business apps, where they run, vendor support lines, how they are licensed.
Backup and recovery. What is backed up, where it goes, retention, and the last time you actually tested a restore.
Vendors and licensing. Contracts, renewal dates, account numbers, support portals.
Runbooks. Step by step for the recurring tasks. Onboarding, offboarding, the printer thing everyone forgets.
Change log. Dated entries for anything you change. Future you will want this.
Inside each section, one page per thing. One page per server, one page per app. That keeps pages short and makes them linkable, which matters in a minute.
Linking to the password manager, not storing the passwords
This is the rule people break first and regret most. Do not put passwords in OneNote. OneNote is not a secrets vault. It has no real audit trail, and every sync copies those notes to more devices. A password manager exists for exactly this job, so let it do the job.
Instead, link out. Most password managers can produce a link or reference that points at a specific entry. In 1Password it is a private link on the item. Bitwarden, Keeper, and others have their own version of a deep link or item URL. Copy that link, then in OneNote highlight the text like domain admin credentials, and paste the link on it with Ctrl+K. Anyone with rights to the vault clicks through and lands on the real entry. Anyone without rights hits a wall, which is the point.
So the server page says what the account is and links to where the secret lives. The secret itself never touches the notebook. You get the convenience of one click without turning your documentation into the biggest security hole in the building.
Linking pages to each other
The thing that turns notes into documentation is cross links. Your app page should link to the server page it runs on. Your runbook should link to the identity page it references. In the desktop app, right-click any page tab and choose Copy Link to Page, then paste it wherever it belongs.
Do this and the notebook stops being a pile of pages and becomes a map. You click from the broken thing to the thing it depends on without searching. During an incident that is the difference between five minutes and fifty.
Where SharePoint carries more than the notebook
OneNote is great for notes, and clumsy for files. That is where the SharePoint site earns its keep beyond just hosting the notebook. Use a document library on the same site for the artifacts that do not belong pasted into a page.
Network diagrams and Visio files.
Exported configs, firewall rules, switch backups.
License PDFs and signed contracts.
Vendor quotes and warranty docs.
SharePoint keeps version history on every file, so when someone overwrites the good diagram with a bad one, you roll it back. Then link from the OneNote page to the library file, and your notes and your files point at each other instead of drifting apart.
Wrapping up
Start the site, save the notebook to it, build the sections from the list above, and make one page per system. Link credentials out to the password manager and never paste a secret. Cross link the pages so the notebook reads like a map, and hang the heavy files in a SharePoint library with version history. Done this way, how to document a new environment stops being a dreaded project and becomes a habit. It is not a weekend project. It is fifteen minutes every time you touch something, and in six months you have the documentation you wish you had inherited.
What can we learn as a person
The reason that undocumented network scared me so much is that I could not ask it anything. There was nobody to ask and nothing written down, so every answer had to be dug up the hard way. Documentation is really just a way of answering questions someone has not asked yet.
I am bad at asking questions in real life. I will spend an hour circling a problem alone rather than send a two line message to someone who already knows the answer. Part of it is pride, part of it is not wanting to bother anyone, and part of it is a quiet fear that needing to ask means I should have already known. So I dig through my own head like it is an undocumented server, when there is a person right there who is the documentation.
The best environments I have worked in were not the ones with the smartest people. They were the ones where asking a question was normal and cheap, where nobody made you feel small for not knowing. I want to be that for other people, and I am still learning to let other people be that for me. So what is the question you have been sitting on for a week, and who could you ask if you let yourself?
The lobby check-in PC has Solitaire open again. The warehouse PC that should only run the inventory app has six tabs of fantasy football. Windows kiosk mode locks a PC down to one app or a short list of apps. Shared PC mode handles the machines a dozen different people sign in to every week.
I covered Zebra kiosk mode for scanners before. This one is the Windows side.
Pick the right kind
Single-app kiosk: One app or Edge, full screen, running above the lock screen. Good for a sign-in tablet, a digital sign, or a lobby browser.
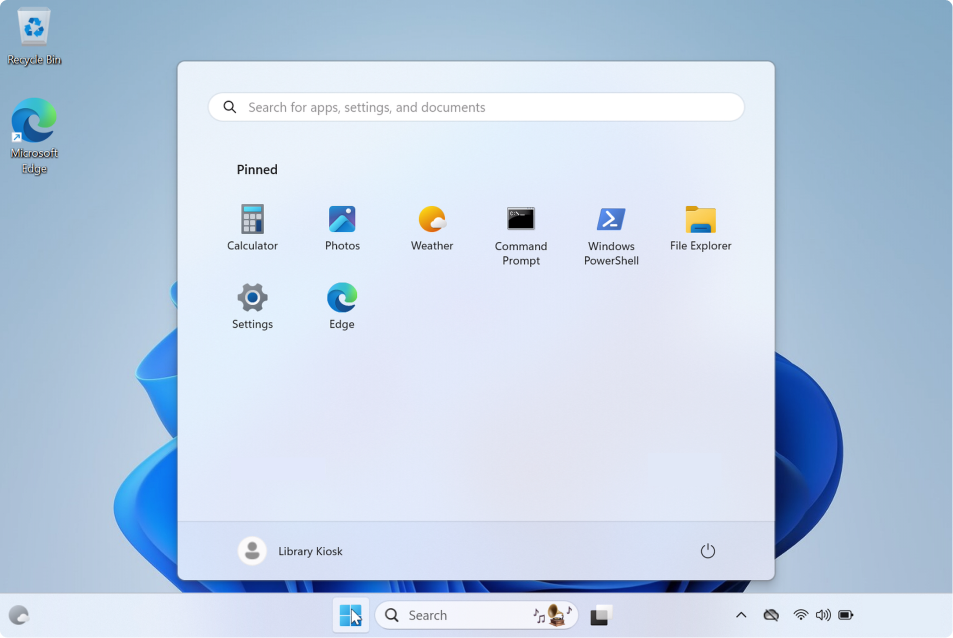
Multi-app kiosk: Windows 11 calls it a restricted user experience. Users get a normal desktop with a short Start menu and taskbar, and everything else is blocked.
Shared PC: A normal PC with many users, where Windows cleans up old accounts so the disk does not fill up.
Windows kiosk mode needs Windows Pro, Enterprise, Education, or IoT Enterprise. It only works at the console, not over Remote Desktop. Members of the local Administrators group never get the kiosk, which is handy for you and confusing if you test with an admin account.
Single-app kiosk in Intune
Intune admin center > Devices > Manage devices > Configuration > Create > New policy.
Set Platform to Windows 10 and later, Profile type to Templates, and pick Kiosk.
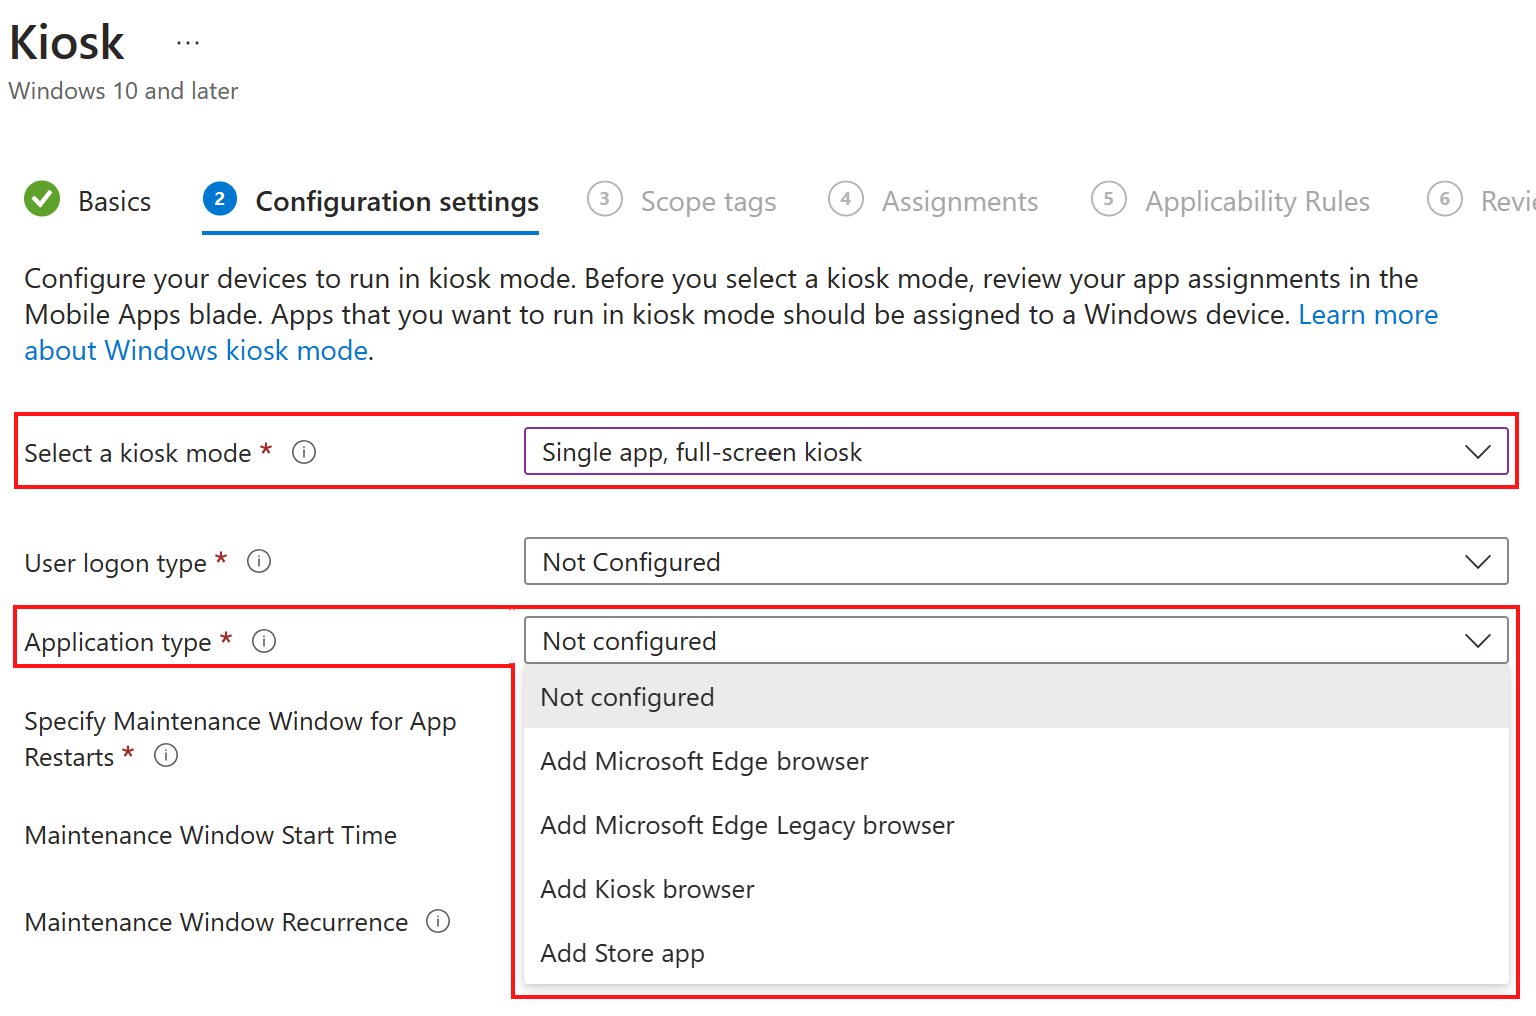
Set Select a kiosk mode to Single app, full-screen kiosk.
Set User logon type. Auto logon creates a local account that signs in by itself. You can also pick a local user account or an Entra user or group.
Set Application type to Add Microsoft Edge browser or Add Store app.
For Edge, enter the Edge Kiosk URL and pick a Microsoft Edge kiosk mode type: Digital/Interactive Signage or Public Browsing. Both run InPrivate.
Set Refresh browser after idle time, so the next person does not see the last person's page.
Assign it to a device group.
The single-app kiosk settings in the Intune Kiosk template. Source: Microsoft Learn.
Intune supports one kiosk profile per device. Edge kiosk mode needs Edge 87 or later. Edge's own settings, like its homepage or extensions, still come from a separate settings catalog policy.
Multi-app kiosk
The Kiosk template's Multi app kiosk option is documented for Windows 10, which reached end of support on October 14, 2025. For Windows 11, Microsoft points you to Assigned Access with an XML file. You deliver it with a custom profile, using the OMA-URI ./Vendor/MSFT/AssignedAccess/Configuration, and paste the XML in.
The XML lists the allowed apps, the Start pins, the taskbar layout, and who gets the experience. Entra users go in as AzureAD\ followed by their UPN, and Entra groups go in by object ID. Nested groups do not work. Microsoft's Assigned Access docs have ready-made examples, including an Edge kiosk, so copy one instead of starting from a blank file.
A Windows 11 multi-app kiosk with a short, locked-down Start menu. Source: Microsoft Learn.
Shared PC mode
For a PC that lots of people sign in to, like a library or a training room, use the Shared multi-user device template. On Windows 11 you can also use the Shared PC category in the settings catalog. Assign it to device groups.
Shared PC mode: Enabled.
Guest account: Guest, Domain, or both. Guest adds a sign-in option that needs no account.
Account Deletion: At storage space threshold, At storage space threshold and inactive threshold, or Immediately after log-out.
Start delete threshold(%) and Stop delete threshold(%): When Windows starts and stops cleaning up old profiles.
Inactive account threshold: How many days an unused account sticks around.
Maintenance start time (in minutes from midnight): 120 means 2 AM.
Let shared PCs sleep instead of shutting down, so maintenance can run overnight.
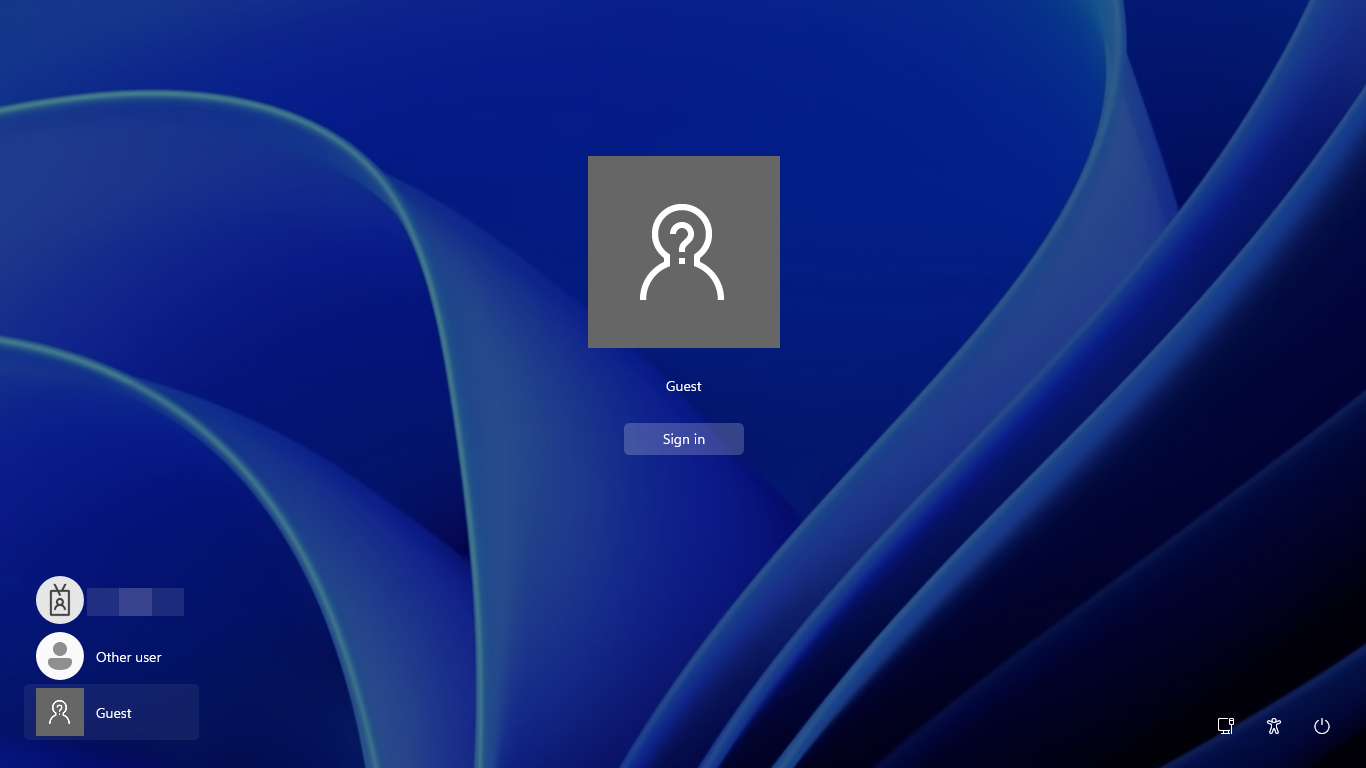
The Guest sign-in option on a Windows 11 shared PC. Source: Microsoft Learn.
Getting out and troubleshooting
Press Ctrl+Alt+Del to get out of a kiosk. It comes back on its own after about 30 seconds, so sign in with an admin account quickly.
Nothing changed after a new policy: Kiosk changes apply at the next sign-in. Sign out and back in.
Testing with an admin account: Local admins never get the kiosk.
Autologon stopped working: Exchange ActiveSync password rules, or a password that expired, can break it.
Multi-app kiosk signs the user straight back out: Conditional Access that needs MFA or terms of use blocks the sign-in. Exclude kiosk accounts from those policies.
Apps missing from Start: The app is not installed for that user, the shortcut does not exist, or an update changed the app's ID. Get-StartApps lists the current IDs.
Self-deploying Autopilot for kiosks: It needs TPM 2.0. Virtual machines fail with 0x800705B4.
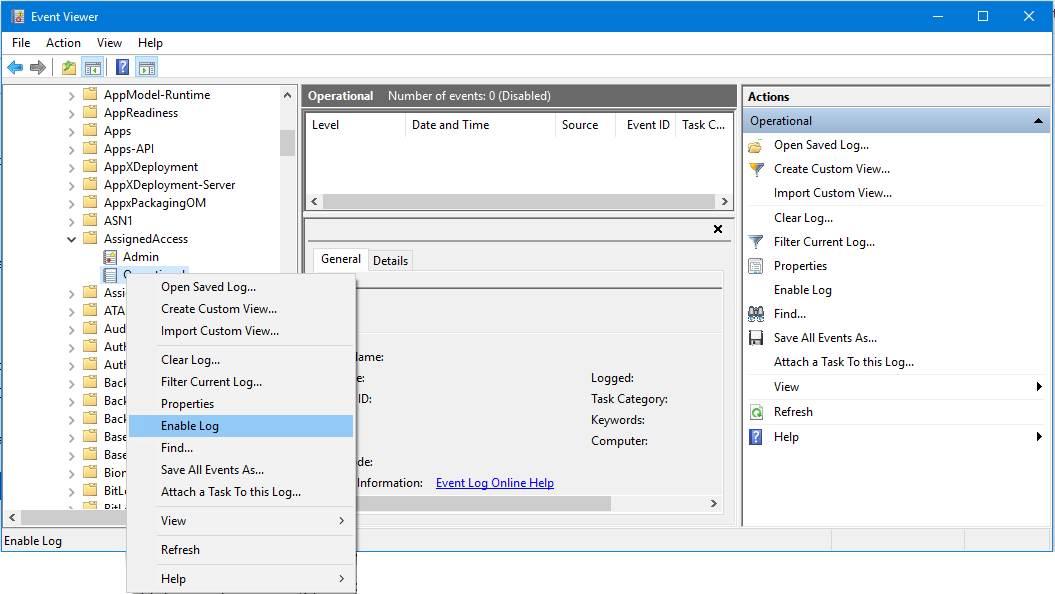
The Assigned Access log is off by default. In Event Viewer, go to Applications and Services Logs > Microsoft > Windows > AssignedAccess, right-click Operational, and choose Enable Log. Reproduce the problem, then read it. Shared PCs keep their own log at C:\Windows\SharedPCSetup.log.
Turning on the Assigned Access log in Event Viewer. Source: Microsoft Learn.
Setting up Windows kiosk mode that sticks
Pick single-app for signs and lobby browsers, multi-app for restricted desks, and Shared PC for rooms full of rotating users. Test Windows kiosk mode with a standard account, keep kiosk accounts out of MFA rules, and turn on the Assigned Access log before you need it.
What can we learn as a person
My favorite kiosk setting is Refresh browser after idle time. When nobody touches the screen for a few minutes, the browser resets. The next person gets a clean start instead of whatever the last person left open.
I do not have that setting. A rough call at four o'clock is still on my screen at dinner. My family walks up and gets the last person's page, the tone and the short answers, none of which was meant for them.
What is still open on your screen from the last person? And how long would your idle timer need to be before the next one gets a clean start?
Someone on the helpdesk asked me "should I just wipe it" about a laptop heading back into the pool for a new hire. I asked what they actually wanted to happen after. They didnt know there was a difference. That conversation is basically why this post exists. Intune wipe vs Fresh Start trips people up constantly, and picking the wrong one costs you real time later.
Intune wipe vs Fresh Start vs Retire: the short version
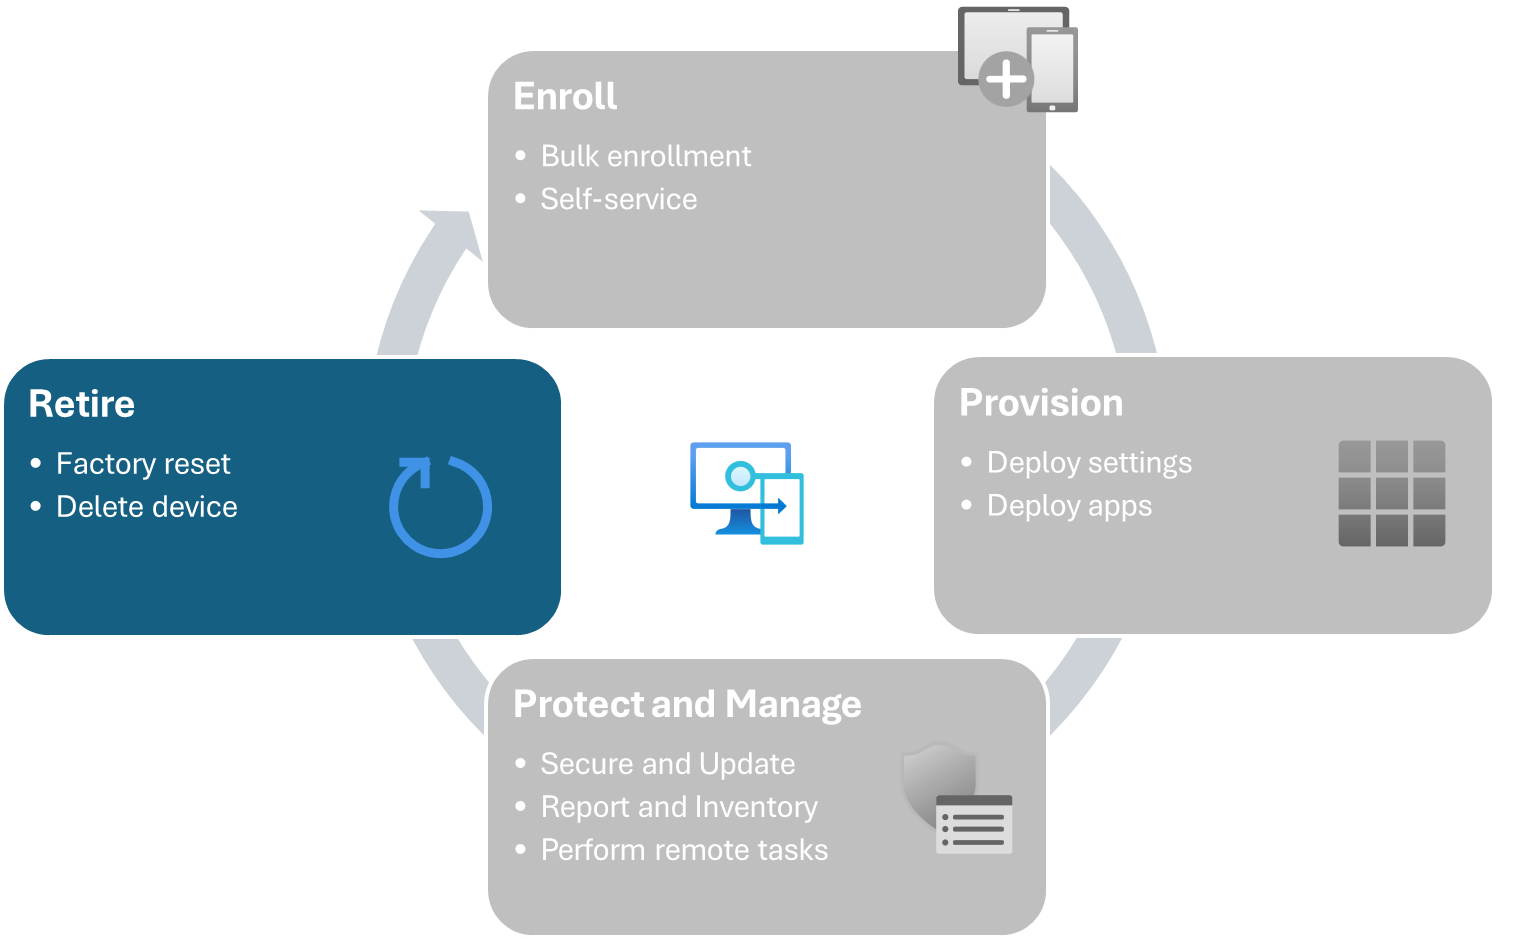
Wipe, full factory reset, removes everything, device goes back to out of box experience
Fresh Start, removes manufacturer bloatware and reinstalls Windows, can optionally keep user data and enrollment
Retire, removes company data and unenrolls the device, but leaves personal files and the OS alone
Autopilot Reset, wipes user data but keeps the device enrolled and Entra joined the whole time
Each one solves a different problem. Grabbing the wrong one is how you end up re-imaging a machine that just needed a lighter touch. Or handing off a "wiped" laptop that still has someone's personal files sitting on it.
Wipe: the full factory reset
Wipe restores a Windows device to factory settings. All data, apps, and settings get removed. Once it finishes, the device sits at the out of box experience screen, ready for whoever unboxes it next.
The three wipe options
Wipe device, but keep enrollment state and associated user account, resets the device but keeps it enrolled in Intune. MDM policies get removed, the device itself stays registered.
Wipe device, and continue to wipe even if device loses power, the nuclear option. Overwrites free space so nothing's recoverable. Built for lost or stolen devices, but it can leave a device unable to boot again if the wipe gets interrupted.
No options selected, the default full wipe. Removes MDM enrollment along with everything else.
A wiped device lands back on the out of box experience. Source: Microsoft Learn.
Does Wipe remove BitLocker?
Not in the sense of stripping the encryption off cleanly. A wipe destroys the underlying data as part of the factory reset, so the question mostly stops mattering. With the "continue to wipe even if device loses power" option specifically, watch out. Microsoft's own troubleshooting docs warn that BitLocker encrypted devices can fail to restart afterward. If that happens, you're looking at bootable media and a manual Windows reinstall, not a quick fix.
This is different from what happens on Retire, which I'll get to in a second. Retire actively suspends BitLocker and removes key protectors because it leaves the disk intact. Wipe doesnt need to bother, since the reset itself makes the old data unreadable anyway.
Does Wipe remove Autopilot registration?
No, and this one catches people off guard. Wiping a device doesnt touch its Windows Autopilot registration at all. The hardware hash stays registered to your tenant. That's actually useful. It means a wiped device runs straight back through your Autopilot deployment profile on next boot instead of landing on a generic setup screen.
If you genuinely want the device gone from Autopilot too, that's a separate manual step. Go to Devices > Enrollment > Windows Autopilot > Devices, find the device, and deregister it there. Wipe and Autopilot deregistration are two different actions, not one.
Fresh Start: cleaning without starting completely over
Fresh Start reinstalls the latest version of Windows and strips out whatever bloatware the manufacturer shipped with it. Unlike Wipe, it gives you a real choice about what survives.
Select Retain user data on this device and the machine stays Entra joined. It automatically re-enrolls in Intune once a licensed user signs back in. It also keeps the contents of the user's home folder while clearing out apps and settings. Skip that option and the device drops all the way back to a fresh OOBE completed state, keeping only the built in local administrator account. BYOD devices get fully removed from Entra ID and Intune in that case.
Fresh Start is the one to reach for when a machine feels sluggish or cluttered. You dont actually want to lose the person's files or start enrollment over from scratch.
Retire: pulling company data off, nothing else
Retire unenrolls a device from Intune and strips out managed apps, profiles, and settings, but it leaves personal files completely alone. This is the one built for BYOD, when someone's leaving the company and its their own phone or laptop.
Does Retire touch BitLocker?
Yes, and this is worth knowing before you click it. If you retire or delete an Entra joined device thats BitLocker protected, Intune triggers a sync. That sync removes the key protectors and suspends BitLocker on the OS volume. Microsoft does this on purpose, to avoid leaving a device stuck encrypted with no recovery path once its Entra object disappears. Back up the BitLocker recovery key and any local admin credentials before you retire a device, just in case.
Retire sits at the end of the device lifecycle, removing company data without touching personal files. Source: Microsoft Learn.
Autopilot Reset: the one people forget exists
Autopilot Reset wipes user data, settings, and apps, then reapplies your original Autopilot configuration automatically. Wi-Fi profiles, region, and keyboard settings survive the reset. The device stays enrolled in Intune and joined to Entra ID the entire time, no re-registration needed.
This is the fast option for repurposing a device between users inside the same organization. Think a shared classroom laptop going to a new student, or a desk machine getting reassigned. It skips the reimaging step entirely.
Autopilot Reset lands the device straight back at sign-in, still enrolled. Source: Microsoft Learn.
Which one do you actually want
Device leaving the org entirely, or going to service for repair: Wipe
Machine feels cluttered but the same person keeps using it: Fresh Start, with retain user data checked
BYOD device, employee's leaving, only company data needs to go: Retire
Reassigning a corporate device to a new person inside your org: Autopilot Reset
Putting it together
Weighing Intune wipe vs Fresh Start vs Retire really comes down to one question: who's keeping the device, and what needs to survive on it. Wipe assumes nobody's coming back to it. Fresh Start assumes the same person is, just with a cleaner slate. Retire assumes the person's keeping the hardware but you're taking your data back. Autopilot Reset assumes the device is staying in your fleet, just changing hands. Match the action to that answer and you'll stop reaching for the nuclear option when a lighter touch would've done the job.
What can we learn as a person
I think about Retire a lot actually, the fact that it exists as its own separate action from Wipe. Somebody at Microsoft decided that removing yourself from something doesnt have to mean destroying the whole thing. You can pull your data back out, close your part of it cleanly, and leave the rest of the person's life untouched. Not everything needs the nuclear option just because it's ending.
I dont think we're always great at that distinction with our own endings. A friendship changes shape, and we either keep pretending its exactly the same, or we wipe it completely and never speak again. There's rarely a Retire option in how we handle it. Something that lets us take our part back without torching everything the other person still has.
Where in your life are you reaching for Wipe when what the situation actually needed was Retire?
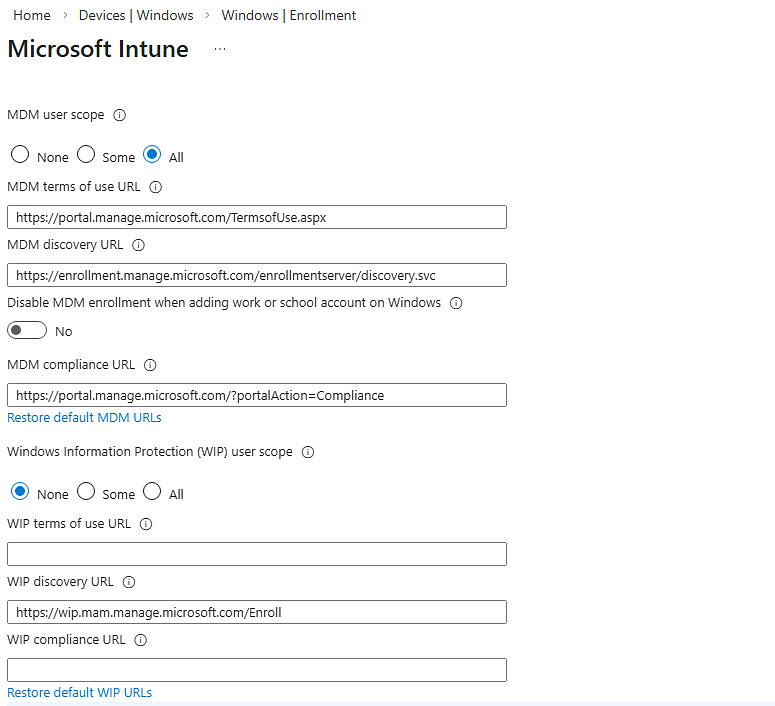
Someone opened their Entra mobility blade and saw a setting called WIP user scope sitting next to MDM user scope. They asked me what it did. Fair question. The honest answer is a little sad. It's not much anymore. So what is WIP, why is that scope still staring at you, and should you touch it? Lets sort it out.
What is WIP?
WIP stands for Windows Information Protection. It's a lightweight, built-in Windows feature that separates corporate data from personal data on the same device. The goal was simple. Let people use one laptop for work and life without leaking company files into personal apps. No switching profiles or environments all day.
Under the hood, WIP tags and encrypts enterprise data and watches how apps move it around. It can also wipe just the company data off a personal device. The personal photos and apps stay untouched. That selective wipe was the party trick everyone liked.
The name it used to have
Before it was WIP, Microsoft called it Enterprise Data Protection, or EDP. You'll still trip over the old name in the plumbing. The configuration service provider that drives it is literally named EnterpriseDataProtection, and app resource files reference EDPAUTOPROTECTION. Same feature, older label.
The scope setting has its own naming history too. That blade in Entra used to be called Mobility (MDM and WIP). Microsoft later renamed it to Mobility (MDM and MAM), so depending on when your tenant was born, you might see either.
So what is the WIP user scope, specifically?
The WIP user scope decides which users get WIP autoenrollment applied to their Windows devices. It lives right next to MDM user scope in the same blade, and it takes the same three values.
None, nobody gets WIP autoenrollment.
Some, only members of the Entra groups you pick.
All, every licensed user.
To find it: Microsoft Entra admin center > Mobility (MDM and MAM) > Microsoft Intune. WIP user scope sits in the same pane as MDM user scope. The idea was a split. MDM user scope enrolled the whole device. The WIP scope let you manage just the Windows apps and their data, no full enrollment needed.
The user scope model in the Entra Mobility blade. WIP user scope sits beside MDM user scope shown here. Source: Microsoft Learn.
Key features worth knowing
Data separation without profile switching. Corporate and personal data live side by side, tagged behind the scenes.
Encryption and selective wipe. Company data gets encrypted, and you can pull just the company data off a personal device on unenroll.
Enlightened versus unenlightened apps. Enlightened apps know the difference between work and personal data. Unenlightened apps get treated as all-or-nothing.
Two enrollment states. With enrollment means MDM manages the whole device. Without enrollment, called MAM, managed only the apps. The without-enrollment path is now deprecated, so you cant create new unenrolled WIP policies.
The four protection modes
This is the part that actually decides how WIP feels to your users. A WIP policy runs in one of four modes, from strict to off.
Mode
What it does
Block
Stops risky data sharing outright. The user cant complete the action.
Allow Overrides
Warns the user, but lets them override and share anyway. The override gets logged to your audit trail.
Silent
Logs quietly in the background. Only hard violations, like unauthorized network access, get stopped.
Off
No protection and no auditing. Windows even tries to decrypt previously tagged files.
Microsoft's own advice was to start in Silent or Allow Overrides, confirm your protected app list is right, and only then tighten to Block. Jump straight to Block on day one and you'll spend the week fielding tickets from people whose normal work suddenly got denied.
Purview Endpoint DLP is what Microsoft points you to now instead of WIP. Source: Microsoft Learn.
Phones, laptops, and where WIP actually applied
WIP was always Windows only. It never ran on an iPhone or an Android device. If someone says they put WIP on their team's iPhones, they're confused. They mean App Protection Policies, the separate MAM feature for iOS and Android. Here's the honest matrix.
Device
WIP?
What you actually use
Windows 10 / 11 laptop or desktop, MDM enrolled
Yes, through Windows 11 23H2
WIP with enrollment
Windows 10 / 11 personal, unenrolled
Deprecated
Was WIP without enrollment, no new policies
Windows 10 Mobile phone
Historically yes
Platform is end of life, so effectively none
iPhone or Android phone
No, never
App Protection Policies (MAM)
Windows 11, version 24H2 and later
Removed
Purview DLP
The part you cant skip: WIP is deprecated
Microsoft announced the sunset of WIP in July 2022. It still works on supported Windows versions, but it gets no new features. Microsoft removed it entirely starting in Windows 11 version 24H2. The without-enrollment flavor is already gone for new policies.
For anything new, Microsoft points you at Microsoft Purview Information Protection and Purview Data Loss Prevention, including Endpoint DLP. That's the modern path, and it's where the same data-separation job now lives. If you want the deeper story on what Purview can and cant see, I wrote about that in does Intune monitor your activity.
Putting it together
WIP is Windows Information Protection, formerly Enterprise Data Protection, and the WIP user scope in Entra just controlled which Windows users it autoenrolled. It ran in four modes from Block to Off, and it only ever touched Windows. For phones you were always using App Protection Policies instead. It's deprecated now, gone in Windows 11 24H2, and Purview DLP is the replacement. If you still see the scope in your tenant, leave it at None unless you have a specific legacy reason. Put your energy into the MAM and DLP tools that are still alive.
What can we learn as a person
The four protection modes stuck with me, because they're really a scale of how rigid you're willing to be. Block never bends. It stops everything it doesn't like, and users route around it or revolt. Off bends so completely it holds nothing up. The modes that actually worked in the real world were the ones in the middle, the ones that gave a little.
Skyscrapers do this on purpose. A tall building is engineered to sway in the wind, sometimes a few feet at the top. If it stood perfectly rigid, the force of the sky pushing on it would crack it and bring it down. The sway is not weakness. The sway is the whole reason it stays standing.
I've been Block mode with people I love. Firm on every rule, no override, and it didnt make me strong, it just made me brittle and made them route around me. But I've also been Off, so flexible about everything that I stopped holding anything up, myself included. The trick I'm still learning is the sway. Enough give to survive the pressure, enough spine to not fall over. So where in your life are you running in Block mode when the wind is asking you to sway a little?
A manager walked over to my desk holding a brand new Android phone and asked me to "put it in the business manager." I knew what they meant, sort of, but that phrase does not map to any single button in Intune. Android has a whole family of ways to run a device, and the words people use for them are a mess. Business manager, work profile, kiosk, COPE, COSU, fully managed. So lets untangle the Android Enterprise management types, figure out what each one actually does to a phone, and how you pick the right one before you hand hardware to a human.
First, the thing everyone calls "the business manager"
When someone says business manager, they almost always mean Managed Google Play. It is Google's enterprise app store, and it is the connection that makes every other Android option possible. You link your Intune tenant to a managed Google Play account once. After that, Intune can push apps, enforce policy, and enroll corporate devices.
You set it up under Devices > Enrollment > Android tab > Managed Google Play. As of August 2024 you can bind it with your Microsoft Entra account instead of a throwaway Gmail address, and that is the path Microsoft now recommends. The moment you connect, Intune drops five helper apps into your console automatically. Intune, Authenticator, Company Portal, Managed Home Screen, and Microsoft Launcher. You did not add them. They just show up because the plumbing needs them.
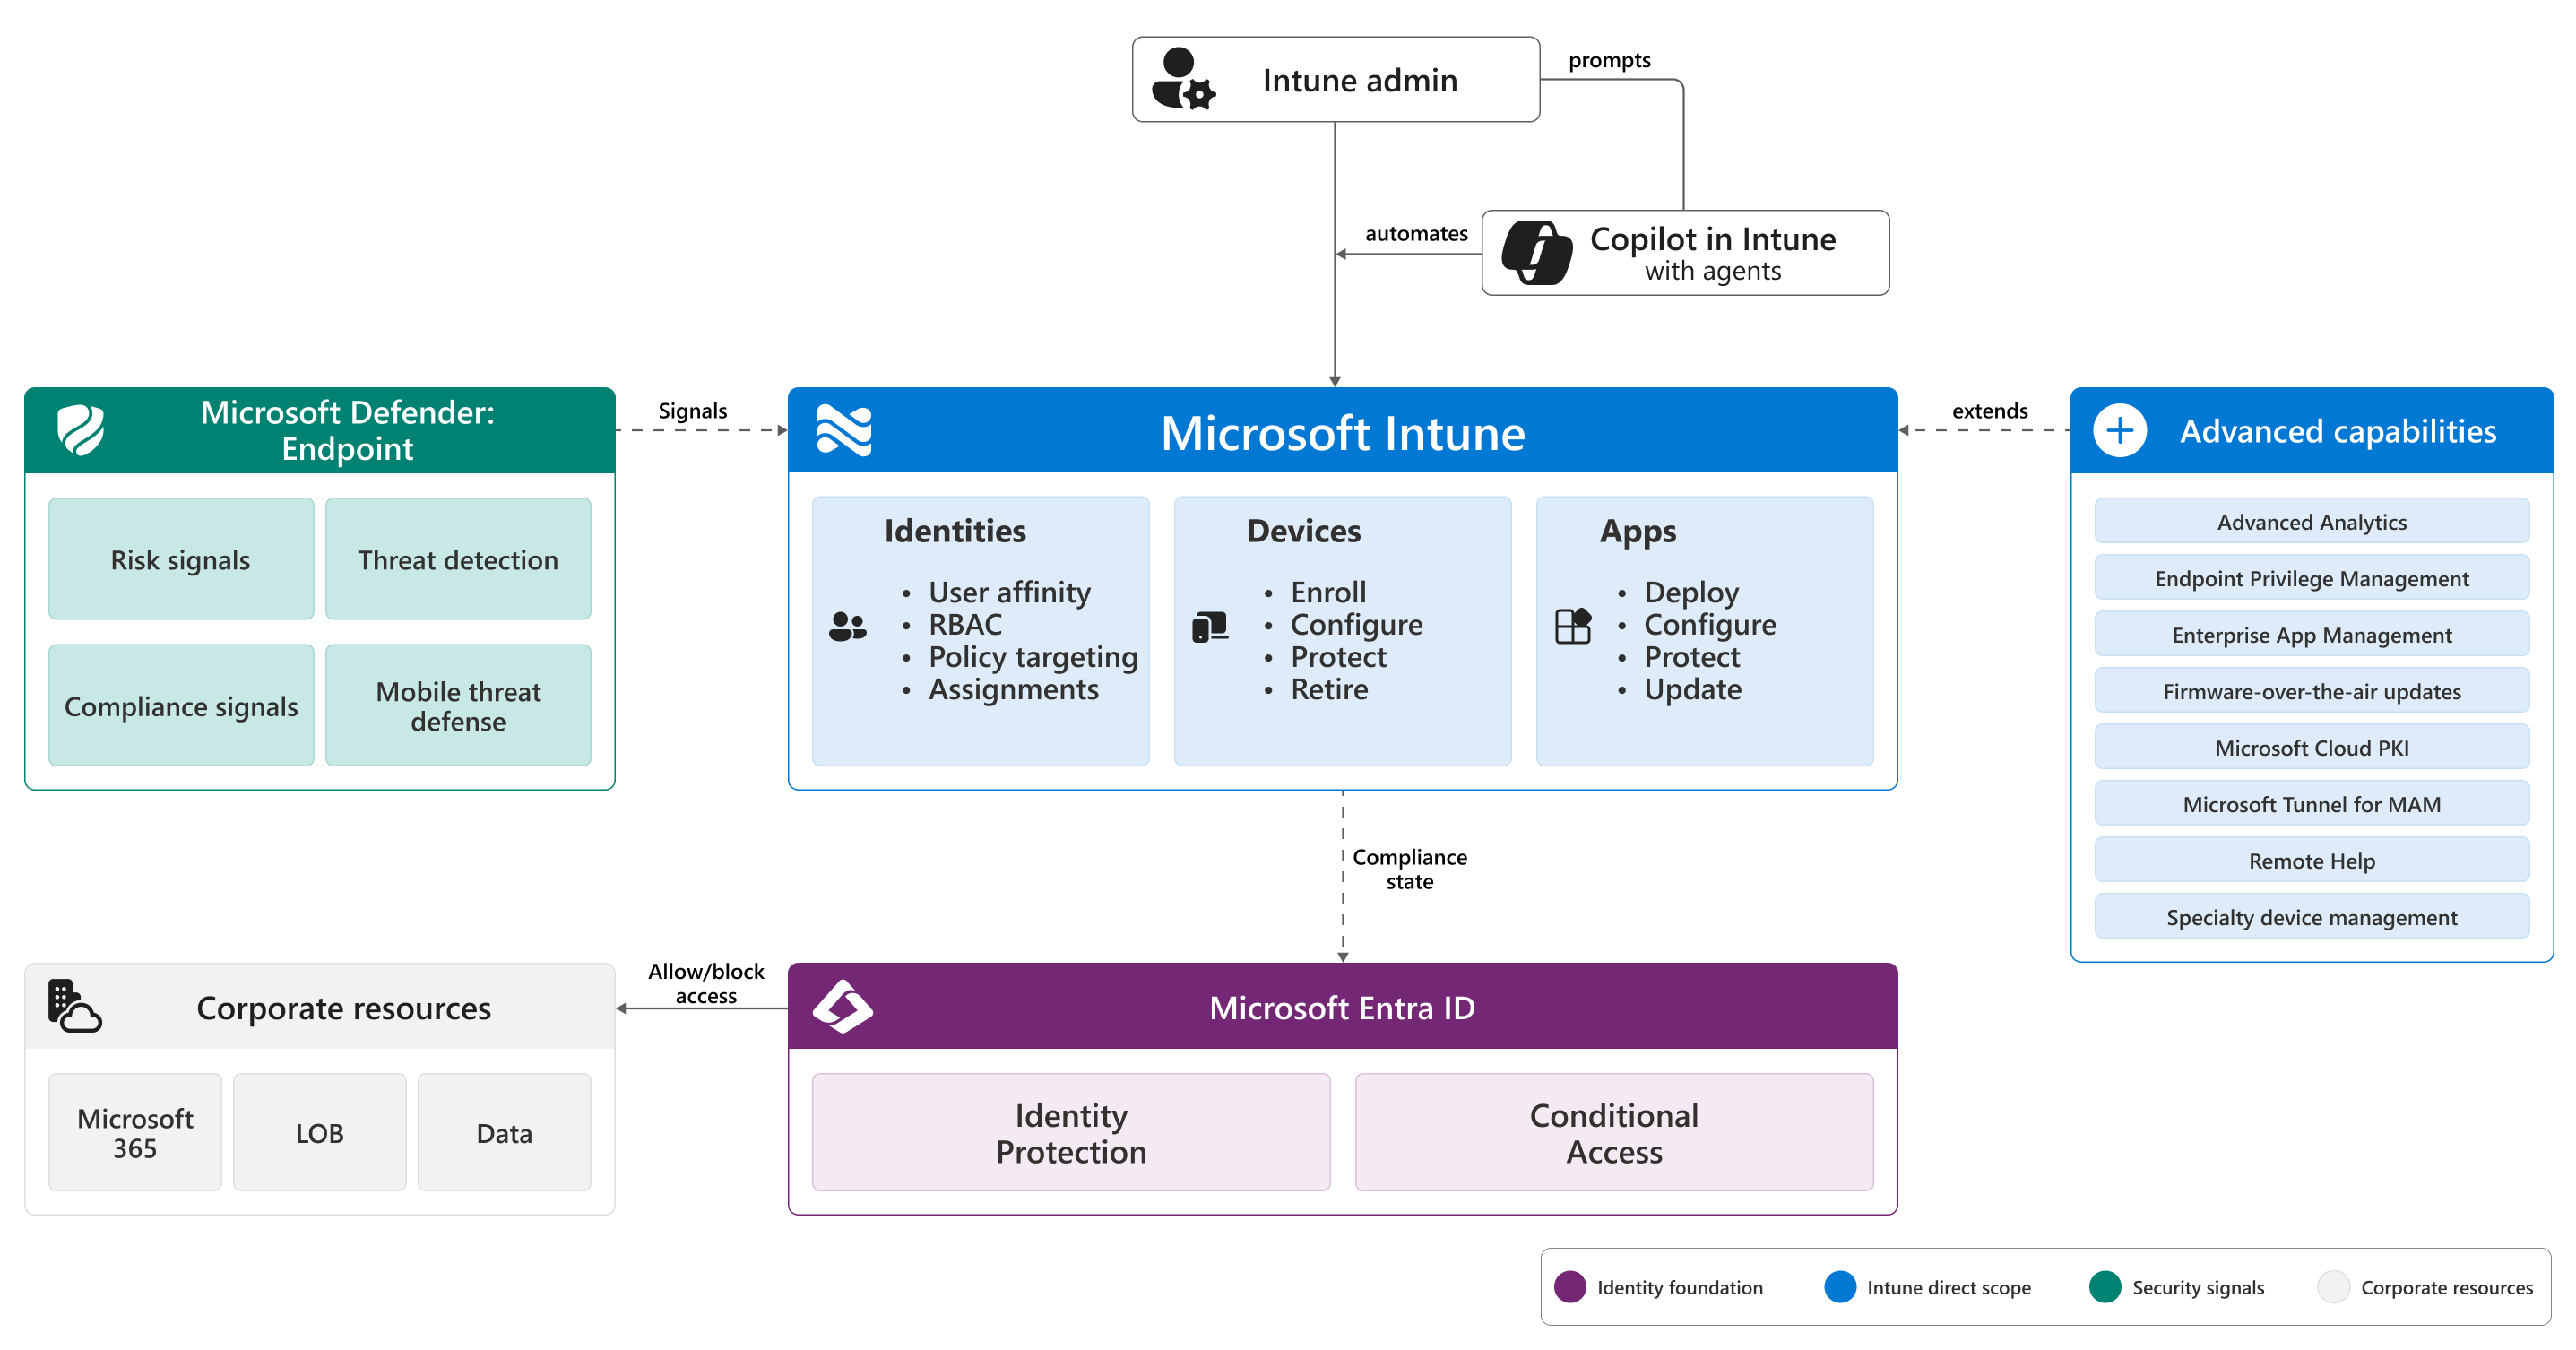
Intune sits over identities, devices, and apps. Android Enterprise is how phones plug into that model. Source: Microsoft Learn.
The Android Enterprise management types, in plain English
There are four live options, and they split cleanly on one question. Who owns the phone, and does the person get a personal side? Here is each one without the acronym soup.
Personally owned work profile (BYOD). The employee owns the phone. Android creates a separate, walled-off work profile with its own apps and its own briefcase badge. You manage that container. You never touch their photos, their texts, or their personal apps.
Corporate-owned work profile (COPE). The company owns the phone, but you still give the person a real personal space. You get more control than BYOD, they still get a private life on the device. This is the "here is your work phone, but check your kid's soccer schedule on it too" option.
Fully managed (COBO). The company owns it and it is a work device, full stop. No personal profile. You control the whole phone, top to bottom.
Dedicated (COSU). The company owns it and no single person owns it. Think kiosk, scanner, digital signage, a tablet bolted to a wall. It usually locks to one app or a small set of apps. Nobody signs in with their own identity.
There is a fifth name you will still hear, Android device administrator, or DA. That was the old way, before work profiles existed. Microsoft deprecated it, and it no longer works on devices that have Google Mobile Services. If someone hands you a DA setup, treat it as legacy and plan your move off it.
One table to keep them straight
Type
Who owns it
Personal space?
Best for
Wipe on exit
Work profile (BYOD)
Employee
Yes, the whole phone is theirs
Personal phones used for work
Only the work container
Corporate work profile (COPE)
Company
Yes, a private profile
Company phones people also live on
Company data, personal stays
Fully managed (COBO)
Company
No
Dedicated work phones per person
Whole device
Dedicated (COSU)
Company
No user identity at all
Kiosks, scanners, signage
Whole device
Personally owned work profile, the polite one
BYOD work profile is the option that respects the line between work and life. Android literally builds a second sandbox on the phone. Work apps go in there with a little badge. Your management stops at the edge of that sandbox. You can wipe the work profile clean and the person keeps every personal thing untouched.
This is the sweet spot for staff who already have a phone they love and do not want a second one in their pocket. It also pairs well with app protection policies if you want to go even lighter. I wrote about that split in Intune devices vs app policies if you are weighing full enrollment against just protecting the apps.
Corporate-owned work profile, the balanced one
COPE is for company hardware that you still want to feel humane. The org owns the phone, so you get stronger controls than BYOD, including tougher password rules. The employee still gets a private profile for personal apps and accounts. It is a good middle path when you are buying the phones but you do not want to run a police state.
One catch worth knowing up front. On COPE devices running newer Android, factory reset protection can require the original Google account after a reset. Plan your reprovisioning so you are not locked out of your own fleet.
Fully managed, the total one
Fully managed, or COBO, is a corporate phone assigned to one person with no personal side. You own the whole device and the whole experience. By default the user cannot install anything outside your approved apps, and they cannot remove what you require. You can open the door to the full Play Store if you want, but the default is locked down.
Reach for this when the phone is a work tool and only a work tool. Field techs, drivers, frontline staff who get a device for the job and nothing else.
Dedicated devices, the kiosk one
Dedicated, or COSU, is the type with no human owner. The device is the point, not the person. It usually pins to a single app or a small locked set through the Managed Home Screen. A checkout tablet, a warehouse scanner, a check-in kiosk, a screen showing a dashboard all day.
Picking a management type is half the job. The other half is provisioning. For the corporate types, the common enrollment paths are:
QR code. Factory reset the device, tap the first screen a few times to open the reader, scan the profile. Best for small batches.
Google Zero Touch. Buy from an authorized reseller and provisioning starts the instant the user powers on. Best for scale.
Samsung Knox Mobile Enrollment. The Samsung equivalent of zero touch for Knox devices.
Token entry. On the Google sign-in screen you type afw#setup instead of an email, then enter a token. Handy when QR and NFC are off the table.
BYOD work profile is the odd one out. It needs no factory reset. The person installs Company Portal, signs in, and Android builds the work profile in place. That single difference drives a lot of real world decisions.
Intune's enrollment options by platform. Android Enterprise gets its own lane. Source: Microsoft Learn.
The factory reset line you cannot ignore
Here is the single fact that trips people up most. Converting a phone into a corporate mode wipes it. You cannot bolt COPE, fully managed, or dedicated onto a phone that already has stuff on it. It has to start clean. BYOD is the exception, because the work profile is added, not baked in.
Management type
Factory reset required first?
Personally owned work profile (BYOD)
No
Corporate-owned work profile (COPE)
Yes
Fully managed (COBO)
Yes
Dedicated (COSU)
Yes
Blocking the types you do not want
You do not have to allow everything. Enrollment restrictions let you decide which Android flavors are even permitted. Under Devices > Enrollment > Device platform restriction, you can allow or block the Android platform, block specific manufacturers, set OS version ranges, and block personally owned devices entirely. If your org is corporate-only, turn personal ownership off and BYOD stops at the door.
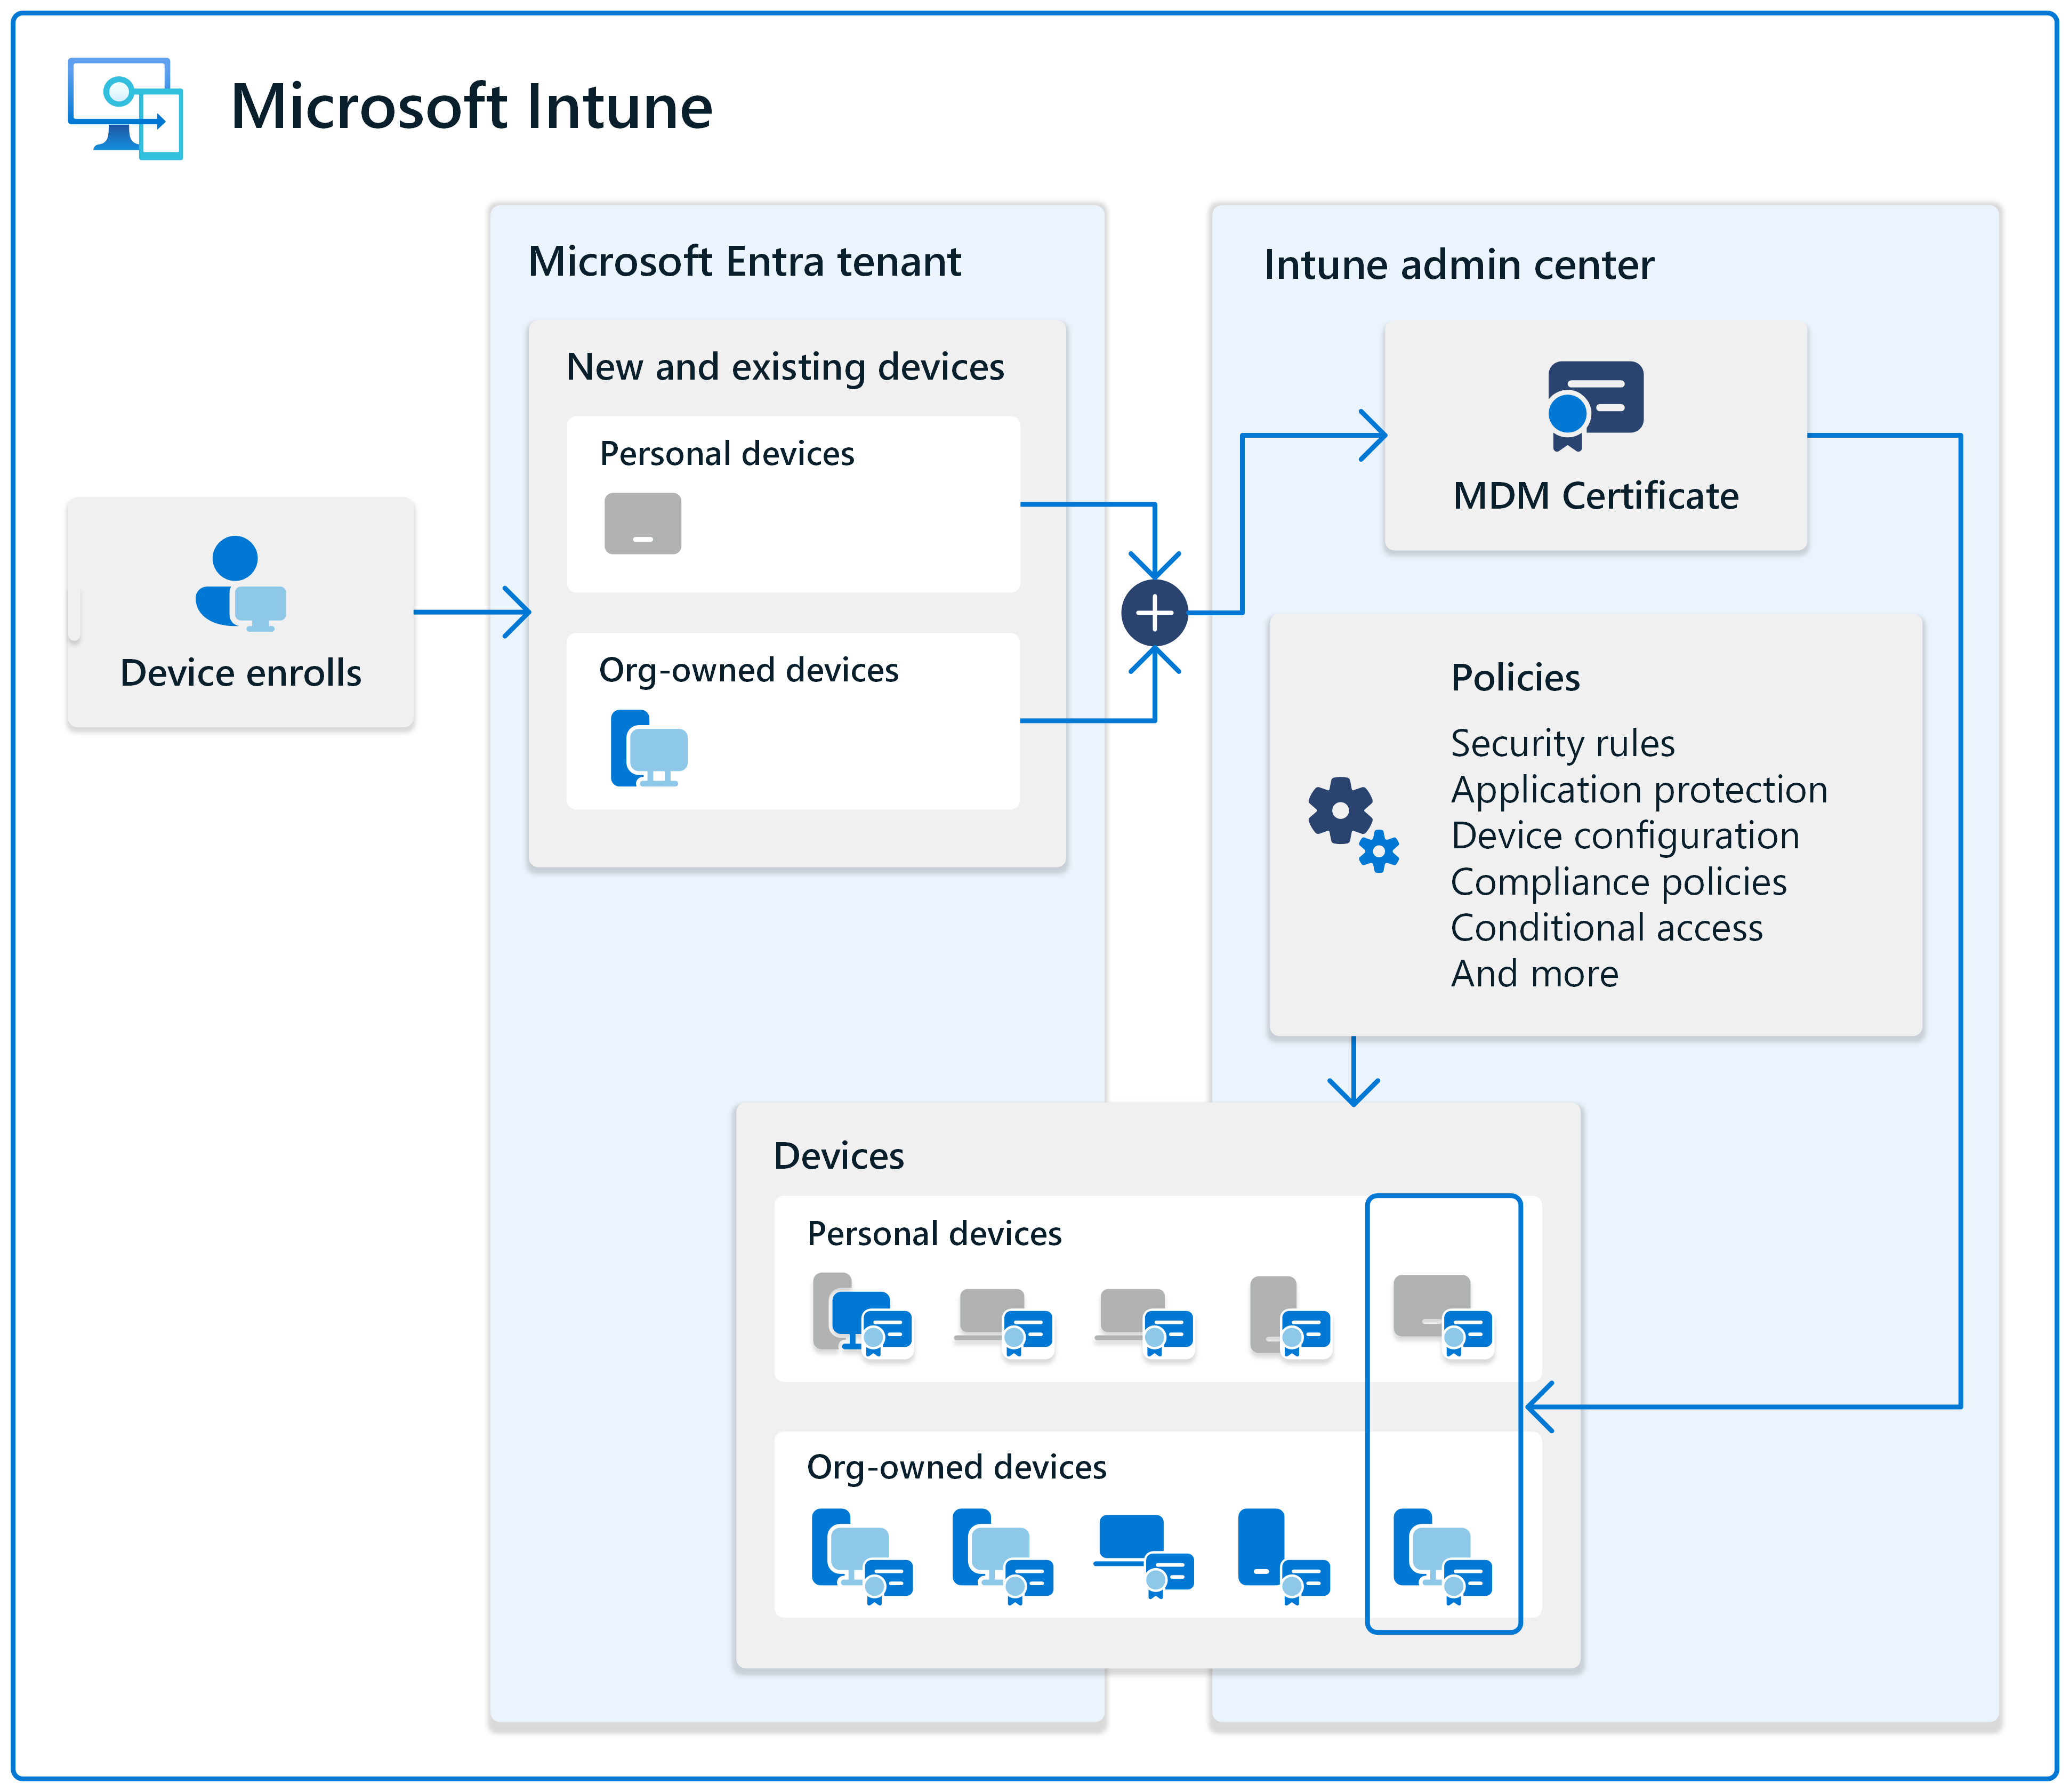
Every enrolled device gets an MDM certificate so Intune can enforce policy. Source: Microsoft Learn.
Putting it together
The Android Enterprise management types come down to two questions. Who owns the phone, and does the person deserve a personal side. Personal phone, use BYOD work profile. Company phone people also live on, use COPE. Pure work phone, go fully managed. No owner at all, go dedicated. Managed Google Play is the connection under all of it, corporate modes need a clean device first, and enrollment restrictions let you slam the door on anything you did not choose. Get those four calls right and the rest of Android management gets a lot quieter.
What can we learn as a person
The factory reset rule stuck with me. To turn a phone into a fully managed or corporate device, you cannot just layer the new rules on top of the old mess. The phone has to be wiped first. A clean slate is not optional. It is the entry fee for becoming something different.
People are not so different. I have tried to bolt a big life change onto a life I never cleared out first. New habit, same old clutter underneath. New boundary, same old patterns still running in the background. It usually failed, and it failed for the same reason a corporate profile fails on a dirty device. There was too much left over to build cleanly on top of.
BYOD is the gentler truth on the other side. Some changes really are additive. You can keep your whole self and just build a small walled space for the new thing, and it coexists fine. The hard part is honesty about which kind of change you are facing. Some things you can add to who you already are. Some things need you to wipe the slate and start clean, even though it costs you everything that was already on there. So which change in your life are you trying to bolt on, when what it actually needs is a reset?
We use cookies to ensure that we give you the best experience on our website. If you continue to use this site we will assume that you are happy with it.