I was working with a client a few months ago, and they needed me to set up auto licensing. The idea is that the helpdesk right-clicks on a user and clicks copy. That user will get all the groups inside the template user. This also includes licensing for O365. Believe it or not, this is super easy to do.
The client’s structure was as such, They had a local active directory that uses ad connect to sync all the user information. The ad sync occurred every 30 minutes.
Local AD
The first step is to create the licensing groups in local AD. In this case, I named them “Microsoft Office 365 E3” and “Microsoft Office 365 F3”. This way it’s super clear. These will be security groups. I have them in an OU that is synced with AD Connect.
Only users that will get E3 will be in the E3 group and the ones getting F3 will be in the F3 group. Once again, very clear.
Now I have created the groups, I complete an AD sync or I wait for the ADSync to be completed. To force an ad sync, you will need to log into the AD sync server. Normally this is a DC, it doesn’t have to be, but normally from my experience, it is.
Start-ADSyncSyncCycle -PolicyType Initial
You can view your sync by loading the Synchronization Service Manager and watching the sync. Once the sync is complete, move to the next step, Azure AD.
Azure AD Licensing Assignments.
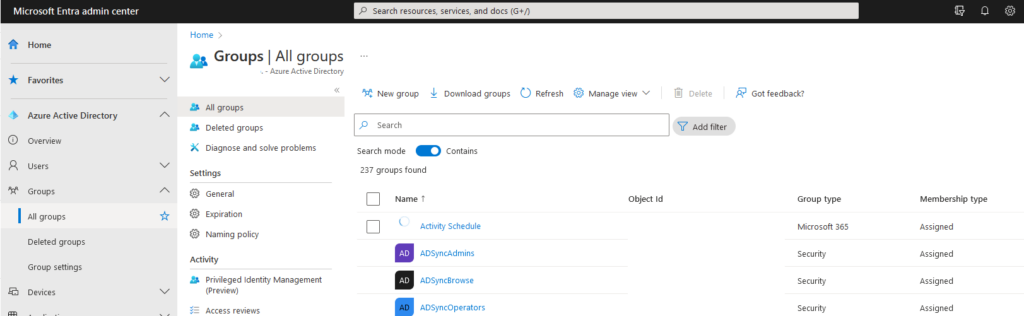
Log into azure ad at https://entra.microsoft.com. On the left side, You will see Groups. Expand Groups and Click all Groups. Then search for the group you are looking for. In this case we want the Microsoft Office 365 E3 Group.
Now its time to add the license for anyone who joins this group.
Click on the Group
Under Manage click Licenses
In The middle Click Assignment
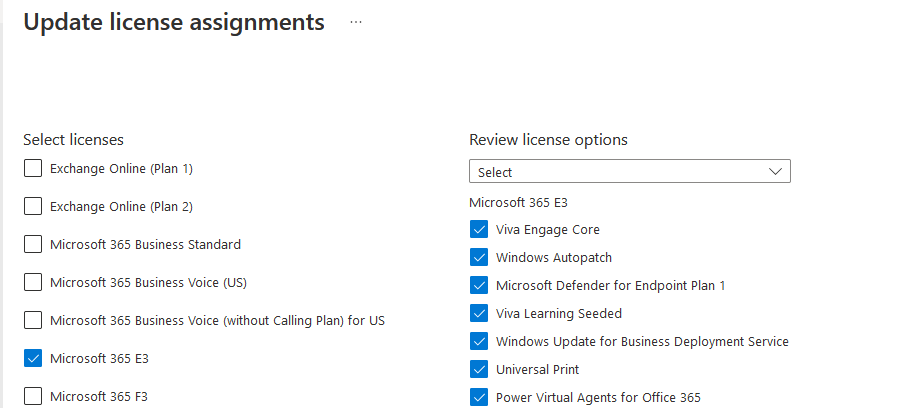
Add the desired licenses and applications associated with the licenses, See the image below.
Click Save.
The final step is to add users accordingly. After they sync, they will receive the licensing accordingly. Now you have a fully automated method of assigning licenses.
Our American society is driven to force people to mask up and be something else. This is very true in IT. In IT, we are told we need to have a decade of rust experience, even though it isn’t a decade old. Impossible standards are always around us, forcing us to believe that we must match those standards to be a valid person or employee.
This is not the case. You are valid. No one can do everything. It’s not possible. I wouldn’t trust brain surgery to my fellow coworkers. I wouldn’t trust grandpa to build a complex security structure with the latest ai technology. It’s just not logical. We are a more powerful group together than apart.
When you try to do everything yourself, you push others away. There is a ton of reasons why we do this. It can range from past trauma, shame, upbringing, pride, and more. By pushing people away, you will face burnout. Thus letting people in is the only way to avoid burnout.
Lets take a look at why it’s ok to be you.
How do I be myself?
Spend time with yourself. We humans, especially us IT people, oftentimes fill our schedule with everything but time for us. We think sleep is time for us. Sleep is a basic requirement, not dedicated time for yourself. Set priorities for your own time. This is a requirement. There is no option. Boredom is good. It forces you to sit with yourself.
Try new hobbies. Once again, it’s ok to branch out and discover new things. If you always enjoyed being outside and playing with the dirt as a child, try out gardening. I always, loved water as a child, so why not swim? The key is to look at what you enjoyed as a child and translate that as an adult. I always enjoyed building new things and making new things. So, I take scraps and try to make something. Most of the time it’s a failure, but sometimes it’s something cool. I personally like “chasing” the dopamine. I like getting my hands on many different things. My joy of teaching is the reason this blog exists. That’s why I blog. It is relaxing for me.
Spend time with Old Friends
If it is safe, spend time with old friends. These memories will show you who you are under that layer of “Worker.” Often times when I am with my friends we talk about goofy stuff our kids are doing or about an anime we just watched. Sometimes we break out the mtg cards and play an old-style game. This brings me back to my core self, my authentic self. Also often times being around others, even though I’m an introvert, helps me see others as they are and not as I want them to be. This is very important for us in IT because of the impossible standards. When the standards are higher than reality, this fosters an attitude that we can be better than others. So being around others will show us, we are equal.
It’s Ok to be you
Being you is not a bad thing. Being someone else is a bad thing. Accepting who you are is the first step of true and lasting growth. Don’t deny yourself of yourself. That’s painful. It’s like a wond of the self. Over time, it will destroy you. So, be ok with being you.
Today’s post is a formula that you can use to get a decent server and install WordPress on it. This is the setup for this site, and it works like magic. This is a self-hosted WordPress for free.
Oracle Always Free Teir
Oracle offers an always free tier for servers. This is an arm server and it does wonders. 8 Cores and 24 gb of ram with up to 200 GB of storage. This thing is a beast for a free server. For more information, you can visit their site: https://docs.oracle.com/en/learn/cloud_free_tier/index.html
When you create your compute, make sure you stay within the always free unless you are willing to pay for more. Also, select the Ubuntu server as this is the easiest way to build your server.
Make sure to download your SSL cert or you will not be able to later.
Another Quick catch is you must open the ports in the firewall of your compute on the main page. Once you do this, then you are free to do more.
WordPress For Free
Now it’s time to install WordPress for Free. Digital Oceans offers a free tutorial for this process as well. I suggest reading over it. https://www.digitalocean.com/community/tutorials/how-to-install-wordpress-on-ubuntu-22-04-with-a-lamp-stack. Once you have your website installed, it’s all about the setup from here. You have the basic setup. Now it’s time to work on logos, placement, content, SEO, and more. This is a learning curve within itself.
I suggest getting a udmey account and searching for the SEO beginner to hero courses as these will change how you build out your site. I always suggest a few plugins for beginners.
Loginizer – This plugin prevents people from brute forcing into your site.
W3 Total Cache – This plugin keeps your site moving quickly and you can set it to do some crazy stuff.
Health Check and Troubleshooting – This will help keep you up to date. This includes things like PHP upgrades and such.
WP Statistics – this one is very simple, it gives you a visit and visitor lists. This way you can see your returning traffic vs new traffic.
Yoast SEO – SEO allows your site to be found. Yoast makes, making sites easier. It helps with blog posts and more. I personally can’t write without it. The readability helped me see some of my language issues.
Shortcodes Ultimate – The paid version of this is amazing, the free is amazing as well. I am able to do quotes and more with the free version. Which is why I use it.
I was inside my unifi controller a while back and the new update had starred out the radius password. The documentation had yet to occur on the radius password. So, I used a simple HTML trick with my firefox to change the stars to clear text. This is how you can Uncover Starred-Out Passwords in firefox.
Developer Options
F12 will trigger the developer options. Inside Google Chrome, the developer window will appear on the right-hand side. In Firefox, the developer window will appear at the bottom of the window. These options allow you to change your current view of the site. If you want to change the background to hot pink, you can. if you want to change a password field to plain text, you can.
Developer Options in Firefox
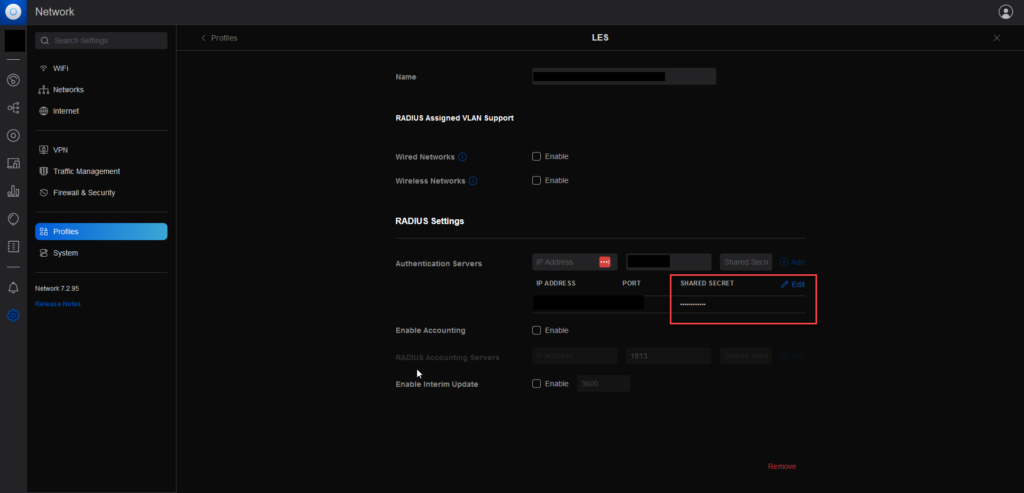
What we are looking at
The view area.
This is the page we are viewing. I want the starred-out shared secret that you see in the red box. Click the edit button to the right of the shared secret. Notice the password is still starred out. To get this information, we need to start the Developer options. Inside the developer options on the left-hand side, you will see a mouse cursor in a box, also known as an inspector. We still have Starred-Out Passwords
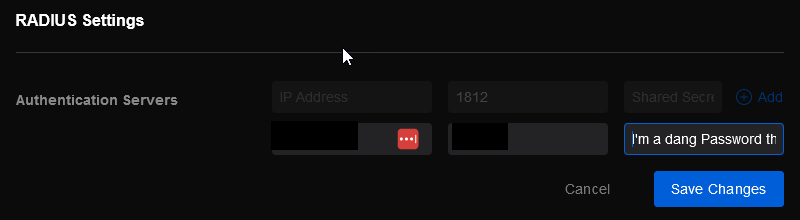
Once you click the inspector tool, you can move the mouse over the shared secret and click on it. Inside the developer options, you will see the HTML itself highlighted. Notice the highlighted HTML code is the input object. We are looking for the word “type”. All we have to do is replace type=”password” to type=”text”. Once you type in text, click enter. The password is now exposed.
That’s pretty much it. The key secret is to make sure you are editing the input and not just the div. I you see div code instead of input code, then you do not have it set in edit mode. This process can be used for just about any website out there. This is how we Uncover Starred-Out Passwords.
Like in my last post, I have been in IT for many years. Every place I have worked at and even when I worked at an MSP, I have always seen the Active Directory Users and Computers take a really long time to load. Often times be very slow while on VPN. I was finally challenged to see why.
Reasons
There are hundreds of reasons apparently for it being slow. I have seen it slow on Global connect, Open VPN, Cisco’s Anyconnect, WatchGuard, and more. Apparently, the issue is with how ADUC communicates via DNS.
Yes, it’s a DNS problem.
The solutions for a slow ADUC on VPN
Point to the server’s IP instead of the DNS name.
If you right click your ADUC in the start menu, you can click properties. Then from there, you can add /server=”<Your Servers IP Address>” and this should resolve the issue. The load time went from 5 minutes to 10 seconds. I’m not all sure the back end fix, but this one worked well.
A registry fix
Here is a registry fix that seems to work on some machines. I tested this on windows 10 and 11. I was unable to test it on multiple network stacks, just my pfsense and untangled stacks. So, let me know if these keys work for you.
I have been in IT for a little over 10 years and have tried various browsers and plugs/extensions. Some are extremely useful, and some, are not so. I abandoned Firefox for a while because it was not compatible with the required software. Recently I have returned back to firefox because of Multi-Account Containers.
Firefox has a unique extension that only it has. This extension is called the multi-account container. What it does is allows you to open a tab in a container of its own. Link
What is Multi-Account Containers
The extension has containers. These containers hold all of the cached items inside of it. For example, if you log into o365 in one container, you will be able to log into a different o365 in another container. Unlike incognito mode, you will be able to work with items that need to cache on your computer like exchange online.
If you are in the MSP world? This is a game-changer. You can have a container for each of your clients and solely work out of that container for that client. For in-house IT, it allows you to test as a normal user vs an IT admin. Even in your home life, the added layer of security helps with your banking and personal items. This way Facebook doesn’t leak into your bank account’s cache.
My favorite feature
When firefox starts, you have a screen full of tabs of previously opened sites or most visited sites. Each one of these you can right-click and open in a different container. I can do this with links, and even the + for a new tab. I can dedicate a tab just for my company and a tab just for personal. This way my o365 doesn’t affect a client’s o365.
And yes, This beast is only available on firefox and firefox off shoots. So, long live firefox!
As always, if you have any questions feel free to ask.
We use cookies to ensure that we give you the best experience on our website. If you continue to use this site we will assume that you are happy with it.