Not too long ago, I needed to do some rule auditing for forwarders in a client’s exchange online. They believed someone had a rule in their exchange account that was forwarded to a spammer. They believed this because new employees were receiving emails within a few days of creation. So, it’s time for some PowerShell magic to save the day. It’s time to Find Forwarding Rules in your mailboxes with PowerShell.
The script today requires the Exchange Online Module to be installed. If you don’t have it, go install it. Once you have it, you will need to connect using the Connect-ExchangeOnline commandlet.
Connect-ExchangeOnline
By doing it this way, MFA will be triggered and we want MFA to be at this level. Security first yall. This brings me to my next point, soon exo 3 will come out and security will be improved greatly.
Once you are connected, we need now to pull all the mailboxes from the system. This command can take some time if you have a large company. In fact, this script with only 300 users took around an hour. The Larger your company is, the longer it will take. Plan ahead accordingly.
$Mailboxes = Get-Mailbox -ResultSize Unlimited
Now we have all the mailboxes, we need to go through each mailbox and get the inbox rules for that mailbox. We start a for each loop of the mailboxes.
$ForwarderRules = foreach ($Mailbox in $Mailboxes) {

}
Next, we will need to grab the inbox rules for that mailbox. We do this with the Get-InboxRule commandlet and we feed it the mailbox alias.
Normally a mailbox has more than one rule. Thus, we need to make another for each loop for the rules inside our main foreach loop.
$ForwarderRules = foreach ($Mailbox in $Mailboxes) {
    $rules = Get-InboxRule -mailbox $Mailbox.Alias
    foreach ($rule in $rules) {

    }
}
Afterward, we need to pull the data out of the rules and make it useful. The amount of output is large, breaking it down and making it useful is important. That’s the whole goal of this. We want to find out who has forwarders and we want to know if those forwarders are forwarding out to someone else. I want to break it up as well so I can look at all the forwarders and just the ones with email addresses.
Gathering Information
Firstly, we need to ask the question, Are we forwarding to someone as an email or an attachment? The properties we want to look at are, forwardto and forwardasattachmentto. If either of these are not null, then we want to look at that information. This allows us to Find Forwarding Rules.
$ForwarderRules = foreach ($Mailbox in $Mailboxes) {
    $rules = Get-InboxRule -mailbox $Mailbox.Alias
    foreach ($rule in $rules) {
        if (($null -ne $rule.ForwardTo) -or ($null -ne $rule.ForwardAsAttachmentTo)) {

        }
    }
}
Now we are looking at a rule object that has a forwarder of some sort. It’s time to let the end user know. Next, we will create a PowerShell Custom Object. Almost every get command I have come across has produced one of these objects.
The object is ready for us. It’s time to fill it in with useful information. We need the mailbox name, the rule name, the rule’s id, if it’s enabled, and finally the forwarder information. The forwarder information is broken up into two. The “ForwardTo” and the “ForwardAsAttachmentTo”. The first forwards the email to a person. The second wraps up the email into an attachment and sends it to the person. We need to see both.
These items are arrays of email addresses and references. If the forwarder points to an external email address it will contain the @ symbol like most email addresses do. If the forwarder points to an internal address like bob in accounting, then it will not have an @ symbol unless told otherwise. This is useful. We can use a where object to pull out the lines with an @ symbol.
Now it’s time to sort the sorted information. First why? Why not add it to the loop above? Two reasons. First is the time it takes to process. Second, I want to run $ForwarderRules to get information and I want to run the next line of code to see the more focused information. I like having options. Now we will take the forwarder rules we created and filter out the nulls of the forwarders. Finally, we want to display the information.
Finally, you have all the email addresses and rules that have a forwarder that forwards to a real email address. You can run through each one and audit them for security.
For years, I thought Burnout was equal to weak. Boy was I wrong. Burnout is a real thing and it changes how you see this world. Burnout can take a good worker and make them the worst worker. That’s what it did to me. What is Burnout and How do you avoid it?
What is burnout
Burnout is a special type of work-related stress. It’s a state of physical, mental, and emotional exhaustion. Burnout is normally accompanied by a reduction of accomplishment and personal identity. AKA, feeling like you are part of a never-ending machine. Does this sound like something you are feeling? If so, ask the following questions about the past 3 to 6 months:
Questions
Have you become Critical of others at work?
Do you have trouble starting the work day?
Do you take extra time to get to work each day? (Especially true for work from home)
How has productivity been? Up or Down?
Is it hard to concentrate on simple tasks?
Feeling Disillusioned about your job?
Substance abuse? Food, drugs, Alcohol, sex, etc…
How is the sleep?
Are you experiencing physical changes like weight gain, headaches, stomach problems, or random unexplained pains?
If you said yes to more than 2 of these, then you may be feeling burnout. We can stop it at its source by changing how we do things or where we do them. It is also a good idea to speak with a medical professional during this time because burnout does cause depression. Depression is a major Killer in the united states.
Results of Burnout
If you allow burnout to run around in your life, there are some consequences.
Excessive stress
Fatigue
Insomnia
Anger, Irritability
Depression
Substance abuse/misuse
heart disease
High blood pressure
Type 2 diabetes
Vulnerability to illnesses
Increase in pain
Possible Causes and Personal Experience
I will go over the basics from the mayo clinic and give some examples of my life that started me down the path of burnout. There are more than these, but these are the most common. I experienced these myself and I fought for a long time against them. Let’s dig in.
Lack of control
Most places allow you to make choices about your work within reason—things like your schedule, assignments, workload, and resources.
In a previous company, the lack of control was evident. I never had the resources I needed when I needed them. For example, the company only had 1 spare SSD but had a demand for a turnaround of 1 day on some high-level clients. This caused issues because it took about 3 to 5 days for a new hard drive to be ordered and shipped. When I brought this up, it was met with, the CEO stating 1 drive or another excuse. This was a daily issue that left me saving face with the client. This was not part of my job duties but became it.
The workload also became an issue. Everyone was assigned to the phones, however, I was the one that got most of the calls. I was a level 2 engineer. The techs were to be answering the phones, but there were never enough techs to answer the phones. It got to the point where I had to study new technologies outside of work just to keep up with the demand.
Unclear Job Expectations
An unclear expectation can cause an unneeded level of stress. If you are unclear about the degree of authority you have or what management expects of you or others, you’re likely to feel uncomfortable.
This was a huge part of me. One company I worked for changed the rules of conduct randomly. This caused undue stress. One minute we are told to answer the phones on the first ring no matter what, then next minute we are told not to and let it ring 2 times for a tech to get it, but then a few minutes later to pick it up. This caused chaos and we didn’t know what we should do.
Other items changed as well. I was told to work on a problem until resolved. Then I am told to escalate if I have a feeling something is going to take more than 30 minutes. Escalation didn’t happen and I was left with an angry client. When brought up what they expected me to do, it changed each time. It was a case-by-case level issue in a structure that was set up to be generalized. This caused problems and unneeded stress. Often times I felt, “Am I doing wrong for even doing my job?”
This is oftentimes caused by the system setup and not a single person.
Dysfunctional workplace dynamics
Sometimes we run into office bullies, micromanagement, undermining coworkers, and more. These are basic Dysfunction.
I will cover my experiences with a bully in moral conflict. The bully was a micromanagement agent as well. So, I can discuss that. He would question everything I did. He always asked if I was smart enough to understand what I was doing. This was a manager who became a director. He questioned the basic things like virus scans. Items like screen cleanliness were an issue for the printer display screen. If a single fingerprint was there, it was my fault.
Another form of micromanagement I have experienced is time. One place I worked at started a phone system that tracked when we were talking and when we were not. We were required to sign out when we left our desks and sign back in when we came back to our desks. We had to give a reason for each time left and came back. This included bathroom breaks. For those with dyslexia, they were often times in the office explaining their medical conditions.
Never stops
When a job is monotonous or chaotic and you need a constant max level of energy to maintain. This is one of the fastest ways to lead to burnout. This often times happens when a company has a high turnover rate or when a company has more work than employees.
At one company I worked with, there was an exodus from IT. For a few months, I was the only person in the IT department who had any idea of what was going on. From when I entered the building to when I left, it was non-stop. Those months caused me so much fatigue. During this time, my personal life was riddled with death. I don’t know how I made it through those months.
Another company I worked for never hired enough people to cover. When people were hired, within a month they were given tasks that took them away from their base job. This left me holding the phones. It was a constant. By the time I left, I had no energy for my family. This was a system issue that the highest management refused to fix.
Lack of social support
Isolation is a huge problem with mental health. If you feel isolated at work, as I use to call it, I’m on an island. Then this leads to depression. The company I worked for that never hired enough was just like this. I often times had calls that were beyond me due to management requirements, but no one was available to help. It oftentimes required me to physically stand behind management until they gave me what I needed. One client often times cursed at me, threatened to get me fired, and even threatened physical harm, a Karen. When I spoke with management about this, the conversation ended up with “It’s just her deal with it.” Over time I did deal with it, and I left.
Work-Life imbalance
if your work takes up so much of your time and energy, that you can’t spend it on life, it’s time to change things around. I experienced this in two different ways.
The first way was when the exodus of IT occurred. I worked anywhere between 40 – 80 hours. While in the waiting room learning the fate of my mother, I had people calling me. It was a nightmare. I was the only one they could contact though. It was a problem.
On the other side of this, I worked 8-5 each day, but it was so constant that I had no mental energy when I got home to do anything. I was burned out each day. All I could do was crash. I didn’t have the energy to see my family, friends, or anyone else. I often times cried while driving to work because I didn’t want to face the day.
Moral Conflict
The place with the exodus of IT. I worked with a bully. At first, he was super friendly. Everyone got along with the man. Then He was promoted to team lead. Finally, He was promoted to director. After his promotion to director, he started showing favoritism to the women of the group. Closed-door meetings became the norm with them. When I had meetings with him, he required them to be closed doors. Which I refused. He started micro-managing each person in the department. It got to the point where he would stand behind us as we answered calls and questioned everything we did. In all honesty, I was ok with this.
At the time I was a system specialist. My hands were in almost every system. So, when something changed, I knew about it as it was my job to know. I started seeing unnerving changes. My coworkers who were of Latino descent suddenly had additional phone calls coming to their desks routed from the outside. Their calls went from 1 to 3 a day to 300 a day. He often times stood behind them as well. Then when it came to hiring he made sure to only hire people he personally knew. These were moral strikes to me. What finally did it for me was when my coworker informed us she was pregnant, he started adding additional workloads onto her plate. Then when she couldn’t perform, he physically marched her out of the building. Two weeks later, he hired a personal friend of his to replace her.
By the way, HR didn’t care. He was getting results. This caused me more stress than documenting my pee breaks.
Outside Forces
Outside forces can cause burnout as well. Family issues, sickness, and more will produce a level of stress that will bleed into the work world.
For me, it was the passing of my parents. My dad was sudden and without warning. After he died there were a lot of things that needed to be done that we didn’t realize he did. Then my mom 6 months later got sick. Her colon died. She almost died then, but she suffered for 6 months. My wife and I became her caretakers.
Handling Job Burnout
There are a few things you can do when you are in a world where burnout is a real deal. Which is anywhere. Items like Setting boundaries, taking breaks, finding that sweet work-life balance, supporting groups, socializing, physical activities, escaping the screen, and finally Set Boundaries.
Setting Boundaries
Setting boundaries is the best way to prevent burnout. What does setting boundaries mean? It means saying No. As a system administrator, I should be expected to plunge into the toilet. there are physical limits to our abilities. We shouldn’t force our bodies and minds beyond those limits. Saying no will give you room to exist and do your best. A car has no ability to say no when it comes down to driving. It will keep going as long as the driver keeps pushing it. However, you are not a car. You can say no. You can set boundaries. For me, I should have set boundaries that I will only follow a new rule for a client if it was in a sop signed by the client. This would have prevented me from becoming angry at the consent changes.
Take breaks
During your work day, it’s ok to use the bathroom. Like the car, it will keep going until it falls apart. Setting boundaries for personal health is important. This includes mental health. Get hit by a client that really tries you, take a break away from your screen. This is very important. If you cannot do this, remember you are not a car. You have a right to set a boundary. If they do not respect the boundary, it’s okay to look for other employment, you are not at fault.
Taking breaks isn’t just limited to daily work, but also your pto. If you have time off, use it. Often times I see people in companies with unlimited pto never take to because of guilt or shame. Take your PTO! You are not a car, You are flesh and blood. You work better when you regularly rest. A good example of this is a client’s computer. When was the last time it was restarted? When was the last time you rested?
Work-Life Balance
talking about taking breaks, you need to realize that human being does better when there is a balance in their life. When my mother was in the hospital. My work life was off-balanced because my life needed more time than work, yet, I was giving work priority. what I should have done was set the boundary with my manager explaining my situation. If he chooses to say no, then that is his fault, you do you. Finding this balance is hard. Some places want you to spend 60 to 80 hours each week. This isn’t a balance. Once again, you are not a car. You deserve better.
Seek Support
It’s ok to talk with HR about your workload, assuming you have a useful HR. It’s also ok to speak with your manager. If neither is willing to support, you, it might be a good idea to find a social group that can help. I use an app called meetup. Here I have found a few related social groups that have helped me solve some of my problems. They gave me tips and tricks not only with my work-related stuff but with general life. I have seen groups on Facebook, linked, everlite, and other places.
Socialize
Along with support groups, it’s important that we system administrators socialize. The thing many of us hate doing. It’s important to socialize for many reasons. You can find support. You can find someone to vent to or even help you find someplace that isn’t nearly as stressful. As social creatures, we need that time with people. I heard it once said that online only provides 30% of the social interaction we need.
Burnout is very isolating. It’s best not to face it alone. Its ok to find others, either for support or just to complain to.
Physical activity
One thing about burnout is the body suffers a build-up of acids and stress hormones. Eating right and drinking water are very important. Getting out and walking, or others is just as important. Sweeting helps push those hormones out of your system. This reduces the chemical impact of burnout. Setting a “Gym time” to focus on your physical health will increase your productivity throughout the day. This gym time can be a simple walk around the office, down the street, and pushups at the desk. Anything physical. Burnout in IT is often a physical as well as a mental experience. So don’t be afraid to set a boundary about sitting too long. You only have one body. Make sure you are doing maintenance.
Escape the screen
It has been proven that escaping the screen is helpful for the mind. As IT people we are always connected. We are always present. Our work email is on our phones. Our personal email and projects talk back to our phone. That interconnection forces us not to be present. Being present allows you to work through your emotions. This avoidance of presence is no different than taking mind-altering drugs. It’s a way to hide away from ourselves. It’s always best to face your emotions head-on with those you can trust. Set a time to escape your screen. When you go for a walk, put your phone away. Be present with the world around you.
Establish a Routine
We are creatures of habit. When we have a routine, others will naturally respect that routine. For example, I take lunch every day at the same time 11 to 11:30 am. No one calls me, no one messages me. They know I am at lunch. This is a boundary I created by doing it over and over again. Everyone knows that I use the bathroom at 9:45 each day. They know it because I do it. Same way with grabbing my kids when I work from home. These are things I do at the same time each day. People respect actions more than words. They know I am going to do XYZ. Routines are important because it gives us something to look towards. It’s a stable object in your daily structure of chaos. Set times to be away from the screen, and do it. People will follow along with actions. If not, keep doing it.
Stay Organized
By having a routine, you start creating an organization in your life. If you know where things are, reduces the stress that you are feeling. Let the organization be yours and not what others dictate. I say this coming from a neurodivergent mind. Many people in IT tell me to use OneNote or obsidian for all my notes. I use a notepad and a whiteboard. My object permanence is much easier to keep if I have a physical object there. For others, it’s different. However, you can keep yourself organized, and do it. The stress reduction is amazing when you know where stuff is. Also, take time to be organized. I sometimes know when we hang up the phone, someone else is already calling us. Take the extra 5 minutes and take notes. If it was a ticket, put the additional information in the ticket. Set that boundary and you will find yourself more organized and able to recall stuff easier.
Set boundaries
If you didn’t realize, setting boundaries is the occurring theme here. If you don’t set boundaries, then you are a car. Waiting to be run over by the monster truck. You are not a machine. You are a human.
As a father, I have boundaries for my children. You would think not touching the stove eye when it’s hot is a common sense thing. It’s hot, it will burn me, better not touch. Even after touching it, my son will try again. The boundary isn’t there to prevent him from learning or being productive, it’s there for his protection, and my productivity protection. Setting boundaries is not just for you, it’s for others as well.
Imagine, you have a heart attack because of the stress. What happens? Well, your kids will see you in a hospital gown and that will leave an impression on them. I know this from watching my mom and dad. Your work will suffer the loss of a head count and your knowledge. For my American readers, the bills from the hospital time will out way the money lost taking time for yourself. We are talking 6 figures.
Setting those boundaries isn’t just for you. It’s for everyone around you.
Final thoughts about Burnout in IT
Burnout in IT has recently become a major problem. However, it’s not just in IT. It’s everywhere. Most of the principles can be used in other fields as well. Take care of yourself.
For the IT manager, please consider making some of these items required. Have your staff make a routine for breaks. If you need to create a rotation, create a rotation. I have found a 10-minute break every 2 hours increases productivity in me by 15%.
While working with Group Policy this month, I ran across an oddity I have never seen before, “Extra Registry Settings” These were inside the default domain policy and I had no idea why they were there. So, I did some research.
What are they?
These keys come from when you have had an ADM or an ADMX installed. Then you create a policy. Later down the road, the ADM or ADMX is removed. These keys will be left behind. So, it’s a tattoo. More like a tattoo on the tattoo artist. You can read more about GPO tattooing here. The main difference between a normal tattoo and this tattoo is one happens on the end user’s computer, while the other happens on both the Group Policy and the end user’s computer.
This is one of those things that can go Very deep. To keep things simple, I will keep it general.
How do you remove it?
Inside the Group Policy Management Module that is installed with Rstat, you have a remove-GPRegistryValue command that can do what you are looking for. You will need the following, The Name of the policy and the key. Please note, these keys live in the HKEY_Local_Machine. Thus, you will need to add such to the command. Your registry might live in the Current users. Do a little research. Here is the code that I used to remove these two items:
Once you remove the Extra Registry keys, you can reload your Group Policy Management and remove the policy. Or you can replace Remove with Get. This will try to get the value, but if it doesn’t exist anymore, PowerShell will present an error.
Sometimes I like to go back and see where I can improve my scripts. A few weeks ago I showed you the Unifi Controller script. Where it pulls the client information from each site. Well, I wanted to improve upon this script. A problem I see with this script is the plain text password. The unifi controller I have to test only accepts plain text, but I don’t want to have a password inside my PowerShell history. Today I want to show you how to convert Get-Credentials to Plain Text.
Get-Credentials as a Parameter
We first need to remove the Username and Password from the parameters and then create a secure credential parameter. By default, we want this to be a mandatory parameter. The type of parameter we will be using is a System Management Automation PScredential. This is what the parameter will look like.
[parameter(
            HelpMessage = "Unifi Username and Password",
            Mandatory = $true)][alias('UserNamePassword')][System.Management.Automation.PSCredential]$Credential
Convert Get-Credentials to Plain Text
Now it’s time to Covert the PSCredentials back to plain text. Inside our PSCredentials lives the username and password we gave the system. Thus we pull the secure string password from the PSCredentials.
$SecurePassword = $Credential.Password
Next, we are going to use the Marshal Class. This class is designed to bridge the gap between managed and unmanaged programming models. The method we will be using is the Secure String to BSTR. This method Allocates an unmanaged binary string and copies the content of a managed secure string object into it. Basically, we find where it lives in memory and combine it. For more information.
Aftward, we Take this coded data and push it into the following method. The PtrToStringAuto. This method allocates a managed string and copies all the characters up to the first null. This copy is from the string stored in unmanaged memory. This is why we need the Coded Password to tell us where the password lives in memory. Basically, I’m taking the coded password and making it human-readable.
A few of my clients use something called LAPS. Laps change the local administrator password on a computer and then store the information inside Active Directory. Since I don’t dive deep into this client’s computers often, I needed something to quickly type the first letter of the computer in question to pull up the LAPS password. Basically, I needed a list of computer names from the command itself. This is fully possible with Dynamic Parameters. So, today we will be grabbing the LAPS password with PowerShell.
Where Does LAPS Password live?
Most companies that set up LAPS do so with Active Directory. By default, Active Directory saves the password into an attribute called “ms-Mcs-AdmPwd” and LAPS also stores the expiration date in “ms-Mcs-AdmPwdExpirationTime” Thus, all you have to do is call a get-adcomputer command and pull out the information.
Now the “ms-Mcs-AdmPwdExpirationTime” is unique and needs to be parsed into something more readable. We can use the m method called [datetime] to do this.
There you have it, That’s how you get the LAPS password, But I want to take this one step further. I don’t know all the computer names. I want that information at my fingertips while I type out the command. So, I want to type something like Get-LAPS -ComputerName <here populate a name where I can tab> and bamn, it gives it to me when I hit enter. That’s where we will dive into dynamic parameters next.
Adding Dynamic Computer Name Parameters
In a previous article, we went over how to make a dynamic parameter. I want to help refresh memories by doing a single parameter and show you how it can be done with this function.
The first thing we need to do is create our form. This form allows us to use the dynamic parameters and gives us spots to pull data. This is more of a road map than anything else, but it is required for dynamics.
function Get-LapsPassword {
    [cmdletbinding()]
    Param()
    DynamicParam {}
    Begin {}
    Process {}
    End {}
}
The first part of our Dynamics is we want to name the parameter template. From there, we want to create a new object. This object will be the system collections object model for collections. AKA system attributes. Then we want to make an attribute object to add to that object later.
The ParameterAttribute will be where we add the flags like mandatory and position. We add those by dropping them directly into the ParamterAttribute object. A fun little fact, you can tab through and see what other items are available for this object. Things like the help message, the value from the pipeline, and more are hidden here. Today we only care about the mandatory and position.
After we build out our parameter Attribute object, we need to add it to the Attribute Collection we made at the start. We do this by using the “.add()” function of objects.
$AttributeCollection.Add($ParameterAttribute)
Now we need to create another object. This will be the Runtime Parameter Directory. Basically, what they will be looking through. This is a system management automation object called runtime defined parameter directory. Say that 10 times fast…
Now we need to make our Validate Set. We will create an array of devices using the Get-adcomputer command. Here we will push (Get-adcomputer -filter {enabled -eq “true”}).name into a variable. Now we will have a list of active computers. Notice that we filter out all other information by using the “.name” call.
Next, we need to create another object. This object is the system management automation validate set attribute object. We can feed this object our Parameter Validate Set.
Afterward, it’s time to feed the Validate Set attribute to the attribute collection from the beginning. We can accomplish this by using the “.add()” method.
$AttributeCollection.Add($ValidateSetAttribute)
Next, it’s time to bring our Attribute collection into the command line. It’s time to make the run-time parameter. Once again, a new object. This time it’s the Run time Defined Parameter object. Like the last object, we can place our data directly into it. We will want the parameter’s name, the type, a string in this case, and the validate set.
Afterward, we take the above parameter and place it into our directory with the “.add()” method. We need the parameter Template and the Run time Parameter.
Finally, in the dynamic parameter block, we return our directory.
return $RuntimeParameterDictionary
Beginning
We are almost done. It’s time to bring the dynamic parameter into the function and make it useable. We do this in the beginning section. We shove the PSBoundParameters of our template name into a variable.
$MemberName = $PSBoundParameters[$paramTemplate]
Then from there, we call the $memberName in our Get-adcomputer command.
The Script
It’s that time, it’s time to put it all together, so you can copy and past it into your toolbox. It’s time To Grab LAPS Password With PowerShell.
function Get-LapsPassword {
[cmdletbinding()]
Param()
DynamicParam {
# Need dynamic parameters for Template, Storage, Project Type
# Set the dynamic parameters' name
$paramTemplate = 'ComputerName'
# Create the collection of attributes
$AttributeCollection = New-Object System.Collections.ObjectModel.Collection[System.Attribute]
# Create and set the parameters' attributes
$ParameterAttribute = New-Object System.Management.Automation.ParameterAttribute
$ParameterAttribute.Mandatory = $true
$ParameterAttribute.Position = 1
# Add the attributes to the attributes collection
$AttributeCollection.Add($ParameterAttribute)
# Create the dictionary
$RuntimeParameterDictionary = New-Object System.Management.Automation.RuntimeDefinedParameterDictionary
# Generate and set the ValidateSet
$ParameterValidateSet = (Get-ADComputer -Filter { enabled -eq "true" }).name
$ValidateSetAttribute = New-Object System.Management.Automation.ValidateSetAttribute($ParameterValidateSet)
# Add the ValidateSet to the attributes collection
$AttributeCollection.Add($ValidateSetAttribute)
# Create and return the dynamic parameter
$RuntimeParameter = New-Object System.Management.Automation.RuntimeDefinedParameter($paramTemplate, [string], $AttributeCollection)
$RuntimeParameterDictionary.Add($paramTemplate, $RuntimeParameter)
return $RuntimeParameterDictionary
} # end DynamicParam
BEGIN {
$MemberName = $PSBoundParameters[$paramTemplate]
} # end BEGIN
Process {
$ComputerInfo = Get-ADComputer -Filter { name -like $MemberName } -Properties *
}
End {
$ComputerInfo | select-object Name, @{l = "AdminPassword"; e = { $_."ms-Mcs-AdmPwd" } }, @{l = "AdminPasswordExpireTime"; e = { [datetime]::FromFileTime(($_."ms-Mcs-AdmPwdExpirationTime")) } }
}
}
Last October, I ran across a client with a broken radius. I want to go through the process I used to troubleshoot the issue. The goal of this to bring you a level of understanding of the troubleshooting processes. Not every process is the same for each It related item. Getting exposed to different steps from different people helps out.
Scenario
Here is the scenario. The client called and stated that no one is able to connect to the wifi. I looked at the device and saw that they were connecting via Radius. Radius allows you to use your username and password for the domain to login into the wifi. It’s one of the more secure ways to setup wifi. I had no documentation to fall back on. Thus, I knew nothing about the radius setup. However, I did know about the wifi controller. It was an Unifi controller.
Troubleshooting Radius – Discovery
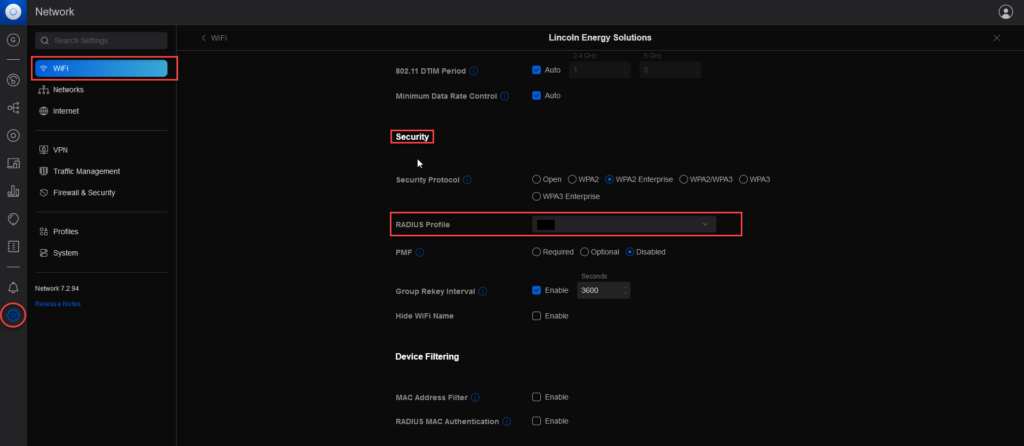
Since we know that the devices are connecting to the wifi that is controlled through the Unifi controller, the first logical step is to go to the Unifi controller. I logged into the Controller and went to the settings button at the bottom of the left-hand side of the menu. From there I clicked on the WiFi menu option. I want to look at the wifi profile of the Corporate wifi. The one they are trying to connect to. Next, I scrolled down to the Security area.
Under the Security area, You will see the Radius Profile. Take note of this name. We will call our bob. Once you have that name, Click the profile on the left-hand side of the screen.
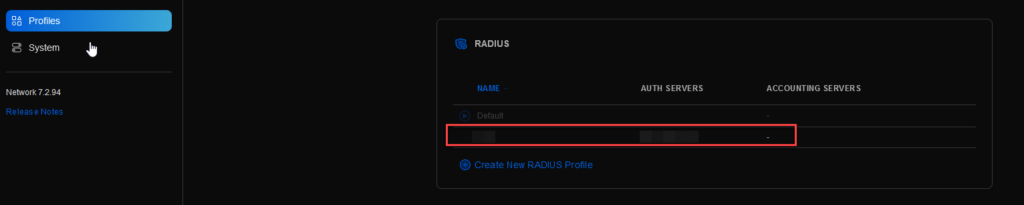
At this point, we have discovered the Radius Profile Name. Next, we need to dig into the Profile itself. More information the better when troubleshooting radius. Once you click on the Profile, scroll down to the Radius Section. From here, I found the name of the profile from before and clicked it.
Here we could see the Authentication servers’ IP addresses and ports. Now we know which server Radius is living on. From here, I go to the devices and find the Device they are trying to connect to. Thankfully, the device was named correctly. If it isn’t, then that’s a whole other ball game. I noted the IP address and mac address of the device. The device was active with no connections.
Troubleshooting Radius on the Server
I used RDP to access the IP address with success. I am thankful because sometimes the radius can be setup using compliance of some sort. Next, I connected to the Network Policy Server. After that, I connected to the Radius clients. Looking over the Friendly names, and IP addresses from the Unifi controller and the Radius Server, the problem was clear.
DHCP change occurred on the access points. This meant the NPS radius client IPs were wrong. To correct this, all I have to do is update the NPS Radius client’s IP addresses. However, I don’t want this to happen again. So, here are the steps I took.
Changed all the Access Points to Static instead of DHCP
Change the NPS Radius Client IP addresses to match.
Once I did this, The client was able to reconnect to their wifi using their windows domain credentials.
We use cookies to ensure that we give you the best experience on our website. If you continue to use this site we will assume that you are happy with it.