Growing up, I watched my parents do this thing that feels kind of rare now. They didn’t just go to work. They built a work life. Like the kind that bleeds into the community, where people know your name, and your effort leaves marks in places you’ll never fully see.
They built communities where they worked and even changed the town. My mom worked as a bookkeeper at a Bilo and my dad was the guy who made all of the TV stuff happen at a TV station. When they both passed away, we had people we didn't even know existed come and tell us stories of how their dedications affected their lives.
And I remember standing there thinking, wow. This is the real stuff. This is human relationships. This is impact. Not titles. Not buzzwords. Not “synergy.” Just showing up, being solid, and treating people like people. I want this.
However, it’s 2026 and not the 1990s.
Companies are purchased. Positions end. Entire departments get “restructured” because somebody in a different state wants a spreadsheet to look cleaner. And sometimes management rewards the loudest person, not the most honest one. I hate even typing that, but you know what I mean. We’ve all seen it.
So yeah, it’s easy to see why people job hop. I’ve experienced this myself on a few occasions, and I’m not pleased. Not because I think loyalty should be forced. But because I miss the idea that work could be steady enough to grow relationships. That you could stay somewhere long enough for people to actually know you. Not just your username in Teams.
And then comes the part that makes me want to gently fold my laptop in half.
I hate searching and comparing my resume to the job posting.
It feels like a game where the rules change every time. The job post reads like a wish list written by three different people who never met. Your resume reads like a life you actually lived. And then an ATS robot shows up and decides your future because you didn’t say “stakeholder management” in the correct sacred order.
Meanwhile I’m sitting there with a Diet Dr Pepper, trying to convince myself this is fine. Life is good. This is normal. Totally.
Its not.
But I still want that thing my parents had. The human part. The stories people tell later. The “they helped me” moments. So I’m not trying to win the corporate hunger games here. I’m trying to find a role where I can actually matter, with people who still value being real.
And since I don’t enjoy the resume-vs-job-post cage match…
So, Lets Match it up, using chat gpt.
What MATCH is
Alright. So when I say “Let’s MATCH it up,” I’m not trying to turn job hunting into some hustle culture personality trait. I’m not here to sell you a seven-step morning routine that starts with cold plunges and ends with crying in LinkedIn Premium.
MATCH is way more boring than that.
And that’s why it works.
MATCH is a comparison framework. That’s it. It’s a method to take a job posting and your resume, put them side by side, and stop relying on vibes. Because vibes are how you end up applying for a role you’re perfect for and getting rejected by a robot that thinks you’re underqualified because you said “ticketing system” instead of “ITSM platform.”
When we use MATCH, we’re doing something super simple:
We’re making sure your resume and the job posting are speaking the same language, without you changing who you are or making stuff up.
Because here’s the uncomfortable truth. A lot of job searching is translation. Not lying. Not exaggerating. Just translating. Like if you’ve been doing “keeping the place from catching fire” for five years, but the job post calls that “risk mitigation and operational continuity,” you should not lose points because you did not use their fancy phrase.
MATCH helps you do that translation in a way that still feels like you.
And it’s designed to be used in four places where people usually get stuck, burnt out, or angry. Sometimes all three.
1) Job Posting vs Resume Analysis
This is the “tell me where I stand” step. What’s a strong match? What’s weak? What’s missing? And what’s in the posting that’s implied but never directly said?
2) Resume Tailoring
This is where we take the truth you already have and shape it so it actually lands. Same experience. Cleaner connection. Less “hope they figure it out.”
3) ATS Optimization
This is the part where we stop pretending ATS does not exist. We pull the real keywords and competency signals, and we weave them in naturally, like a normal human. Not like a resume that reads like it was written by a toaster oven.
4) Interview Preparation
This is my favorite use of MATCH, honestly. Because it shows you where you’re weakest before you’re sweating through a “Tell me about a time…” question. You find the gaps, you build stories, you prepare your receipts.
So yeah, MATCH is not magic.
It’s more like a flashlight.
You shine it on the job post. You shine it on your resume. You see what’s real. And then you make smart edits instead of panic edits.
Now let’s break down the acronym itself, because each letter has a job. Once you get it, you will never go back to randomly editing bullets until you hate yourself.
The MATCH acronym
So now that we know MATCH is not a motivational poster, let’s actually break it down. This part matters because each letter is a different kind of thinking. If you skip steps, you end up doing what most people do. You rewrite your resume in a mild panic, throw more words at it, and hope the algorithm feels kindness that day.
MATCH keeps you honest. It also keeps you from spiraling.
M — Map
Mapping is where you stop guessing what the company wants and you make them say it out loud.
You take the job posting and break it down into parts you can actually work with:
The implied expectations are the sneaky ones. This is the stuff they do not say directly but they hint at. Like “fast-paced environment” usually means “we are understaffed and proud of it.” Or “must be able to juggle priorities” means “you will get interrupted every 12 minutes.”
When you Map, you create the benchmark. This is the measuring stick. Without it, you are just editing your resume in the dark.
Mini prompt for M (Map):
Map this job description into five sections:
1) Required skills
2) Preferred skills
3) Core responsibilities
4) Keywords and tools
5) Implied expectations (things not stated directly but strongly suggested)

Job Description:
[Paste job post]
A — Align
Align is where you look at your resume and ask one simple question.
Where do I already match this?
Not where you could match if you had three more certs and a time machine. Where you match now, based on what you have actually done.
This is also where you separate strong matches from partial matches. Strong match means you have done it, you can prove it, and you can talk about it. Partial match means you have some adjacency, but the proof is light or the wording is not clear.
Align is basically the honesty filter. It shows you what is already working so you do not accidentally delete your best stuff while chasing keywords.
Mini prompt for A (Align):
Using the mapped job requirements below, identify where my resume aligns.

Output in three sections:
1) Strong matches (clear evidence)
2) Partial matches (some evidence, needs strengthening)
3) Not present (missing or unclear)

Job Requirements (from Map):
[Paste the mapped list]

Resume:
[Paste resume]
T — Translate
Translate is my favorite, because this is where we stop losing points for wording.
Translation is not lying. It is not inflating. It is taking the real work you did and describing it in the same dialect the job posting uses.
Job posts have a language. Sometimes it is clean and direct. Sometimes it sounds like it was written by a committee that only communicates in buzzwords.
Either way, if the posting says “identity lifecycle management” and your resume says “made accounts and removed accounts,” you are talking about the same thing. The machine does not always know that. The recruiter might not either, especially if they are scanning at warp speed.
Translate means you mirror phrasing, match seniority language, and surface transferable skills. You keep the truth, but you present it in a way that lands.
Mini prompt for T (Translate):
Rewrite my resume bullets to better match the language of the job description.
Do not exaggerate or add experience I do not have.
Keep my original meaning, but mirror the job posting phrasing and seniority level.

Job Description:
[Paste job post]

Resume bullets to rewrite:
[Paste bullets]
C — Close Gaps
Close Gaps is where you look at what is missing and decide what kind of missing it is.
There are two kinds of gaps that matter.
The first is a real gap. You do not have that skill yet. You cannot claim it.
The second is a signal gap. You have done the work, but your resume is not proving it clearly. This one is way more common than people think.
Close Gaps is where you identify:
Missing skills Weak experience signals Missing metrics Experience that should be expanded
Then you decide what to do with it.
Add it, if it is true and relevant. Reframe it, if it exists but is hidden. Remove it, if it distracts from the role you want.
This is the section that saves you from tossing your whole resume into the trash because one posting asked for a tool you used one time in 2019.
Mini prompt for C (Close Gaps):
Identify gaps between the job description and my resume.
For each gap, label it as:
- Real gap (I do not have it)
- Signal gap (I have it but my resume does not show it well)

Then recommend one of these actions:
Add, Reframe, Remove, or Ignore (if low importance)

Job Description:
[Paste job post]

Resume:
[Paste resume]
H — Highlight
Highlight is where we decide what gets the best real estate.
Because the top of your resume is prime land. The first third of the first page is basically beachfront property. That is where the reader decides if they keep going.
Highlight means you prioritize:
Most relevant experience Job-specific metrics Keywords Core competencies
This is where you move the right bullets up, trim the fluff, and make it easy for a recruiter to connect the dots without working overtime.
Highlight is also where you stop treating your resume like a biography. It is not your life story. It is a targeted document meant to get you into a conversation.
A human conversation, ideally. With a person who might someday tell a story about working with you.
Mini prompt for H (Highlight):
Based on the job description, tell me what to highlight on my resume.

1) List the top 8 items I should prioritize (skills, keywords, accomplishments)
2) Tell me what should move to the top of the resume
3) Suggest a revised order for my sections (Summary, Skills, Experience, Projects, etc.)
4) Identify anything that should be trimmed or moved down

Job Description:
[Paste job post]

Resume:
[Paste resume]
Next up is where we put MATCH to work in the four places you listed.
And yes, I will give you copy and paste prompts that are ready to go, plus what good output should look like so you can tell if ChatGPT is being helpful or just being ChatGPT.
MATCH in real life: the 4 core use cases
This is the part where we stop admiring the acronym and actually use it. Because MATCH is cute on paper, but the whole point is that it saves you from that awful feeling of staring at a job post and thinking, “Cool. I have no idea what they want, and I’m apparently unqualified to exist.”
So we are going to use MATCH four different ways. Same framework, different outcome.
And I want you to notice something as we go. This is not just about getting past the ATS. It’s about respecting your own time and energy. Job searching can make you feel disposable. MATCH pulls you back into control. You stop begging for a chance and you start making a case.
1) Job Posting vs Resume Review
This is the “tell me the truth” step.
Before we tailor anything, before we optimize, before we rewrite a single bullet, we compare what they asked for to what you actually have. Line by line. Not emotionally. Not hopefully. Just honestly.
You want the model to:
Map the job post into requirements
Align your resume evidence to each requirement
Translate where your experience exists but your wording is weak
Close gaps by identifying what is missing or unclear
Highlight the strongest parts so you know what to lead with
This is the step that answers the question you are already asking in your head: “Am I even close?”
Copy and paste prompt (Job Posting vs Resume Review using MATCH):
Use the MATCH framework (Map, Align, Translate, Close Gaps, Highlight) to compare this job description to my resume.

M) Map:
- Extract required skills, preferred skills, responsibilities, keywords/tools, and implied expectations.

A) Align:
- For each mapped item, show where my resume provides evidence.
- Mark each item as Strong match, Partial match, or Not present.

T) Translate:
- Suggest wording changes to my existing bullets that better mirror the job posting language.
- Do not add experience I do not have.

C) Close Gaps:
- List gaps and label each as Real gap (I do not have it) or Signal gap (I have it but it is not clear).
- Recommend Add, Reframe, Remove, or Ignore for each gap.

H) Highlight:
- Tell me the top 8 things I should emphasize on my resume for this job.
- Suggest what should move to the top of the resume.

Output format:
1) A comparison table: Job requirement | Resume evidence | Match level | Notes
2) Then the rewritten bullet suggestions
3) Then a short competitiveness summary (Strong fit, Moderate fit, Stretch)

Job Description:
[Paste job post]

Resume:
[Paste resume]
What good output looks like If the output is good, it will feel specific. It will point to exact lines in your resume. It will not just say “You match well.” It will say “This bullet proves it, and this is the missing keyword.”
If the output is bad, it will be vague. It will give you generic career advice. It will try to rewrite your life story. We do not want that.
2) Resume Tailoring
This is where you take the same truth and aim it like a flashlight.
Tailoring does not mean changing who you are. It means choosing what to emphasize so the reader immediately understands why you belong in the room. Most resumes are not “bad.” They are just not targeted. They are written like a general biography instead of a specific argument.
Tailoring is also where you stop treating every bullet equally. Some bullets are doing real work. Some bullets are just taking up space.
Copy and paste prompt (Resume Tailoring using MATCH):
Use the MATCH framework to tailor my resume for this exact job.
Do not exaggerate. Do not invent experience. Keep it honest.

M) Map the job post into:
- Required skills
- Preferred skills
- Responsibilities
- Keywords/tools
- Implied expectations

A) Align my current resume to that map and identify:
- What already supports the job strongly
- What supports it weakly

T) Translate:
- Rewrite my Professional Summary (3 to 4 lines) to match this role.
- Rewrite my top 6 to 10 bullets to mirror the job posting language.
- Keep bullet structure consistent and results-focused.

C) Close Gaps:
- Identify missing signals and suggest what to expand, add, or reframe using my existing experience.

H) Highlight:
- Recommend the best ordering of sections and which items should be in the top third of page one.

Output:
1) Revised Summary
2) Revised Skills or Core Competencies section (if needed)
3) Revised bullets (ready to paste)
4) Notes on what changed and why

Job Description:
[Paste job post]

Resume:
[Paste resume]
How you use the result Take the revised summary and the top bullets first. That is the “prime real estate.” If you only have the energy for one thing, do that. It gives you the biggest return.
3) ATS Optimization
Let’s talk about the robot.
ATS systems are not evil. They are just literal. They scan for signals. They look for keywords, tools, titles, and patterns. Humans do this too, but ATS does it faster and colder and without caffeine.
ATS optimization is not keyword stuffing. Keyword stuffing is how you end up with a resume that reads like a broken toaster manual.
Optimization is making sure the words that matter actually show up in a way that still sounds human.
Copy and paste prompt (ATS Optimization using MATCH):
Use MATCH to optimize my resume for ATS for this job posting.

M) Map:
- Extract the top 20 keywords, tools, and competency phrases from the job post.
- Group them into categories (tools, processes, soft skills, certs, domains).

A) Align:
- Check my resume for each keyword or phrase.
- Mark as Present, Present but weak, or Missing.

T) Translate:
- Rewrite bullets where needed to naturally include missing or weak keywords.
- Keep the statements truthful and specific.
- Do not overuse the same keyword.

C) Close Gaps:
- Identify missing terms that I cannot honestly claim.
- Suggest alternatives that reflect adjacent experience I do have.

H) Highlight:
- Provide a final ATS-friendly Skills/Core Competencies block tailored to this job.

Output:
1) Keyword table with status
2) Revised bullets (ready to paste)
3) ATS Skills block

Job Description:
[Paste job post]

Resume:
[Paste resume]
Small warning that saves pain Do not chase every keyword. Some job posts are written like Christmas lists. Prioritize the recurring themes. If “Active Directory” shows up five times, that matters more than a tool mentioned once.
4) Interview Preparation
This is where MATCH turns into confidence.
Interview prep is not memorizing answers. It is knowing your weak spots and having stories ready, so you are not inventing coherence under pressure.
MATCH helps you identify:
Where your experience is strongest, so you can lead with it
Where you are thin, so you can prepare a clean explanation
Where the job expects something you have not done, so you can position adjacent work
Copy and paste prompt (Interview Preparation using MATCH):
Use the MATCH framework to prepare me for an interview for this role.

M) Map:
- Identify the top responsibilities, required skills, and implied expectations.
- Identify what this role will likely measure in interviews.

A) Align:
- Based on my resume, list my strongest matching areas and why.

T) Translate:
- Convert my strongest bullets into 6 STAR stories (Situation, Task, Action, Result).
- Keep them short and conversational.

C) Close Gaps:
- Identify my weakest areas for this role.
- For each weak area, give me:
  a) a truthful explanation strategy
  b) a bridge statement using related experience
  c) a learning plan answer if asked directly

H) Highlight:
- Provide a list of 10 likely interview questions for this role.
- Tell me which 3 stories I should lead with and why.

Job Description:
[Paste job post]

Resume:
[Paste resume]
How you practice without losing your mind Read your STAR stories out loud once. Fix what sounds weird. Then stop. You are not trying to become a different person. You are trying to become a clearer version of the person who already did the work.
Pro Tips
Here’s where we make MATCH actually feel usable when you’re tired, annoyed, and your brain is doing that thing where it wants to quit forever. These are the little moves that make the whole process less painful and way more consistent.
Ask for a comparison table
Do not let the model ramble. Rambling is how you end up with a pretty paragraph and zero action.
Ask for a simple table like this:
Job Requirement | Resume Evidence | Gap Level
That’s it. It forces clarity. It forces receipts. It also makes it obvious when your resume is missing proof, not experience.
If the job says “automation” and your resume evidence is “helped with scripts sometimes,” the gap level is going to tell on you. That’s a good thing. Better now than in an interview.
Run it twice
First run is analysis. Second run is writing.
If you try to do both in one shot, you usually get a mushy blend of generic advice and half-rewritten bullets. Instead:
Pass 1: Compare and diagnose using MATCH. Pass 2: Rewrite only the sections with the highest impact.
This keeps you from rewriting your whole resume like you are repainting a house because one wall has a scuff mark.
Ask for confidence level and assumptions
This one is huge. Models love to sound confident, even when they are guessing.
So tell it to label:
Confidence level for each match (High, Medium, Low)
Assumptions it had to make (like “I assume you used Jira because you said ticketing”)
Assumptions are where people accidentally drift into stuff they cannot defend. We are not doing that. We are staying clean.
Keep a “truth inventory”
This is the thing that keeps you honest when tailoring starts to feel like fiction writing.
Make a small list for yourself of:
Tools you truly used
Metrics you can defend
Projects you can explain without sweating
Stories you can tell in an interview
Then when MATCH suggests edits, you only accept changes that fit inside your truth inventory. That’s how you stay human. That’s how you avoid becoming the person who “led a global transformation initiative” when you were really just trying to keep the server from screaming.
Also, it makes interviews easier. You are not performing. You are just telling the truth clearly.
And yes, I still recommend doing all of this with a Diet Dr Pepper nearby. Not because it makes the ATS nicer. It just makes you feel slightly less like you are being judged by a spreadsheet.
Closing thoughts
I keep coming back to my parents because it’s the cleanest example I have of what work can look like when it’s human.
They weren’t famous. They weren’t chasing “personal brand.” They just showed up, did the job, treated people right, and stayed long enough for roots to grow. And when they were gone, people showed up with stories. Not about their job titles, but about how they made life easier, how they helped, how they mattered. That is legacy. Quiet, steady, real.
Now we live in a world where companies can act like people are disposable. One acquisition, one reorg, one manager with a weird ego, and suddenly you’re updating your resume on a Tuesday like none of it counted. That messes with you. It makes you question the whole idea of “building something” at work.
But here’s the thing I have to remind myself of, and maybe you need it too.
Even if the system is cold, you don’t have to become cold.
Job searching feels gross sometimes because it turns humans into documents. It turns your lived experience into bullet points. It turns your relationships into “stakeholders.” But under all that noise, what you are really doing is trying to find your people again. A team you can contribute to. A place where your effort is felt. A manager who values truth more than theatrics. Coworkers who remember you as a person, not a resource.
You are human, just like the rest of us. Let's treat each other as such.
So, here I am looking down at a project to create a new domain and migrate users. Normally this isn't a bad process. You clone the user on the other domain and have them sign in. Use a tool like Profwiz or ADMT (assuming it works). Then I realize, they are AD synced to Entra/Identity. Oh, this is going to be interesting. So, I pulled out my Diet Dr Pepper and got to work. It's time to find the Entra ID source anchor attribute.
ms-DS-ConsistencyGuid is the Entra ID source anchor attribute
This little guy is the magic sauce that you are looking for. Back in the day, the syncing attribute was the object guid. This was a problem as many companies had more than one domain with the same account names. So, this little consistency guid matches the Immutable ID in entra. Lets take a look at these two.
On-prem AD user:
Attribute: ms-DS-ConsistencyGuid
Type: GUID stored as binary
Entra ID user:
Attribute: immutableId
Type: Base64-encoded version of that GUID
As long as these values never change, your hybrid identity stays the same. Change it the wrong way, your sync gets ugly. Here is how you can get the information from AD.
If it's $null, nothing is using it yet, it not, then something is using it.
It’s a GUID field, perfect for unique identity.
It doesn’t change when you move users between OUs.
In the right design, you keep it stable even across forests and migrations.
Microsoft now recommends it specifically as the Entra ID source anchor attribute.
This is important to understand. if these don't match, you don't have a sync going on. Lets write a powershell that will check both.
Confirm with powershell
This powershell grabs both and lets us know if they match, if they don't it tells us.
<#
.SYNOPSIS
    Compare on-prem ms-DS-ConsistencyGuid with Entra/Azure AD ImmutableId.

.DESCRIPTION
    For each user:
      - Reads ms-DS-ConsistencyGuid from AD
      - Converts it to Base64 (what ImmutableId should be)
      - Gets the cloud ImmutableId by UPN
      - Outputs if they match

    NOTE: This script is READ-ONLY. It does NOT change anything.
#>

Import-Module ActiveDirectory
Import-Module MSOnline

Write-Host "Connecting to Entra/Azure AD..."
Connect-MsolService

Write-Host "Getting AD users..."
$adUsers = Get-ADUser -Filter * -Properties userPrincipalName, ms-DS-ConsistencyGuid |
           Where-Object { $_.UserPrincipalName -ne $null }

$result = @()

foreach ($user in $adUsers) {

    $upn = $user.UserPrincipalName

    # Get ms-DS-ConsistencyGuid from AD
    $consistencyBytes = $user.'ms-DS-ConsistencyGuid'
    $consistencyGuid  = $null
    $adAnchorBase64   = $null

    if ($consistencyBytes) {
        $consistencyGuid = [Guid]$consistencyBytes
        $adAnchorBase64  = [Convert]::ToBase64String($consistencyBytes)
    }

    # Get cloud ImmutableId by UPN
    $cloudUser      = Get-MsolUser -UserPrincipalName $upn -ErrorAction SilentlyContinue
    $immutableId    = $null
    $matchStatus    = "Unknown"

    if ($cloudUser) {
        $immutableId = $cloudUser.ImmutableId
    }

    # Work out match status
    if ($adAnchorBase64 -and $immutableId) {
        if ($adAnchorBase64 -eq $immutableId) {
            $matchStatus = "Match"
        } else {
            $matchStatus = "Mismatch"
        }
    }
    elseif ($adAnchorBase64 -and -not $immutableId) {
        $matchStatus = "No ImmutableId in Entra"
    }
    elseif (-not $adAnchorBase64 -and $immutableId) {
        $matchStatus = "No ConsistencyGuid in AD"
    }
    else {
        $matchStatus = "Neither Set"
    }

    $result += [PSCustomObject]@{
        UserPrincipalName   = $upn
        ConsistencyGuid     = $consistencyGuid
        ADSourceAnchorB64   = $adAnchorBase64
        EntraImmutableId    = $immutableId
        MatchStatus         = $matchStatus
    }
}

# Show on screen
$result | Sort-Object MatchStatus, UserPrincipalName | Format-Table -AutoSize

# Optional: save to CSV for review
#$result | Export-Csv .\AnchorComparison.csv -NoTypeInformation
This script will give you a list of all the users and if it matches. Here is a script that will force the user to the immutableid. The check gives you info, and if you don't check it will set it.
function Set-MsDsConsistencyGuidFromImmutableId {
    <#
    .SYNOPSIS
        Set ms-DS-ConsistencyGuid from Entra/Azure AD ImmutableId for one user.

    .DESCRIPTION
        Given a samAccountName:
          - Look up the on-prem AD user
          - Read ms-DS-ConsistencyGuid
          - Look up the Entra/Azure AD user by UPN
          - If ms-DS-ConsistencyGuid is empty and ImmutableId exists,
            set ms-DS-ConsistencyGuid to the ImmutableId value (decoded from Base64)

        Use -Check to only show what would happen, without making changes.

    .PARAMETER SamAccountName
        The on-prem AD samAccountName of the user.

    .PARAMETER Check
        If supplied, only checks and reports. No changes are made.
    #>

    [CmdletBinding()]
    param(
        [Parameter(Mandatory = $true)]
        [string]$SamAccountName,

        [switch]$Check
    )

    # Make sure AD module is available
    if (-not (Get-Module ActiveDirectory -ListAvailable)) {
        Write-Error "ActiveDirectory module not found. Install RSAT / AD tools first."
        return
    }
    Import-Module ActiveDirectory -ErrorAction Stop

    # Make sure MSOnline module is available
    if (-not (Get-Module MSOnline -ListAvailable)) {
        Write-Error "MSOnline module not found. Install-Module MSOnline first."
        return
    }
    Import-Module MSOnline -ErrorAction Stop

    # Get on-prem user
    $adUser = Get-ADUser -Identity $SamAccountName -Properties userPrincipalName, ms-DS-ConsistencyGuid -ErrorAction SilentlyContinue

    if (-not $adUser) {
        Write-Error "No AD user found with samAccountName '$SamAccountName'."
        return
    }

    $upn = $adUser.UserPrincipalName
    if (-not $upn) {
        Write-Error "User '$SamAccountName' does not have a UPN. Cannot match to Entra."
        return
    }

    # Current AD ConsistencyGuid
    $currentConsistencyBytes = $adUser.'ms-DS-ConsistencyGuid'
    $currentConsistencyGuid  = $null
    $currentConsistencyB64   = $null

    if ($currentConsistencyBytes) {
        try {
            $currentConsistencyGuid = [Guid]$currentConsistencyBytes
            $currentConsistencyB64  = [Convert]::ToBase64String($currentConsistencyBytes)
        }
        catch {
            Write-Warning "Failed to interpret existing ms-DS-ConsistencyGuid as GUID/Base64: $_"
        }
    }

    # Get cloud user and ImmutableId
    $cloudUser = Get-MsolUser -UserPrincipalName $upn -ErrorAction SilentlyContinue
    if (-not $cloudUser) {
        Write-Error "No Entra/Azure AD user found with UPN '$upn'."
        return
    }

    $immutableId = $cloudUser.ImmutableId

    # Decide what to do
    $action = "None"
    $result = "No change"

    if ($currentConsistencyBytes) {
        # Already has a ConsistencyGuid
        $action = "None"
        $result = "ms-DS-ConsistencyGuid already set. Nothing to do."
    }
    elseif (-not $immutableId) {
        $action = "None"
        $result = "Cloud user has no ImmutableId. Cannot set ms-DS-ConsistencyGuid from it."
    }
    else {
        # We CAN set ms-DS-ConsistencyGuid from ImmutableId
        $action = "Set ms-DS-ConsistencyGuid from ImmutableId"

        try {
            $newBytes = [Convert]::FromBase64String($immutableId)
            $newGuid  = [Guid]$newBytes

            if ($Check) {
                $result = "CHECK ONLY: Would set ms-DS-ConsistencyGuid to $newGuid from ImmutableId."
            }
            else {
                Set-ADUser -Identity $adUser.DistinguishedName -Replace @{ 'ms-DS-ConsistencyGuid' = $newBytes }
                $currentConsistencyGuid = $newGuid
                $currentConsistencyB64  = [Convert]::ToBase64String($newBytes)
                $result = "UPDATED: ms-DS-ConsistencyGuid set to $newGuid from ImmutableId."
            }
        }
        catch {
            $action = "Error"
            $result = "Failed to convert ImmutableId '$immutableId' to GUID/bytes: $_"
        }
    }

    # Output a simple summary object
    [PSCustomObject]@{
        SamAccountName            = $SamAccountName
        UserPrincipalName         = $upn
        CurrentConsistencyGuid    = $currentConsistencyGuid
        CurrentConsistencyGuidB64 = $currentConsistencyB64
        CloudImmutableId          = $immutableId
        Action                    = $action
        Result                    = $result
        CheckMode                 = [bool]$Check
    }
}
Notes
if you have two domains, and the Entra ID source anchor attribute is the same in a synced area in both, you will get odd little accounts out of no where. Once you remove one of those into a unsynced ou, this will resolve the issue.
You can force a user to become someone else using the Entra ID source anchor attribute ms-ds-consistencyguid. This isn't a great thing, but it's a hack around. So, if you want bob to become philip's entra account, just change his anchor.
What can we learn as a person
In Entra, the anchor says “this is who I am, no matter where you move me.” In real life, we’ve got those too—just without the GUID. They’re the moments, labels, and stories that quietly tell us who we are: the kid who “wasn’t smart,” the one who always had to fix everything, the person who “always messes things up.” Those anchors don’t sit in a database, but they still decide what we “sync” with: what relationships we accept, what jobs we go for, what kind of treatment we think we deserve.
The tricky part is that a lot of those anchors were never chosen on purpose. They just happened, and we started believing, “This is just who I am.” But an anchor in your life is not a prison; it’s a reference point you’re allowed to outgrow. You might not be able to change what happened, but you can change what it means. “I failed” can become “I learned what I need to avoid next time.” “I grew up in chaos” can become “No wonder I get anxious when things change—and I can still learn how to calm myself and ask for what I need.” Same history, different interpretation.
So it’s worth asking yourself: What have I been using as my anchor? And if you could pick one on purpose, what would it be instead? Maybe something like “I’m learning,” or “I’m allowed to grow,” or “I deserve basic respect, even when I screw up.” In identity systems, once the anchor is stable and correct, all the sync errors start to calm down. In life, when your inner anchor shifts from shame to self-respect, a lot of emotional “sync errors” start to calm down too. The past doesn’t vanish—but it stops being the only thing that gets to name you.
The other day, I was showing a friend how to set up Intune deployments. Then it hit me: I have unique scripts for script detections and things like that here on therandomadmin.com. However, I haven't really gone through the detection rules for built-in items. I was like, well now I have to fix that. So here we are going to fix that with the Intune Detection Rules. Let's get started.
Types of Intune Detection Rules
There are three built-in detection types that we will go over today. They are the MSI, File, and Registry.
MSI is like the easy button, (no not the staples one from the commercials... did I just age myself?)
File is my least favorite one, but it works for legacy apps
Registry is my favorite one and it's the one that I will spend some time on for you all.
Other than the built-in items, there are scripted items which is unique in it's own rights. You can take a look at how these scripts work here. Andrew has a good tutorial on his blog as well. Today will be all about the built-in items.
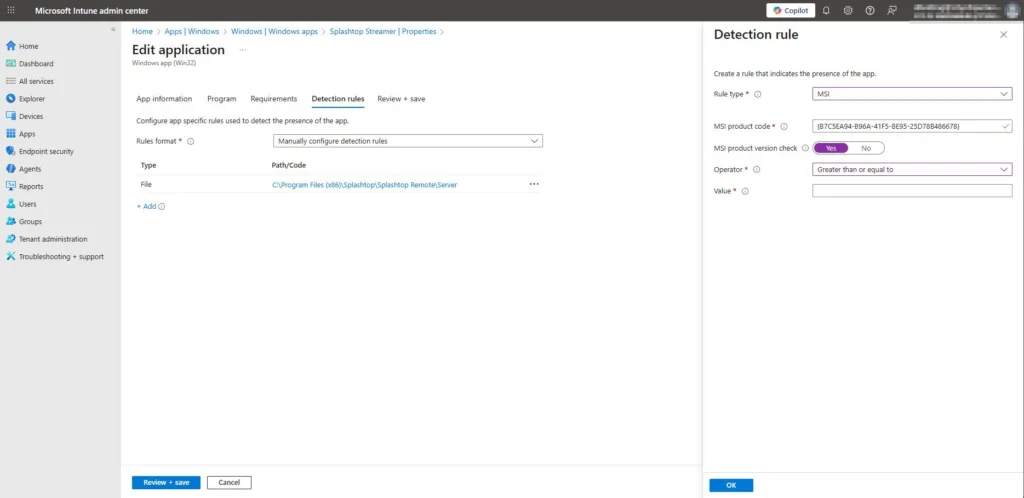
The Built-In MSI Rule
The MSI rule is the easy button of the detection scripts. If you are using an MSI, it will pull the information directly from the MSI. Once you get to the detection rule part you can follow these steps:
Click Add
Select MSI
And click save
Magic, right? The other thing you can do is select "MSI Product Version Check." Here you can select an operator like "greater than or equal to" and then give it the value. Which is the product version. This helps with auto-updated items. Which I always suggest using. Below is a screenshot.
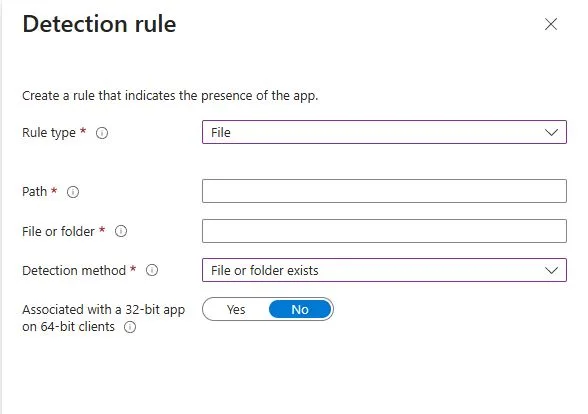
File Detection Rule
Our next built-in detection rule is for files. This is good if you have an app that doesn't install like normal apps. Older apps or more niche apps are like this. For example. We installed a special Creo app. It installed in the C:\PTC location, and it didn't add itself to the registry uninstall strings. It didn't come in an MSI; it was an EXE with custom everything. This app was a pain in the backstracher. So we used the File location rule. Here is how you can set it up.
Inside your detection rule, click Add.
Rule type: File
Path: The folder that you want to check. In this case it was C:\PTC
File or Folder: Here we wanted to see if the creo.exe existed. So, that's what I put here.
Detection Method: We used file or folder existed.
Greater than or equal to string
As you will learn, I am all about the version numbers. If you select the string (version), you will need to get that version number from the file you are pulling from. You can do this with PowerShell pretty quickly.
Once you have this information, you will then proceed to input it into the value section once you select the string (version) and greater than or equal to options.
Built-In Intune Detection Rule for Registry
The registry key is the most common and the most useful as well. Most apps install themselves in this method. The script below is going to be your best friend. What it does is give you the information you need. Lets break down what each item is so we can look at the script and make this happen. I'm giving this the most focus because it's the most common.
Registry Type: The type we are using.
Key Path: The path of the uninstall string that we will be using
Value Name: What we are looking for, this case we will be looking for displayversion
Detection Method: Version Comparison
Operator: Greater than or equal to
Value: What value we are looking for
Assocated: Is it a 32 or 64.
Script
So you will have to go digging into the registry for this information. However, this registry area is just confussing and really hard to manually dig through. So powershell is once again, our friend.
All you have to do is replace the app name. It will provide you with everything you need inside the built-in detection rule. This is the output that it provides:
RuleType         : Registry
KeyPath          : HKEY_LOCAL_MACHINE\Software\Microsoft\Windows\CurrentVersion\Uninstall\{6EB73F60-E858-3AF3-913A-0C1783656B42}
ValueName        : DisplayVersion
DetectionMethod  : Version comparison
Operator         : Greater than or equal to
Value            : 143.0.7499.170
AssociatedWith32 : False
This script really makes finding apps easier. If the app installs in another place, good hunting, my friends.
What we can learn as a person
I am still missing my keys. I have the backup fob for my car, but I have no idea where my normal keys are. So no house key right now. Sometimes, I need to backtrace what I have done to find where I am going. Which is ok. This is why I document so much because I don't have the brain space to remember everything I have done. This is also why this blog post exists. I realized I never once really did explain how to use the built-in tools. Now I have a place to come and get the script I need and anyone else needs. So that will be nice later down the road, and I will thank myself later. Giving myself the little micro successes in the future is what I am going for here. The keys, on the other hand, I didn't set up a space for them to go with the new desk I have. Thus, they are in the ether somewhere, and when I find them, they will go into my little cubby on my new desk. So, set yourself up for micro successes, whether you know it or not, in the future. This will reduce a lot of stress and anxiety in the future. Remember, 80% of life is the systems that you have put into place. So, let's make good systems. Then you can set up your own Intune detection rules for your life to detect when you gave yourself successes. Like, when I see the wallet inside the new cubby. I can give myself a little thanks.
The VPN tunnel was solid. We had split-tunnel traffic, per-user group policies, and MFA layered on Azure AD sign-ins. Nothing fancy, just a Meraki firewall and a bunch of cloud-native users on laptops.
Then someone asked for Wi-Fi to authenticate via RADIUS.
Not Wi-Fi on laptops, Wi-Fi for the office printers and a couple of older VOIP phones. Devices that didn’t speak SAML, didn’t join Azure AD, and couldn’t use certificates without a management headache. Just a plain old SSID with LDAP-backed RADIUS.
That’s when the obvious hole showed up: we didn’t have an LDAP source. Azure AD, by itself, doesn’t expose LDAP or Kerberos. And we had no on-prem domain controller.
At first, we thought Meraki might support SAML auth directly. It doesn’t, not for VPN or Wi-Fi. It does support RADIUS, but that assumes your RADIUS server has an actual directory to talk to.
We weren’t going to roll out on-prem AD just to get LDAP. That would mean a domain controller, backups, patches, and joining devices, all the things we’d intentionally avoided by going full Azure AD in the first place.
What we needed was LDAP, not Active Directory in the traditional sense. Just something that could respond to a bind request and validate passwords that already existed in Azure AD. That pointed us to Azure AD Domain Services. So, what is Azure's AD DS?
What is Azure AD Domain Services?
Azure AD Domain Services (Azure AD DS) is Microsoft’s way of giving you the parts of Active Directory that legacy systems still expect without forcing you to build or maintain domain controllers.
When you enable it, Microsoft stands up two managed domain controllers inside your chosen Azure virtual network. You can’t RDP into them, patch them, or change their schema. They just exist, quietly providing LDAP, Kerberos, and NTLM.
That’s the entire draw: a read-only, managed domain that syncs from your Azure AD tenant. When a user resets their password in Azure AD, that hash syncs down to Azure AD DS so older systems can authenticate it.
It’s not the same thing as Azure AD. Azure AD DS exposes the traditional domain protocols that cloud-only Azure AD never had. You can bind to it with LDAP, join Windows VMs to the domain, and even apply Group Policy Objects.
But there are limits worth knowing early. You can’t extend the schema. You can’t create or edit users directly with ADUC, the objects are synchronized one-way from Azure AD. Forest and domain trusts are unsupported, so it stands alone. Replication is handled entirely by Microsoft and runs on their schedule, not yours.
If you’re thinking of it as “Active Directory in the cloud,” that’s close enough for function but wrong in control. It’s closer to “a read-only mirror of Azure AD that speaks old protocols.”
For teams like ours, that was perfect. We didn’t want the overhead of managing AD. We just needed LDAP to exist long enough for the Meraki RADIUS server to point at something that could actually answer.
Why a cloud-native org might still need it
If you start in the cloud, Active Directory sounds like something you escaped from. You’ve got Azure AD for identity, Entra ID for MFA, and Intune for device management, everything’s tidy until you run into gear that doesn’t understand any of it.
That’s where the problem hides. Legacy protocols didn’t retire when we moved to the cloud. Printers, VPN clients, even network appliances like Meraki still expect LDAP or Kerberos to confirm a user exists. Azure AD doesn’t provide either. It speaks modern OAuth and SAML, great for browsers, useless for RADIUS.
In our case, the Meraki firewall was doing its job. It could handle RADIUS authentication, but it needed a directory to check against. We pointed it at Azure AD and got nothing. Meraki expected LDAP; Azure AD offered tokens. Different worlds.
Azure AD Domain Services bridged that gap neatly. Once it was running, we could bind the Meraki RADIUS server directly to the managed domain using LDAP over SSL. No extra domain controllers. No sync tools. Just credentials that matched the same users already living in Azure AD.
The benefit wasn’t only the VPN fix. Azure AD DS opened up old SMB file shares, on-prem accounting apps, and one ancient label printer server that refused to die. Anything that needed to see “DOMAIN\username” finally had somewhere to look.
We didn’t bring Active Directory back from the dead, we just gave the ghosts of LDAP and NTLM a place to live that didn’t need babysitting.
Setup decisions and things that stalled us
When we decided to spin up Azure AD Domain Services, the wizard made it look easy, pick a resource group, choose a network, and wait. The waiting part wasn’t optional.
Azure AD DS takes a while to build. About forty-five minutes after deployment, the domain name resolved, but LDAP wasn’t answering yet. Microsoft handles replication behind the scenes, so all you can do is watch the portal and drink coffee. The service eventually wakes up, but it’s a quiet kind of delay that catches people off guard.
We tied it into an existing virtual network where our jump host lived. That vNet had subnets for servers and management tools, but no DNS server configured. Azure AD DS creates its own DNS, and here’s the catch: every VM that needs to talk to it must use its private IPs as DNS. Ours were 10.x.x.4 and 10.x.x.5, automatically assigned inside the vNet. Forgetting that step means your domain join will hang forever at “locating domain controller.”
The next tripwire was password hashes. Azure AD doesn’t store NTLM hashes unless you enable that sync for Domain Services. When you first turn on AD DS, users need to reset their passwords before they can authenticate through LDAP or Kerberos. The portal explains this in one small note, which most people skim. We learned the hard way, nobody could log in until they changed passwords.
Once DNS was right and passwords synced, domain join worked like it used to. From the jump box:
No special parameters, no magic. The VM rebooted, grabbed a GPO, and joined the managed domain.
One last surprise: Azure AD DS doesn’t live on public IPs. Everything that touches it, servers, RADIUS, management VMs, must exist inside or be peered to the same vNet. That meant moving our RADIUS instance closer, network-wise, to keep LDAP traffic private and fast.
It wasn’t hard work, but it reminded us how much “simple” depends on wiring things the right way first.
What’s different about managing it
Once the domain started answering pings and LDAP binds, the real question was: how do you manage something you don’t control?
Azure AD Domain Services feels familiar at first. You can open Active Directory Users and Computers (ADUC), Group Policy Management Console (GPMC), and even AD Sites and Services from a domain-joined VM. But the difference shows up fast, it’s all read-only from Azure AD’s point of view.
You can’t make new users or edit synced ones inside ADUC. The data comes one way: Azure AD → Azure AD DS. Any changes flow down automatically, not up. The right place to create a new account is still the Entra (Azure AD) portal. The managed domain just receives a copy when synchronization runs.
Group Policy still works, but it’s scoped to the AADDC Computers and AADDC Users containers. There’s no organizational unit hierarchy beyond what Microsoft provides. You can create your own OUs under those if you need custom policies, but it’s best to keep it minimal. GPO replication is slower than you’d expect, usually a few minutes rather than seconds. Enough to wonder if it applied, not long enough to panic.
DNS management is handled inside the Azure portal. The domain creates an internal zone matching your AD DS domain name. You can add or modify records, but Microsoft owns the root of that zone. If you need conditional forwarders or split-brain setups, you handle that in your own DNS server, not theirs.
From a backup and uptime standpoint, it’s completely hands-off. Microsoft maintains two domain controllers behind the service, replicating automatically across zones in the selected region. There’s no RDP access, no snapshots, and no patch windows to plan. You give up visibility in exchange for reliability, and for most small or hybrid environments, that’s a fair deal.
The adjustment was mostly mental. After years of scripting our own domain controllers, it felt odd to trust a directory we couldn’t touch. But the logs told the truth: LDAP binds were succeeding, Kerberos tickets were valid, and RADIUS requests from the Meraki box were authenticating just fine.
Sometimes the best kind of admin work is the one that doesn’t need you anymore.
Why this didn’t mean ‘going back on-prem’
After Azure AD DS was running and the RADIUS server finally answered a test request, someone joked that we’d rebuilt Active Directory in the cloud. It wasn’t wrong, but it missed the point.
We didn’t resurrect on-prem AD. We just rented the only pieces we still needed: LDAP and Kerberos. No domain controllers to patch, no replication errors, no SYSVOL eating itself on a Friday. Microsoft runs the plumbing, we just point systems at it.
That small distinction mattered. The Meraki VPN clients could now use the same usernames and passwords that Azure AD handled for everything else. The accounting share mounted without a service account buried in a batch file. Legacy systems got to stay alive while we planned their replacements.
For a company that started cloud-first, Azure AD Domain Services wasn’t a step backward, it was a bridge. It gave the network just enough “old” behavior to keep RADIUS and LDAP-bound devices working, without dragging a full domain back into maintenance.
There’s still a line between the new world and the old one, but now it’s clean. The VPN connects. The logs stay quiet. And nobody’s asked for a physical domain controller since.
What can we learn as a person
So, I have 7 Doom boxes. What's a doom box you ask? It's a box that you throw something into and you forget about it. They are not cool. They build up over time and then you take a weekend to clean them out. This is kind of how servers can be over time. I have seen environments with 3000 servers but only needed 7 of them. While I have seen some with 300 and needed all 300. Knowing what to keep and what not to keep is so important, especially for our mental health. The Ad ds takes the load of active directory off of us and takes it to the cloud where it's more manageable. We have so many things in our life that we should do that with. But what are they? What is your AD DS? What should you be off loading to others?
It was one of those afternoons where my Dr Pepper was flat but the ticket queue was very much not. I’d been asked to sketch a plan for Veeam backups across 500 TB of mixed storage, and my brain felt like a RAID array rebuilding on one disk. I tossed a lazy prompt at GPT—“make a plan for veeam backups for 500tb of data”—and, wow, the answers were technically correct yet painfully generic. “Assess requirements.” “Consider retention.” Thanks, fortune cookie. Google failed me earlier, and this wasn’t better. That’s when I remembered the DREAM prompt framework I’ve been preaching to everyone else but somehow forgot to use myself.
Here’s the embarrassing part: the model wasn’t the problem; I was. I asked for a plan with zero shape. No constraints, no context, no targets. So of course it handed me fluffy advice. The moment I re-framed it with DREAM—Define, Research, Explore, Act, Measure—the tone changed. Instead of “back up stuff, be safe,” it started asking the right questions and proposing paths I could actually run in production: storage tiers vs. immutability windows, WAN links vs. backup windows, scale-out repository design, off-site copy jobs with SOBR, and what to measure after week one.
We’ll break DREAM down step by step next, but the headline is simple: if you want GPT-5 to move from brainstorm to blueprint, give it rails. That’s what the DREAM prompt framework is—rails. And when your soda is warm and your SLAs are colder, rails beat vibes every single time.
What DREAM Means (Define, Research, Explore, Act, Measure)
If you strip away the fancy talk, the DREAM prompt framework is just good project hygiene packaged for GPT-5. It gives the model rails so your ideas don’t fall into the “uhh… maybe?” ditch. DREAM stands for Define, Research, Explore, Act, Measure, and each word pulls the conversation from fuzzy thoughts into something you can actually run. Think of it like moving a ticket from “New” to “Closed” without skipping the bits that always come back to bite you.
DREAM shines on idea-to-action workflows and loves GPT-5’s step-by-step reasoning. When you’re planning a rollout, a migration, or a playbook, it keeps you honest. For quick trivia, skip the ceremony. For anything with owners, timelines, and risk, DREAM the thing.
Measure: A Quick Tour of the DREAM prompt framework
Define is your one-sentence truth. Name the problem, the goal, and who cares about it. Not “fix backups,” but “protect 500 TB with 30-day retention and a 24-hour RPO for Tier 1.”
Research is where GPT-5 surfaces the context you forgot: versions, licensing, bandwidth, compliance, and edge cases. Ask for assumptions and unknowns so you can verify.
With Explore, demand at least three distinct approaches. Each needs pros, cons, costs, risks, and a rollback path. Include one “risky but interesting” option to test constraints.
Act turns direction into a tiny, reversible plan. Steps, owners, timeboxes, comms notes, change control, and a test plan. If it won’t fit in a ticket, it’s not tight enough.
Finally, Measure defines success before you start. Pick KPIs like adoption, reliability, support load, and security. Set thresholds for “stop” or “roll back,” then iterate the plan next sprint.
When to Use DREAM—and When Not To
The DREAM prompt framework shines whenever you’re turning a messy idea into a plan with owners, timelines, and “please-don’t-break-prod” risk. Think rollouts, migrations, incident playbooks, change windows, or even a hiring pipeline you want to run like a project. If the outcome needs trade-offs, a rollback, and a way to prove it worked, DREAM earns its keep. You’ll feel it click the moment GPT-5 starts naming constraints you forgot and options you didn’t consider. That’s the sweet spot: idea → action without the chaos.
But not everything needs the full ceremony. If you’re asking for a single switch, a one-line command, or a quick definition—skip DREAM and go straight for the answer. No need to drag five steps into “what’s the Veeam flag for synthetic fulls?” land. Same for trivia and “remind me the syntax” moments. Use DREAM when you’d normally open a ticket, write a runbook, or brief a stakeholder. Use something lighter when you just need a nudge, not a roadmap. Your brain (and your weekend) will thank you.
The Five Steps, Admin-Style (Deep Dive)
Define — say the quiet part out loud
If the DREAM prompt framework had a heartbeat, this would be it. Define is your one-sentence truth: the outcome you want, who it’s for, the guardrails you can’t break, and how you’ll know you hit the mark. Most of us (me included) jump straight to tools—“we need Veeam,” “we need Intune”—and then wonder why GPT-5 hands us mush. Tools are tactics. Define is the destination.
Think outcome first, not vibes. For the Veeam mess, “make a plan for veeam backups for 500tb of data” was hopeless because it hides the goals. A real Define reads like a tight change request: “Protect 500 TB across Tier 1 and Tier 2 workloads with Tier 1 at 24-hour RPO/4-hour RTO and Tier 2 at 48-hour RPO/12-hour RTO, 30-day onsite + 90-day immutable offsite, within an eight-hour nightly window over a 1 Gbps WAN, staying under $X/month, with success = 95% job success by week two and a clean quarterly restore test.” Now GPT-5 can actually help, because you just told it the finish line and the walls.
A simple formula keeps you honest: Who + What + Why + Constraints + Target. Who’s impacted (stakeholders), what outcome is required (not the tool), why it matters (risk or value), constraints you can’t break (budget, windows, compliance), and the target you’ll measure (RPO/RTO, adoption, error rate). If you’re prompting, ask GPT-5 to restate your Define in under 50 words and call out any missing constraints. It’s a tiny move that saves hours. Start here, every time, and the rest of DREAM becomes a path instead of a maze.
Research: context beats guesses
This is where the DREAM prompt framework gets real. Research turns “make a plan for backups” into “make the right plan for our 500 TB, our people, our network.” For the Veeam scenario, research means asking GPT-5 to uncover the stuff that actually changes design and risk: daily change rates by tier, the nightly backup window, RPO and RTO targets, expected dedupe and compression, WAN limits, immutability needs, and who signs off when a restore test passes or fails. The model can’t see your diagrams, so we give it a clear picture of the world and declare what is non-negotiable.
How to prompt GPT-5 for research
The prompt that works for me is simple: “Research the environment and list only factors that affect design or risk.” Then I make it write down assumptions and unknowns first, before it recommends anything. If it assumes a 3% change rate but your Tier 1 apps churn 12%, you catch the mismatch before the plan hardens. I also ask for a short, plain-English compare of a few decision points: backup copy jobs versus replication, Direct SAN versus HotAdd versus NBD, SOBR layout choices, object lock targets versus plain S3, plus a one-sentence “when to pick this” for each. No fluff, just decision fuel.
To keep it tidy, shape the output into four parts: inventory, constraints, risks, and validation steps. Inventory should include proxy counts, repository types, storage tiers, bandwidth, VM counts, and the biggest data movers. Constraints capture the hard walls like the eight-hour window, the shared 1 Gbps link, 30-day local plus 90-day immutable off-site, and the budget ceiling. Risks call out likely failure modes with a short why, and validation turns them into quick checks you can run this week. Finish by asking GPT-5 to restate the environment in under 120 words and flag the top three assumptions that could sink the plan. Clean research makes Explore honest, which is exactly the promise of the DREAM prompt framework.
Explore — multiple options with trade-offs
Exploration is where the DREAM prompt framework pays rent. You stop chasing the first “okay” idea and ask GPT-5 for several real choices, each with pros, cons, risks, and a way to roll back. Options reduce anxiety. They also force better thinking because you compare, not just hope. In this step, I tell the model to keep it practical, budget-aware, and reversible. No moonshots unless I ask for one on purpose.
Why explore at least three paths
One option is a wish. Two options is a debate. Three is a decision. The DREAM prompt framework nudges you to search the design space before you commit. You want variety, not clones. Ask for different transports, storage layouts, and off-site strategies. Also ask for a “risky but interesting” design to test your bias. Worst case, you decline it and feel smarter. Best case, you find a win that was hiding behind a scary assumption.
Option patterns to test for the 500 TB Veeam case
Option A: Direct SAN to SOBR with cloud immutability. Use Direct SAN transport for speed, land backups on a Scale-Out Backup Repository, and tier to object storage with immutability. Pros: fast ingest, predictable windows, ransomware-resistant copies. Cons: fibre/iSCSI complexity, capital cost. Risks: repository bottlenecks, transform times. Rollback: fall back to HotAdd proxies and shrink SOBR scope.
Option B: HotAdd proxies, per-VM chains, heavy use of synthetic fulls. Keep it virtual and flexible. Pros: easier to scale proxies, good for mixed clusters. Cons: slower than Direct SAN at scale, more snapshot stun risk. Risks: long merge operations, noisy neighbors. Rollback: pin Tier 1 jobs to dedicated proxies or move them to Direct SAN.
Option C: Backup copy to a hardened repository on-prem plus object-lock off-site. Split duties: quick local restores, durable off-site copies. Pros: cheap fast restores, solid immutability story. Cons: more moving parts, two storage tiers to babysit. Risks: missed copy windows, capacity drift. Rollback: pause copy jobs, extend retention locally while you fix throughput.
Option D (risky but interesting): Direct-to-object as primary. Shrink on-prem storage and push chains to object storage with immutability from day one. Pros: small footprint, simple lifecycle. Cons: API rate limits, restore performance sensitivity. Risks: slow mass restores, surprise egress. Rollback: pivot Tier 1 to a local performance tier, keep Tier 2 direct-to-object.
How to prompt GPT-5 for useful options
Give the model rails. Try this shape: “Explore four distinct backup designs for 500 TB. For each, write a short summary, the best-fit scenario, pros, cons, top risks, and a simple rollback plan. Keep each option under 120 words.” The DREAM prompt framework loves constraints like that. It keeps answers readable and decision-ready. Add one more line: “Highlight what changes if the backup window is eight hours versus twelve.” That single tweak exposes the real trade-offs.
Use constraint flips to widen the search
When the options feel same-y, flip a constraint and rerun Explore. Increase the window from eight to twelve hours. Add a 10 Gbps link for copies. Drop the budget by 20 percent and see what breaks. Or require 90-day immutability everywhere and watch designs shift. The DREAM prompt framework is about learning by contrast. You learn faster when the model shows you how one pressure dial changes the picture.
Decide, then capture the unknowns
End Explore with a checkpoint. Ask GPT-5 to pick the best fit for your stated goals and list the top three unknowns you must validate this week. Maybe it’s real-world change rates, proxy throughput, or object storage API quotas. That short list flows straight into your test plan. It also calms the brain. Decisions get easier when you know exactly what to prove next. That’s the whole point of Explore in the DREAM prompt framework: choices first, commitment second, evidence always.
Act — tiny, reversible plan with owners
Act is where the DREAM prompt framework turns ideas into motion without burning weekends. The goal isn’t a 40-page binder; it’s a small, testable plan you can pivot from. For our 500 TB Veeam case, we’ll ship value fast, validate the scary bits, and keep every step reversible. Think “tight loop, clear owners, easy rollback.” If a task can’t be owned by a real human with a real deadline, it’s not in this phase. We’ll also bake in comms, change control, and a proof step so success isn’t a vibe—it’s visible.
Owners at a glance
Name: names. A plan without people is just a wish.
Stakeholders: app owners for Tier 1/Tier 2 sign-offs.
Keep a living RACI in the change record. One owner per step, no “shared” ownership. If two teams touch a task, split it into two tasks. Fewer arguments, faster motion.
10-day pilot plan (reversible by design)
Day 1–2: Prep. Confirm RPO/RTO by tier, pick 20 TB pilot set, allocate pilot proxies, carve a small SOBR performance tier, wire object-lock target.
Day 3–4: First backups. Run per-VM chains, synthetic fulls off hours. Capture ingest and transform times.
Day 5: Copy jobs off-site. Test bandwidth shaping and windows.
Day 6: Hardening. Immutable windows, MFA on consoles, service accounts least privilege, config backup to a sealed mailbox/repo.
Day 7: Restore drills. File-level, whole VM, and app-aware for one Tier 1 workload. Time the RTO.
Day 8: Tuning. Add/remove proxies, adjust block sizes, parallel streams.
Day 9: Health checks. 95% job success target, alert routes, dashboards.
Day 10: Go/No-Go. If KPIs pass, schedule next 100 TB. If not, roll back to pre-pilot state (see below) and fix.
Change control and comms that don’t annoy everyone
Open a single parent change with dated child tasks. In the description, write a two-sentence purpose, the KPI targets, and the rollback trigger. For comms, send a tiny heads-up to app owners and service desk: what’s changing, when, how to ask for a restore, and who’s on call. After each pilot day, drop a 3-bullet update in the channel: what ran, what passed, what blocked. People don’t read long memos. They do read three bullets.
Decide stop points before you start. Example triggers: job success below 90% for two days, backup window exceeds 8 hours, copy jobs miss two consecutive windows, restore drill misses RTO by 50%. Rollback steps: pause new jobs, revert proxy count/transport to last-known-good, pin Tier 1 to the performance tier, extend local retention temporarily, and disable copy jobs while keeping prior points immutable. Document “how to un-pause” right next to “how to pause.” Future-you will forget.
Measure — KPIs, cadence, iteration
Measurement is the inhale after action. It’s how the DREAM prompt framework keeps you honest and calm when the pager chirps at 3 a.m. If Define was the destination and Act was the drive, Measure is the dashboard. For our 500 TB Veeam rollout, we’re not chasing vanity stats. We want a few clear numbers that prove backups ran, copies landed off-site, restores worked, and the team can sleep. Keep it simple, visible, and tied to decisions.
The KPIs that actually prove it worked
Start with reliability: job success rate over the last seven days, not just last night. Add performance: total data ingested within the nightly window and the lag to complete off-site copies. Fold in restore reality: median and p95 restore times for Tier 1 workloads and a weekly pass/fail on a real restore drill. Track protection depth: how many assets meet your policy versus how many should. Don’t forget security posture: percentage of restore points on immutable storage and configuration backup health. For our pilot, targets might look like 95% job success by week two, an eight-hour backup window, off-site lag under 24 hours, Tier 1 restores under four hours, and 100% of restore points meeting immutability rules. Round it out with cost signals such as storage growth rate and object storage egress so finance doesn’t ambush you later.
Set the cadence so the numbers change behavior
Data without rhythm is just trivia. The DREAM prompt framework loves a weekly review because it’s fast enough to course-correct and slow enough to do the work. Put a 20-minute standing check-in on the calendar: project lead, backup engineer, storage, network, and a rotating app owner. Review the last seven days, call out misses, and assign one improvement each. Keep a single lightweight dashboard on the wall of the meeting: reliability, performance, restores, security, and cost. If a KPI is green for three weeks, stop talking about it and free up time for what hurts.
Define thresholds and stop/rollback rules before you start
You already set them in Act; now you enforce them. Write down the triggers that force a pause, and make them boringly clear. If job success dips below 90% for two days, you halt new onboarding and tune. While, If the backup window spills past eight hours, you add proxies or adjust concurrency before you grow scope. If off-site lag exceeds 24 hours twice in a week, you reduce job overlap or open a bandwidth change with networking. If a Tier 1 restore misses the four-hour RTO by 50%, you freeze scope and fix the path end-to-end. The point isn’t punishment. It’s safety rails so small problems don’t snowball.
Close the loop and iterate like you mean it
Measurement only matters if it changes next week’s plan. Use the last five minutes of the weekly to pick a single improvement: adjust block sizes, rebalance SOBR extents, add a proxy in the noisy cluster, or move a chatty app to a different window. Ask GPT-5 to suggest the smallest change with the biggest gain, then test it over one week. Next review, keep what worked and revert what didn’t. That is the iteration heartbeat inside the DREAM prompt framework: evidence in, tiny change out, repeat. It lowers stress and makes progress feel inevitable, which is kind of the dream, right?
A quick prompt to generate your measurement plan
When you’re ready to let the model help, give it rails: “Using the KPIs above, create a one-page measurement plan for a 500 TB Veeam rollout. Include definitions, targets, data sources, and specific stop/rollback triggers. Propose a weekly agenda with owners and one improvement experiment per week.” You’ll get a clean draft you can paste into the change record and your team chat. More importantly, you’ll have a living loop that keeps your project out of the “we’ll fix it later” graveyard and squarely inside the DREAM prompt framework promise: clear goals, real action, and measurable wins.
Compatibility, Depth & Pairings
Why GPT-5 clicks with DREAM
GPT-5 loves structure. Give it a clean scaffold and it reasons like a pro. The DREAM prompt framework provides that scaffold, moving the model from fuzzy brainstorming to concrete next steps. Instead of “tell me everything about backups,” you hand it a lane, a finish line, and a few cones on the track. The result is tighter reasoning, fewer detours, and plans you can paste into a change record without blushing. DREAM also plays nicely with longer conversations. You can pause after each step, review, then resume. That pacing keeps the model focused and keeps you sane.
Pick the right reasoning depth
Not every task needs the same brainpower. For quick choices, L3 depth is enough: short context, clear constraints, fast options. The designs and playbooks, L4 is the sweet spot: compare alternatives, name risks, propose owners and timelines. For audits, migrations, or multi-team projects, ask for L5: deeper research, citations to your internal docs if you paste them in, and layered plans with rollback rules. Tell GPT-5 what you want up front. “Use L4 depth and pause after Explore” is a simple line that makes the DREAM prompt framework feel like a co-pilot, not a chatterbox.
Pairing DREAM with improvement cycles
DREAM gets you from idea to action. Pair it with a loop to keep getting better. My two favorites: MEASURE and VECTOR. After you ship with DREAM, run a MEASURE cycle over the next few weeks to tune KPIs, adjust thresholds, and lock in what worked. VECTOR helps when you’re balancing direction and effort across teams. Use it to realign priorities without redoing the whole plan. This pairing turns the DREAM prompt framework into a living system: plan once, then refine in small steps rather than heroic rewrites.
Simple pairing playbook
Ship a pilot using DREAM. In the weekly review, kick off a MEASURE pass: confirm KPI definitions, confirm data sources, and document one improvement to test next week. If priorities shift, drop a quick VECTOR-style checkpoint: “What direction changed, what trade-offs are acceptable, what effort is realistic.” Then loop. You get steady progress, fewer surprises, and a calm team that knows what happens next. That’s the promise of the DREAM prompt framework when it’s paired well: clear thinking, smooth execution, and easy iteration.
Step-by-Step Usage: A Mini Playbook
The setup: keep it small and real
The DREAM prompt framework works best when you give GPT-5 rails. Before you start, name one clear outcome, one constraint you can’t break, and one date that matters. That’s enough fuel. Then tell the model you’ll move step by step and pause between stages. This keeps answers tight and saves you from a 1,000-word word salad that reads like a committee memo.
Step 1: Define
Open with a single, punchy sentence that says what you’re trying to change and why anyone should care. Then ask GPT-5 to restate it back under 50 words and call out what’s missing. Try: “Use the DREAM prompt framework. Step 1: Define the goal in one sentence, list stakeholders, and name hard constraints. Keep it under 50 words. Ask me two clarifying questions.” Now the model knows the finish line and the walls around it.
Step 2: Research
Next, make the model gather context without drowning you. Ask for only what changes design or risk, and force it to list assumptions and unknowns first. Try: “Step 2: Research. Summarize environment factors that affect design or risk. Write assumptions and unknowns before recommendations. End with three quick validation checks I can run this week.” Short, useful, verifiable—chef’s kiss.
Step 3: Explore
This is the tasting flight. Ask for at least three distinct approaches, each with pros, cons, top risks, and a tiny rollback idea. Add one “risky but interesting” option to challenge your bias. Prompt it like this: “Step 3: Explore three to four distinct options with pros, cons, risks, best-fit scenario, and a 3-step rollback. Keep each option under 120 words. Highlight what changes if the window is 8h vs 12h.” Options calm the nervous system because you’re choosing, not hoping.
Step 4: Act
Turn direction into a small, reversible plan with real owners and dates. Ask for a checklist you can paste into a ticket, plus change control notes and a restore test. Try: “Step 4: Act. Produce a 10-day pilot plan with owners, effort estimates, and a go/no-go gate. Include comms, change control, and a restore drill. Keep steps small and reversible.” If a step can’t be owned by a human, it’s not a step yet.
Step 5: Measure
Close the loop or you’ll drift. Pick a few KPIs that prove it worked—reliability, performance, restores, security—and set thresholds for stop or rollback. Then schedule a weekly 20-minute review. Prompt it like: “Step 5: Measure. Define KPIs, targets, data sources, and explicit stop/rollback triggers. Propose a weekly agenda and one improvement experiment per week.” The DREAM prompt framework loves rhythm; it turns numbers into decisions.
Pause points that save sanity
Between steps, tell GPT-5 to stop and wait. After Explore, pick a direction; after Act, confirm owners and dates; after Measure, agree on the one change you’ll test next week. This pacing keeps everyone aligned and prevents the “we changed the plan mid-email” chaos that ruins Fridays.
A tiny template you can paste
When you’re rushing, drop this in verbatim: “Use the DREAM prompt framework. We will proceed step by step and pause after each stage. Start with Step 1: Define the goal in ≤50 words, list stakeholders, and hard constraints. Ask me two clarifying questions, then stop.” That single paragraph transforms GPT-5 from a chatty oracle into a calm co-pilot.
Paste-Ready Prompt Template
You know those days when the brain feels like dial-up? This is the moment the DREAM prompt framework pays rent. A tight, paste-ready prompt turns GPT-5 from “interesting chatter” into “actionable plan.” The goal here isn’t poetry. It’s a clean scaffold you can drop into ChatGPT, fill in a few blanks, and get structured, step-by-step output without babysitting every sentence.
The core template (copy/paste)
Use the DREAM prompt framework (Define, Research, Explore, Act, Measure).
We will proceed step by step and pause after each stage.

Context:
- Goal: <one-sentence outcome; no tools yet>
- Audience: <who this is for>
- Constraints: <budget/time/compliance/network/etc.>
- Deadline/Window: <date or timeframe>
- KPIs (success looks like): <3–5 measurable targets>
- OptionsCount: <3–4>

Instructions, follow these steps:
1 — Define: Restate the goal in ≤50 words, list stakeholders, and confirm hard constraints. Ask me 2 clarifying questions. Stop.
2 — Research: List only factors that change design or risk. Write assumptions and unknowns first. End with 3 quick validation checks I can run this week. Stop.
3 — Explore: Provide <OptionsCount> distinct approaches with pros, cons, top risks, best-fit scenario, and a 3-step rollback for each. Keep each option ≤120 words. Highlight what changes if the time window tightens. Stop.
4 — Act: Propose a 10-day pilot plan with owners, effort, comms notes, change control, and a restore/test step. Keep steps small and reversible. Include explicit go/no-go criteria. Stop.
5 — Measure: Define KPIs, targets, data sources, and stop/rollback triggers. Propose a weekly 20-minute review agenda plus one improvement experiment to test next week. Stop.

Output formatting:
- Use short paragraphs (no walls of text).
- Plain language, no buzzwords.
- Call out “Assumptions,” “Unknowns,” and “Risks” with short lists.
Optional add-ons when you need extra rigor
When stakes are high, bolt on one or two of these and rerun the same prompt. Ask for a “risky but interesting” option to challenge bias. Require a compare-and-decide table after Explore with a one-line rationale. Add “include rollback triggers next to each KPI” for faster decisions. If you’re working across teams, tell GPT-5 to include a tiny RACI map in Act so ownership isn’t fuzzy. The DREAM prompt framework stays the same; you’re just tightening the guardrails.
A quick filled example (Veeam pilot)
If you’re staring down that 500 TB rollout, here’s a fast fill to get moving. Goal: protect 500 TB with Tier 1 at 24-hour RPO and 4-hour RTO, Tier 2 looser, within an eight-hour nightly window. Audience: IT ops and app owners. Constraints: 1 Gbps shared WAN, 30-day local plus 90-day immutable off-site, real budget ceiling. KPIs: ≥95% job success by week two, off-site lag <24 hours, Tier 1 restore ≤4 hours, 100% points on immutability. Plug those into the template, hit enter, and you’ve got structured output you can paste into a change record without blushing. That’s the quiet power of the DREAM prompt framework—less noise, more done.
Three In-Depth Example Prompts (Steal These)
You don’t need perfect energy to get perfect structure. Drop one of these into ChatGPT, add your details, and let the DREAM prompt framework carry the load. I’ve kept each story short, human, and ready to ship. And yes, there’s a bonus fourth example for finding a remote job because life is life.
Example 1: Startup idea: a hydration app people actually use
You’ve got a half-formed app idea and a blinking cursor. The DREAM prompt framework turns “hmm” into a clean path from concept to prototype, then defines what success looks like in month one through three. You’ll get research on existing hydration tools, a few standout features that aren’t copycat, and a tiny build plan you can run without quitting your day job.
Help me design a new mobile app that helps people track daily water intake. Use the DREAM prompt framework. Steps:
1: Define the problem and the target user in ≤50 words.
2: Research current hydration apps and user pain points.
3: Explore 3 unique features with pros/cons and risks.
4: Act with a 4-week prototype plan and simple roles.
5: Measure success for the first 3 months (KPIs, targets).
Pause after each step.
Example 2: Personal learning goal: Spanish in one year without burnout
Ambition is great; burnout is real. With the DREAM prompt framework, GPT-5 maps the barriers, suggests proven methods, and shapes a weekly plan that fits real schedules. You’ll also get a monthly scoreboard that keeps motivation alive when life gets loud.
I want to learn Spanish within one year. Use the DREAM prompt framework. Define my main challenges and the exact outcome I want. Research evidence-based methods and tools for adult learners. Explore daily practice strategies for 20, 40, and 60 minutes. Act with a weekly plan I can follow for the next 4 weeks. Measure progress monthly with specific checkpoints and habits.
Example 3: Community impact: reduce plastic waste in a small town
Big problems feel abstract until you scale them to your block. The DREAM prompt framework scopes the issue, brings in relevant data, and compares several initiatives. You end with one practical plan the community can launch and a one-year dashboard the council can actually read.
Design a local community project to reduce plastic waste in a small town. Follow these steps:
1. Define the scale of the problem and key stakeholders.
2. Research current plastic usage and local constraints.
3. Explore 4 initiatives with costs, effort, and risks.
4. Act with a 90-day rollout plan and simple roles.
5. Measure success over one year with KPIs and review cadence.
Pause after each step.
Example 4: Find a remote job: targeted search that lands interviews
Job hunting can feel like shouting into the void. The DREAM prompt framework gives you a focused campaign: crisp role targets, a research pass on companies, three search strategies, and a two-week sprint plan. You also get a measurement loop so you iterate fast instead of doom-scrolling.
Help me find a fully remote job in IT/Systems Administration. Follow these steps:
1. Define my target roles, seniority, and non-negotiables in ≤50 words.
2. Research companies and platforms that match my skills and timezone.
3. Explore 3 search strategies: focused applications, referral-driven outreach, and portfolio/content signal. Include pros/cons and risks.
4. Act with a 14-day plan: daily outreach quotas, resume/LinkedIn updates, tailored cover notes, and a mock interview schedule.
5. Measure with weekly KPIs: applications sent, referral replies, interviews booked, and quality-of-fit. Propose iterate steps for week two.
Pause after each step.
Each of these keeps the rails tight and the decisions visible. That’s the real magic of the DREAM prompt framework: clear steps, tiny wins, and enough structure to make progress feel inevitable.
Pro Tips for Using Chat GPT 5 Acronyms Like DREAM
The DREAM prompt framework is simple, but the way you drive it decides whether you get a runbook or a riddle. These are the habits that keep GPT-5 useful on messy, real-world work—where budgets are real and Friday nights deserve peace.
Start with outcomes, not tools
If you open with “we need Veeam/Intune/Kubernetes,” the model will chase the tool and forget the finish line. Begin every prompt with the outcome: who benefits, what “good” looks like, and the guardrails you can’t break. Tell GPT-5 to restate your goal in under 50 words and flag what’s missing. The DREAM prompt framework loves that tight opening because it anchors every later choice.
Demand assumptions and unknowns up front
Hallucinations hide inside silent assumptions. Make GPT-5 list what it’s assuming and what it doesn’t know before it prescribes anything. You’ll catch the “3% daily change rate” myth or the “unlimited WAN” fantasy before they poison the plan. It feels nitpicky. It saves weekends.
Force options with real trade-offs
One option is a wish. Ask for three or four distinct approaches, each with pros, cons, costs, risks, and a tiny rollback idea. Include one “risky but interesting” path to challenge bias. The DREAM prompt framework isn’t about perfect; it’s about visible choices so you can pick with eyes open.
Keep actions tiny and reversible
Big steps create fear and stall projects. Tell GPT-5 to write a 7–10 day pilot with owners, timeboxes, and a clear go/no-go. Every step should be undoable without drama. If it can’t be owned by a real human with a date, it’s not an action yet—it’s still research.
Measure like you mean it
Pick a few KPIs that prove value, not vanity: reliability over seven days, ingest inside the window, off-site lag, restore times, immutability coverage. Add thresholds for “stop” or “roll back” before you start. The DREAM prompt framework turns numbers into decisions when you give it bright lines.
Use pause points to prevent chaos
After Explore, stop and choose. Followed by Act, confirm owners and dates and finally Measure, pick one improvement to test next week. These pauses keep scope from shape-shifting mid-email and make long threads feel calm. “Pause after this step” might be the most productive sentence you type all day.
Flip a constraint to widen thinking
When options look the same, change one pressure dial and rerun Explore. Extend the window, cut the budget, add a faster link, or require immutability everywhere. Seeing how designs bend under new rules is where the insight lives. The DREAM prompt framework thrives on contrast.
Make ownership explicit (RACI in a sentence)
Vague ownership kills good plans. Ask GPT-5 to include a one-line RACI for each step: who’s responsible, who approves, who consults, who’s informed. Names, not teams. If two names appear on one task, split the task. That tiny bit of clarity prevents 90% of “I thought you had it” moments.
Teach the model your world
Paste a short “environment snapshot” before you start: versions, windows, bandwidth, compliance rules, budget ceilings. Keep it under 120 words. The DREAM prompt framework works best when GPT-5 sees your constraints; otherwise it invents a friendlier universe where everything is faster and free.
Red-team your own plan
Before you ship, ask GPT-5 to critique the chosen option like a cranky SRE: failure modes, blind spots, and how a restore drill could embarrass you. Then have it propose the smallest experiment that would disprove the plan fast. A five-minute red team now beats a five-hour postmortem later.
Use these habits and the DREAM prompt framework stops being a cute acronym and starts feeling like a calm, repeatable way to ship. Less noise. More done. And maybe—just maybe—your Dr Pepper stays cold this time.
Mental Health Note: Structure Reduces Stress
Some days the brain cooperates. Other days it’s foggy, loud, and a little mean. That’s when the DREAM prompt framework feels less like “process” and more like a floatation device. Structure turns the big scary blob into five small doors you can open one at a time. It doesn’t fix life, but it lowers the volume so you can breathe and pick the next right move.
Why structure calms your nervous system
An unframed problem keeps your fight-or-flight on standby. The DREAM prompt framework gives your mind a sequence: Define, then Research, then Explore, then Act, then Measure. You are not juggling twelve thoughts anymore. You’re asking one question at a time and parking the rest. That cut in mental switching reduces anxiety, which reduces mistakes, which reduces more anxiety. Nice little flywheel.
On heavy days, shrink the DREAM prompt framework to a thirty-second ritual. Write a two-sentence Define. Ask GPT-5 for three research unknowns, not twenty. Pick one Explore option that feels doable and schedule a thirty-minute Act step, timer on, phone flipped. After, Measure with one yes/no: “Did this move us forward?” These micro-moves create momentum. Momentum is basically confidence with sneakers on.
Minimum-viable DREAM for bad days
When motivation face-plants, try MVD: one line per step. Define in 15 words. Research with one assumption to verify. Explore with one alternative and a single risk. Act with a task that fits inside a coffee break. Measure with a tiny check you can run today. It is still the DREAM prompt framework, just wearing sweatpants.
Numbers can help or they can bully. In the DREAM prompt framework, KPIs are there to guide, not shame. Use them to decide the next small experiment, not to beat yourself up. Missed a target? Cool. Write a one-line guess why, change one variable, try again next week. Progress over drama.
Boundaries keep the engine healthy
GPT-5 will talk forever. You shouldn’t. Put time boxes around each DREAM prompt framework step and add pause points: “stop after Explore,” “stop after Act.” Close your laptop when the timer ends. Write a “done list,” not just a “to-do.” Your brain likes seeing proof that the day was real, even when it felt wobbly.
Structure doesn’t make life easy, it makes it survivable. On the days when you’re tired or anxious or both, the DREAM prompt framework gives you rails. One step, then another, then a small win you can point to. And honestly, that quiet little win is the best kind of medicine I know.
Wrap-Up: Clarity Beats Chaos
When the day gets loud and the queue looks feral, the DREAM prompt framework is the calm voice in the room. It takes you from “hmm” to “here’s the plan,” whether you’re wrangling 500 TB of Veeam backups, spinning up a community project, or hunting a remote role without burning out. Define gives you a finish line. Research adds truth. Explore creates choices. Act ships something small and reversible. Measure closes the loop so next week is smarter than last week. That’s not just project hygiene; that’s sanity maintenance.
Your two-minute next step
Open ChatGPT and paste the template from Section 7. Fill in five blanks: goal, audience, constraints, deadline, KPIs. Tell it to pause after each step. If you like automation, drop the PowerShell helper and generate a clean scaffold first. Then run a tiny pilot. Ten days, named owners, boring rollback. Put one weekly metric review on the calendar and keep it to twenty minutes. If a KPI is red, pick one experiment, not five. You’ll feel the stress ratchet down because you’re driving the work, not chasing it.
A small promise to yourself
On the wobbly days, shrink DREAM to sweatpants mode: one line per step, one action you can do before your Dr Pepper goes flat. Progress over drama. The cat was amazing. And if Google failed you earlier (same), this is the part where structure quietly wins. Use the DREAM prompt framework for your next rollout or job search, and let me know what you shipped. Clarity beats chaos. Every time.
We use cookies to ensure that we give you the best experience on our website. If you continue to use this site we will assume that you are happy with it.