The other day, I was showing a friend how to set up Intune deployments. Then it hit me: I have unique scripts for script detections and things like that here on therandomadmin.com. However, I haven't really gone through the detection rules for built-in items. I was like, well now I have to fix that. So here we are going to fix that with the Intune Detection Rules. Let's get started.
Types of Intune Detection Rules
There are three built-in detection types that we will go over today. They are the MSI, File, and Registry.
MSI is like the easy button, (no not the staples one from the commercials... did I just age myself?)
File is my least favorite one, but it works for legacy apps
Registry is my favorite one and it's the one that I will spend some time on for you all.
Other than the built-in items, there are scripted items which is unique in it's own rights. You can take a look at how these scripts work here. Andrew has a good tutorial on his blog as well. Today will be all about the built-in items.
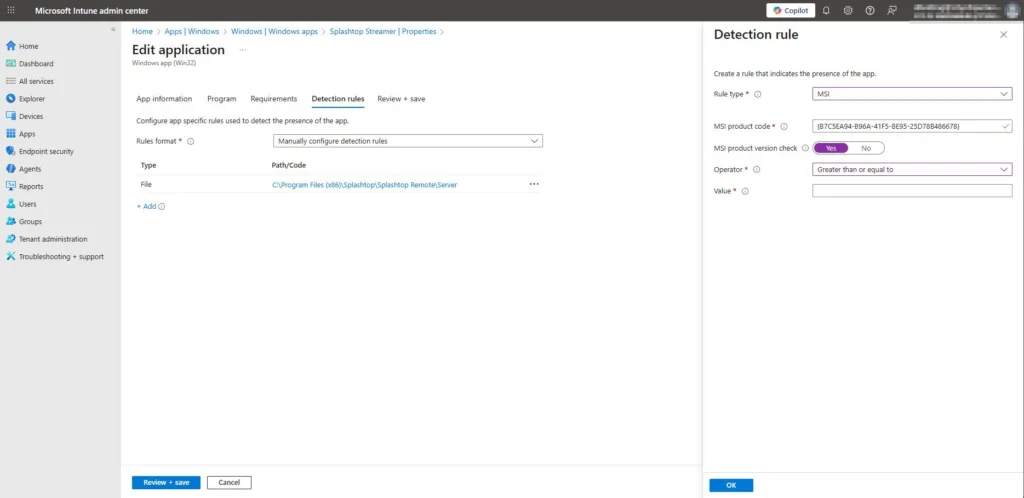
The Built-In MSI Rule
The MSI rule is the easy button of the detection scripts. If you are using an MSI, it will pull the information directly from the MSI. Once you get to the detection rule part you can follow these steps:
Click Add
Select MSI
And click save
Magic, right? The other thing you can do is select "MSI Product Version Check." Here you can select an operator like "greater than or equal to" and then give it the value. Which is the product version. This helps with auto-updated items. Which I always suggest using. Below is a screenshot.
File Detection Rule
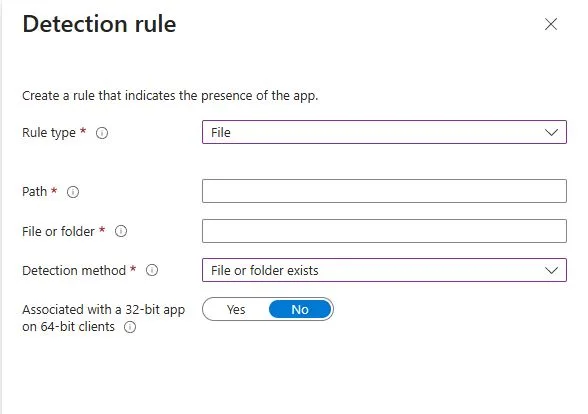
Our next built-in detection rule is for files. This is good if you have an app that doesn't install like normal apps. Older apps or more niche apps are like this. For example. We installed a special Creo app. It installed in the C:\PTC location, and it didn't add itself to the registry uninstall strings. It didn't come in an MSI; it was an EXE with custom everything. This app was a pain in the backstracher. So we used the File location rule. Here is how you can set it up.
Inside your detection rule, click Add.
Rule type: File
Path: The folder that you want to check. In this case it was C:\PTC
File or Folder: Here we wanted to see if the creo.exe existed. So, that's what I put here.
Detection Method: We used file or folder existed.
Greater than or equal to string
As you will learn, I am all about the version numbers. If you select the string (version), you will need to get that version number from the file you are pulling from. You can do this with PowerShell pretty quickly.
Once you have this information, you will then proceed to input it into the value section once you select the string (version) and greater than or equal to options.
Built-In Intune Detection Rule for Registry
The registry key is the most common and the most useful as well. Most apps install themselves in this method. The script below is going to be your best friend. What it does is give you the information you need. Lets break down what each item is so we can look at the script and make this happen. I'm giving this the most focus because it's the most common.
Registry Type: The type we are using.
Key Path: The path of the uninstall string that we will be using
Value Name: What we are looking for, this case we will be looking for displayversion
Detection Method: Version Comparison
Operator: Greater than or equal to
Value: What value we are looking for
Assocated: Is it a 32 or 64.
Script
So you will have to go digging into the registry for this information. However, this registry area is just confussing and really hard to manually dig through. So powershell is once again, our friend.
All you have to do is replace the app name. It will provide you with everything you need inside the built-in detection rule. This is the output that it provides:
RuleType         : Registry
KeyPath          : HKEY_LOCAL_MACHINE\Software\Microsoft\Windows\CurrentVersion\Uninstall\{6EB73F60-E858-3AF3-913A-0C1783656B42}
ValueName        : DisplayVersion
DetectionMethod  : Version comparison
Operator         : Greater than or equal to
Value            : 143.0.7499.170
AssociatedWith32 : False
This script really makes finding apps easier. If the app installs in another place, good hunting, my friends.
What we can learn as a person
I am still missing my keys. I have the backup fob for my car, but I have no idea where my normal keys are. So no house key right now. Sometimes, I need to backtrace what I have done to find where I am going. Which is ok. This is why I document so much because I don't have the brain space to remember everything I have done. This is also why this blog post exists. I realized I never once really did explain how to use the built-in tools. Now I have a place to come and get the script I need and anyone else needs. So that will be nice later down the road, and I will thank myself later. Giving myself the little micro successes in the future is what I am going for here. The keys, on the other hand, I didn't set up a space for them to go with the new desk I have. Thus, they are in the ether somewhere, and when I find them, they will go into my little cubby on my new desk. So, set yourself up for micro successes, whether you know it or not, in the future. This will reduce a lot of stress and anxiety in the future. Remember, 80% of life is the systems that you have put into place. So, let's make good systems. Then you can set up your own Intune detection rules for your life to detect when you gave yourself successes. Like, when I see the wallet inside the new cubby. I can give myself a little thanks.
The VPN tunnel was solid. We had split-tunnel traffic, per-user group policies, and MFA layered on Azure AD sign-ins. Nothing fancy, just a Meraki firewall and a bunch of cloud-native users on laptops.
Then someone asked for Wi-Fi to authenticate via RADIUS.
Not Wi-Fi on laptops, Wi-Fi for the office printers and a couple of older VOIP phones. Devices that didn’t speak SAML, didn’t join Azure AD, and couldn’t use certificates without a management headache. Just a plain old SSID with LDAP-backed RADIUS.
That’s when the obvious hole showed up: we didn’t have an LDAP source. Azure AD, by itself, doesn’t expose LDAP or Kerberos. And we had no on-prem domain controller.
At first, we thought Meraki might support SAML auth directly. It doesn’t, not for VPN or Wi-Fi. It does support RADIUS, but that assumes your RADIUS server has an actual directory to talk to.
We weren’t going to roll out on-prem AD just to get LDAP. That would mean a domain controller, backups, patches, and joining devices, all the things we’d intentionally avoided by going full Azure AD in the first place.
What we needed was LDAP, not Active Directory in the traditional sense. Just something that could respond to a bind request and validate passwords that already existed in Azure AD. That pointed us to Azure AD Domain Services. So, what is Azure's AD DS?
What is Azure AD Domain Services?
Azure AD Domain Services (Azure AD DS) is Microsoft’s way of giving you the parts of Active Directory that legacy systems still expect without forcing you to build or maintain domain controllers.
When you enable it, Microsoft stands up two managed domain controllers inside your chosen Azure virtual network. You can’t RDP into them, patch them, or change their schema. They just exist, quietly providing LDAP, Kerberos, and NTLM.
That’s the entire draw: a read-only, managed domain that syncs from your Azure AD tenant. When a user resets their password in Azure AD, that hash syncs down to Azure AD DS so older systems can authenticate it.
It’s not the same thing as Azure AD. Azure AD DS exposes the traditional domain protocols that cloud-only Azure AD never had. You can bind to it with LDAP, join Windows VMs to the domain, and even apply Group Policy Objects.
But there are limits worth knowing early. You can’t extend the schema. You can’t create or edit users directly with ADUC, the objects are synchronized one-way from Azure AD. Forest and domain trusts are unsupported, so it stands alone. Replication is handled entirely by Microsoft and runs on their schedule, not yours.
If you’re thinking of it as “Active Directory in the cloud,” that’s close enough for function but wrong in control. It’s closer to “a read-only mirror of Azure AD that speaks old protocols.”
For teams like ours, that was perfect. We didn’t want the overhead of managing AD. We just needed LDAP to exist long enough for the Meraki RADIUS server to point at something that could actually answer.
Why a cloud-native org might still need it
If you start in the cloud, Active Directory sounds like something you escaped from. You’ve got Azure AD for identity, Entra ID for MFA, and Intune for device management, everything’s tidy until you run into gear that doesn’t understand any of it.
That’s where the problem hides. Legacy protocols didn’t retire when we moved to the cloud. Printers, VPN clients, even network appliances like Meraki still expect LDAP or Kerberos to confirm a user exists. Azure AD doesn’t provide either. It speaks modern OAuth and SAML, great for browsers, useless for RADIUS.
In our case, the Meraki firewall was doing its job. It could handle RADIUS authentication, but it needed a directory to check against. We pointed it at Azure AD and got nothing. Meraki expected LDAP; Azure AD offered tokens. Different worlds.
Azure AD Domain Services bridged that gap neatly. Once it was running, we could bind the Meraki RADIUS server directly to the managed domain using LDAP over SSL. No extra domain controllers. No sync tools. Just credentials that matched the same users already living in Azure AD.
The benefit wasn’t only the VPN fix. Azure AD DS opened up old SMB file shares, on-prem accounting apps, and one ancient label printer server that refused to die. Anything that needed to see “DOMAIN\username” finally had somewhere to look.
We didn’t bring Active Directory back from the dead, we just gave the ghosts of LDAP and NTLM a place to live that didn’t need babysitting.
Setup decisions and things that stalled us
When we decided to spin up Azure AD Domain Services, the wizard made it look easy, pick a resource group, choose a network, and wait. The waiting part wasn’t optional.
Azure AD DS takes a while to build. About forty-five minutes after deployment, the domain name resolved, but LDAP wasn’t answering yet. Microsoft handles replication behind the scenes, so all you can do is watch the portal and drink coffee. The service eventually wakes up, but it’s a quiet kind of delay that catches people off guard.
We tied it into an existing virtual network where our jump host lived. That vNet had subnets for servers and management tools, but no DNS server configured. Azure AD DS creates its own DNS, and here’s the catch: every VM that needs to talk to it must use its private IPs as DNS. Ours were 10.x.x.4 and 10.x.x.5, automatically assigned inside the vNet. Forgetting that step means your domain join will hang forever at “locating domain controller.”
The next tripwire was password hashes. Azure AD doesn’t store NTLM hashes unless you enable that sync for Domain Services. When you first turn on AD DS, users need to reset their passwords before they can authenticate through LDAP or Kerberos. The portal explains this in one small note, which most people skim. We learned the hard way, nobody could log in until they changed passwords.
Once DNS was right and passwords synced, domain join worked like it used to. From the jump box:
No special parameters, no magic. The VM rebooted, grabbed a GPO, and joined the managed domain.
One last surprise: Azure AD DS doesn’t live on public IPs. Everything that touches it, servers, RADIUS, management VMs, must exist inside or be peered to the same vNet. That meant moving our RADIUS instance closer, network-wise, to keep LDAP traffic private and fast.
It wasn’t hard work, but it reminded us how much “simple” depends on wiring things the right way first.
What’s different about managing it
Once the domain started answering pings and LDAP binds, the real question was: how do you manage something you don’t control?
Azure AD Domain Services feels familiar at first. You can open Active Directory Users and Computers (ADUC), Group Policy Management Console (GPMC), and even AD Sites and Services from a domain-joined VM. But the difference shows up fast, it’s all read-only from Azure AD’s point of view.
You can’t make new users or edit synced ones inside ADUC. The data comes one way: Azure AD → Azure AD DS. Any changes flow down automatically, not up. The right place to create a new account is still the Entra (Azure AD) portal. The managed domain just receives a copy when synchronization runs.
Group Policy still works, but it’s scoped to the AADDC Computers and AADDC Users containers. There’s no organizational unit hierarchy beyond what Microsoft provides. You can create your own OUs under those if you need custom policies, but it’s best to keep it minimal. GPO replication is slower than you’d expect, usually a few minutes rather than seconds. Enough to wonder if it applied, not long enough to panic.
DNS management is handled inside the Azure portal. The domain creates an internal zone matching your AD DS domain name. You can add or modify records, but Microsoft owns the root of that zone. If you need conditional forwarders or split-brain setups, you handle that in your own DNS server, not theirs.
From a backup and uptime standpoint, it’s completely hands-off. Microsoft maintains two domain controllers behind the service, replicating automatically across zones in the selected region. There’s no RDP access, no snapshots, and no patch windows to plan. You give up visibility in exchange for reliability, and for most small or hybrid environments, that’s a fair deal.
The adjustment was mostly mental. After years of scripting our own domain controllers, it felt odd to trust a directory we couldn’t touch. But the logs told the truth: LDAP binds were succeeding, Kerberos tickets were valid, and RADIUS requests from the Meraki box were authenticating just fine.
Sometimes the best kind of admin work is the one that doesn’t need you anymore.
Why this didn’t mean ‘going back on-prem’
After Azure AD DS was running and the RADIUS server finally answered a test request, someone joked that we’d rebuilt Active Directory in the cloud. It wasn’t wrong, but it missed the point.
We didn’t resurrect on-prem AD. We just rented the only pieces we still needed: LDAP and Kerberos. No domain controllers to patch, no replication errors, no SYSVOL eating itself on a Friday. Microsoft runs the plumbing, we just point systems at it.
That small distinction mattered. The Meraki VPN clients could now use the same usernames and passwords that Azure AD handled for everything else. The accounting share mounted without a service account buried in a batch file. Legacy systems got to stay alive while we planned their replacements.
For a company that started cloud-first, Azure AD Domain Services wasn’t a step backward, it was a bridge. It gave the network just enough “old” behavior to keep RADIUS and LDAP-bound devices working, without dragging a full domain back into maintenance.
There’s still a line between the new world and the old one, but now it’s clean. The VPN connects. The logs stay quiet. And nobody’s asked for a physical domain controller since.
What can we learn as a person
So, I have 7 Doom boxes. What's a doom box you ask? It's a box that you throw something into and you forget about it. They are not cool. They build up over time and then you take a weekend to clean them out. This is kind of how servers can be over time. I have seen environments with 3000 servers but only needed 7 of them. While I have seen some with 300 and needed all 300. Knowing what to keep and what not to keep is so important, especially for our mental health. The Ad ds takes the load of active directory off of us and takes it to the cloud where it's more manageable. We have so many things in our life that we should do that with. But what are they? What is your AD DS? What should you be off loading to others?
It was one of those afternoons where my Dr Pepper was flat but the ticket queue was very much not. I’d been asked to sketch a plan for Veeam backups across 500 TB of mixed storage, and my brain felt like a RAID array rebuilding on one disk. I tossed a lazy prompt at GPT—“make a plan for veeam backups for 500tb of data”—and, wow, the answers were technically correct yet painfully generic. “Assess requirements.” “Consider retention.” Thanks, fortune cookie. Google failed me earlier, and this wasn’t better. That’s when I remembered the DREAM prompt framework I’ve been preaching to everyone else but somehow forgot to use myself.
Here’s the embarrassing part: the model wasn’t the problem; I was. I asked for a plan with zero shape. No constraints, no context, no targets. So of course it handed me fluffy advice. The moment I re-framed it with DREAM—Define, Research, Explore, Act, Measure—the tone changed. Instead of “back up stuff, be safe,” it started asking the right questions and proposing paths I could actually run in production: storage tiers vs. immutability windows, WAN links vs. backup windows, scale-out repository design, off-site copy jobs with SOBR, and what to measure after week one.
We’ll break DREAM down step by step next, but the headline is simple: if you want GPT-5 to move from brainstorm to blueprint, give it rails. That’s what the DREAM prompt framework is—rails. And when your soda is warm and your SLAs are colder, rails beat vibes every single time.
What DREAM Means (Define, Research, Explore, Act, Measure)
If you strip away the fancy talk, the DREAM prompt framework is just good project hygiene packaged for GPT-5. It gives the model rails so your ideas don’t fall into the “uhh… maybe?” ditch. DREAM stands for Define, Research, Explore, Act, Measure, and each word pulls the conversation from fuzzy thoughts into something you can actually run. Think of it like moving a ticket from “New” to “Closed” without skipping the bits that always come back to bite you.
DREAM shines on idea-to-action workflows and loves GPT-5’s step-by-step reasoning. When you’re planning a rollout, a migration, or a playbook, it keeps you honest. For quick trivia, skip the ceremony. For anything with owners, timelines, and risk, DREAM the thing.
Measure: A Quick Tour of the DREAM prompt framework
Define is your one-sentence truth. Name the problem, the goal, and who cares about it. Not “fix backups,” but “protect 500 TB with 30-day retention and a 24-hour RPO for Tier 1.”
Research is where GPT-5 surfaces the context you forgot: versions, licensing, bandwidth, compliance, and edge cases. Ask for assumptions and unknowns so you can verify.
With Explore, demand at least three distinct approaches. Each needs pros, cons, costs, risks, and a rollback path. Include one “risky but interesting” option to test constraints.
Act turns direction into a tiny, reversible plan. Steps, owners, timeboxes, comms notes, change control, and a test plan. If it won’t fit in a ticket, it’s not tight enough.
Finally, Measure defines success before you start. Pick KPIs like adoption, reliability, support load, and security. Set thresholds for “stop” or “roll back,” then iterate the plan next sprint.
When to Use DREAM—and When Not To
The DREAM prompt framework shines whenever you’re turning a messy idea into a plan with owners, timelines, and “please-don’t-break-prod” risk. Think rollouts, migrations, incident playbooks, change windows, or even a hiring pipeline you want to run like a project. If the outcome needs trade-offs, a rollback, and a way to prove it worked, DREAM earns its keep. You’ll feel it click the moment GPT-5 starts naming constraints you forgot and options you didn’t consider. That’s the sweet spot: idea → action without the chaos.
But not everything needs the full ceremony. If you’re asking for a single switch, a one-line command, or a quick definition—skip DREAM and go straight for the answer. No need to drag five steps into “what’s the Veeam flag for synthetic fulls?” land. Same for trivia and “remind me the syntax” moments. Use DREAM when you’d normally open a ticket, write a runbook, or brief a stakeholder. Use something lighter when you just need a nudge, not a roadmap. Your brain (and your weekend) will thank you.
The Five Steps, Admin-Style (Deep Dive)
Define — say the quiet part out loud
If the DREAM prompt framework had a heartbeat, this would be it. Define is your one-sentence truth: the outcome you want, who it’s for, the guardrails you can’t break, and how you’ll know you hit the mark. Most of us (me included) jump straight to tools—“we need Veeam,” “we need Intune”—and then wonder why GPT-5 hands us mush. Tools are tactics. Define is the destination.
Think outcome first, not vibes. For the Veeam mess, “make a plan for veeam backups for 500tb of data” was hopeless because it hides the goals. A real Define reads like a tight change request: “Protect 500 TB across Tier 1 and Tier 2 workloads with Tier 1 at 24-hour RPO/4-hour RTO and Tier 2 at 48-hour RPO/12-hour RTO, 30-day onsite + 90-day immutable offsite, within an eight-hour nightly window over a 1 Gbps WAN, staying under $X/month, with success = 95% job success by week two and a clean quarterly restore test.” Now GPT-5 can actually help, because you just told it the finish line and the walls.
A simple formula keeps you honest: Who + What + Why + Constraints + Target. Who’s impacted (stakeholders), what outcome is required (not the tool), why it matters (risk or value), constraints you can’t break (budget, windows, compliance), and the target you’ll measure (RPO/RTO, adoption, error rate). If you’re prompting, ask GPT-5 to restate your Define in under 50 words and call out any missing constraints. It’s a tiny move that saves hours. Start here, every time, and the rest of DREAM becomes a path instead of a maze.
Research: context beats guesses
This is where the DREAM prompt framework gets real. Research turns “make a plan for backups” into “make the right plan for our 500 TB, our people, our network.” For the Veeam scenario, research means asking GPT-5 to uncover the stuff that actually changes design and risk: daily change rates by tier, the nightly backup window, RPO and RTO targets, expected dedupe and compression, WAN limits, immutability needs, and who signs off when a restore test passes or fails. The model can’t see your diagrams, so we give it a clear picture of the world and declare what is non-negotiable.
How to prompt GPT-5 for research
The prompt that works for me is simple: “Research the environment and list only factors that affect design or risk.” Then I make it write down assumptions and unknowns first, before it recommends anything. If it assumes a 3% change rate but your Tier 1 apps churn 12%, you catch the mismatch before the plan hardens. I also ask for a short, plain-English compare of a few decision points: backup copy jobs versus replication, Direct SAN versus HotAdd versus NBD, SOBR layout choices, object lock targets versus plain S3, plus a one-sentence “when to pick this” for each. No fluff, just decision fuel.
To keep it tidy, shape the output into four parts: inventory, constraints, risks, and validation steps. Inventory should include proxy counts, repository types, storage tiers, bandwidth, VM counts, and the biggest data movers. Constraints capture the hard walls like the eight-hour window, the shared 1 Gbps link, 30-day local plus 90-day immutable off-site, and the budget ceiling. Risks call out likely failure modes with a short why, and validation turns them into quick checks you can run this week. Finish by asking GPT-5 to restate the environment in under 120 words and flag the top three assumptions that could sink the plan. Clean research makes Explore honest, which is exactly the promise of the DREAM prompt framework.
Explore — multiple options with trade-offs
Exploration is where the DREAM prompt framework pays rent. You stop chasing the first “okay” idea and ask GPT-5 for several real choices, each with pros, cons, risks, and a way to roll back. Options reduce anxiety. They also force better thinking because you compare, not just hope. In this step, I tell the model to keep it practical, budget-aware, and reversible. No moonshots unless I ask for one on purpose.
Why explore at least three paths
One option is a wish. Two options is a debate. Three is a decision. The DREAM prompt framework nudges you to search the design space before you commit. You want variety, not clones. Ask for different transports, storage layouts, and off-site strategies. Also ask for a “risky but interesting” design to test your bias. Worst case, you decline it and feel smarter. Best case, you find a win that was hiding behind a scary assumption.
Option patterns to test for the 500 TB Veeam case
Option A: Direct SAN to SOBR with cloud immutability. Use Direct SAN transport for speed, land backups on a Scale-Out Backup Repository, and tier to object storage with immutability. Pros: fast ingest, predictable windows, ransomware-resistant copies. Cons: fibre/iSCSI complexity, capital cost. Risks: repository bottlenecks, transform times. Rollback: fall back to HotAdd proxies and shrink SOBR scope.
Option B: HotAdd proxies, per-VM chains, heavy use of synthetic fulls. Keep it virtual and flexible. Pros: easier to scale proxies, good for mixed clusters. Cons: slower than Direct SAN at scale, more snapshot stun risk. Risks: long merge operations, noisy neighbors. Rollback: pin Tier 1 jobs to dedicated proxies or move them to Direct SAN.
Option C: Backup copy to a hardened repository on-prem plus object-lock off-site. Split duties: quick local restores, durable off-site copies. Pros: cheap fast restores, solid immutability story. Cons: more moving parts, two storage tiers to babysit. Risks: missed copy windows, capacity drift. Rollback: pause copy jobs, extend retention locally while you fix throughput.
Option D (risky but interesting): Direct-to-object as primary. Shrink on-prem storage and push chains to object storage with immutability from day one. Pros: small footprint, simple lifecycle. Cons: API rate limits, restore performance sensitivity. Risks: slow mass restores, surprise egress. Rollback: pivot Tier 1 to a local performance tier, keep Tier 2 direct-to-object.
How to prompt GPT-5 for useful options
Give the model rails. Try this shape: “Explore four distinct backup designs for 500 TB. For each, write a short summary, the best-fit scenario, pros, cons, top risks, and a simple rollback plan. Keep each option under 120 words.” The DREAM prompt framework loves constraints like that. It keeps answers readable and decision-ready. Add one more line: “Highlight what changes if the backup window is eight hours versus twelve.” That single tweak exposes the real trade-offs.
Use constraint flips to widen the search
When the options feel same-y, flip a constraint and rerun Explore. Increase the window from eight to twelve hours. Add a 10 Gbps link for copies. Drop the budget by 20 percent and see what breaks. Or require 90-day immutability everywhere and watch designs shift. The DREAM prompt framework is about learning by contrast. You learn faster when the model shows you how one pressure dial changes the picture.
Decide, then capture the unknowns
End Explore with a checkpoint. Ask GPT-5 to pick the best fit for your stated goals and list the top three unknowns you must validate this week. Maybe it’s real-world change rates, proxy throughput, or object storage API quotas. That short list flows straight into your test plan. It also calms the brain. Decisions get easier when you know exactly what to prove next. That’s the whole point of Explore in the DREAM prompt framework: choices first, commitment second, evidence always.
Act — tiny, reversible plan with owners
Act is where the DREAM prompt framework turns ideas into motion without burning weekends. The goal isn’t a 40-page binder; it’s a small, testable plan you can pivot from. For our 500 TB Veeam case, we’ll ship value fast, validate the scary bits, and keep every step reversible. Think “tight loop, clear owners, easy rollback.” If a task can’t be owned by a real human with a real deadline, it’s not in this phase. We’ll also bake in comms, change control, and a proof step so success isn’t a vibe—it’s visible.
Owners at a glance
Name: names. A plan without people is just a wish.
Stakeholders: app owners for Tier 1/Tier 2 sign-offs.
Keep a living RACI in the change record. One owner per step, no “shared” ownership. If two teams touch a task, split it into two tasks. Fewer arguments, faster motion.
10-day pilot plan (reversible by design)
Day 1–2: Prep. Confirm RPO/RTO by tier, pick 20 TB pilot set, allocate pilot proxies, carve a small SOBR performance tier, wire object-lock target.
Day 3–4: First backups. Run per-VM chains, synthetic fulls off hours. Capture ingest and transform times.
Day 5: Copy jobs off-site. Test bandwidth shaping and windows.
Day 6: Hardening. Immutable windows, MFA on consoles, service accounts least privilege, config backup to a sealed mailbox/repo.
Day 7: Restore drills. File-level, whole VM, and app-aware for one Tier 1 workload. Time the RTO.
Day 8: Tuning. Add/remove proxies, adjust block sizes, parallel streams.
Day 9: Health checks. 95% job success target, alert routes, dashboards.
Day 10: Go/No-Go. If KPIs pass, schedule next 100 TB. If not, roll back to pre-pilot state (see below) and fix.
Change control and comms that don’t annoy everyone
Open a single parent change with dated child tasks. In the description, write a two-sentence purpose, the KPI targets, and the rollback trigger. For comms, send a tiny heads-up to app owners and service desk: what’s changing, when, how to ask for a restore, and who’s on call. After each pilot day, drop a 3-bullet update in the channel: what ran, what passed, what blocked. People don’t read long memos. They do read three bullets.
Decide stop points before you start. Example triggers: job success below 90% for two days, backup window exceeds 8 hours, copy jobs miss two consecutive windows, restore drill misses RTO by 50%. Rollback steps: pause new jobs, revert proxy count/transport to last-known-good, pin Tier 1 to the performance tier, extend local retention temporarily, and disable copy jobs while keeping prior points immutable. Document “how to un-pause” right next to “how to pause.” Future-you will forget.
Measure — KPIs, cadence, iteration
Measurement is the inhale after action. It’s how the DREAM prompt framework keeps you honest and calm when the pager chirps at 3 a.m. If Define was the destination and Act was the drive, Measure is the dashboard. For our 500 TB Veeam rollout, we’re not chasing vanity stats. We want a few clear numbers that prove backups ran, copies landed off-site, restores worked, and the team can sleep. Keep it simple, visible, and tied to decisions.
The KPIs that actually prove it worked
Start with reliability: job success rate over the last seven days, not just last night. Add performance: total data ingested within the nightly window and the lag to complete off-site copies. Fold in restore reality: median and p95 restore times for Tier 1 workloads and a weekly pass/fail on a real restore drill. Track protection depth: how many assets meet your policy versus how many should. Don’t forget security posture: percentage of restore points on immutable storage and configuration backup health. For our pilot, targets might look like 95% job success by week two, an eight-hour backup window, off-site lag under 24 hours, Tier 1 restores under four hours, and 100% of restore points meeting immutability rules. Round it out with cost signals such as storage growth rate and object storage egress so finance doesn’t ambush you later.
Set the cadence so the numbers change behavior
Data without rhythm is just trivia. The DREAM prompt framework loves a weekly review because it’s fast enough to course-correct and slow enough to do the work. Put a 20-minute standing check-in on the calendar: project lead, backup engineer, storage, network, and a rotating app owner. Review the last seven days, call out misses, and assign one improvement each. Keep a single lightweight dashboard on the wall of the meeting: reliability, performance, restores, security, and cost. If a KPI is green for three weeks, stop talking about it and free up time for what hurts.
Define thresholds and stop/rollback rules before you start
You already set them in Act; now you enforce them. Write down the triggers that force a pause, and make them boringly clear. If job success dips below 90% for two days, you halt new onboarding and tune. While, If the backup window spills past eight hours, you add proxies or adjust concurrency before you grow scope. If off-site lag exceeds 24 hours twice in a week, you reduce job overlap or open a bandwidth change with networking. If a Tier 1 restore misses the four-hour RTO by 50%, you freeze scope and fix the path end-to-end. The point isn’t punishment. It’s safety rails so small problems don’t snowball.
Close the loop and iterate like you mean it
Measurement only matters if it changes next week’s plan. Use the last five minutes of the weekly to pick a single improvement: adjust block sizes, rebalance SOBR extents, add a proxy in the noisy cluster, or move a chatty app to a different window. Ask GPT-5 to suggest the smallest change with the biggest gain, then test it over one week. Next review, keep what worked and revert what didn’t. That is the iteration heartbeat inside the DREAM prompt framework: evidence in, tiny change out, repeat. It lowers stress and makes progress feel inevitable, which is kind of the dream, right?
A quick prompt to generate your measurement plan
When you’re ready to let the model help, give it rails: “Using the KPIs above, create a one-page measurement plan for a 500 TB Veeam rollout. Include definitions, targets, data sources, and specific stop/rollback triggers. Propose a weekly agenda with owners and one improvement experiment per week.” You’ll get a clean draft you can paste into the change record and your team chat. More importantly, you’ll have a living loop that keeps your project out of the “we’ll fix it later” graveyard and squarely inside the DREAM prompt framework promise: clear goals, real action, and measurable wins.
Compatibility, Depth & Pairings
Why GPT-5 clicks with DREAM
GPT-5 loves structure. Give it a clean scaffold and it reasons like a pro. The DREAM prompt framework provides that scaffold, moving the model from fuzzy brainstorming to concrete next steps. Instead of “tell me everything about backups,” you hand it a lane, a finish line, and a few cones on the track. The result is tighter reasoning, fewer detours, and plans you can paste into a change record without blushing. DREAM also plays nicely with longer conversations. You can pause after each step, review, then resume. That pacing keeps the model focused and keeps you sane.
Pick the right reasoning depth
Not every task needs the same brainpower. For quick choices, L3 depth is enough: short context, clear constraints, fast options. The designs and playbooks, L4 is the sweet spot: compare alternatives, name risks, propose owners and timelines. For audits, migrations, or multi-team projects, ask for L5: deeper research, citations to your internal docs if you paste them in, and layered plans with rollback rules. Tell GPT-5 what you want up front. “Use L4 depth and pause after Explore” is a simple line that makes the DREAM prompt framework feel like a co-pilot, not a chatterbox.
Pairing DREAM with improvement cycles
DREAM gets you from idea to action. Pair it with a loop to keep getting better. My two favorites: MEASURE and VECTOR. After you ship with DREAM, run a MEASURE cycle over the next few weeks to tune KPIs, adjust thresholds, and lock in what worked. VECTOR helps when you’re balancing direction and effort across teams. Use it to realign priorities without redoing the whole plan. This pairing turns the DREAM prompt framework into a living system: plan once, then refine in small steps rather than heroic rewrites.
Simple pairing playbook
Ship a pilot using DREAM. In the weekly review, kick off a MEASURE pass: confirm KPI definitions, confirm data sources, and document one improvement to test next week. If priorities shift, drop a quick VECTOR-style checkpoint: “What direction changed, what trade-offs are acceptable, what effort is realistic.” Then loop. You get steady progress, fewer surprises, and a calm team that knows what happens next. That’s the promise of the DREAM prompt framework when it’s paired well: clear thinking, smooth execution, and easy iteration.
Step-by-Step Usage: A Mini Playbook
The setup: keep it small and real
The DREAM prompt framework works best when you give GPT-5 rails. Before you start, name one clear outcome, one constraint you can’t break, and one date that matters. That’s enough fuel. Then tell the model you’ll move step by step and pause between stages. This keeps answers tight and saves you from a 1,000-word word salad that reads like a committee memo.
Step 1: Define
Open with a single, punchy sentence that says what you’re trying to change and why anyone should care. Then ask GPT-5 to restate it back under 50 words and call out what’s missing. Try: “Use the DREAM prompt framework. Step 1: Define the goal in one sentence, list stakeholders, and name hard constraints. Keep it under 50 words. Ask me two clarifying questions.” Now the model knows the finish line and the walls around it.
Step 2: Research
Next, make the model gather context without drowning you. Ask for only what changes design or risk, and force it to list assumptions and unknowns first. Try: “Step 2: Research. Summarize environment factors that affect design or risk. Write assumptions and unknowns before recommendations. End with three quick validation checks I can run this week.” Short, useful, verifiable—chef’s kiss.
Step 3: Explore
This is the tasting flight. Ask for at least three distinct approaches, each with pros, cons, top risks, and a tiny rollback idea. Add one “risky but interesting” option to challenge your bias. Prompt it like this: “Step 3: Explore three to four distinct options with pros, cons, risks, best-fit scenario, and a 3-step rollback. Keep each option under 120 words. Highlight what changes if the window is 8h vs 12h.” Options calm the nervous system because you’re choosing, not hoping.
Step 4: Act
Turn direction into a small, reversible plan with real owners and dates. Ask for a checklist you can paste into a ticket, plus change control notes and a restore test. Try: “Step 4: Act. Produce a 10-day pilot plan with owners, effort estimates, and a go/no-go gate. Include comms, change control, and a restore drill. Keep steps small and reversible.” If a step can’t be owned by a human, it’s not a step yet.
Step 5: Measure
Close the loop or you’ll drift. Pick a few KPIs that prove it worked—reliability, performance, restores, security—and set thresholds for stop or rollback. Then schedule a weekly 20-minute review. Prompt it like: “Step 5: Measure. Define KPIs, targets, data sources, and explicit stop/rollback triggers. Propose a weekly agenda and one improvement experiment per week.” The DREAM prompt framework loves rhythm; it turns numbers into decisions.
Pause points that save sanity
Between steps, tell GPT-5 to stop and wait. After Explore, pick a direction; after Act, confirm owners and dates; after Measure, agree on the one change you’ll test next week. This pacing keeps everyone aligned and prevents the “we changed the plan mid-email” chaos that ruins Fridays.
A tiny template you can paste
When you’re rushing, drop this in verbatim: “Use the DREAM prompt framework. We will proceed step by step and pause after each stage. Start with Step 1: Define the goal in ≤50 words, list stakeholders, and hard constraints. Ask me two clarifying questions, then stop.” That single paragraph transforms GPT-5 from a chatty oracle into a calm co-pilot.
Paste-Ready Prompt Template
You know those days when the brain feels like dial-up? This is the moment the DREAM prompt framework pays rent. A tight, paste-ready prompt turns GPT-5 from “interesting chatter” into “actionable plan.” The goal here isn’t poetry. It’s a clean scaffold you can drop into ChatGPT, fill in a few blanks, and get structured, step-by-step output without babysitting every sentence.
The core template (copy/paste)
Use the DREAM prompt framework (Define, Research, Explore, Act, Measure).
We will proceed step by step and pause after each stage.

Context:
- Goal: <one-sentence outcome; no tools yet>
- Audience: <who this is for>
- Constraints: <budget/time/compliance/network/etc.>
- Deadline/Window: <date or timeframe>
- KPIs (success looks like): <3–5 measurable targets>
- OptionsCount: <3–4>

Instructions, follow these steps:
1 — Define: Restate the goal in ≤50 words, list stakeholders, and confirm hard constraints. Ask me 2 clarifying questions. Stop.
2 — Research: List only factors that change design or risk. Write assumptions and unknowns first. End with 3 quick validation checks I can run this week. Stop.
3 — Explore: Provide <OptionsCount> distinct approaches with pros, cons, top risks, best-fit scenario, and a 3-step rollback for each. Keep each option ≤120 words. Highlight what changes if the time window tightens. Stop.
4 — Act: Propose a 10-day pilot plan with owners, effort, comms notes, change control, and a restore/test step. Keep steps small and reversible. Include explicit go/no-go criteria. Stop.
5 — Measure: Define KPIs, targets, data sources, and stop/rollback triggers. Propose a weekly 20-minute review agenda plus one improvement experiment to test next week. Stop.

Output formatting:
- Use short paragraphs (no walls of text).
- Plain language, no buzzwords.
- Call out “Assumptions,” “Unknowns,” and “Risks” with short lists.
Optional add-ons when you need extra rigor
When stakes are high, bolt on one or two of these and rerun the same prompt. Ask for a “risky but interesting” option to challenge bias. Require a compare-and-decide table after Explore with a one-line rationale. Add “include rollback triggers next to each KPI” for faster decisions. If you’re working across teams, tell GPT-5 to include a tiny RACI map in Act so ownership isn’t fuzzy. The DREAM prompt framework stays the same; you’re just tightening the guardrails.
A quick filled example (Veeam pilot)
If you’re staring down that 500 TB rollout, here’s a fast fill to get moving. Goal: protect 500 TB with Tier 1 at 24-hour RPO and 4-hour RTO, Tier 2 looser, within an eight-hour nightly window. Audience: IT ops and app owners. Constraints: 1 Gbps shared WAN, 30-day local plus 90-day immutable off-site, real budget ceiling. KPIs: ≥95% job success by week two, off-site lag <24 hours, Tier 1 restore ≤4 hours, 100% points on immutability. Plug those into the template, hit enter, and you’ve got structured output you can paste into a change record without blushing. That’s the quiet power of the DREAM prompt framework—less noise, more done.
Three In-Depth Example Prompts (Steal These)
You don’t need perfect energy to get perfect structure. Drop one of these into ChatGPT, add your details, and let the DREAM prompt framework carry the load. I’ve kept each story short, human, and ready to ship. And yes, there’s a bonus fourth example for finding a remote job because life is life.
Example 1: Startup idea: a hydration app people actually use
You’ve got a half-formed app idea and a blinking cursor. The DREAM prompt framework turns “hmm” into a clean path from concept to prototype, then defines what success looks like in month one through three. You’ll get research on existing hydration tools, a few standout features that aren’t copycat, and a tiny build plan you can run without quitting your day job.
Help me design a new mobile app that helps people track daily water intake. Use the DREAM prompt framework. Steps:
1: Define the problem and the target user in ≤50 words.
2: Research current hydration apps and user pain points.
3: Explore 3 unique features with pros/cons and risks.
4: Act with a 4-week prototype plan and simple roles.
5: Measure success for the first 3 months (KPIs, targets).
Pause after each step.
Example 2: Personal learning goal: Spanish in one year without burnout
Ambition is great; burnout is real. With the DREAM prompt framework, GPT-5 maps the barriers, suggests proven methods, and shapes a weekly plan that fits real schedules. You’ll also get a monthly scoreboard that keeps motivation alive when life gets loud.
I want to learn Spanish within one year. Use the DREAM prompt framework. Define my main challenges and the exact outcome I want. Research evidence-based methods and tools for adult learners. Explore daily practice strategies for 20, 40, and 60 minutes. Act with a weekly plan I can follow for the next 4 weeks. Measure progress monthly with specific checkpoints and habits.
Example 3: Community impact: reduce plastic waste in a small town
Big problems feel abstract until you scale them to your block. The DREAM prompt framework scopes the issue, brings in relevant data, and compares several initiatives. You end with one practical plan the community can launch and a one-year dashboard the council can actually read.
Design a local community project to reduce plastic waste in a small town. Follow these steps:
1. Define the scale of the problem and key stakeholders.
2. Research current plastic usage and local constraints.
3. Explore 4 initiatives with costs, effort, and risks.
4. Act with a 90-day rollout plan and simple roles.
5. Measure success over one year with KPIs and review cadence.
Pause after each step.
Example 4: Find a remote job: targeted search that lands interviews
Job hunting can feel like shouting into the void. The DREAM prompt framework gives you a focused campaign: crisp role targets, a research pass on companies, three search strategies, and a two-week sprint plan. You also get a measurement loop so you iterate fast instead of doom-scrolling.
Help me find a fully remote job in IT/Systems Administration. Follow these steps:
1. Define my target roles, seniority, and non-negotiables in ≤50 words.
2. Research companies and platforms that match my skills and timezone.
3. Explore 3 search strategies: focused applications, referral-driven outreach, and portfolio/content signal. Include pros/cons and risks.
4. Act with a 14-day plan: daily outreach quotas, resume/LinkedIn updates, tailored cover notes, and a mock interview schedule.
5. Measure with weekly KPIs: applications sent, referral replies, interviews booked, and quality-of-fit. Propose iterate steps for week two.
Pause after each step.
Each of these keeps the rails tight and the decisions visible. That’s the real magic of the DREAM prompt framework: clear steps, tiny wins, and enough structure to make progress feel inevitable.
Pro Tips for Using Chat GPT 5 Acronyms Like DREAM
The DREAM prompt framework is simple, but the way you drive it decides whether you get a runbook or a riddle. These are the habits that keep GPT-5 useful on messy, real-world work—where budgets are real and Friday nights deserve peace.
Start with outcomes, not tools
If you open with “we need Veeam/Intune/Kubernetes,” the model will chase the tool and forget the finish line. Begin every prompt with the outcome: who benefits, what “good” looks like, and the guardrails you can’t break. Tell GPT-5 to restate your goal in under 50 words and flag what’s missing. The DREAM prompt framework loves that tight opening because it anchors every later choice.
Demand assumptions and unknowns up front
Hallucinations hide inside silent assumptions. Make GPT-5 list what it’s assuming and what it doesn’t know before it prescribes anything. You’ll catch the “3% daily change rate” myth or the “unlimited WAN” fantasy before they poison the plan. It feels nitpicky. It saves weekends.
Force options with real trade-offs
One option is a wish. Ask for three or four distinct approaches, each with pros, cons, costs, risks, and a tiny rollback idea. Include one “risky but interesting” path to challenge bias. The DREAM prompt framework isn’t about perfect; it’s about visible choices so you can pick with eyes open.
Keep actions tiny and reversible
Big steps create fear and stall projects. Tell GPT-5 to write a 7–10 day pilot with owners, timeboxes, and a clear go/no-go. Every step should be undoable without drama. If it can’t be owned by a real human with a date, it’s not an action yet—it’s still research.
Measure like you mean it
Pick a few KPIs that prove value, not vanity: reliability over seven days, ingest inside the window, off-site lag, restore times, immutability coverage. Add thresholds for “stop” or “roll back” before you start. The DREAM prompt framework turns numbers into decisions when you give it bright lines.
Use pause points to prevent chaos
After Explore, stop and choose. Followed by Act, confirm owners and dates and finally Measure, pick one improvement to test next week. These pauses keep scope from shape-shifting mid-email and make long threads feel calm. “Pause after this step” might be the most productive sentence you type all day.
Flip a constraint to widen thinking
When options look the same, change one pressure dial and rerun Explore. Extend the window, cut the budget, add a faster link, or require immutability everywhere. Seeing how designs bend under new rules is where the insight lives. The DREAM prompt framework thrives on contrast.
Make ownership explicit (RACI in a sentence)
Vague ownership kills good plans. Ask GPT-5 to include a one-line RACI for each step: who’s responsible, who approves, who consults, who’s informed. Names, not teams. If two names appear on one task, split the task. That tiny bit of clarity prevents 90% of “I thought you had it” moments.
Teach the model your world
Paste a short “environment snapshot” before you start: versions, windows, bandwidth, compliance rules, budget ceilings. Keep it under 120 words. The DREAM prompt framework works best when GPT-5 sees your constraints; otherwise it invents a friendlier universe where everything is faster and free.
Red-team your own plan
Before you ship, ask GPT-5 to critique the chosen option like a cranky SRE: failure modes, blind spots, and how a restore drill could embarrass you. Then have it propose the smallest experiment that would disprove the plan fast. A five-minute red team now beats a five-hour postmortem later.
Use these habits and the DREAM prompt framework stops being a cute acronym and starts feeling like a calm, repeatable way to ship. Less noise. More done. And maybe—just maybe—your Dr Pepper stays cold this time.
Mental Health Note: Structure Reduces Stress
Some days the brain cooperates. Other days it’s foggy, loud, and a little mean. That’s when the DREAM prompt framework feels less like “process” and more like a floatation device. Structure turns the big scary blob into five small doors you can open one at a time. It doesn’t fix life, but it lowers the volume so you can breathe and pick the next right move.
Why structure calms your nervous system
An unframed problem keeps your fight-or-flight on standby. The DREAM prompt framework gives your mind a sequence: Define, then Research, then Explore, then Act, then Measure. You are not juggling twelve thoughts anymore. You’re asking one question at a time and parking the rest. That cut in mental switching reduces anxiety, which reduces mistakes, which reduces more anxiety. Nice little flywheel.
On heavy days, shrink the DREAM prompt framework to a thirty-second ritual. Write a two-sentence Define. Ask GPT-5 for three research unknowns, not twenty. Pick one Explore option that feels doable and schedule a thirty-minute Act step, timer on, phone flipped. After, Measure with one yes/no: “Did this move us forward?” These micro-moves create momentum. Momentum is basically confidence with sneakers on.
Minimum-viable DREAM for bad days
When motivation face-plants, try MVD: one line per step. Define in 15 words. Research with one assumption to verify. Explore with one alternative and a single risk. Act with a task that fits inside a coffee break. Measure with a tiny check you can run today. It is still the DREAM prompt framework, just wearing sweatpants.
Numbers can help or they can bully. In the DREAM prompt framework, KPIs are there to guide, not shame. Use them to decide the next small experiment, not to beat yourself up. Missed a target? Cool. Write a one-line guess why, change one variable, try again next week. Progress over drama.
Boundaries keep the engine healthy
GPT-5 will talk forever. You shouldn’t. Put time boxes around each DREAM prompt framework step and add pause points: “stop after Explore,” “stop after Act.” Close your laptop when the timer ends. Write a “done list,” not just a “to-do.” Your brain likes seeing proof that the day was real, even when it felt wobbly.
Structure doesn’t make life easy, it makes it survivable. On the days when you’re tired or anxious or both, the DREAM prompt framework gives you rails. One step, then another, then a small win you can point to. And honestly, that quiet little win is the best kind of medicine I know.
Wrap-Up: Clarity Beats Chaos
When the day gets loud and the queue looks feral, the DREAM prompt framework is the calm voice in the room. It takes you from “hmm” to “here’s the plan,” whether you’re wrangling 500 TB of Veeam backups, spinning up a community project, or hunting a remote role without burning out. Define gives you a finish line. Research adds truth. Explore creates choices. Act ships something small and reversible. Measure closes the loop so next week is smarter than last week. That’s not just project hygiene; that’s sanity maintenance.
Your two-minute next step
Open ChatGPT and paste the template from Section 7. Fill in five blanks: goal, audience, constraints, deadline, KPIs. Tell it to pause after each step. If you like automation, drop the PowerShell helper and generate a clean scaffold first. Then run a tiny pilot. Ten days, named owners, boring rollback. Put one weekly metric review on the calendar and keep it to twenty minutes. If a KPI is red, pick one experiment, not five. You’ll feel the stress ratchet down because you’re driving the work, not chasing it.
A small promise to yourself
On the wobbly days, shrink DREAM to sweatpants mode: one line per step, one action you can do before your Dr Pepper goes flat. Progress over drama. The cat was amazing. And if Google failed you earlier (same), this is the part where structure quietly wins. Use the DREAM prompt framework for your next rollout or job search, and let me know what you shipped. Clarity beats chaos. Every time.
Chaos greeted my Tuesday before coffee. Tickets screamed from three dashboards. A file server blinked like a sleepy raccoon. Meetings overlapped, because of course they did. Prompts to Chat GPT 5 sounded rushed and vague. Results came back scattered and oddly confident. Google failed me right when nerves felt loud. One deep breath changed the tempo of everything. The F.L.A.R.E.prompt framework slid back into memory. Focus, Logic, Action, Reflection, Expansion sat like anchors. Stress eased once a plan appeared on paper. Prompts became shorter and strangely more exact. Outcomes turned sharper, faster, and less hand-wavy. Scope tightened, and noise fell to the floor.
Confidence returned like a charger clicking into place. The cat was amazing, asleep on command. Tiny wins multiplied while adrenaline cooled its jets. Boundaries around tasks made thinking feel safer. Emotions regulated once structure started doing work. Frameworks can feel rigid during wild days. This one felt more like rails on ice. Words found direction without losing necessary nuance. Work moved again, and so did relief. Prompts behaved, which felt like a small miracle. That morning convinced me to teach this. Tuesdays should not depend on caffeine alone. They should depend on repeatable, human-friendly scaffolding. That is what F.L.A.R.E. quietly delivers.
Why F.L.A.R.E. Matters for Chat GPT 5
Prompts act like API calls for your brain. Clear inputs create reliable, useful outputs every time. F.L.A.R.E. gives prompts a lean, durable backbone. Focus defines the single, measurable goal with clarity. Logic sets structure, comparisons, and meaningful constraints around delivery. Action requests a tangible format and useful artifact. Reflection invites critique, risks, and honest trade-offs. Expansion explores alternatives, deeper angles, and fresh next steps. Together, those pieces guide layered reasoning on demand. Strategic planning benefits from that added mental scaffolding.
Brainstorming picks up speed without losing useful depth. Technical analysis gains comparisons that expose hidden assumptions. Creative writing lands with shape and ethical texture. Chat GPT 5 acronyms can feel like alphabet soup. This one translates directly into saved minutes and sanity. L3 to L5 reasoning loves explicit lanes and constraints. GPT-4 and GPT-5 reward that structure with clarity. Even GPT-3.5 improves when the rails exist. Admins need repeatable prompts under genuine time pressure. Writers need reliable depth without drowning the reader. Managers need pros and cons before decisions land. Humans need calm when alerts start stacking high. F.L.A.R.E. gives you calm that scales with complexity.
What the F.L.A.R.E. Prompt Framework Is
The F.L.A.R.E.prompt framework is a simple but powerful way to shape prompts for Chat GPT 5. It helps you get answers that are not just accurate, but also layered, insightful, and creative. The acronym stands for Focus, Logic, Action, Reflection, and Expansion. Some people swap the last part for “Expression,” but in this guide, we’ll use “Expansion” because it’s about pushing ideas further.
Each part of F.L.A.R.E. serves a purpose:
Focus defines the single, clear goal for your prompt.
Logic adds structure, constraints, or comparisons.
Action tells the model exactly what to produce.
Reflection invites analysis, critique, or evaluation.
Expansion requests alternatives, deeper insights, or extra ideas.
The magic of F.L.A.R.E. is that it encourages multi-layered thinking. Instead of getting a single, surface-level answer, you receive output that’s organized, reasoned, and broadened. This makes it especially useful for strategic planning, technical analysis, and creative work.
It’s not for every task, though. If you just need a quick fact or a simple conversion, F.L.A.R.E. might be overkill. But when the problem requires more depth, it gives Chat GPT 5 a “map” to follow.
You can also adapt F.L.A.R.E. depending on the model. GPT-4 and GPT-5 excel at handling all five parts. GPT-3.5 benefits from a simplified version where Reflection is lighter and Expansion is shorter. Either way, the framework’s structure guides the model toward clarity and depth — and that’s exactly what busy admins, managers, and writers need.
F — Focus
Why Focus Comes First
The F.L.A.R.E.prompt framework starts with Focus for a good reason. It gives your prompt a single destination before anything moves. Clarity at the start prevents wandering, hedging, and wasted cycles. Busy admins need that guardrail on chaotic days. Chat GPT 5 responds best to clear targets. Ambiguity invites broad, generic answers that require editing. A sharp focus line trims noise and reduces decision fatigue. Think of it like a firewall rule for language. Permit only the traffic that serves the goal. Everything else gets dropped without drama. Mood steadies when scope feels contained and workable.
Workflows also speed up because choices shrink. Teams align faster when the north star is explicit. Stakeholders read the same sentence and nod. That alignment saves meetings and prevents rework. Among Chat GPT 5 acronyms, F.L.A.R.E. wins on clarity. Focus also helps mental bandwidth through hectic mornings. Small decisions stay small when goals stay crisp. Your future self will thank present you. Less noise, more momentum, and fewer do-overs. Tension drops because the model stops guessing your intent. That single win can calm an overloaded nervous system.
How to Write a Strong Focus Line
Start with one outcome stated in a single sentence. Name the system, audience, and relevant constraints. Those details change tone, scope, and technical depth. Keep verbs decisive to guide action and evaluation. Avoid stacking multiple goals into one overloaded line. Short prompts can still carry serious clarity. Here is a clean template to reuse daily. Focus: Create a six-month plan to improve internal communication. That sentence sets direction without prescribing every step. Add audience when tone or risk appetite matters. For example, write for a cautious leadership team.
Or target frontline engineers who need concrete playbooks. Context prevents the model from guessing your expectations. Constraints also help, but keep them light. Choose a timeframe, budget hint, or tool boundary. Say what must be included, not everything possible. You can deepen detail later in Logic. Two more examples show the pattern in action. Focus: Design a basic server uptime monitor for small Linux fleets. Focus: Draft a one-page rollout plan for MFA in remote teams. Notice the verbs lead directly to deliverables. Domains define the playing field clearly. They still leave room for creative, useful solutions. Write your focus last if scope feels fuzzy. Sometimes thinking becomes clear after listing constraints. Either order works if the line stays crisp. Commit to one goal, and everything else stabilizes.
Pitfalls to Avoid and Quick Fixes
Common mistakes creep in when days get hectic. Multiple goals land inside one sentence without warning. That pattern splits the model’s attention immediately. Results drift and feel strangely generic or noisy. Fix it by separating goals into sequential prompts. Each outcome deserves its own crisp focus line. Another trap hides in unstated audiences and domains. The model then guesses tone, risk, and vocabulary. Outcomes wobble because assumptions differ across roles. Prevent this by naming the reader or decision maker. State the system, platform, or business context up front.
Missing constraints also cause subtle scope creep. Vagueness invites scope to expand without end. Set one boundary like time, budget, or tool family. You can always elaborate later during Logic. Overloaded metrics create a different problem entirely. Metrics belong, but not in a huge cluster. Pick one or two that express success simply. Clarity beats volume when guiding early reasoning. Copy length also matters during stressful moments. Rambling focus lines burn cognitive energy fast. Trim adjectives and aim for direct, active verbs. Another gentle fix involves reading the line aloud.
Mouth feel reveals awkward clauses and hidden tangents. If breath runs out, the sentence probably does too. Rewrite until it sounds clean and confident. Good focus reads like a precise ticket title. Your team should recognize the goal immediately. They should also understand the boundary of effort. That shared understanding prevents meetings and rework. Calm follows when everyone sees the same target.
L — Logic
Why Logic Is the Backbone of F.L.A.R.E.
Logic is where the F.L.A.R.E.prompt framework stops being an idea and starts becoming a plan. It gives structure to your request and prevents the model from wandering. Chat GPT 5 works best when it has boundaries and a clear route to follow. Without logic, you’re asking it to drive without a map — and yes, it will get somewhere, but you may not like the neighborhood.
Logic sets up the sequence of steps, the criteria for success, and any comparisons you want made. It can also highlight constraints like timeframes, budgets, or available tools. These guardrails help the model think like you do, only faster. In high-pressure work, this is the difference between a guess and a decision-ready output.
When you combine a strong Focus with solid Logic, you’re basically giving GPT a blueprint. That blueprint ensures the end result fits your exact needs — no surprises, no missing steps, and no wasted time.
How to Build Strong Logic Into Your Prompt
Start by deciding how you want the information organized. Do you need phases? A checklist? A side-by-side comparison? Tell the model exactly what shape you expect.
Example: Logic: Use three phases, list key actions and potential risks, and compare Slack with Microsoft Teams.
Notice this example doesn’t just say “plan the project.” It gives the number of phases, the type of content for each, and the tools to evaluate. That’s enough detail to keep Chat GPT 5 structured while leaving room for creativity.
You can also include metrics, risk thresholds, or dependencies. These make the output more actionable in real-world situations. For technical requests, logic might involve naming programming languages, libraries, or specific system requirements.
Common Logic Mistakes and How to Avoid Them
A frequent issue is being too vague. If you say “make a plan” without stating how it should be broken down, you might get a wall of text. Another mistake is overloading your logic with every possible requirement. That can cause the model to get bogged down and produce overly complex results.
The fix is balance — enough structure to guide the answer without choking creativity. Think of Logic as the skeleton: strong enough to hold the shape, flexible enough to move. In the Chat GPT 5 acronyms toolkit, this step is where efficiency lives.
A — Action
Why Action Turns Plans Into Results
Action is where the F.L.A.R.E.prompt framework stops thinking and starts shipping. A plan might feel satisfying, but only an actual deliverable will close a ticket, meet a deadline, or satisfy a stakeholder. Chat GPT 5 responds best when you tell it exactly what to produce. Without that clarity, you risk getting a long, thoughtful lecture instead of something you can actually use.
When you define the action clearly, you remove guesswork. Specific formats, lengths, and structures keep the output focused and easy to integrate into your workflow. It’s like the build step in a CI pipeline — a moment where a concept turns into something tangible. For busy admins, managers, or writers, this is where the win happens. Clarity here saves time, prevents rework, and keeps teams aligned on expectations.
The beauty of Action is its versatility. You can request roadmaps, tables, scripts, checklists, or even creative pieces — all tailored to your audience and needs. Adding details such as the required tone, the level of depth, or the acceptance criteria makes it even easier to get a result you can immediately deploy. Among the Chat GPT 5 acronyms, this step is where insight becomes something real and ready.
How to Write Precise Action Lines
Start by naming the exact deliverable you want. Follow that with the structure, length, and any relevant constraints. If the audience matters — such as executives needing summaries or engineers needing technical depth — mention it. For technical work, specify the language or formatting. For narrative tasks, request headings, sections, or word counts.
Here are a few strong examples:
Action: Produce a phase roadmap with owners, timeline, and risks.
Action: Draft a one-page SOP with steps, checks, and rollback plan.
Action: Provide Python code with comments, tests, and a README.
Action: Create a table summarizing pros, cons, and estimated costs.
Action: Output a checklist ready to paste into Jira.
Notice how each example starts with the deliverable, then adds the format and constraints. This rhythm ensures expectations are visible and outcomes are predictable. When you get Action right, you turn planning into tangible results — and save yourself the headache of chasing clarity later.
R — Reflection
Why Reflection Sharpens Decisions
Reflection is the checkpoint that stops confident nonsense from sliding past. It asks the model to critique its own work. Pros and cons appear, along with risks and trade-offs you might miss. Hidden assumptions surface, which saves time and rework later. Strategic planning gains clarity when weak paths get flagged early. Brainstorming improves because ideas meet friction before resources move. Technical analysis benefits from comparisons that expose blind spots and bias. Creative writing deepens when themes, stakes, and ethics get examined. Admins love this because it reveals failure modes and mitigations. Stakeholders appreciate confidence levels and clear caveats attached to claims.
The F.L.A.R.E.prompt framework bakes this discipline into every complex task. L3 works for structured evaluation when speed matters. L4 adds head-to-head comparisons that guide choices under pressure. L5 synthesizes insights and uncovers patterns you did not expect. GPT-4 and GPT-5 handle these layers with steady focus. GPT-3.5 can still help with a lighter touch. Reflection also regulates stress on hectic days. A short pause creates calm and confidence before execution.
How to Ask for Reflection in Prompts
Start by naming the lens you want applied. Request comparisons, trade-offs, and the criteria behind each judgment. Ask for pros, cons, risks, and mitigations as discrete sections. Invite a confidence score with a sentence on why. Require the model to list assumptions that shaped its answer. Include early warning signals for the top failure modes. Direct it to compare options across cost, risk, and effort. Specify a scoring scale to prevent squishy language and hedging. Encourage short tables when scanning speed beats narrative. Keep depth aligned with L3, L4, or L5 reasoning.
Example prompts work well inside the Chat GPT 5 acronyms toolkit. “Compare Slack and Teams on security, governance, cost, and adoption. Score one to five.” Another good line is, “List three failure modes with early signals and mitigations.” Creative projects can ask, “Which theme lands harder, and why.” Close with a brief retro that names next steps. Reflection, requested clearly, trades guesswork for grounded choices.
E — Expansion (or Expression)
Why Expansion Unlocks Extra Value
Expansion is where strong answers grow richer. The F.L.A.R.E.prompt framework uses this step to widen perspective. Alternatives appear, and depth increases without losing focus. Strategy benefits because options reduce decision risk. Technical work improves through scalable patterns and edge cases. Creative writing deepens with themes, echoes, and fresh angles. Chat GPT 5 handles this breadth with impressive control. Among Chat GPT 5 acronyms, F.L.A.R.E. shines here most. Reflection catches risks, while Expansion supplies better routes. Both together create insight that actually ships.
Teams feel calmer when choices are visible. Anxiety drops because the path no longer feels singular. Leaders see trade-offs and can stage experiments responsibly. Admins get quick wins and stretch goals in one pass. That balance protects schedules and budgets during busy quarters. Busy brains appreciate structure that still invites creativity. L3 reasoning handles quick breadth without heavy synthesis. L4 adds comparisons that support disciplined choices. L5 pushes into novel combinations and bold proposals. GPT-4 and GPT-5 manage L5 with steady focus.
Even short prompts gain value from Expansion. A single paragraph can request three alternatives. A second line can ask for next-step experiments. The F.L.A.R.E.prompt framework keeps everything orderly and tight. Depth arrives without drowning the reader in noise. Momentum continues because options fit the original goal. That is the quiet power of Expansion. Ideas multiply while clarity stays intact. Calm follows when you know more than one way works.
How to Use Expansion and Expression
Use Expansion when you want breadth with purpose. Ask for alternatives that still honor the Focus. Request two or three additional approaches, not twenty. Push for stretch goals that extend the baseline plan. Invite deeper dives where risk or payoff looks high. Direct the model to surface edge cases and failure modes. Ask for adjacent ideas that share tooling and people. Encourage small experiments that prove value quickly. Specify resources, effort, and expected impact for each idea. That detail supports planning without endless meetings later.
Expression is a sibling that tunes voice and style. Request tone changes for different audiences or channels. Ask for executive crispness, or friendly help-desk warmth. Direct the model to keep facts while shifting language. That move saves time when repackaging deliverables. The F.L.A.R.E.prompt framework makes this handoff very clean. Expansion grows ideas, and Expression readies them for humans.
Concrete prompts keep Expansion efficient and sane. Try asking for “three alternatives with pros, cons, and effort.” Consider adding “rank by impact and risk tolerance.” You can include “name quick wins and stretch bets.” Creative teams might request “two thematic variations with moral weight.” Technical teams could ask “scalable paths for 10x growth.” Those lines stay short, but they unlock depth. Options arrive shaped, scored, and ready to discuss. That is Expansion working exactly as designed.
When to Use F.L.A.R.E. vs Skipping It
When F.L.A.R.E. Shines
Complex work deserves the F.L.A.R.E.prompt framework. Strategy sessions, roadmaps, and change plans need layered thinking. Brainstorming benefits from breadth without devolving into chaos. Technical analysis gains structure, comparisons, and measurable constraints. Creative writing lands deeper themes with clear arcs and options. Cross-team projects also thrive with explicit structure and deliverables. Vendor evaluations improve when pros, cons, and risks surface early. Migration planning needs phases, owners, and rollback paths. Incident postmortems want critiques, lessons, and next steps. Decision memos benefit from options scored by impact and risk.
That is where Chat GPT 5 acronyms actually pay rent. F.L.A.R.E. turns fuzzy goals into clear, reviewable artifacts. Reflection catches weak paths before they burn time or budget. Expansion proposes alternatives that protect timelines under pressure. L3 fits structured planning with moderate depth and speed. L4 adds comparisons that guide choices with less debate. L5 synthesizes patterns and proposes bold but defensible moves. GPT-4 and GPT-5 handle those layers beautifully. Busy admins and managers feel calmer with that scaffolding. Writers appreciate clarity that still leaves room for voice. Teams move faster because the path is visible and stable. Use F.L.A.R.E. whenever outcomes depend on sound reasoning and options.
When Skipping F.L.A.R.E. Is Smarter
Not every task needs the full F.L.A.R.E.prompt framework. Quick facts, definitions, and unit conversions require speed. Simple CRUD tasks do not benefit from layered reasoning. Renaming files or reformatting text demands direct instructions. Short shell or PowerShell snippets should stay lean. A single Action line often beats a full framework there. Focus plus Action can deliver perfect brevity under load. Over-structuring small asks wastes time and attention. Mechanical work wants predictable, minimal prompts every time. Daily standups and tiny updates rarely need Reflection sections. Expansion also adds overhead to very narrow jobs. Save it for features, risks, or strategy discussions.
Consider partial F.L.A.R.E. for medium complexity tickets. Try Focus, Logic, and Action without the rest. Add Reflection only when choices or risks appear. Request Expansion when options would actually change decisions. GPT-3.5 prefers trimmed Reflection and shorter Expansion. Older tools sometimes struggle with heavy prompt scaffolds. Choose the smallest prompt that meets the moment. That habit preserves energy for real thinking later. Skipping pieces is not failure or laziness. It is good prompt hygiene and better time management.
Reasoning Depth L3–L5, and Choosing the Right Lane
What the Levels Mean
Reasoning depth sets how hard the model thinks. The F.L.A.R.E.prompt framework makes this choice explicit and useful. L3 delivers structured reasoning with solid organization and modest depth. Plans appear with phases, owners, and light risks. Comparisons are brief and practical. This level suits roadmaps, SOPs, and short memos. L4 adds sharper analysis and clear head-to-head comparisons. Trade-offs surface with criteria and simple scoring. Risks connect to mitigations and early warning signs. You get balanced views without academic detours. L5 goes deep on synthesis and creativity. Patterns merge, and novel ideas appear with real nuance. Multiple models and frameworks get woven together. This level shines for strategy, architecture, and invention.
Time and attention act like budgets here. L3 is fast and predictable. L4 costs more cycles but saves debate. L5 consumes the most time yet often pays off big. Chat GPT 5 handles all three lanes confidently. GPT-4 does well on complex L4 and many L5 asks. GPT-3.5 benefits from trimmed scopes and lighter Reflection. Among Chat GPT 5 acronyms, F.L.A.R.E. makes these choices visible. That visibility reduces stress and sets clear expectations. Teams know the destination and the thinking depth. Editors know where to challenge or accept. Decisions then land with less noise and fewer surprises.
How to Choose the Right Lane
Start with stakes and timeline before picking depth. High stakes with short timelines favor L4 over L5. Moderate stakes and tight calendars prefer L3 clarity. Novel problems reward L5 synthesis when time allows. Familiar territory with process debt leans toward L3. Audience matters as much as difficulty. Executives often want L3 or lean L4 summaries. Engineers may request L4 comparisons and concise tables. Creative teams can handle L5 exploration with options. State the lane directly in your prompt. Try “Use L4 reasoning with brief comparisons.” That line sets expectations and editing effort.
Constraints also guide the choice smartly. Fixed budgets and compliance push toward L4. Undefined scope invites L5, paired with a cap. Limited telemetry or data leans toward L3 structure. Model selection matters, too. GPT-5 handles layered prompts with steady control. GPT-4 does great with L3 and L4 depth. GPT-3.5 performs best with trimmed Reflection and Expansion. The F.L.A.R.E.prompt framework supports partial mixes as needed. Start at L3, then request L4 comparisons if gaps appear. Escalate to L5 only when the payoff justifies it. That cadence protects calendar sanity without dulling insight.
Compatibility Notes: GPT-4, GPT-5, and Adapting to 3.5
GPT-4 and GPT-5 with F.L.A.R.E.
GPT-4 and GPT-5 carry real weight when prompts get layered. The F.L.A.R.E.prompt framework suits their strengths beautifully. Focus lands cleanly, and Logic stays stable under revision. Action turns into structured outputs with fewer odd tangents. Reflection produces balanced comparisons instead of noisy hedging. Expansion adds options without drifting from the original goal. Teams feel the improvement during planning and review cycles. Editors also see clearer trade-offs and stronger evidence. L3 reasoning runs fast and very consistent on both models. L4 delivers thoughtful comparisons with light scoring and criteria. L5 shines for synthesis, architecture, and inventive routes. Complex roadmaps benefit from phased structure and clear risks. Technical analysis improves through explicit constraints and benchmarks.
Creative writing gains depth without losing momentum or clarity. Stakeholders get artifacts ready for meetings and decisions. Busy admins get shippable checklists, scripts, and tables. Confidence grows because outputs feel predictable and repeatable. Among Chat GPT 5 acronyms, F.L.A.R.E. rewards these models most. GPT-5 especially handles Expansion with calm breadth. Large alternatives appear without bloating the final deliverable. Governance concerns also receive clearer treatment during Reflection. Those wins compound during fast quarters and tight budgets. Use these models when layered thinking actually decides outcomes.
Adapting F.L.A.R.E. for GPT-3.5
GPT-3.5 can still benefit from F.L.A.R.E. with trims. Scope should be smaller, and structure should be lighter. Focus must stay crisp and unambiguous from the start. Logic deserves fewer constraints and simpler comparisons. Action works best with short, very concrete formats. Reflection should request brief pros and cons, not essays. Expansion needs two options, not a sprawling menu. Tone guidance helps reduce guesswork and extra edits. L3 is the sweet spot for most daily tasks. L4 can work when comparisons remain narrow and clear. L5 usually overextends attention and runtime on 3.5.
Technical requests should name languages and libraries upfront. Narrative tasks should include headings and word targets. Tables often beat paragraphs for scanning and accuracy. Confidence scores help flag shaky assumptions quickly. Error handling deserves a line in Action requests. Short checklists also improve reliability during handoffs. The F.L.A.R.E.prompt framework still provides needed rails here. Trimmed prompts keep throughput high during busy mornings. Savings appear as fewer rewrites and faster approvals. When stakes rise, escalate the task to GPT-4 or GPT-5. Those models handle layered Reflection and Expansion with ease. Choose the smallest tool that meets the moment cleanly.
Step-by-Step Usage Checklist
Prepare the Focus, Logic, and Action
Start with calm, not speed. One clean Focus line sets the destination before anything churns. State the single outcome, the audience, and the domain. A tiny constraint keeps scope from ballooning under stress. Example goals might target a roadmap, SOP, or short analysis. Clear goals prevent the model from guessing your intent. Teams also align faster when that line feels undeniable. Next comes Logic, which turns wishes into a working blueprint. Choose phases, comparisons, and measurable criteria that matter. Timeframes, risks, and dependencies belong here, not everywhere. Structure should guide, not suffocate exploration or clarity. Consider lightweight metrics that show progress without busywork.
Comparisons need stated lenses, like cost, risk, or adoption. Those lenses keep debates from drifting into personality contests. With structure ready, move into Action for the artifact. Name the deliverable, the format, and the length. Audience and tone belong in this instruction as well. Acceptance criteria tell everyone what “done” actually means. Technical tasks deserve languages, libraries, and packaging requests. Narrative tasks benefit from headings and tidy sections. Tables enable scanning during reviews and standups. Checklists travel best inside tickets and project boards. Action, finally, is where anxiety drops and production begins. The F.L.A.R.E.prompt framework feels light when used this way. Clear inputs produce reliable outputs that ship on time.
Add Reflection, Expansion, and Reasoning Depth
Now install quality brakes with Reflection. Ask for pros, cons, and explicit trade-offs tied to criteria. Confidence levels help when stakes and timelines feel sharp. Assumptions should be listed so weak spots become visible. Early warning signals prevent small risks from becoming incidents. Comparisons across tools or patterns expose hidden costs. Short tables can accelerate scanning during hectic reviews. After critique, request Expansion to widen the map responsibly. Ask for alternatives that still honor your original Focus. Two or three options usually beat a giant menu. Quick wins belong next to well-labeled stretch goals. Edge cases keep plans durable when pressure spikes later.
Adjacent ideas can reuse existing teams and tooling. Expression is the style lever for different audiences. Tone shifts repack the same truth for new rooms. Round out the checklist with Reasoning Depth selection. L3 suits structured work with modest complexity and time. L4 adds comparisons that guide decisions under pressure. L5 invites synthesis and bold proposals when time exists. GPT-4 and GPT-5 handle layered prompts with calm control. GPT-3.5 prefers trimmed Reflection and shorter Expansion. Among Chat GPT 5 acronyms, this framework stays practical. The cadence protects energy while keeping outcomes strong.
Three In-Depth Example Prompts You Can Copy
Technical: Server Uptime Monitor With Comparisons
Technical work loves structure with room to breathe. The F.L.A.R.E.prompt framework gives you both. This prompt targets a simple uptime monitor with sane guardrails. It asks for clear deliverables and helpful comparisons. It also invites next steps without drowning you in theory. Keep sentences short and expectations visible. That helps under pressure and inside tickets. Among Chat GPT 5 acronyms, F.L.A.R.E. delivers real leverage here. It’s planning, execution, and thoughtful critique in one pass.
Copyable prompt: Focus: Design a basic Python service that monitors server uptime. Logic: Trigger an alert when downtime exceeds five minutes. Include retry strategy and backoff. Compare requests and httpx for HTTP checks. Action: Provide commented code, a README, and a minimal config file. Include a systemd unit example. Reflection: Give pros and cons for each library. Add failure modes with early warning signals. Include confidence and key assumptions. Expansion: Suggest a plan for scaling to 500 endpoints. Propose resilience ideas for network jitter and rate limits. L4 reasoning. Output: Use bullets and one table for comparisons.
Why this works: Focus narrows the target and prevents drift. Logic supplies thresholds, comparisons, and reliability concerns. Action demands artifacts that ship without rework. Reflection catches blind spots before on-call pain arrives. Expansion extends the design toward realistic growth. The model now thinks like a helpful engineer. You get code, docs, and a next-step path. Calm replaces guesswork, which is the real win.
Mental Health: Burnout Recovery Plan for a Sysadmin
Busy admins need care as much as clusters do. The F.L.A.R.E.prompt framework can shape support without fluff. This prompt treats burnout with practicality and compassion. It is not medical advice and should stay general. It still delivers structure, reflection, and safe experiments. Short sentences help when the brain feels loud. Clarity reduces decision fatigue and guilt. That matters during hard weeks more than we admit.
Copyable prompt: Focus: Create a seven-day burnout recovery plan for a stressed sysadmin. Logic: Include morning, mid-day, and evening actions. Respect work limits and realistic energy levels. Compare short mindfulness and CBT-style thought records. Action: Produce a simple schedule, two micro-practices, and a boundary script. Add a one-page reflection worksheet. Reflection: Explain trade-offs between the two methods. List early signs of improvement and red flags. Offer a confidence rating and assumptions. Expansion: Suggest three community supports and two workplace tweaks. Include a gentle relapse plan and a tiny reward. L3 reasoning. Output: Use friendly tone and short checklists.
Why this works: Focus names the life context without judgment. Logic sets humane constraints and useful comparisons. Action gives tools you can actually use today. Reflection adds safety rails and honest expectations. Expansion offers options when energy rises again. The result respects humans and calendars. Calm becomes more likely, which helps real recovery.
Legal: One-Page NDA for a Small Tech Vendor
Legal tasks benefit from clarity and clear limits. The F.L.A.R.E.prompt framework keeps risk visible and scoped. This prompt requests a simple NDA starting point. It is not legal advice and needs attorney review. It still saves time by shaping a workable draft. Short sections help stakeholders scan quickly. Trade-offs land cleanly without heated debates. That keeps projects moving with fewer delays.
Copyable prompt: Focus: Draft a one-page mutual NDA for a small tech vendor. Logic: Keep plain language and U.S. law assumptions. Include term, exclusions, and permitted disclosures. Add a notice clause and governing law placeholder. Action: Provide the NDA text and a redline checklist. Include signature blocks and a definition table. Reflection: Explain pros and cons of mutual versus unilateral NDAs. Note risks for startups and common negotiation points. Provide confidence and key assumptions. Expansion: Suggest two shorter fallback clauses for stubborn negotiations. Offer guidance for remote signing and storage. L4 reasoning. Output: Clear headings and a brief summary box.
Why this works: Focus narrows scope to a mutual NDA. Logic defines clauses and boundaries without bloat. Action creates a draft plus a practical checklist. Reflection surfaces negotiation friction before meetings start. Expansion equips you with lighter fallback language. The deliverable becomes faster to review and approve. That is real value from Chat GPT 5 acronyms in practice.
Pro Tips for Admins and Creators
Practical Prompting Habits
Strong prompts begin with calm, not speed. The F.L.A.R.E.prompt framework rewards slow starts and sharp finishes. Clear focus lines shrink choices and reduce edits. Logic then adds rails without smothering creativity or nuance. Action converts thoughts into shippable artifacts with deadlines. Reflection exposes blind spots before they burn sprint time. Expansion adds options that respect scope and budgets. Short sentences help brains overloaded by alerts and pings. Varying tone for audience prevents accidental friction during reviews. Tables beat paragraphs when scanning time is tight. Checklists travel well inside tickets and change plans. Word targets control bloat and protect attention.
Confidence scores flag soft spots for quick follow-up. Assumptions lists invite useful challenges from teammates. L3 works for routine planning with modest stakes. L4 suits choices that need head-to-head comparisons. L5 helps when invention or synthesis actually decides outcomes. GPT-4 and GPT-5 handle these lanes with ease. GPT-3.5 prefers trimmed Reflection and smaller Expansion. Prompts improve when you recycle winning templates. Namespacing prompt snippets keeps teams consistent and fast. A tiny library saves hours across busy quarters. Version prompts just like code and policy. Notes on results help future you avoid pitfalls. Small rituals drive reliability when stress runs high.
Operational Guardrails That Save Time
Good guardrails create calm during noisy weeks. Scope caps prevent sprawling answers that stall delivery. Timeboxes keep meetings from dissolving into rabbit holes. Comparison lenses should be named upfront and clearly. Cost, risk, effort, and adoption usually cover essentials. Acceptance criteria define “done” before anyone argues. File formats matter for handoffs and automation steps. JSON, YAML, and Markdown plug into real workflows. Tables support decision memos and stakeholder summaries. Code requests deserve tests, comments, and a README. Failure modes belong in Reflection with early warning signals. Confidence levels focus review energy where needed most.
Assumptions lists reduce blame and improve fixes. Output limits protect attention and reduce skimming fatigue. A short “next steps” line keeps momentum alive. Role targeting prevents tone mismatches and confusion. Executives need crisp summaries with clear trade-offs. Engineers need specifics, not vague promises or vibes. Help desks need scripts and safe rollback notes. Governance needs audit points and retention reminders. The F.L.A.R.E.prompt framework supports all of that gracefully. Chat GPT 5 acronyms may seem cute, yet they help. Rails make speed possible without risking chaos. Consistency also strengthens trust across teams and quarters. Calm grows when results feel predictable and usable.
Make Outputs Easy to Use
Usability decides whether work ships or stalls. Prompts should request formats that fit real hands. Roadmaps belong as bullets with owners and timelines. SOPs work best with numbered steps and checks. Decision memos benefit from tables with simple scores. Technical outputs need code blocks and clear packaging. Narrative pieces deserve headings and tight sections. Summaries should lead, with details tucked beneath. Readers scan first, then dive when needed. Audience targeting finishes the job with less friction. Executives want impact, risk, and cost in plain terms. Engineers want constraints, examples, and edge cases named. Creatives need theme, tone, and pacing guidance.
Accessibility matters for teams moving fast together. Short sentences help everyone track meaning under pressure. The F.L.A.R.E.prompt framework keeps that structure humane. Reflection adds caveats that protect hard schedules. Expansion offers quick wins and clean stretch goals. Expression can retune tone for different rooms. Templates reduce decision fatigue during crunch weeks. Reuse wins because meetings shrink and shipping speeds up. Calm follows when outputs drop straight into work.
PowerShell Helper to Generate F.L.A.R.E. Prompts
Why a PowerShell helper saves real time
Templates reduce friction when days get loud. The F.L.A.R.E.prompt framework works best with repeatable scaffolds. A tiny PowerShell function gives you that scaffold on demand. You fill five fields, and a clean prompt appears. No more hunting old docs or half-finished notes. This matters when tasks pile up before coffee. Admins need speed without losing structure or nuance. Writers need shape that still allows voice and tone. Managers need consistent asks that land the first time.
Consistency improves results across teams and quarters. Standard fields enforce Focus, Logic, and Action every time. Reflection and Expansion arrive without extra brain load. Reasoning depth also becomes an explicit choice. That makes expectations clear before anyone reviews. CI for prompts sounds funny, yet it works. Fewer surprises means fewer meetings and edits. Calm grows when outputs feel predictable and usable. Among Chat GPT 5 acronyms, F.L.A.R.E. benefits most from tooling. A small helper provides leverage you can feel fast. Scripts also travel well inside repos and wikis. Teams share the same rails with almost no overhead. That is how structure becomes kindness during crunch weeks.
PowerShell: generate F.L.A.R.E. prompts fast
Drop this function into your profile or a tools module. Use it in PowerShell 5.1 or PowerShell 7. The output pastes cleanly into ChatGPT. Fields map directly to the F.L.A.R.E.prompt framework. You can also copy to the clipboard with a switch.
function New-FLAREPrompt {
    [CmdletBinding()]
    param(
        [Parameter(Mandatory=$true)][string]$Focus,
        [Parameter(Mandatory=$true)][string]$Logic,
        [Parameter(Mandatory=$true)][string]$Action,
        [Parameter(Mandatory=$true)][string]$Reflection,
        [Parameter(Mandatory=$true)][string]$Expansion,
        [ValidateSet('L3','L4','L5')][string]$ReasoningDepth = 'L4',
        [switch]$CopyToClipboard
    )

    $prompt = @"
Use the FLARE prompt framework to answer.
Reasoning Depth: $ReasoningDepth

Focus: $Focus
Logic: $Logic
Action: $Action
Reflection: $Reflection
Expansion: $Expansion

Output format: concise bullets or tables where helpful.
"@

    if ($CopyToClipboard) { $prompt | Set-Clipboard }
    return $prompt
}

# Example
# New-FLAREPrompt -Focus "Improve patching for 200 laptops" `
#   -Logic "Phased plan, KPIs, 90-day timeline" `
#   -Action "Roadmap with owners and weekly checklist" `
#   -Reflection "Compare Intune and PDQ with risks" `
#   -Expansion "Three quick wins and three stretch goals" `
#   -ReasoningDepth L3 -CopyToClipboard
Will this PowerShell script work for the topic? Yes. It builds a F.L.A.R.E. -formatted prompt for immediate use. The helper keeps prompts short, structured, and reusable. That is speed without sacrificing clarity or care.
What can we learn as a person - The human side of structure.
Why Structure Feels Like Kindness
Chaos makes small tasks feel enormous. A clear framework shrinks them back to size. The F.L.A.R.E.prompt framework does more than tidy words. It regulates attention when alarms keep buzzing. Boundaries give your brain fewer doors to check. Decisions stop ricocheting and start landing. That shift feels like kindness on a rough day. People often fear structure will box them in. The opposite happens when it is humane and light. Constraints remove junk choices that drain energy. Creativity then shows up with surprising ease. Confidence follows because progress becomes visible again. You can see the next safe step clearly. Teams notice the calmer tempo during reviews.
Meetings shorten because expectations already match. Reflection, especially, acts like a seatbelt for momentum. It slows the car just enough to see the curve. Risks reveal themselves without dramatic detours. Trade-offs appear as adult conversations, not firefights. The model mirrors that calm with better answers. Among Chat GPT 5 acronyms, F.L.A.R.E. earns trust here. Tools help, but the human feels the win. You get clarity plus self-respect, not just output. That is why structure reads as care, not control. Work turns back into work, not a panic sport. Tuesdays stop eating your lunch and your nerves.
How to Practice Reflection Without Burning Out
Start with small rituals that survive busy weeks. Ask three questions after each important deliverable. What worked, what failed, and what surprised you. Keep answers short to protect attention. Add one mitigation you will actually try. Name one assumption that deserves a test. The F.L.A.R.E.prompt framework supports this with honest lenses. Request pros, cons, and a confidence note every time. Ask for early warning signals you can watch. Invite a comparison table when choices look close. Choose L3 depth when time feels tight. Move to L4 if trade-offs need scoring. Save L5 for strategy and invention sprints. GPT-4 and GPT-5 handle those layers smoothly.
GPT-3.5 prefers lighter Reflection and fewer branches. Personalize the ritual so it feels friendly. A calm tone matters when energy runs low. Use checklists to keep guilt out of learning. Celebrate one tiny improvement before closing the loop. That habit rewires stress into traction. Among Chat GPT 5 acronyms, F.L.A.R.E. makes reflection portable. You get a built-in brake that never shames. I lean on that when meetings stack high. It reminds me progress is a series of gentle course corrections. Not a heroic leap, just steady, human steps.
It's a new day and a new shiny toy for us homelabers. Last month, the processor on my old laptop finally breathed its last. It was a good laptop, but it was ready to pass on. However, what made this crappy is my little Dell gave up as well. I had to rethink how I was going to do some of my services. So, I started looking. I wanted something small that could run one or two small Dockers. So let's start finding nimo.
Nimo MPL2B
This little bad boy has made my day. My old laptop was a quad cord with 16 gb of ram. It ran my books and my search engine. Lets talk a little about this guy. Here are the stats
Intel 12th Gen N100 Processor
16 GB LPDDR5 Ram
512 GB Samsung hard drive.
2 HDMI, 3 usb, sd card, usb c, Ethernet port, and audio jack.
Windows 11 Pro (Yes Pro)
The stats are not super powerful, but I only paid 160 USD for it on a amazon sale. Now, what I like about this device is a little more than just what the device itself, but the company behind the device. This small computer has a metal shell, uses a real samsung hard drive. It's put together very well. On top of all of that, it's primary focus is education. They give big discounts to college students. So, lets set this bad boy up.
The setup
Alright, so first things first… we’re not rocking Windows 11 on this cute little box. Nope. We’re tossing that out and going full Linux. I mean, we’re homelabbers, right? This is the part where things got fun (and slightly annoying). But let’s make this easy for you, so you don’t spend your morning yelling at your BIOS screen like I did.
Step 1: Smack That F2 Key
Power that baby on and start slapping the F2 key like you’re trying to skip a YouTube ad. This gets you into the BIOS. For the Nimo MPL2B, that’s the magic key. Inside the BIOS, scroll around until you find the boot order section. You want to move USB to the top. If you don’t, it’s going to ignore your pretty flash drive like it owes it money. Save with F10 (usually), and let it reboot.
Step 2: Build That Boot Stick
Now you need to make your Ubuntu USB.
Head over to ubuntu.com and snag the latest Desktop ISO (I used 24.04 LTS because I like things that don’t break).
Fire up balenaEtcher (or Rufus or whatever you use).
Burn that ISO onto a USB stick like it’s 2005 and you’re making a mix CD.
Step 3: Boot and Install
Plug in the stick, boot the Nimo, and it should go into the Ubuntu install menu. If not, go back and double-check that boot order. Trust me, I’ve done that loop.
Choose “Install Ubuntu”
When asked about how to install it, pick Erase disk and install Ubuntu. I don’t dual boot—either we’re Linux or we’re not.
Choose your region, user name, and let Ubuntu do its thing.
Step 4: Reboot and Celebrate
When it’s all done, yank the USB out, hit Enter, and let it reboot into a clean Ubuntu desktop. This is where the magic begins.
OS Setup
Alright, let’s give your fresh Nimo MPL2B some love. We’re going to:
Update Ubuntu (because the install image is already out of date)
Install Tailscale so you can SSH into this little beast from anywhere, even grandma’s house.
We’ll do it step-by-step, and yes, you’re getting the PowerShell/terminal copy-paste magic too.
Step 1: Update and Upgrade Ubuntu
Open Terminal (Ctrl+Alt+T or just click that little black square of doom). Paste this in:
sudo apt update && sudo apt upgrade -y
This fetches the latest package list and updates anything that needs it. The -y flag answers “yes” to all prompts like a good little automaton.
Step 2: Install Tailscale (aka VPN Magic)
Tailscale lets you connect to this mini-PC like it’s on your local network—even if you’re 2 states over, crying in a Starbucks.
First, add the Tailscale repo and key:
curl -fsSL https://pkgs.tailscale.com/stable/ubuntu/$(lsb_release -cs).noarmor.gpg | sudo tee /usr/share/keyrings/tailscale-archive-keyring.gpg >/dev/null
curl -fsSL https://pkgs.tailscale.com/stable/ubuntu/$(lsb_release -cs).tailscale.list | \
  sudo tee /etc/apt/sources.list.d/tailscale.list
Then update apt again and install Tailscale:
sudo apt update && sudo apt install tailscale -y
Now enable and start it:
sudo tailscale up
That command will open a URL in your terminal. Copy it, paste it in your browser, and sign in to link the device to your Tailscale network. Boom. Your Nimo is now part of the mesh.
Install Docker & Docker Compose
Now open a terminal and paste the code below. This will setup docker and set you as a user for the docker.
Save and exit (Ctrl+X, then Y, then Enter). Now we can run it.
docker compose up -d
You can access it by going to your IP address on port 8080 or your tailscale ip. So, it should be like, http://localhost:8080.
There we have it. Your home lab with a search engine as the starting point. It's not much, but it will grow. This little Nimo can't run a corporate system, or a deep advanced AI, but It holds what I like to use. Since I'm the main user, I get to tell the user what I want to do with it. Even when sometimes that user can be overzealous. Don't forget, you can get around the gnat using this setup as well if you have an external machine somewhere.
What can we learn as a person.
Alright. Let’s take a breather.
This little Nimo box? It’s cool, it’s compact; it’s cheap. And yeah, it runs Docker like a champ most of the time. But here’s where the wheels can start to wobble: expectations.
See, I caught myself doing it. I wanted this $160 mini-PC to replace my old laptop, my Pi-hole box, my local dev stack, and maybe cure my ADHD while it was at it. Did you know that bats arn't blind? Wait wrong thing. Dang, no ADHD cure yet.
And that’s the trap. The Slow Burn of Expectation
It’s not always the big crashes that break us. Sometimes it’s the micro-disappointments. You expect your container to run. It doesn't. You expect it to stay cool. It doesn’t. You expect it to be perfect—and suddenly, you’re annoyed at a tiny piece of metal because you needed it to be more than what it is.
That adds up. Day by day. Task by task. And eventually, those micro letdowns become something heavier: dread, frustration, that creeping “what’s even the point?” feeling that whispers depression.
The AA Folks Were Onto Something
There’s this line in the Serenity Prayer:
“Accepting the world as it is, not as I would have it.”
That hits. Hard. We can't change the laws of thermals. We can't make N100 CPUs act like Xeons. And no, we can't Docker our way out of emotional burnout. Even though that would be amazing. Like the time i found a cold diet dr pepper in the back of the fridge, I mean, it was ice cold. Like Amazing... Anyways, squirrel.
But we can manage our expectations. We can say, “This box does this thing. And that’s good enough.” You get way more peace out of that than you do out of pushing it to failure. This is true for your friends, family, coworkers, politicians, even.... YOURSELF. Dumb ass brain, you hear me! wait can brains hear? Ghall my adhd won again. Nimo you failed me on this adhd stuff.
Let the Box Be a Box
Let this little Nimo machine be what it is: a budget-friendly, tinker-happy toy for nerds like us. It’s not your therapist. It’s not your fix. This Nimo just a cool piece of gear that does its job. if you don’t ask it to carry your whole mental load.
And just like the box, you should let You be you. We have expectations that people put on us, but some of us put expectations on ourselves that just are not realistic. So, look at your expectations, are they realistic? Or are you hoping to cure you... please insert 25 cents to continue... problems with something simple. We are humans, our problems tend to be more complex than running a docker command.
We use cookies to ensure that we give you the best experience on our website. If you continue to use this site we will assume that you are happy with it.