Yesterday I had to clear out a few users’ google chrome cache. It was a little aggravating going computer by computer. We were doing this because recently a core web app was updated. The application left traces of itself in the Google Chrome Cache and it caused all kinds of problems. So the last few I looked for a way to do it with PowerShell. Long and behold you can Clear Google Cache with Powershell.
The Script
We are starting with the script, to begin with. We are doing this because the core of this script is wrapped around a remote template I use. I will cover the template later down the road.
Let’s break down the script and see what is needed and how it is needed. The first thing you will notice is the computer and the user are both lists of strings. [String[]]. This means I will have to loop through each one. This is important because this means you can target a single user on multiple machines or multiple users on a single machine or both. The second thing I want to point out is the credentials. So, if you are not in admin mode, you can deploy the script with your admin creds, or with the local admin creds.
The Username is not a required item. Why did I do this? The simple answer is, if you don’t put a username, then it will clear every user’s google chrome cache. Notice in the “begin” area, we have if null is equal to username, then we want the username to be *. Later we ask, if the username is not equal to *, then we use the user. If not, we use the * which will go through all the users at once. Also notice in the do the user, we test if the user exists. If it doesn’t we deploy an error, if it does, we do our work.
if ($null -eq $username) { $username = "*" }
if ($user-ne "*") { do the user
    if (Test-Path C:\Users\$user) { Its there, lets go for it.} else { Error will robison.}
} else {do everyone}
The Core
At the core of this script is the remove-item blurp. We are going through each user data area and clearing out the different types of cache. There is the default cache, code, media, storage, and script caches. Each of these folders will have folders inside of them. So we need to recurse. We want to force it and we don’t care about the errors as some cache will not delete while chrome is active. Could I have added a kill chrome, yes, but why? if the end-user is working in chrome, this is going to be disruptive and force them to restart chrome. Lets look at the code.
That’s all the code you will need. If you selected not to use username the $user will turn into * which will do every user, including default. if you have something like sccm, pdq, intune, ninja, pulse, etc, then just user this part of the code with * instead of user. This will clear the cache as needed.
We close it all up and send it as a job to the machine in question. This way we are not stuck on each computer. It speeds things up. With Powershell 7, you can loop with a number of objects that you want which would speed this up even more.
Recently I went over how to get information from the Unifi Controller. Now I want to show you how to grab information from the unifi device itself. In this example, we are going to use SSH with Powershell to pull some basic information from an unifi AP.
SSH with Powershell
The first thing you will need is to make an ssh connection. Most computers have open ssh installed and you can type in ssh username@ipaddress and access it after inputting passwords and such. However, I want to work with powershell and not whatever shell the unifi will present me. Thus, we will run through a module called POSH-SSH by darkoperator.
Install Posh-ssh
The first thing you will need to do, if you haven’t already, is installing the module. This module lives in the standard repos, which makes life so much easier. Here is the command:
Install-Module -Name Posh-SSH
Once you have the command installed, that’s when we import with the import module command.
Making a connection
The next step is to make the connection. The feel of this command is just the same as that of enter-pssession. We call the computer name, normally an IP address, and we add the credentials. The biggest difference is we add an acceptkey flag. You can also give your session an ID number, this is good if you are doing more than one at a time. Today we are only focusing on one connection. So it’s not needed, but it becomes very useful with loops. Like always, these sessions start at 0.
This creates a session of 0 which we can send commands to later. Remember, each session connection adds another session number. So the next one will be 1 and so on so forth. if you need more information or become lost with which sessions you are using, get-sshsession will help resolve this question.
Invoking SSH commands with Powershell
The next thing we need to do is invoke commands. What is the point of just connecting when we have the power of ssh and powershell? The command we can use is called invoke-sshcommand. When working with any system, you need to be mindful of that system’s shell. Ssh gives you the connection, and that system determines what you can use. This took me a while to figure out. One of the commands inside the unifi devices is info. This gives you useful information. So when you are connected, typing info will telling you IP addresses, mac address, inform statuses, and more. However, with the SSHcommand, it produces nothing useful. As the image below shows.
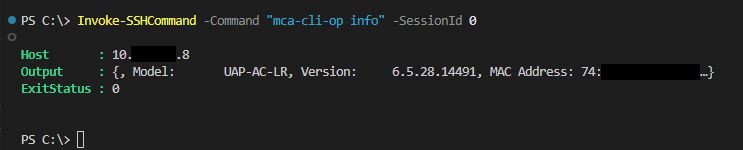
So, what is needed to do from here is adding a flag to let it know you are coming from somewhere else. This flag is “mca-cli-op” followed by the command you want. However, as the image below suggests, it parses the output as a single object. We need to go deeper by selecting the output.
This is nice to know, however… It’s a string. You will need to parse this data out accordingly. I do this by using select-string then from there working each item. When I select the string, for example, model. I take the output and select-string model. Then i convert that to a string as select string make it into an match info object. Which isn’t as helpful as you would think. Then from there, I replace any spaces and split from the : to get the information I need. Below is the code.
From here you can change the inform, or other items using the flag and the command accordingly. Once you are finished with your session, make sure to remove it with the Remove-SSHSession command.
The Script
Here is the script. This script allows you to do more than one IP address.
While working with Group Policy this month, I ran across an oddity I have never seen before, “Extra Registry Settings” These were inside the default domain policy and I had no idea why they were there. So, I did some research.
What are they?
These keys come from when you have had an ADM or an ADMX installed. Then you create a policy. Later down the road, the ADM or ADMX is removed. These keys will be left behind. So, it’s a tattoo. More like a tattoo on the tattoo artist. You can read more about GPO tattooing here. The main difference between a normal tattoo and this tattoo is one happens on the end user’s computer, while the other happens on both the Group Policy and the end user’s computer.
This is one of those things that can go Very deep. To keep things simple, I will keep it general.
How do you remove it?
Inside the Group Policy Management Module that is installed with Rstat, you have a remove-GPRegistryValue command that can do what you are looking for. You will need the following, The Name of the policy and the key. Please note, these keys live in the HKEY_Local_Machine. Thus, you will need to add such to the command. Your registry might live in the Current users. Do a little research. Here is the code that I used to remove these two items:
Once you remove the Extra Registry keys, you can reload your Group Policy Management and remove the policy. Or you can replace Remove with Get. This will try to get the value, but if it doesn’t exist anymore, PowerShell will present an error.
Sometimes I like to go back and see where I can improve my scripts. A few weeks ago I showed you the Unifi Controller script. Where it pulls the client information from each site. Well, I wanted to improve upon this script. A problem I see with this script is the plain text password. The unifi controller I have to test only accepts plain text, but I don’t want to have a password inside my PowerShell history. Today I want to show you how to convert Get-Credentials to Plain Text.
Get-Credentials as a Parameter
We first need to remove the Username and Password from the parameters and then create a secure credential parameter. By default, we want this to be a mandatory parameter. The type of parameter we will be using is a System Management Automation PScredential. This is what the parameter will look like.
[parameter(
            HelpMessage = "Unifi Username and Password",
            Mandatory = $true)][alias('UserNamePassword')][System.Management.Automation.PSCredential]$Credential
Convert Get-Credentials to Plain Text
Now it’s time to Covert the PSCredentials back to plain text. Inside our PSCredentials lives the username and password we gave the system. Thus we pull the secure string password from the PSCredentials.
$SecurePassword = $Credential.Password
Next, we are going to use the Marshal Class. This class is designed to bridge the gap between managed and unmanaged programming models. The method we will be using is the Secure String to BSTR. This method Allocates an unmanaged binary string and copies the content of a managed secure string object into it. Basically, we find where it lives in memory and combine it. For more information.
Aftward, we Take this coded data and push it into the following method. The PtrToStringAuto. This method allocates a managed string and copies all the characters up to the first null. This copy is from the string stored in unmanaged memory. This is why we need the Coded Password to tell us where the password lives in memory. Basically, I’m taking the coded password and making it human-readable.
A few of my clients use something called LAPS. Laps change the local administrator password on a computer and then store the information inside Active Directory. Since I don’t dive deep into this client’s computers often, I needed something to quickly type the first letter of the computer in question to pull up the LAPS password. Basically, I needed a list of computer names from the command itself. This is fully possible with Dynamic Parameters. So, today we will be grabbing the LAPS password with PowerShell.
Where Does LAPS Password live?
Most companies that set up LAPS do so with Active Directory. By default, Active Directory saves the password into an attribute called “ms-Mcs-AdmPwd” and LAPS also stores the expiration date in “ms-Mcs-AdmPwdExpirationTime” Thus, all you have to do is call a get-adcomputer command and pull out the information.
Now the “ms-Mcs-AdmPwdExpirationTime” is unique and needs to be parsed into something more readable. We can use the m method called [datetime] to do this.
There you have it, That’s how you get the LAPS password, But I want to take this one step further. I don’t know all the computer names. I want that information at my fingertips while I type out the command. So, I want to type something like Get-LAPS -ComputerName <here populate a name where I can tab> and bamn, it gives it to me when I hit enter. That’s where we will dive into dynamic parameters next.
Adding Dynamic Computer Name Parameters
In a previous article, we went over how to make a dynamic parameter. I want to help refresh memories by doing a single parameter and show you how it can be done with this function.
The first thing we need to do is create our form. This form allows us to use the dynamic parameters and gives us spots to pull data. This is more of a road map than anything else, but it is required for dynamics.
function Get-LapsPassword {
    [cmdletbinding()]
    Param()
    DynamicParam {}
    Begin {}
    Process {}
    End {}
}
The first part of our Dynamics is we want to name the parameter template. From there, we want to create a new object. This object will be the system collections object model for collections. AKA system attributes. Then we want to make an attribute object to add to that object later.
The ParameterAttribute will be where we add the flags like mandatory and position. We add those by dropping them directly into the ParamterAttribute object. A fun little fact, you can tab through and see what other items are available for this object. Things like the help message, the value from the pipeline, and more are hidden here. Today we only care about the mandatory and position.
After we build out our parameter Attribute object, we need to add it to the Attribute Collection we made at the start. We do this by using the “.add()” function of objects.
$AttributeCollection.Add($ParameterAttribute)
Now we need to create another object. This will be the Runtime Parameter Directory. Basically, what they will be looking through. This is a system management automation object called runtime defined parameter directory. Say that 10 times fast…
Now we need to make our Validate Set. We will create an array of devices using the Get-adcomputer command. Here we will push (Get-adcomputer -filter {enabled -eq “true”}).name into a variable. Now we will have a list of active computers. Notice that we filter out all other information by using the “.name” call.
Next, we need to create another object. This object is the system management automation validate set attribute object. We can feed this object our Parameter Validate Set.
Afterward, it’s time to feed the Validate Set attribute to the attribute collection from the beginning. We can accomplish this by using the “.add()” method.
$AttributeCollection.Add($ValidateSetAttribute)
Next, it’s time to bring our Attribute collection into the command line. It’s time to make the run-time parameter. Once again, a new object. This time it’s the Run time Defined Parameter object. Like the last object, we can place our data directly into it. We will want the parameter’s name, the type, a string in this case, and the validate set.
Afterward, we take the above parameter and place it into our directory with the “.add()” method. We need the parameter Template and the Run time Parameter.
Finally, in the dynamic parameter block, we return our directory.
return $RuntimeParameterDictionary
Beginning
We are almost done. It’s time to bring the dynamic parameter into the function and make it useable. We do this in the beginning section. We shove the PSBoundParameters of our template name into a variable.
$MemberName = $PSBoundParameters[$paramTemplate]
Then from there, we call the $memberName in our Get-adcomputer command.
The Script
It’s that time, it’s time to put it all together, so you can copy and past it into your toolbox. It’s time To Grab LAPS Password With PowerShell.
function Get-LapsPassword {
[cmdletbinding()]
Param()
DynamicParam {
# Need dynamic parameters for Template, Storage, Project Type
# Set the dynamic parameters' name
$paramTemplate = 'ComputerName'
# Create the collection of attributes
$AttributeCollection = New-Object System.Collections.ObjectModel.Collection[System.Attribute]
# Create and set the parameters' attributes
$ParameterAttribute = New-Object System.Management.Automation.ParameterAttribute
$ParameterAttribute.Mandatory = $true
$ParameterAttribute.Position = 1
# Add the attributes to the attributes collection
$AttributeCollection.Add($ParameterAttribute)
# Create the dictionary
$RuntimeParameterDictionary = New-Object System.Management.Automation.RuntimeDefinedParameterDictionary
# Generate and set the ValidateSet
$ParameterValidateSet = (Get-ADComputer -Filter { enabled -eq "true" }).name
$ValidateSetAttribute = New-Object System.Management.Automation.ValidateSetAttribute($ParameterValidateSet)
# Add the ValidateSet to the attributes collection
$AttributeCollection.Add($ValidateSetAttribute)
# Create and return the dynamic parameter
$RuntimeParameter = New-Object System.Management.Automation.RuntimeDefinedParameter($paramTemplate, [string], $AttributeCollection)
$RuntimeParameterDictionary.Add($paramTemplate, $RuntimeParameter)
return $RuntimeParameterDictionary
} # end DynamicParam
BEGIN {
$MemberName = $PSBoundParameters[$paramTemplate]
} # end BEGIN
Process {
$ComputerInfo = Get-ADComputer -Filter { name -like $MemberName } -Properties *
}
End {
$ComputerInfo | select-object Name, @{l = "AdminPassword"; e = { $_."ms-Mcs-AdmPwd" } }, @{l = "AdminPasswordExpireTime"; e = { [datetime]::FromFileTime(($_."ms-Mcs-AdmPwdExpirationTime")) } }
}
}
We use cookies to ensure that we give you the best experience on our website. If you continue to use this site we will assume that you are happy with it.