I was working with a client a few months ago, and they needed me to set up auto licensing. The idea is that the helpdesk right-clicks on a user and clicks copy. That user will get all the groups inside the template user. This also includes licensing for O365. Believe it or not, this is super easy to do.
The client’s structure was as such, They had a local active directory that uses ad connect to sync all the user information. The ad sync occurred every 30 minutes.
Local AD
The first step is to create the licensing groups in local AD. In this case, I named them “Microsoft Office 365 E3” and “Microsoft Office 365 F3”. This way it’s super clear. These will be security groups. I have them in an OU that is synced with AD Connect.
Only users that will get E3 will be in the E3 group and the ones getting F3 will be in the F3 group. Once again, very clear.
Now I have created the groups, I complete an AD sync or I wait for the ADSync to be completed. To force an ad sync, you will need to log into the AD sync server. Normally this is a DC, it doesn’t have to be, but normally from my experience, it is.
Start-ADSyncSyncCycle -PolicyType Initial
You can view your sync by loading the Synchronization Service Manager and watching the sync. Once the sync is complete, move to the next step, Azure AD.
Azure AD Licensing Assignments.
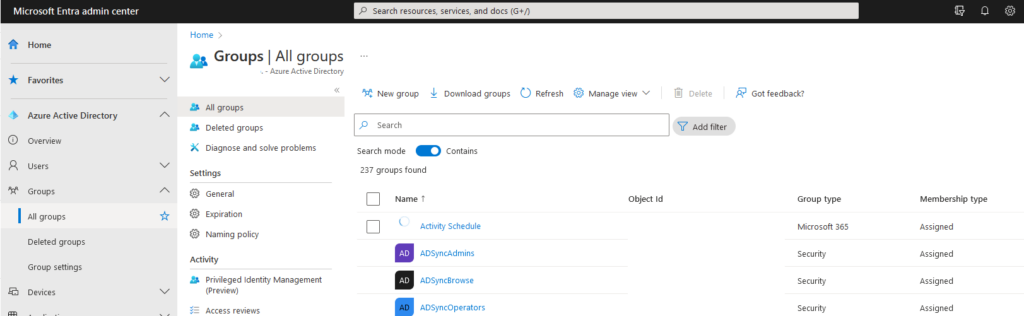
Log into azure ad at https://entra.microsoft.com. On the left side, You will see Groups. Expand Groups and Click all Groups. Then search for the group you are looking for. In this case we want the Microsoft Office 365 E3 Group.
Now its time to add the license for anyone who joins this group.
Click on the Group
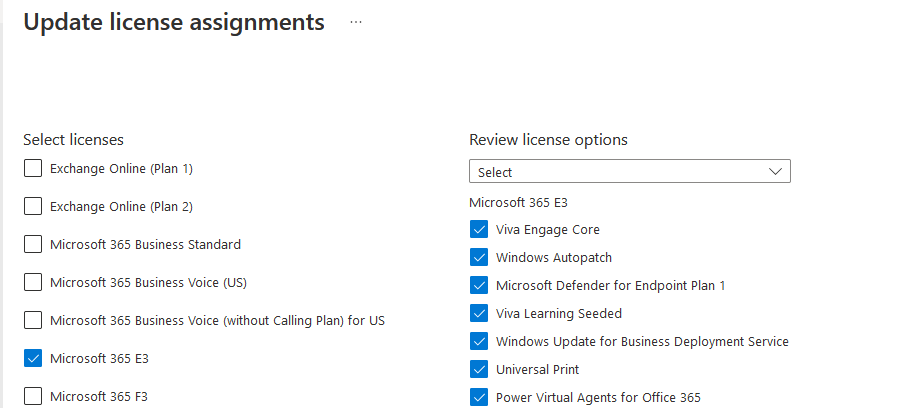
Under Manage click Licenses
In The middle Click Assignment
Add the desired licenses and applications associated with the licenses, See the image below.
Click Save.
The final step is to add users accordingly. After they sync, they will receive the licensing accordingly. Now you have a fully automated method of assigning licenses.
Today I was trying to sync a user’s account to the cloud and I received an error code that was new to me. Access denied, Unauthorized! I was using a domain admin account. I should have full access and rights. It threw me off as I have never seen such a thing. Why was I getting the “Azure AD Connect Unauthorized error”? This is what the error message looked like:
Retrieving the COM class factory for remote component with CLSID {xxxxxxxx-xxxx-xxxx-xxxx-xxxxxxxxxxx}
from machine DC-01 failed due to the following error: 80070005 DC-01.
    + CategoryInfo          : WriteError: (Microsoft.Ident...ADSyncSyncCycle:StartADSyncSyncCycle)
      [Start-ADSyncSyncCycle], UnauthorizedAccessException
    + FullyQualifiedErrorId : Retrieving the COM class factory for remote component with CLSID
      {835BEE60-8731-4159-8BFF-941301D76D05} from machine DC-01 failed due to the following error:
      80070005 DC-01.,Microsoft.IdentityManagement.PowerShell.Cmdlet.StartADSyncSyncCycle
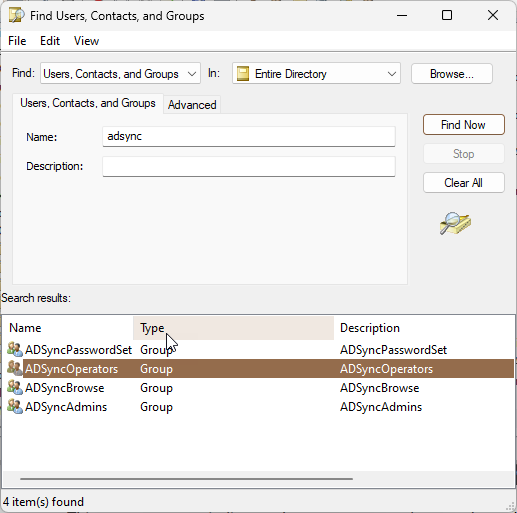
I was lost for a second. After looking into ad for the ADSync groups and found that no user had access to any of the groups. There were 4 groups found: the Password Set, Operators, Browse, and admins.
I added the domain admins to the ADSync Admins. Once I logged out of the server and logged back into the server. Then I was able to complete an ADSync Cycle. This resolved the Azure AD Connect Unauthorized error message for me. Why were domain admins not present? I don’t know, but now I know where to look if I see this error again.
As part of my efforts to harden clients’ azure accounts, We need to remove/refresh all the sign-in tokens from the disabled account. Why? That’s very simple, If you don’t, then any signed-in device still has access. For example, if I terminate a user, I block their sign-in in office 365. The block will take effect within 24 hours. This is why we want to Revoke Disabled Sign-in tokens.
The user can steal data if you don’t remove/refresh the sign-in tokens. By removing/refreshing the sign-in tokens, the outlook can no longer authenticate back with office 365. This means no more new emails. Everything on the computer is still a free game. The user can decode the PST files. I revoke/refresh the tokens with a single command from the Azure AD PowerShell module.
It’s time to break down the “Revoke Disabled Sign-in” script. The first step is to grab all the users from the azure ad. We do this with the Get-AzureADUser command. Next, we parse that information through a where-object. We want to filter out the accountEnabled by the value of false. Now that we have all the disabled users we start a foreach-object loop. Inside our loop, we want to trigger the Revoke-AzureADUserAllRefreshToken command using the Object ID. We are grabbing the previous command’s output using the $_ object. The ObjectID is the object we are pulling out.
Conclusion
At the end of the day, this code snippet is a catch-all for standard processes. Whenever you terminate an employee, it’s always a good idea to revoke the sign-in tokens.
I hope this helps. Please let me know if you have any questions.
It’s time to Install Sentinel One. In this blog, we are going to go through the process of installing Sentinel One through Intune. We are going to be using the IntuneWinAppUtil program, and the MSI download of Sentinel one that you can obtain from your Sentinel one login portal. I will not go over how to download the msi installer.
File/Folder Structure
The next item you will need is the Microsoft Win32 Content Prep Tool [Link]. Once you have downloaded this file, I suggest creating a file structure as follows
Intune
Files
IntuneWin
After that, Extract the intunewinapputil.exe file to the top level of your file structure, intune. Place the MSI inside the Files location. Then we should be ready to run intunewinapputil.exe. Before you do, I always suggest reading the help by using the /? command line prompt. Here is the command we are going to use to convert our file.
Intune Win App Util
.\IntuneWinAppUtil.exe -c c:\Intune\Files -s SentinelOneInstaller.msi - o c:\Intune\IntuneWin
Afterward, we use the command above to convert our file into a intune installer file. This will give us a large amount of control. Things like detection rules, custom msi inputs and more. Which we will be using.
Intune – Setting up the installer
Next, It’s time to crack open the intune process. Log in to https://endpoint.microsoft.com/ with an account with intune rights.
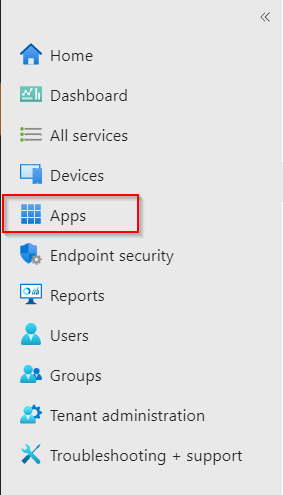
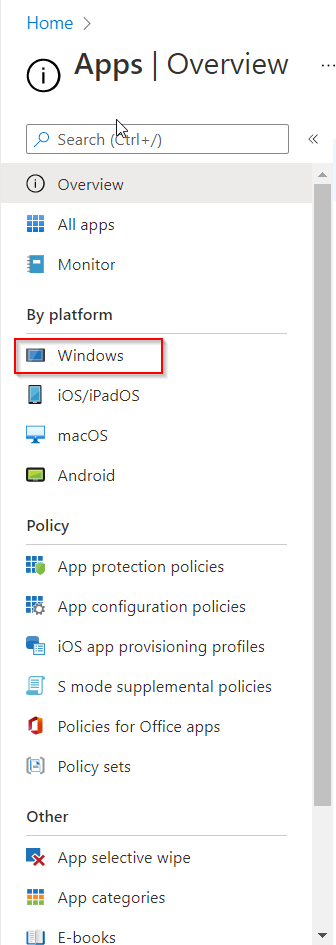
Once you have logged into the endpoint management system. Click the Apps on the left-hand side of the screen.
Since we are deploying sentinel one to windows machines, under by platform, click the windows icon.
Uploading the Installer
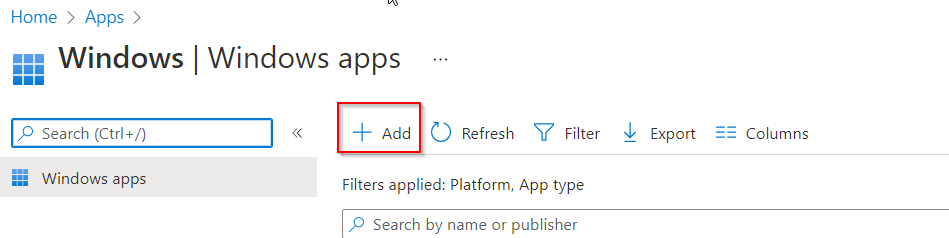
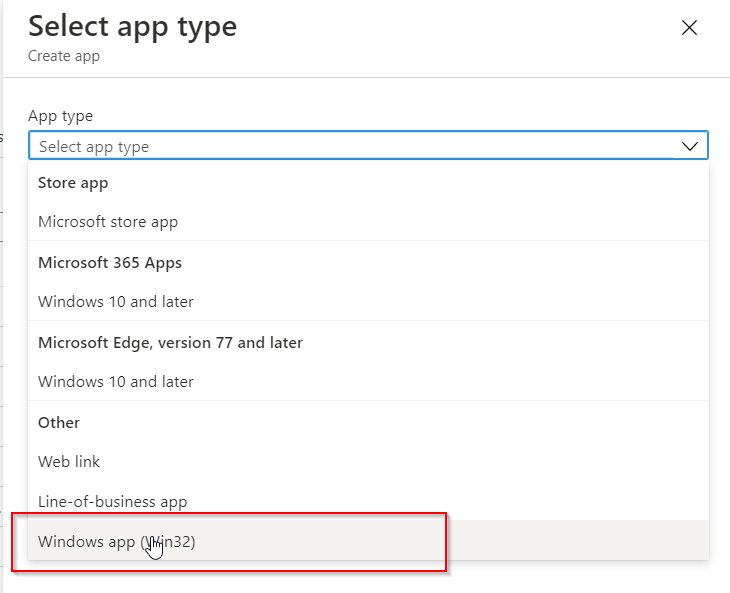
Now we are going to click the add button on the right-hand side of the screen. This will bring up the add dialog box. We are deploying out the final option. Click the Windows App (Win32) option.
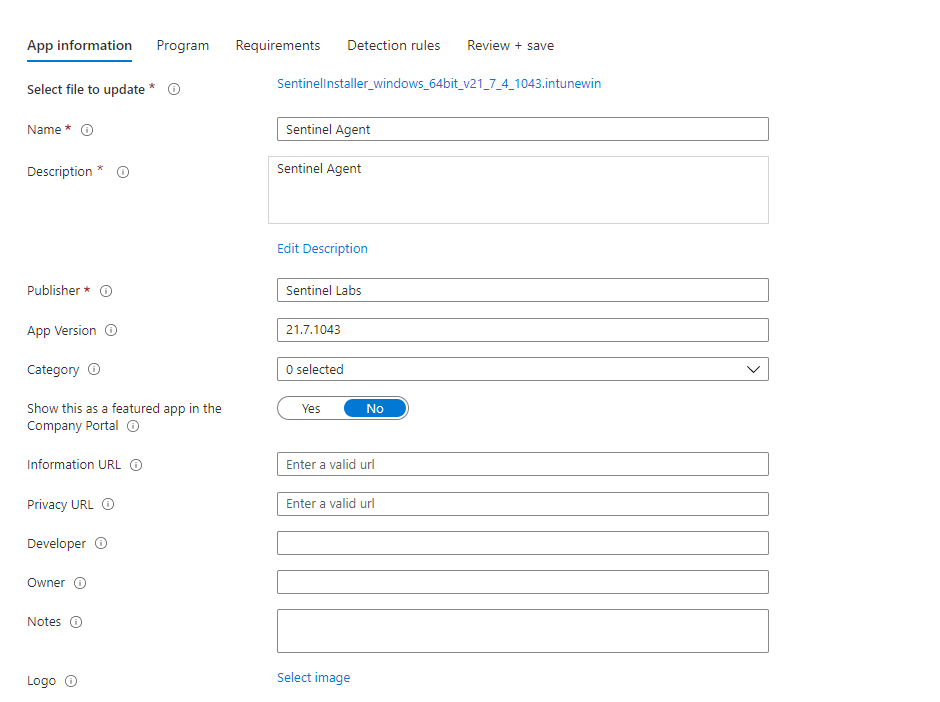
You will be brought to an upload page. Here you select the app package file and click the blue button on the right-hand side of the screen. This is where we go to the file we created in the previous steps. We upload the file here. Once it uploads it will populate the information like name and other items. Click ok to move to the app information page.
Setting the rules
Here we can change the name. Add a unique, html, description. Update the publisher, the application version and more. The category we are going to select is computer management. They show this as a featured app in the company portal. You want to check that one. This allows people to download this version of perch. If you want to feel in any of the other information you are welcome to. Once you have the required information, click next to go to the Program page. Where we determine how to install this application.
Adding the Key
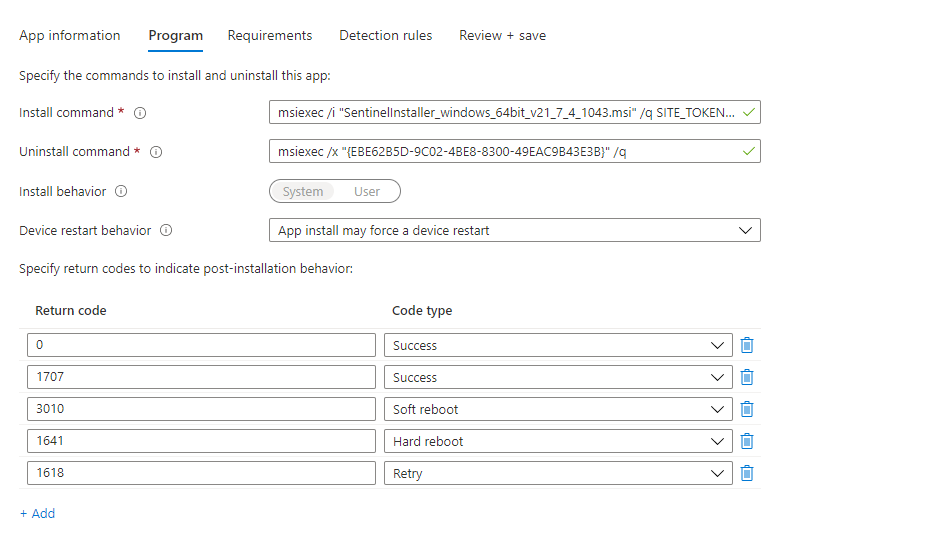
On this page, we want to show the install and uninstall commands. This is where research comes into play. If you don’t know the silent install command of your program then that’s a problem. If you don’t know how your program responds to installs and the error codes or success codes it produces. that’s also a problem. You will need to know these things for other applications. Sentinel One is unique as it’s commands is a little different. Here is the install command:
Keep the uninstall command the same. As the MSI installer of Sentinel One is the app code. The biggest problem with the uninstall command with S1 is that it doesn’t work without prior approval. You have to log into the S1 Portal and approve its uninstall. Keep the default and continue.
Another thing to point out, this kicked my tail, the SITE_TOKEN does not have a /, I repeat NO /.
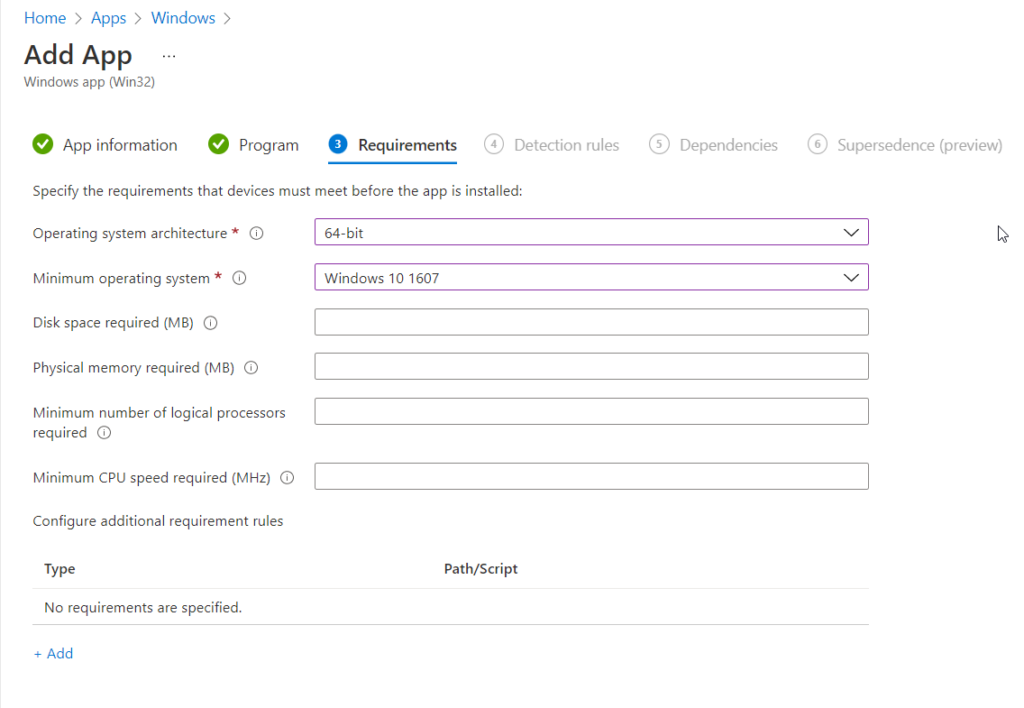
On this page, we can scan the system to make sure we meet the requirements. So if you know this is a heavy application, you can say to have at least 8GB of ram. You can even have PowerShell scripts that can trigger. A good example would be a user. If user Bob is on this PC don’t install it. The required items are the OS Arch and the minimum os. Which is going to be windows 10 1607 as that is intune’s min. Don’t get this confused with the next item. These are the requirements. Not meeting the requirements will prevent the app from installing. Once you have added what you want, click next.
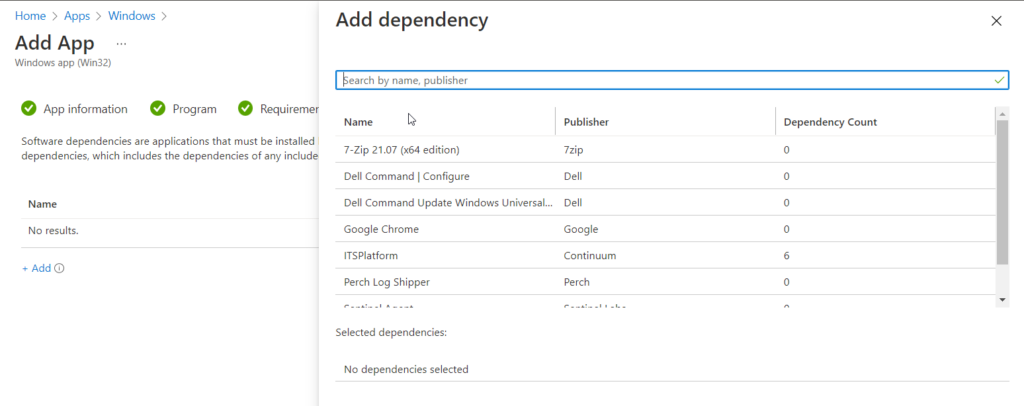
On this page, we are going to select any dependencies that the application may need. Something unique about Sentinel One is, it will capture all of your custom PowerShell deployments. It’s best to set those as dependencies on this installer. This way they will deploy before S1 does. S1, doesn’t need any additional dependencies from my current knowledge and testing.
Detection Rules
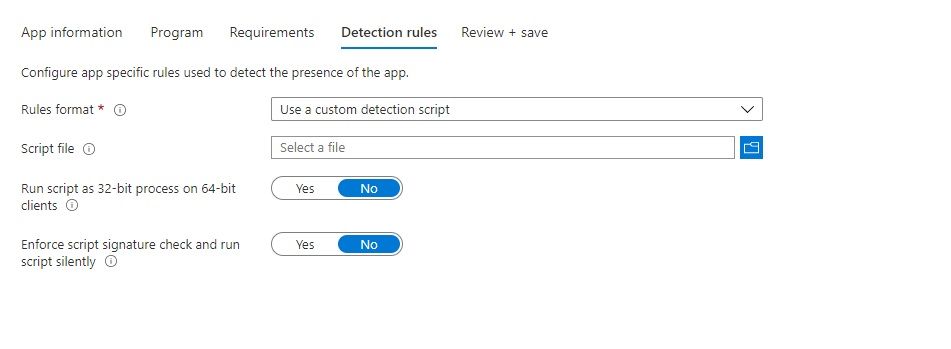
We are going to use a Powershell Script to validate the install. Click on the Rule Format and select Use Custom Detection script. Upload your script file using the blue folder icon.
This script checks for the Sentinel Agent every 30 seconds after installation. Then it increases my timer, by 30. It finally stops at 300 seconds. If services are null, it just exits, and thus a failure is seen in intune. If it is installed, it exits with a string. This tells the system that the installation was successful. What I like about this part is, that if the edit needs to be done, it can be done at this point using PowerShell.
The next screen supersedence is where you can choose what will replace the application. This is a preview feature at the moment and the idea is for upgrades. The final section is the Assignment, this is where you will select a group of devices for S1 to deploy out to.
I hope this is helpful for everyone viewing this page.
Recently I covered how to install perch using PowerShell. Today we are going to Install Perch Log Shipper with Intune. This is very useful for tools like continuum where there is very few software deployment tools built-in. Intune is a powerful tool that you can use to deploy software for a client. Today we are going to be looking at how to deploy Perch through intune.
The first thing we need is a fresh perch installer. You can acquire one here. [link]. Once you have the installer, you will need to download the Microsoft Win32 Content Prep Tool [Link]. Let’s setup our directory like so. Top Folder = Intune. Two subfolders, one called Files and the other called intunewin. Extract the exe from the Microsoft win32 content prep tool to the intune folder. Copy the perch installer to the files folder. Now we have a setup that is easy to remember.
By default, you can not deploy EXE programs via intune. You must convert them to the win32 application or a .intunewin file. The tool you just downloaded can do just that. The Tools name is IntuneWinAppUtil.exe.
IntuneWinAppUtil.exe
Start a command prompt and navigate to your intune folder using the CD command. Run the intunewinapputil.exe /? command to view the help selection. Notice we are going to be using the -c -s and -o commands. Here is the following command you will use to convert the perch installer into a intunewin application.
Now we have a perch installer for Intune. Lets move to intune and take a look.
Intune Apps
It’s time to crack open the Intune process. Log in to https://endpoint.microsoft.com/ with an account with intune rights.
Once you have logged into the endpoint management system. Click the Apps on the left-hand side of the screen.
Since we are deploying perch to windows machines, under by platform, click the windows icon.
Now we are going to click the add button on the right-hand side of the screen. This will bring up the add dialog box. We are deploying out the final option. Click the Windows App (Win32) option.
Upload the Package
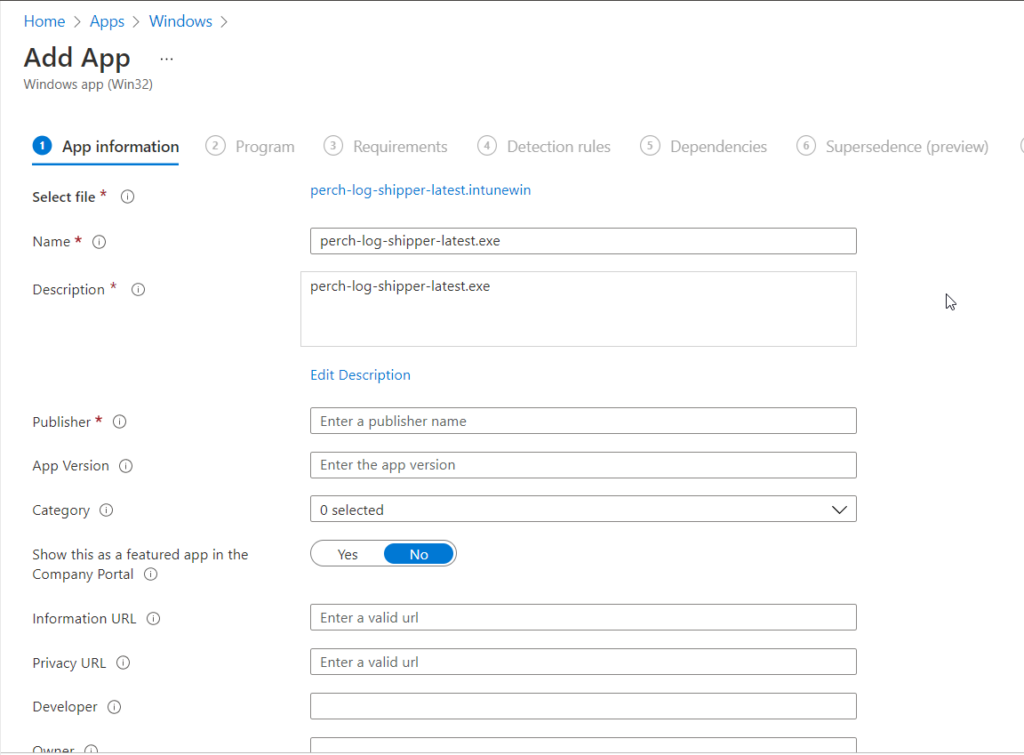
Afterward, we are brought to the app page. Here you select the app package file and click the blue button on the right-hand side of the screen. This is where we go to the file we created in the previous steps. We upload the file here. Once it uploads it will populate the information like name and other items. Click ok to move to the app information page.
App Information
Here we can change the name. Add a unique, html, description. Update the publisher, the application version and more. The category we are going to select is computer management. The show this as a featured app in the company portal. You want to check that one. This allows people to download this version of perch. If you want to feel in any of the other information you are welcome to. Once you have the required information, click next to go to the Program page. Where we determine how to install this application.
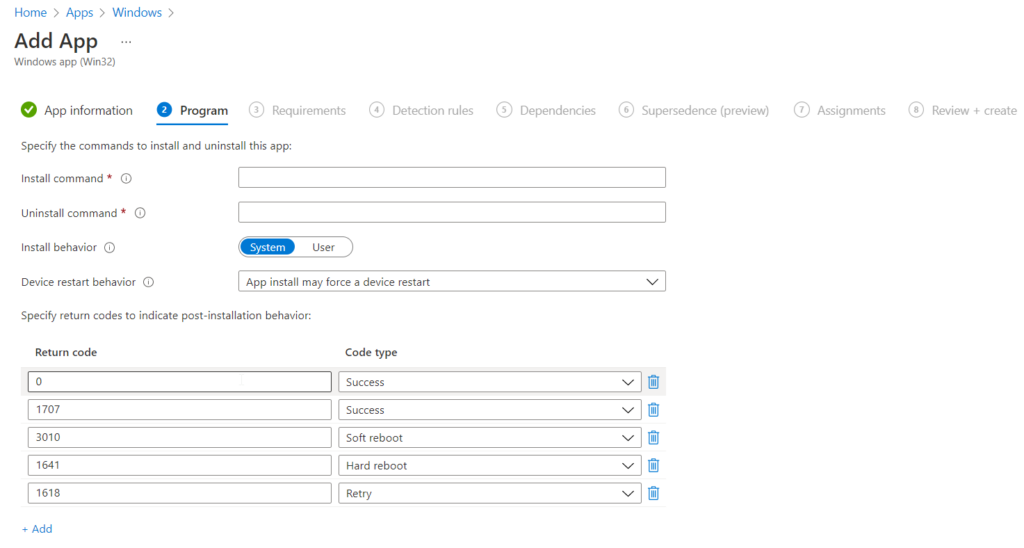
Program Information
On this page we want to show the install and uninstall command. This is where research comes into play. If you don’t know the silent install command of your program then that’s a problem. If you don’t know how your program responds to installs and the error codes or success codes it produces. that’s also a problem. You will need to know these things for other applications. Thankfully perch follows the basic ones. Here is the installer command:
Once you have the installer and uninstaller in place, click the next button to go to the requirement page.
Requirements
On this page, we can scan the system to make sure we meet the requirements. So if you know this is a heavy application, you can say to have at least 8GB of ram. You can even have PowerShell scripts that can trigger. A good example would be a user. If user Bob is on this PC don’t install. The required items are the OS Arch and the minimum os. Which is going to be windows 10 1607 as that is intunes min. Don’t get this confused with the next item. These are the requirements. Once you have added what you want, click next.
Dependencies
On this page, we are going to select any dependencies that the application may need. For example, let’s say your application needs 7-zip. Set up an install for 7 zip and make it a dependency and have it install the dependency. One hack I found is if you know the app is going to break other apps while installing as the ITS Platform does, then you can set the other applications as dependants and install them. Thankfully perch does not have any additional dependants. So, when it does it’s taxes, life is easier. (American joke).
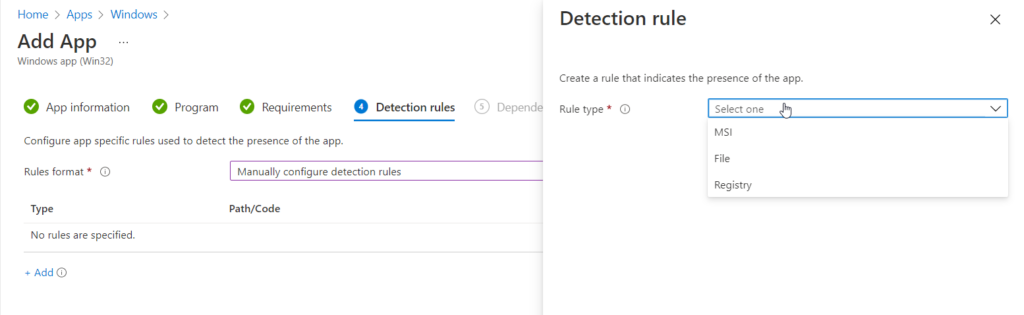
Detection Rules
Detection is very important. if the rule doesn’t exist, then intune has no idea if it was installed. If the detection policy is incorrect, the same issue. It’s very wise to know what you are looking for. In this case perch always installs on c:\program files\perch. So we will select the manual to configure detection rule. Then select add. We will select a file from the drop-down list and enter the folder path of c:\program files and the folder name perch. Then click folder or existing file. That’s your detection policy.
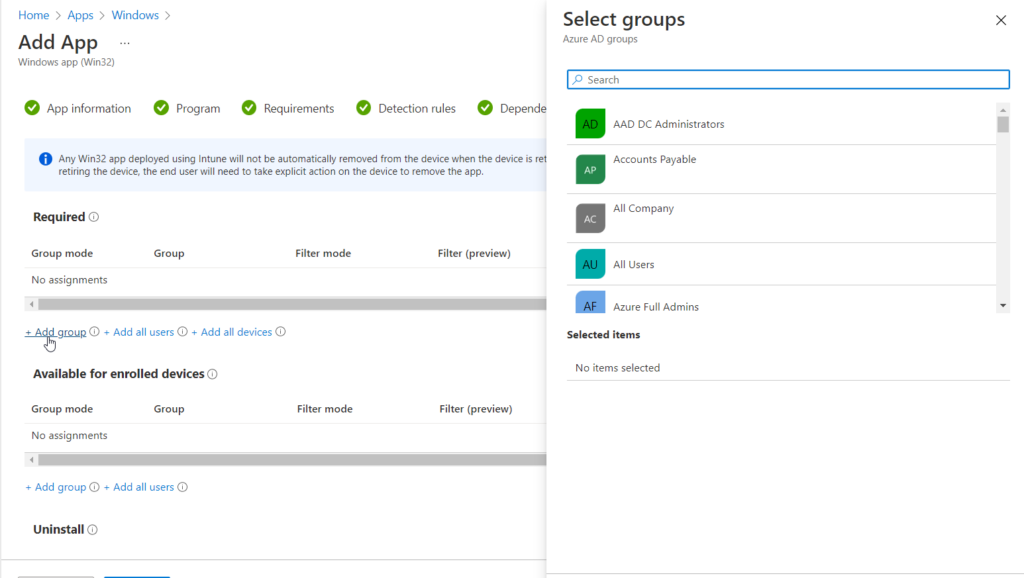
Group Assignments
In like fashion, The next window of importance is the Assign. If you want the app to deploy with autopilot, you must select the app as required, or be tied into another application install dependency. Here we are adding a group of computers. This is very common. The other options are available for enrolled devices. If the computer has the company portal, they can download it without needing admin rights. The final option is to uninstall which would uninstall from the select computers.
Finally, the last page is to review all the settings. Once you click save the file will upload and it might take some time. The bigger the file the longer it will take. This is how you Install Perch Log Shipper with Intune.
Conclusion
Hopefully this guide helped you through the process of setting up an Install Perch Log Shipper with Intune
We use cookies to ensure that we give you the best experience on our website. If you continue to use this site we will assume that you are happy with it.