Last week we went over how to do audits using PowerShell (Link). Today we will use scheduled tasks with PowerShell to have the audit script run hour by hour. We do this because we don’t want to be manually running the PowerShell script every hour. Let the computer handle all of that for us. We will go over how to manually build the Scheduled Task and the PowerShell way.
Manual Process – Scheduled Tasks
Lets take a look at the manual process. We are placing our AuditDisabledAccounts.ps1 script on the computer. I like placing things in the c:\scripts or c:\temp folder. Sometimes this is good, sometimes this is bad. It depends on the world you are working in.
Start Task Scheduler
Click Task Scheduler Library.
Right Click and select basic task
Name it accordingly. I am naming mine “Hourly Disabled AD Audit.”
Under Triggers, I selected When the computer starts.
This scheduled task will repeat itself with another setting. It’s best to get it started when the computer starts. This way if the system restarts, it will start again. It can become confusing over time.
Now we have a basic scheduled task setup. Next we want to have it trigger every hour. Sense we opened the properites you can now do just this.
On the general tab
Radio check: “Run whether the user is logged on or not.”
If you need to change the user, this is where you will do that.
Click the Triggers tab.
You will see at startup, click edit
Under advanced Settings
Check Repeat task every
Select 1 hour
Duration: Indefinitely
Click ok
That’s how you manually setup a Scheduled Task for PowerShell.
Powershell Method
Now we can do a Scheduled Tasks with PowerShell. We will be using the scheduledtask commands to create the task accordingly. Lets take a look at the script itself.
The first thing we do is setup. We want to have the script, the name, the out file for our audit report, our servers, and the hours back we want to go.
The first thing we want is the veriables. We want the path of the script. We want it’s name. Where our CSV files will be dropped, the servers, how many hours back, usernames and passwords. Notice that the User is using a read-host and creds is using a secure string. This is to help stop shoulder surfers and powershell memory. This way you password isn’t passed around. Basicly, we input the password as a secure string, and it becomes a veraible. Thus, if someone is looking through the powershell history, or is monitoring it with something like defender, then they will not see the password. Only the veraible from this point on.
Decoding Passwords as Veriables
Part of the Scheduled Tasks with PowerShell is we need to register the task later. This means that the password needs to be plain text. However, we don’t want a password to ever exist in the shell visability. So we want to decode it directly into a Veriable.
The code above allows you to convert the secure string to normal text in Powershell 5. If you are using powershell 7, this isn’t a problem. But most servers are still defaulting at 5. The new veriable name is UnsecurePassword which has the password as plain text for the register command.
Triggers – Scheduled Task for powershell
We need to start making the triggers. Unlike the gui, we can’t setup a startup with a hourly repeat. Instead, the safeist way is to do an hourly thing for repeating the hour. We do this using the new-scheduledtasktrigger command.
Since we have 24 hours in a day, we want to repeate a foreach-object loop 24 times. We start at 0 and go to 23 which makes 24. Wow… Anyways, As we loop, the $_ will be the number. So we create a new trigger at that time and set it to daily. All of this will be dumped into the $triggers array.
Principal
Next we want to setup a user account. The command for this is…. Yep, you guessed it, New-ScheduledTaskPrincipal. Here we are setting the ID to the author, using our user flag, doing the logontype as password, and the runlevel is limited. We don’t want it to have full access to anything since it’s not doing anything on the local PC. Notice the ` symbol. This allows you to do mulitlple lines with one command. It’s like break here and continue to the next line. It makes reading code so much easier.
Next we need to do our actions. AKA, what’s it going to do. Using the New-scheduledTaskAction we want to execute with powershell and push our arguments in. Using our Veriables, we fill in the blanks. It’s very straight forward. The secret sause here is the arguments will be like you did with the gui approach.
Next we need to make the task itself. We are going to use the New-ScheduledTask command. This part of the command creates a task object that will need to be registered. We give it the description we want. The Actions from above. The user inside the principal names and the triggers we built out.
Finally, we want to register the task in question. We are going to use “Register-scheduledTask” to do this. Notice that this is where we are using that password we used at the start. It’s used as a variable, and thus it’s never shown in the PowerShell history.
Additional Thoughts on Scheduled Tasks with PowerShell
This technique is very powerful. I built out a script that scanned the local network via Get-NetNeighbor. The script was a scheduled task and it grabbed all the devices. Imagine having admin rights, pushing out a script that scans the local network drops a scheduled task on another computer that scans that network. You could map out a whole network within a few minutes. This could be used as a worm and it’s a good reason to block WMI on the network except from the machines that does the administration.
What can we learn as a person?
It’s always a good idea to have routine. Having a Scheduled task in your life that you like tends to improve our lives. For example, I like going to a monthly meetup with my friends. It’s something I look forward to. Having it on my calendar helps. This is why vacations are important. We need to have those things on our calendar. It’s ok to have them on the calendar. So, find something you can look forward to, and put it on the calendar.
Digital explorer, how are you? Are you ready to learn more about how your computer works? Good news! You’ve just found PowerShell, the best tool for a digital spy to peek behind the scenes. It’s kind of like a mix between Sherlock Holmes and Ace Ventura: strange, funny, and never dull. Are you read for some monitoring program modules with PowerShell?
Why try to look? Now picture being able to see exactly what your computer does—or doesn’t do. Yes, PowerShell lets you find those hard-to-find modules that know a lot about security and speed. That’s pretty brave, huh?
Just put on your detective shoes and grab a magnifying glass (or a nice chair, really). We are about to start an exciting trip through the Search-ProcessModule function’s twists and turns. It sounds like a wild ride full of surprises, geeky charm, and “aha!” moments. Let’s work together to break this code and maybe save the internet in the process!
Getting to know PowerShell and Process Modules
Thanks for coming back, digital spy! PowerShell is an amazing tool that lets you control your system like a pro. You already know how to use it. Let’s look at process modules, which are an important but often ignored part of the PowerShell toolkit.
What’s the big deal about process modules?
When it comes to your software ecosystem, process modules are like the unsung stars. Each section in your apps is like a little brain—it’s important for them to work but doesn’t get much attention. Monitoring these units isn’t just about knowing what’s going on inside; it’s also about spotting problems before they get worse.
You could find a part that is acting up and slowing down your system, or you could find a security risk before it becomes a threat. That is why it’s important to keep an eye on process units. It’s like having x-ray vision that lets you see right through the outside of your system to its working heart.
Now that you know this, you’re not just working on hope; you have knowledge and foresight. Next, we’ll talk about the Search-ProcessModule function, which is the main character of our story. It’s the most important thing you can use to put this idea into action. Watch out!
A Look at the Search-ProcessModule Function
Now that you know how process modules work, it’s time to bring out the big guns. Now comes the Search-ProcessModule function, which is your secret tool against waste and security risks. The great thing about this PowerShell function is that it can do a lot of different things. Let’s take apart monitoring program modules with PowerShell.
Finding Out What Search-ProcessModule Can Do for You
The Search-ProcessModule function isn’t just another script; it’s a very useful tool for finding specific modules in any process. This function is where you can get quick and accurate answers, whether you’re trying to fix a program that’s running slowly or making sure that security rules are being followed.
How Function Parameters Work:
ProcessName: This is where you define the process name that you want to look at. It’s like picking which room in a huge house to look.
ModuleName: This is where you list one or more modules that you want to find in the chosen process. It’s like knowing what kind of furniture you want for that room.
ComputerName: If you choose “ComputerName,” you can do this search on a remote computer. Not a problem. With this number, you can reach more people on the network. A quick run-through of how it works
Before the Search-ProcessModule code does anything else, it checks to see if the given process is already running. Then it goes deeper and checks each module that the process loaded. It’s smart as it doesn’t just look at names; it also looks for patterns that fit your search. It’s like having a bloodhound that sniffs out the exact thing you want.
What if something goes wrong? The function has a strong way of handling errors. It won’t just fall down; it will also tell you why, giving you clear error messages that can help you figure out what to do next.
Uses in the Real World
The Search-ProcessModule tool can be used to find unnecessary modules that slow down the server and make sure that only authorized modules are running on sensitive systems. It is very flexible and powerful. It’s like having eyes and ears in the digital world, and it really does keep the system safe.
We’ll go over everything you need to know to start using this powerful tool in the next part, from installing it to setting it up. Keep listening, because soon you’ll be a pro at module watching!
Creating an Environment for Utilizing Search-ProcessModule
Okay, let’s prepare the stage for an outstanding performance from the Search-ProcessModule function. Getting everything ready may seem like a task, but believe me, it’s a breeze—easier than baking a pie, in fact! Here’s a straightforward guide to getting everything tuned and ready to go.
Preparing PowerShell for Optimal Performance
First, you need to ensure that PowerShell is installed on your machine. If you’re using a recent version of Windows, well done! It’s likely that you already have it installed. Simply type PowerShell in your search bar and check if it appears. If it doesn’t, no problem! A brief visit to the Microsoft website will help you find what you need for a download.
Setting Up Execution Policies
First, let’s discuss execution policies. PowerShell prefers a cautious approach, so it does not execute scripts without careful consideration. Here’s a step-by-step guide on how to create the perfect setting:
Launch PowerShell with administrative privileges by right-clicking and selecting “Run as administrator”.
Execute the command Set-ExecutionPolicy RemoteSigned. This policy allows you to execute scripts that you have created or obtained from reliable sources.
Getting Ready for Remote Execution
Considering using the Search-ProcessModule function on a remote machine? Enabling PowerShell remoting is necessary. Here’s the enchanting incantation:
Continuing in your admin PowerShell window, go ahead and enter the command Enable-PSRemoting -Force. This command will help you configure your machine to send and receive PowerShell commands remotely.
Make sure the remote machine is set up in a similar way if you want to take a look at its process modules.
Simple Test Run
Now, let’s ensure that everything is functioning properly:
Launch PowerShell.
Give the Get-Process command a try to easily view the processes currently running on your machine. If you come across a well-organized list, you’re all set!
Finishing the Setup
And just like that, everything is ready for you! You’re all set to begin using the Search-ProcessModule function with ease in your environment. Now, we’ll explore a straightforward guide that will help you effectively utilize this tool to maintain the stability of your systems. Stay prepared, as things are about to become quite captivating!
A lot of work so far to do something as simple as monitoring program modules with PowerShell. However, this is all for remote and local monitoring. If your environment is already setup, you don’t need all of this.
The Script
Function Search-ProcessModule {
    [CmdletBinding()]
    param (
        [Parameter(Mandatory=$true, HelpMessage="Enter the name of the process you want to check.")]
        [Alias("Process")]
        [string]$ProcessName,

        [Parameter(Mandatory=$true, HelpMessage="Enter the name(s) of the module(s) you want to find in the process.")]
        [Alias("Module")]
        [string[]]$ModuleName,

        [string]$ComputerName
    )

    $scriptBlock = {
        param($ProcessName, $ModuleName)
        try {
            $processes = Get-Process -Name $ProcessName -ErrorAction Stop
            foreach ($process in $processes) {
                $modules = $process.Modules | Select-Object -ExpandProperty ModuleName
                foreach ($name in $ModuleName) {
                    if ($modules -like "*$name*") {
                        return $true
                    }
                }
            }
            return $false
        } catch {
            Write-Error "Error: $_.Exception.Message"
            return $false
        }
    }

    if ($ComputerName) {
        Invoke-Command -ComputerName $ComputerName -ScriptBlock $scriptBlock -ArgumentList $ProcessName, $ModuleName
    } else {
        & $scriptBlock $ProcessName $ModuleName
    }
}
Detailed Breakdown of the Search-ProcessModule Script
Now that your stage is set, it’s time to spotlight the star of the show: the Search-ProcessModule function. Let’s dissect this function piece by piece, understanding how each part works and how you can use it to keep your systems running smoothly.
The Heart of the Function: The Script Block
The core of the Search-ProcessModule function is a script block. Think of this as the brain of the operation, where all the major decisions are made. Here’s how it ticks:
Initialization: The script block starts by taking in the ProcessName and ModuleName parameters you specify.
Process Check: It uses Get-Process to locate the process. If the process isn’t running, it stops and raises an error—no wild goose chases here!
Module Search: Next, it sifts through each module loaded by the process, checking if any match the names you’re curious about. It’s thorough, ensuring no stone is left unturned.
Navigating Through Processes and Modules
As we dive deeper:
Iterative Checks: For each process found, the function iterates through all loaded modules. It uses a loop to compare each module name against your specified criteria.
Pattern Matching: It isn’t just looking for exact names; it’s smarter! The function searches for patterns, catching even partially matching names.
Error Handling: Your Safety Net
Errors? No problem:
The function is equipped with try-catch blocks, making it robust against unexpected hiccups. If something goes wrong, it catches the error and provides a clear message. This helps you understand what went wrong and how to fix it.
For Remote Enthusiasts: Running the Script on Another Machine
Got a remote machine? Here’s your toolkit:
If you specified a ComputerName, the function doesn’t just run locally. It uses Invoke-Command to execute the script block on the remote machine. This feature turns your local setup into a command center for multiple machines.
Putting It All Together
With this detailed breakdown, you’re not just running scripts; you’re conducting an orchestra of system checks with precision. Next, we’ll walk through a step-by-step guide to deploying this function effectively, ensuring you’re fully equipped to monitor and manage your system’s modules like never before.
Practical Application: MS Teams
When managing IT environments, especially in settings where communication tools like Microsoft Teams are widely used, it’s crucial to ensure that system updates or software deployments do not disrupt important meetings or presentations. Here’s how you can use the Search-ProcessModule function to intelligently manage deployments based on Teams’ activity. We are about to bring reality to monitoring program modules with PowerShell.
Scenario Setup
Let’s consider a common scenario: you need to deploy an application on a user’s machine during working hours. The challenge is to do this without interrupting an ongoing Microsoft Teams conference call or screen sharing session.
Step-by-Step Guide for Monitoring Teams
Step 1: Identify the Process
We know that the main process for Microsoft Teams is named ‘MS-Teams’. This is your target process for monitoring.
Step 2: Define Modules of Interest
For detecting conference calls, we look for the module ‘coremmres.dll’.
For detecting screen sharing, the modules ‘mfmjpegdec.dll’ and ‘mfperfhelper.dll’ are the indicators.
Step 3: Craft Your PowerShell Command
To check for a conference call, your command might look like this:
Run these commands remotely or locally based on your administration setup. If either command returns True, you know now is not a good time for interactive tasks.
Step 5: Integrate with PADT
With this information, you can configure PADT to delay or adjust the deployment method. For example, if Teams is currently used for a call or sharing a screen, you might opt to deploy the application silently or reschedule the deployment.
Advanced Automation Tips
To streamline this monitoring program modules with PowerShell, consider setting up a scheduled task that checks for these conditions at regular intervals or right before a planned software deployment. You can also integrate these checks into your deployment scripts, automating the decision-making process based on the presence of these modules.
Final Thoughts
Using the Search-ProcessModule function to monitor applications like Microsoft Teams ensures that your software deployments are as unobtrusive as possible. This approach not only minimizes disruptions but also enhances user satisfaction and system administration efficiency.
What can we learn as a person?
Just as the Search-ProcessModule function in PowerShell allows system administrators to preemptively identify potential issues by monitoring certain modules, we can similarly benefit from understanding and managing our personal triggers. This proactive approach not only prevents disruptions in our digital systems but can also lead to more harmonious personal and professional lives.
The Importance of Recognizing Triggers
Imagine walking into a room full of people. It’s loud, crowded, and there’s only one exit. For someone like me, who experiences PTSD, such settings can quickly become overwhelming. This is a trigger—a psychological trigger that, much like an unwanted software module, can disrupt my operating system—my mental state.
Drawing Parallels with PowerShell
Just as we use the Search-ProcessModule function to detect if Microsoft Teams is in a delicate state (like a conference call or screen sharing), understanding our mental triggers allows us to gauge when we’re potentially entering a delicate emotional state. The function helps avoid awkward disruptions during digital meetings; similarly, knowing our triggers can help avoid personal discomfort or emotional crises.
Personal Strategies for Managing Triggers
Here’s how I manage:
Preparation: Much like how we prepare our systems with the right tools (like PowerShell scripts), I equip myself with tools to manage my triggers. Carrying headphones helps manage sound levels, much like how monitoring tools help manage system performance.
Avoidance: If I know ahead of time that a situation—like a noisy room with poor acoustics and limited exits—might become overwhelming, I choose not to engage, similar to how we might delay software deployment during critical business operations.
Awareness: Just as system monitoring provides real-time insights into what’s happening with our digital environments, being mindful and aware of my surroundings helps me maintain emotional equilibrium.
Broader Implications
This isn’t just about avoiding what makes us uncomfortable. It’s about understanding the environments in which we thrive. Knowing your triggers and how to manage them can dramatically improve your quality of life, enhance your interactions, and reduce stress—much like how effective system monitoring can enhance performance and reduce downtime.
In both technology and life, the better we understand the systems and their sensitivities, the more effectively we can manage them. Whether it’s preventing a software crash during a critical presentation or managing personal stress in a crowded environment, the principles remain the same: monitor, understand, and prepare. This proactive approach not only prevents problems but also promotes a smoother, more efficient experience for everyone involved.
Here, we’ll learn how to use the & operator to run script blocks—your go-to PowerShell script block tutorial! You’re not alone if you’ve ever thought PowerShell scripting was a little confusing. Today, we’re simplifying the & operator, one of PowerShell’s most important features, and making it really easy to use. Knowing how to use this operator successfully will improve your scripting talents, regardless of experience level. Together, we can make writing scripts as pleasurable as indulging in your preferred treat after a demanding day! Join me as we dive into our PowerShell script block tutorial.
What is the & Operator?
Your key to running commands kept in script blocks or variables in PowerShell is the & operator, sometimes referred to as the call operator. Consider it as your script’s magic wand, waved to bring it to life. What use is this to us? As simple as entering Write-Host “Hello, World!” commands aren’t always clear-cut. The & operator exists to make sure things go smoothly and precisely as intended when you start storing commands in variables or need to perform complicated expressions kept as script blocks.
For example, typing just $command in PowerShell will return the string “Get-Date” if your command is $command = “Get-Date”—not very useful if you’re trying to find out the time! But & $cmd runs it, converting your string into a useful command. That seems easy enough, right? Still, so potent.
Understanding Script Blocks
Moving deeper into the rabbit hole, let’s talk about script blocks. In PowerShell, a script block is essentially a collection of statements or expressions that are written as a single unit but executed as needed. Imagine them as your script’s building blocks, where each block is crafted to perform specific tasks.
Syntax-wise, a script block is encased in curly braces {}. Here’s a straightforward example:
In this script block, we’re passing a parameter $name and outputting a friendly greeting along with the current date. But without our trusty & operator, this friendly message remains locked inside its curly brace prison. By calling & $myScriptBlock -name 'Frank', you breathe life into it, and out pops, “Hello, Frank! Today is [current date].”
Script blocks can be as simple or as complex as you need them to be, handling anything from quick one-liners to extensive scripts requiring loops, conditionals, and more. They’re incredibly powerful because they let you neatly package and repeatedly execute chunks of code with minimal fuss.
Executing Script Blocks with the & Operator
Now, let’s get our hands dirty and see the & operator in action. We’ll take the script block we mentioned earlier and really break it down. This script block scrambles a message—a fun way to see the power of randomization in PowerShell:
To execute this script block and see your message get all mixed up, you’d use:
& $myScriptBlock "I like cheese cake on my chocolate syrup."
This line invokes the script block with the & operator and passes the string “I like cheese cake on my chocolate syrup” as an argument. The script takes each character, scrambles them, and outputs something that looks like your original message went through a blender. It’s a practical, hands-on way to see script blocks and the & operator in perfect harmony.
Practical Examples
While our scrambled message is fun, let’s look at more practical uses of script blocks and the & operator in everyday scripting tasks. Here are a few scenarios:
Batch Renaming Files:This script block takes a file and a new name as parameters and renames the file accordingly.
To elevate your scripting game, here are some advanced tips and tricks for using script blocks and the & operator in PowerShell:
Passing Multiple Parameters: You can pass multiple parameters to a script block by simply separating them with commas after the script block call:
& $myBlockParam $arg1, $arg2, $arg3
Using Script Blocks for Asynchronous Tasks: PowerShell allows script blocks to be run asynchronously, which can be great for performance when dealing with long-running tasks
Congratulations for delving deeply into the operator and script blocks of PowerShell! We’ve unpacked a lot of really technical material today, transforming what may have appeared like magic into a set of useful abilities you can apply immediately. We began with a review of the & operator, looked at defining and running script blocks, and even played about with message scrambling. We next advanced to increasingly difficult scenarios to show how script blocks might make chores like batch renaming files or sorting through logs easier.
Writing more effective and efficient scripts is easy when you have the & operator in your toolbox. PowerShell is a potent tool. Recall that putting in constant practice is the best approach to improve. Try out several script blocks, modify our examples, and learn how you might use them for everyday chores.
For those who are itching for more, I suggest you to explore more sophisticated PowerShell scripting methods or sign up for PowerShell forums and groups. There is always a new, clever method to learn in the field of scripting, and learning never really ends.
May your scripts always run well and happy scripting! Thank you for looking at our PowerShell script block tutorial.
What can we learn as a Person?
Here’s the thing about PowerShell script blocks: they’re modular. You write them once and use them wherever needed without starting from scratch each time. It’s neat, tidy, and incredibly efficient. Now, let’s take this concept and apply it to something a bit closer to our everyday lives—our work-life balance.
Why Boundaries Matter
Imagine your life as a complex script. Each segment—work, family, personal time—is like a little block of code. Just like in scripting, you don’t want these blocks interfering with each other more than they need to. It messes things up. If work starts to bleed into family time regularly, it’s like a script executing commands where it shouldn’t. Before you know it, you’re looking at a full-blown system crash (or in human terms, a burnout).
Recycling What Works
Why reinvent the wheel? If you’ve nailed a routine that keeps your work and personal life neatly compartmentalized, keep that going. Apply it as often as needed, just like a reusable script block. Found that turning off email notifications after 6 PM helps keep your evenings calm? Make it a staple. Effective routines are like code that doesn’t need debugging—they just work, and they save you a ton of mental energy.
Tweaking the System
Life, just like software, updates and changes all the time. New job? Family dynamics shifted? Just as a programmer tweaks a script to fit new requirements, you might need to adjust your boundaries and routines to keep everything running smoothly. It’s not about sticking rigidly to old scripts but adapting them to better fit your current scenario.
So, let’s take a leaf out of our script book. Setting clear, modular boundaries in our lives isn’t just about keeping things orderly. It’s about ensuring we don’t run ourselves into the ground. After all, nobody’s got time for downtime, right?
Tired of manually configuring networks for each VM? Perhaps you’re not alone. Virtual network management is time-consuming and error-prone. If I told you there’s a simpler way? This essay examines a PowerShell script that does that. Making your life easy is key. This will teach you how to quickly Bulk Configure VM networks with PowerShell.
This PowerShell script revolutionizes. Create a private switch and assign it to all VMs automatically. Imagine setting up networks without manually selecting VMs. The script verifies network’s existence. If not, it binds your VMs to a new private switch. Automation saves time and reduces errors. Efficiency at its best.
Before you start, make sure you have everything. PowerShell must be installed and running first. Additionally, the script requires administrative permissions to make significant modifications to your VM setup. View your VM network settings. Using this will prevent configuration conflicts. Checked everything? You can automate your VM network setup now.
The Script
$NewSwitchName = Read-Host "Enter the name for the private switch network"
$NewSwitch = Get-VMSwitch -Name $NewSwitchName -ErrorAction SilentlyContinue
if ($null -ne $NewSwitch) {
    Write-Error "Network $NewSwitchName Already Exists"
    end
}
New-VMSwitch -Name $NewSwitchName -SwitchType Private -

$VMs = Get-VM
foreach ($VM in $VMs) {
    $networkAdapters = Get-VMNetworkAdapter -VMName $vm.Name
    if (!($networkAdapters.name -contains "$NewSwitchName")) {
        Add-VMNetworkAdapter -VMName $vm.Name -SwitchName $NewSwitchName -Name $NewSwitchName
        Connect-VMNetworkAdapter -VMName $vm.Name -Name $NewSwitchName -SwitchName $NewSwitchName
    }
    Start-Sleep -Seconds 5
    Get-VMNetworkAdapter -VMName $vm.Name | Select-Object VMName,SwitchName,MacAddress,IPAddresses,Status,connected | ft
}
The Breakdown
Let’s unravel this script line by line to understand exactly how it simplifies your VM network configurations.
Reading the Switch Name:
First, the script prompts you to enter a name for your new private network switch. It uses this name to create or identify the switch.
$NewSwitchName = Read-Host "Enter the name for the private switch network"
Checking for an Existing Switch:
It looks up an existing switch by the entered name. If found, it proceeds; if not, it silently handles the error without stopping the script.
Each step is crafted to ensure your VM networks are set up efficiently and correctly, without manual repetition. This script is your shortcut to smarter VM management. A great way to Bulk configure VM networks with PowerShell.
Running the script
Running the script is easy. PowerShell needs administrator access to modify VM networks. Go to your script directory. Enter [YourScriptName].Type ps1 and Enter. Enter the network switch name as instructed on-screen. Each VM is configured by the script. Watch it streamline your network one VM at a time.
Fixing Common Problems
Despite this handy script, things may not always go well. Here are some common issues and their solutions:
Script Not Starting: Verify administrative permissions. Without these, the script can’t alter network settings.
Error “Network Already Exists”: A switch with the specified name already exists. Change the name or remove the switch if it’s unnecessary.
Adapters Not Connecting: Make sure your VMs can accept updated network configurations. VMs may need restarts to acknowledge updated settings.
Recheck each script step for typos or access rights if you find any issues. PowerShell errors typically indicate the problem, so check the output.
Conclusion
Congratulations on automating VM network setups with PowerShell! Your virtual machine management improved significantly. Try tweaking the script to meet your environment and watch how smooth your operations perform. Share a story or tweak? Leave a comment—let’s learn from each other and establish a smart system admin community!
What can we learn as a person?
Throughout my life, I’ve seen how friends often come from friends. My best friend? I met him because of a kid from the playground, and my wife, well, I met her through someone in a chat room. Even those pals from Discord were introduced by someone else. It’s kind of like that PowerShell script we talked about—making connections that make everything work better.
Building these networks, whether they’re the tight-knit kind or the more extensive, professional types, is crucial. It’s just like setting up networks in PowerShell. You’ve got your internal network—those are your close friends, the ones who really get you. And then there’s your external network, which includes acquaintances and professional contacts. Both are key for different reasons.
Networking events? They’re gold. They throw you into a room with people who might just have the same quirks or career goals. It’s about planting seeds that could grow into either your next job opportunity or into someone you can rely on when things get rough.
Just as our script ensures smooth communication across VMs, weaving through networking events helps build a solid web of contacts. Every handshake or quick chat could be the start of something big—think of each as connecting a new node in your vast network.
Keep it balanced, keep it genuine, and watch as your network—both personal and professional—flourishes. Just like a well-run system of VMs, a well-nurtured network supports and enhances your life in ways you might not even expect.
Hi there! When you were setting up a virtual machine, did you ever get stuck and scratch your head? You’re not the only one. I still remember the first time I tried it; let’s just say there were more “oops” than I’d like to admit. The good news is that I’ve been there, and I can show you how to use PowerShell to set up a Windows 11 VM on Hyper-V.
The next question you might have is “Why PowerShell?” Believe me, you’ll be a pro at setting up VMs once you get the hang of it. Also, it’s always good to have a cool trick handy, right? I’ll show you how to set up a VM whether you need it for work, testing, or simple fun. Let’s go on this trip together and setup Windows 11 VM on Hyper-V with PowerShell.
Why Set Up a VM with PowerShell?
Then you might ask, “What’s the big deal about PowerShell?” I can tell you, it’s like having a magic wand for your computer, but it’s more of a little blue box instead of a wooden stick. (Not a Tardis, sorry, Dr. Who fans.) You can make a VM, set it up, and have it going in no time with just a few commands. But it’s not just about speed. You can be precise, have full control, and automate jobs with PowerShell. This makes your life a lot easier.
I remember setting up several virtual machines for a job. It would have been a headache to do it by hand. It was like telling my computer, “Hey, do this for me, will you?” with PowerShell. And that was it, it was done. It was like having your own genie!
But here’s the really cool part: Standardization through automation is a big reason why people use PowerShell. It’s important to be able to do things over and over again in IT. We can do this with PowerShell, which makes sure that every VM setting is the same and free of mistakes. You know that every time you bake that cake, it will turn out just right because you have a plan.
Using PowerShell for your VM setups is a game-changer, no matter how experienced you are or how new you are to it. When you do it this way, you’ll be more efficient, in charge, and consistent. Are you ready to use your magic wand? Let’s do it.
Prerequisites
Before we dive into the magical world of setting up a VM, let’s make sure everything is ready. To begin, you will need these things:
A Windows 10 or 11 Pro computer: This is our trusty horse, ready to take us through the process of setting up our VM. To get to Hyper-V, make sure it’s at least the Pro version.
Make sure that Hyper-V is turned on for your machine. For me, it’s like letting the world of virtualization in.
The Windows 11 ISO file is: This is a plan for the VM that we are going to build soon. It’s available for download on the Microsoft page.
TPM chip and system that can handle virtualization: Make sure that your computer has a TPM chip and an engine that can handle virtualization. It’s like having the right engine and safety features to make the ride go smoothly.
RAM: For running properly, your host OS needs at least 8 GB of RAM, and the VM needs at least 6 GB. I think you should have 16 GB of RAM so that both your host and VM work right.
Finally, enough disk space. This is dependent on you, but at least 32 gb of free space is recommended for a useful system.
Lets get started
Setting up Hyper-V
Now, it’s time to start sounding like a robot. So, lets roll up our sleeves and get our fingers dirty. Setting up Hyper-V is our first step towards creating our Windows 11 VM. Here’s how we do it:
Enable Hyper-V: Open PowerShell as an administrator. Then we will flip the virtualization engine on inside Windows with the following command:
Verify Hyper-V Installation: Once the installation is complete, We need to make sure it all worked. We can do this by running the following command in the same window:
Restart Your Machine: Because we are working with windows, We need to restart after installing hyper-v. Thanks windows. You can restart from your powershell console.
Restart-Computer -force
So that’s it for Hyper-V! Now that Hyper-V is set up, our Windows 11 VM can run on it. Setting up the stage for a big show is like that.
Creating the Windows 11 VM
Now that we have Hyper-V ready, it’s time to create our Windows 11 VM. Follow these steps, and you’ll have your VM up and running in no time:
Open PowerShell as Administrator: Start by opening PowerShell with administrative privileges. It’s like putting on your wizard hat before casting a spell.
Create a New Virtual Machine: The below command conjures up a new VM named “Windows11VM” with 6GB of RAM and a 50GB virtual hard drive. It’s like building the foundation of your virtual house.
Mount the Windows 11 ISO: Now, let’s attach the Windows 11 ISO to our VM. This step is like putting the key in the ignition, getting ready to start the engine.
Start the VM and Install Windows 11: Finally, start your VM and go through the Windows 11 installation. Connect to your VM using the Hyper-V Manager and proceed with the Windows 11 installation. It’s like watching your virtual house come to life, brick by brick.
Start-VM -Name "Windows11VM"
And there you have it! Your Windows 11 VM is now created and ready for action. It’s like having a brand-new playground to explore and enjoy.
What can we learn as a person today?
Do you remember exploring your toy box for your favorite toy as a kid? Always bottom, right? However, the thrill was finding all those great gadgets you forgot you had. Techies feel like way when fiddling with virtual machines. It’s our adult toy box full with electronic toys waiting to be played with.
Our VM is like an old toy box every time we use it. We may be looking for something specific, but we often find interesting new tricks or forgotten skills. Exploring and playing keeps us interested in tech and exercises our minds.
Having a place to experiment, make errors, and learn is crucial. It’s about exploring and having fun, not just making virtual machines. Please enjoy your virtual toy boxes and the excitement and growth they offer to your life as we navigate the tech world.
Over the years of Intune deployments, I have searched for a way to let my end users know that an application is being installed or uninstalled from their computer. I have used things ranging from notification bubbles to blanking a screen. All of these methodologies are poor at best. I found a few paid items that companies just didn’t want to pay for due to the insanity of the pricing. For example, one company wanted us to pay 150 USD per deployment. Times that by 1500 devices, that adds up quickly. It wasn’t until I found the PowerShell App Deployment Toolkit that I found what I was finally looking for.
What is the PowerShell App Deployment Toolkit?
This toolkit is an immensely powerful and amazingly simple setup. You can download the tool kit here. It provides a framework to install and uninstall applications using PowerShell through a signed application. This allows us to deploy complex and confusing deployments as a single package. A good example would be AutoCAD. Recently, I was tasked with standardizing AutoCAD in a single department. Some members used AutoCAD 2016, some used 2024. This was a problem as the 2024 files did not work with the 2016 AutoCAD. Thus, I needed to uninstall the previous versions of AutoCAD before I installed the current version. As all files are backed up, I didn’t have to worry about them losing any files. The toolkit was perfect for this.
Key items I like of the toolkit
Simple packaging
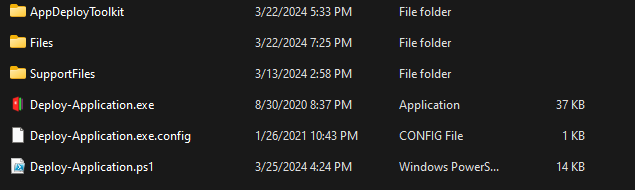
Many application toolkits come with complex packaging. It’s normally an application that wraps itself around another application that keeps doing this until it’s all transparent. With the PowerShell App Deployment Toolkit, all you need to interact with is the deploy-application.ps1 file. That’s assuming you are doing more than an a MSI file. If you are only using an MSI file, all you need to do is drop the file in.
As you can see in the screen shot, this is the package. When you download the zip file, you will be greeted with this amazing structure. The Deploy-Application.ps1 is where our code will go. The Files folder is where the installer files would go. Following our auto cad example, the installer and updates would all be placed inside the Files folder.
Deploy-Application.ps1
This file has an amazing setup. It first has a wall of documentation inside the file itself. The file explains each step along the way. It is broken up into installation, uninstallation, and repair. Each section has a Pre, during and post process in each section. This is great if you need to kill some services, send a message or more. It’s also helpful because it gives you a structure to work within.
The Commands
Inside this packaging there are many useful commands. As I stated in the intro, it’s full of ways to communicate what you are doing with the end user. During an application install, you can show which applications needs to be turned off for the install to work by using the show-installationwelcome command.
This example shows us it wants to close the applications and gives the user a 60 second window to do so. This isn’t the only thing this command can do.
Other commands like execute-process, will launch processes that you need from the file directory and more. All while logging what’s going on. You can find a full help system for all the unique commands inside the tool kit. Navigate to the tool kit > AppDeployToolkit > AppDeployToolkithelp.ps1 will bring up a gui that allows you to read all about the commands.
Using the Toolkit with Intune
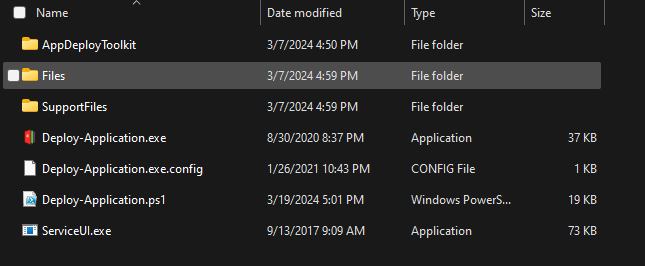
If you want the tool kit to work with the end user profile, then you will need to grab a unique little tool from MDT. We will need the ServiceUI.exe from the MDT software. You can download MDT here. Once you have the MDT installed. we need to pull the ServiceUI.exe out of the MDT install. Navigate to, C:\Program Files\Microsoft Deployment Toolkit\Templates\Distribution\Tools\x64 and copy the ServiceUI.exe file. Place this file in the home of your PowerShell App Deployment Toolkit file structure.
As you can see, the ServiceUI.exe is in the root folder. Now we need to create the package. We can create a win32 app package. I covered this here. This is the same concept.
The folder would be the folder with your toolkit
The setup file would be the Deploy-Application.exe
The output file would be wherever you want the Intune app to be dumped.
and we don’t need to catalog the folder.
Once you have your application built, it’s time to see how it works inside Intune. We start by building your application package. As stated in the previous blog, we start the application by uploading. The big difference here is our install and uninstall commands.
Understanding the commands
Our install command will be the using the ServiceUI.exe and the deploy-application.exe
By default, the Deploy-application.exe will be interactive. There are two flags for the Deploy-Application and here are what they are.
DeploymentType: (Super Straight forward)
Install: Installs the application
Uninstall: Uninstalls the application
Repair: repairs the application.
DeployMode:
Interactive: Shows all of the prompts needed.
NonInteractive: Only shows the required prompts.
Silent: Shows no prompts.
We can translate the command above by using these flags. By default the Deploy-application.exe is install and interactive. So, we know that the application would be prompted and the end user will see the command. The uninstall command will uninstall and it will be interactive. The ServiceUI.exe allows you to run applications as the user in and the system at the same time. The biggest issue with the ServiceUI.exe is the application will not install until someone logs in. No flags are needed here.
Over all, PSappdeploytoolkit changes the ball game with deployments. I encourage anyone and everyone to dig deeper into it.
What can we learn as a person today?
I live in the south of United states. From time to time I will hear people battling over belief systems. In my life time I have come to an understanding of how these systems work. I liken “objective truth” as fish in a sea. Our belief systems is the net we use to capture those fish. Some nets are better than others. The water of the sea is useless, distracting, or misinformation. It only makes it harder to bring those pieces of the objective truth into ourselves. A good net can capture a lot of fish, and let the water out at the same time. A bad net, like a tarp, captures some but becomes unmanageable due to the water. This is the same way with our beliefs. We are only strong enough to lift so much at different points in our lives.
Premade Nets
I see organized religions as premade nets. Think of it like a tool kit. It’s a format that is easy to use and allows you to do stuff with it. Does the toolkit work for everyone, no. Just like this PowerShell toolkit, it would be useless in a world without powershell. So chromeOS, this toolkit isn’t useful. This is the same with some beliefs. They are useful where they are, but not useful in other places. Sometimes these toolkits/nets, are useful for some but not others. If you don’t know PowerShell, this toolkit wouldn’t be useful to you. If you are shame sensitive, some religions are not for you.
Everyone has their own tool set or net. No single tool set is inherently bad. It’s how we use them and where we use them. If you take a net to a small pond, get ready to waste your time and damage your net. If you throw your net aggressively into a aggressive sea, get ready to lose that net.
Homemade Nets
Once someone understands how the nets are made and how to repair them, It’s always best for them to start building their own nets using the techniques they have used on their previous nets. By having a net/toolset of your own, this allows you to have full knowledge and be able to repair quickly. This belief system would be uniquely yours and different from others. So, when it breaks, you can grow it, replace parts, and more without having any problems. It’s yours and no one elses.
We use cookies to ensure that we give you the best experience on our website. If you continue to use this site we will assume that you are happy with it.