Over the years of Intune deployments, I have searched for a way to let my end users know that an application is being installed or uninstalled from their computer. I have used things ranging from notification bubbles to blanking a screen. All of these methodologies are poor at best. I found a few paid items that companies just didn't want to pay for due to the insanity of the pricing. For example, one company wanted us to pay 150 USD per deployment. Times that by 1500 devices, that adds up quickly. It wasn't until I found the PowerShell App Deployment Toolkit that I found what I was finally looking for.
What is the PowerShell App Deployment Toolkit?
This toolkit is an immensely powerful and amazingly simple setup. You can download the tool kit here. It provides a framework to install and uninstall applications using PowerShell through a signed application. This allows us to deploy complex and confusing deployments as a single package. A good example would be AutoCAD. Recently, I was tasked with standardizing AutoCAD in a single department. Some members used AutoCAD 2016, some used 2024. This was a problem as the 2024 files did not work with the 2016 AutoCAD. Thus, I needed to uninstall the previous versions of AutoCAD before I installed the current version. As all files are backed up, I didn't have to worry about them losing any files. The toolkit was perfect for this.
Key items I like of the toolkit
Simple packaging
Many application toolkits come with complex packaging. It's normally an application that wraps itself around another application that keeps doing this until it's all transparent. With the PowerShell App Deployment Toolkit, all you need to interact with is the deploy-application.ps1 file. That's assuming you are doing more than an a MSI file. If you are only using an MSI file, all you need to do is drop the file in.
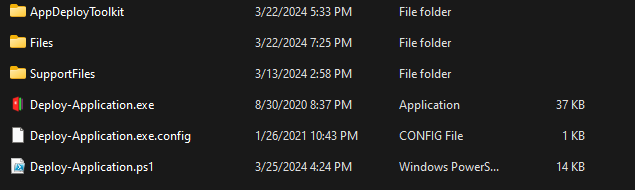
As you can see in the screen shot, this is the package. When you download the zip file, you will be greeted with this amazing structure. The Deploy-Application.ps1 is where our code will go. The Files folder is where the installer files would go. Following our auto cad example, the installer and updates would all be placed inside the Files folder.
Deploy-Application.ps1
This file has an amazing setup. It first has a wall of documentation inside the file itself. The file explains each step along the way. It is broken up into installation, uninstallation, and repair. Each section has a Pre, during and post process in each section. This is great if you need to kill some services, send a message or more. It's also helpful because it gives you a structure to work within.
The Commands
Inside this packaging there are many useful commands. As I stated in the intro, it's full of ways to communicate what you are doing with the end user. During an application install, you can show which applications needs to be turned off for the install to work by using the show-installationwelcome command.
This example shows us it wants to close the applications and gives the user a 60 second window to do so. This isn't the only thing this command can do.
Other commands like execute-process, will launch processes that you need from the file directory and more. All while logging what's going on. You can find a full help system for all the unique commands inside the tool kit. Navigate to the tool kit > AppDeployToolkit > AppDeployToolkithelp.ps1 will bring up a gui that allows you to read all about the commands.
Using the Toolkit with Intune
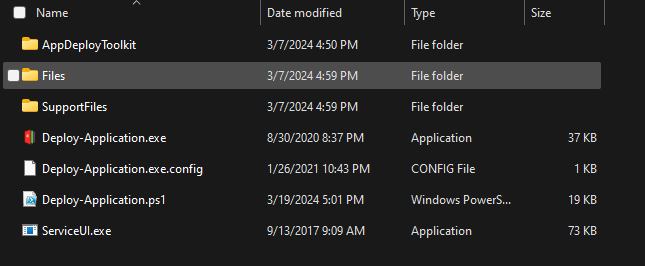
If you want the tool kit to work with the end user profile, then you will need to grab a unique little tool from MDT. We will need the ServiceUI.exe from the MDT software. You can download MDT here. Once you have the MDT installed. we need to pull the ServiceUI.exe out of the MDT install. Navigate to, C:\Program Files\Microsoft Deployment Toolkit\Templates\Distribution\Tools\x64 and copy the ServiceUI.exe file. Place this file in the home of your PowerShell App Deployment Toolkit file structure.
As you can see, the ServiceUI.exe is in the root folder. Now we need to create the package. We can create a win32 app package. I covered this here. This is the same concept.
The folder would be the folder with your toolkit
The setup file would be the Deploy-Application.exe
The output file would be wherever you want the Intune app to be dumped.
and we don't need to catalog the folder.
Once you have your application built, it's time to see how it works inside Intune. We start by building your application package. As stated in the previous blog, we start the application by uploading. The big difference here is our install and uninstall commands.
Understanding the commands
Our install command will be the using the ServiceUI.exe and the deploy-application.exe
By default, the Deploy-application.exe will be interactive. There are two flags for the Deploy-Application and here are what they are.
DeploymentType: (Super Straight forward)
Install: Installs the application
Uninstall: Uninstalls the application
Repair: repairs the application.
DeployMode:
Interactive: Shows all of the prompts needed.
NonInteractive: Only shows the required prompts.
Silent: Shows no prompts.
We can translate the command above by using these flags. By default the Deploy-application.exe is install and interactive. So, we know that the application would be prompted and the end user will see the command. The uninstall command will uninstall and it will be interactive. The ServiceUI.exe allows you to run applications as the user in and the system at the same time. The biggest issue with the ServiceUI.exe is the application will not install until someone logs in. No flags are needed here.
Over all, PSappdeploytoolkit changes the ball game with deployments. I encourage anyone and everyone to dig deeper into it.
What can we learn as a person today?
I live in the south of United states. From time to time I will hear people battling over belief systems. In my life time I have come to an understanding of how these systems work. I liken "objective truth" as fish in a sea. Our belief systems is the net we use to capture those fish. Some nets are better than others. The water of the sea is useless, distracting, or misinformation. It only makes it harder to bring those pieces of the objective truth into ourselves. A good net can capture a lot of fish, and let the water out at the same time. A bad net, like a tarp, captures some but becomes unmanageable due to the water. This is the same way with our beliefs. We are only strong enough to lift so much at different points in our lives.
Premade Nets
I see organized religions as premade nets. Think of it like a tool kit. It's a format that is easy to use and allows you to do stuff with it. Does the toolkit work for everyone, no. Just like this PowerShell toolkit, it would be useless in a world without powershell. So chromeOS, this toolkit isn't useful. This is the same with some beliefs. They are useful where they are, but not useful in other places. Sometimes these toolkits/nets, are useful for some but not others. If you don't know PowerShell, this toolkit wouldn't be useful to you. If you are shame sensitive, some religions are not for you.
Everyone has their own tool set or net. No single tool set is inherently bad. It's how we use them and where we use them. If you take a net to a small pond, get ready to waste your time and damage your net. If you throw your net aggressively into a aggressive sea, get ready to lose that net.
Homemade Nets
Once someone understands how the nets are made and how to repair them, It's always best for them to start building their own nets using the techniques they have used on their previous nets. By having a net/toolset of your own, this allows you to have full knowledge and be able to repair quickly. This belief system would be uniquely yours and different from others. So, when it breaks, you can grow it, replace parts, and more without having any problems. It's yours and no one elses.
This past month I was given a task to Uninstall a few applications in Intune. However, the app's uninstall feature did not work according to plan. However, a bunch of these worked with the cim methods of uninstall. Which I thought was funny. After writing a bunch of the same code over and over again, I decided to write a General Uninstaller for Intune. This also requires a custom Detection Script.
Here we have a general uninstaller for Intune. This script allows us to feed the product name as is or we can add wild cards to the name. We start off the script by grabbing the product names from the user. This will be done during the intune setup. When it deploys, the first thing this script does is grab all the applications inside the win32_product. If the application didn't register in this windows system, then this script is going to be pointless for you.
Once we have the products, we go through each Product Name. We first check to see if the product is on the system. If it isn't, we output success and exit with a unique exit code. This will be used later. However, if the product is on the machine, we grab the install location. Then we pipe the product into the uninstall method in the cim method command. Finally, we see if the install location exists inside the installed object. Some applications give us this information some don't. Some give us multiple locations while others don't.
To work around this, we check if install location property is null. If it isn't null, then we move on and start a loop. The loop is only because some install locations have more than one location. Then we test if the file path still exists. Sometimes, the applications uninstaller will remove the folder, sometimes, it doesn't and that's why we test. If the file location is there still, we remove it with a good old force and recurse. Finally, we exit with the unique exit code.
With any custom script installs or uninstalls, a custom detection script is necessary. The first step is to grab the product names. Just like before, it's a list of strings. So they can do more than one. Then we grab all the products with our cim instance and win32_product. Then we loop through each product name and see if the product exists still. If it does, we exit with a 1. This basically says, I failed! Intune needs a string and an exit code of 0 to be successful. The exit of 1 without the string ends the script and without that string, intune assumes failure. However, if we go through them all, and none trigger the exit, then we are safe to exit with a 0 and the beautiful word success.
Building it out in Intune.
Building the IntuneWin File
The first thing you will need to do is save your script into a folder and then download the WinIntuneApp, aka, Win32 Prep Tool, to package up the powershell script. Unpackage this tool and start up your command prompt. The application will guide you through the process of setting up a intunewin app.
General Uninstaller for Intune
Please specify the source folder: This is the folder that will have your script inside of it. If you wanted to create something more complex, this part would change your way of deployment. Future blog post coming.
Please Specify the setup file: This is going to be the powershell name. General-Uninstall.ps1
please specify the output folder: This is the folder that the intunewin file will be dropped.
Do you want to specify catalog folder (Y/N)? This one is for more advanced packages. We can say no to this option for this setup.
Setting Up Intune for Your Uninstaller
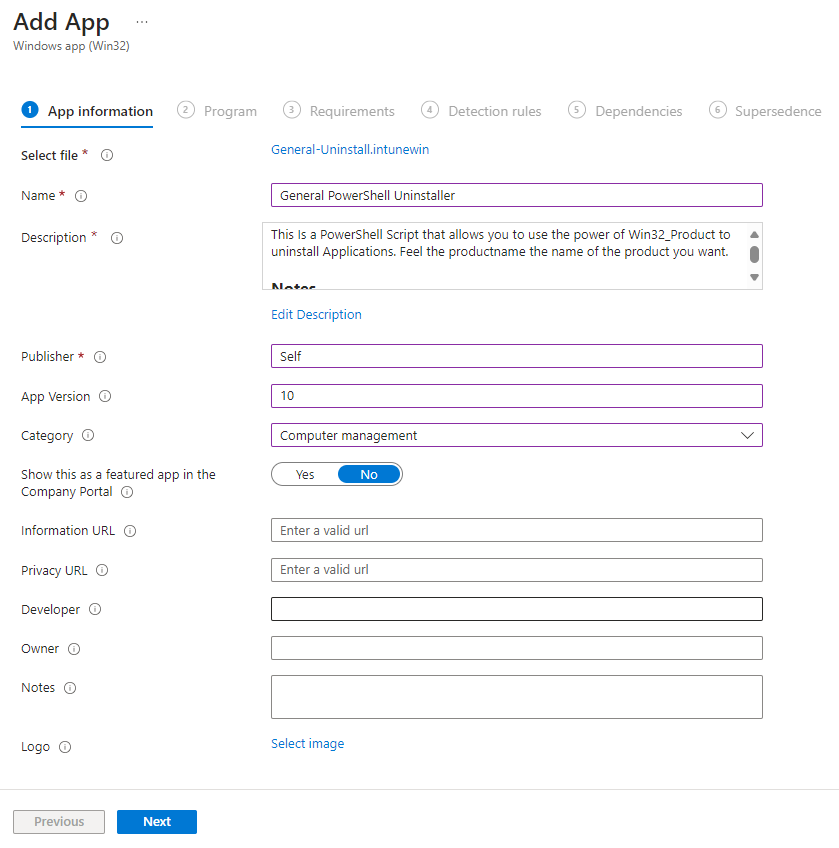
Now we have the IntuneWin file. It's time to setup the intune Deployment. This is where you will be able to add things like the productname to our General Uninstaller for Intune.
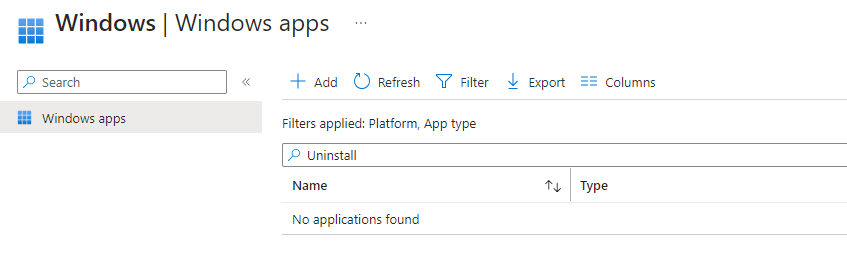
Navigate to Endpoint Manager
Click Apps
Click Windows
Click Add
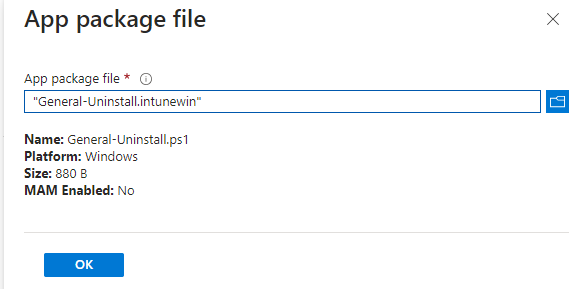
Click the Select App Package File.
Add the General-Uninstall.IntuneWin file.
Click ok
Change the Name
Click the edit Description and add a detailed description for other users. Make sure to provide instructions on what to do with the detection script.
The publisher can be your company or in my case self.
The gategory is going to be computer management as it is a general uninstaller.
Feel free to add any additional information. Link this blog post if you wish for the information URL.
The Uninstall command can be as simple as a removal file.
Device Restart Behavior: Determine behavior based on return codes
Return Codes: Remember that unique exit code we had in the script. This is where you would place that code. I have it as 1212 is a success.
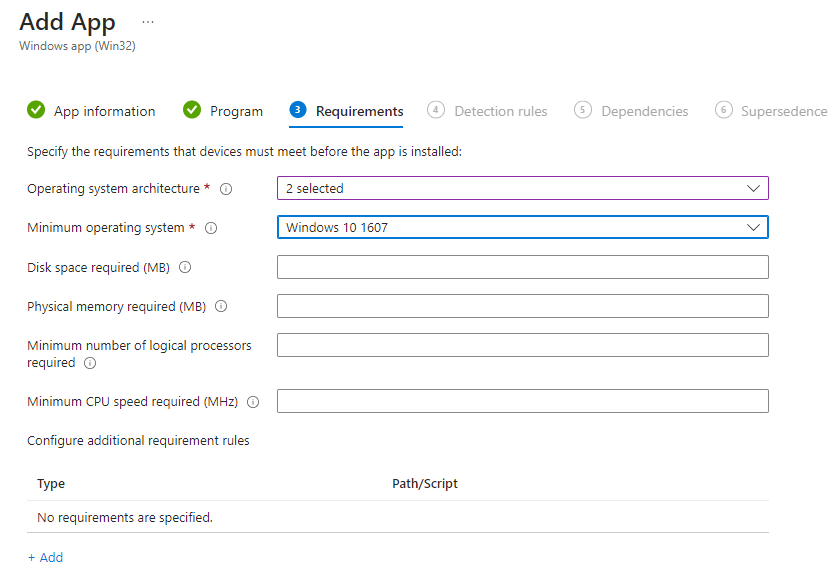
The next screen the requirement screen. We can do a lot with this screen, but we don't need to here.
Operating System Architecture:
32
64
Minimum Operating System: Windows 10 1607.
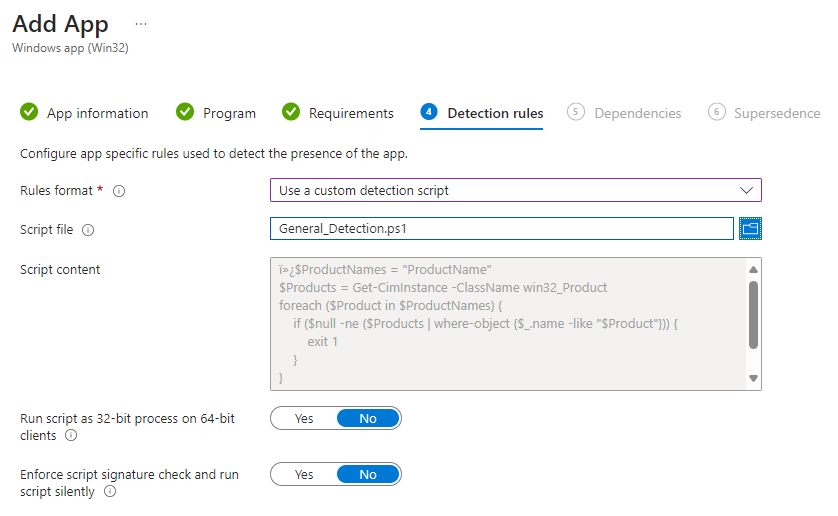
Now we need to setup the custom detection.
Select User A custom Detection Script
Validate your product names to be uninstalled.
Upload and click next.
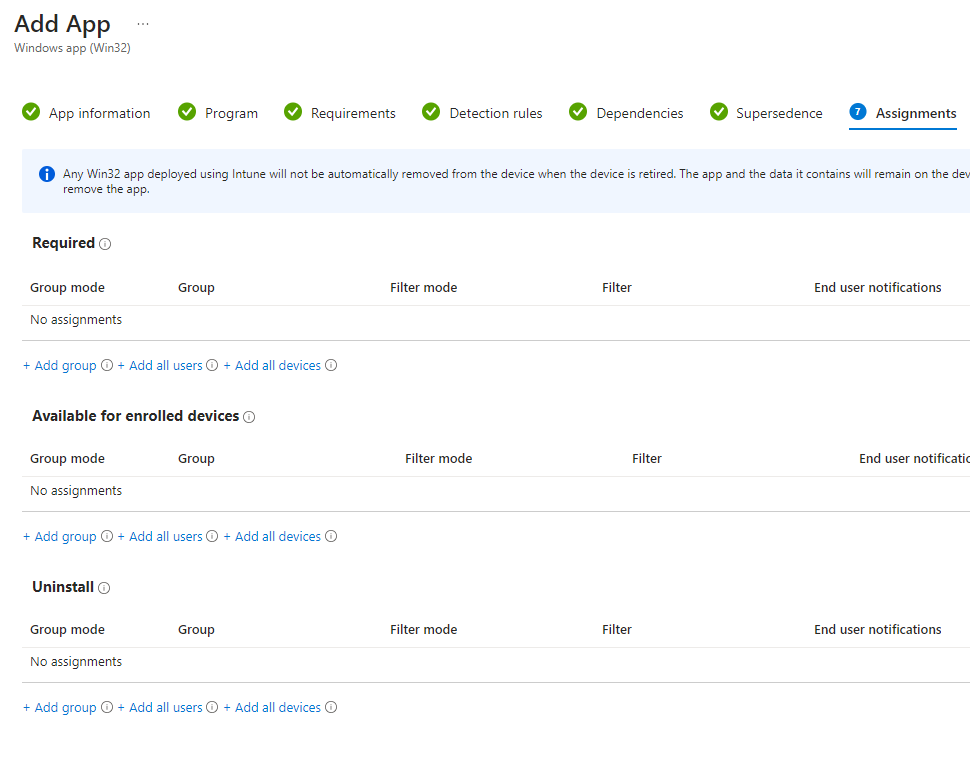
Accept the defaults for Dependencies and Supersedences.
The final screen is where you are able to assign the script to people. There are three sections. Required, aviable for enrolled devices and uninstall. This is where you will select who is going to get what.
Testing, Monitoring, and deployment
The assignment area is where you assign the script to who you want. This is very important. Here is where you would want to test the users. Have a test group and apply it first. H
Deploy the uninstall app to the test device group.
Monitor the Intune deployment status for the app to ensure successful deployment to devices/users.
Test if the application is still on a target computer. This can be done with control pannel, powershell, and more options.
Redefine and correct any issues and restart the testing.
Deploy
What can we learn as a person today?
When was the last time you threw a rock? How about a rock in a lakes? The last time you did, did you notice the ripples? Just like a deployment like this can cause ripples in your company, removing things from your life can cause just as many ripples in yourself. Make sure you are ready to let go of that thing you are holding onto. It's always a good idea to test it out, or have a support group to help you. Those ripples can do some damage. So be ready to Uninstall parts of your life before you do it.
Recently I was working with a company that gave me a really locked down account. I wasn't use to this as I have always had some level of read only access in each system. I was unable to create a graph API application either. So, I was limited to just my account. This was a great time to use the newer command lines for graph Api as when you connect to Graph API using the PowerShell module, you inherit the access your account has. So today we will Get Intune Devices with PowerShell and Graph API.
The Script
Function Get-IntuneComputer {
    [cmdletbinding()]
    param (
        [string[]]$Username,
        [switch]$Disconnect
    )
    begin {

        #Connects to Graph API

        #Installs the Module
        if ($null -eq (Get-Module Microsoft.Graph.Intune)) {Install-module Microsoft.Graph.Intune}

        #Imports module
        Import-Module Microsoft.Graph.Intune

        #Tests current Connection with a known computer
        $test = Get-IntuneManagedDevice -Filter "deviceName eq 'AComputer'"

        #If the test is empty, then we connect
        if ($null -eq $test) {Connect-MSGraph}
    }
    process {

        #Checks to see if the username flag was used
        if ($PSBoundParameters.ContainsKey('Username')) {
            #if it was used, then we go through each username get information
            $ReturnInfo = foreach ($User in $Username) {
                Get-IntuneManagedDevice -Filter "userPrincipalName eq '$User'" | select-object deviceName,lastSyncDateTime,manufacturer,model,isEncrypted,complianceState
            }
        } else {

            #Grabs all of the devices and simple common information.
            $ReturnInfo = Get-IntuneManagedDevice | Get-MSGraphAllPages | select-object deviceName,lastSyncDateTime,manufacturer,model,isEncrypted,complianceState,userDisplayName,userPrincipalName
        }
    }
    end {

        #Returns the information
        $ReturnInfo

        #Disconnects if we want it.
        if ($Disconnect) {Disconnect-MgGraph}
    }
}
The Breakdown
Parameters
We enter the script with the common parameters. Command let binding flag. This gives us additional parameters like verbose. Next, we have a list of strings called Username. We are using a list of strings to allow us to have multiple inputs. Doing this, we should be able to use a list of usernames and get their Intune Device information. Note that this is a multiple input parameter, thus, you will need to deal with it with a loop later. Next is the Disconnect switch. It's either true or not. By default, this script will keep connected to Intune.
Connecting to Intune
Next we will connect to the Intune system. First, we need to check and install the module. We check the install by using the get-module command. We are looking for the Microsoft.Graph.Intune module. If it doesn't exist, we want to install it.
if ($null -eq (Get-Module Microsoft.Graph.Intune)) {Install-module Microsoft.Graph.Intune}
If the module does exist, we will simply skip the install and move to the import. We will be using the importing the same module
Import-Module Microsoft.Graph.Intune
Afterwards, We want to test the connection to Microsoft Intune. The best way to do this is to test a command. You can do it however you want. I am testing against a device that is in Intune.
We will be using this command later. Notice the filter. We are filter the deviceName here. Replace the 'AComputer' with whatever you want. If you want to use another command, feel free. This was the fastest command that tested. The above command will produce a null response if you are not connect. Thus, we can test, $test with an if statement. If it comes back with information, we are good, but if it is null, we tell it to connect.
if ($null -eq $test) {Connect-MSGraph}
Get Intune Devices with PowerShell
Now it's time to Get Intune Devices with PowerShell. The first thing we check to see is if we used a username parameter. We didn't make this parameter mandatory to give the script flexibility. Now, we need to code for said flexibility. If the command contained the Username flag, we want to honor that usage. We do this with the PowerShell Bound Parameters. The PowerShell Bound Parameters is the - that come after the command. We are looking to see if it contains a key of username. If it does, we want to grab the needed information with the username. While if it doesn't, we grab everything.
if ($PSBoundParameters.ContainsKey('Username')) {
    #Grab based on username
} else {
    #get every computer
}
As we spoke about the list of string parameter needing a loop, this is where we are going to do that. We first create a foreach loop of users for the username. Here, the we will dump the gathered information into a Return variable of $ReturnInfo. Inside our loop, we gather the requried information. The Get-IntuneManagedDevice command filter will need to use the userPrincipalName. These filters are string filters and not object filters. Thus, the term like will cause issues. This is why we are using the equal term.
Now, if we are not searching the Username, we want to grab all the devices on the network. This way if you run the command without any flags, you will get information. Here, we use the Get-IntuneManagedDevice followed by the Get-MSGraphAllPages to capture all the pages in question.
Now it's time to end the script. We want to return the information gathered. I want to know some basic information. The commands presented produces a large amount of data. In this case we will be selecting the following:
Finally, we test to see if we wanted to disconnect. A simple if statement does this. If we choose to disconnect we run the Disconnect-MgGraph command.
if ($Disconnect) {Disconnect-MgGraph}
What can we learn as a person
In PowerShell, we can stream line the output that we get. Often times commands like these produce a lot of useless but useful information. It's not useful at the moment. This is like our work enviroment. I use to be a big advacate of duel, and not more screens. I would often have 5 things going on at once. My desk use to have everything I needed to quickly grab and solve a personal problem. For example, my chapstick sat on my computer stand. My water bottle beside the monitor. Papers, sticky notes, and more all scattered accross my desk. I wondered why I couldn't focus. Our brains are like batteries. How much focus is the charge. Our brains take in everything. Your brain notices the speck of dirt on the computer monitor and the sticky note, without your password on it, hanging from your monitor. This takes your charge.
Having two monitors is great and I still use two. However, I have a focused monitor and a second monitor for when I need to connect to something else. At some point I will get a larger wider monitor and drop the second one all together. Having less allows your brain to grab more attention on one or two tasks. Someone like myself, I have more than one task going at any moment. That's ok with my brain. Let's use our Select-object command in real life and remove the distractions from our desks.
In the intricate web of modern network management, the security and integrity of user accounts stand paramount. "AD User Audit with PowerShell" isn't just a technical process; it's a critical practice for any robust IT infrastructure. Why, you ask? The answer lies in the layers of data and accessibility that each user account holds within your organization's Active Directory (AD). Whether it's for compliance, security, or efficient management, auditing user accounts is akin to a health check for your network’s security posture.
Understanding the last login times, password policies, and group memberships doesn’t only highlight potential vulnerabilities; it also paves the way for proactive management and policy enforcement. PowerShell, with its powerful scripting capabilities, emerges as an indispensable tool in this endeavor. It transforms what could be a tedious manual audit into an efficient, automated process.
Why Perform an AD User Audit?
An "AD User Audit with PowerShell" serves multiple purposes:
Security: Identifying inactive accounts or those with outdated permissions reduces the risk of unauthorized access.
Compliance: Regular audits ensure adherence to internal and external regulatory standards.
Operational Efficiency: Understanding user activities and configurations aids in optimizing network management.
The first thing we do in this powershell script is the import module. We are importing the ActiveDirectory. Then we are going to setup a nice little function to help grab the expiry date of the account. The function here will depend on the dates and time as the parameters. The function resolves the time span needed. Next we will grab the data we need. That's the Name, Samaccountname, enabled, last logon date, password last set, member of, locked out, and finally when created. From there we will use select object. This is where some of the good stuff happens. When we select the pasword expire date, we are going to use the @ name and expression. Lets break that down some.
Inside the select object command, you can select different properties and give custom properties. Having a name or label is the first part. The Expression can be it's own command line. Here we have the function from earlier. We are pushing the get-aduser's password last set and running it through the get-passwordexpirydate. Make sure to wrap the expression inside curly brackets. We can do this same thing with the group membership.
The Group Membership pulls apart the memberof and passes it through the get-adgroup. From there we grab the name of the group. Now since we want to export this into a csv, it would be best to use a join to make it easy. Once we have that information setup. We export it to a csv. Then we are done. This information can then be passed on to the security admin to work with.
Script Deployment and Usage
The execution of this script in your environment is straightforward but requires administrative privileges. It's designed to run seamlessly, outputting a comprehensive report that encapsulates the health and status of each user account in your Active Directory. This report not only informs your immediate security strategies but also assists in long-term IT planning and policy development.
What can we learn as a person today?
Just as "AD User Audit with PowerShell" ensures the health of an IT infrastructure, journaling serves as a personal audit. It's a practice that offers self-reflection, tracking progress, and identifying areas for improvement in our personal lives.
Self-Reflection
Journaling is a gateway to the soul, a mirror reflecting our deepest thoughts and feelings. In the quiet moments with our journal, we engage in an intimate conversation with ourselves. This practice allows us to confront our fears, celebrate our successes, and ponder our aspirations. It's a safe space where we can express emotions without judgment, helping us understand and accept who we are.
Imagine a day filled with stress and uncertainty, where words left unsaid create a storm inside you. In your journal, these unspoken thoughts find a voice. You write about the meeting that didn't go as planned, the conversation with a friend that left you unsettled. As the words flow, there's a sense of unburdening, a weight lifting off your shoulders. It's in this self-reflection that clarity emerges, often bringing peace and a newfound understanding of your emotional landscape.
Tracking Progress
Like a lighthouse guiding ships through a stormy sea, journaling illuminates our path through life's complexities. It helps us track where we've been and where we're heading, offering insights into our personal evolution. By regularly documenting our experiences, thoughts, and feelings, we create a tangible record of our journey. This practice can reveal patterns in our behavior and responses, helping us recognize both our strengths and areas for growth.
Consider a journal entry from a year ago, describing feelings of apprehension about starting a new venture. Fast forward to today, and your journal tells a different story—one of growth, learning, and newfound confidence. The contrast between then and now is stark, yet it's a powerful testament to your resilience and adaptability. Reading your past entries, you feel a surge of pride in how far you've come, reinforcing your belief in your ability to face future challenges.
Identifying Areas for Improvement
Journaling not only captures our current state but also acts as a compass, pointing out the areas in our life that need attention. It can highlight recurring issues, whether in relationships, work, or personal habits, prompting us to seek solutions or make necessary changes. This process of self-audit through journaling encourages us to be honest with ourselves, to confront uncomfortable truths, and to take actionable steps towards betterment.
Imagine writing about the same problem repeatedly—a strained relationship with a colleague or a persistent feeling of dissatisfaction. Seeing these recurring themes in your journal can be an eye-opener, signaling a need for change. It might inspire you to initiate a difficult conversation, seek external advice, or explore new opportunities. The journal becomes a catalyst for transformation, nudging you towards decisions and actions that align with your true desires and values.
Final Thoughts
In each stroke of the pen, journaling offers a chance for introspection, growth, and healing. It's our personal audit, tracking our emotional health and guiding us towards a more mindful and fulfilling life. Just as "AD User Audit with PowerShell" ensures the health of our digital environments, journaling safeguards the wellbeing of our inner world.
Today we are going to go over how to create hundreds of users at once using PowerShell in active Directory. This is great for building a home lab to test things out with. To learn how to build your own AD lab, you can look over this video. Towards the end of this video he shows you how to do the same thing, but, today, I am going to show you a simple way to get unique information. This way you can use PowerShell to Create Bulk Users in your Active Directory.
This script is very dependant on a csv file that magically seems to appear. Well, it doesn't. The first thing we need is to get a CSV of bulk users to create bulk users. To do this, you can navigate to a site called fake name generator. This site allows you to quickly generate user information to use to build your site.
Navigate to the https://www.fakenamegenerator.com/.
Select Common Sepearted (CSV) and the compression is zip.
Then select your country. I selected American.
Note: Some languages will cause issues with AD due to unique characters. If you do select this, make sure to correct for it.
Select your country of choice. I choose the US.
Select the age and gender ranges. You can keep this standard
Then I selected All on the included fields.
Select how many you want and enter email
Note: A single OU doesn't display more than 2000 users. This script creates sub OUs just for this case based on the zodaic signs.
Then verify and place your order.
Once you have the file, we can get started explaining what we are going to do to Create Bulk Users in Active Directory with the Power of PowerShell.
The Breakdown
It's time to break down this script. The first two lines are the domain information. I'm using therandomadmin.com as a example. The next is the Bulk Users csv. These are the lines you want to change if you want to use this in your own lab. The next line grabs the OUs names. We want the full state names in this case from the csv. Next we will create the Employees OU that will host all of the other OUs.
Now we have the OU built, we will make a path for later. by dropping the Employees and the domain ou into it's own variable. using this variable, we enter a foreach loop using the OUs. We want to build a new OU for each OU in the OUs.
Next, we will go through the loop of users. In each loop, we want to build a splat. Splatting was covered here in a previous blog. In this splat, we are looking over the New-ADUser commandlet. Lets break it apart.
Using the csv file. We are using the Given name, Surname, and Middle Initial. Using this information, we make the display name, given name, sur name and the name. Then we use the city, color and occupation. The next part is we want to build the usernames.
Using the same structure as the name, We just add dots and for the email, we just add the domain. Then we will grab the street address, city, state, country, and home phone.
StreetAddress = $user.StreetAddress
City = $user. City
State = $user. State
Country = $user. Country
HomePhone = $user.TelephoneNumber
Next we want to use do the company information. We want the department as the color, the Title will be the occupation, employee id will be the users number, the employee number would be the social and finally the division would be the state.
Company = "The Random Admin"
Department = $user. Color
Title = $user. Occupation
EmployeeID = $user. Number
EmployeeNumber = $user.NationalID.replace("-",'')
Division = $user. State
Now we have company information, we want to make account information. Things like being enabled, password changing, the password and finally the OU. We want to do the Full state name for the OU. This way it matches with the OUs we built before hand.
Finally, we want to push though the command itself. These are the cmdletbinding() flag commands like verbose and error action.
ErrorAction = "SilentlyContinue"
Verbose = $true
Now the splat is done. It's time to build the try catch with a useful error. By default the Error message is massive. So, making it easier with just the Name is very much more helpful. We will make sure to splat in the new-aduser information.
That's all for this script. It's not hard, but it should allow you to create a lab quickly. You can download the CSV here if you wish.
What can we learn as a person today?
Unlike the God's of old, we are not able to create new people in our lives to meet our needs. Instead, we have to find people. Like we pointed out last week, networking is massive. How we are to other with our networking is extremely important. Without networking, we tend to find ourselves in a hole. Imagine a giant hole in the ground with oiled up smooth metal walls and all you have to get out is a rope that is at the top of the hole. There is a lot that can happen here. The rope can stay there. Someone can throw you the rope.
Throwing the rope
Someone can throw you the rope and walk away. The rope will land in the hole with you. You can try to throw the rope out, but without something to cling to, the rope will just fall back down to you. This is like the man who says to just study for this exam or that exam. He threw you a rope, but hasn't really done anything else.
Now image if someone secured that rope to something like a car or a rock and threw the other end to you. Now you have something to climb up with. This is the person who has given you resources to look into. For example, I hear you want to get into networking but have no experience. I'm going to say study the network plus exam and then tell you about professor messor on youtube. This is super helpful and most people can climb out of the hole with the rope. However, in this senerio, the wall's are oiled up. Thus, footing is an issue.
Finally, we have the guy who ties the rope to his car, and throws you the other end. Then backs up with his car pulling you out of the hole. This would be a manager, or a senior member of an IT company taking a new person under their wing and leverging the company to help them learn new things. This is the kind of company, I would want to work with.
Final Thoughts
When you are working with people helping them with their career, some people just need the rope. Some people need the anchor and finally some needs to be pulled out of the hole. A lot of this is due to society and situations. Being aware of these facts can help you network with others better and grow your support team. Being aware of yourself allows you to know who you need as well. Do you need the truck? Do you need an anchor? What is it that we need to get you out of the holes that we find ourselves in? What can we be to others?
One of my favorite things with powershell is building out splat parameters for commands through the main parameter set. Today we are going to go over how that is done. We are going to do this through the Get-childitem and get-ACL. These are some mighty commands and they can help you find permission gaps quickly and easily. Let us Building Parameters for Commands together.
This script is simple, it allows you to grab a directory's ACL recursively. However, how it does it is kind of cool. Get-Childitem has so many different options, but using it within a function can take some of that power away. So, by passing the parameters that we want at the top level allows us to give that power back to the get-childitem. However, this could lead to a lot of if statements. Instead, we are going to build a splat parameter for our commands. I have covered splats in a previous blog post, but I wanted to point them out to express how much power they do have.
The Power of Splat
Splatting is a method in which you can build a parameter set for a command. The amazing part of splatting is the splat is a powershell object. This means you can add to it after the initial splat is started. To start a splat all one has to do is declare a variable with an object attached. The variable is declared with the $ and the object is a simple at symbol followed by curly brackets with an equal sign nestled in the middle. We can use objects anywhere in powershell. A custom PS object is the same way. If you wanted to, you can declare the object and give it an order with [pscustomobject][order]. However, that's not always the best option as orders cause issue if things are not in that order later down the road.
$Param = @{}
At this point the powershell object is empty. From here we can start building parameters for our object. To do that we are going to use the add-member command. In our example, we are working with true and false statements. Our function parameters are mostly switches. I threw in some strings as well to give you examples of how to build with a string. The first check is to see if we have a recursive. This is simple to do. We ask if the recurse is true. Then we add the member.
The add-member starts us down the path of building our splat. The Add-member can give us a lot of different options on which way we want to add things. Here, we need to add the recurse flag to get-childitem. This is a note property inside the command. The best way I see note properties is a name with a value. That value can be null. Here we are adding the "Recurse" name and giving it a value of the boolean true. Thus, when we drop the splat into the command, the command will see a flag of recurse. We do this same method with the rest. Directory is a flag, and so is file.
Unlike the last three, the filter parameter is a string. We are going to use the same method using the note property. We want to give the name as a filter and the value will be our value from our command line. The difference here is we want to place that filter in a string. The next part of the filter is how we test the filter. Instead of doing a simple check to see if the value is true, we need to check the parameters. This is done through the value $PSboundParameters. We want to see which keys the power shell bound parameters are holding. What this means is when you do get-command -something "bob" we want to know if something exists. Then we are going to use that's something, aka bob.
The next step is to use the splat. Which is very easy to do. To use a splat, instead of using the dollar sign, all you need to do is use the at symbol and the parameter. The Command should not have any other flags set as it all lives inside the splat. Building a parameter splat is super easy and makes life easier in the long run.
$Items = Get-ChildItem @Param
What can we learn as a person from splatting
As we go through our lives, we are a representation of a splat. We start off with a few things and over time we add and remove aspects from ourselves. Others add and remove aspects of us as well. Growing up in school, teacher pours so much of their selves into their students. As we get older, we have to do the same for ourselves. We have to add the note properties to our lives, or we will always stay the same. Today you add-member -membertype noteproperty "Splatting" -value "dang it's cool" to yourself. Unlike a computer though, we have to practice to bring it close to ourselves. We have to conceptualize the idea.
As you go through life, you have to depend on your own splat. Not enjoying that splat, means you have to work on it. It takes action to do so. The thing that stops most people from taking that action is fear of the unknown or fear of dealing with the pain. As someone who has been working on himself for many years now, I can safely say, it's ok not to be ok. It's ok not to enjoy parts of your splat, but overall, your splat is who you are. So go out into this world and put your @ on things. Change up that splat if you don't like parts of it. Just enjoy being yourself.
We use cookies to ensure that we give you the best experience on our website. If you continue to use this site we will assume that you are happy with it.