Did you know you can add a comment to a group policy? Did you know you can report on that comment as well. Basically, if you put the purpose and any additional information like security groups, applied to and not to, and so on and so forth, you can document and report on the group policy using PowerShell. Let me show you how.
Commenting Group Policy
There are two ways you can comment group policy, the first is the GUI. The second is through PowerShell. First we will do a comment via the GUI.
The GUI Way
300start Group Policy Management Console
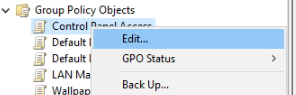
Select the policy object you wish to comment
Right click and click edit on this policy
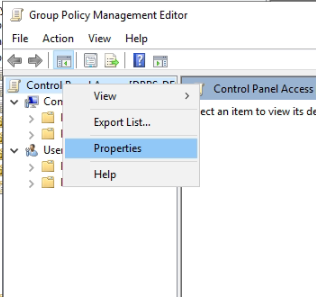
In the navigation plane, right click the policy’s name and select properties
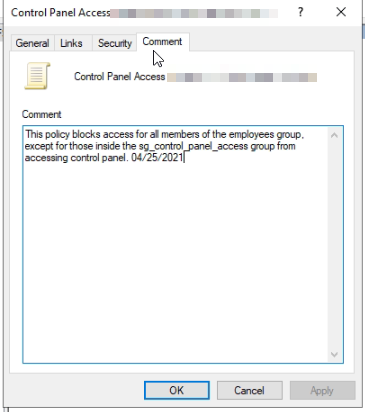
Click the Comment tab
Enter your comment
Apply and Ok.
The PowerShell Way
The command we are going to be using is the get-gpo command. This command allows you to grab the single GPO or all of the GPOs in the company.
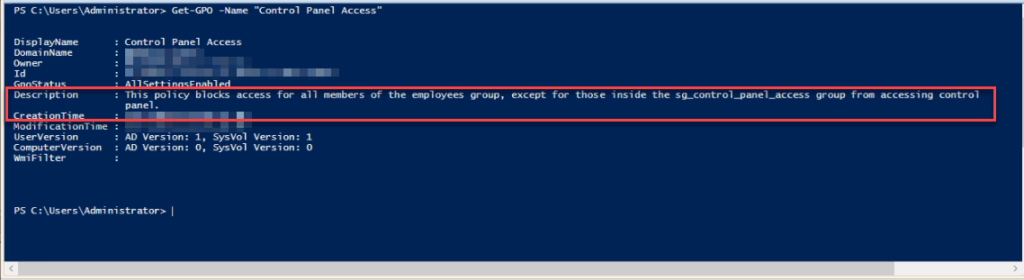
Get-GPO -Name "Control Panel Access"
Results of Get-GPO
You can see the comment we added to the policy earlier as the description. Why Microsoft hasn’t changed the name on the tab, I will never know. For anyone who is familiar with PowerShell there is no Set-GPO commandlet native to PowerShell. So, it’s time to put our thinking caps on and figure out what we can do. I piped this command into get-member.
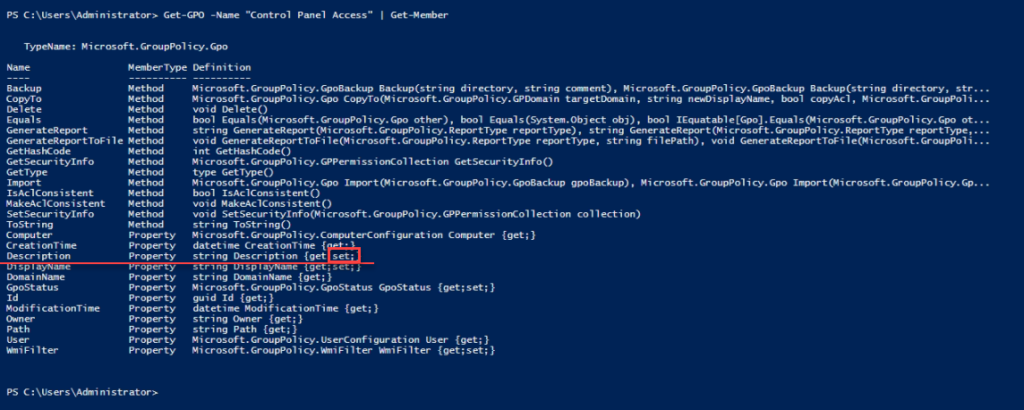
Get-GPO -Name "Control Panel Access" | Get-Member
Results of the get member
Look what we found. The Description property has a set feature to it. This means you can set the property using the get-gpo command.. Bingo! Lets do this!
(Get-GPO -Name "Control Panel Access").Description = "This policy blocks access for all members of the employees group, except for those inside the sg_control_panel_access group from accessing control panel. 04/25/2021"
Results from the above command.
I wanted to add today’s date into the description. This way whoever comes behind me sees when it was written. Now let’s see if the GUI updated accordingly as well.
The new information is inside the policy
It updated like we believed it would. This is because of the set feature inside the property. The command allowed us to set the property. Such a simple and yet lovely thing. Now, you can run a report asking for just the name and description to get much more information. If you do this with all of your policies, life gets a little easier.
Maybe, one day I will use a dynamic parameter and create a set-GPOdescriptoin command to set the description of any gpo you can select from. Hum…
Like always, if you have any questions feel free to ask.
Nested objects are very useful as they can give you a way to store complex data. The featured image of this blog is of a nested temple. Each room is nested on top of the other. What’s cool about this image is each room has items inside of it. For example, there a water bottle. Think of nested arrays like this. The full thing is a temple. That is the first object. Then we have small buildings inside that. Those are our secondary objects. Those secondary objects also have properties. So imagine the roof being the second object’s properties. Inside each building there are rooms. Those are our third objects. What’s in those rooms are the properties of those rooms. Then you can have a chest that could be a fourth object and it could have its own properties. As you can tell, this can get confusing quickly. Parsing through that data can be a challenge. Below we will go through the process of adding display names to the account SKU for the licenses for each user. We do this for later reporting. There are a few things you will need before we start.
Now you need to connect to the Microsoft Online account. You can do this by using the connect-msolservice. Make sure you have the credentials required.
$Users = Get-MsolUser -all
Now download the list here. You will need to import the file into PowerShell. You can do this with the Import-CSV command. Inside this list, you can add what you want and so on and so forth.
Add the Add to Licenses
Now we have the array built, it’s time to start learning something cool. The goal is to add the display name of the Account SKU inside the licenses area of each user. This way when you see the licenses you know what you are looking at later. More importantly, this will teach you how to place information directly into an array instead of rebuilding the array.
For vs Foreach
I love foreach, it helps so much. foreach ($user in $users) is nice. This is great for rebuilding an array because you can push the information into another array easily like this. Great for a full rebuild. However, in our world we want to put the data directly into the array itself. The Foreach creates a temporary object based on the object that is inside the array. So it creates a “User” based on the “Users.” Thus, doing $user | add-member doesn’t stay. I tried this a few hundred times. So, the for loop is going to be our friend. The reason for this is you can say where in the original loop you want to go to. Lets start the loop shall we.
The first part is the for loop. We start the loop at 0. ($I = 0) we start at 0 because arrays start at 0. Then we will continue this loop while $I is less than the total user count. Each loop will increase the $I by 1 using the $I++. This is a basic for loop setup. This will give us the index of the users. The next step is the test to see if the user has licenses.
if ($Null -ne $Users[$I].Licenses) {}
A few things with this if statement. First the $Null is on the left. The reason for that is because we evaluate nothing first. Then if the next thing even has something in it, it triggers right off the bat. If it doesn’t, then we else out. Thus, having $Null on the left is faster. Next notice the $Users[$I]. This is basically we want the Object at index of $I. Each time the loop process, that $I increases. Thus, we go through the loop. Finally we are looking at the .Licenses. If It doesn’t have a licenses, we don’t want to evaluate anything. We will leave this alone. Now if it does, then we get to have our fun. Normally users have more than one license inside their profile. Thus, we have more than one loop.
for (($A = 0); $A -lt $Users[$I].Licenses.count; $A++) {}
Now notice, I replaced $I with $A, but I changed up the condition. If $A is less than the current index of $users licenses count. Then we increase $A by 1 with the $A++. Now we are within the user array within a user and evaluating licenses. We are going deep.
So here we are grabbing that AccountSkuID with our $Los variable. Then we compare from our Imported $SKUs we downloaded and imported earlier. We place that inside the $Lose value. So now we have the Displayname and the SKU name.
To prevent any errors, we check $Lose to see if it’s null. I it is, then we want to place the information into it differently. This way later when we look at the data we don’t get some odd errors.
if ($Null -ne $Lose) {}
Finally the meat and potatoes of why we are here. We want to add that Display name for that sku. So let’s do that. We want the current $I user. We want the current $A licenses. Once we have both of those, we want to use add-member to add a note property. We want to name it something different than just DisplayName because that is everywhere. So, I like to use smaller names. I used $Lice. You can use Displayname, or not. I’m just odd.
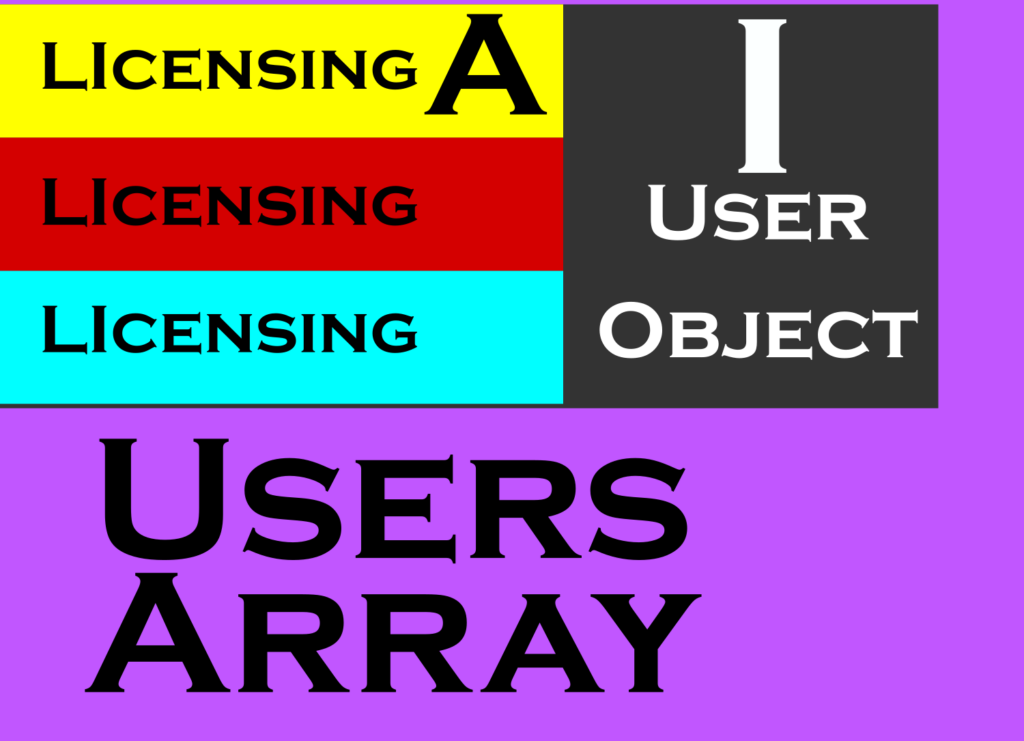
As we loop through this process, it will add the Display name to each license inside the array. This way you can report on it later. In the else part of our test, we place the note property name the same but the value would be “N/A” or something along those lines. As long as it’s not null, we are safe. Below is a visual that might help understand how this loop works. The User object (Black) is the I. The LIcenses are multi-color. A. All of it lives within the User Array which is Purple.
If you have any questions, please feel free to reach out.
I don’t like working with Citrix receiver. They drive me crazy. One version doesn’t work with the other and so on and so forth. Then finding the one you need is a pain. Thankfully, the workspace is a little better at this process. Many of my clients have recently updated their back end so the new workspace will work for them. It only took a while. So, I built a script that automatically downloads the newest version and installs it accordingly. It wasn’t until later did I realize someone else did this already. But the one I made is a little better as it doesn’t run into the conflict of pulling the version number, at least in my humble opinion. This time we will start off with the script for us lazy admins. If you want to learn how it works, keep reading on.
Lets break this guy down. The first part is we are testing if the c:\temp folder exists. If it doesn’t then we will create it. Then we test if the Citrix folder exists, if it doesn’t, once again, we create it. We do this with the Test-Path for testing and the New-Item cmdlets.
IF (!(Test-Path c:\temp)){New-Item -Path c:\ -Name Temp -ItemType "directory"}
IF (!(Test-Path c:\temp\Citrix)) {New-Item -Path c:\temp -Name Citrix -ItemType "directory"}
Now we have the folders we will be using created, we need to move to creating the first log entry. We want this log to have a timestamp on it that matches the downloaded installer. To do this, we need to get the datetime first. While doing that we will create the filename of the log and the file name of the download path. This way it’s easier to work with later on in the script. We do this by using the Get-Date cmdlet. Normally the Get-Date cmdlet outputs is an object. Which isn’t very useful in a file name since it contains forbidden characters. (Not forbidden like slifer the sky dragon). A translation is required. We do this with the .tostring() method. Notice the way we format it.
We then use the $StartTime variable inside the log name and the download pathname. This is done by a string with the variable inside of it. Next will be to create the log. We do this with a simple > which means out and create. >> means out and append. Notice in the example below we $($StartTime) we do this because the next character is a :. Inside PowerShell, you can do things like $Global:Var which tells the shell to keep that var in memory for other functions to use. This means the : is a command character. This is why we wrap the start time variable inside a $(). Powershell will only print what is inside the $(). Finally, take note of the > $Logname. We will be using $Logname more inside this script. This is why we created the variable.
Now we have the start of the log. It’s time to get the installer. In the past, we would just go to the download link and add that to a download script. However, recently Citrix changed how they download. They have tacked on an additional piece of code. Everything past the GDA is that special code they have tacked on to stop direct downloading. However, we have PowerShell on our side.
The first thing we want to do is setup a try catch. This way we can catch errors and log them. Also we can break the script with an error message that is useful. This way if you are deploying out with something like continuum or PDQ your error message makes sense. Inside the try, we want to get the webpage itself. Then log that we grabbed information. The cmdlet to get the website is Invoke-webrequest. In the below example I am using the -usebasicparsing because it’s more compatible with websites and with systems. My goal is to launch this thing to 100+ machines. The -Uri is for the website itself and finally, we use the -sessionvariable as a websession. This allows us to grab data easier, especially if it’s auto-generated, like in this case.
After we grab the website, we have to log the event. We do the same thing we did with $StartTime and place it in the file we created a few moments ago.
If these commands fail for whatever reason, the website is down, the internet is blocking, anything, we need to know that the site can’t be reached. This is why we have a log. We create the same as the $logime but this time we also add a write-error and a break command. The write-error command will send an error to a deployment software, This way we know what’s going on. The break command breaks the script at that point and doesn’t continue.
$LogTime = (Get-date).tostring("yyyy:MM:dd-hh:mm:ss")
"Site: $($LogTime): Failed to access" >> $Logname
Write-Error "Site Error: Site not accessible"
Break
Lets put them together inside the try catch so you can see what it looks like.
Now we have the website itself inside a variable. It’s time to find what we need. The $CitrixPage contains different elements inside of it. Each item can give you information. The Rawcontent is just like it sounds, raw content of the page. While status code can give you information about if the site is up or what condition it is in. In this case, we will be looking at the links and status code. We check if the site has a good status of 200, if it doesn’t, then we don’t want to battle that battle. Thus we log and break like before. If it does, however, we want to take apart the links and find the one that contains the exe that we need. We do this with a where-object cmdlet. We search the .rel for the *CitrixWorkspaceApp.exe. Because the .links sometimes produces incomplete links, we have to build them. That’s the second step is to build the link. We will wrap the outcome inside an https: string.
if ($CitrixPage.statuscode -eq 200) {
    $DownloadLink = $CitrixPage.Links | Where-Object {$_.rel -like "*CitrixWorkspaceApp.exe*"}
    $URL = "Https:$($DownloadLink.rel)"
} else {
    "Site: $($LogTime): Site Status Code $($CitrixPage.StatusCode)" >> $Logname
    Write-Error "Site Error: Status Code $($CitrixPage.StatusCode)"
    Break
}
Now we have the custom URL for the download, we need to download the file itself. Remember the $DownloadFullPath we created a while ago. It’s time to use it. We will be using the invoke-webrequest once again as well. This time we will use the -OutFile cmdlet. This cmdlet of invoke-webrequest will download the file as requested from the url provided. Of course, we want to wrap all of this inside of a try catch. This way we can log correctly and break as needed.
Now we have the installer to work with. The filename has the same time/date stamp as the log file so we can compare if the script doesn’t finish up correctly. Next we will start the process of another try catch to install the program. The command we will use is the Start-Process command. We start the $DownloadFullPath for the file name. We want this thing to be quiet and overwrite everything else there. Citrix, if given the /forceinstall will force the install by uninstalling the last version. Finally we tell it not to reboot with the /noreboot. Once we get past the arguments, we want to make sure we have the information from this thus we put the -passthru flag. This will allow us to store the information into a variable if we want to use that information later. The final part of the command is the -erroraction. We want this thing to stop if it hits an error. This way we know that something is broken. Then we log accordingly and catch accordingly like above.
We are almost done! This program takes an average of 5 minutes on older machines to install. Thus we sleep for 7 minutes. To do this we use the command Start-Sleep and set the -seconds to 420 seconds. We also make sure we log this information.
As we are not in a hurry, we use the PowerShell command Get-CimInstance to get the products and sort through that to find the Citrix Workplace Browser using the where-object cmdlet.
Finally we check to see if the install was successful or not. This is done with a simple $null -ne $something. We do it this way because we first load nothing and start to compare nothing to something. if something is there, then we know the statement is true and stop processing. Very simple concept. If $Citrix does contain something we log that the install was successful and remove the installer. If we find $Citrix is $null, then we log the error and error out once again.
With all good scripts, there is always room for improvement. The one that is blaring is the waiting for the install. This should really be a loop checking files or a registry key. If the file or key is not present, then continue to way 30 seconds. This would speed up the process as some computers process faster while others do not.
The second is the get-ciminstance because this is a slow command. We can improve the speed of this command by targeting once again either a file or a registry key instead. This way we can prove it was installed without the 30 to 60 second wait for the get-ciminstance to do its thing.
As always, If you have any questions, feel free to ask.
Do you need to audit your azure tenant for Licensed users vs non-licensed users? There is a simple way to do this using the MSOnline module. If you don’t have the MSOline module installed, you will need to install it. The big thing is this module only works on Powershell 5.1. So, let’s install and import our Module
Next step is to connect to the tenant. We do this with connect-msolservice. If you are doing this via the console, you can use the -Credential flag. if you are using this from a script, you will need to setup the PS credential object yourself. In this example, we are going to use the default console.
Connect-MsolService -Credential (Get-Credential)
Now we need to grab the users from the system. I want to grab all the users so we can audit accordingly. With the default Get-Msoluser you can select just the unlicensed users. You can even do the reconciled users. The way we get the all users is the -All flag.
$Users = Get-MsolUser -All
To gather the difference between the licenses and the non-licensesd we will use a where-object command.
Now we have a clear cut difference between the licensed and unlicensed users. We can continue to audit. If you just want the unlicensed users you can use the -UnlicensedUsersOnly flag.
Unlicensed users can contain things like contacts and service accounts. So be careful. However, it does show users that might need to be given licenses. To filter out the contacts, all you have to do is remove the UserType Guest.
Do you need something to let your end-user know what’s going on? Don’t want your end-user to see the program running? Well, PowerShell has the ability to use the system windows notify system. AKA, the message box that pops up on the right of the screen.
The first step to make this happen is we need to add the assembly, system.windows.forms. We do this by the amazing command add-type.
add-Type -AssemblyName System.Windows.Forms
Now we have the assemblies loaded into ram, we need to create an object from those assemblies. This way we can command the object later. We do this using the New-object cmdlet. We want the notification tray icons. So we want the system.windows.forms.notifyicon.
You know that notifications have icons. Yep, It’s from the application itself. So, if you have this function in another application, it will show that the application’s icon. We call upon the System.Drawing.Icon to do this. But First, we need to know which app we are currently using. We do this with Get-Process with the ID and the current Pid.
What’s cool about this is we are extracting the icon of the application itself with that extract associated icon. We push it into our notify icon object. Next, we want to add the Tip Icon. That’s the ! ? so on and so forth. We do this by using the system.windows.forms.tooltipicon function. Believe it or not, we can use a validate set in the parameters to get the exact naming input as well. The property of the object is BalloonTipIcon.
Now the message itself. At this point we have an icon, the notification icon and that’s it. This is the meat of the notification. The propriety in the balloon object is, BalloonTipText.
$balloon.BalloonTipText = $Message
Just a quick note, to much text is ugly.
Next is the title, I like to use just the word attention as it brings the users eyes to it. The balloon’s propriety for this is BalloonTipTitle.
$balloon.BalloonTipTitle = "Attention"
Finally, we want to make this thing visible. An invisible tooltip is as useful as invisible ink without a black light. As you have guessed by now, Visible is the balloon’s propriety.
$balloon.Visible = $true
Now the drum roll, please! It’s time to show our masterpiece that will be enjoyed by the end-user for a split second. The ShowBalloonTip(). Yes, let us do it! This is a method and will show the balloon tip for x time. This is set up in milliseconds. So, every 1000 milliseconds makes a second.
$balloon.ShowBalloonTip($Time)
Lets put it all together shall we. Behold the script of the balloon tip.
The Script
Function Invoke-SHDBallonTip {
[cmdletbinding()]
param (
[string]$Message = "Your task is finished",
[int]$Time = 10000,
[validateset("Info", "Warning", "Error")][string]$Messagetype = "Info"
)
#Adds the reqruired assembly's for the ballon tips.
Add-Type -AssemblyName System.Windows.Forms
#Creates the notifiy icon that will appear in the notification tray.
$global:balloon = New-Object System.Windows.Forms.NotifyIcon
$path = (Get-Process -id $pid).Path
$balloon.Icon = [System.Drawing.Icon]::ExtractAssociatedIcon($path)
$balloon.BalloonTipIcon = [System.Windows.Forms.ToolTipIcon]::$Messagetype
$balloon.BalloonTipText = $Message
$balloon.BalloonTipTitle = "Attention"
$balloon.Visible = $true
$balloon.ShowBalloonTip($Time)
}
That’s it, folks. Such a simple thing. Here are a few things you can do. You can change the $path to $Path = Get-Process -id $PID. Then in the balloon.icon, use $path.path. In the balloon tip title, you can put $path.description and now you have the description as the title. Other than that, it’s pretty straight forward.
I would love to hear back from yall. Let me know if there is anything you would like for me to write about.
We use cookies to ensure that we give you the best experience on our website. If you continue to use this site we will assume that you are happy with it.