Custom Compliance Policy Scripts will change how you build out compliance policies. In order to make a Custom Compliance Policy Script, you first must have Intune. You can review the licenses here. Once you have the proper licensing you should be able to log into the endpoint manager. The first thing we will need is a PowerShell script and a Json for this policy.
Custom Compliance Policy Scripts
The first thing we are going to do is build out the script. In this example, we are going to test for Sentinel One and Pearch. There are two ways we can do this, We can test if the services are installed or we can test to see if the product is installed. We will be using the services because the Product is a slower process. The output needs to be a compressed JSON file. Time to start building.
Firstly, we get the services with Get-Service.
#Grabs Services
$Services = Get-Service
Since we have the services, we can start testing against the collected info. We are looking for the services for perch and sentinel one. We will search for these two services using a where-object command. Below are the two services we are looking for.
Perch = Perch-Auditbeat
Sentinel One = SentinelAgent
We will wrap this where-object command inside an if..then statement. The output we are looking for is True or False.
Finally, we sort and we send the results to a json file using the sort-object and convertto-json commands.
#Returns the Service
$ReturnHash | Sort-Object -Property name | ConvertTo-Json -Compress
Make sure to save this script as a PS1 because we will have to upload it later.
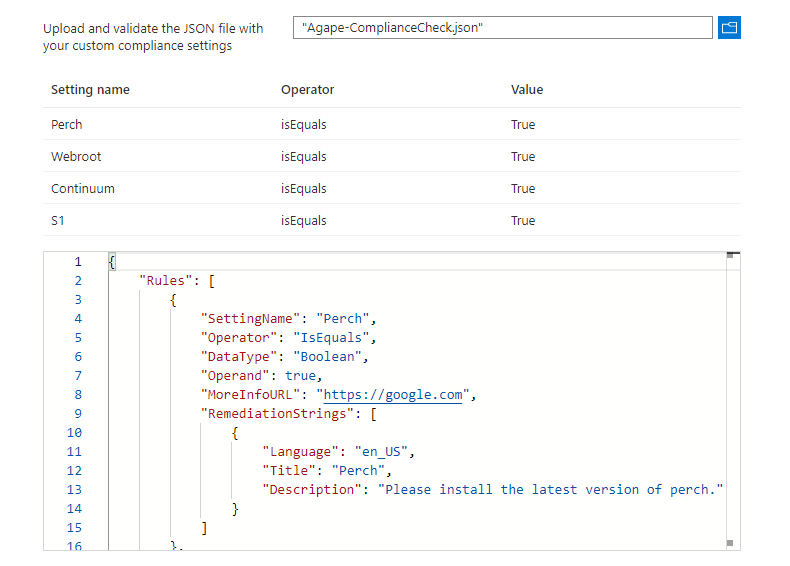
Custom Compliance Policy JSON
The next step is to create a custom compliance JSON file for your PowerShell. The JSON responds to the supported operators of IsEqual and the supported datatype of boolean. You can learn more about how to build your JSON here. Below is the JSON file.
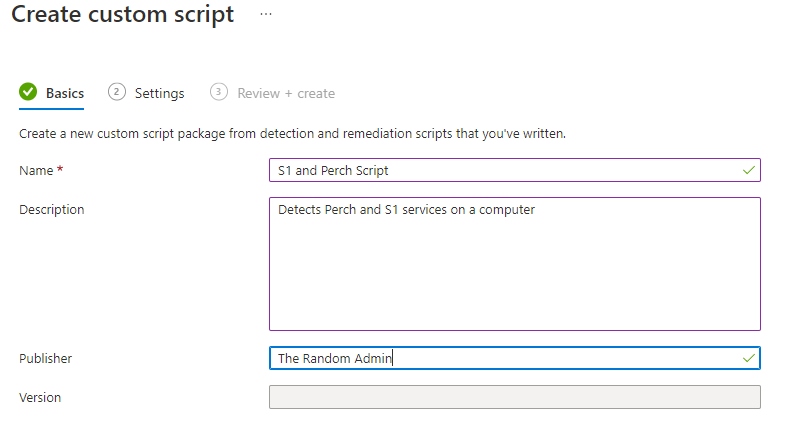
Under the basics tab, we need to fill in some information.
Name it something that makes sense. For example, S1 and Perch Script
The description is where you need to explain what’s going on. If you have any links, this is where you should add them.
The publisher is going to be yourself unless you are pulling the script from someone else.
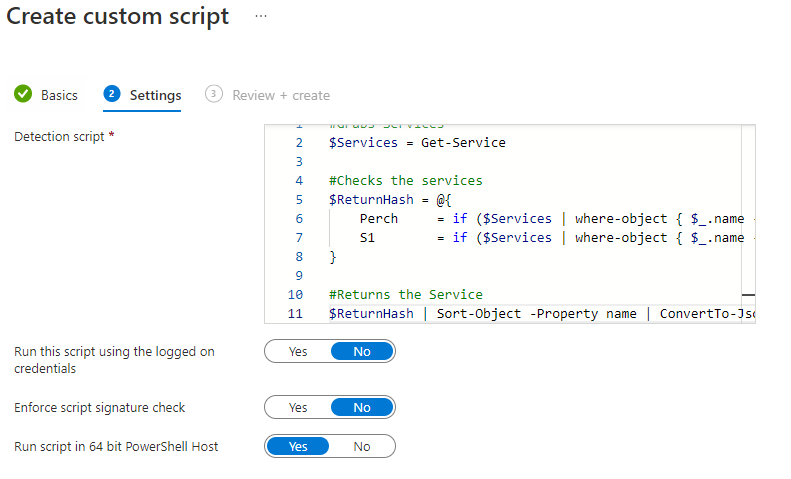
Afterward, Click next to go to the Settings tab. Inside this tab, you will need to add the script that we wrote above. Just in case you forgot it.
#Grabs Services
$Services = Get-Service
#Checks the services
$ReturnHash = @{
    Perch     = if ($Services | where-object { $_.name -like "perch-auditbeat" }) { $true } else { $false }
    S1        = if ($Services | where-object { $_.name -like "SentinelAgent*" }) { $true } else { $false }
}
#Returns the Service
$ReturnHash | Sort-Object -Property name | ConvertTo-Json -Compress
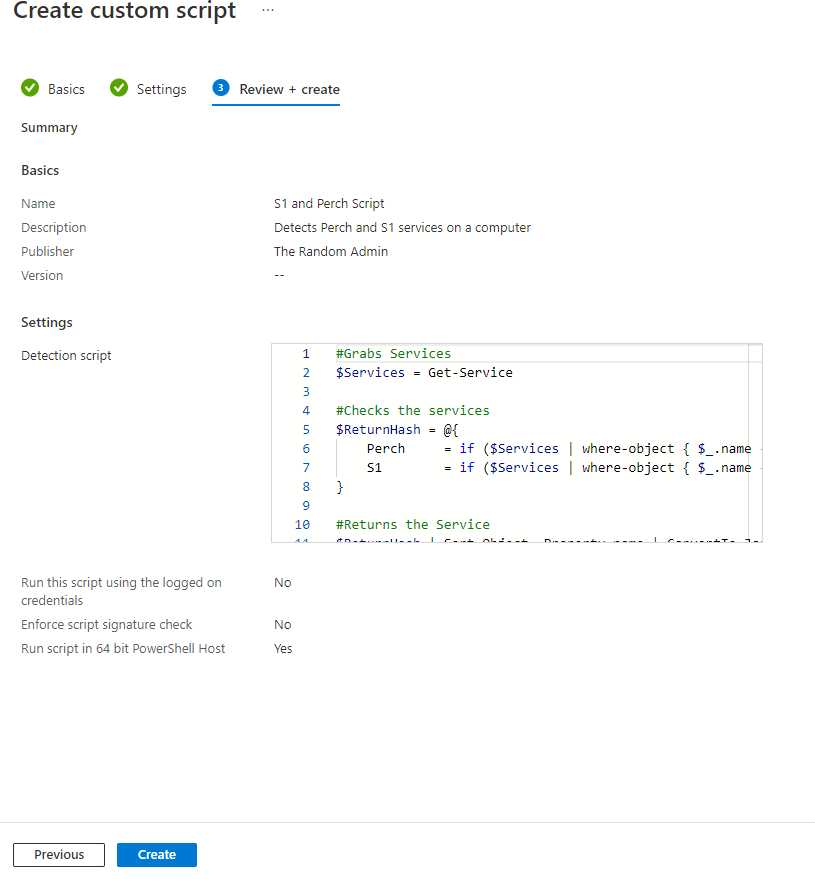
The script needs to run as the computer since we are pulling from the services. We don’t need to enforce the script signature check and we are running the PowerShell 64 because it’s 2022. Once you have these set, click next to go to the review page. Review the settings and click create. The script takes about 2 minutes to show up in the Compliance Policies scripts.
Building the Custom Compliance Policy
Navigate back to Endpoint manager > Devices > Compliance Policies. Click the Create Policy button on the top of the screen. A “Create a policy” sidebar will appear. Set the platform to “Windows 10 and Later” and click create.
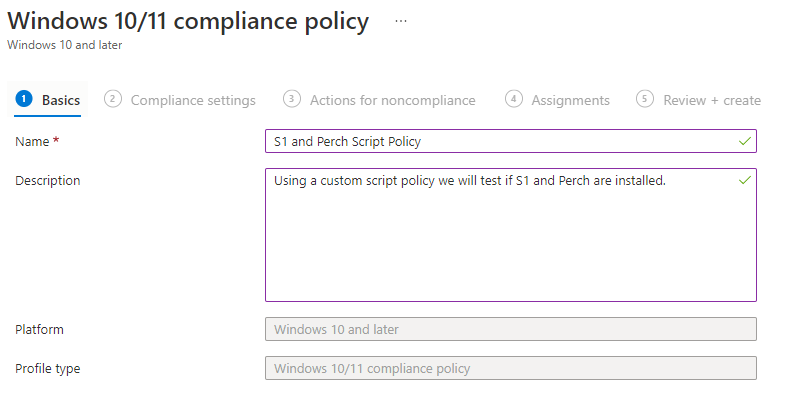
Basic Tab
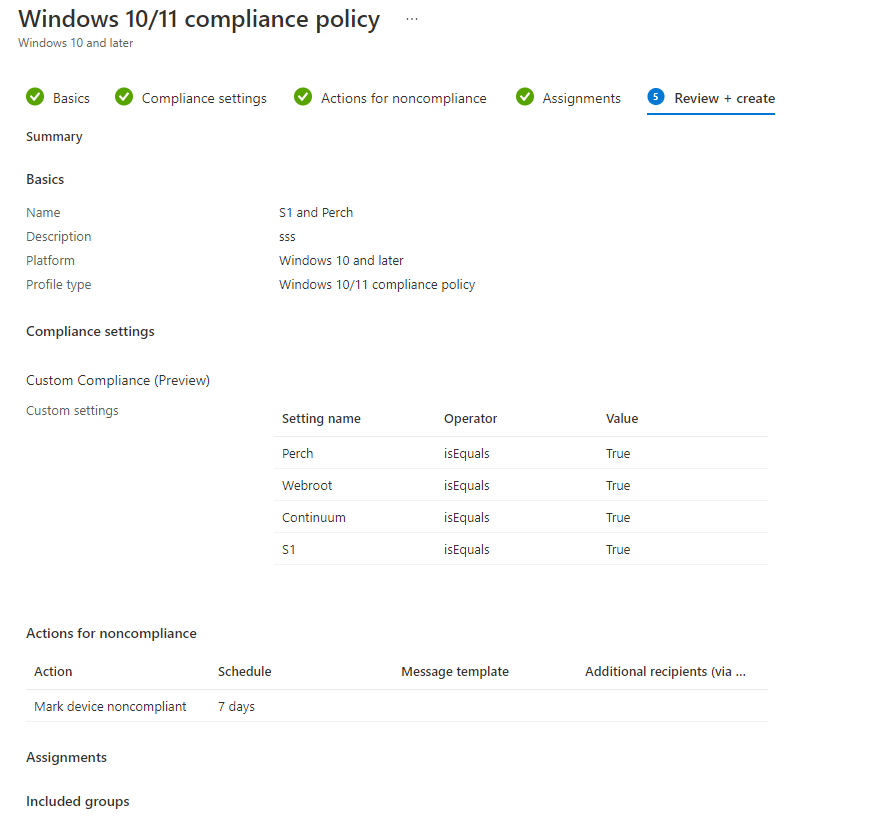
This is where we will name the policy and give it a good description. The name needs to be unique and helps the end user understand what’s going on. I have named this one S1 and Perch Script Policy and described what it is doing in the description.
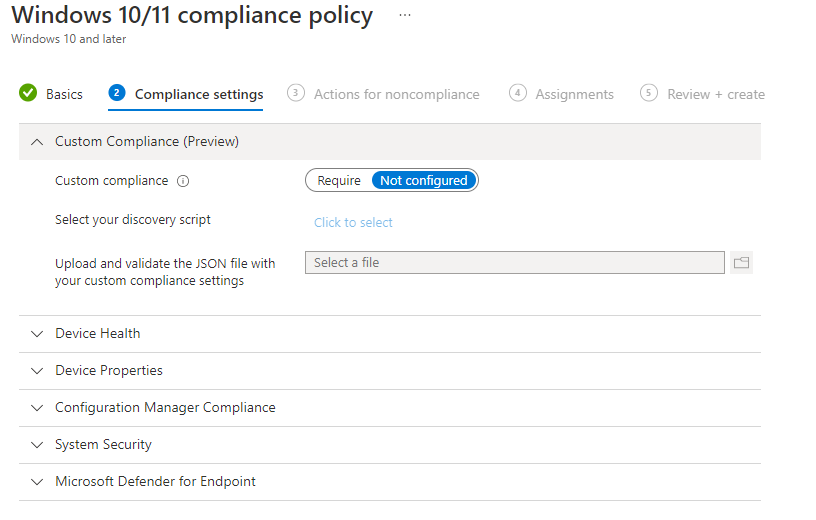
Compliance Settings Tab
Here is where we will be adding the script that we created in the previous step. Firstly, click the required toggle box. Next, click the “Click to Select”. A side “select a discovery script” will appear. Find your script and select it here. After that, we need to upload the JSON file. Click the blue icon and select your file. Additional information will appear.
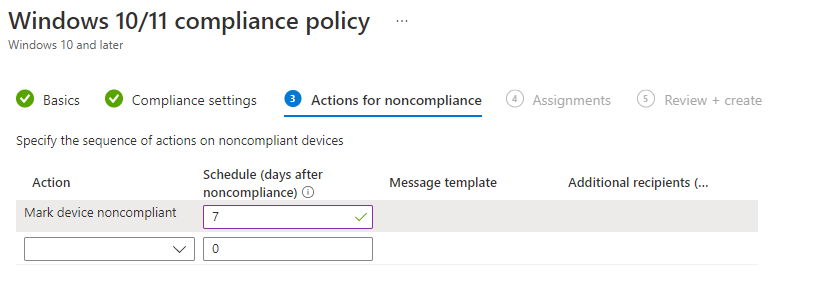
Action for NonCompliance
Aftward, click the next button to bring yourself to the Action for NonCompliance tab. There is one default item in this list. Here you can do things like, emailing the user or marking them as noncompliant. You can even retire the machine after so many days. You can add message templates and more. For us, we are using the default setup at the 7 days mark.
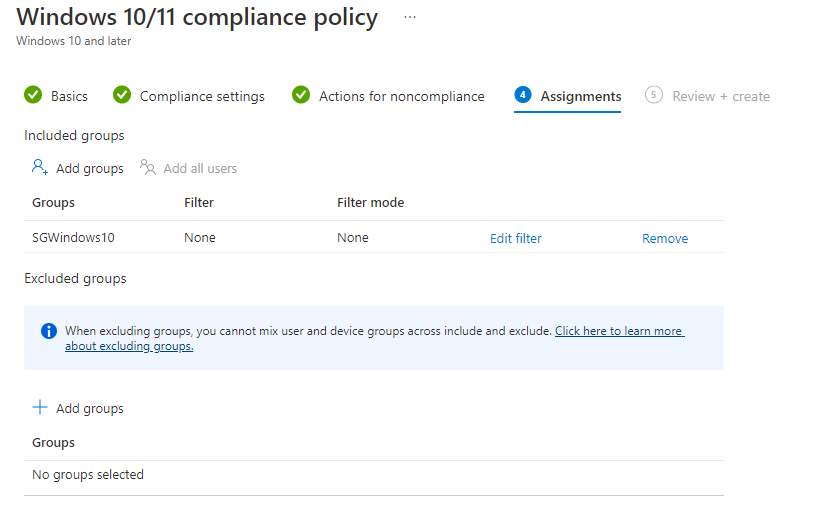
Assignments
Comparatively, click next. The next tab is the assignments tab. This is where you can select your groups. In this example, I selected the windows 10 groups. To learn how to set up a dynamic windows 10 group, you can go here. To add a group, all you have to do is click Add Groups under the included. If you want to exclude a group, then add a group under excluded groups.
Review and Create
Finally, once you have the pieces put together, we can review them. If you see any errors, go back and fix them accordingly. If not, Click create. It can take a few minutes for the Custom Compliance Policy Scripts to show up in the main menu. Give it time.
Conclusion
Creating a Custom Compliance Policy Scripts will change how you Intune. It has changed how I Intune. The more you dig the deeper this rabbit whole will go. Take time and enjoy reading each thing you can do. It makes the world of custom compliance policies with PowerShell scripts different.
It’s time to Set Users’ MFA with a nice little function. This function is designed to gather information and set a user’s MFA with the method you want. It even allows you to reset and disable MFA. We are going to break this blog up a little differently. We will go through each area of the function as the breakdown. Let’s get started.
Function and Parameters
The first thing we are going to build out is the Function and the Parameters. The function command is like a wrapper for a script. This way you can add this to your PowerShell tool kit module.
Function Set-SHDUserMFA {
    [CmdletBinding()]
        param(
    )
}
Parameters
User Principal Name
The parameters are where people select items that they want. We have a few here. The First parameter is the User Principal Name. This is like an email address. This parameter is a List of strings. Basically, you are allowed to add more than one user name to this field. To make life easier we have set a Parameter set name. The PSN is called UPN. So the end user can either type UPN or UserPrincipalName for this parameter. This parameter is Mandatory.
Function Set-SHDUserMFA {
    [CmdletBinding()]
        param(
            [Parameter(Mandatory = $true, ParameterSetName = 'UPN', Position = 0),ValueFromPipeline = $true,ValueFromPipelineByPropertyName = $true,][string[]]$UserPrincipalName,
    )
}
Status
Afterward, The status parameter allows you to set the MFA status that you want. Here we have Enabled, Disable, Enforced, and Reset. The Enabled will enable MFA. Disable of course disables. Enforced will skip the text and go straight to the Apps. Finally, the reset will reset all the MFA token flags. This is how you Set Users’ MFA. This parameter isn’t mandatory.
Finally, we have the Info switch. This switch tells the script to produce an in-depth MFA report on the user. This parameter is not mandatory. We choose not to make it mandatory because we might not care.
Chiefly, I stated that we were targeting one section at a time. Here in the begin, we will check the environment that we are working with. The MSOnline module only runs in PowerShell 5 and not PowerShell 7. Thus we need to check. Thus, we use the PS Version Table variable. This will produce the PowerShell version number. We can test against that and end the script if the user is using PowerShell 7. In the below example, we are using the write-error to let the user know what’s going on.
#Checks PS version
if ($PSVersionTable.psversion.major -ne 5) {
    Write-Error "Your Powershell Version is $($PSVersionTable.psversion.major). Msonline service only works on Powershell 5. Ending."
    end
}
Module Test
Aftward, we test the MSOnline module. The Get-InstalledModule tests the installation status of MSOnline. Running MSOnline command tests the status of the module load. Afterward, we either connect or error out.
#Checks to see if the module is installed if not, tells the end user to install.
if (Get-InstalledModule -name MSOnline -ErrorAction SilentlyContinue) {

    #Checks to see if the msolservice if it isn't connected, we connect
    if (-not (Get-MsolDomain -ErrorAction SilentlyContinue)) {
        Connect-MsolService
    }
} else {
    Write-Error "MSOnline Services are not installed. Please install the MSOnline services with the following command `n Install-module MSOnline `n"
}
Process – Set Users’ MFA
Confirming the User
Next, we start the process section. The process is where most of the meat and potatoes are. Firstly we have the User Principal Name loop. This loop is very important. The parameter we created beforehand has multiple possible inputs. Thus, it’s best to loop through those possible inputs. We are going to call the Internal variable UPN.
foreach ($UPN in $UserPrincipalName) {
    #Do Stuff Yall
}
After that, we will be building out a try/catch to test if the user exists. The try/catch will give us the ability to test the user without blowing up the script. Get-MsolUser is the command we will be using with an error action of “stop”. The catch will contain the error write-out.
#Checks if the user exists, if not, ends the upn and writes an error.
try {
    $User = Get-MsolUser -UserPrincipalName $UPN -ErrorAction Stop
} catch {
    Write-Error $_.Exception.Message
}
The Switch
Now that we have the user verified, it’s time to move forward. We start with the switch. The switch is a process of if statements but formatted nicely. In our case, we will be building the switch of the status parameter. If the user selected blah, then we take blah action. Here is the basic structure of a switch. It’s switch and the parameters name. Then each possible answer to that parameter. The status is a “validate set” parameter. This means all the answers are inside the parameter.
The enabled will enable the MFA of a target user. We went over some of this code in a previous blog. Firstly, we want to create a new object. This object is a Microsoft Online Administration object that focuses on Strong authentication requirements. Once we create this object we will assign properties different values. Finally, we use the Set-Msoluser to set the user accordingly.
On the other hand, We have enforced. Enforced forces the user to use an authentication app. We will follow the same path as before. Create the object, and set the properties. Then set the object to the user with the set-msoluser command. Notice the sar.state property.
Before we created an object, this time we only need a command. We are using the Reset-Msolstrongauthenticationmethodbyupn. Don’t even try saying the command without spaces. This is a beast of a command, but it works. What it does is it resets the methods that the user uses to login in. If the user selected an authentication app, this will allow the user to set another one up. Great command if a user lost their phone.
Finally, we have “disable”. Unlike before methods we will be setting the strong authentication requirements to NOTHING! ABSOLUTELY NOTHING! (UHF reference).
Finally, the Info Flag piece. Here we are going to be gathering information about the user. It’s at the end of the command because we want the information after we set the user’s MFA. The first step we take is to grab user information. We do this with the Get-Msoluser command. “But couldn’t we use the previous $user grab?” The answer is no because we want the most up-to-date. We want to reflect on the changes we have made beforehand.
#Grabs the user information
$User = Get-MsolUser -UserPrincipalName $UPN -ErrorAction Stop
Confirm Strong Authentication Requirements
Afterward, we want to test this data. The first test is, does the user have strong authentication requirements. “Strongauthenticationrequirements” property is our target. Since the property has data, we place that data into the “MFAState” parameter. However, if it doesn’t, we put “Disabled” into this variable.
#If it has a strong authentication requirement we grab the state, if the state is blank, then we return disabled
if ($User.StrongAuthenticationRequirements) {
$MFAState = $User.StrongAuthenticationRequirements.State
} else {
$MFAState = 'Disabled'
}
Find the Default
Next, we want to grab the default method type. We do this with a where-object that searches for “isdefault”. Then we expand the method types.
This will produce a string if there is a default. However, it will produce null if there is not. So we test to see if the $MethodType has data. Once we do that we start another switch. I like switches. Inside this switch we are comparing the unique names to real names. This makes life easier and allows non-admin answers they can understand. Here is a list of names and their translations.
OneWaySMS = SMS
TwoWayVoiceMobile = Phone call
PhoneAppOTP = TOTP
PhoneAppNotification = Authenticator App
However, it’s none of these, we just say, disabled.
#if the methods are not blank, we find out which one is the right method. and make since of the code. If it is blank, we say disabled.
if ($MethodType) {
switch ($MethodType) {
'OneWaySMS' { $DefaultMethodType = 'SMS' }
'TwoWayVoiceMobile' { $DefaultMethodType = 'Call' }
'PhoneAppOTP' { $DefaultMethodType = 'TOTP' }
'PhoneAppNotification' { $DefaultMethodType = 'Authenticator App' }
}
} else {
$DefaultMethodType = 'Disabled'
}
PS Custom Object
Finally, the PS custom object. This is where we return the information the user wants. The PowerShell custom object will contain the following information, the username, display name, the mfa state, and the default method type.
The last thing we do is we null out the methodtypes. Sometimes PowerShell 5 will carry over these items in a loop.
#Nulls out the method type variable because we are in a loop.
$MethodType = $null
Conclusion
When you Set Users’ MFA, you make people mad. However, life gets way more secure. This function is inside my tool belt and it helps me out almost every day. I can push hundreds of users through it quickly. I will leave you with the script itself.
The Script
Function Set-SHDUserMFA {
<#
.SYNOPSIS
Sets the MFA status of a user.
.DESCRIPTION
The script can grab the Status information of MFA of a user. It can set the users mfa to enabled, enforced, disabled, and even reset the mfa of a user.
.PARAMETER UserPrincipalName
A list of strings, the user principal names of the users you wish to preform the actions against.
.PARAMETER SetStatus
The action you wish to preform
Enabled: Enables MFA
Disable: Disables MFA
Reset: Resets MFA
Enforced: Enforces MFA
.PARAMETER Info
Grabs UPN, Displayname, The MFA state, and Default Method Type
.NOTES
Name: Set-SHDUserMFA
Author: therandomadmin
Version: 1.0
DateCreated: 8/3/2022
.LINK
#>
[CmdletBinding()]
param(
[Parameter(Mandatory = $true, ParameterSetName = 'UPN', Position = 0,ValueFromPipeline = $true,valueFromPipelineByPropertyName = $true,)][string[]]$UserPrincipalName,
[Parameter(Mandatory = $false)][validateset("Enabled", "Disable", "Enforced", "Reset")][string]$Status,
[Parameter()][Switch]$Info
)
BEGIN {
#Checks PS version
if ($PSVersionTable.psversion.major -ne 5) {
Write-Error "Your Powershell Version is $($PSVersionTable.psversion.major). Msonline service only works on Powershell 5. Ending."
end
}
#Checks to see if the module is installed if not, tells the end user to install.
if (Get-InstalledModule -name MSOnline -ErrorAction SilentlyContinue) {
#Checks to see if the msolservice if it isn't connected, we connect
if (-not (Get-MsolDomain -ErrorAction SilentlyContinue)) {
Connect-MsolService
}
}
else {
Write-Error "MSOnline Services are not installed. Please install the MSOnline services with the following command `n Install-module MSOnline `n"
}
}
PROCESS {
#Starts the UPN loop
foreach ($UPN in $UserPrincipalName) {
#Checks if the user exists, if not, ends the upn and writes an error.
try {
$User = Get-MsolUser -UserPrincipalName $UPN -ErrorAction Stop
}
catch {
Write-Error $_.Exception.Message
}
#Checks status
switch ($Status) {
#If enabled then we enable mfa
'Enabled' {
$sar = New-Object -TypeName Microsoft.Online.Administration.StrongAuthenticationRequirement
$sar.RelyingParty = "*"
$sar.State = "Enabled"
Set-MsolUser -UserPrincipalName $UPN -StrongAuthenticationRequirements $sar
}
#if enforced, we enforce mfa
'Enforced' {
$sar = New-Object -TypeName Microsoft.Online.Administration.StrongAuthenticationRequirement
$sar.RelyingParty = "*"
$sar.State = "Enforced"
Set-MsolUser -UserPrincipalName $UPN -StrongAuthenticationRequirements $sar
}
#if reset, resets mfa
'Reset' { Reset-MsolStrongAuthenticationMethodByUpn -UserPrincipalName $UPN }
#if disable, it removes mfa requirements
'Disable' { Set-MsolUser -UserPrincipalName $UPN -StrongAuthenticationRequirements @() }
}
#if you flip the flag for info we grab the info.
if ($Info) {
#Grabs the user information
$User = Get-MsolUser -UserPrincipalName $UPN -ErrorAction Stop
#If it has a strong authentication requirement we grab the state, if the state is blank, then we return disabled
if ($User.StrongAuthenticationRequirements) {
    $MFAState = $User.StrongAuthenticationRequirements.State
} else {
    $MFAState = 'Disabled'
}
#grabs the Strong authentication methods
$MethodType = $User.StrongAuthenticationMethods | Where-Object { $_.IsDefault -eq $true } | select-object -ExpandProperty MethodType
#if the methods are not blank, we find out which one is the right method. and make since of the code. If it is blank, we say disabled.
if ($MethodType) {
    switch ($MethodType) {
        'OneWaySMS' { $DefaultMethodType = 'SMS' }
        'TwoWayVoiceMobile' { $DefaultMethodType = 'Call' }
        'PhoneAppOTP' { $DefaultMethodType = 'TOTP' }
        'PhoneAppNotification' { $DefaultMethodType = 'Authenticator App' }
    }
} else {
    $DefaultMethodType = 'Disabled'
}
#creates a ps object and displays all the information collected
[PSCustomObject]@{
    UserPrincipalName = $User.UserPrincipalName
    DisplayName       = $User.DisplayName
    MFAState          = $MFAState
    DefaultMethodType = $DefaultMethodType
}
#Nulls out the method type variable because we are in a loop.
$MethodType = $null
}
}
}
END {}
}
Today in the field, we needed to find all of the device’s IP and Mac Info for each network adapter. This was a large undertaking. We were looking for a special network adapter that didn’t show up in our normal reports from our RMM. However, our RMM could push out PowerShell scripts and return the network adapters for us. The information we needed was the network adapter index number. Then we needed the mac address and IP address. Finally, we needed the name of the network device. The stage is set.
Network Adapters
Firstly, we need to grab the network adapters. We are using the Get-NetAdapter command. This command lists all the current network adapters on the device in question.
$Adapters = Get-NetAdapter
The net adapter gives us the name of the adapter, the mac address, and the index we are looking for. Since we placed the net adapters in a workable variable, we can loop this variable. While looping, we are targeting the interface index.
Net IP Address
Secondly, the next piece we need is the IP information from each network adapter. We do this with the Get-NetIPAddress command. This command grabs the IP address of each network adapter, along with the interface Index. This means we can marry the mac address to the IP address. This command produces both the IPv4 and IPv6 address.
$IP = Get-NetIPAddress
This command produces a large list of useful information. The information we want is the index, ipv4 and ipv6 addresses. Since we have both pieces of the pie, it’s time to marry the two.
IP and Mac Info
As a result of having the above commands information, we can marry these two together. We start with a foreach loop of the adapters.
$Return = foreach ($Adapter in $Adapters) {
    #Do Something
}
We are looping the adapters because it’s the physical side of things. Plus, the IP information directly links to the network adapter. We place the foreach loop information into a variable. This allows us to filter later. Next, is the PS custom object. A PS custom object is the object we are after.
It’s within this object that magic happens. The current adapter will provide the name, interface description, mac address, index, link speed, and status. From there we will grab the IPv5 address by using where-objects. First, we search for the index of the IP command for the adapter index. Then we search for the address family to be IPv4. We repeat this process for IPv6. This is what the loop looks like.
Even though this case was a fringe case, it still shows the power that Powershell can provide. We were able to grab the IP and Mac Info for each network adapter. From there we were able to generate the report needed. Pull all of the Mac addresses and IP addresses needed to complete the project. Overall, this was a success for us. I hope you are able to use some if not all of this code somewhere.
As part of my efforts to harden clients’ azure accounts, We need to remove/refresh all the sign-in tokens from the disabled account. Why? That’s very simple, If you don’t, then any signed-in device still has access. For example, if I terminate a user, I block their sign-in in office 365. The block will take effect within 24 hours. This is why we want to Revoke Disabled Sign-in tokens.
The user can steal data if you don’t remove/refresh the sign-in tokens. By removing/refreshing the sign-in tokens, the outlook can no longer authenticate back with office 365. This means no more new emails. Everything on the computer is still a free game. The user can decode the PST files. I revoke/refresh the tokens with a single command from the Azure AD PowerShell module.
It’s time to break down the “Revoke Disabled Sign-in” script. The first step is to grab all the users from the azure ad. We do this with the Get-AzureADUser command. Next, we parse that information through a where-object. We want to filter out the accountEnabled by the value of false. Now that we have all the disabled users we start a foreach-object loop. Inside our loop, we want to trigger the Revoke-AzureADUserAllRefreshToken command using the Object ID. We are grabbing the previous command’s output using the $_ object. The ObjectID is the object we are pulling out.
Conclusion
At the end of the day, this code snippet is a catch-all for standard processes. Whenever you terminate an employee, it’s always a good idea to revoke the sign-in tokens.
I hope this helps. Please let me know if you have any questions.
A client called in and told me a line of information that made me concerned about security. I ran a webroot scan and wanted to give another level of the scan. I am partial to the Microsoft Safety Scanner. It runs well connectwise backstage. You can read more about the safety scanner here. So, lets look at this oneliner.
The first part of this little script is to test and create the folder that will hold our file. We are doing this by using test-path. Then if the file doesn’t exist, aka !. Then we create it with the new-item.
The next part is we are going to download the Microsoft security scanner from Microsoft directly. The link is the direct download. We use invoke-webrequest to download the file. The -outfile flag is where we will download the file at and its name. In this case, we are going to name it something simple. Mss.exe inside our temp folder. We use the -usebasicparsing because most machines only have PowerShell 5.
Then we run the command needed. We start the command with the path. C:\temp\mss.exe. We want it to be quiet and we want to force it. So we use the /Q to quiet, and /F:Y to force.
c:\temp\mss.exe /Q /F:Y
The system will not prompt for any kind of approval. It will run and delete what it needs to delete. This is a simple, deploy and walk away one-liner. So, add it to your deployment scripts and enjoy scanning with a Microsoft safety scanner.
Dynamic Groups in Azure AD is something that will change how you work. Inside my azure AD, I want a group for my windows 10 devices and a group for my windows 11 devices. Dynamic Groups allow you to set parameters for the members of that group. For example, if you want only Windows 10 devices, you select the build number. Want only Azure AD joined, add the parameter. So on and so forth.
Getting Started with Dynamic Groups in Azure AD
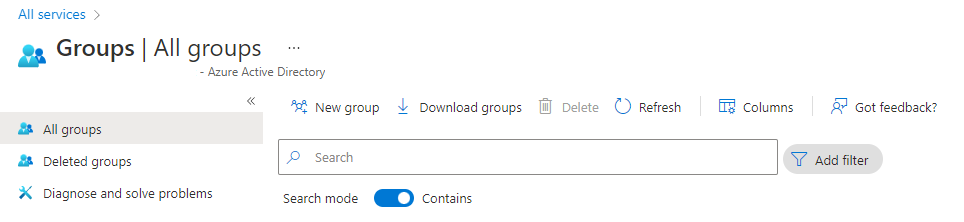
The first thing we need to do is log into azure. Click Groups on the left-hand side. Then Click all groups. Search for the group you want to make, just in case it’s already been built. Once you confirmed that it’s not the case, click “New Group”.
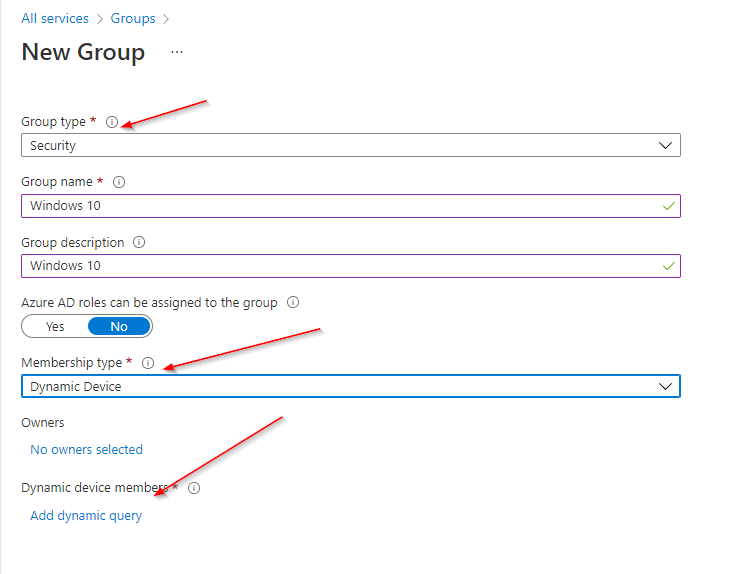
Here are the settings you will need to use:
Group Type: Security
Group Name: Windows 10
Group Description: All windows 10 machines
Membership Type: Dyanmic Device
Now you will need to click the Add Dynamic Query to add a custom query.
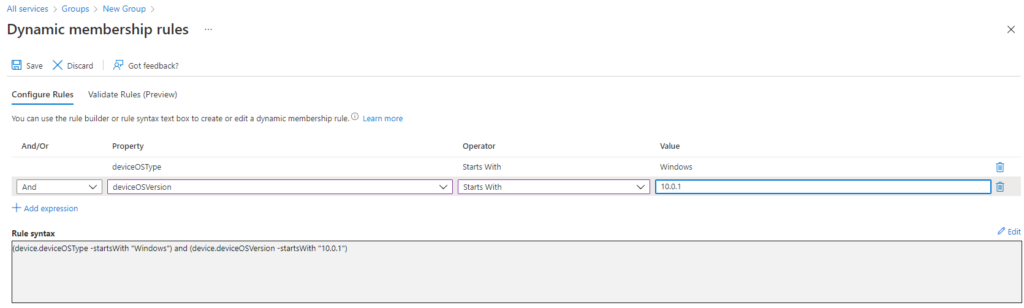
From here, we will click the Property and select DeviceOSType The operator is Starts With and Finally, the value will be Windows. We select these options for the first check because we only want windows devices. Macs start with “Mac”, Linux starts with the Version Number or the name of the OS type. While Windows always, and I mean always, Starts with Windows. Windows Server, Windows 10, Windows Vista, Windows 3.0.
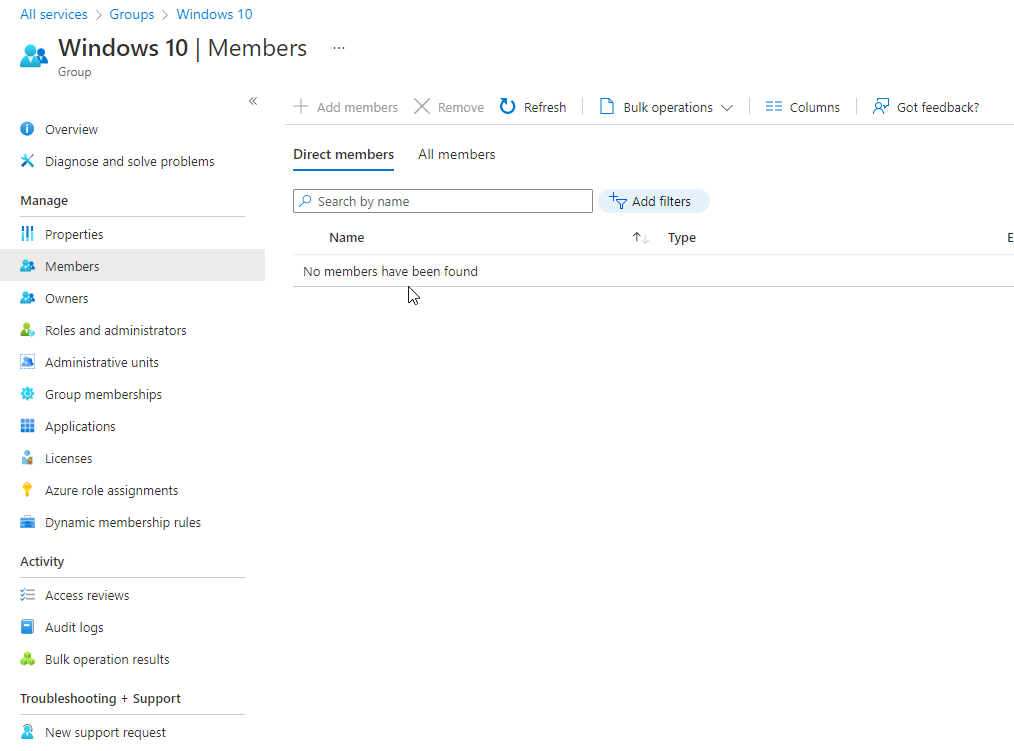
Next, we need to click Add Expression. The And/Or needs to be set to And. So we are checking both queries. The property is going to be DeviceOSVersion, and the operator is going to be Start With. The value is important. As we have entered the world of Windows 11. Why is the value so important? It’s because Windows 11 is nothing more than a skin for windows 10 when it comes to the version number. Windows 11’s version number is 10.0.22000. While Windows 10 is 10.0.19… It’s super important for windows 10 groups to use a value of 10.0.1 with Start with. If you want only windows 11, use 10.0.2. I am expecting Windows 12 (currently in development) to be 10.0.3. Once you click the ok, You can check the members by clicking the Members tab on the left side of the Windows 10 group.
Windows 10 – 10.0.1 Windows 11 – 10.0.2
This group’s concept can be taken a few steps further. You can call out the windows version, and make groups accordingly. This will give some clearer auditing. This also will tell you what you need to update. I hope this helps out.
For more information about Dynamic Groups in Azure AD go here.
We use cookies to ensure that we give you the best experience on our website. If you continue to use this site we will assume that you are happy with it.