Anyone who has been in IT long enough has performed a Ping Test. A simple ping and IP address. Most of us have used the “Ping 8.8.8.8 >> c:\pingtest.txt” to see how many times something failed. But did you know you can do the same thing with PowerShell? It’s also much cleaner and easier to understand. Unlike simple ping, we can see when the outage was, not just there was one. This helps to find logs easier.
The Script – Ping Test with PowerShell
function Test-Ping {
    <#
    .SYNOPSIS
        Sends an email using custom SMTP settings.
    .DESCRIPTION
        Sends an email using custom SMTP settings.
    .PARAMETER SecondsToRun
        [Int] How long the script will run. This will add the number of seconds to the current time. Then we will loop based off that input. Default is 24 hours
    .PARAMETER Outfile
        [string] The full path of where the CSV will go.
    .PARAMETER SecondsToSleep
        [int] How many second will be between each test. Default is 1
    .PARAMETER IPaddress
        [ipaddress] The IP address that we want to test. Default is 8.8.8.8
    .PARAMETER Show
        [switch]Displays the output of the ping.
    .EXAMPLE
        Test-Ping -SecondsToSleep 1 -IPaddress 8.8.4.4 -SecondsToRun 24 -Outfile c:\temp\google1.csv -show
        Pings 8.8.4.4 for 24 seconds at a one second interval. It appends the ping log to c:\temp\google1.csv and shows the output
            DateTime            IPaddress Latency  Status
            --------            --------- -------  ------
            2022-09-27_08_47_01 8.8.4.4        21 Success
            2022-09-27_08_47_02 8.8.4.4        11 Success
            2022-09-27_08_47_03 8.8.4.4        10 Success
            2022-09-27_08_47_04 8.8.4.4        10 Success
            2022-09-27_08_47_05 8.8.4.4        10 Success
            2022-09-27_08_47_06 8.8.4.4        10 Success
            2022-09-27_08_47_07 8.8.4.4        10 Success
    .EXAMPLE
            Test-Ping -SecondsToSleep 1 -IPaddress 8.8.4.4 -SecondsToRun 7

            DateTime            IPaddress Latency  Status
            --------            --------- -------  ------
            2022-09-27_08_48_56 8.8.4.4        11 Success
            2022-09-27_08_48_57 8.8.4.4        10 Success
            2022-09-27_08_48_58 8.8.4.4        10 Success
            2022-09-27_08_48_59 8.8.4.4        12 Success
            2022-09-27_08_49_00 8.8.4.4        10 Success
            2022-09-27_08_49_01 8.8.4.4        10 Success
            2022-09-27_08_49_02 8.8.4.4        11 Success

            If you choose not to have an output of any type, the show will happen to have an output.
    .OUTPUTS
        PowerShell Custom Object
    .NOTES
        Author: David Bolding
        Date: 09/27/2022
    .LINK
        https:://therandomadmin.com
    #>
    [cmdletbinding()]
    param (
        [int]$SecondsToRun,
        [string]$Outfile,
        [int]$SecondsToSleep,
        [ipaddress]$IPaddress,
        [switch]$Show
    )

    #Determines if Seconds was delcared.
    #if it wasn't, add 24 hours. If it was, add those seconds.
    if ($PSBoundParameters.ContainsKey('SecondsToRun')) {
        $Time = (Get-date).AddSeconds($SecondsToRun)
    }
    else {
        $Time = (Get-date).AddSeconds(86400)
    }

    #While current time is less than or equal to the added seconds.
    while ((get-date) -le $time) {

        #if IPaddress exists, we ping that ip address with test-connection with a count 1
        #if not, we ping google.
        if ($PSBoundParameters.ContainsKey('IPaddress')) {
            $Test = Test-Connection $IPaddress -count 1
        }
        else {
            $Test = Test-Connection 8.8.8.8 -count 1
        }

        #Grabs current datetime in a readable string
        $DateTime = (Get-date).ToString("yyyy-MM-dd_hh_mm_ss")

        #Creates object
        $Results = [pscustomobject][ordered]@{
            DateTime  = $DateTime
            IPaddress = $test.address.IPAddressToString
            Latency   = $test.Latency
            Status    = $test.Status
        }

        #If outfile exists, drop the csv there and append
        #if not, display
        if ($PSBoundParameters.ContainsKey('Outfile')) {
            if ($Show) {
                $Results | Export-Csv -Path $Outfile -Append -NoClobber -NoTypeInformation
                $Results
            }
            else {
                $Results | Export-Csv -Path $Outfile -Append -NoClobber -NoTypeInformation
            }

        }
        else {
            #If no output is selected, we force an output with the else.
            $Results
        }

        #if secondstosleep exists, we sleep by that many, if not, we sleep for 1 second.
        if ($PSBoundParameters.ContainsKey('SecondsToSleep')) {
            start-sleep -Seconds $SecondsToSleep
        }
        else {
            Start-Sleep -Seconds 1
        }
    }
}
The Breakdown
This function is designed to be quick. The idea is to quickly type Test-Ping and off to the races we go. You can set each parameter accordingly. We are going to work with 5 parameters. Firstly, “SecondsToRun” is for how long you want this script to run. Next, we have the “Outfile” parameter. This parameter is a full file path string. For example, c:\temp\pingtest.csv. Aftward, we have “SecondsToSleep”. This will be how long between intervals. Next, we want an IP address using the “IPaddress”. Finally, we have the show switch. So, if you select the csv output, if you want to see the output at the same time, you can trigger the show flag.
The first part of the script is using the PSBoundParameter. This little guy lets you review what the end user puts into the function. In this case, we are looking for the key SecondToRun. If we have this key, we get the time that many seconds from now and place it into a variable. If we key isn’t present, we create a Time variable of 24 hours from now. Another way to go about this is by default the variable at the start. Then dropping it there.
The Loop
while ((get-date) -le $time) { #Do Something }
Afterward, we enter the loop. The idea behind the look is the current time has to be less than or equal to the $time variable we made in our last step.
Like before, we are using the PSboundParameters and we are looking for the IPaddress. Here, if we have the IP address stated, we use the test-connection command and grab information about the IP address. if now, we use google. Like before, you can default the parameter as well to achieve the same results. It’s dependent on your goals.
#Grabs current datetime in a readable string
$DateTime = (Get-date).ToString("yyyy-MM-dd_hh_mm_ss")

#Creates object
$Results = [pscustomobject][ordered]@{
    DateTime  = $DateTime
    IPaddress = $test.address.IPAddressToString
    Latency   = $test.Latency
    Status    = $test.Status
}
Next, we grab the current date and create our PowerShell Custom Object. This is where it differs from simple ping and useful data. We have a date time. We have the latency and the status. As this is a PowerShell custom object, we can export this data, sort this data, and even more.
#If outfile exists, drop the csv there and append
#if not, display
if ($PSBoundParameters.ContainsKey('Outfile')) {
    if ($Show) {
        $Results | Export-Csv -Path $Outfile -Append -NoClobber -NoTypeInformation
        $Results
    } else {
        $Results | Export-Csv -Path $Outfile -Append -NoClobber -NoTypeInformation
    }
} else {
    #If no output is selected, we force an output with the else.
    $Results
}
What we do here with the data is we check if we want to output this data. if we do, we just dump it. If we want this data to show, we ask it to show with the show tag. Notice the -append flag on the export-csv. This means we are going to be adding to the file instead of rebuilding it. Thus a log. Now, if you don’t flag anything, we will have it show. This way we are not getting null.
#if secondstosleep exists, we sleep by that many, if not, we sleep for 1 second.
if ($PSBoundParameters.ContainsKey('SecondsToSleep')) {
    Start-sleep -Seconds $SecondsToSleep
} else {
    Start-Sleep -Seconds 1
}
Finally, we sleep. This is our interval ratio. Like before, if it doesn’t exist, we use 1 second. If it does, we use that input. This could be done using the same default method.
Conclusion
In conclusion, this is designed to be part of your toolbox. So, if you want to ping your DNS server for 24 hours and see if there is anything wrong you can log it outside of the shell. I would suggest this function be in the profile of every machine on your network as it can save so much time with troubleshooting. It’s easy doing a Ping Test with PowerShell.
When building out scripts, we must consider different ways they will fail. One of the ways I have seen them fail is through the UAC of a computer. The script needs to be run by an administrator. The question is, How do you check if you are running as an Administrator? Here are the two ways I like doing this check.
The Comment Requires it
Powershell has a handy little feature called #Requires. The idea is simple, you place a #Requires at the top of your script. I suggest looking at the official documentation because there is a lot you can do. As of PowerShell 4, #Requires -RunAsAdministrator is a thing. Having this requirement at the start will tell the shell to fail out.
Powershell Checks
The next method is using PowerShell to check if the current shell is administrator through the security protocols of windows. This method only uses two lines of code to produce a true or false statement. Thus, it’s best to keep it inside a function for later use.
function Test-Administrator {
    $user = [Security.Principal.WindowsIdentity]::GetCurrent();
    (New-Object Security.Principal.WindowsPrincipal $user).IsInRole([Security.Principal.WindowsBuiltinRole]::Administrator)
}
The first part is grabbing the current user of the terminal. We store that information and then create a new object. We create a security principal windows Principal object. Here we can check what the user’s role was and if it was the built-in administrator role.
There we have it, how to test if a script is running as admin.
Taking it an additional step forward
Let’s take this script to the next level by adding a restart in admin mode. The following code can be used to restart any terminal session into admin mode. However, it breaks in vs code.
The first part of this script catches the current process information. Then we pass that information into a new system diagnostic object to find the process start information. Next, we change the arguments to start a file and the current script’s name. We also set the verb to runas to trigger a run as administrator call. Then we start the process that we created and close to this current process. Afterward, the script will run as admin.
Now to make this more practical. Add the above code to the Citrix Workspace Installer. Then wrap the script up into an EXE with the PS1toExe program. Finally, add the little script program to your toolbox for future use.
The other day I needed to test if a registry key was present on an end user’s computer and make it if it didn’t exist. I performed a registry key value test with PowerShell. Since I was doing more than one, I pulled an older tool from my tool box for this one. It’s small but easy to use.
This script is only a “Try Catch” with some added inputs. We are first grabbing what we want to test in our parameters. We have two mandatory strings and a switch. The first string is for the path in which we are going to test. The second is the value we want to test. for example, if we want to see if google earth has a version number, we would give the path of HKLM:\Software\Google\Google Earth Pro and the value of Version. If we want to see that version we flip the next part which is the only switch, show value. Instead of saying true or false it will say the value.
Inside our try-catch box, we are using the Get-ItemProperty command. We select the $Value. Finally, we stop the command using the error action flag stop. This prevents the command from falling apart. Next, we throw all that information into the $Values parameter.
Aftward, we use a basic if statement. We show the value when the “showvalue” flag is set. However, if it’s not, we just send a true. Finally, the catch will tell us a false statement if the Get-ItemProperty command failed for any reason.
Conclusion
There are other ways to do this, but this was the quickest I have found. I added the show Value recently because I needed it for troubleshooting the code. Overall, this little guy is perfect to add to any script that deals with registry changes.
While reading on Reddit, I found a common thread. People need a quick way to do a Share Point File Audit. I have a PowerShell function for this in my toolbox. This tool heavily uses the Search-UnifiedAuditLog command let. The most common items I tend to audit are file modifications and deletions. This function goes through, modified, moved, renamed, downloaded, uploaded, accessed, synced, malware detection, restored from trash, locked, and finally unlocked. The Search-UnifiedAuditLog is an exchange online command at the time of this writing. Thus, you need to connect to exchange online. In this function, I am using the switch command. I will follow that structure for the breakdown. Lets first jump in with the function.
I’m glad you came to the breakdown. It means you want to know how the code works. This means you truly care about learning. Thank you. This code repeats itself a few times in different ways. So, I will call out the differences, but not the likes after the first time explaining something. The first section is our Parameters.
Parameters
We have 8 Parameters, and only one of them is mandatory. Firstly, we have the Type parameter. This mandatory validate set allows you to select from a list of commands we will be using in this function.
Deleted
Modified
Created
Moved
Renamed
Downloaded
Uploaded
Synced
Accessed
MalwareDetected
Restored
Locked
UnLocked
Afterward, we have Keep Alive. This allows us to run the command multiple times without signing back into the system. So, if you want to keep your session alive, flip that flag. Next, we have two switches. The first Switch is to pull only items edited in SharePoint itself. The next is for one drive. They are named accordingly. After that, we have a start date and an end date. These values are nullable. Basically, you don’t need them. The outfile is asking for just the name of the file. We are using the “./” to save it wherever you run the command from. Finally, we have the result size. If you want the max number of results, 5000. However, you can make this number smaller.
Begin
In our begin section, we want to test the Exchange Online Management Module. Secondly, we want to validate exchange connectivity. After that, we want to gather the date information for the start and end dates. Let’s take a look at the exchange part first.
The Get-Module command works with PowerShell 5.1. However, I have seen PowerShell flak with this command failing to pull the information. I am going to assume your PowerShell is up to date with your current version.
Afterward, we want to install the exchange online management module if we don’t detect the module. We are using the count to see how many objects are inside our module variable. If it’s 0, it’s time to install. We install it from the PSGallery.
Now, we test exchange connections. We use the Get-PSSession to review the current connections. Next, we test if the connections with the name “ExchangeOnlineInternalSession” is greater than zero. “isconnected” will produce a true or false statement.
If ($isconnected -ne "false") {
    try {
        Connect-ExchangeOnline
    } catch {
        Write-Error "Exchange Online Failed. Ending"
        end
    }
}
After which, we can test with. False, we try to connect. However, if there is an error, we end the script and let the user know. We are not using a credential object to authenticate because MFA should always be a thing.
#Auto Generates Start and Finish dates
if ($Null -eq $StartDate) { $StartDate = ((Get-Date).AddDays(-89)).Date }
if ($Null -eq $EndDate) { $EndDate = (Get-Date).Date }
#Tests if end date is before start date.
if ($EndDate -lt $StartDate) { $StartDate = ((Get-Date).AddDays(-89)).Date }
if ($EndDate -gt (Get-Date).Date) { $EndDate = (Get-Date).Date }
Afterward, we need to get the dates right. If the start date is null, we are going to pull 90 days back. We do this by using the standard. We do the same with the end date. If it’s null, we grab today’s date. Now to prevent errors, we check the start date and end date. The end date can’t be before the start date. This is similar to the end date. The end date can’t be greater than the current date. We use the if statement to resolve this.
Process
We begin the process by looking directly at our “Type” variable by using a switch command. The switch allows us to go through each “Type” and run the commands accordingly. Let’s look at one of the switch processes.
The data that search-unifiedauditlog produces a section called “AuditData”. This section has almost every piece of information you will need. The difference between each “Type” will be the Operations, and session id. The operations target the required logs. This creates the backbone of the Share Point File Audit. The graph below will show which operations I am using. Once you gather the operation information, we need to pull the AuditData. This data will be in JSON format. We start off by looping the records with a for each loop. Then we pull the auditdata and pipe it into convertfrom-json. Next, we create our PS Custom Object. Other than Moved, the output of the other logs contains almost the same information. See the script for the information.
Operation Filters
Deleted
FileDeleted
FileDeletedFirstStageRecycleBin
FileDeletedSecondStageRecycleBin
FileVersionsAllDeleted
FileRecycled
Modified
FileModified
FileModifiedExtended
Moved
FileMoved
Renamed
FileRenamed
Downloaded
FileDownloaded
Uploaded
FileUploaded
Synced
FileSyncDownloadedFull
FileSyncUploadedFull
Accessed
FileAccessed
FileAccessedExtended
MalwareDetected
FileMalwareDetected
Restored
FileRestored
Locked
LockRecord
UnLocked
UnlockRecord
End
Finally, it’s time for the end block. This is where we will present the data we have gathered. Firstly, we need to determine if the SharePoint or Onedrives were flipped or not.
Here we checking if both flags are not checked or if both flags are checked. Then we check if the user gave us a filename. If they did, we export our report to a csv file wherever we are executing the function from. However, if the user didn’t give us a filename, we just dump all the results.
Now, if the user selected either or, we present that information. We present those infos by using a where-object. Like before we ask if the user produced an outfile. Finally, we ask if keep alive was set. If it wasn’t we disconnect from the exchange.
Conclusion
In conclusion, auditing shouldn’t be difficult. We can quickly pull the info we need. I hope you enjoy this powerful little tools.
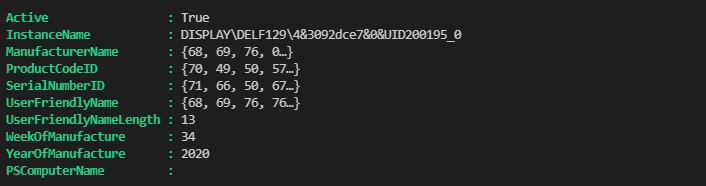
Today, in the field, we will discover a user’s monitors through PowerShell. This is very useful for any kind of RMM tool. I used this script with PDQ and Continuum. You can also run this script with backstage. Let’s take a look at the script for Monitor Discovery.
The first part of this script is grabbing information from the root namespace. We are looking at the wmi monitor ID information. We are using the get-ciminstance command to grab this information. the wmimonitorid produces encoded data streams. Finally, I pipe the output into a “for each object” loop. This loop is extremely important. By holding everything inside this loop, products like azure PowerShell terminal or Continuum Connectwise see everything after it as part of the initial line.
Aftward, we build out our adapter list inside the loop. I was about to find this list thanks to magnumdb. We set the interface number as the variable name and the type as that variable’s value. This way we can use a simple period call for the type later.
Next, it’s time to grab additional information. Firstly, we are grabbing the instance name. Later, you will see why.
$Instance = $_.InstanceName
Notice we are using the dollar sign followed by an underline. This means grabbing the previous piped item. In our case, the previous item is the wmimonitorid information.
Aftward, we are grabbing the basic sizes of the screen. We are doing this using the wmi object called wmimonitorbasicdisplayparam. Let me untie my tongue after that one. This cim instance produces all of the monitors’ information at once. Thus, we need to filter with a where-object. This command produces the same instance name as the previous command. That’s why we gathered that information beforehand.
Before we continue, I want you to look closely. Notice that we have inside the where-object a $_. already for the instance name. The $_ is calling the previous pipe. In this case that is the wmimonitorbasicdisplayparams. This is why we created the $Instance variable.
Certainly, we will use this same trick with our next piece of information. We will query the wmimonitorconnectionparams using the same method. However, we want only the video output technology variable. This is why we wrap the command inside a parenthesis.
Finally, we need to build the output. This is what the end user will see and interact with. This is accomplished by using the ps custom object. Lets talk about each variable as there are special conditions in the code here.
Manufacturer
We are using the system text encoding to decode the wmi monitor id data. It will be looking at the manufacturername. After decoding, we want to trim the data.
Certainly, like the previous variable, we are going to do the same thing with the name. Using the System text encoding, we get the string and trim down the userFriendlyName information.
Afterward, we work with the size. In this case we are going to do some math. The $Size variable are not encoded like the previous commands. Thus we can do some basic math. We add the max horizontal image size to the max vertical image size. Then we divide that by 2.54. Finally, we round that. This code is a little ugly.
Finally, we will use the adapter types from above. It’s as simple as using the $adaptertypes.”$connections”. See, I told you that you will see this later.
Monitor Discovery is not out of reach. PowerShell is the tool that brings this to life without costing additional money. I have used this code to grab hundreds of computer monitor information. Then I used a web scraper to grab the prices of the monitors. At the end of the day, I produced a list of computer monitors and their prices. This gave us a total number to give insurance.
At a previous company, we had to maintain windows updates without WSUS. This caused some unique complexities. Back then, all machines in question were Microsoft Surface Tablets. This means that driver updates were important. Thus, I created a one-liner to update windows. In today’s post, we will go over Windows Updates with PowerShell. Using PowerShell allows you to use tools like backstage or scripts to install updates on remote machines quickly. The first part of this post will be how to do it manually and then the final part is oneliners. PSWindowsupdate is the module we will be using.
Warnings
Today’s code has the ability to install all windows updates. This includes updates blocked by different software. Thus, reviewing the updates and being confident in what you are updating are essential to success.
The Manual Breakdown
Once you are connected to a machine that you want to do windows updates with PowerShell, start a PowerShell session. Each step from here own will help make a clear and clean method.
Execution Policy
Set-ExecutionPolicy - ExecutionPolicy Bypass
This command allows you to install modules and any other items in PowerShell. The PSWindowsUpdate will require the execution policy to be at least set to bypass. You can learn more about execution policies here. Note, you must be running PowerShell in an evaluated prompt for this code to work.
Nuget
Install-PackageProvider Nuget -Force
After setting the execution policy, we might need to update the package provider. Making a single-line script becomes a challenge because of this. With this knowledge, we want to force an installation of the newest package provider.
The next piece is to install the pswindowsupdate module. This module is the module that does our heavy lifting. Here is where we will need to use the force and confirm flags.
Import PSWindowsUpdate
Import-Module PSWindowsUpdate
Now we have the module. It is time to import the module. Importing a module does not need additional input.
Getting the Windows Update
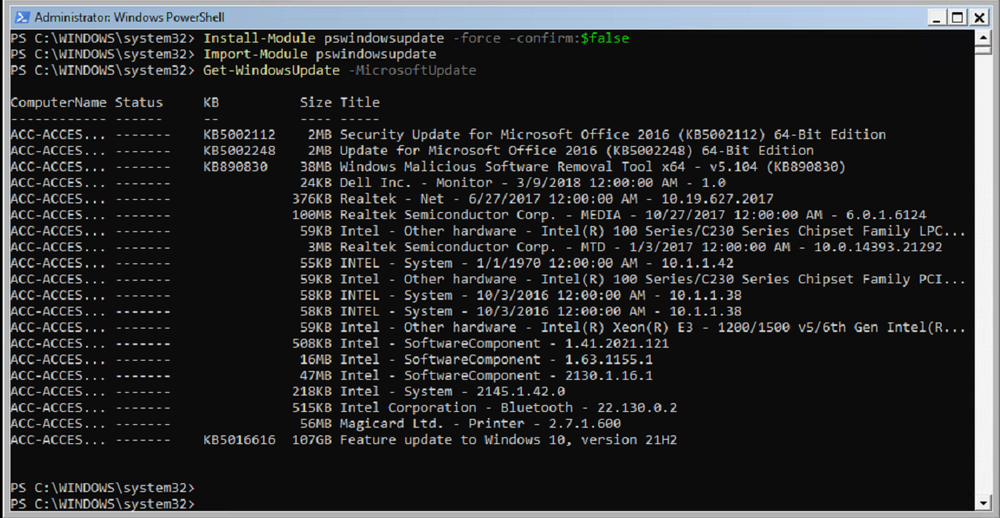
Get-WindowsUpdate -MicrosoftUpdate
It’s time to get the updates.Here is where we grab the KB information. This is where Windows Updates with Powershell Happens. This is where you can find updates to research. It’s important to know what you are updating.
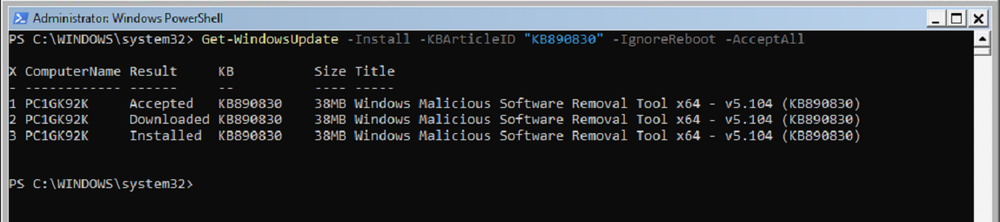
This command will install the KB that you wish without asking any questions. You will see a fancy update process bar during this time.
One-Liner Commands to Install Windows Updates With PowerShell
The following are single-line commands. These commands will install all the updates according to their purpose. The following commands have the ability to break your system. One example of this is the BitLocker update that bricked machines recently. The following command will install all the KB updates.
This command will install all updates on the machine. This includes the KB Microsoft and vendor updates. Please be aware of any dangerous updates that are in the wild. The following command will install those as well.
We use cookies to ensure that we give you the best experience on our website. If you continue to use this site we will assume that you are happy with it.