
For the past few months, I have been working with zebra scanners. MC9300 and MC9400 to be more excat. These scanners are unique in the fact that they do not have any cameras. These scanners are Android OS devices. That means they can go into intune without to many issues. Normally, you scan a QR code with your camera and then it takes you to Google Play. However, there is no camera and no app store on these scanners by default. The idea with these units is you use a program called stagenow and have stagenow enroll them into Intune. So, how do you do that? The Zebra documentation is nice, but it has some issues. Enrolling Zebra Scanners into Intune is not for the faint of heart.
So, why? Why not use other MDMs. Good question. I like punishment, maybe? In this case, this is the option management wanted. Thus, I followed orders and made it happen. There are some things you will need before we get started.
- Admin access to your Intune with the proper licensing. If you have E5 licenses and a P2 plan, you should be golden.
- A computer with stage now.
- A wireless network that has access to the stage now computer and to the interent. At this stagenow computer will be running an FTP service.
Creating the Enrollment
Before we start our first steps, we want to create a Kisok scanner device. This will have one or two apps on it. Thats’ important to think about. We can create a large number of deployment types, and not all of them fit with our goals. These devices will be used to scan boxes and nothing else. So we will be using corporate-owned dedicated devices. The first step is to create the enrollment in Intune.
- We navigate to your intune instance.
- Devices > Android > Enrollment > Corporate-owned Dedicated devices
- Click Create Policy
- Name: Zebra Enrollment
- Description: This policy is to enroll zebra devices into corporate-owned dedicated devices
- Token Type: Corporate-Owned Dedicated devices
- Token expiration data: Input a reasonable date
- Click Next
- Click Create
We will be taken to the policy screen. From here, we need to go into our new policy. Here we will see all the information you just put in. Now we need to get that token.
- Click on the policy
- Manage > Token > Show Token
- Using your cell phone and a QR app, scan the QR to gather its information.
- I have a Samsung phone. I just use the scan QR code feature. Then select the show text.
- Send this text to yourself. I used teams.
- Below is what the code will look like.
{"android.app.extra.PROVISIONING_DEVICE_ADMIN_COMPONENT_NAME":"com.google.android.apps.work.clouddpc/.receivers.CloudDeviceAdminReceiver","android.app.extra.PROVISIONING_DEVICE_ADMIN_SIGNATURE_CHECKSUM":"<Hash Number>","android.app.extra.PROVISIONING_DEVICE_ADMIN_PACKAGE_DOWNLOAD_LOCATION":"https://play.google.com/managed/downloadManagingApp?identifier=setup
","android.app.extra.PROVISIONING_ADMIN_EXTRAS_BUNDLE":{"com.google.android.apps.work.clouddpc.EXTRA_ENROLLMENT_TOKEN":"<Your Token>"}}
Inside this text, you will see a variety of links and something called “Extra_Enrollment_Token” You will need the string of numbers that follows this. You will also see a CHECKSUM, you will need this hash. Finally, you will see something called Provisioning_Device_Admin_Package_Download_Location followed by a link. Click this link. It will download an APK. This APK is very import and cannot be renamed. You will want to transfer this app to your stage now machine.
Stage Now Setup
Now that we have created the enrollment, downloaded our app and gotten our token, it’s time to make the stage now profile. The stage now profile is going to consist of the following configurations.
- Stager now Network
- Wifi
- FileMgr
- AppMgr
- Intent
Start your stage now application and log into the admin portal. You will need the average MX version of your zebra scanners. On average, I have seen a range from 8.4 all the way to 13.1 in my environment. Thus, we must select our lowest version. In my case, it will be 8.4. I will post a blog post in the future on how to standardize our MX versions with Intune.
- Click Create New Profile
- Click Xpert Mode
- Name the policy. I like to have the mx version in the name and what it’s doing. So for our example, I used “Enroll_Intune_8.4” Notice, no spaces.
- Now we are sent to the add/edit window. Click Wizard.
- Scroll down until you see the “StageNow Network” and click the plus sign. You will notice that it is added to the right-hand menu.
- Click the settings tab
- Add Wifi, Filemgr, AppMgr and Intent
- Click ok
Now we will start creating the profile itself. We are thrilled with the first item in our list, “stageNow Network.”. Here we will have drop-downs and other options. So follow along.
Connect a network
- Drop Down: The devices I wish to provision are currently not connected to a network. I will define a network with this profile that can be used for staging.
- Click Continue
- Network Type > Drop Down: WiFi
- Certificate Management: No
- Please note that if your network uses a cert, you will need to set it up here.
- Disconnect Networks: No
- We select No because the next section disconnects the networks for us.
- Disalbe Network: Yes
- This will disconnect from all of the other networks
- Click Continue
- Add Network: Yes
- SSID: Your SSID
- Security Mode: Personal
- In this example, we are going to use a basic wifi setup with a password.
- WPA Mode: WPA/WPA2
- Encryption Type: Do not change
- We don’t change because by default it is aes-ccmp/tkip
- Key Type: Passphrase
- Protected Key: Checked
- Passphrase: <Enter your passphrase>
- Use DHCP: Check
- Keep everything else as default.
- Click continue.
- Connect Network: Confirm everything here and click continue
Wifi
After you click the continue button, you are brought to review. Let’s click the StageNow Config button at the top. To get back into the configuration window. This is the network we will use for Enrolling Zebra Scanners into Intune. We are doing this here to change some basic settings. Like, is the wifi enabled? Is there a sleep policy? Stuff like that. We want to make sure we can get as much possible out of the way now before we deal with it later.
- Target OS: Android
- Wi-Fi Enable: Enabled
- Sleep Policy: Never Sleep
- Network Notification: Use Network Notifications
- Enable Wi-Fi Verbose Logging: Do not change
- If you want this feature, you can set it; however, it eats resources on the scanner.
- Configure Country: Check
- Country: USA
- Notes: By leaving it unchecked, it will perform an auto setup. This can be a problem if you have scanners around the world.
- RF Band: Unchanged
- This is something you will need to communicate with your network team. Some places use 2.4, some use 5. You can tell it which channels to work with as well. This is a very advanced system for the most part.
- Leave all the other settings the way they are.
- The network action is do nothing because you are already connected to your staging network from the previous set.
FileMGR
The file manager area is import for us our Enrolling Zebra Scanners into Intune as it allows us to get the intune onto the device itself. After we click continue on the wifi, we will come into the new settings.
- File Actions: Transfer/Copy File
- Target Access Method: File in the device file system
- Target Path and File Name: /sdcard/AndroidDevicePolicy.apk
- Source Access Method: File on a remote server
- Source File URL:
- Click the three dots
- Search for the file and add it.
- Continue
AppMGR
Now the app is on the scanner from the stage now profile, it’s time to install the app. We are going to select upgrade as upgrade is install and upgrade at the same time.
- Action: Upgrade
- APK Path and Name: /sdcard/AndroidDSevicePolicy.apk
- Protected list action: Do nothing
- Here you can add this app to the protected list, thus making it unchangeable. This could cause Intune to fail. You can also remove it from said list.
- Access to app information action: Do nothing
- Click Continue
Intent
This final stage joins it to intune. We will be creating a json file before we continue. Remember that code we got from the qr code. This is where we are going to be using it. This json is our butter for Enrolling Zebra Scanners into Intune. Here is the json.
{
"android.app.extra.PROVISIONING_DEVICE_ADMIN_COMPONENT_NAME":"com.google.android.apps.work.clouddpc/.receivers.CloudDeviceAdminReceiver",
"android.app.extra.PROVISIONING_DEVICE_ADMIN_SIGNATURE_CHECKSUM": "<Oh a has code from ealier.> ",
"android.app.extra.PROVISIONING_DEVICE_ADMIN_PACKAGE_DOWNLOAD_LOCATION":"https://play.google.com/managed/downloadManagingApp?identifier=setup",
"android.app.extra.PROVISIONING_LEAVE_ALL_SYSTEM_APPS_ENABLED": true,
"android.app.extra.PROVISIONING_ADMIN_EXTRAS_BUNDLE":{"com.google.android.apps.work.clouddpc.EXTRA_ENROLLMENT_TOKEN":"<YourTokenYall>"}
}
Remember we grabbed the check sum and the token from before? Well, this is where we are going to use it. Replace where I have the <> and you should be good to go with the file. Make sure to save this in the same folder on the stagenow computer as the app from before and save the file as a.json file.
Now back to stage now.
- Action: Enroll a Device Owner
- Package name: com.google.android.apps.work.clouddpc
- Class Name: com.google.android.apps.work.clouddpc.receivers.CloudDeviceAdminReceiver
- Json Value: Json File
- Json File:
- Click the three dots and navigate to your newly created json file.
- Click continue
Final steps of stage now
Once you click the stage now button, you will be set to the review screen. Here you can make sure all of your settings are correct by clicking the expand button. By default, the bar codes are encrypted. If you don’t want that, this is where you can change it. I always suggest encryption. Once you have everything the way you want, all you have to do is click complete profile.
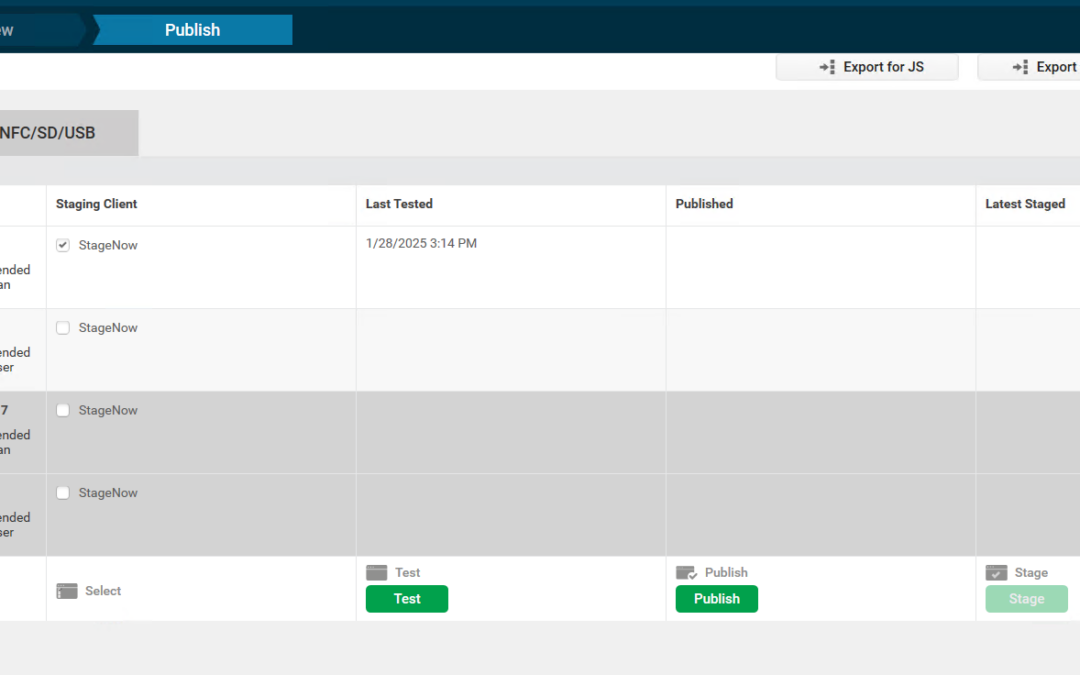
Now here is the next important aspect of the whole setup. Creating the barcodes to scan. After you click the Complete Profile, you will be taken to the bar code window. There will be options for linear and PDF417 barcodes. The linear is going to give you a lot of bar codes. So pick the PDF417.
CATCH! Android 11 and down use PDF417, for Android 13 and above, use JS PDF417.
So we want to click the StageNow client check for what we want to use. Then I like to test. You can click the test to generate the barcodes. Finally, you can click publish to publish the profile.
Using the barcodes
Once you have the bar codes, Enrolling Zebra Scanners into Intune is so much easier. From a recently wiped scanner, open stage now and scan the bar codes. The scanner will connect to your wifi of choice. Then, if the stage is now up and running, it will download the file. Then it will install the app. Finally, if the network is running correctly, it will join intune. From there, intune takes over and stage now is no longer needed.
Import gotchas at this stage is stagenow has to be active with this setup. The reason is because each time the application is active, it spins up an FTP. The FTP username and password are embedded into the QR code from where you encrypted it. So, if your network can’t reach this server, this means it will not work as well. So make sure the network team is good to go.
What can we learn as a person?
Things don’t always go as planned, no matter how much we prepare. I spent six months perfecting an MDM transition while managing my regular duties. My Intune setup was nearly flawless: scanners were configured in under 30 minutes, upgraded to the optimal OS for our company (not Android 13), and everything seemed ready. I created detailed instructions and videos for end users, tested the process with multiple people, and received praise for how well it worked.
The rollout began smoothly at our northern office, where everything connected as expected. Then things unraveled. At other locations, wireless networks failed due to improperly configured DHCP, incomplete AP broadcasting, poisoned ARP tables on switches, and more. It felt like every fix led to another failure. Users blamed me since I handled the transition, but the root issue was network-related—something I had no access to or control over.
Despite my setup being perfect, it failed because of factors outside my control. And that’s okay. Failure doesn’t define us, even when others assign blame. IT is a team effort, and sometimes you must navigate challenges with colleagues who may not be as invested or responsive.
In this case, waiting for the network admin to confirm readiness and documenting everything (CYA!) saved me. It’s a reminder that our worth isn’t tied to mistakes—ours or others’. Sometimes, patience and accountability are the real wins.