One of my favorite things with powershell is building out splat parameters for commands through the main parameter set. Today we are going to go over how that is done. We are going to do this through the Get-childitem and get-ACL. These are some mighty commands and they can help you find permission gaps quickly and easily. Let us Building Parameters for Commands together.
This script is simple, it allows you to grab a directory’s ACL recursively. However, how it does it is kind of cool. Get-Childitem has so many different options, but using it within a function can take some of that power away. So, by passing the parameters that we want at the top level allows us to give that power back to the get-childitem. However, this could lead to a lot of if statements. Instead, we are going to build a splat parameter for our commands. I have covered splats in a previous blog post, but I wanted to point them out to express how much power they do have.
The Power of Splat
Splatting is a method in which you can build a parameter set for a command. The amazing part of splatting is the splat is a powershell object. This means you can add to it after the initial splat is started. To start a splat all one has to do is declare a variable with an object attached. The variable is declared with the $ and the object is a simple at symbol followed by curly brackets with an equal sign nestled in the middle. We can use objects anywhere in powershell. A custom PS object is the same way. If you wanted to, you can declare the object and give it an order with [pscustomobject][order]. However, that’s not always the best option as orders cause issue if things are not in that order later down the road.
$Param = @{}
At this point the powershell object is empty. From here we can start building parameters for our object. To do that we are going to use the add-member command. In our example, we are working with true and false statements. Our function parameters are mostly switches. I threw in some strings as well to give you examples of how to build with a string. The first check is to see if we have a recursive. This is simple to do. We ask if the recurse is true. Then we add the member.
The add-member starts us down the path of building our splat. The Add-member can give us a lot of different options on which way we want to add things. Here, we need to add the recurse flag to get-childitem. This is a note property inside the command. The best way I see note properties is a name with a value. That value can be null. Here we are adding the “Recurse” name and giving it a value of the boolean true. Thus, when we drop the splat into the command, the command will see a flag of recurse. We do this same method with the rest. Directory is a flag, and so is file.
Unlike the last three, the filter parameter is a string. We are going to use the same method using the note property. We want to give the name as a filter and the value will be our value from our command line. The difference here is we want to place that filter in a string. The next part of the filter is how we test the filter. Instead of doing a simple check to see if the value is true, we need to check the parameters. This is done through the value $PSboundParameters. We want to see which keys the power shell bound parameters are holding. What this means is when you do get-command -something “bob” we want to know if something exists. Then we are going to use that’s something, aka bob.
The next step is to use the splat. Which is very easy to do. To use a splat, instead of using the dollar sign, all you need to do is use the at symbol and the parameter. The Command should not have any other flags set as it all lives inside the splat. Building a parameter splat is super easy and makes life easier in the long run.
$Items = Get-ChildItem @Param
What can we learn as a person from splatting
As we go through our lives, we are a representation of a splat. We start off with a few things and over time we add and remove aspects from ourselves. Others add and remove aspects of us as well. Growing up in school, teacher pours so much of their selves into their students. As we get older, we have to do the same for ourselves. We have to add the note properties to our lives, or we will always stay the same. Today you add-member -membertype noteproperty “Splatting” -value “dang it’s cool” to yourself. Unlike a computer though, we have to practice to bring it close to ourselves. We have to conceptualize the idea.
As you go through life, you have to depend on your own splat. Not enjoying that splat, means you have to work on it. It takes action to do so. The thing that stops most people from taking that action is fear of the unknown or fear of dealing with the pain. As someone who has been working on himself for many years now, I can safely say, it’s ok not to be ok. It’s ok not to enjoy parts of your splat, but overall, your splat is who you are. So go out into this world and put your @ on things. Change up that splat if you don’t like parts of it. Just enjoy being yourself.
Recently, I have been troubleshooting radius. Radius hasn’t changed in decades. I say this lightingly too. The network policy server is a feature that helps with connecting things like unifi wifi and more. Each radius connection produces a reason code. Today we want to look through the radius logs and get as much useful information without screaming at the screen. Radius logs are a little daunting. This is why many people use an SQL server for the radius logs. However, if you are not one of those people who can do this, the traditional radius logging works wonders. So, we will read radius logs with PowerShell.
Radius Logging
Before we start, we need to know what we are dealing with. The standard location for readius logs is: C:\Windows\System32\LogFiles. You can change this location as you see fit. I personally changed my locations to a c:\logs\radius location. This helps me find it quicker and generally, I don’t have trouble guessing what is what. You can set the radius log location by doing the following:
Start Network Policy Server
Click account
Under Log File Properties click Change Log File Properties
A box will pop up called “Log File Properties” Click on the “Log File” tab.
This is where you can change your directory.
Change your Format to DTS Compliant. As this script works best with it.
I personally like smaller files when I am working with log searches. So I select the “When log file reaches this size:” I select 1 – 5 MB.
Click ok
Now your log files will live wherever you told them. You will need to change the script around a little if you are using a different location than me.
As you can tell, this script needs to be used on the server in question. However, You could wrap this script into a nice wrapper. That would allow you to execute on remote machines. The breakdown is very simple on this one as well. DTS is an XML format. Thus, you just need to use the [XML] before any of the lines. The XML is formatted with the event, it’s name, and the text. It’s a very simple setup. From there I select what I want and give it in a pscustom object. That’s it. Its a very simple setup. That’s why we should always read radius logs with Powershell.
In a previous blog, we discussed doing a speed test on a computer using PowerShell. Let’s take that script and expand on it with three lines of code and some prep time. This will allow us to update items inside our Ninja One RMM tool. So we can push a Speedtest To Ninja One.
What’s Ninja One?
Ninja One is an amazing RMM tool. I have used many different ones over the years and Ninja one blows my mind. it has a strong community behind it and it keeps growing. It’s the only rmm tool that isn’t afraid to make mistakes and grow. When in used continuum, I saw many times, largely requested items went to the void. While in ninja, It never goes to the void. So, if you are looking for a Good RMM, Ninja One is amazing. With that said, let’s go deep into custom fields and how to set them up for script inputs.
Ninja One Custom Fields
There are currently two ways to make a custom field for a computer. The first is global. This means all companies, roles, and devices will have them. The other way is through the roles. Both options live under the Administration > Devices. Today we are going to setup a Role Custom Field. We are going this route because we don’t want the isp speed check information for internal servers and such.
Click Administration
Click Devices
Click Role Custom Fields
Click The Add Button
Click Fields
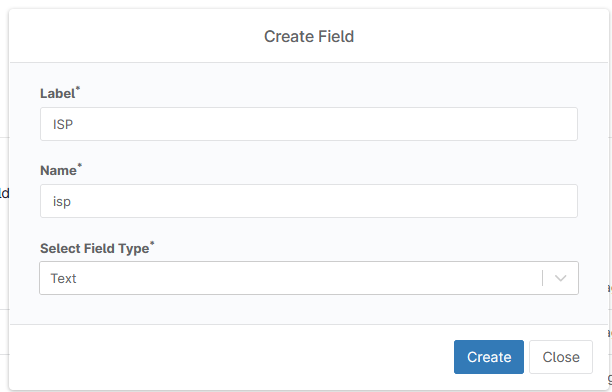
This next part is important. The label is the text that you will read. The Name is what will be used to call the field later. The field type is what you will make it. For example, multi text, text, date, etc… The first custom field will be the following:
Label: ISP
Name: isp
Type: text
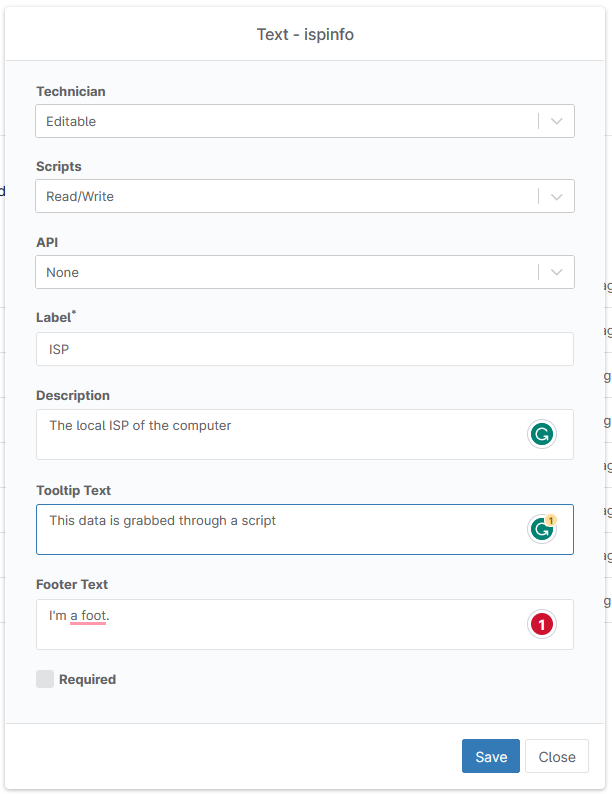
When you click create, the next window will appear. This window is more important. This is where you can choose to allow scripts, APIs and more. If you are planning to allow your technicians to edit this field, then set the technician to editable. The next is script. This is where the script comes into play. This allows the Ninja command line interface to push the Speedtest to Ninja. It has to be at least write for it to work. Next, is the API option. If you are planning to do some special API stuff, this is where you give your field permissions for the APIs. The label is just a label, the description is just a description, the tooltip allows you to give context, the footer text is just that, footer text and finally, you can make it required.
Speedtest to Ninja One
Follow the same steps to create the DownloadSpeed, and UploadSpeed fields. You want them both to be text and you want the script to be at least write. Now, if you have done all that, you are ready to add the ninja command line to the speed test script. This is going to be shockingly easy. The first step is to put your return into a return variable.
Once you have a returnable variable, let’s pass them into the Ninja One command line interface. First notice the PowerShell module name is NJCLiPSh. The commands all start with Ninja. If you want to dig deeper, you can read up on the Ninja One documentation. I will place additional resources at the end.
The command we are going to be using to update our custom fields is “Ninja-Property-Set”. This command will allow us to set any “script” enabled property. It’s as simple as stating the name and value. The auth from the computer will confirm everything is right and update only that device’s property. It’s amazingly simple.
There are many more things you can do with this script. After building out the Speedtest script, I found out someone else did it better. Which is normal and ok. Check out Mikey O’Toole’s exploring into custom fields, here. He goes through different ways to address the custom fields.
Often times I need to run a speed test on a remote machine. Doing a speed test tends to help you understand what’s going on with the end user’s computer. For example, currently, my ISP is having issues. I am getting around 6mbps down and 75 Mbps up. If I called in and said I couldn’t watch training videos… that’s why. so it’s essential to know the speeds. That’s why we want to do a speed test with Powershell.
As we enter this script, you can see my laziness already. The first thing I do is make a string called ctemp for the “c:\temp”. This way I don’t have to type “c:\temp” repeatedly. Next, we test the path to see if c:\temp exists. If it doesn’t, we make it. We do this with the new-item command with the name as temp and the item type as a directory. We do the same thing with c:\temp\speedtest for later. If you really want to get fancy, you can replace the C: with an $env:systemdrive.
The next step is to download the speed test application from ookla. We need the URL and where it’s going to be downloaded. That’s why the URL has the URL needed. We want to call the file speedtest.zip. Next, we test to see if we already downloaded it. If we didn’t, we download the file using the invoke web request and the out file tags.
Once we have the file downloaded, we need to extract the Speed test files. We use the expand archive command to force the download to the c:\temp\speedtest folder that we made at the beginning. I use the force flag here to overwrite anything just in case the file was already there.
Expanding the drive
#Expand the Zip File
Expand-Archive $DownloadPath -DestinationPath "$CTemp\Speedtest" -Force
Next, we run the Speed test with PowerShell. In PowerShell, you can run apps directly inside the shell and input that data directly into the shell by using the & sign. With this software, we need to accept the license if we want to do this script without human interaction. Finally, we want to push its output into a variable. Since it’s a test, let us call it a test.
The variable $test contains a few strings with the information we need. It’s time to work with those strings. The string contains the server, isp, download, upload, and jitter information. Here is an example output of what this little program produces:
Speedtest by Ookla

     Server: Piedmont Redacted
        ISP: Spectrum Business
    Latency:    22.46 ms   (0.12 ms jitter)

   Download:   166.84 Mbps (data used: 217.5 MB)

     Upload:   194.09 Mbps (data used: 224.6 MB)
Packet Loss:     0.0%
 Result URL: redacted
The first item I want to extract is the download. The code is a little complex so lets start from the inside. We start off with our $test variable. We want to find the string line that contains “Download:” and then trim that up.
Next, we need to wrap this inside a regex match. We are using the .net structure here using the [regex]:match. Don’t use matches, it will give you additional information. The match uses our variable and the regex to match with. The regex is the hardest part. So let’s take it apart.
The Regex
'[0-9]+\.?[0-9]*'
The first part [0-9] is searching for characters 0 – 9. However, it only looks at the first digit. The + looks for the rest until we reach a “.”. The “\” is before the “.” because “.” is a used variable in regex. If we stop here, we only get the first part of the download speed. We don’t get anything past the “.”. So we add the “?”. Once we do this it allows us to continue. At this point, we look for another [0-9]. Once again, it’s just the first character. We want everything past that so we add the “*”. Now we have the first match. This is the download speed. Once we have the regex information we ask for only the value. We do this with the upload speed as well.
Now, we need to work with The ISP. We search for the “ISP:” inside our test variable. Like before, we trim up the string. This removes the spaces at the start and end. Then we split this string with the “:”. The split is here because it makes sense. We select the second object from that split as it contains the text. The first, which is also 0, doesn’t contain the text. Now we have the string, we once again trim it up. There you go. That’s the ISP. We do the same thing with the server as the ISP. The results URL is a little different. We split the space and then select the third object.
Displaying the information
Finally, we create a PS custom object and place each piece of useful information into it. When you launch the script, this information will return and you can see it inside your rmm feedback. From here, you can add this information to your RMM tool in custom fields if you wish. Since I use Ninja at the moment, I will go over that later.
That’s it, Speed Test with PowerShell is at your fingertips. I hope you enjoy it.
Last week we discussed sending emails with Graph API. You can read about it here. Today we will be taking that script and making it so it can be automated. On the backend, you will need to create an Azure App. You can read about how to do that here. The following code only works in Powershell 7 and above. Automating with Graph API works best in PowerShell 7. You will need to set up your App with Users.Read.All and Mail.Send as the minimal. levels.
The Script
import-module Microsoft.Graph.Users
Import-module Microsoft.Graph.Users.Actions

$EmailToSend = "A Cloud Email @ your domain"
$EmailToReceive = "Any Email"
$AppID = "This is your App ID"
$SecuredPassword = "This is your Password"
$tenantID = "This is your tenant ID"

$SecuredPasswordPassword = ConvertTo-SecureString -String $SecuredPassword -AsPlainText -Force
$ClientSecretCredential = New-Object -TypeName System.Management.Automation.PSCredential -ArgumentList $AppID, $SecuredPasswordPassword

Connect-MgGraph -TenantId $tenantID -ClientSecretCredential $ClientSecretCredential

#Connect-MgGraph -Scopes "User.Read.All, Mail.Send"
$users = Get-MgUser -filter "accountenabled eq false"
$ReturnString = ""
foreach ($user in $users) {
    if ($null -ne (Get-MgUserLicenseDetail -UserId $user.Id)) {
        [pscustomobject][ordered]@{
            UPN      = $user.UserPrincipalName
            Licenses = (Get-MgUserLicenseDetail -UserId $user.id).SkuPartNumber -join ", "
        }
        $ReturnString = $ReturnString + "$($user.UserPrincipalName): $((Get-MgUserLicenseDetail -UserId $user.id).SkuPartNumber -join ", ")`n"
    }
}

$body = @"
<html>
<header>Licenses</header>
<body>
<center>
<h1>Disabled Users</h1>
<h2>With Licenses</h2>
</center>
$ReturnString
</body>
</html>
"@
$params = @{
    message = @{
        subject = "Disabled Users with Licenses"
        body = @{
            contentType = "HTML"
            content = $body
        }
        toRecipients = @(
            @{
                emailAddress = @{
                    address = $EmailToReceive
                }
            }
        )
    }
    saveToSentItems = "false"
}

# A UPN can also be used as -UserId.
Send-MgUserMail -UserId $EmailToSend -BodyParameter $params
The Breakdown
This script is the same as last week’s except for how it connects and how you feed the email addresses. We are using the Client Secret Credential flag, which is only available in Powershell 7, to trigger the connect command. You need some basic information first. This information will allow Automating with Graph API to work.
$AppID = "This is your App ID"
$SecuredPassword = "This is your Password"
$tenantID = "This is your tenant ID"
The App is the application ID from the azure app you created. the tenant ID is also the tenant ID of the azure app you created. Remember, I stated to keep the secret key value. This is where you will use it. Place it in the Secure Password area. Next, we need to convert this information into a secure object.
Now, we need to convert the plain text to a secure string. We do this with the convertto-securestring command. We enter the string and force it with the force tag. Once we have done that, we want to create a credential object. We use the new-object command to create an automation pscredential object. We feed it the appID and the password we created above. This gives us the ps object that we will use for the next part.
Using the connect-mggraph command we connect to our tenant and pass the app id and password as a single object. This will connect us directly to Graph API. Later we will run this script through the task scheduler. The remainder of the script will stay the same. Finally, we supply the email addresses. Automating with Graph API couldn’t be easier. So Enjoy!
We use cookies to ensure that we give you the best experience on our website. If you continue to use this site we will assume that you are happy with it.