Send-SHDMailMessage

Send-SHDMailMessage

Recently the send-mailmessage was put to rest with good reason. It failed to do its job by securing the emails. It sent items via plain text and not SSL encrypted. Great for internal nothing fancy, but bad if you wanted to send data outside the world. So, I built an alternative that I use the mail message system inside windows. Let’s Send Mail With Powershell.

The Script

function Send-SHDMailMessage {
    <#
    .SYNOPSIS
        Sends an email using custom SMTP settings.
    .DESCRIPTION
        Sends an email using custom SMTP settings.
    .PARAMETER From
        As string. Name of the Email address from which it will come from. 
        Example: "David Bolding <admin@example.com>"
    .PARAMETER To
        As string. The email address too. 
        Example: "Admin@example.com"
    .PARAMETER SMTPUsername
        As string. The Username for the SMTP service you will be using. 
    .PARAMETER SMTPPassword
        As string. The Password in plain text for the smtp service you will be using. 
    .PARAMETER SMTPServer
        As string. The server name of the SMTP service you will be using. 
    .PARAMETER SMTPPort
        As string. The Server Port for the smtp serivce you will be using. 
    .PARAMETER Subject
        As string. The subject line of the email. 
    .PARAMETER Body
        As string. The body of the email as a string. Body takes default over BodyAsHtml
    .PARAMETER BodyAsHTML
        As string. The body of the email in html format. 
    .PARAMETER PlainText
        Sends the email in plain text and not ssl. 
    .PARAMETER Attachment
        As array of strings. A list of full file names for attachments. Example: "c:\temp\log.log"
    .PARAMETER CC
        Email address for a carbon copy to this email.
    .PARAMETER BCC
        Email address for a blind carbon copy of this email. 
    .PARAMETER Priority
        A validate set for High, Normal, Low. By default it will send emails out with Normal.
    .EXAMPLE
        $Message = @{
            from = "HR <HumanResources@Example.com>"
            To = "Somebody@Example.com"
            SMTPUsername = "SMTP2GoUsername"
            SMTPPassword = "SMTP2GoPassword"
            SMTPServer = "mail.smtp2go.com"
            SMTPPort = "2525"
            Subject = "Test"
            Attachment = "C:\temp\JobOffer1.pdf","C:\temp\JobOffer2.pdf"
            BodyAsHtml = @"
            <html>
            <body>
                <center><h1>Congradulation</h1></center>
                <hr>
                <p>Attached is the job offers we discussed on the phone.</p>
                <br>
                Thank you,<br><br>
                Human Resources
            </body>
            </html>
        "@
        }
        Send-SHDMail @Message
        
        Sends an email using the required information with two attachments. 
    .EXAMPLE
        $Message = @{
            from = "HR <HumanResources@Example.com>"
            To = "Somebody@Example.com"
            SMTPUsername = "SMTP2GoUsername"
            SMTPPassword = "SMTP2GoPassword"
            SMTPServer = "mail.smtp2go.com"
            SMTPPort = "2525"
            Subject = "Test"
            BodyAsHtml = @"
            <html>
            <body>
                <center><h1>Sorry, Not Sorry</h1></center>
                <hr>
                <p>Sorry you didn't get the job. Maybe next time show up with clothing on.</p>
                <br>
                Thank you,<br><br>
                Human Resources
            </body>
            </html>
        "@
        }
        Send-SHDMail @Message

        This will send out an email without any attachments. 
    .EXAMPLE
        $Message = @{
            from = "HR <HumanResources@Example.com>"
            To = "Somebody@Example.com"
            SMTPUsername = "SMTP2GoUsername"
            SMTPPassword = "SMTP2GoPassword"
            SMTPServer = "mail.smtp2go.com"
            SMTPPort = "2525"
            Subject = "Test"
            Body = "Your Hired"
        }
        Send-SHDMail @Message

        Sends out a message using just a simple text in the body. 
    .EXAMPLE
        $Message = @{
            from = "HR <HumanResources@Example.com>"
            To = "Somebody@Example.com"
            SMTPUsername = "SMTP2GoUsername"
            SMTPPassword = "SMTP2GoPassword"
            SMTPServer = "mail.smtp2go.com"
            SMTPPort = "2525"
            Subject = "Test"
            Attachment = "C:\temp\JobOffer1.pdf","C:\temp\JobOffer2.pdf"
        }
        Send-SHDMail @Message

        This will send out an email that is blank with attached items. 
    .EXAMPLE
        $Message = @{
            from = "Notify <Notify@Example.com>"
            To = "Somebody@Example.com"
            SMTPUsername = "SMTP2GoUsername"
            SMTPPassword = "SMTP2GoPassword"
            SMTPServer = "mail.smtp2go.com"
            SMTPPort = "2525"
            Subject = "$SomethingWrong"
            PlainText = $true
        }
        Send-SHDMail @Message

        This will send out an unsecured email in plain text. 
    .EXAMPLE
        $Message = @{
            from = "Notifiy <Notify@example.com>"
            To = "IT@example.com"
            SMTPUsername = "SMTPUser"
            SMTPPassword = "SMTPPassword"
            SMTPServer = "mail.example.com"
            SMTPPort = "2525"
            Subject = "Server Down"
            CC = "ITManagers@Example.com"
            BCC = "CFO@Example.com"
            PlainText = $True
            Priority = "High" 
            BodyAsHTML = @"
            <html>
                <body>
                    <center><h1>SERVER DOWN!</h1></center>
                </body>
            </html>
        "@
        }
        Send-SHDMailMessage @Message
    .OUTPUTS
        no Output. 
    .NOTES
        Author: David Bolding
        Date: 09/8/2021
    .LINK
    #>
    [cmdletbinding()]
    param (
        [parameter(Mandatory = $true)][String]$From,
        [parameter(Mandatory = $true)][String]$To,
        [parameter(Mandatory = $true)][String]$SMTPUsername,
        [parameter(Mandatory = $true)][String]$SMTPPassword,
        [parameter(Mandatory = $true)][String]$SMTPServer,
        [parameter(Mandatory = $true)][String]$SMTPPort,
        [parameter(Mandatory = $true)][String]$Subject,
        [Switch]$PlainText,
        [string]$Body,
        [String]$BodyAsHTML,
        [String[]]$Attachment,
        [string]$CC,
        [string]$BCC,
        [Validateset("High","Low","Normal")][String]$Priority
    )
    # Server Info
    $SmtpServer = $SmtpServer
    $SmtpPort = $SmtpPort

    # Creates the message object
    $Message = New-Object System.Net.Mail.MailMessage $From, $To

    If ($PSBoundParameters.ContainsKey("CC")) {
        $Message.CC.Add($CC)
    }
    If ($PSBoundParameters.ContainsKey("BCC")) {
        $Message.Bcc.Add($BCC)
    }
    If ($PSBoundParameters.ContainsKey("Priority")) {
        $Message.Priority = $Priority
    } else {
        $Message.Priority = "Normal"
    }
    # Builds the message parts
    
    $Message.Subject = $Subject
    
    if ($PSBoundParameters.ContainsKey("Body")) {
        $Message.IsBodyHTML = $false
        $Message.Body = $Body
    }
    elseif ($PSBoundParameters.ContainsKey("BodyAsHTML")) {
        $Message.IsBodyHTML = $true
        $Message.Body = $BodyAsHTML
    }
    else {
        $Message.IsBodyHTML = $false
        $Message.Body = ""
    }
    
    if ($PSBoundParameters.ContainsKey('Attachment')) {
        foreach ($attach in $Attachment) {
            $message.Attachments.Add("$Attach")
        }
    }
    
    # Construct the SMTP client object, credentials, and send
    $Smtp = New-Object Net.Mail.SmtpClient($SmtpServer, $SmtpPort)
    if ($PlainText) { 
        $Smtp.EnableSsl = $true 
    }
    else { 
        $Smtp.EnableSsl = $true 
    }
    $Smtp.Credentials = New-Object System.Net.NetworkCredential($SMTPUsername, $SMTPPassword)
    $Smtp.Send($Message)

    #Closes the message object and the smtp object. 
    $message.Dispose()
    $Smtp.Dispose()
}    
    

Examples

        $Message = @{
            from = "HR <HumanResources@Example.com>"
            To = "Somebody@Example.com"
            SMTPUsername = "SMTP2GoUsername"
            SMTPPassword = "SMTP2GoPassword"
            SMTPServer = "mail.smtp2go.com"
            SMTPPort = "2525"
            Subject = "Job Offers"
            Attachment = "C:\temp\JobOffer1.pdf","C:\temp\JobOffer2.pdf"
            BodyAsHtml = @"
            <html>
            <body>
                <center><h1>Congradulation</h1></center>
                <hr>
                <p>Attached is the job offers we discussed on the phone.</p>
                <br>
                Thank you,<br><br>
                Human Resources
            </body>
            </html>
        "@
        }
        Send-SHDMail @Message

In this example, I am using the SMTP2go service to send a job offer letter to a new employee. It contains the attachment flag with two offers. Each attachment is separated with a comma as this is a list of strings. The Body is an HTML using the BodyAsHTML flag. The BodyAsHTML has some custom formatting to make it look somewhat nice.

$Message = @{
    from = "HR <HumanResources@Example.com>"
    To = "Somebody@Example.com"
    SMTPUsername = "SMTP2GoUsername"
    SMTPPassword = "SMTP2GoPassword"
    SMTPServer = "mail.smtp2go.com"
    SMTPPort = "2525"
    Subject = "Thank you"
    BodyAsHtml = @"
            <html>
            <body>
                <center><h1>Sorry, Not Sorry</h1></center>
                <hr>
                <p>Sorry you didn't get the job. Maybe next time show up with clothing on.</p>
                <br>
                Thank you,<br><br>
                Human Resources
            </body>
            </html>
        "@
}
Send-SHDMail @Message

In this example, we are once again using the SMTP2Go to send a rejection letter. No attachments are present on this email. The bodyashtml string is set with a nice custom HTML page.

$Message = @{
    from = "Notify <Notify@Example.com>"
    To = "Somebody@Example.com"
    SMTPUsername = "SMTP2GoUsername"
    SMTPPassword = "SMTP2GoPassword"
    SMTPServer = "mail.smtp2go.com"
    SMTPPort = "2525"
    Subject = "Server Down"
    Body = "XYZ Server Is Down"
}
Send-SHDMail @Message

In this example, we are sending out a notification email using a different user than before. We are using the same smtp2go, but you can use any server with the username and password you like. The body is a basic string with no HTML formating.

$Message = @{
    from = "Notify <Notify@Example.com>"
    To = "Somebody@Example.com"
    SMTPUsername = "SMTP2GoUsername"
    SMTPPassword = "SMTP2GoPassword"
    SMTPServer = "mail.smtp2go.com"
    SMTPPort = "2525"
    Subject = "$SomethingWrong"
    PlainText = $true
}
Send-SHDMail @Message

In this example, we are sending a notification email without a body. We are using a custom variable for the subject line. We are also sending this without the SSL encryption as some legacy systems don’t understand SSL encryption.

$Message = @{
    from = "Notifiy <Notify@example.com>"
    To = "IT@example.com"
    SMTPUsername = "SMTPUser"
    SMTPPassword = "SMTPPassword"
    SMTPServer = "mail.example.com"
    SMTPPort = "2525"
    Subject = "Server Down"
    CC = "ITManagers@Example.com"
    BCC = "CFO@Example.com"
    Priority = "High" 
    BodyAsHTML = @"
            <html>
                <body>
                    <center><h1>SERVER DOWN!</h1></center>
                </body>
            </html>
        "@
}
Send-SHDMailMessage @Message

In this example, we are Sending a Carbon copy to the IT manager and a blind carbon copy of the email to the CFO with a high priority.

Notes

  • The Body and BodyAsHTML can conflict with each other. If you do both the Body and BodyAsHTML, by default, the body will be selected. If you do not put in a body or bodyashtml, it will send the email with a body of “”.
  • This script requires you to have an SMTP service like SMTP2Go.

Conclusion

That my friends is how you Send Mail With Powershell.

User Terminations, Standard Method for emails

User Terminations, Standard Method for emails

As I have been in IT, i have seen more than one way to handle emails after a user has left, both on-prem and off prem. This setup is for office 365/exchange online.

Shared Mailboxes And Forwarder

Overview

This method is based on a variation of how Microsoft suggests doing it with Office 365. But it doesn’t limit the amount of time required. The Basic Idea is to convert a mailbox from a standard user to a shared mailbox. Then Grant the user who needs access to the mailbox access. This way they can go into the OWA and access past emails.

Details

There are hundreds of documents out there showing you how to do this, It’s not a hard process at all. Why not another!

  1. Log into the O365 client using either your user/exchange admin or global admin account.
  2. Click the Admin Center button.
  3. Next, Click the Exchange Admin Button at the bottom left-hand side of the screen.
  4. Now you are in the Exchange Admin Center. If you are familiar to exchange on-prem, it doesn’t look anything like that but has similar flows. Click the recipient button on the left.
  5. Click the Mailbox button.
  6. Search for the user you wish to edit and click on the user. The user menu will appear on the right.
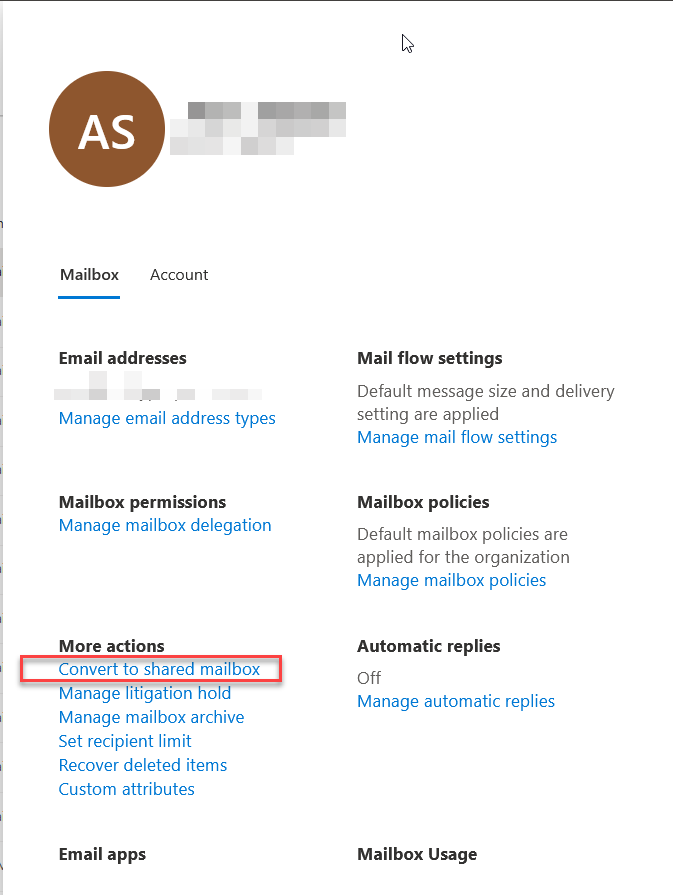
  7. Click the Convert to shared mailbox option.
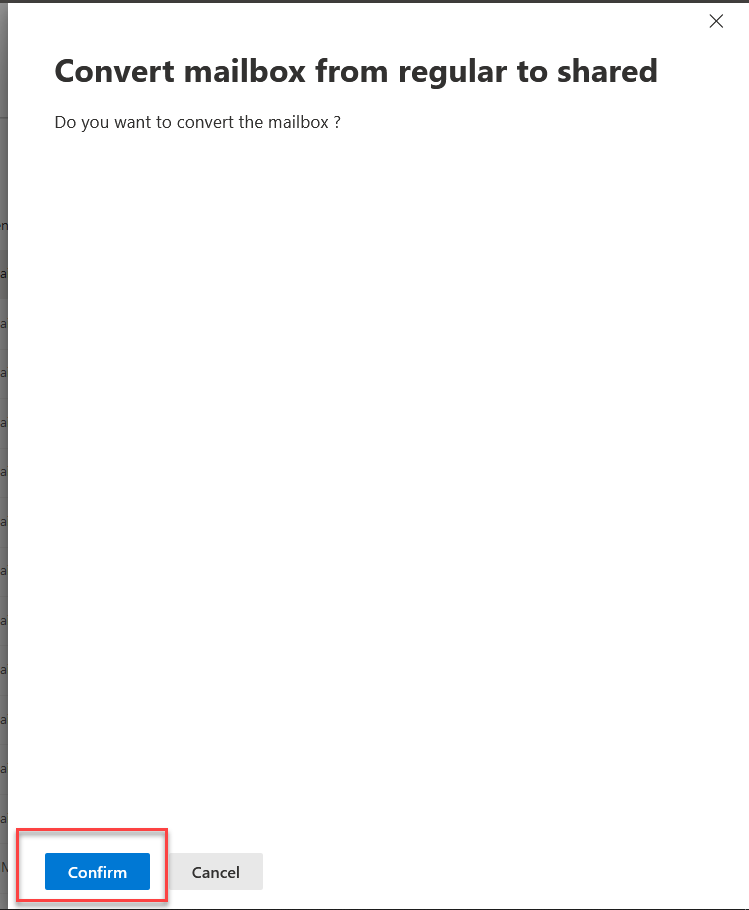
  8. The next screen will want you to confirm this action. Do so by clicking confirm.
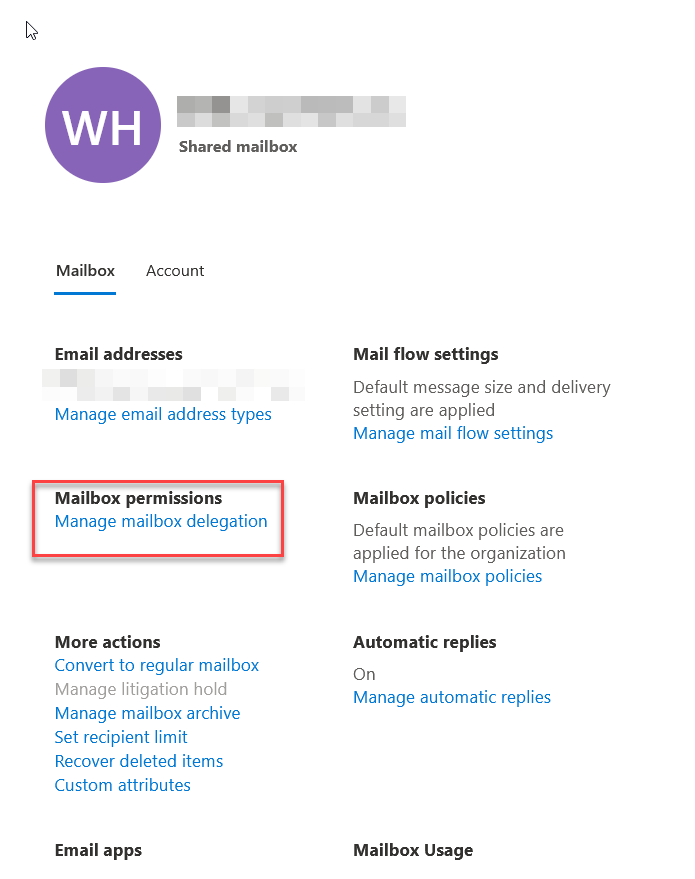
  9. Exchange Online will convert this mailbox into a shared mailbox. It can take up to 30 minutes from my experience for this to happen. Once the mailbox is converted, the user plane will change and say shared mailbox.
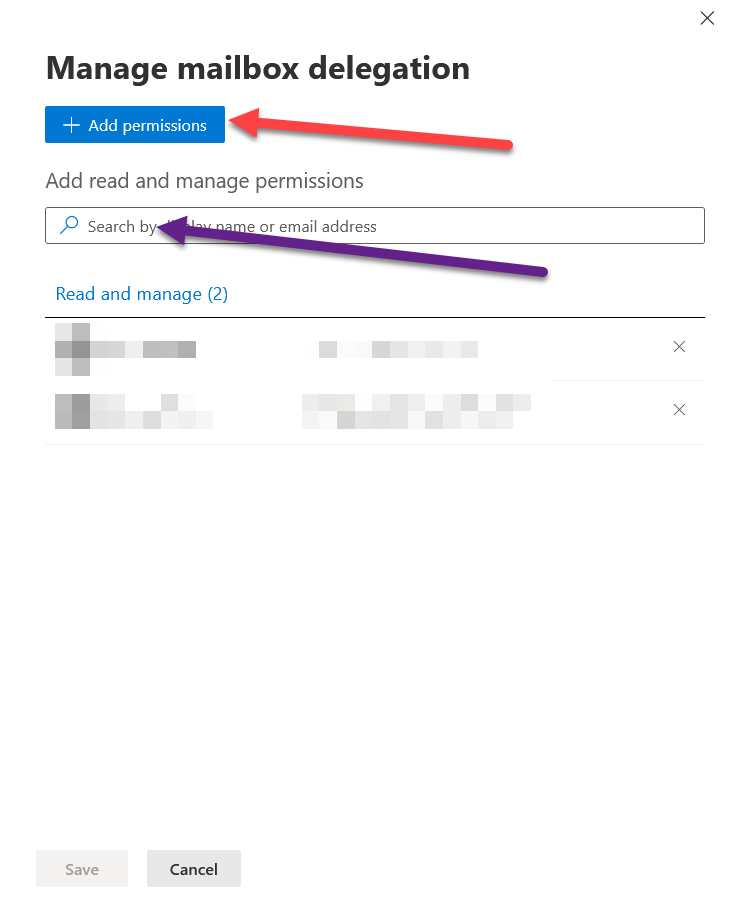
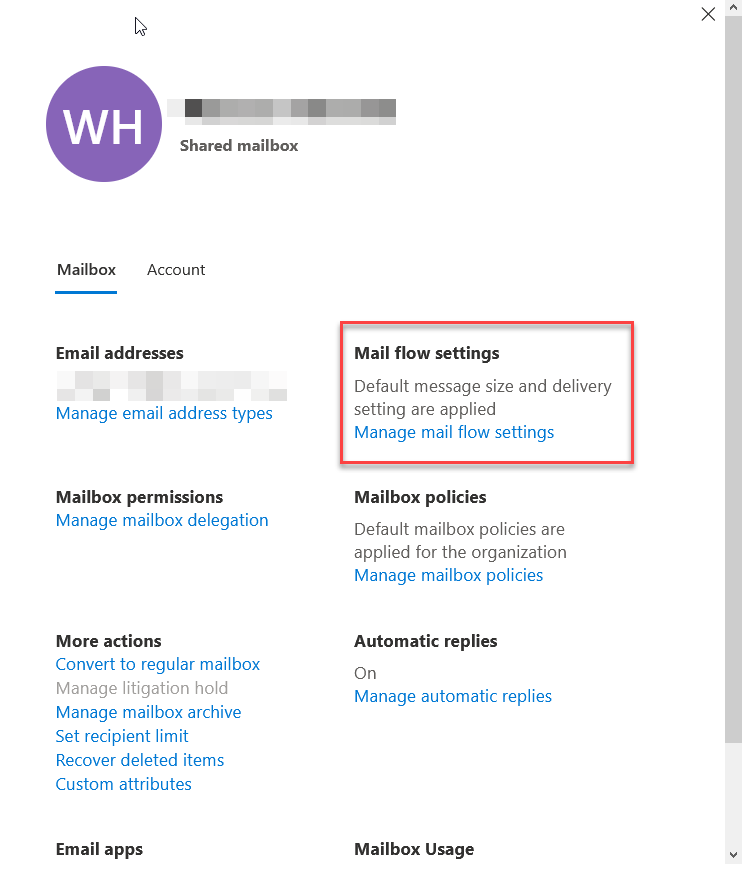
  10. Once the mailbox is a shared mailbox, indicated by saying shared mailbox under the display name. We need to grant permissions. To do that we click the Manage Mailbox delegation.
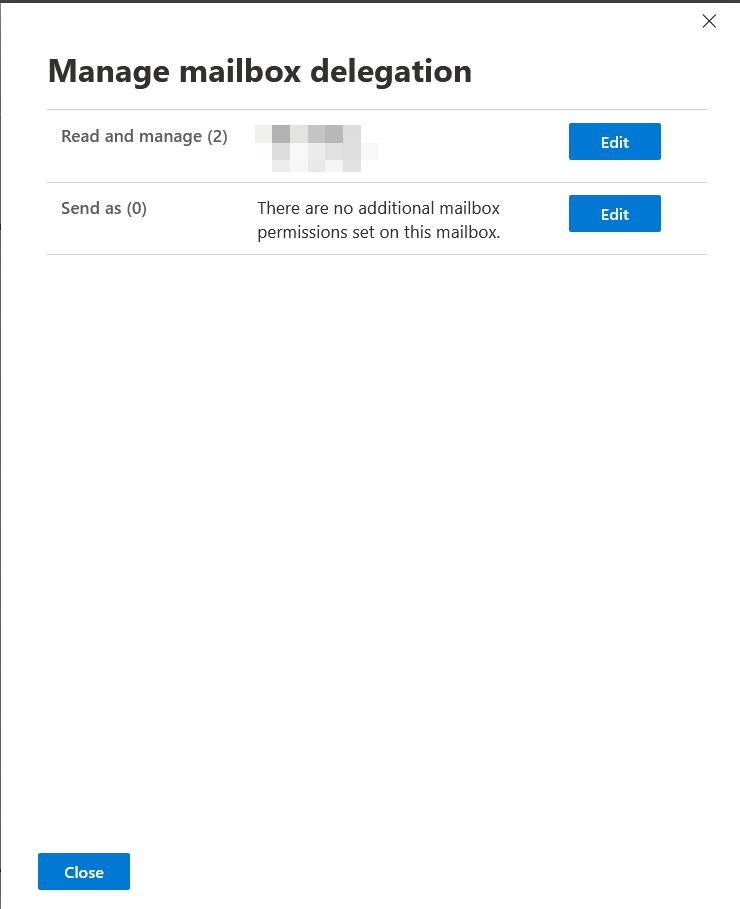
  11. Once in here, click the edit button for the read and manage option. I have never seen someone use the send as an option for former employees, but I have seen it for something like the marketing mailbox at a larger company.
  12. Here you have two options, You can either type out the name, or click the add permissions button and search that way. The add permissions button list all of the users in the company, while the search box just searches by display name or email address.
  13. Make sure you are clicking save with each change or it will not be changed.
  14. Add the permissions accordingly and click save.
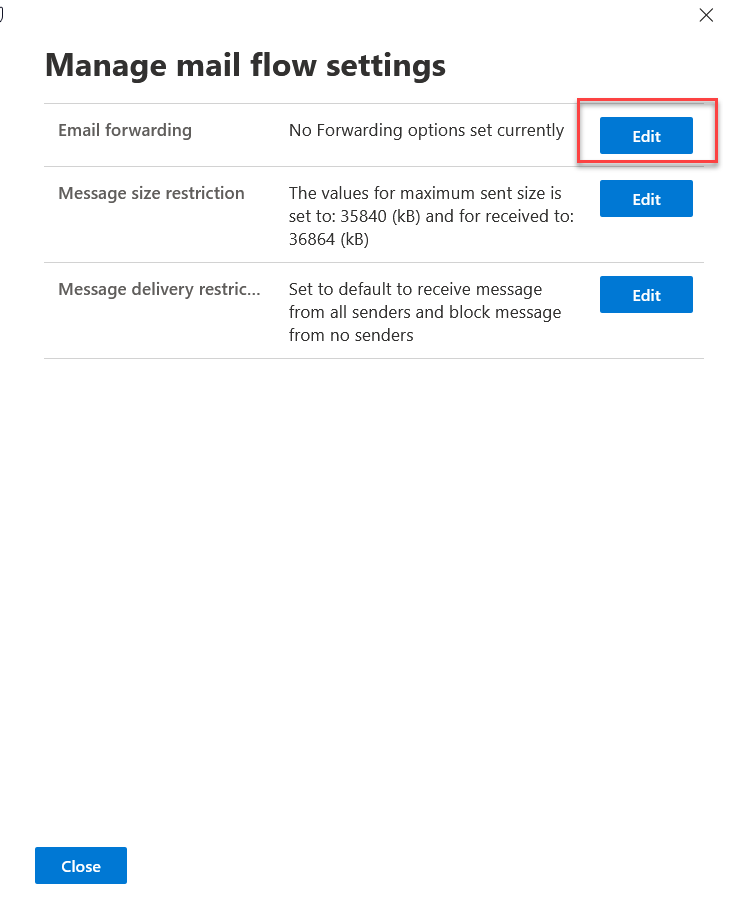
  15. Now we must set the forwarder. Click Manage Mailflow settings.
  16. Click the edit button for Email forwarding.
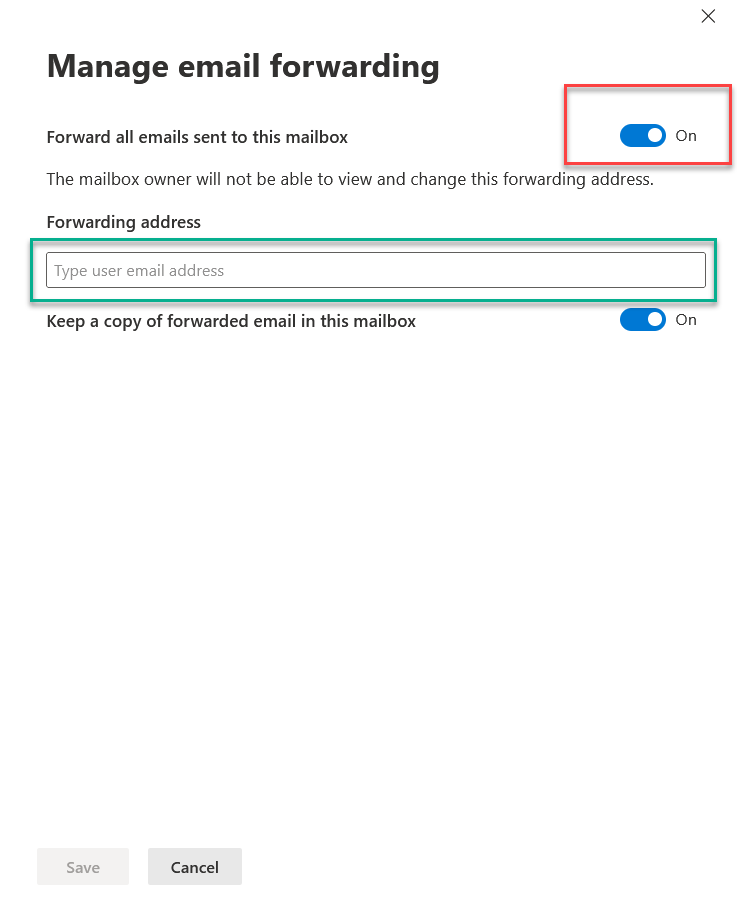
  17. Next, toggle button the Forward all emails sent to this mailbox
  18. The search box will appear. Search for the user and click add.
  19. Click Save.

Pros

  • Previous emails are saved.
  • Can have multiple people accessing the box together through delegations.
  • Can set send as to mimic the previous employee’s presence.
  • Can set strict permissions to who and what can see what.
  • Saves a license.
  • Simple and industry standard.
  • Forwarder set.

Cons

  • Forwards to the single user, not multiple users.
  • Set and forget. Often times you will end up with a large number of these boxes and will need to routinely clear them out.
  • Mobile apps tend to have issues with shared mailboxes.

Use Case

As this is industry standard, it’s very userful. A user leaves, convert the mailbox to a shared. It no longer has a password to worry about. Your users can gain direct access to the mailbox with outlook, or OWA.

Scripted Way

That’s right every way can be scripted. Here is the script for this method.

$Username = Read-Host "Please enter the username of the employee"
$Delegets = Read-Host "Please Enter the name of the delegate"
set-mailbox $Username -Type Shared
Add-MailboxPermission -Identity "$Username" -User $Delegets -AccessRights FullAccess -InheritanceType All

Password Notifications

Password Notifications

I wanted to share a little script that has changed the world at my current company. It’s a simple password email notification script. What it does is grabs the users’ whos passwords about to expire. Then it emails that user with instructions on how to reset their password. Then it sends an email to the user’s manager with a list of when the user’s password will expire. Then finally it sends an email to another person with a complete list of all expiring users and when they will expire. After the user hits zero, the script no longer cares about that person. This is to prevent lots of headaches in the long run with on leave and whatnots. The best thing to do is to set up a scheduled task on a server with rsats. The computer will also need a relay setup on the exchange server.

The Script

param (
    [parameter(Helpmessage = "Return Email", Mandatory = $true)][string]$ReturnEmail,
    [parameter(Helpmessage = "Email Sent to IT", Mandatory = $true)][string]$ITEmail,
    [parameter(Helpmessage = "Mail Server", Mandatory = $true)][string]$MailServer,
    [parameter(Helpmessage = "Employee Organizational Unit", Mandatory = $true)][string]$EmployeeOU,
    [parameter(Helpmessage = "Training Link", Mandatory = $true)][string]$TrainingLink,
    [parameter(Helpmessage = "Training Link", Mandatory = $true)][string]$DaysWithinExpiration
)
$MaxPwdAge = (Get-ADDefaultDomainPasswordPolicy).MaxPasswordAge.Days
$expiredDate = (Get-Date).addDays(-$MaxPwdAge)
$emailDate = (Get-Date).addDays( - ($MaxPwdAge - $DaysWithinExpiration))
$ExpiredUsers = Get-ADUser -Filter { (PasswordLastSet -lt $emailDate) -and (PasswordLastSet -gt $expiredDate) -and (PasswordNeverExpires -eq $false) -and (Enabled -eq $true) } -Properties DisplayName, PasswordNeverExpires, Manager, PasswordLastSet, Mail, "msDS-UserPasswordExpiryTimeComputed" -SearchBase "$EmployeeOU" | Select-Object DisplayName, samaccountname, manager, PasswordLastSet, @{name = "DaysUntilExpired"; Expression = { $_.PasswordLastSet - $ExpiredDate | Select-Object -ExpandProperty Days } }, @{name = "EmailAddress"; Expression = { $_.mail } }, @{Name = "ExpiryDate"; Expression = { [datetime]::FromFileTime($_."msDS-UserPasswordExpiryTimeComputed") } } | Sort-Object PasswordLastSet
$ExpiredUsers
foreach ($ExpiredUser in $ExpiredUsers) {
    $ReturnHTML = @" 
<html> 
<head>
<style>
body {
    Color: #252525;
    font-family: Verdana,Arial;
    font-size:11pt;
}
h1 {
    text-align: center;
    color:#C8102E;
    Font-size: 34pt;
    font-family: Verdana, Arial;
}
h2 {
    text-align: center;
    color:#9EA2A2;
    Font-size: 20pt;
}
h3 {
    text-align: center;
    color:#211b1c;
    Font-size: 15pt;
}
h4 {
    text-align: center;
    color:#242526;
    Font-size: 15pt;
}
a:link {
    color:#C8102E;
    text-decoration: underline;
    cursor: auto;
    font-weight: 700;
}
a:visited {
    color:#C8102E;
    text-decoration: underline;
    cursor: auto;
    font-weight: 700;
}
</style>
</head>
<body>
Dear $($ExpiredUser.DisplayName),<br><br>
Your password was last set on <i>$($ExpiredUser.PasswordLastSet)</i>. This means your password will expire in <b>$($ExpiredUser.DaysUntilExpired) Days</b>. Please reset your password before <b>$($ExpiredUser.ExpiryDate)</b><br>
<ol>
<li>Find a computer connected to the network</li>
<li>if the computer is logged in, on your keyboard press, <b>ctrl+alt+del</b> at the same time. </li>
<li>Select <b>Change Password</b></li>
<li>replace the username section with <b>$($ExpiredUser.samaccountname)</b>.</li>
<li>Enter your old password in the old password location.</li>
<li>Enter a new password in the new password location.</li>
<li>Confirm your new password in the confirm password location</li>
<li>Click Enter</li>
</ol>
<br>
<hr>
<br>
For more Information on how to change your password Please watch these videos.<br>
<a href='$TrainingLink'>How to change your Password.</a><br><br>

Thank you<br>
IT Department
</body> 
</html> 
"@  
    Send-MailMessage -To $($ExpiredUser.EmailAddress) -From "$ReturnEmail" -Subject "$($ExpiredUser.DisplayName) Password Notification" -BodyAsHtml $ReturnHTML -SmtpServer $MailServer
}
$Managers = $ExpiredUsers | Select-Object -ExpandProperty manager -Unique
foreach ($Manager in $Managers) {
    $ReportingtoHTML = $ExpiredUsers | Where-Object { $_.manager -eq $Manager } | Select-Object -Property DisplayName, @{name = "EmailAddress"; Expression = { $_.mail } }, @{label = "DaysUntilExpired"; expression = { "$($_.DaysUntilExpired) Days" } }, ExpiryDate | ConvertTo-Html -Fragment -As Table
    $Manager = Get-ADUser $Manager -Properties DisplayName, PasswordNeverExpires, Manager, PasswordLastSet, "msDS-UserPasswordExpiryTimeComputed" | Select-Object DisplayName, samaccountname, mail, manager, PasswordLastSet, @{name = "DaysUntilExpired"; Expression = { $_.PasswordLastSet - $ExpiredDate | Select-Object -ExpandProperty Days } }, @{name = "EmailAddress"; Expression = { $_.mail } }, @{Name = "ExpiryDate"; Expression = { [datetime]::FromFileTime($_."msDS-UserPasswordExpiryTimeComputed") } } | Sort-Object PasswordLastSet
    $ManagerReturnHTML = @" 
<html> 
<head>
<style>
h1 {
    text-align: center;
    color:#C8102E;
    Font-size: 34pt;
    font-family: Verdana, Arial;
}
h2 {
    text-align: center;
    color:#9EA2A2;
    Font-size: 20pt;
}
h3 {
    text-align: center;
    color:#211b1c;
    Font-size: 15pt;
}
h4 {
    text-align: center;
    color:#242526;
    Font-size: 15pt;
}
a:link {
    color:#C8102E;
    text-decoration: underline;
    cursor: auto;
    font-weight: 700;
}
a:visited {
    color:#C8102E;
    text-decoration: underline;
    cursor: auto;
    font-weight: 700;
}
body {
width:75%;
background-color:#ffffff;}
table {border-collapse: collapse; border: 1px solid rgb(45,41,38); text-align: Center;}
th {background-color: #f7a1af; text-align: Center;}
tr:nth-child(even) {background-color: #f2f2f2;}
tr {text-align: Center;}
td {border:1px solid rgb(45,41,38);text-align: Center;}
</style>
</head>
<body style="font-family:verdana;font-size:13"> 
Dear $($Manager.DisplayName),<br><br>
Here is a list of all employees that are reporting to you whose passwords are to expire within the next 14 days. Please have these employees reset their passwords <b>before</b> their expirydate. Please note that we have also sent an email to the employee with the instructions on how to reset their password.<br>
<br>
$ReportingtoHTML
<br>
The below videos have been sent to these employees. If the employee needs help, refer them to these videos or instruct them how to reset their passwords.<br>
<a href='$TrainingLink'>How to change your Password.</a><br><br>
<br>

Thank you<br>
IT Department
</body> 
</html> 
"@  
    Send-MailMessage -To $($Manager.EmailAddress) -From "$ReturnEmail" -Subject "User Password Notification" -BodyAsHtml $ManagerReturnHTML -SmtpServer $MailServer
}
$ITReturnHTML = $ExpiredUsers | Select-Object @{label = "Name"; expression = { $_.Displayname } }, @{Label = "UserName"; expression = { $_.samaccountname } }, EmailAddress, @{label = "Manager"; expression = { $(($_.Manager.Split(',')).split('=')[1]) } }, ExpiryDate, @{Label = "Days"; expression = { $_.DaysUntilExpired } } | ConvertTo-Html -Fragment -As Table
$ItReportReturnHTML = @" 
<html> 
<head>
<style>
h1 {
    text-align: center;
    color:#C8102E;
    Font-size: 34pt;
    font-family: Verdana, Arial;
}
h2 {
    text-align: center;
    color:#9EA2A2;
    Font-size: 20pt;
}
h3 {
    text-align: center;
    color:#211b1c;
    Font-size: 15pt;
}
h4 {
    text-align: center;
    color:#242526;
    Font-size: 15pt;
}
a:link {
    color:#C8102E;
    text-decoration: underline;
    cursor: auto;
    font-weight: 700;
}
a:visited {
    color:#C8102E;
    text-decoration: underline;
    cursor: auto;
    font-weight: 700;
}
body {
background-color:#ffffff;}
table {border-collapse: collapse; border: 1px solid rgb(45,41,38); text-align: Center;}
th {background-color: #54c6ff; text-align: Center;}
tr:nth-child(even) {background-color: #f2f2f2;}
tr {text-align: Center;width:20%;}
td {border:1px solid rgb(45,41,38);text-align: Center;}
</style>
</head>
<body style="font-family:verdana;font-size:13"> 
Dear IT,<br><br>
Please see the expiring/expired password list below.
<br><br>
$ITReturnHTML
<br>
The below videos have been sent to these employees. If the employee needs help, refer them to these videos or instruct them how to reset their passwords.<br>
<a href='$TrainingLink'>How to change your Password.</a><br><br>
<br>

Thank you<br>
IT Department
</body> 
</html> 
"@  
Send-MailMessage -To $ITEmail -From "$ReturnEmail" -Subject "Password Expiry Notification" -BodyAsHtml $ItReportReturnHTML -SmtpServer $MailServer
$Admins = Get-ADUser -Filter { (samaccountname -like "*_adm") -and (PasswordLastSet -lt $emailDate) -and (PasswordLastSet -gt $expiredDate) -and (PasswordNeverExpires -eq $false) -and (enabled -eq $true) } -Properties *
Foreach ($Admin in $Admins) {
    $Username = $Admin.samaccountname -replace "(_.*)", ""
    $User = Get-ADUser -Identity $Username -Properties *
    $ReturnHTML = @" 
<html> 
<head>
<style>
body {
    Color: #252525;
    font-family: Verdana,Arial;
    font-size:11pt;
}
h1 {
    text-align: center;
    color:#C8102E;
    Font-size: 34pt;
    font-family: Verdana, Arial;
}
h2 {
    text-align: center;
    color:#9EA2A2;
    Font-size: 20pt;
}
h3 {
    text-align: center;
    color:#211b1c;
    Font-size: 15pt;
}
h4 {
    text-align: center;
    color:#242526;
    Font-size: 15pt;
}
a:link {
    color:#C8102E;
    text-decoration: underline;
    cursor: auto;
    font-weight: 700;
}
a:visited {
    color:#C8102E;
    text-decoration: underline;
    cursor: auto;
    font-weight: 700;
}
</style>
</head>
<body>
Dear $($User.DisplayName),<br><br>
Your Admin password was last set on <i>$($Admin.PasswordLastSet)</i>. This means your password will expire in <b>$($admin.DaysUntilExpired) Days</b>. Please reset your password before <b>$($Admin.ExpiryDate)</b><br>
<ol>
<li>Find a computer connected to the network</li>
<li>if the computer is logged in, on your keyboard press, <b>ctrl+alt+del</b> at the same time. </li>
<li>Select <b>Change Password</b></li>
<li>replace the username section with <b>$($Admin.samaccountname)</b>.</li>
<li>Enter your old password in the old password location.</li>
<li>Enter a new password in the new password location.</li>
<li>Confirm your new password in the confirm password location</li>
<li>Click Enter</li>
</ol>
<br>
<hr>
<br>
For more Information on how to change your password Please watch these videos.<br>
<a href='$TrainingLink'>How to change your Password.</a><br><br>

Thank you<br>
IT Department
</body> 
</html> 
"@  
    Send-MailMessage -To $($User.EmailAddress) -From "$ReturnEmail" -Subject "$($User.DisplayName) Password Notification" -BodyAsHtml $ReturnHTML -SmtpServer $MailServer
}