Here is a little powerhouse script I wrote to audit the mailbox sizes. The focus recently is to see who’s mailbox sizes are about to be over and if it’s the deleted folder. I can’t show you all of the scripts, but I can show you part of it. This part will pull the data down in such a way that you can view the mailbox sizes, who has the largest mailboxes, what folder is the largest in those mailboxes, and what their deleted folder is sitting at. Let us take a look at the script itself.
The Script
function Get-SHDEXOMailboxSizeAudit {
    [cmdletbinding()]
    param (
        [pscredential]$Credential
    )
    Begin {

        #Installs required modules
        Write-Verbose "Installing required modules"
        if (!(Get-InstallEdModule ExchangeOnlineManagement)) { Install-Module ExchangeOnlineManagement }

        Write-Verbose "Checking and importing required modules"
        # Starts importanting required modules
        if (!(Get-Command Connect-ExchangeOnline)) { Import-Module ExchangeOnlineManagement }

    }
    process {

        #Connecting to exchange. Grabing credentials.
        if (!($PSBoundParameters.ContainsKey('Credential'))) {
            $Credential = (Get-Credential)
        }
        Connect-ExchangeOnline -credential $Credential

        #Grabs all the mailboxes at once. As this report will look at all the mailboxes.
        $Mailboxes = Get-Mailbox

        #Starts looping through each mailbox
        For ($M = 0; $M -le $Mailboxes.count; $M++) {

            Write-Verbose "Gathering Info on: $($Mailboxes[$M].UserPrincipalName)"

            #Grabs the mailbox stats.
            $Stats = Get-EXOMailboxStatistics $mailboxes[$M].UserPrincipalName
            $FolderStats = Get-EXOMailboxFolderStatistics $mailboxes[$M].UserPrincipalName

            #Starts looping through those folders to get their sizes.
            $MainFolderStats = foreach ($Folder in $FolderStats) {
                $FolderSize = [math]::Round((($Folder.FolderSize.split('(')[1].split(' ')[0] -replace ',', '') / 1gb), 2)
                [pscustomobject]@{
                    Name = $Folder.name
                    Size = $FolderSize
                }
            }

            #Adds this information to the mailbox object
            $Mailboxes[$M] | add-member -Name "Statistics" -MemberType NoteProperty -Value $Stats
            $Mailboxes[$M] | add-member -Name "FolderStats" -MemberType NoteProperty -Value $MainFolderStats
        }

        #Creates a return value.
        $Return = foreach ($Mail in $Mailboxes) {

            #Starts looking at mailboxes that are not the discovery mailbox.
            if (!($mail.UserPrincipalName -like "DiscoverySearchMailbox*")) {

                #Grabs the deleted folder as that is a folder we want to see in this report.
                $Deleted = $Mail.FolderStats | where-object { $_.name -like "Deleted Items" }

                #Grabs the largest folder. If  it's not the deleted folder, then we might want to increase their mailbox sizes.
                $LargestFolder = $Mail.FolderStats | Sort-Object Size -Descending | select-object -first 1

                #Doing some math on a string. The string format (# bytes). Thus, we work the string to get the bytes. Divide and round.
                $Size = [math]::Round(($Mail.Statistics.TotalItemSize.value.tostring().split('(')[1].split(' ')[0].replace(',', '') / 1gb), 2)

                #Grabs the mailboxes percentage.
                $DeletedToMailboxPercent = [math]::Round((($Deleted.Size / $size) * 100), 0)

                #Outputs the data to the return value.
                [pscustomobject]@{
                    DisplayName             = $Mail.Displayname
                    UserPrincipalName       = $Mail.UserPrincipalName
                    MailboxSize             = $Size
                    LargetsFolder           = $LargestFolder.Name
                    LargetsFolderSize       = $LargestFolder.Size
                    DeletedItemSize         = $Deleted.Size
                    DeletedToMailboxPercent = $DeletedToMailboxPercent
                }
            }
        }

        #Disconnects exchange
        Disconnect-ExchangeOnline -confirm:$false > $null
    }
    End {
        $Return | sort-object MailboxSize -Descending
    }
}
The breakdown
First this script is designed to work on powershell 7. It will not work on powershell 5.
The first part we come to is the [pscredential] object. Notice it’s not mandatory. Notice no pipelining either. I have found PS credentials pipped intend to do very poorly. So, it’s simple, bam wam done.
Begin
Inside our begin tab, we have the module setup. We check installed modules for exchangeonlinemanagement. if it’s there, we ignore it and import the module, if it’s not we install it. Same way with importing. If it’s imported, then we do nothing, if it’s not, we import it.
Process
Next, we grab credentials if need be and connect to exchange. We use the get-credential command to grab the credentials. Then we use the connect-exchangeonline command to connect to the exchange online.
Once we are connected, the magic can start. This is the sweetness of this script. The first step is to grab all of the mailboxes at once with Get-Mailbox. Then we start a loop, not any loop, a for a loop. Wait! David, WHY A FOR LOOP! It’s simple, we want to add information to the index. So, we need to be able to call the index. We use the Get-EXOMailboxStatistics and choose the userprincipalname of the index we are looking for. We do the same thing with Get-EXOMailboxFolderStatistics. These gives us some clear stats we can use later on in the script. Now we loop through the folder stats that we just collected and math ourselves some bytes to gb. See the output of the get-exomailboxfolderstatistics looks like “24mb (#### bytes). So we need to filter that out and get the ####. I use a split to do this. I split out the string at the ‘(‘. This way, the bytes are on object 1. Then we split it again by the space. Now the bytes are on the 0 object. Then we replace the ‘,’ with nothing. Now we divide all that by 1gb to convert it to gbs. Then we drop that all into the mainfolderstats. Next, we add all of that information into the mailbox variable we created before this looping madness using add-member. We are adding it as a noteproperty.
Now we have prepped our data, it’s time to sort it. We start the loop once more, but this time it’s simple for each loop as we don’t need the array index value. We first grab all the deleted items folder. Then we grab the largest folder using the sort-object command on the size object of the folderstats note property that we made in the last step. Then we do some math. Like before to get the mailbox overall size. Finally, we grab the deleted mailbox percentage with a little more math. This time its percentage math. Now we have all of this useful information we use our pscustomobject and put it all together.
Then we disconnect using the disconnect-exchangeonline command.
End
Finally we display the return information inside our end tab. We sort the object by the mailbox size in a descending order.
This past week I needed to find all of the quickbook files on a computer without accessing quickbooks itself. The core of the script is a simple Get-Childitem command looped for each logical disk on the machine. Looking for one of the four main extensions for quickbooks. The four extensions are as follows
Since I want this to be a little easier to use, I broke it down between the file types with a validate set parameter. This way you can choose which extension you want. Then I go through each extension and make an if statement for each one matching up the extension.
Next we get the disks using the Get-CimInstance -classname win32_logicaldisk. This grabs all the mapped drives, local drives, and anything else that has a drive letter.
Now we loop through those disks and search the root of each drive for any files with the extension we choose. We select the fullname as this gives us the full path. I also like having file size and last write time to determine if the file is valid still. Once we go through this loop we display the information.
Improvements
I can add remote computers to this setup.
That’s it, if you have any questions feel free too reach out.
This little guy is a simple dynamic parameter resource for you all. Take a look at my previous blog post about how these parameters work. Totally worth adding these things to your scripts. This script is simple, it uses the add-adgroupmemeber and dynamic parameters to help pad against mistakes.
The Script
function Set-SHDADGroupMemebers {
    [cmdletbinding()]
    param (
        [parameter(mandatory=$true)][validateset('Add','Remove')][string]$Action,
        [securestring]$Credential,
        [switch]$Output
    )
    DynamicParam {


        # Set the dynamic parameters' name
        $ParamName_portgroup = 'Group'
        # Create the collection of attributes
        $AttributeCollection = New-Object System.Collections.ObjectModel.Collection[System.Attribute]
        # Create and set the parameters' attributes
        $ParameterAttribute = New-Object System.Management.Automation.ParameterAttribute
        $ParameterAttribute.Mandatory = $true
        # Add the attributes to the attributes collection
        $AttributeCollection.Add($ParameterAttribute)
        # Create the dictionary
        $RuntimeParameterDictionary = New-Object System.Management.Automation.RuntimeDefinedParameterDictionary
        # Generate and set the ValidateSet
        $arrSet = (Get-ADGroup -Filter *).name
        $ValidateSetAttribute = New-Object System.Management.Automation.ValidateSetAttribute($arrSet)
        # Add the ValidateSet to the attributes collection
        $AttributeCollection.Add($ValidateSetAttribute)
        # Create and return the dynamic parameter
        $RuntimeParameter = New-Object System.Management.Automation.RuntimeDefinedParameter($ParamName_portgroup, [string], $AttributeCollection)
        $RuntimeParameterDictionary.Add($ParamName_portgroup, $RuntimeParameter)


        # Set the dynamic parameters' name
        $ParamName_datastore = 'Username'
        # Create the collection of attributes
        $AttributeCollection = New-Object System.Collections.ObjectModel.Collection[System.Attribute]
        # Create and set the parameters' attributes
        $ParameterAttribute = New-Object System.Management.Automation.ParameterAttribute
        $ParameterAttribute.Mandatory = $true
        # Add the attributes to the attributes collection
        $AttributeCollection.Add($ParameterAttribute)
        # Generate and set the ValidateSet
        $arrSet = (Get-ADUser -Filter *).name
        $ValidateSetAttribute = New-Object System.Management.Automation.ValidateSetAttribute($arrSet)
        # Add the ValidateSet to the attributes collection
        $AttributeCollection.Add($ValidateSetAttribute)
        # Create and return the dynamic parameter
        $RuntimeParameter = New-Object System.Management.Automation.RuntimeDefinedParameter($ParamName_datastore, [string], $AttributeCollection)
        $RuntimeParameterDictionary.Add($ParamName_datastore, $RuntimeParameter)
        return $RuntimeParameterDictionary
    }

    begin{
        $Group = $PsBoundParameters[$ParamName_portgroup]
        $username = $PsBoundParameters[$ParamName_datastore]
    }
    process {
        if ($PSBoundParameters.ContainsKey('Credential')) {
            if ($Action -like "Add") {
                Add-ADGroupMember -Identity $group -Members $username -Credential $Credential
            } elseif ($Action -like "Remove") {
                Remove-ADGroupMember -Identity $group -Members $username -Credential $Credential
            } else {
                Get-ADGroupMember -Identity $group -Credential $Credential
            }
        } else {
            if ($Action -like "Add") {
                Add-ADGroupMember -Identity $group -Members $username
            } elseif ($Action -like "Remove") {
                Remove-ADGroupMember -Identity $group -Members $username
            } else {
                Get-ADGroupMember -Identity $group
            }
        }
    }
    end {
        if ($Output) {
            if ($PSBoundParameters.ContainsKey('Credential')) {
                Get-ADGroupMember -Identity $Group -Credential $Credential
            } else {
                Get-ADGroupMember -Identity $group
            }
        }
    }
}
Dynamic parameters… OMG… Lets just say, when I first started using them, my brain melted. These things take so much effort to get going. Then the way to document them is even harder. After using PowerShell for many years, I finally figured them out and it’s time to help you out. There are many blogs out there and many posts on redit about Dynamic Paramters. All of them fall short one way or another. I am going to try and not do that today. By the end of this blog we will create a Add-SHDUserToGroup command with Two Dynamic Parameters of User and Group.
Structure
So, Dynamic Parameters is a parameter that is more fluid. You can pull the structure of Active Directory and tab through users as a parameter or you can look at the inside of a file. The limits are bound to a single column array. This means you can’t use all of the Get-ADuser command. You have to parse it out with something like select-object. We will get more into that later. First thing first. Structure. Where does a Dynamic Parameter start? It starts after the param() and before your Begin {} tag.
function Add-SHDUserToGroup {
    [cmdletbinding()]
    param ()
    DynamicParam {}
    Begin {}
    Process {}
    End {}
}
To use the Dynamic Parameters you have to have the param() tag. This tag can stay blank. As scripters we always want our functions to be advanced functions. This way we can see the verbose tags as we run our tests. Thus me, you will need to run an test more than once.
Planning Stage
Before you go any farther. You need to plan out your Dynamic Parameter. In our example, I will be working with a company that has over active 4000 users in their AD. So, a get-aduser -filter * would bring running the command to it’s knees. The object you target to gather information from will execute a command and it will effect the PS session you are in. It may even crash your powershell. I learned this the hard way when calling a script to gather every user’s name from Azure AD. I always suggest using the # and list out the commands you want to run. Study those commands and find the fastest approach. You don’t want your user waiting 5 minutes to hit tab or spend 5 minutes tabbing through options they don’t need. The name should also be reflective. In this example we will be using one a single object and not an array. So no string[].
The Setup
Lets go line by line. I found the original part of this bad boy online on github. However, where it failed was how to use it. Then I found a script that showed how to use the dynamic parameter. I was confussed, but Hopefully you will not be. The first thing we want to do is name it.
$ParamName = "User"
The next item is to create a collection of attributes. The first part of this command creates the array. Kind of like an $a =@() deal, but not. We are going to use the System > Collections > Object Model > collections and select the system attributes. Inside the object Model there are many other types of collection items. Avoid those for now.
Now we need to create and set the parameter’s attributes. We create the attribute set with the new-object cmdlet like before. System > Management > Automation > ParameterAttribute. This is the life of the parameter’s attribute. Then we set the attribute to mandatory by adding the .Mandatory = $true flag. Then we finally add this to our AtrributeCollection object we made in the previous steps using the .Add() method.
Now it’s time to create the Directory. Once again, this is an object like before, thus new-object. We are living inside the System > Management > Automation world. This time we want the RuntimeDefinedParameterDictionary.
The dirctionary has been created. Now we need to fill that dictionary up with information to select from. So, lets create an array object and fill it it up. Then we will place that object into the dictionary. This is also the important part because this is the “Dynamic” part of the dynamic parameters. We will be selecting all the enabled user. Then we create a new object for the validation set. Similar to the [validateset()] inside the parameters. Then we add the vlidateset to the attributecollection again using the .add() option.
Now we need the run time parameter set. We do this using the new-object. This set will basically hold the object’s name, its type, and the collection. Imagine it as the [validateset(“A”,”b”,”c”)][string]$users. Once again System > management > Automation > RuntimeDefinedParameter. Name, type, and collection. Once we have made this with the previous information, we need to add it to our dictionary with an add() once again.
Finally we want to return the RunTimeParameterDictionary.
return $RuntimeParameterDictionary
Phew, that’s a lot for one parameter! However, now we have a parameter that gives us a userful list of users with their system names we can call from. How do we use that information?
Begin Tag
Inside the begin tag, lets put the parameter into something that we can use inside the process tag.
$UserName = $PsBoundParameters[$ParamName]
Process tag
Now in the process tag all we have to do is use the information above ($username) and use that instead of using the same old information over and over again. We search for the username of the user.
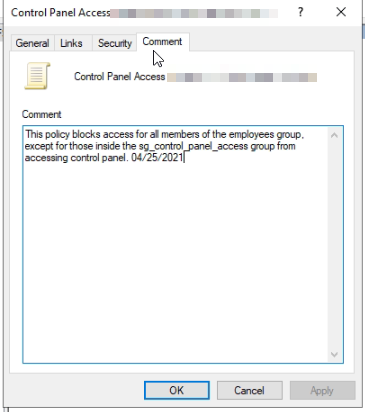
Did you know you can add a comment to a group policy? Did you know you can report on that comment as well. Basically, if you put the purpose and any additional information like security groups, applied to and not to, and so on and so forth, you can document and report on the group policy using PowerShell. Let me show you how.
Commenting Group Policy
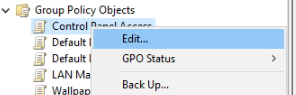
There are two ways you can comment group policy, the first is the GUI. The second is through PowerShell. First we will do a comment via the GUI.
The GUI Way
300start Group Policy Management Console
Select the policy object you wish to comment
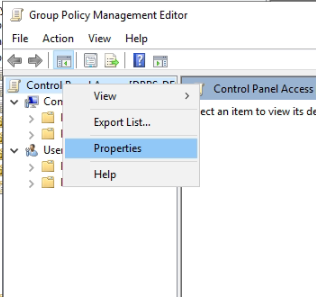
Right click and click edit on this policy
In the navigation plane, right click the policy’s name and select properties
Click the Comment tab
Enter your comment
Apply and Ok.
The PowerShell Way
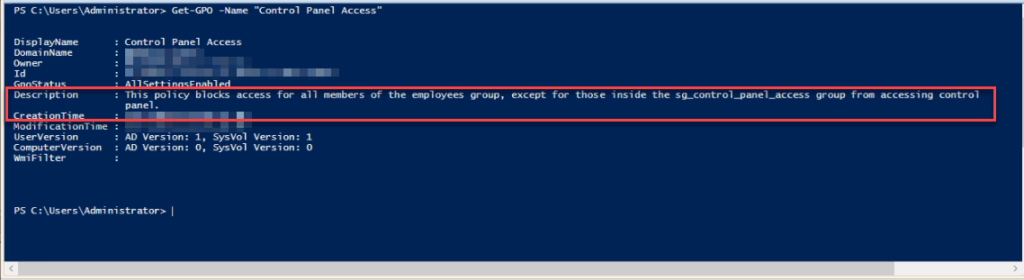
The command we are going to be using is the get-gpo command. This command allows you to grab the single GPO or all of the GPOs in the company.
Get-GPO -Name "Control Panel Access"
Results of Get-GPO
You can see the comment we added to the policy earlier as the description. Why Microsoft hasn’t changed the name on the tab, I will never know. For anyone who is familiar with PowerShell there is no Set-GPO commandlet native to PowerShell. So, it’s time to put our thinking caps on and figure out what we can do. I piped this command into get-member.
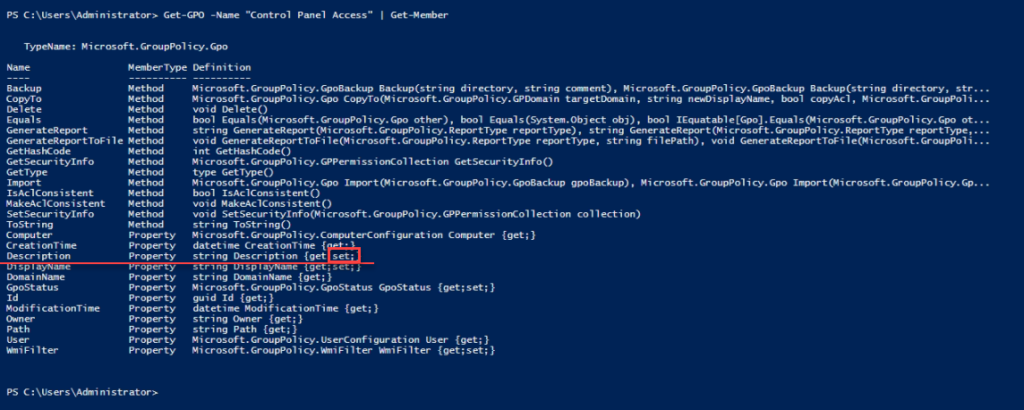
Get-GPO -Name "Control Panel Access" | Get-Member
Results of the get member
Look what we found. The Description property has a set feature to it. This means you can set the property using the get-gpo command.. Bingo! Lets do this!
(Get-GPO -Name "Control Panel Access").Description = "This policy blocks access for all members of the employees group, except for those inside the sg_control_panel_access group from accessing control panel. 04/25/2021"
Results from the above command.
I wanted to add today’s date into the description. This way whoever comes behind me sees when it was written. Now let’s see if the GUI updated accordingly as well.
The new information is inside the policy
It updated like we believed it would. This is because of the set feature inside the property. The command allowed us to set the property. Such a simple and yet lovely thing. Now, you can run a report asking for just the name and description to get much more information. If you do this with all of your policies, life gets a little easier.
Maybe, one day I will use a dynamic parameter and create a set-GPOdescriptoin command to set the description of any gpo you can select from. Hum…
Like always, if you have any questions feel free to ask.
Nested objects are very useful as they can give you a way to store complex data. The featured image of this blog is of a nested temple. Each room is nested on top of the other. What’s cool about this image is each room has items inside of it. For example, there a water bottle. Think of nested arrays like this. The full thing is a temple. That is the first object. Then we have small buildings inside that. Those are our secondary objects. Those secondary objects also have properties. So imagine the roof being the second object’s properties. Inside each building there are rooms. Those are our third objects. What’s in those rooms are the properties of those rooms. Then you can have a chest that could be a fourth object and it could have its own properties. As you can tell, this can get confusing quickly. Parsing through that data can be a challenge. Below we will go through the process of adding display names to the account SKU for the licenses for each user. We do this for later reporting. There are a few things you will need before we start.
Now you need to connect to the Microsoft Online account. You can do this by using the connect-msolservice. Make sure you have the credentials required.
$Users = Get-MsolUser -all
Now download the list here. You will need to import the file into PowerShell. You can do this with the Import-CSV command. Inside this list, you can add what you want and so on and so forth.
Add the Add to Licenses
Now we have the array built, it’s time to start learning something cool. The goal is to add the display name of the Account SKU inside the licenses area of each user. This way when you see the licenses you know what you are looking at later. More importantly, this will teach you how to place information directly into an array instead of rebuilding the array.
For vs Foreach
I love foreach, it helps so much. foreach ($user in $users) is nice. This is great for rebuilding an array because you can push the information into another array easily like this. Great for a full rebuild. However, in our world we want to put the data directly into the array itself. The Foreach creates a temporary object based on the object that is inside the array. So it creates a “User” based on the “Users.” Thus, doing $user | add-member doesn’t stay. I tried this a few hundred times. So, the for loop is going to be our friend. The reason for this is you can say where in the original loop you want to go to. Lets start the loop shall we.
The first part is the for loop. We start the loop at 0. ($I = 0) we start at 0 because arrays start at 0. Then we will continue this loop while $I is less than the total user count. Each loop will increase the $I by 1 using the $I++. This is a basic for loop setup. This will give us the index of the users. The next step is the test to see if the user has licenses.
if ($Null -ne $Users[$I].Licenses) {}
A few things with this if statement. First the $Null is on the left. The reason for that is because we evaluate nothing first. Then if the next thing even has something in it, it triggers right off the bat. If it doesn’t, then we else out. Thus, having $Null on the left is faster. Next notice the $Users[$I]. This is basically we want the Object at index of $I. Each time the loop process, that $I increases. Thus, we go through the loop. Finally we are looking at the .Licenses. If It doesn’t have a licenses, we don’t want to evaluate anything. We will leave this alone. Now if it does, then we get to have our fun. Normally users have more than one license inside their profile. Thus, we have more than one loop.
for (($A = 0); $A -lt $Users[$I].Licenses.count; $A++) {}
Now notice, I replaced $I with $A, but I changed up the condition. If $A is less than the current index of $users licenses count. Then we increase $A by 1 with the $A++. Now we are within the user array within a user and evaluating licenses. We are going deep.
So here we are grabbing that AccountSkuID with our $Los variable. Then we compare from our Imported $SKUs we downloaded and imported earlier. We place that inside the $Lose value. So now we have the Displayname and the SKU name.
To prevent any errors, we check $Lose to see if it’s null. I it is, then we want to place the information into it differently. This way later when we look at the data we don’t get some odd errors.
if ($Null -ne $Lose) {}
Finally the meat and potatoes of why we are here. We want to add that Display name for that sku. So let’s do that. We want the current $I user. We want the current $A licenses. Once we have both of those, we want to use add-member to add a note property. We want to name it something different than just DisplayName because that is everywhere. So, I like to use smaller names. I used $Lice. You can use Displayname, or not. I’m just odd.
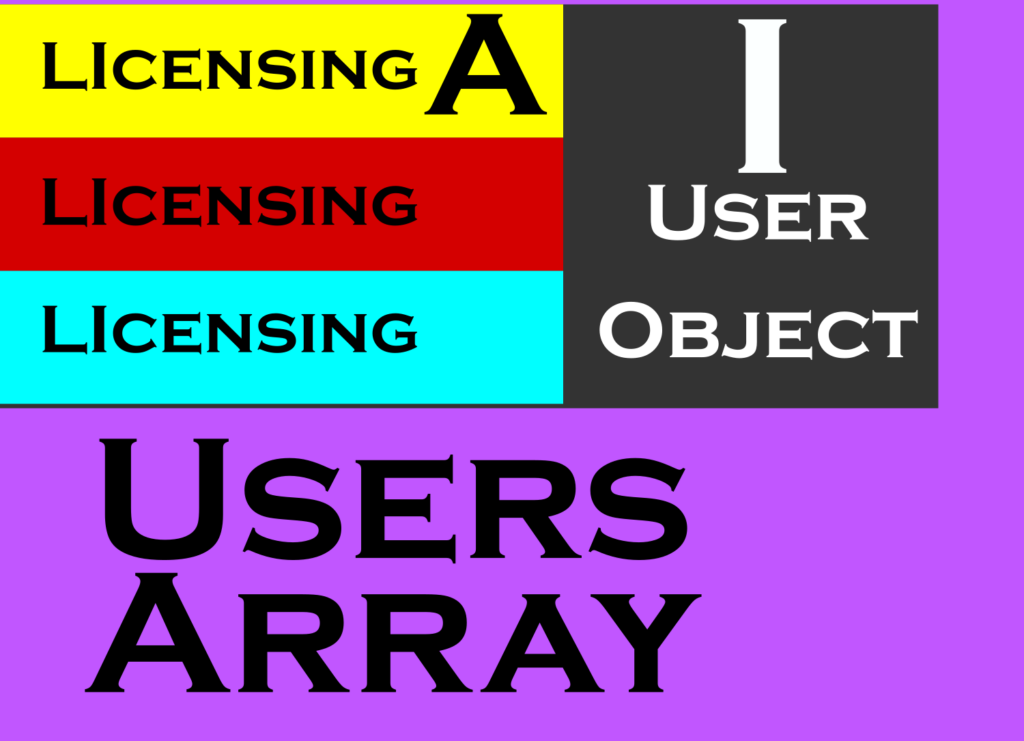
As we loop through this process, it will add the Display name to each license inside the array. This way you can report on it later. In the else part of our test, we place the note property name the same but the value would be “N/A” or something along those lines. As long as it’s not null, we are safe. Below is a visual that might help understand how this loop works. The User object (Black) is the I. The LIcenses are multi-color. A. All of it lives within the User Array which is Purple.
If you have any questions, please feel free to reach out.
We use cookies to ensure that we give you the best experience on our website. If you continue to use this site we will assume that you are happy with it.