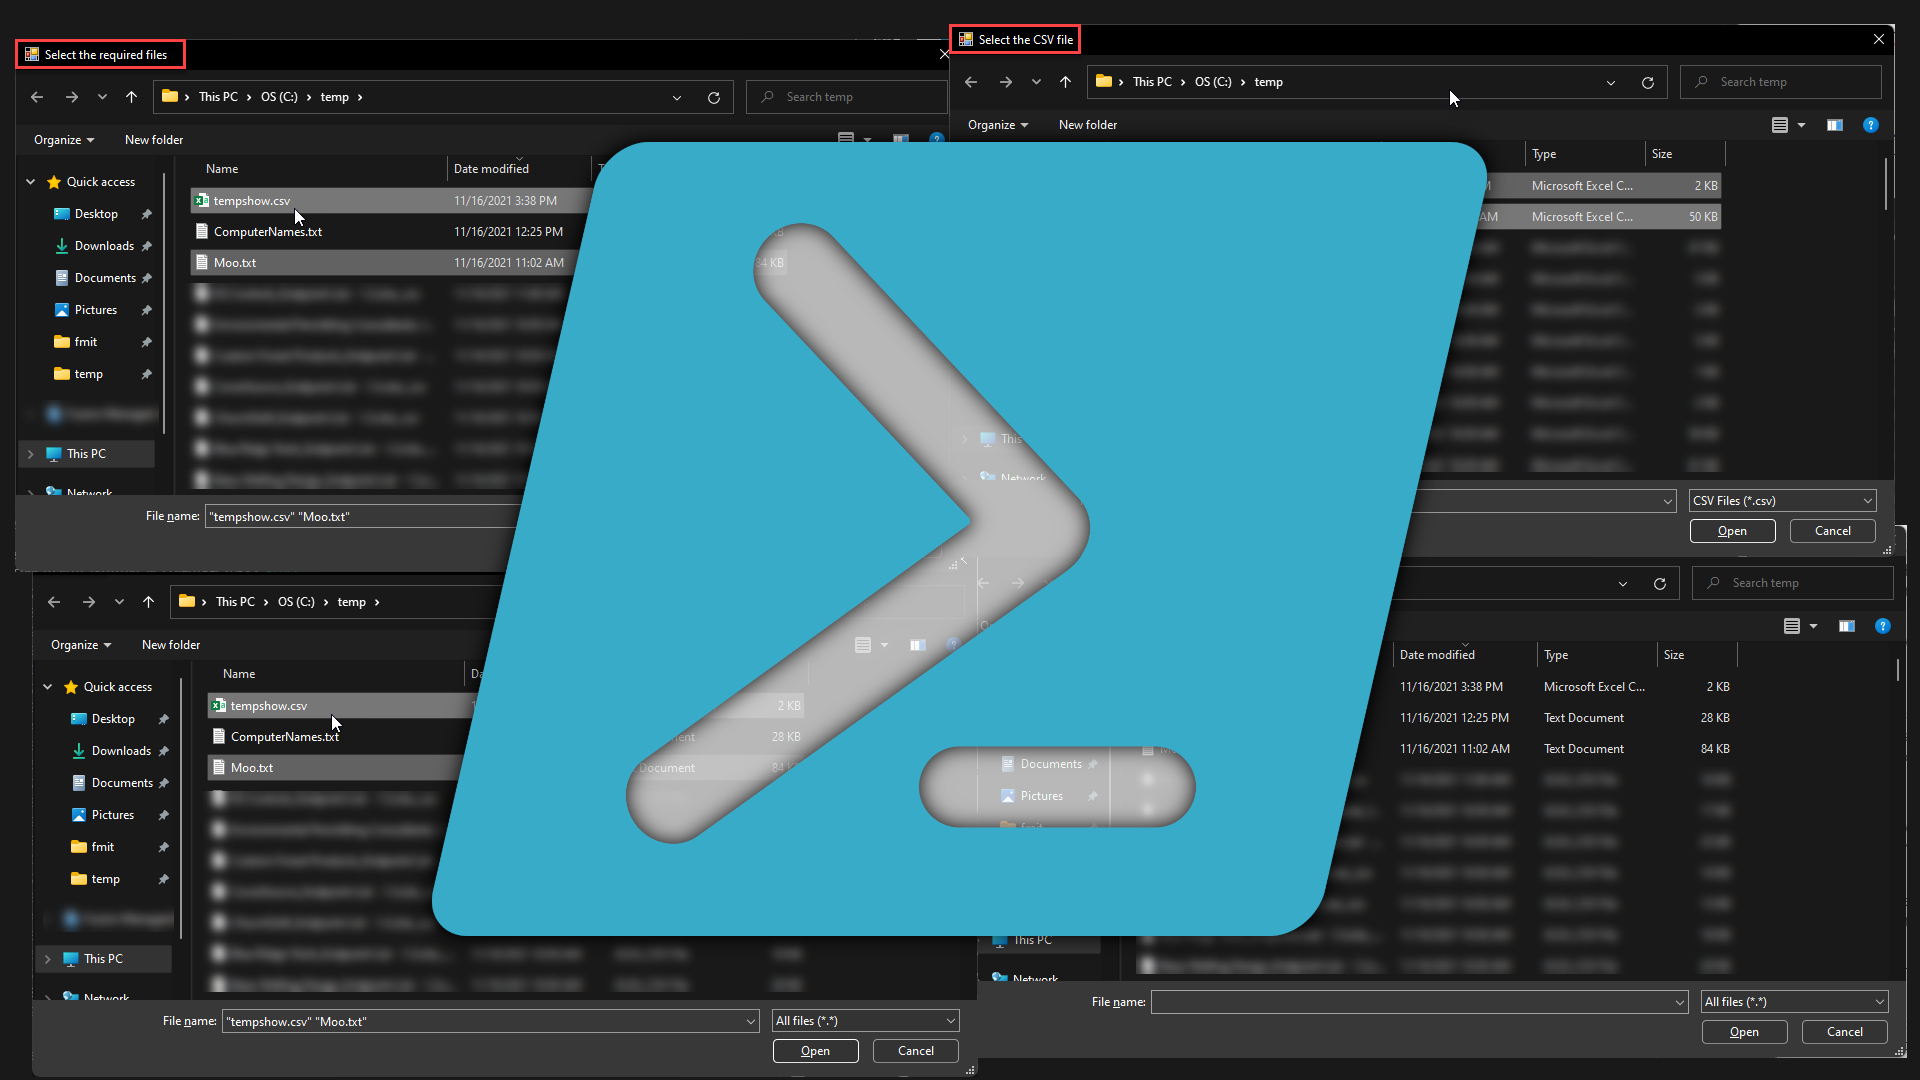
by David | Nov 24, 2021 | Information Technology, PowerShell
I love a good prank. Sometimes pranks need to challenge us. I coded a good prank and it requires a scheduled task and a little bit of PowerShell. The idea behind the prank is the computer will alert you with a beep, then read a random fact to you. Then it closes off with a set of beeps. It looks at this over and over and over again. We will call this script facts.ps1.
Facts.ps1
$random = Get-Random -minimum 20 -maximum 60
Start-Sleep -s $random
[system.console]::beep(600, 2000)
Add-Type -AssemblyName System.Speech
$voice = New-Object System.Speech.Synthesis.SpeechSynthesizer
$Facts = (Invoke-WebRequest -Uri https://therandomadmin.com/nextcloud/index.php/s/9rmSoM2ppY5ggia/download).tostring() -split "[`n]"
$random = Get-Random $Facts
$voice.Speak($random)
Let’s break it down so you can appreciate the greatness of this command. The first thing we do is get a random number between 20 and 60 seconds. We do this so the anti-virus doesn’t attack it from starting by the scheduled task time. Then we start sleeping for that amount of time. Once we are done sleeping, we sound the alarm. The [System.Console]::beep(Pitch,Length) does this part.
Next, we import the speech assembly to read off the Fact. That is done by the Add-Type command. Then we set up the voice by using the new-object command and create the System > Speech > Synthesis > Speech Synthesizer. I remember back in high school this was amazing new technology. I wish it would grow.
Now we get the fact sheet from the web. You can download this file and host it wherever you want. I stole it from various sites myself. We grab it with the invoke-webrequest command. Then we convert it to a string. We split said string up by each new string. Now we have the information, we grab a random item by using the get-random command. Then, we dump that into the $voice we made a while ago. It speaks it out to the user. Finally, 3 final beeps to let the user know it’s done and over.
Now we need to take the next steps:
- Get the script on the target computer
- Setup a scheduled task to have it run.
To get it on the other persons computer you can put it into a next cloud and download it from there. Use the invoke-webrequest and download the file to the c:\temp\facts.ps1. Then we create two variables, taskname, and facts. The task name is going to be called “Facts” and the Facts needs to be wherever you downloaded the file.
Invoke-WebRequest -Uri "https://rndadhdman.com/index.php/s/mTA6YaDZ7YXAo9E/download" -OutFile c:\temp\Facts.ps1
$taskName = "Facts"
$Facts = "C:\temp\Facts.ps1"
Then we are going to set up action for our scheduled task with the New-ScheduledTaskAction commandlet. The execute will be powershell.exe. The arguments will be execution policy bypass, Noprofile, nologo, noninteractive, windows style will be hidden, and the file is of course the $facts.
$Action = New-ScheduledTaskAction -Execute "PowerShell.exe" -Argument "-executionpolicy bypass -noprofile -nologo -noninteractive -WindowStyle Hidden -file $Facts -Force"
Next we create the trigger with the New-ScheduledTaskTrigger commandlet. This is where the fun can be exciting. We can do this one, daily, minutely, oh yeah. We only want to do this once, so we will select once in this case, but we want it to repeat every minute or so. We do that with the new-timespan commandlet.
$taskTrigger = New-ScheduledTaskTrigger -Once -At (Get-Date).AddMinutes(10) -RepetitionInterval (New-TimeSpan -Minutes 1)
Finally, we put it together with the register-scheduledtask commandlet. The task name will be the $taskname, the action will be $action, and the trigger will be $tasktrigger.
Register-ScheduledTask -TaskName $taskName -Action $Action -Trigger $taskTrigger -Force
For the rest of the day, their computer will read off odd strange facts.
I hope you enjoyed it.
by David | Nov 10, 2021 | Information Technology, PowerShell, Resources
From time to time, you will be asked to create a web report with data that can only be easily obtained by PowerShell. There are hundreds of modules out there that can do this, which is very nice. This blog isn’t about those modules, but instead some tricks I have learned over the years. When it comes to custom HTML reports, these are very customized from data sources like Azure, Active Directory, even SLQlite services. If all possible I like to use the Universal dashboard. But the UD doesn’t translate to emails or IIS pages very well. Let’s get started with the here string.
Here-String
$HereString =@"
Information
"@
A here-string is used to create a block of text. In the example above you see the variable HereString is equal to @””@. This is very important. The @ symbol indicates the start and stops of a here-string. You can place variables inside the here-string as well. This means you can build variables outside of the here-string and plump them into the string. Here is an example of our base for the website.
$HTML = @"
<html>
<head>
<title>Employee List</title>
<style>
</style>
</head>
<body>
</body>
</html>
"@
From this template, we can add CSS coding, powershell tables, lists and much more. The next important item we need to talk about is the convertto-html commandlet.
Convertto-html
This command is the heart of creating tables out of PowerShell information. For example, you want to pull all enabled users from the employees OU and display their displaynames, samaccountnames, department, and title in order. That’s a simple get-aduser command.
$users = Get-ADUser -Filter {enabled -eq $true} `
-SearchBase "OU=hospice Users,DC=Hospice,DC=Local" `
-Properties displayname,samaccountname,title,department `
| Select-Object Displayname,Samaccountname,Title,Department `
| sort-object Displayname
Now we need to convert this array of data into a useable table. This is where convertto-html comes into place. We can tell the command to create a full website just for the tabled information or we can tell it to produce a single table using the as flag and the fragment flag.
$UsersToHTML = $users | ConvertTo-Html -as Table -Fragment
Now we have a user table that we can drop into our Here-string from above. The Here-string is the last thing you will create during this custom process.
$HTML = @"
<html>
<head>
<title>Employee List</title>
<style>
</style>
</head>
<body>
$UsersToHTML
</body>
</html>
"@
This is pretty much the basics of how you would create a site of all users and their user names. You export that site using the >> command. So it would look like this:
$HTML >> <Pathtohtml>.html
Going Deeper – Employee Directory With Images
Let’s go a little deeper by making an employee Directory with pictures. In this scenario, we will assume that the active directory has thumbnail photos inside of it. This Scenario is going to be based on an IIS server and everything is set up for a basic HTML page. I will as
Requirements:
- If a property is not present in the AD account, null or blank, do not display that property.
- All users must have a photo or a placeholder.
- The table must be in alphbetical order by the displayname.
- Required Properities:
- Photo
- Display Name
- Username
- Job Title
- Department
- Mobile Phone
- Office Phone
- Fax
- Manager
The first thing we need to do is grab the data that we need from the active directory. We do that with the get-aduser command.
$users = Get-ADUser -filter {enabled -eq $true} `
-Properties thumbnailPhoto,Displayname,SamAccountName,Title,Department,MobilePhone,OfficePhone,Fax,Manager
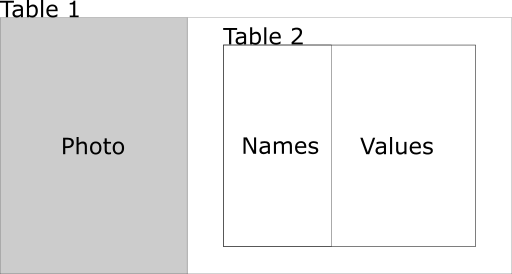
There will be two tables that we will be working with. The first table will be two columns and however many rows we will need. The first column will contain the 128×128 active directory thumbnail photo. The second column will contain the Users information. The second column will contain a table with two columns and 8 rows. The first column will be the name of the value and the second column will be the value itself.
I can do this in two ways. I can start the first table inside the here-string or I can create the table before the here-string. I’m going to create the table before the here-string. This way I have a clear image in my head of the table that I am inputting into the here-string. Notice the UserTable is a here-string as well. So we will refer to the Main HTML here-string as the HTML string from here on out.
$UserTable = @"
<table id="myTable">
<tr class="header">
<th style="width:20%;visibility: hidden;"></th>
<th style="width:30%;visibility: hidden;"></th>
</tr>
"@
Now we have a basic HTML table built. From here on out, we will be creating the rows for this table. Inside each row will be the two columns. The photo column and the data column. The data column will contain the table with the employee data on it. It’s time to start looping through that user’s object we created a while ago. We start off with a simple foreach loop. Inside the loop the logic will go as follows:
- Grab the photo from the thumbnail property and save it to the image repo using the username.
- Start the new row. Inside the first column of the new row, we check to see if that photo exists. If it does, then we we create an img tag of the file, if it doesn’t then we target the general image file.
- The second column we blank out the values for each item.
- Then we create the table.
- Then we create if statements that creates each row in table 2. if the users object has the property in question for that user, we set the value and create the <tr> accordingly.
- Finally we close off the second table and the row.
- Then after all of the rows on table 1 is created, we close off the table.
Phew. This is going to be crazy.
The first part is to download the photo in question. If the user’s profile has a thumbnail photo we will download it from AD using the set-content command. (PS5)
foreach ($User in $Users) {
$PhotoPath = "<path>/images/$($user.samaccountname).jpg"
if ($Null -ne $user.thumbnailPhoto) {
$user.thumbnailPhoto | Set-Content $PhotoPath -Encoding byte
}
}
The next step is to determine if the file exists. If it does, we want to create the Image URL towards the new user’s image. If not, we want it to go to the placeholder image. All of this is still within the Loop in question.
if (Test-Path $PhotoPath) {
$ImageURL = "Images/$($user.UserPrincipalName).jpg"
} else {
$ImageURL = "Images/Placeholder.png"
}
Now we need to make a placeholder for each property that we will be using. We do this so the next time the loop processes, we have fresh variables.
$DisplayName = ""
$Username = ""
$JobTitle = ""
$Department = ""
$MobilePhone = ""
$OfficePhone = ""
$Fax = ""
$Manager = ""
Now we need to test these variables and fill them up with HTML code. Each one of these will be a row on the table2. The code below is the same for each of these. All you need to do is replace the <value> with the value in question. The one on the left is what you will replace. The one on the right is an example.
if ($Null -ne $User.<Value>) {
$<value>= @"
<tr>
<td style='font-size:16px; text-align:justify; width:100px;'>
<strong><value>:</strong>
</td>
<td style='vertical-align: top; text-align:left;'>
$($User.<value>)
</td>
</tr>
"@
}
if ($Null -ne $User.OfficePhone) {
$OfficePhone= @"
<tr>
<td style='font-size:16px; text-align:justify; width:100px;'>
<strong>Office Phone:</strong>
</td>
<td style='vertical-align: top; text-align:left;'>
$($User.OfficePhone)
</td>
</tr>
"@
}
Once you create a value for each of these items, it’s time to put it together into the User’s table. AKA table2. We start off by using the $usertable from above combined with a here-string. Remember we are now entering the first table again and creating each row. Here is what the code will look like.
$UserTable = $UserTable + @"
<tr>
<td> <center><a href="$ImageURL" target="_blank"><img src='$ImageURL' style='width:125px; height:125px; border-radius:100px;'></a></center></td>
<td>
<table>
$DisplayName
$UserName
$JobTitle
$Department
$MobilePhone
$OfficePhone
$Fax
$Manager
</table>
</td>
</tr>
"@
We are building this string. This is what you see the $usertable = $usertable + Here-String. All of this is the single row for the table in question. We loop through all of the users using this method and close out the Loop. Once the loop is closed out what we need to do next is close out the table. We do this by adding a final </table> to the end of the table in question.
$UserTable = $UserTable + "</table>"
The final part is placing this table inside an HTML website. It’s as simple as slipping $UserTable between the two bodies.
$HTML = @"
<html>
<head>
<title>Employee List</title>
<style>
</style>
</head>
<body>
$UserTable
</body>
</html>
"@
Now we have an HTML site. We can further edit this and create a nice CSS code with some java-scripts, but I’m not going to get fancy here. The final thing we have to do is export this html page.
$HTML > <pathtosite>\index.html
This process is basically building inside out. We started by the image and then the data. We built accordingly. Now the script itself.
The Script
param (
$Filepath = (Read-Host "File Path for "),
$ImagePath = (Read-Host "Image Folder")
)
$users = Get-ADUser -filter {enabled -eq $true} `
-Properties thumbnailPhoto,Displayname,SamAccountName,Title,Department,MobilePhone,OfficePhone,Fax,Manager
$UserTable = @"
<table id="myTable">
<tr class="header">
<th style="width:20%;visibility: hidden;"></th>
<th style="width:30%;visibility: hidden;"></th>
</tr>
"@
foreach ($User in $Users) {
$PhotoPath = "$ImagePath/$($user.samaccountname).jpg"
if ($Null -ne $user.thumbnailPhoto) {
$user.thumbnailPhoto | Set-Content $PhotoPath -Encoding byte
}
if (Test-Path $PhotoPath) {
$ImageURL = "Images/$($user.UserPrincipalName).jpg"
} else {
$ImageURL = "Images/Placeholder.png"
}
$DisplayName = ""
$Username = ""
$JobTitle = ""
$Department = ""
$MobilePhone = ""
$OfficePhone = ""
$Fax = ""
$Manager = ""
if ($Null -ne $User.displayname) {
$DisplayName= @"
<tr>
<td style='font-size:16px; text-align:justify; width:100px;'>
<strong>Display Name:</strong>
</td>
<td style='vertical-align: top; text-align:left;'>
$($User.displayname)
</td>
</tr>
"@
}
if ($Null -ne $User.samaccountname) {
$Username= @"
<tr>
<td style='font-size:16px; text-align:justify; width:100px;'>
<strong>Username:</strong>
</td>
<td style='vertical-align: top; text-align:left;'>
$($User.samaccountname)
</td>
</tr>
"@
}
if ($Null -ne $User.title) {
$JobTitle = @"
<tr>
<td style='font-size:16px; text-align:justify; width:100px;'>
<strong>Job Title:</strong>
</td>
<td style='vertical-align: top; text-align:left;'>
$($User.title)
</td>
</tr>
"@
}
if ($Null -ne $User.Department) {
$Department= @"
<tr>
<td style='font-size:16px; text-align:justify; width:100px;'>
<strong>Department:</strong>
</td>
<td style='vertical-align: top; text-align:left;'>
$($User.Department)
</td>
</tr>
"@
}
if ($Null -ne $User.MobilePhone) {
$MobilePhone = @"
<tr>
<td style='font-size:16px; text-align:justify; width:100px;'>
<strong>Mobile Phone:</strong>
</td>
<td style='vertical-align: top; text-align:left;'>
$($User.MobilePhone)
</td>
</tr>
"@
}
if ($Null -ne $User.OfficePhone) {
$OfficePhone= @"
<tr>
<td style='font-size:16px; text-align:justify; width:100px;'>
<strong>Office Phone:</strong>
</td>
<td style='vertical-align: top; text-align:left;'>
$($User.OfficePhone)
</td>
</tr>
"@
}
if ($Null -ne $User.Fax) {
$Fax = @"
<tr>
<td style='font-size:16px; text-align:justify; width:100px;'>
<strong>Fax:</strong>
</td>
<td style='vertical-align: top; text-align:left;'>
$($User.Fax)
</td>
</tr>
"@
}
if ($Null -ne $User.Manager) {
$ManagerInfo = $User.Manager.split(',')[0] -replace "CN=",''
$Manager = @"
<tr>
<td style='font-size:16px; text-align:justify; width:100px;'>
<strong>Manager:</strong>
</td>
<td style='vertical-align: top; text-align:left;'>
$($ManagerInfo)
</td>
</tr>
"@
}
$UserTable = $UserTable + @"
<tr>
<td> <center><a href="$ImageURL" target="_blank"><img src='$ImageURL' style='width:125px; height:125px; border-radius:100px;'></a></center></td>
<td>
<table>
$DisplayName
$UserName
$JobTitle
$Department
$MobilePhone
$OfficePhone
$Fax
$Manager
</table>
</td>
</tr>
"@
}
$UserTable = $UserTable + "</table>"
$HTML = @"
<html>
<head>
<title>Employee List</title>
<style>
</style>
</head>
<body>
$UserTable
</body>
</html>
"@
$Html > $Filepath
That’s all folk, yall have a great week!
by David | Nov 3, 2021 | Help Desk, Information Technology, PowerShell
How does one enable, disable, and reset a user’s MFA in Office 365? I was surprised by how much is required for enabling MFA.
Enable MFA
The first thing we do is Get the User from the Get-MsolUser.
$user = Get-MsolUser -UserPrincipalName $UPN
Next, we create a Strong Authentication object using the New-Object.
$SAR = New-Object -TypeName Microsoft.Online.Administration.StrongAuthenticationRequirement
Now the object is created, you can review the object by using the Get-Member command. This object has 4 properties and 4 methods. We can now edit the properties. We will edit the RelyingParty and state.
$sar.RelyingParty = "*"
$sar.State = "Enabled"
Now we place the edited items into the user’s account.
$sarobject = @($sa)
Set-MsolUser -UserPrincipalName $user.Userprincipalname -StrongAuthenticationRequirements $sarobject
The Script
$user = Get-MsolUser -UserPrincipalName $UPN
$SAR = New-Object -TypeName Microsoft.Online.Administration.StrongAuthenticationRequiremen $sar.RelyingParty = "*"
$sar.State = "Enabled"
$sarobject = @($sa)
Set-MsolUser -UserPrincipalName $user.Userprincipalname -StrongAuthenticationRequirements $sarobjec
Disable MFA
Disabling MFA is extremely easy compared to enabling it. It’s as simple as putting a blank object inside the strong authentication requirements flag.
Set-MsolUser -UserPrincipalName $user.Userprincipalname -StrongAuthenticationRequirements @()
Reset MFA
The last one is to reset the MFA. Microsoft created a commandlet just for this case. The command is Reset-MsolStrongAuthenticationMethodByUpn.
Reset-MsolStrongAuthenticationMethodByUpn -UserPrincipalName $user.Userprincipalname
I hope this helps out.
by David | Oct 27, 2021 | Exchange, Information Technology, PowerShell
This past week I have had multiple terminals up with different clients on different terminals connected to different Microsoft services. I quickly realized that I needed to know if I was already connected or not to each Microsoft service. I knew that Get-PPSession was a key to this, but what surprised me was azure and msols didn’t have a PPSession to review. I use 4 different connections on a daily basis. The Msol, Exchange Online, Compliance, and Azure AD. Here is how you can quickly test each service to see if it’s connected.
Msol Service
With Msol we want to test a command to see if it works. We output that command to null. The command I found to be the quickest for this is Get-MsolDomain. Once we run the command we check to see how successful that command was with $?. I like to put things into arrays for future use. So, I dropped it into a $Results and then present those display those results.
Get-MsolDomain -Erroraction SilentlyContinue | out-null
$Results = $?
$Results
Exchange Online
With Exchange online, we can use the Get-PSSession. We search the connection uri for outlook.office365. We also look at the state to be opened. We then ask if how many sessions there are. if it’s greater than 0, then we are good to go. Believe it or not, this is a one-liner.
(Get-PSSession | Where-object { ($_.ConnectionURI -like "*outlook.office365.com*") -and ($_.State -like "Opened")}).count -gt 0
Compliance
With Compliance, it’s similar to the exchange online. We are using the Get-PSSession again. This time we are looking for the word compliance and the state open as well. Once again, this can be a one-liner.
(Get-PSSession | where-object { ($_.ConnectionUri -like "*compliance*") -and ($_.State -like "Opened") } ).count -gt 0
Azure AD
Finally, we come to the Azure AD, Just like the Msol, we have to check it using a command. I have seen people use the Get-AzureADTenantDetail commandlet. So we will use that commandlet and pipe it into out-null. Then we confirm if it worked with the $? command.
Get-AzureADTenantDetail -ErrorAction SilentlyContinue | out-null
$Results = $?
$Results
The Function
Let’s combine it together into a function.
function Test-SHDo365ServiceConnection {
<#
.SYNOPSIS
Tests to see if you are connected to verious of services.
.DESCRIPTION
Tests to see if you are connected to Microsoft Online Services, Exhcange Online, Complience Center, and Azure AD.
.PARAMETER MsolService
[switch] - Connects to Microsoft Online Services
.PARAMETER ExchangeOnline
[switch] - Connects to Exchange Online
.PARAMETER Complience
[switch] - Connects to complience services
.PARAMETER AzureAD
[switch] - Connects to azure AD
.EXAMPLE
PS> Test-SHDo365ServiceConnection -MsolService
Gives a trur or False statement on weither connected or not.
.OUTPUTS
[pscustomobject]
.NOTES
Author: David Bolding
.LINK
https://github.com/rndadhdman/PS_Super_Helpdesk
#>
[cmdletbinding()]
param (
[switch]$MsolService,
[switch]$ExchangeOnline,
[Switch]$Complience,
[switch]$AzureAD
)
if ($MsolService) {
Get-MsolDomain -Erroraction SilentlyContinue | out-null; $Results = $?
[pscustomobject]@{
Service = "MsolService"
Connected = $Results
}
}
if ($ExchangeOnline) {
$Results = (Get-PSSession | Where-object { ($_.ConnectionUri -like "*outlook.office365.com*") -and ($_.State -like "Opened")}).count -gt 0
[pscustomobject]@{
Service = "ExchangeOnline"
Connected = $Results
}
}
if ($Complience) {
$Results = (Get-PSSession | where-object { ($_.ConnectionUri -like "*compliance*") -and ($_.State -like "Opened") } ).count -gt 0
[pscustomobject]@{
Service = "Complience"
Connected = $Results
}
}
if ($AzureAD) {
Get-AzureADTenantDetail -ErrorAction SilentlyContinue | out-null; $Results = $?
[pscustomobject]@{
Service = "AzureAD"
Connected = $Results
}
}
} #Review
by David | Oct 20, 2021 | Information Technology, PowerShell
Need to find duplicates in an array? It’s as simple as using a group object. So we take an array, and group the array by property or group of properties. Then we search those groups for any group that has a count of 2 or greater. Then we display those groups. Here is the heart of the code:
$InputObject | Group-Object -Property $Property | Where-Object { $_.count -ge 2 } | ForEach-Object { $_.group }
Now it’s as simple as wrapping this one-liner into a function. The Group-object property switch can take multiple inputs. So it’s best to set that as a list of strings. Here we go:
The Script
function Get-SHDArrayDuplicates {
[cmdletbinding()]
param (
[array]$InputObject,
[string[]]$Property
)
$InputObject | Group-Object -Property $Property | Where-Object { $_.count -ge 2 } | ForEach-Object { $_.group }
}
by David | Oct 6, 2021 | Information Technology, PowerShell, Uncategorized
Recently I was playing with some sql event viewer logs. These logs don’t have properties that we can pull from to make life easier. So, everything has to be parsed through the string. Which isn’t bad, but it’s a challenge to think about. Here is what one of the strings looks like:
Login failed for user 'db_admin'. Reason: Password did not match that for the login provided. [CLIENT: 10.0.80.55]
I wanted three items from this list, the username, the reason, and the IP address. The username is inside the single quotes. The reason goes from the word reason to the [ for client. The IP address is inside the brackets for the client. Lets get started. First lets get the data.
$test = invoke-command -ComputerName servername -ScriptBlock {Get-WinEvent -FilterHashTable @{logname='application';providername='MSSQLSERVER';Keywords='4503599627370496'}}
Grabing Everything between double single qoutes.
Now we have the data, it’s time to get the username. As I said, the username is found inside the single quotes. So we want to select the string with a pattern that pulls the double single quotes.
($t.message | Select-String -Pattern "'.*?'" -AllMatches).Matches.Value -replace "'",""
This bad boy here grabs everything between the single quotes. The ‘—‘ is the boundaries. the . says to match any character except the terminators. Yeah, we don’t want skynet. Then the X? tells it to match the previous token between 0 and forever times. The select starts off with the first ‘ and then moves to the next character. which is a wild card. Then we search all wildcards forever until the next ‘ with the *? characters.
We select every item in the string that matches that pattern using the -AllMatches. Then we grab the Matches by using the ().Matches. We want those values so we select the value from the matches. ().Matches.Value. This still selects the double single quotes ‘ and we really don’t want this. So we simply remove them by using the -replace command. We replace the ‘ by saying -replace “‘”,””. Looks a little confusing but it works.
Grabbing Text after a word and before a symbol.
The next part is to grab the reason. This is basically grabbing everything after a single word and before something different. The logic is the same as before, but this time we are grabbing it based off a word.
Reason = (($t.Message | Select-String -Pattern "Reason:.*\[" -AllMatches).Matches.Value -replace ' \[','') -replace 'Reason: ',''
In this instance we are searching for the word Reason:. Once we find that word, we select the first object in front of it using a wild card again. The wild card is a . like before. Then we tell it to continue searching using the * until we reach special character of [. Notice the \ is before the [. The reason for this is because in the world of Regex the bracket, [, is a special character used for searching. Thus this code is saying, start with the word reason: and search everything until you reach the square bracket.
Once we have the pattern we select all the matches like before with the -allmatches. We then select the matches and the values using the ().matches.value commands. From there we want to remove the square bracket and the word reason:. We do that with replace commands to remove the word reason we use -replace (“Reason: “,”) and to remove the extra space and square bracket we us -replace (‘ \[‘,”). Notice once again, the \ before the square bracket.
Pulling an IP address from a string
The next thing we need is the IP address of the log. The IP address is located in the square brackets with the word client inside of it. The key here is not to search those brackets. We want the IP address of any and all strings. We want all the IP addresses and not just one.
IPAddress = ($t.message | Select-String -Pattern "\d{1,3}(\.\d{1,3}){3}" -AllMatches).Matches.Value
This one is much more complex than the last one. The first thing we do is look for is up to three digits side by side. \d means digits. The {1,3} means between 1 and 3. We do this until we reach a . mark. Then we repeat the process again 3 times. We use the () to create a group. Inside that group, we have the \. which is the decimal point followed by the \d{1,3} again. Saying after the decimal point looks for up to three digits again. Finally, we tell the code to do this 3 times with the {3} tag at the end of the group.
Like before we use the -allmatches flag to get all the matches and pipe it out using the ().Matches.value method. But wait! This only pulls the IP address format, not the IP address. This works for an IP address of 512.523.252.1 which we all know is an invalid IP address. To do that we have to dive much deeper into regex. This next part is complex.
Validate an IP address
The above gives an idea of what we want to look for, a starting point, here is the big fish that we need to break down. This code is a bit longer. This code is broken up between whatif structures. Which is pretty cool. It’s going to take some effort to explain it all. So we will take one group at a time with each whatif | statement. Remember each group represented with () is for a single octet. I am going to try my best at explaining this one. I’m not fully sure, but once again, I will try.
^((25[0-5]|2[0-4][0-9]|[01]?[0-9][0-9]?)\.){3}(25[0-5]|2[0-5][0-9]|[01]?[0-9][0-9]?)$
Our first what if statement is the 25[0-5]. The maximum number for an octet is 255. In fact, 255.255.255.255 is the broadcast address. In this what-if statement, we are looking at matching the first two characters of an octet as 25 then we are looking for any number after that as a 0 to 5. So, anything like 256 would be ignored.
The next one is for the middle of the 255 range. This tests to see if the range is 2xy. The x is between 0 and 4 and the y is 0 and 9. I’ll be honest, When I changed out the 4 with a 5, the value of 256 was accepted when it shouldn’t have been. There is something special later on on this one.
Now we are matching if the first character is a 1. So, this will cover the 100-199 ranges. If there is a 1 there, if not, then it will cover the 0-99. The ? matches the previous item between 0 and one times. So the previous item is a 1 or a number. This creates the nice 0-199 range.
The \ symbol is our break symbol to break the regex processing on the next item which is our . symbol. Normally . means a wild card. In this case it means a period or decimal point. Then we close the group with our closing parentheses, ). Now we have made a group that determines if an object is between 1 and 255 with a period at the end, we need to do this 3 times. There is multiple ways to do this. We can repeat the code 3 times or we can just say {3}. That’s what we did here.
(25[0-5]|2[0-5][0-9]|[01]?[0-9][0-9]?)
Finally, we repeat the code again. This time without the \. at the end. The reason we do this is that the last octet doesn’t have a period at the end. This matches between 1-255 without the period.
Grabbing Mac Addresses from a string
Another item I pull from logs is mac addresses. Most of the time these are security logs from a firewall. However, it’s important to be able to pull a match address. The big thing between a mac address and an IP address is the mac address requires letters and numbers. They also come in all forms of delimiters. the most common are :, ., –, and a space for the truly evil people. Thus, you have to address each of these items. Here is the code:
([0-9a-fA-F]{2}[: \.-]){5}([0-9a-fA-F]{2})
The first part of the code is looking for the numbers 0 – 9. For example 0F:69:0F:FE:00:01 is the code. The first section is 0F. The 0 – 9 helps us find the 0. The next part a – f helps us find a,b,c,d,e, and f. The A – F helps us find A,B,C,D,E, and F. This way we don’t have to worry about case sensitivity when searching for the logs as some logs don’t capitalize the letters. Finally, we are going to search this two times before our next symbol.
This next part is the search for the different symbols. Notice we have the common ones in there. The first is the standard colon :. It is followed by a space and then the escape character because the period is a wild card character. Which is then followed by the hyphen – as ipconfig /all gives you hypens. It’s all within the search brackets.
We then close up the group with our () marks. This will search for at least one of those that match. We want 5 items in a row for a mac address. Mac addresses contain 6 sections. So, the next code is important to find that 6th. We search for the 5 in the row by the {5} mark.
We repeat the code over again. This way we get that last section of the mac address. This time tho, we don’t have the search for the unique symbols as the last section of a mac address doesn’t have one.
Putting these in a script
If you read my blog often, you know I like functions. Here are two functions you can add to your tool bag.
Get-SHDIPFromString
Function Get-SHDIPFromString{
[cmdletbinding()]
Param (
[string]$String
)
foreach ($string in $string) {
($String | Select-String -Pattern "((25[0-5]|2[0-4][0-9]|[01]?[0-9][0-9]?)\.){3}(25[0-5]|2[0-4][0-9]|[01]?[0-9][0-9]?)" -AllMatches).Matches.Value
}
}
Example:
PS> Get-SHDIPFromString -String "This message contains 192.168.25.5 as an IP address."
192.168.25.5
Get-SHDMacFromString
function Get-SHDMacFromString {
[cmdletbinding()]
Param (
[string[]]$String
)
foreach ($string in $String) {
($String | Select-String -Pattern '(?<mac>([0-9a-fA-F]{2}[: \.-]){5}([0-9a-fA-F]{2}))' -AllMatches).matches.value
}
}
Example:
PS> Get-SHDMacFromString -String "Physical Address. . . . . . . . . : 11-35-AF-FE-11-A1"
11-35-AF-FE-11-A1