Need to deploy the latest version of firefox to 1000 machines, Here is a little powerhouse script that can do just that. It’s similar to my last script (Gimp) as it downloads directly from the web. This time we don’t have to parse out a website since Modzilla has it laid out before us.
The source is awesome. We are downloading directly from the site with their latest 64-bit product. This time we are going with the temporary file and then downloading the file with invoke-webrequest. Then we start the process of installing it with the /s flag which means silent. Since we are coming from the temp folder I threw in the runas flag to run it as the system. This way it installs for all users. Next, we set the wait flag to install the system. From everything I have read, we don’t need to uninstall the previous version to install the newest version. We do however have to stop the process that’s why we have a get process and stop process above. Finally, we remove the installer. That’s it. A lot simpler than Gimp.
The first thing we do is set up the path we want to make. Then we test to see if the path exists. If they don’t, we make them. I’m using temp in this cause because I will be deploying this to 2000+ machines. We will remove the installer afterward. I want the Temp folder to existing afterward for future deployments.
Next, we grab the URL we want to work with This is the gimp’s official download portal. This portal is by default Oldest to newest when you pull from it using Powershell.
Then we use the Invoke-webrequest to grab the website as we did in a previous post. From there we grab all of the links. In this case, since it’s a repo, they are all download links except for 2. We only want the exes of the list, so we use a where-object to find those. Then we select the last 1 as it is the newest version.
Now we need to build our URL and our Path. This is some string controls. Notice the $($Something.Something) in this code. When you deal with an array in a string and want to grab a sub item, you need to call it out with the $().
Now we want to uninstall the pervious version of Gimp. Since gimp doesn’t show up in the win32_products, we go to it manually in the file system. Newer gimps host themselves inside the program files > gimp 2. So we search to see if that folder exists with a test-path. If it does, we then check to see if gimp is running. Then kill it with fire… ok, not fire, but force. Gimp is awesome about putting an uninstaller inside the file system. So we will use that. It’s located in the Gimp 2 > Uninst > Unins000.exe. Which can be triggered with a /verysilent parameter to keep it quiet. We do this with a start process and we use a flag -wait to wait on it to uninstall.
Then we start the install of the new gimp with the start-process again. We use the Download Name we made eailer with an argument list of /verysilent /norestart /allusers and a -wait.
In this article, I will guide you through the process of deploying webroot via Group Policy. This is a fairly straightforward process with only a little editing of the MSI. I am assuming you know how to download the MSI from the webroot portal. The portal changes often, so, I will leave this part out. If you are ready, throw on your group policy pins, and let’s get started.
Super Orca
The first thing you will need is the Super Orca. You can download it here, link. Once you get super orca installed, we will be able to download and set up the webroot MSI.
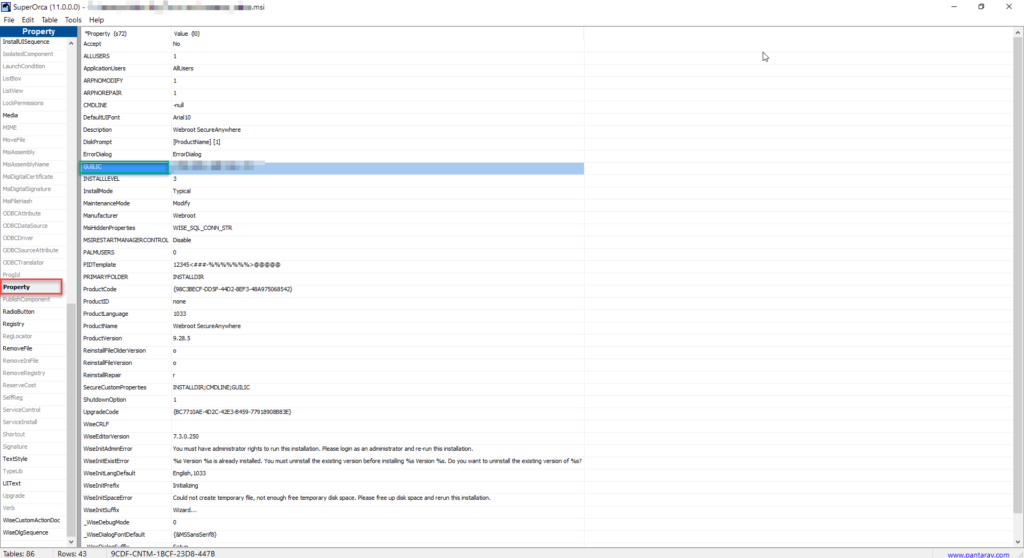
Open Super Orca
Open the Webroot MSI.
Click the Property On the left (Red Block).
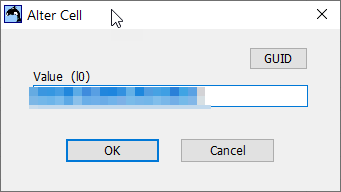
Click GUILIC (Green Block)
Enter the Key Number
Click File
Click Save As
Save as a different name. ALWAYS KEEP THE ORIGINAL!
Shared Folder
Now you have the MSI ready. You need to place it into a shared folder location. This location has to be accessible to every computer in the company as a minimum of read-only. Make sure the share is shared! I can’t tell you how many times I made this mistake. If it’s shared, good, make sure some of the clients can reach it.
Group Policy
Now we have the MSI ready to go. It’s time for the group policy. It’s a very simple computer policy. In my experience, a lot of IT managers don’t want AVs on servers. So, this tutorial will include a wmi filter. Let’s get to it.
Open Group Policy.
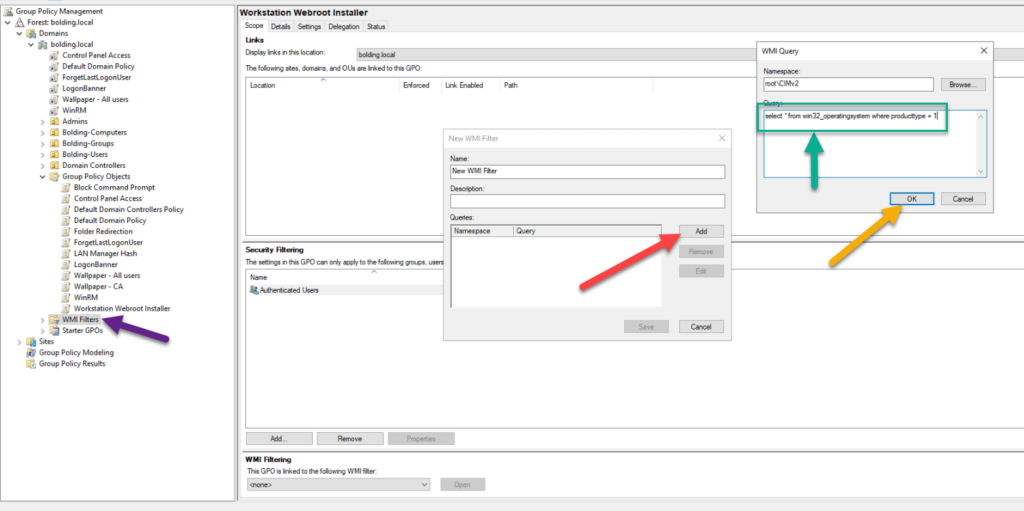
Create a new policy and name it Workstation Webroot Deployment
Enter: select * from win32_operatingsystem where producttype = 1
The numbers mean:
Workstation
Domain Controller
Server
Click Ok
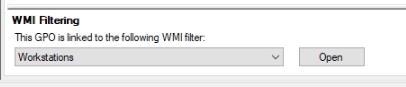
Under the WMI Filter Select the WMI Object.
All that is left is linking the GPO. Now you can link it wherever you want. Most orgs have an OU just for workstations and one for servers just for this case. It doesn’t matter where you link it the WMI filter will ignore servers and only hit the workstations.
As always, if you have questions, feel free to ask. If you ever see anything that is wrong, feel free to reach out and correct me. Thank you for reading.
I don’t like working with Citrix receiver. They drive me crazy. One version doesn’t work with the other and so on and so forth. Then finding the one you need is a pain. Thankfully, the workspace is a little better at this process. Many of my clients have recently updated their back end so the new workspace will work for them. It only took a while. So, I built a script that automatically downloads the newest version and installs it accordingly. It wasn’t until later did I realize someone else did this already. But the one I made is a little better as it doesn’t run into the conflict of pulling the version number, at least in my humble opinion. This time we will start off with the script for us lazy admins. If you want to learn how it works, keep reading on.
Lets break this guy down. The first part is we are testing if the c:\temp folder exists. If it doesn’t then we will create it. Then we test if the Citrix folder exists, if it doesn’t, once again, we create it. We do this with the Test-Path for testing and the New-Item cmdlets.
IF (!(Test-Path c:\temp)){New-Item -Path c:\ -Name Temp -ItemType "directory"}
IF (!(Test-Path c:\temp\Citrix)) {New-Item -Path c:\temp -Name Citrix -ItemType "directory"}
Now we have the folders we will be using created, we need to move to creating the first log entry. We want this log to have a timestamp on it that matches the downloaded installer. To do this, we need to get the datetime first. While doing that we will create the filename of the log and the file name of the download path. This way it’s easier to work with later on in the script. We do this by using the Get-Date cmdlet. Normally the Get-Date cmdlet outputs is an object. Which isn’t very useful in a file name since it contains forbidden characters. (Not forbidden like slifer the sky dragon). A translation is required. We do this with the .tostring() method. Notice the way we format it.
We then use the $StartTime variable inside the log name and the download pathname. This is done by a string with the variable inside of it. Next will be to create the log. We do this with a simple > which means out and create. >> means out and append. Notice in the example below we $($StartTime) we do this because the next character is a :. Inside PowerShell, you can do things like $Global:Var which tells the shell to keep that var in memory for other functions to use. This means the : is a command character. This is why we wrap the start time variable inside a $(). Powershell will only print what is inside the $(). Finally, take note of the > $Logname. We will be using $Logname more inside this script. This is why we created the variable.
Now we have the start of the log. It’s time to get the installer. In the past, we would just go to the download link and add that to a download script. However, recently Citrix changed how they download. They have tacked on an additional piece of code. Everything past the GDA is that special code they have tacked on to stop direct downloading. However, we have PowerShell on our side.
The first thing we want to do is setup a try catch. This way we can catch errors and log them. Also we can break the script with an error message that is useful. This way if you are deploying out with something like continuum or PDQ your error message makes sense. Inside the try, we want to get the webpage itself. Then log that we grabbed information. The cmdlet to get the website is Invoke-webrequest. In the below example I am using the -usebasicparsing because it’s more compatible with websites and with systems. My goal is to launch this thing to 100+ machines. The -Uri is for the website itself and finally, we use the -sessionvariable as a websession. This allows us to grab data easier, especially if it’s auto-generated, like in this case.
After we grab the website, we have to log the event. We do the same thing we did with $StartTime and place it in the file we created a few moments ago.
If these commands fail for whatever reason, the website is down, the internet is blocking, anything, we need to know that the site can’t be reached. This is why we have a log. We create the same as the $logime but this time we also add a write-error and a break command. The write-error command will send an error to a deployment software, This way we know what’s going on. The break command breaks the script at that point and doesn’t continue.
$LogTime = (Get-date).tostring("yyyy:MM:dd-hh:mm:ss")
"Site: $($LogTime): Failed to access" >> $Logname
Write-Error "Site Error: Site not accessible"
Break
Lets put them together inside the try catch so you can see what it looks like.
Now we have the website itself inside a variable. It’s time to find what we need. The $CitrixPage contains different elements inside of it. Each item can give you information. The Rawcontent is just like it sounds, raw content of the page. While status code can give you information about if the site is up or what condition it is in. In this case, we will be looking at the links and status code. We check if the site has a good status of 200, if it doesn’t, then we don’t want to battle that battle. Thus we log and break like before. If it does, however, we want to take apart the links and find the one that contains the exe that we need. We do this with a where-object cmdlet. We search the .rel for the *CitrixWorkspaceApp.exe. Because the .links sometimes produces incomplete links, we have to build them. That’s the second step is to build the link. We will wrap the outcome inside an https: string.
if ($CitrixPage.statuscode -eq 200) {
    $DownloadLink = $CitrixPage.Links | Where-Object {$_.rel -like "*CitrixWorkspaceApp.exe*"}
    $URL = "Https:$($DownloadLink.rel)"
} else {
    "Site: $($LogTime): Site Status Code $($CitrixPage.StatusCode)" >> $Logname
    Write-Error "Site Error: Status Code $($CitrixPage.StatusCode)"
    Break
}
Now we have the custom URL for the download, we need to download the file itself. Remember the $DownloadFullPath we created a while ago. It’s time to use it. We will be using the invoke-webrequest once again as well. This time we will use the -OutFile cmdlet. This cmdlet of invoke-webrequest will download the file as requested from the url provided. Of course, we want to wrap all of this inside of a try catch. This way we can log correctly and break as needed.
Now we have the installer to work with. The filename has the same time/date stamp as the log file so we can compare if the script doesn’t finish up correctly. Next we will start the process of another try catch to install the program. The command we will use is the Start-Process command. We start the $DownloadFullPath for the file name. We want this thing to be quiet and overwrite everything else there. Citrix, if given the /forceinstall will force the install by uninstalling the last version. Finally we tell it not to reboot with the /noreboot. Once we get past the arguments, we want to make sure we have the information from this thus we put the -passthru flag. This will allow us to store the information into a variable if we want to use that information later. The final part of the command is the -erroraction. We want this thing to stop if it hits an error. This way we know that something is broken. Then we log accordingly and catch accordingly like above.
We are almost done! This program takes an average of 5 minutes on older machines to install. Thus we sleep for 7 minutes. To do this we use the command Start-Sleep and set the -seconds to 420 seconds. We also make sure we log this information.
As we are not in a hurry, we use the PowerShell command Get-CimInstance to get the products and sort through that to find the Citrix Workplace Browser using the where-object cmdlet.
Finally we check to see if the install was successful or not. This is done with a simple $null -ne $something. We do it this way because we first load nothing and start to compare nothing to something. if something is there, then we know the statement is true and stop processing. Very simple concept. If $Citrix does contain something we log that the install was successful and remove the installer. If we find $Citrix is $null, then we log the error and error out once again.
With all good scripts, there is always room for improvement. The one that is blaring is the waiting for the install. This should really be a loop checking files or a registry key. If the file or key is not present, then continue to way 30 seconds. This would speed up the process as some computers process faster while others do not.
The second is the get-ciminstance because this is a slow command. We can improve the speed of this command by targeting once again either a file or a registry key instead. This way we can prove it was installed without the 30 to 60 second wait for the get-ciminstance to do its thing.
As always, If you have any questions, feel free to ask.
You read that right, access PDQ information with PowerShell. You will need the PS SQL Lite module first. This module will allow you to access the SQL lite server. The second thing you will need is a Powershell script on the server accessing the module information. Then finally you will need to be able to access that script remotely. Let’s install the PSSQLite first. Do this on the PDQ server as the script that will be interacting with the SQLite database is on that server.
Now we ill build a script on the PDQ server. The folder should be accessible by anyone you want to run this script. Let’s look at the starting points.
First we will import the module using the Import-Module command.
Import-Module PSSQLite
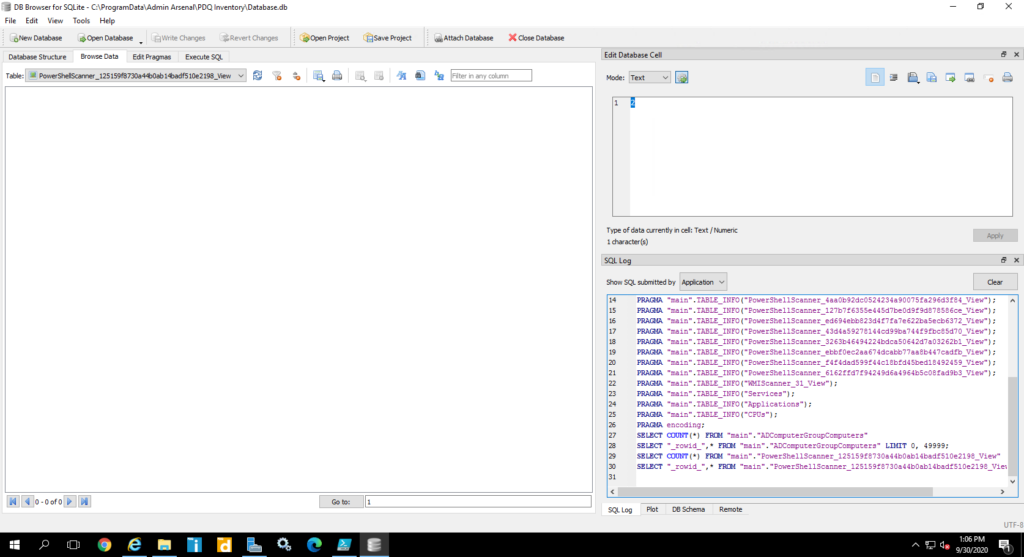
Next we need to declare the database. By default the database is located under the C > ProgramData > Admin Arsenal > PDQ Inventory > Database.db if it is not, you will need to declare it here.
Before we continue, this script is designed to grab just a single computer’s information. If you choose to grab more than one computer, this can cause PDQ to crash and even the server to crash. So, play itself and don’t be too greedy. With that said, Let’s grab the computers with the computer name. from the server. This is our first SQL query of the script. It’s also the most important as it gives us the Computer ID. Without it, nothing else will work.
$Computer = Invoke-SqliteQuery -DataSource $Database -Query "SELECT * FROM Computers WHERE Name LIKE '$ComputerName'"
The Command to grav the SQL lite database information is Invoke-SQLiteQuery. Watch out because I made the mistake of adding an additional L while typing it. We select the data base as the data source. And the rest is very much like SQL commands. Inside our Query we select everything from the computers table where the name is like the computer name we provide. This gives us a lot of useful data that can be used else where. Once again, the ComputerID is the most important part of this data.
We will repeat this process but instead of looking for the name, we will be looking for the computerID inside our SQL Query from each table.
Apps = Invoke-SqliteQuery -DataSource $Database -Query "SELECT * FROM Applications WHERE ComputerID LIKE '$($Computer.ComputerID)'"
Here we are selecting everything from the Application table where the ComputerID is like $($Computer.ComputerID). Without the first command the second command would not run. From here you can do each table like this until you create a list of data you want. You can place the data inside the [pscustomobject] and pump that out for use else where. Here is a full list of items I grab.
[pscustomobject]@{
    Computer = $Computer
    CPU = Invoke-SqliteQuery -DataSource $Database -Query "SELECT * FROM CPUs WHERE ComputerID LIKE '$($Computer.ComputerID)'"
    CustomInfo = Invoke-SqliteQuery -DataSource $Database -Query "SELECT * FROM CustomComputerValues WHERE ComputerID LIKE '%$($Computer.ComputerId)%'"
    Apps = Invoke-SqliteQuery -DataSource $Database -Query "SELECT * FROM Applications WHERE ComputerID LIKE '$($Computer.ComputerID)'"
    PDQDeployments = Invoke-SqliteQuery -DataSource $Database -Query "SELECT * FROM PDQDeployments WHERE ComputerID LIKE '$($Computer.ComputerID)'"
    DiskDrives = Invoke-SqliteQuery -DataSource $Database -Query "SELECT * FROM DiskDrives WHERE ComputerID LIKE '$($Computer.ComputerID)'"
    Displays = Invoke-SqliteQuery -DataSource $Database -Query "SELECT * FROM Displays WHERE ComputerID LIKE '$($Computer.ComputerID)'"
    EnvironmentVariables = Invoke-SqliteQuery -DataSource $Database -Query "SELECT * FROM EnvironmentVariables WHERE ComputerID LIKE '$($Computer.ComputerID)'"
    HardwareDevices = Invoke-SqliteQuery -DataSource $Database -Query "SELECT * FROM HardwareDevices WHERE ComputerID LIKE '$($Computer.ComputerID)'"
    HotFixes = Invoke-SqliteQuery -DataSource $Database -Query "SELECT * FROM HotFixes WHERE ComputerID LIKE '$($Computer.ComputerID)'"
    LocalUsers = Invoke-SqliteQuery -DataSource $Database -Query "SELECT * FROM LocalUsers WHERE ComputerID LIKE '$($Computer.ComputerID)'"
    LocalGroups = Invoke-SqliteQuery -DataSource $Database -Query "SELECT * FROM LocalGroups WHERE ComputerID LIKE '$($Computer.ComputerID)'"
    LocalGroupMembers = Invoke-SqliteQuery -DataSource $Database -Query "SELECT * FROM LocalGroupMembers WHERE ComputerID LIKE '$($Computer.ComputerID)'"
    MemoryModules = Invoke-SqliteQuery -DataSource $Database -Query "SELECT * FROM MemoryModules WHERE ComputerID LIKE '$($Computer.ComputerID)'"
    NetworkAdapters = Invoke-SqliteQuery -DataSource $Database -Query "SELECT * FROM NetworkAdapters WHERE ComputerID LIKE '$($Computer.ComputerID)'"
    LocalPrinters = Invoke-SqliteQuery -DataSource $Database -Query "SELECT * FROM Printers WHERE ComputerID LIKE '$($Computer.ComputerID)'"
    ProductKeys = Invoke-SqliteQuery -DataSource $Database -Query "SELECT * FROM ProductKeys WHERE ComputerID LIKE '$($Computer.ComputerID)'"
    Profiles = Invoke-SqliteQuery -DataSource $Database -Query "SELECT * FROM PowerShellScanner_4aa0b92dc0524234a90075fa296d3f84_View WHERE ComputerID LIKE '$($Computer.ComputerID)'"
    Scanns = Invoke-SqliteQuery -DataSource $Database -Query "SELECT * FROM ScanProfileComputers WHERE ComputerID LIKE '$($Computer.ComputerID)'"
    Services = Invoke-SqliteQuery -DataSource $Database -Query "SELECT * FROM Services WHERE ComputerID LIKE '$($Computer.ComputerID)'"
    Shares = Invoke-SqliteQuery -DataSource $Database -Query "SELECT * FROM Shares WHERE ComputerID LIKE '$($Computer.ComputerID)'"
    SharesPermission = Invoke-SqliteQuery -DataSource $Database -Query "SELECT * FROM SharePermissions WHERE ComputerID LIKE '$($Computer.ComputerID)'"
    WindowsFeatures = Invoke-SqliteQuery -DataSource $Database -Query "SELECT * FROM WindowsFeatures WHERE ComputerID LIKE '$($Computer.ComputerID)'"
    WindowsTaskSchedules = Invoke-SqliteQuery -DataSource $Database -Query "SELECT * FROM WindowsTaskSchedules WHERE ComputerID LIKE '$($Computer.ComputerID)'"
    DesktopShortcuts = Invoke-SqliteQuery -DataSource $Database -Query "SELECT * FROM Files WHERE ComputerID LIKE '$($Computer.ComputerID)'"
    Activation = Invoke-SqliteQuery -DataSource $Database -Query "SELECT * FROM PowerShellScanner_6162ffd7f94249d6a4964b5c08fad9b3_View WHERE ComputerID LIKE '$($Computer.ComputerID)'"
    Bitlocker = Invoke-SqliteQuery -DataSource $Database -Query "SELECT * FROM PowerShellScanner_f609ba7492b54dbeaf1d7d72b05d50e4_View WHERE ComputerID LIKE '$($Computer.ComputerID)'"
    GPO = Invoke-SqliteQuery -DataSource $Database -Query "SELECT * FROM WMIScanner_31_View WHERE ComputerID LIKE '$($Computer.ComputerID)'"
}
I want to point out the Profiles object. This is the PowerShell scanner name for the profile size scanner. To grab the table names I suggest using the SQLite browser. You can download it here: Link.
Notice the bottom right hand side there is text. This text is the commands. You can browse around and find good information.
The call
Now you must create a function to call the script. This part is the easy part. We will be using the Invoke-command to trigger the script in question.
The above code is part of a script that will give me quick information. As you see, it should be treated as an XML because the data is loaded like an XML.
One of the things I have done is used this inside my universal dashboard to allow quick information that is formatted nicely.
Watch out
Here are some gotyas. If the database is busy, sqlite will break down on you.
If the disk is busy, the SQL lite will break down on you.
Don’t make to many requests as it slows everything down.
We use PDQ where I work, and I am lazy. So, I have made a way to set up devices into Different OUs. This way when I am gone, it’s as easy as putting a computer into an OU and walks away. When I image, The image will load the OS and put the computer into the OU for me, which makes it even sweeter. Then PDQ will hit that OU, check the file, and bam, off to the races with the most up to date software. Makes a great hybrid solution.
Here are a few things you will need before we get started.
A Licensed version of PDQ.
A laptop Deployment Package
A general knowledge of how the conditions work in package deployments.
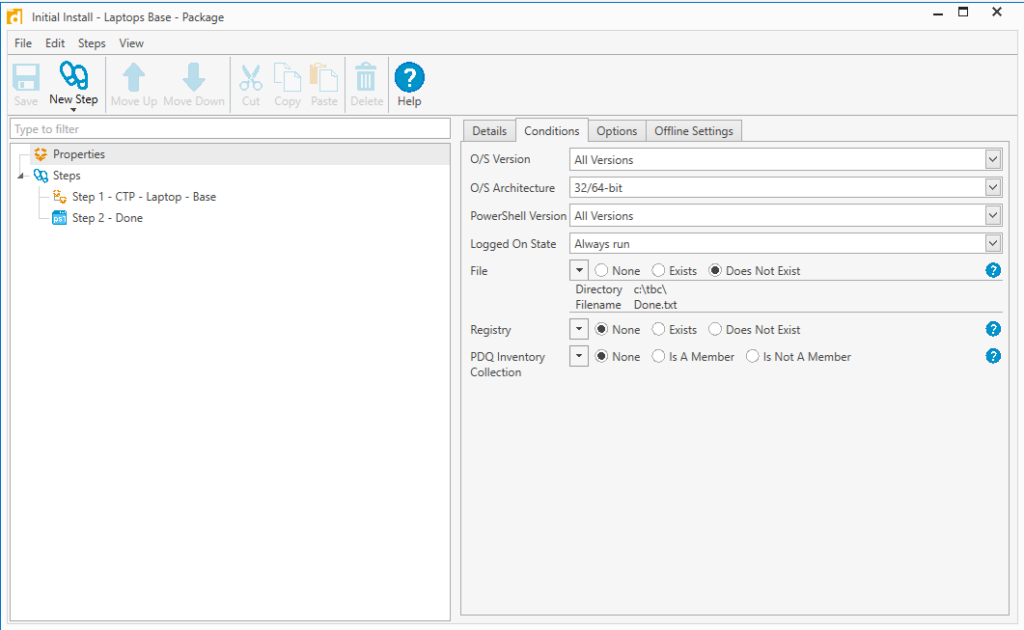
We first make a new package deployment. This package deployment will have the Laptop package deployment nested inside of it. We will place a special condition on this deployment package. On your new package deployment, select properties and then conditions. Under File we will select “Does Not Exist” and put a directory of your choice and a filename of your choice.
Initial Install – Laptop Base
Your first step is the laptop base install. I name my deployments with a CTP if it is complete. The second step is the “Done” step which creates the condition file. This way it will not redeploy, but you can force it by deleting the file.
Now you have the initial install package built, it’s time to build the scheduling.
Right click on the deployment package
Select New Schedule
Under Targets tab, click choose targets
Select Active Directory
Select Containers
Select the OU you want.
Under Triggers select the Interval button
Here you change the Time ranges. we do an hour as it takes 30 minutes for the laptop deployment to go through.
Select the Package tab
Confirm your package is located there.
Under Options
Here you can tell it to stop redeploying if the deployment was successful. We don’t want to do that because we have a condition and we don’t want it to stay in that OU. This is a good way to create a reminder for yourself by having the Notification send you emails.
You’re done.
A quick way to add a computer to the OU while setting it up is the Add-Computer Command.
Add-Computer -DomainName <Your Domain> -OUPath <OU Path for the Initial Install> -NewName <New Computer Name> -Credential (Get-Credential) -restart
This command will add the computer to the OU that you want and restart it. Make sure you have a group policy set to the OU to turn off or Open the ports on the firewall.
We use cookies to ensure that we give you the best experience on our website. If you continue to use this site we will assume that you are happy with it.