Any IT professional will tell you, technology changes almost daily. Some things seem like they will never change then bam, it changes. For example the dependency on IE. In the 90s and most of the 20s it was IE. Firefox and Chrome started back then but didn’t really gain traction. Now here it is 2021, Google search no longer supports IE. Microsoft no longer supports IE. IE is a bad word in the security world. So it’s time to move away from IE. Most companies have done just that. Thousands of security-minded websites no longer develop for IE and purposely broken their sites on IE. The immortal IE was a problem this week.
Scenario – Always IE
A user called in and stated “Every time I go to ADP I get a message saying ‘Your browser isn’t supported.'” The browser was IE. ADP was a URL link on the desktop. URL links go to the default browser. The user stated that they changed the default browser to Google Chrome more than once, but it changes back after they restart the computer.
Who, What, Where, When, How
Who: The user was a standard user and located in the User OU in AD.
What: URL link is opening IE instead of google chrome.
Where: End user’s laptop.
When: Every time they reboot.
How: When they double click a url icon.
With this info gathered, I started troubleshooting. I changed the default browser to Google chrome. The user stated after a reboot it changes back. I rebooted the machine to see this behavior. Sure enough, the default app changed from Google Chrome to IE. The most common thing that changes the default apps around is Group Policy. I ran gpresult /r on the computer and saw a default app policy.
Hum…
I logged into the server and loaded the group policy. Sure enough, there was a default app policy. This policy lived at the top level of the domain as well. Default app policy lives under Computer > Policies > Administrative Templates > Windows Components > File Explorer > Default Associations Configuration File. They use an XML file on a share that can be read by everyone in the company. I looked into this file and saw .htm, .HTML, HTTP, and https were set to internet explorer.
At this point, I knew this was going to be a change request. I informed the client that this is a change request. Then I contacted the client’s leadership and acquired permission from the leadership via email. They responded with, YES PLEASE! This is my CYA that I needed. My assets were covered. Time to kick it into high gear.
Inside the default app XML file, I changed the .htm, .HTML, HTTP, and HTTPS progId to ChromeHTML and the ApplicationName to Google Chrome. This is what it looked like.
I asked the user to reboot their computer and test if the URLs opened in google chrome. The user reported that it did. I called few other users in the org and tested with them. Normally I would create a new OU and test with a test box, but this client did not have a test box. So, why not test in production! Please don’t test in production unless you have to.
In the end, the problem was a Default App Policy. Fixing that fixed more than just this single user’s issue. The leadership was happy with the change and they enjoyed using their drag and drop URL icons.
As always, if you have questions, feel free to ask.
Need to find duplicates in an array? It’s as simple as using a group object. So we take an array, and group the array by property or group of properties. Then we search those groups for any group that has a count of 2 or greater. Then we display those groups. Here is the heart of the code:
Now it’s as simple as wrapping this one-liner into a function. The Group-object property switch can take multiple inputs. So it’s best to set that as a list of strings. Here we go:
I have been working with group policy recently and have been enjoying it. I wanted to share this knowledge with the rest of the world. I’m going to do that through a few scenarios. This first part is gathering information. More information you have, the more likely you will be successful at resolving the issue.
Scenario – User can’t hear conference call
The ticket came in as, “I can’t hear people on a conference call with XYZ company.” The help desk guy tried to figure it out. He updated the ticket with “It’s just broke.” Then he escalated the ticket to me. So, I called the person up and was blasted with an ear full of, “it ain’t working, and this be broke and that be broke, and I needed this call for a client, and and and…” The normal basically.
Who, What, Where, When, How
Here is the information I pulled. Who is the User? What computer is the user using? What is the real problem? Where is the Computer located? Where are the user and computer located in AD? When did this start happening? Finally, how can I recreate the issue?
Once I pulled that information, I discovered they were using a Website to communicate with an HR company via web conferencing. Hum… Anyways, The computer was in the standard laptop OU, and the user was inside the standard Recruiter’s OU. The problem was only noticed that week. I asked her to try another site and finally had her try google video conferencing. None of these technologies worked. I finally had her try a product She has used in the past that worked. This product was an in-house remote connect with the audio program. The in-house program worked. At this point, I knew the browser was ok. There was something else stopping it. I suspected Group Policy at this point.
Hum…
To confirm group policy was doing this to her, I ran the “Group Policy Results Wizard” in the group policy management console towards the bottom. Inside the wizard, I selected the computer she was on. Then I selected her. The wizard did its wizard magic and gave me a full list of everything that was applied to her, how long each step took, and which one won over the other. Sure enough, she had a browser policy attached to her. From the wizard, I was able to see the website she was trying to use was not listed. At this point, I had some work to do.
Make a change request with managements. If approved, move to the next step. If not, tell the user they are not allowed to use the conferenceing software on those sites.
Add the site to the group policy
then run gpupdate /force on her computer
Management did not approve the change. So, I called the user and informed them of the issue. They were not happy, but then I had the power of management behind me.
Deeper Dive
There are a few things in the Scenario to take note of.
Getting the right information from the user is key.
Scopes of group policies on a user and the OU they are in.
The group policy management tool has some cool troubleshooting tools.
Permissions from Management, AKA, cya.
Getting the right information from the user
Getting the right information is hard sometimes. Here is the conversation that went down between me and her.
Me: Which computer is this happening on?
Her: ALL OF THEM! (First Key that it’s group policy)
Me: let’s focus on one computer. Which computer was the first computer you noticed this issue?
Her: Gives me a computer name.
Once I had the computer name that it happened first. I pinged it to see if it was active or not. I also know that she has logged into the computer within the past few days as the ticket she put in was only a few days old.
AD information and Scopes
As I had a hint that this might be a group policy-related item from when she said, “It happens Everywhere” I made sure to note at the OU the computer was located in and the OU the user was located in. Then I started up group policy management and looked at her and her computer there. Her OU had the browser policy inherited from the top-level user OU. Then I used the tools inside group policy to confirm the issue.
Using built in tools to confirm
Group policy management console has a set of very useful tools that will help out to gather information. The first tool is the Group Policy Modeling tool. This tool will create a “what if” to the information you feed it. It doesn’t need access to the computer in question, just the domain. The second tool, the one I used is called Group Policy Results. This bad boy needs access to the computer. What it does is it reaches into the computer and pulls the group policy information. This one shows you what happened. It’s kind of like running gpresult /r on a computer, but on drugs. This tool confirmed the browser policy was attached.
CYA like a kid in a candy shop
Group policy has the power to change everything that is connected to it. A simple small change can have rippling effects for years to come. There is a real chance of tattooing your network as well. Tattooing is where a group policy change stays after the policy has been removed. So, best to CYA yourself. For those that don’t know CYA means to cover your assets. This is why I brought management into the picture. They get paid the big bucks and if something happens, I can point to the email I sent to the management. The manager said no, and thus the answer became no.
I hope this was helpful for you all. The one thing I want you to take away from this blog is CYA! You can be the best at your job, but if you make a change and management don’t agree, cya can save your tail.
As always, if you have questions, feel free to ask.
The goal of this blog is to show you a way to speed up a computer using basic software commands/programs. I use these daily and I have seen them work. Sometimes they don’t sometimes they do.
Disk Cleanup
Disk cleanup is a powerful built-in tool that allows you to clean up temporary files and whatnots. It’s a very surface-level tool. I tend to prefer tools like wise disk cleaner over this tool. In this tool you can clean up a full range of items:
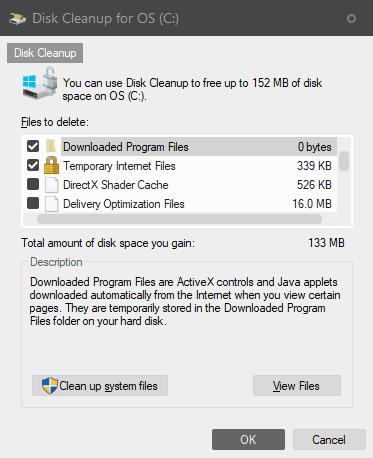
Disk Cleanup has two modes. A mode for standard users and a mode for Admins. Of course, you have to have admin rights to run the admin side of the app. Disk cleanup starts in standard mode. You know it’s in standard mode by the lack of options and the button with the admin shield on it called “Clean Up System Files”.
Standard user Mode
Download Program Files
Temporary Interent Files (Edge and IE Only)
DirectX Shader Cache
Delivery Optimization Files
Recycle Bin
Temporary Files
Thumbnails
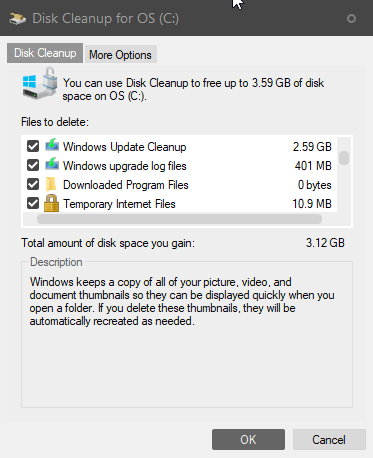
Clean Up System Files – Admin Mode
When you click the “Clean Up system files”, disk cleanup restarts with more options. These options down blow. They include things like windows update items.
Windows update Cleanup
Windows update log files
Downloaded program files
temporary internet files (only edge and IE)
DirectX Shader Cache
Delivery Optimization Files
Device Driver packages
Language resource files
The Recycling Bin
Temporary files
Temporary windows installation files
Thumbnails
Wise Disk Cleaner
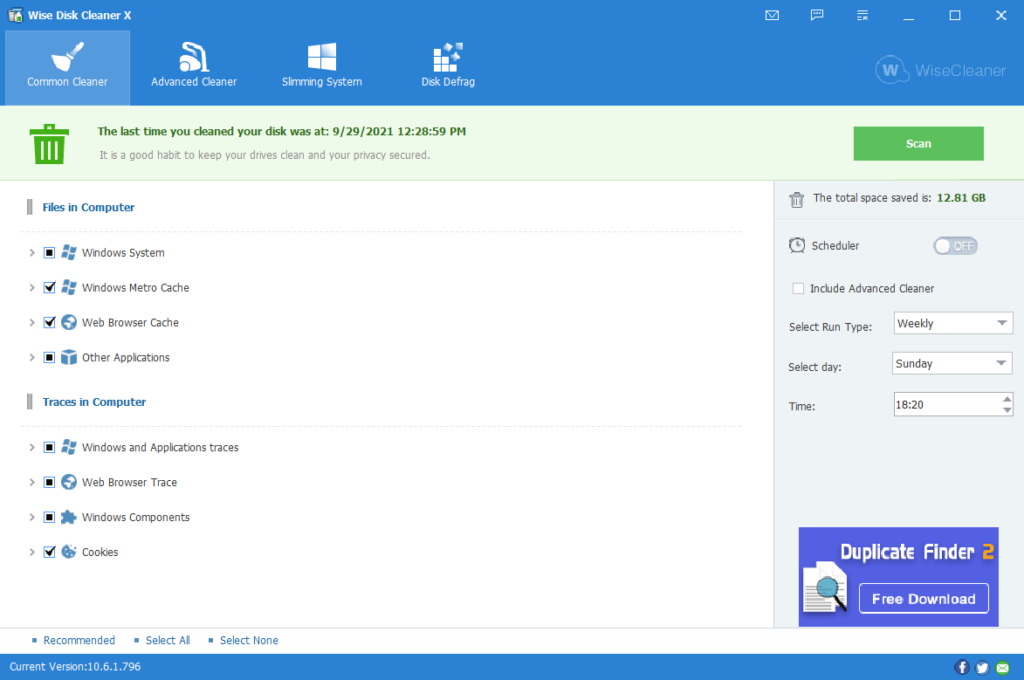
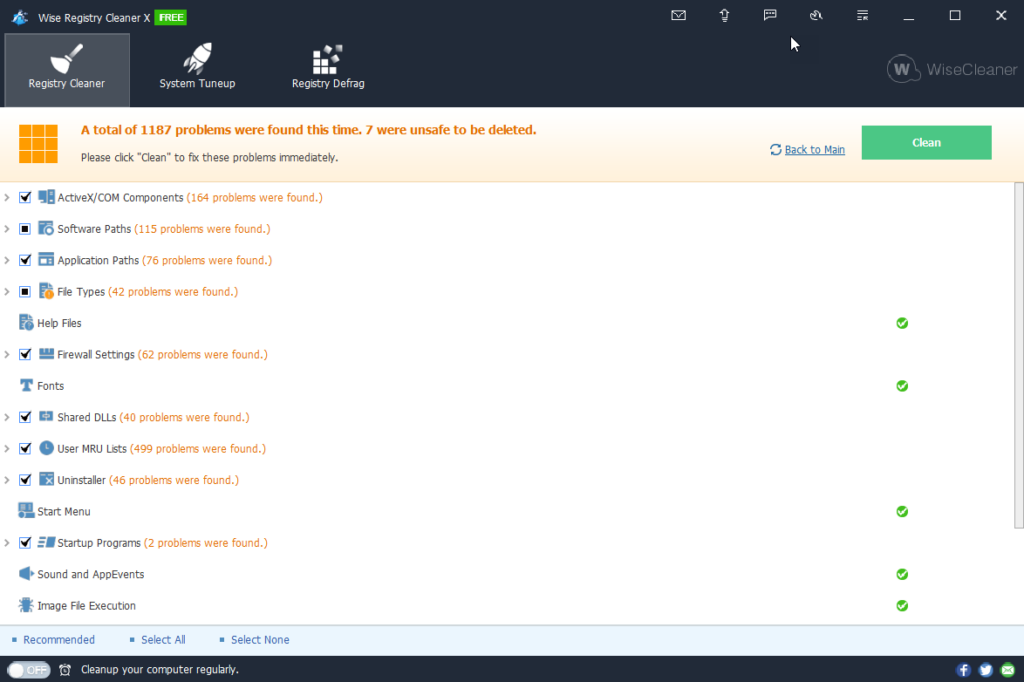
The next tool is a disk cleaner as well, but it goes much further than the basic standard disk cleanup. This tool is called wise disk cleaner by the company called wise. They also make wise registry cleaner and more. This software will clean out the temporary files of all of your browsers, your windows, cookies, and much more. It’s repo of what it looks for is fairly large. What I like about wise is it is smart as well. It knows what can be dangerous and what is not. You can tell it to be dangerous as well.
Wise disk cleaner on startup.
All you have to do is click the scan and then clean up. It does everything for you. Along with the scan and clean-up, it also offers disk defragging for HHDs. The system slimming and advanced cleaner are tools for the more advanced user and I wouldn’t recommend using them if you are new to computers.
I personally like that wise has a portable version in the portable apps platform and all versions have command-line switches as well. Here is more useful information:
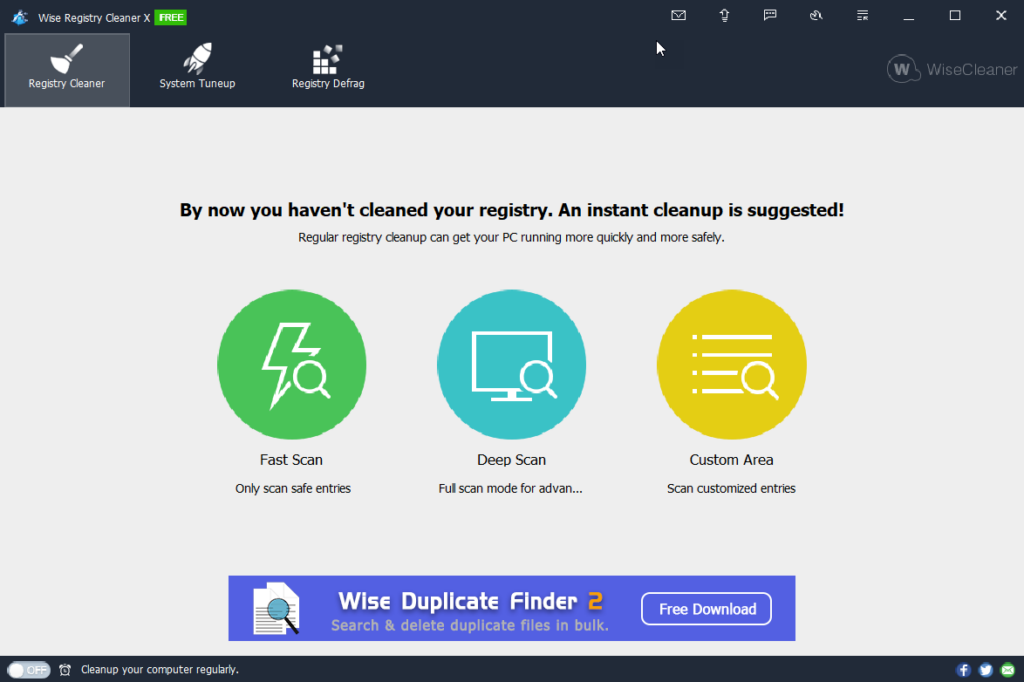
After I run the disk cleaner, I run the wise registry cleaner on computers. Whenever a program installs, updates add to and so on with the OS, the registry gets junky. This junk often times has pointers to dead ends and other items that slow down the system. It is important to clean up those bad pointers, especially after a windows update.
What I like about Wise Registry Cleaner is it offers backing up your system with a restore point and a registry back before it does anything. They know that something bad could happen. The app also offers different scan types. Fast, Deep, and Custom.
Wise Registry Cleaner Start Page
The next example is a deep scan of a system I was working on.
Wise Registry Cleaner Scan
Wise Registry cleaner also has command lines like the disk cleaner. Here is some useful links.
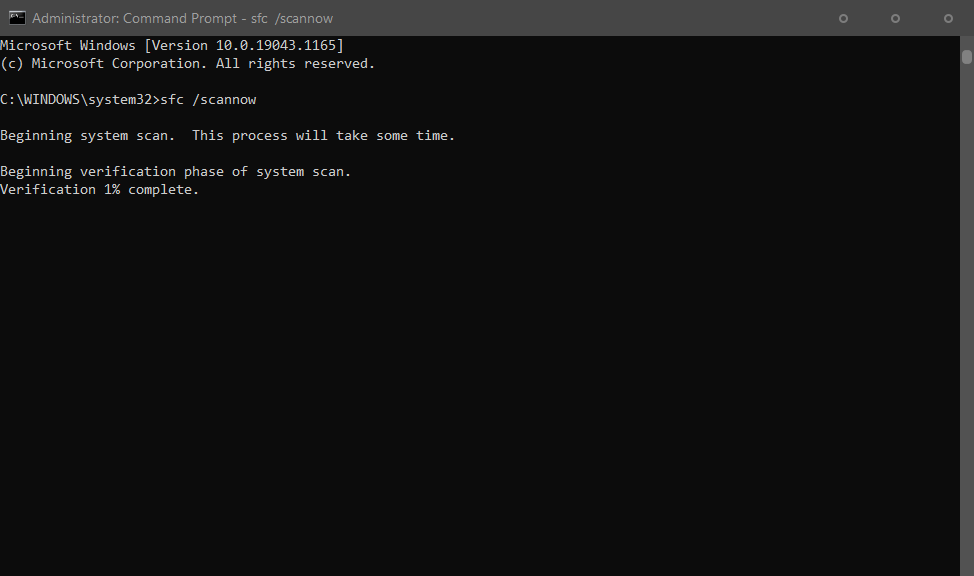
This tool allows you to quickly find issues with your OS. Missing files, missing registry keys, and more. It validates your internal OS settings. The command has to be run as an administrator.
SFC /Scannow
SFC has much more flags that you can run, but I will not cover them in this blog. That’s worthy of its own blog post. For more information, you can check out the Microsoft documentation here.
DISM Cleanup
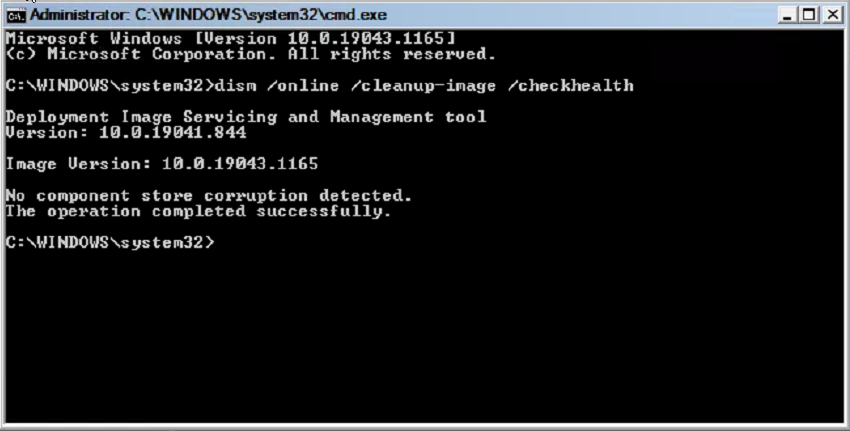
Finally, you can use the DISM command to reach out to Microsoft itself and compare/repair your system. the /online flag tells dism to go online. The /cleanup-image opens up the cleaning process and the various commands after that repair different items.
dism /online /cleanup-image /checkhealth
This command checks the system for anything that might be corrupt or damaged. This one is a high level and it also checks itself. Basically lets make sure the tool works.
dism /online /cleanup-image /scanhealth
This command scans the system for missing files, damaged files, and much more based on the image from Microsoft. This one is much more in-depth than the checkhealth. This part takes some time and once complete, the system is ready for the next command.
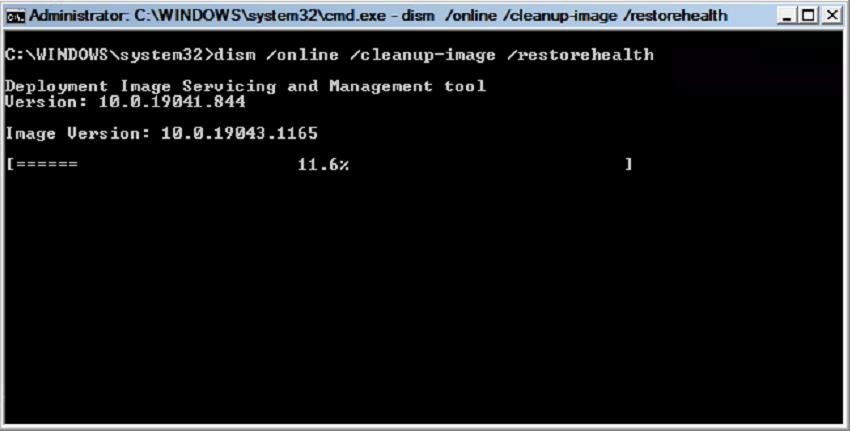
dism /online /cleanup-image /restorehealth
This command takes the list from scanhealth and the online repository and repairs the OS image. Without this command, nothing is getting fixed. It’s also best to run this command last. If this process appears stuck at any point, that’s normal. Let it do what it gots to do.
Final thoughts
I have come across lots of computers recently where office updates have damaged the OS and left thousands of useless files lying around. Completing these tasks has brought new life into those computers. It doesn’t work all the time, but when it does, it’s awesome. Out of all of the systems I have worked with the number one issue I see the most is age. Most slow computers are due to the fact that the computer is 10 years old trying to run the latest and greatest. My suggestion for those machines is linux.
I hope these little tricks will help you in your day-to-day IT endeavors.
Recently I was playing with some sql event viewer logs. These logs don’t have properties that we can pull from to make life easier. So, everything has to be parsed through the string. Which isn’t bad, but it’s a challenge to think about. Here is what one of the strings looks like:
Login failed for user 'db_admin'. Reason: Password did not match that for the login provided. [CLIENT: 10.0.80.55]
I wanted three items from this list, the username, the reason, and the IP address. The username is inside the single quotes. The reason goes from the word reason to the [ for client. The IP address is inside the brackets for the client. Lets get started. First lets get the data.
Now we have the data, it’s time to get the username. As I said, the username is found inside the single quotes. So we want to select the string with a pattern that pulls the double single quotes.
This bad boy here grabs everything between the single quotes. The ‘—‘ is the boundaries. the . says to match any character except the terminators. Yeah, we don’t want skynet. Then the X? tells it to match the previous token between 0 and forever times. The select starts off with the first ‘ and then moves to the next character. which is a wild card. Then we search all wildcards forever until the next ‘ with the *? characters.
We select every item in the string that matches that pattern using the -AllMatches. Then we grab the Matches by using the ().Matches. We want those values so we select the value from the matches. ().Matches.Value. This still selects the double single quotes ‘ and we really don’t want this. So we simply remove them by using the -replace command. We replace the ‘ by saying -replace “‘”,””. Looks a little confusing but it works.
Grabbing Text after a word and before a symbol.
The next part is to grab the reason. This is basically grabbing everything after a single word and before something different. The logic is the same as before, but this time we are grabbing it based off a word.
In this instance we are searching for the word Reason:. Once we find that word, we select the first object in front of it using a wild card again. The wild card is a . like before. Then we tell it to continue searching using the * until we reach special character of [. Notice the \ is before the [. The reason for this is because in the world of Regex the bracket, [, is a special character used for searching. Thus this code is saying, start with the word reason: and search everything until you reach the square bracket.
Once we have the pattern we select all the matches like before with the -allmatches. We then select the matches and the values using the ().matches.value commands. From there we want to remove the square bracket and the word reason:. We do that with replace commands to remove the word reason we use -replace (“Reason: “,”) and to remove the extra space and square bracket we us -replace (‘ \[‘,”). Notice once again, the \ before the square bracket.
Pulling an IP address from a string
The next thing we need is the IP address of the log. The IP address is located in the square brackets with the word client inside of it. The key here is not to search those brackets. We want the IP address of any and all strings. We want all the IP addresses and not just one.
This one is much more complex than the last one. The first thing we do is look for is up to three digits side by side. \d means digits. The {1,3} means between 1 and 3. We do this until we reach a . mark. Then we repeat the process again 3 times. We use the () to create a group. Inside that group, we have the \. which is the decimal point followed by the \d{1,3} again. Saying after the decimal point looks for up to three digits again. Finally, we tell the code to do this 3 times with the {3} tag at the end of the group.
Like before we use the -allmatches flag to get all the matches and pipe it out using the ().Matches.value method. But wait! This only pulls the IP address format, not the IP address. This works for an IP address of 512.523.252.1 which we all know is an invalid IP address. To do that we have to dive much deeper into regex. This next part is complex.
Validate an IP address
The above gives an idea of what we want to look for, a starting point, here is the big fish that we need to break down. This code is a bit longer. This code is broken up between whatif structures. Which is pretty cool. It’s going to take some effort to explain it all. So we will take one group at a time with each whatif | statement. Remember each group represented with () is for a single octet. I am going to try my best at explaining this one. I’m not fully sure, but once again, I will try.
Our first what if statement is the 25[0-5]. The maximum number for an octet is 255. In fact, 255.255.255.255 is the broadcast address. In this what-if statement, we are looking at matching the first two characters of an octet as 25 then we are looking for any number after that as a 0 to 5. So, anything like 256 would be ignored.
2[0-4][0-9]|
The next one is for the middle of the 255 range. This tests to see if the range is 2xy. The x is between 0 and 4 and the y is 0 and 9. I’ll be honest, When I changed out the 4 with a 5, the value of 256 was accepted when it shouldn’t have been. There is something special later on on this one.
[01]?[0-9][0-9]?
Now we are matching if the first character is a 1. So, this will cover the 100-199 ranges. If there is a 1 there, if not, then it will cover the 0-99. The ? matches the previous item between 0 and one times. So the previous item is a 1 or a number. This creates the nice 0-199 range.
\.){3}
The \ symbol is our break symbol to break the regex processing on the next item which is our . symbol. Normally . means a wild card. In this case it means a period or decimal point. Then we close the group with our closing parentheses, ). Now we have made a group that determines if an object is between 1 and 255 with a period at the end, we need to do this 3 times. There is multiple ways to do this. We can repeat the code 3 times or we can just say {3}. That’s what we did here.
(25[0-5]|2[0-5][0-9]|[01]?[0-9][0-9]?)
Finally, we repeat the code again. This time without the \. at the end. The reason we do this is that the last octet doesn’t have a period at the end. This matches between 1-255 without the period.
Grabbing Mac Addresses from a string
Another item I pull from logs is mac addresses. Most of the time these are security logs from a firewall. However, it’s important to be able to pull a match address. The big thing between a mac address and an IP address is the mac address requires letters and numbers. They also come in all forms of delimiters. the most common are :, ., –, and a space for the truly evil people. Thus, you have to address each of these items. Here is the code:
([0-9a-fA-F]{2}[: \.-]){5}([0-9a-fA-F]{2})
[0-9a-fA-F]{2}
The first part of the code is looking for the numbers 0 – 9. For example 0F:69:0F:FE:00:01 is the code. The first section is 0F. The 0 – 9 helps us find the 0. The next part a – f helps us find a,b,c,d,e, and f. The A – F helps us find A,B,C,D,E, and F. This way we don’t have to worry about case sensitivity when searching for the logs as some logs don’t capitalize the letters. Finally, we are going to search this two times before our next symbol.
[: \.-]
This next part is the search for the different symbols. Notice we have the common ones in there. The first is the standard colon :. It is followed by a space and then the escape character because the period is a wild card character. Which is then followed by the hyphen – as ipconfig /all gives you hypens. It’s all within the search brackets.
(){5}
We then close up the group with our () marks. This will search for at least one of those that match. We want 5 items in a row for a mac address. Mac addresses contain 6 sections. So, the next code is important to find that 6th. We search for the 5 in the row by the {5} mark.
([0-9a-fA-F]{2})
We repeat the code over again. This way we get that last section of the mac address. This time tho, we don’t have the search for the unique symbols as the last section of a mac address doesn’t have one.
Putting these in a script
If you read my blog often, you know I like functions. Here are two functions you can add to your tool bag.
Get-SHDIPFromString
Function Get-SHDIPFromString{
    [cmdletbinding()]
    Param (
        [string]$String
    )
    foreach ($string in $string) {
        ($String | Select-String -Pattern "((25[0-5]|2[0-4][0-9]|[01]?[0-9][0-9]?)\.){3}(25[0-5]|2[0-4][0-9]|[01]?[0-9][0-9]?)" -AllMatches).Matches.Value
    }
}
Example:
PS> Get-SHDIPFromString -String "This message contains 192.168.25.5 as an IP address."
192.168.25.5
With everything that happened with Facebook yesterday, I began to wonder where does my query goes when I type in facebook.com. So, I did a few things and found out. The first thing I did was resolve the name facebook.com to an IP address, or group of IP addresses in this case with the command resolve-dnsname.
Resolve-DnsName -Name facebook.com
Then from there, I used the site, ip-api.com to pull the location information of the IP address. This awesome little site gives you city, state, country, zip codes, and even the ISP information of an IP address.
$Info = Invoke-RestMethod -Method Get -URI "http://ip-api.com/json/$IP"
That’s the base of the code that we will explore. It’s very straightforward, but I want to clean it up some. I want to make a Get GEO IP information and a Resolve DNSname to Geo IP. I want it to all work together even if there is multiple IP addresses and hosts names. So, lets start off with the scripts and break them down. This will contain two functions for what we are wanting.
Get-SHDGeoIP
function Get-SHDGeoIP {
    [cmdletbinding()]
    param (
        [parameter(Mandatory = $true)][ipaddress[]]$IPAddress,
        [switch]$Complete
    )
    foreach ($IP in $IPAddress) {

        $Info = Invoke-RestMethod -Method Get -URI "http://ip-api.com/json/$IP"
        if ($Complete) {
            $Info
        }
        else {
            [pscustomobject]@{
                IPAddress = $info.Query
                City      = $Info.city
                State     = $Info.regionName
                Country   = $Info.country
                ISP       = $Info.isp
            }
        }
    }
}
This script is going to pull the geo information for us. We start off with the parameters. We are testing the parameters to see if the IP address is an valid IP address. We do that with [ipaddress]. This tests for both IPv4 and IPv6. We tell it to be a array of IPaddresses with the [] inside of it. [ipaddress[]]. Just for cleaner fun, I have a switch for a complete information dump. This way
Since this is an array of IP addresses, we will start a foreach loop for each IP address in the array. We start the foreach loop by grabbing the IP information. If the user selected complete, we just dump the information we gathered to the user. if they didn’t select complete, we create a custom object with the IP address, city, state, country and ISP information.
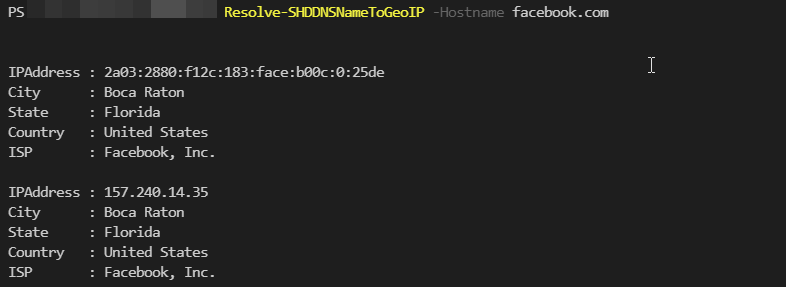
The next function uses the previous function and combines it with Resolve-DnsName. We start off with a list of strings for our hostname parameter and our complete parameter. We start our loop like before of the host names. Then we use the Get-SHDGeoIP -IPAddress command with the Resolve-DnsName -Name and the link name. We then select the IP addresses which is an array. We place that array inside the Get-SHDGeoIP and bam, we have our information. Converting a hostname like Facebook.com to IP information.
With these two little scripts, you will be able to find quick information about a website and where it is being hosted. For example, this site is hosted in new jersey. I personally didn’t know that.
We use cookies to ensure that we give you the best experience on our website. If you continue to use this site we will assume that you are happy with it.