This one was a fun one that really threw me for a loop. DNS is an issue no matter where you go. Recently facebook showed the world how DNS can take everything down. DNS in your domain is very important to keep alive and healthy. Having items sit in your DNS is deadly to your org. That is why something called DNS Scavenging exists. This story is a story about DNS and how it directly affected group policy.
Scenario – Wrong Server!
A client called and stated that group policy wasn’t applied to a single machine. He said he couldn’t even log into the machine with new accounts, just accounts that were on there from the day before. He went as far as to say that a user that just changed his password had to use his old password. Very interesting combo of items.
Who, What, Where, When, How
Who: Anyone using this computer. Users who never signed into the machine, and users who has signed in but changed their passwords recently.
What: Login with thier current passwords, Login, Group Policy not applying.
Where: This single machine, later on discovered another.
When: One week before the issue started. (After DHCP was edited)
How: When they log in.
When I first came in, I looked at the machine in question. I ran an IPconfig /all on the machine to get basic information. I marked down the IP, subnet, mac address, DNS servers, and the DHCP server. I then ran the gpresult /r and the command errored out saying the group policy server did not respond. Hum… I pinged the DNS I noted and the ping came back. I ran NSLookup on the dns server’s IP address to get a hostname. The hostname came back as “xxx-bobsmacbook”. Well now, that’s not the DNS server. I asked the client for the DNS server information. He gladly gave it to me. I RDPed into the DNS server. The DNS server was also the DHCP server and the AD server. All the fsmo roles were on this machine. Sigh… Ok, other than that, I deep-dived into DNS because the NSLookup came back as someone’s mac book. Sure enough, there was an entry into DNS from about 2 years before for bobsmacbook at the IP address the machine believed was the DNS server. Infact, every IP address in the subnet was inside there. Most of them were years old.
I looked at the client and asked why their DNS was so full of old records. He replied with, that’s our archive. It took everything in me not to facepalm. I mean, my hand moved instinctively to my face. After explaining the importance of DNS to the client, the client agreed to enable DNS Scavenging. Wouldn’t you know it, after the first rotation, the entire company started to move much quicker. Requests to the IIS server took only seconds instead of minutes. Copying files across the network just generally did better. NSlookup worked. The computer in question group policy was updated correctly. When DNS breaks, everything suffers. In this case, DNS was a young man covered in trash bags.
How to enable DNS Scavenging
DNS Scavenging is an windows feature that finds old stale records and removes them. This ensures environments with DHCP do not detect multiple devices based on bad/multiple DNS entries for the same device. Here are the steps to enable it.
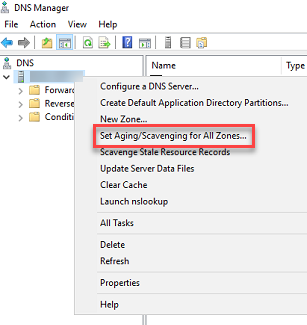
Start > Programs > Administrative tools > DNS > DNS Manager.
Right click the DNS Server
Click set Aging/Scavenging for all zones.
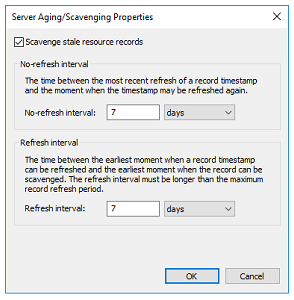
Check box the “Scavenge Stale Resources Records
Select the No-refresh and Refresh intervals totals combined equals to or is less than the DHCP lease. If the lease is 8 days, set the rates at 4 each.
Click Ok.
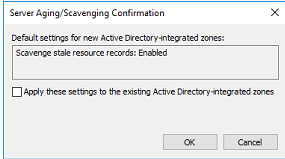
On the Server Aging/Scavenging Confirmation screen, check box the “Apply these settings to existing active directory intergrated zones.”
Click ok
(Optional) Right click the DNS server and click the “Scavenage State Resource Records” to start the process.
There you have it. The DNS records will be purged when the time comes. This allows DHCP to issue IP addresses with no problems and DNS stays clean.
As always, if you have any questions, feel free to ask.
A while back, a client called and told me he made a few new group policies, and they were not working as expected. He stated some policies applied to the wrong users, while another didn’t apply at all to any users. He stated he set the security group correctly. When I hear, “The policy didn’t apply, or the policy is applying to the wrong person, I immediately think, delegation. Let’s look at the two policies and what broke them.
Scenario – Restricted Google Chrome Policy applying to everyone.
This client had special needs to restrict google chrome. This included items like the auto-fill feature to be turned off, prohibiting Chrome extensions, and more. This was user policy. He only wanted it to Restrict to the techs computers, and not the management nor the IT department.
Who, What, Where, When, How
Who: This was effecting all the users at once.
What: A chrome policy that restricted users in google chrome.
Where: Everywhere
When: After the client applied the google chrome policy.
How: Through Group Policy.
It was clear, group policy was the issue. So, I took a gander at the delegation of the policy he called “Restricted Chrome Policy”. The policy
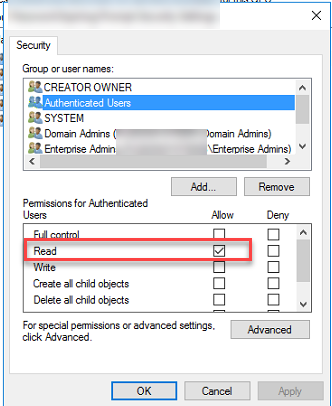
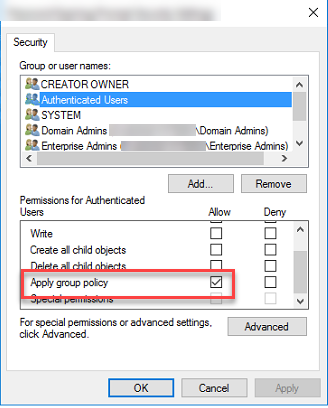
Immediately, I saw that the tech group was not in the policy. In fact, this was the standard policy setup. However, one thing I have learned over the years, never to assume. So, I clicked the authenticated users and clicked the advanced button at the bottom of the delegation screen.
Showing Read is checked
Showing Apply is checked
In this case, I was right in my assumption. The authenticated user are every user on the domain. This is a large group and it’s required for any group policy to work. The thing about it though, if the “Apply group policy” is checked, it applies the group policy to everyone. (Unless another policy closing to the ad object applies or enabled that overwrites the policy in question. )
This is what I did. I unchecked the “Apply Group Policy” check box. Created a security group called SG_Policy_Chrome_Tech and added all the techs inside that group. Then I add that group to the delegation. I made sure the read was checked and apply group policy was checked. Then on an end user’s computer, I ran the gpupdate /force and the policy was applied correctly.
Scenario – Group Policy wasn’t applied at all.
The second policy was harder to track down as it was a password alert policy. (Something I will cover later). The policy was to prompt a user within 14 days that their password is going to expire. It is done with a simple logon script. Very simple script, very simple policy. They called it “Password Prompt”. The client discovered it wasn’t being applied when he completed a gpresult /r on an end-user and didn’t see it. It turns out that it was only meant for users and not service accounts.
Who, What, Where, When, How
Who: Users
What: Password Prompt is not applying
Where: Main OU level
When: Always
How: Hum…
By default, group policy management opens the policy where you can see the scope. I noticed right there something was missing. The client had set the user’s group “employees” but I didn’t see authenticated users. I went to the delegation tab, and I was right. There was no authenticated users group. I went through and added the authenticated users group, and made sure the “Apply this policy” wasn’t checked, and read was checked.
The reason we do this is we want everyone to read the policy, but not apply it. How can you apply something you know nothing about? The same concept is applied here. The computer account can’t read the policy if it doesn’t know it exists. The authenticated user allows that reading. Once set, and a good old gpupdate /force was applied. The password policy showed applied.
Another way you can go about doing this is by adding the domain computers group. As it is the computer that will need to read the policy. This is thanks to the June 14 2016 security update.
The takeaway
Delegation is important. The Authenticated user’s group is required in all group policies at a minimum of read. If you set the authenticated user’s group to read-only, you use a security group with apply in order to apply a policy. The scope screen only shows you what is being applied, and thus, you may not even notice the authenticated users.
I hope this has been helpful for you. As always, if you have questions reach out to me.
We use cookies to ensure that we give you the best experience on our website. If you continue to use this site we will assume that you are happy with it.