While working with Group Policy this month, I ran across an oddity I have never seen before, “Extra Registry Settings” These were inside the default domain policy and I had no idea why they were there. So, I did some research.
What are they?
These keys come from when you have had an ADM or an ADMX installed. Then you create a policy. Later down the road, the ADM or ADMX is removed. These keys will be left behind. So, it’s a tattoo. More like a tattoo on the tattoo artist. You can read more about GPO tattooing here. The main difference between a normal tattoo and this tattoo is one happens on the end user’s computer, while the other happens on both the Group Policy and the end user’s computer.
This is one of those things that can go Very deep. To keep things simple, I will keep it general.
How do you remove it?
Inside the Group Policy Management Module that is installed with Rstat, you have a remove-GPRegistryValue command that can do what you are looking for. You will need the following, The Name of the policy and the key. Please note, these keys live in the HKEY_Local_Machine. Thus, you will need to add such to the command. Your registry might live in the Current users. Do a little research. Here is the code that I used to remove these two items:
Once you remove the Extra Registry keys, you can reload your Group Policy Management and remove the policy. Or you can replace Remove with Get. This will try to get the value, but if it doesn’t exist anymore, PowerShell will present an error.
Documentation is a big deal in the world of IT. There are different levels of documentation. I want to go over in-place documentation for group policy. Comments in Group Policy are in-place documentation.
How to comment on a Group Policy
This process is not straightforward by any stretch of the imagination. The first and foremost way to add comments to a Group Policy is to use the GUI.
Open Group Policy Management Console
Select the policy you wish to comment
Right-click the policy in question and click edit
Inside the group policy management editor, right-click the policy name and click properties
Click the comment tab
Now enter your comment.
click Apply and Ok
The second way to add a comment in group policy is by using PowerShell. The Description of a policy is where the comment lives. Thus using the command Get-GPO will produce the comment. We will dig more into that later.
Get-GPO -name "Control Panel Access"
Using the Get-Member command we can pipe our Get-GPO command and see what is doable. You will be treated to a list of member types and what they are capable of. The description has a get and a set method to it. This means, you can set the description, aka comment.
(Get-GPO -name "Control Panel Access").Description = "This is my comment"
Suggestions
Here are a few suggestions for documenting the policy like this.
Use the(Get-date).ToString(“yyyy-MM-dd_hh_mm_ss”) at the beginning to setup your date time.
Then, I would add the author of the policy/comment
A quick description of the policy
Whether it’s a user or computer policy.
Any WMI filters.
More information here helps the next person or even yourself months down the road. Don’t go overboard as it can cause issues later. Using the ‘`n’ will create a new line which can be helpful as well.
Pulling Comments with PowerShell
Now that we have all the policies documented, we can pull the information from the in-place documentation. We do this by using the GPO-Get -All command. One way to do this is by using the select-object command and passing everything into a csv. I personally don’t like that, but it works.
I would like to go deeper into In-Place Documentation as it is very useful down the road. Powershell uses the #, other programs use different methods as well. If you get a chance to place in place documentation, life becomes easier when you are building out the primary documentation as you have a point of reference to look back at.
Any IT professional will tell you, technology changes almost daily. Some things seem like they will never change then bam, it changes. For example the dependency on IE. In the 90s and most of the 20s it was IE. Firefox and Chrome started back then but didn’t really gain traction. Now here it is 2021, Google search no longer supports IE. Microsoft no longer supports IE. IE is a bad word in the security world. So it’s time to move away from IE. Most companies have done just that. Thousands of security-minded websites no longer develop for IE and purposely broken their sites on IE. The immortal IE was a problem this week.
Scenario – Always IE
A user called in and stated “Every time I go to ADP I get a message saying ‘Your browser isn’t supported.'” The browser was IE. ADP was a URL link on the desktop. URL links go to the default browser. The user stated that they changed the default browser to Google Chrome more than once, but it changes back after they restart the computer.
Who, What, Where, When, How
Who: The user was a standard user and located in the User OU in AD.
What: URL link is opening IE instead of google chrome.
Where: End user’s laptop.
When: Every time they reboot.
How: When they double click a url icon.
With this info gathered, I started troubleshooting. I changed the default browser to Google chrome. The user stated after a reboot it changes back. I rebooted the machine to see this behavior. Sure enough, the default app changed from Google Chrome to IE. The most common thing that changes the default apps around is Group Policy. I ran gpresult /r on the computer and saw a default app policy.
Hum…
I logged into the server and loaded the group policy. Sure enough, there was a default app policy. This policy lived at the top level of the domain as well. Default app policy lives under Computer > Policies > Administrative Templates > Windows Components > File Explorer > Default Associations Configuration File. They use an XML file on a share that can be read by everyone in the company. I looked into this file and saw .htm, .HTML, HTTP, and https were set to internet explorer.
At this point, I knew this was going to be a change request. I informed the client that this is a change request. Then I contacted the client’s leadership and acquired permission from the leadership via email. They responded with, YES PLEASE! This is my CYA that I needed. My assets were covered. Time to kick it into high gear.
Inside the default app XML file, I changed the .htm, .HTML, HTTP, and HTTPS progId to ChromeHTML and the ApplicationName to Google Chrome. This is what it looked like.
I asked the user to reboot their computer and test if the URLs opened in google chrome. The user reported that it did. I called few other users in the org and tested with them. Normally I would create a new OU and test with a test box, but this client did not have a test box. So, why not test in production! Please don’t test in production unless you have to.
In the end, the problem was a Default App Policy. Fixing that fixed more than just this single user’s issue. The leadership was happy with the change and they enjoyed using their drag and drop URL icons.
As always, if you have questions, feel free to ask.
In this article, I will guide you through the process of deploying webroot via Group Policy. This is a fairly straightforward process with only a little editing of the MSI. I am assuming you know how to download the MSI from the webroot portal. The portal changes often, so, I will leave this part out. If you are ready, throw on your group policy pins, and let’s get started.
Super Orca
The first thing you will need is the Super Orca. You can download it here, link. Once you get super orca installed, we will be able to download and set up the webroot MSI.
Open Super Orca
Open the Webroot MSI.
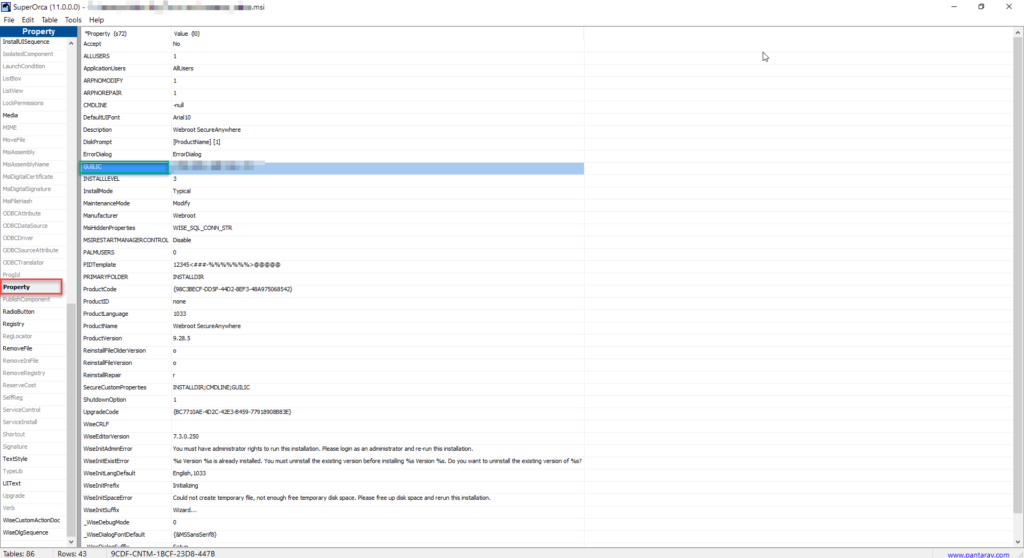
Click the Property On the left (Red Block).
Click GUILIC (Green Block)
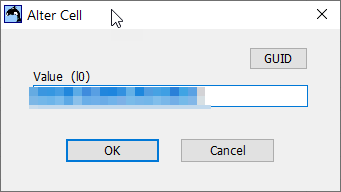
Enter the Key Number
Click File
Click Save As
Save as a different name. ALWAYS KEEP THE ORIGINAL!
Shared Folder
Now you have the MSI ready. You need to place it into a shared folder location. This location has to be accessible to every computer in the company as a minimum of read-only. Make sure the share is shared! I can’t tell you how many times I made this mistake. If it’s shared, good, make sure some of the clients can reach it.
Group Policy
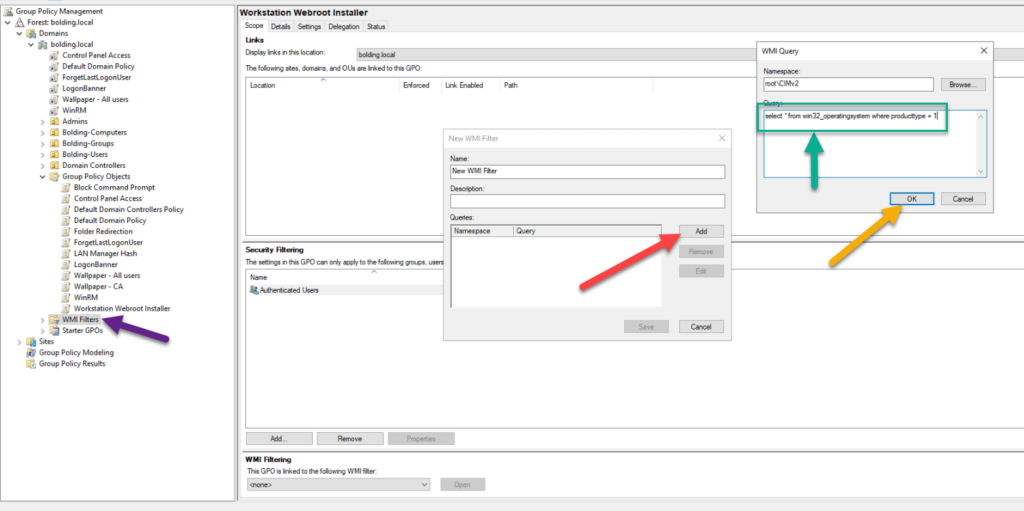
Now we have the MSI ready to go. It’s time for the group policy. It’s a very simple computer policy. In my experience, a lot of IT managers don’t want AVs on servers. So, this tutorial will include a wmi filter. Let’s get to it.
Open Group Policy.
Create a new policy and name it Workstation Webroot Deployment
Enter: select * from win32_operatingsystem where producttype = 1
The numbers mean:
Workstation
Domain Controller
Server
Click Ok
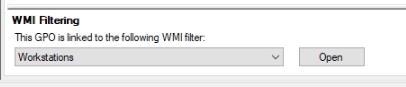
Under the WMI Filter Select the WMI Object.
All that is left is linking the GPO. Now you can link it wherever you want. Most orgs have an OU just for workstations and one for servers just for this case. It doesn’t matter where you link it the WMI filter will ignore servers and only hit the workstations.
As always, if you have questions, feel free to ask. If you ever see anything that is wrong, feel free to reach out and correct me. Thank you for reading.
Recently I came across a client that had an amazing legal notice before you logged into a computer. I also noticed that it didn’t remember who last logged in. This gave a unique level of security and provided a good AUL at the same time. I wanted to guide you through the process. This is done with Group Policy, thus a domain structure is the best bet. The first part is to forget the last logged-in user.
Forgetting the Last logon user
The first step is to start Group Policy Management. Then Create a new group policy object. There are multiple ways to do this, pick your favorite. I named my policy, ForgetLastLogonUser.
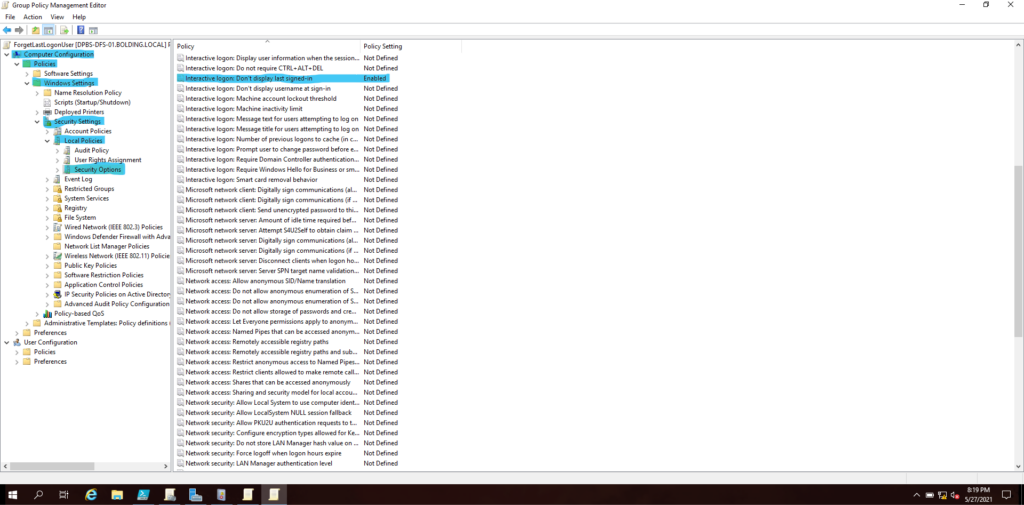
Inside the windows Group policy, lets navigate to Computer Configuration > Policies > Windows Settings > Security Settings > Local Policies > Security Options. Then we will enable Interactive logon: don’t display last signed-in.
This setup will remove the last logged on user which will help users remember their username and increase security through obscurity.
Legal Notice
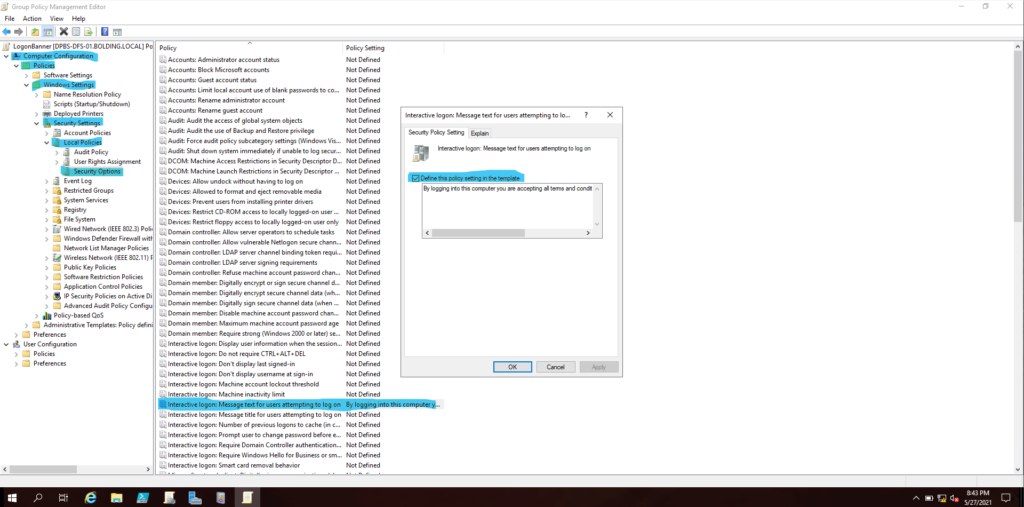
The next thing they did was setup a legal notice. This is also known as a banner. Lets create another policy like above. I’m going to name my policy, LogonBanner. Click edit on your logonbanner and navigate to Computer Configuration > Policies > Windows Settings > Security Settings > Local Policies > Security Options and double click Interactive Logon: Message text for user attempt to log on. This is where you will define your login message.
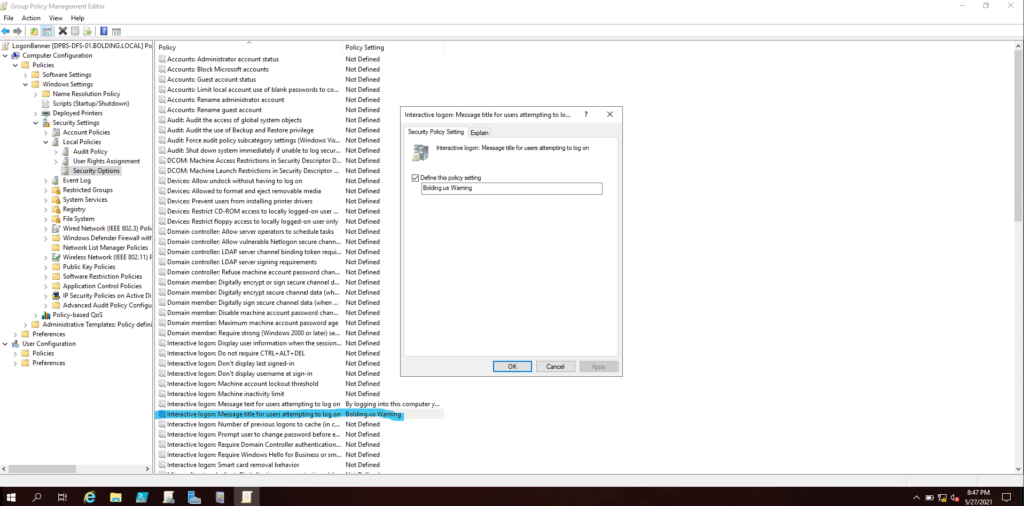
Next do the same thing for Interactive Logon: Message title for users attempting to log on.
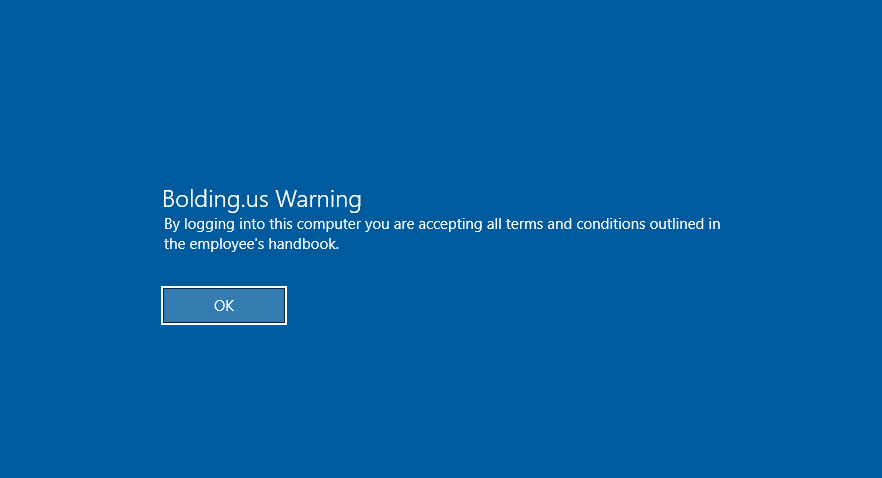
With both of those in place, this is what it finally looks like.
That’s pretty rad. I hope you all like this little tutorial.
We use cookies to ensure that we give you the best experience on our website. If you continue to use this site we will assume that you are happy with it.