Today we are going to go over how to create hundreds of users at once using PowerShell in active Directory. This is great for building a home lab to test things out with. To learn how to build your own AD lab, you can look over this video. Towards the end of this video he shows you how to do the same thing, but, today, I am going to show you a simple way to get unique information. This way you can use PowerShell to Create Bulk Users in your Active Directory.
This script is very dependant on a csv file that magically seems to appear. Well, it doesn’t. The first thing we need is to get a CSV of bulk users to create bulk users. To do this, you can navigate to a site called fake name generator. This site allows you to quickly generate user information to use to build your site.
Navigate to the https://www.fakenamegenerator.com/.
Select Common Sepearted (CSV) and the compression is zip.
Then select your country. I selected American.
Note: Some languages will cause issues with AD due to unique characters. If you do select this, make sure to correct for it.
Select your country of choice. I choose the US.
Select the age and gender ranges. You can keep this standard
Then I selected All on the included fields.
Select how many you want and enter email
Note: A single OU doesn’t display more than 2000 users. This script creates sub OUs just for this case based on the zodaic signs.
Then verify and place your order.
Once you have the file, we can get started explaining what we are going to do to Create Bulk Users in Active Directory with the Power of PowerShell.
The Breakdown
It’s time to break down this script. The first two lines are the domain information. I’m using therandomadmin.com as a example. The next is the Bulk Users csv. These are the lines you want to change if you want to use this in your own lab. The next line grabs the OUs names. We want the full state names in this case from the csv. Next we will create the Employees OU that will host all of the other OUs.
Now we have the OU built, we will make a path for later. by dropping the Employees and the domain ou into it’s own variable. using this variable, we enter a foreach loop using the OUs. We want to build a new OU for each OU in the OUs.
Next, we will go through the loop of users. In each loop, we want to build a splat. Splatting was covered here in a previous blog. In this splat, we are looking over the New-ADUser commandlet. Lets break it apart.
Using the csv file. We are using the Given name, Surname, and Middle Initial. Using this information, we make the display name, given name, sur name and the name. Then we use the city, color and occupation. The next part is we want to build the usernames.
Using the same structure as the name, We just add dots and for the email, we just add the domain. Then we will grab the street address, city, state, country, and home phone.
StreetAddress = $user.StreetAddress
City = $user. City
State = $user. State
Country = $user. Country
HomePhone = $user.TelephoneNumber
Next we want to use do the company information. We want the department as the color, the Title will be the occupation, employee id will be the users number, the employee number would be the social and finally the division would be the state.
Company = "The Random Admin"
Department = $user. Color
Title = $user. Occupation
EmployeeID = $user. Number
EmployeeNumber = $user.NationalID.replace("-",'')
Division = $user. State
Now we have company information, we want to make account information. Things like being enabled, password changing, the password and finally the OU. We want to do the Full state name for the OU. This way it matches with the OUs we built before hand.
Finally, we want to push though the command itself. These are the cmdletbinding() flag commands like verbose and error action.
ErrorAction = "SilentlyContinue"
Verbose = $true
Now the splat is done. It’s time to build the try catch with a useful error. By default the Error message is massive. So, making it easier with just the Name is very much more helpful. We will make sure to splat in the new-aduser information.
That’s all for this script. It’s not hard, but it should allow you to create a lab quickly. You can download the CSV here if you wish.
What can we learn as a person today?
Unlike the God’s of old, we are not able to create new people in our lives to meet our needs. Instead, we have to find people. Like we pointed out last week, networking is massive. How we are to other with our networking is extremely important. Without networking, we tend to find ourselves in a hole. Imagine a giant hole in the ground with oiled up smooth metal walls and all you have to get out is a rope that is at the top of the hole. There is a lot that can happen here. The rope can stay there. Someone can throw you the rope.
Throwing the rope
Someone can throw you the rope and walk away. The rope will land in the hole with you. You can try to throw the rope out, but without something to cling to, the rope will just fall back down to you. This is like the man who says to just study for this exam or that exam. He threw you a rope, but hasn’t really done anything else.
Now image if someone secured that rope to something like a car or a rock and threw the other end to you. Now you have something to climb up with. This is the person who has given you resources to look into. For example, I hear you want to get into networking but have no experience. I’m going to say study the network plus exam and then tell you about professor messor on youtube. This is super helpful and most people can climb out of the hole with the rope. However, in this senerio, the wall’s are oiled up. Thus, footing is an issue.
Finally, we have the guy who ties the rope to his car, and throws you the other end. Then backs up with his car pulling you out of the hole. This would be a manager, or a senior member of an IT company taking a new person under their wing and leverging the company to help them learn new things. This is the kind of company, I would want to work with.
Final Thoughts
When you are working with people helping them with their career, some people just need the rope. Some people need the anchor and finally some needs to be pulled out of the hole. A lot of this is due to society and situations. Being aware of these facts can help you network with others better and grow your support team. Being aware of yourself allows you to know who you need as well. Do you need the truck? Do you need an anchor? What is it that we need to get you out of the holes that we find ourselves in? What can we be to others?
From time to time, you will be asked to create a web report with data that can only be easily obtained by PowerShell. There are hundreds of modules out there that can do this, which is very nice. This blog isn’t about those modules, but instead some tricks I have learned over the years. When it comes to custom HTML reports, these are very customized from data sources like Azure, Active Directory, even SLQlite services. If all possible I like to use the Universal dashboard. But the UD doesn’t translate to emails or IIS pages very well. Let’s get started with the here string.
Here-String
$HereString =@"
Information
"@
A here-string is used to create a block of text. In the example above you see the variable HereString is equal to @””@. This is very important. The @ symbol indicates the start and stops of a here-string. You can place variables inside the here-string as well. This means you can build variables outside of the here-string and plump them into the string. Here is an example of our base for the website.
From this template, we can add CSS coding, powershell tables, lists and much more. The next important item we need to talk about is the convertto-html commandlet.
Convertto-html
This command is the heart of creating tables out of PowerShell information. For example, you want to pull all enabled users from the employees OU and display their displaynames, samaccountnames, department, and title in order. That’s a simple get-aduser command.
Now we need to convert this array of data into a useable table. This is where convertto-html comes into place. We can tell the command to create a full website just for the tabled information or we can tell it to produce a single table using the as flag and the fragment flag.
Now we have a user table that we can drop into our Here-string from above. The Here-string is the last thing you will create during this custom process.
This is pretty much the basics of how you would create a site of all users and their user names. You export that site using the >> command. So it would look like this:
$HTML >> <Pathtohtml>.html
Going Deeper – Employee Directory With Images
Let’s go a little deeper by making an employee Directory with pictures. In this scenario, we will assume that the active directory has thumbnail photos inside of it. This Scenario is going to be based on an IIS server and everything is set up for a basic HTML page. I will as
Requirements:
If a property is not present in the AD account, null or blank, do not display that property.
All users must have a photo or a placeholder.
The table must be in alphbetical order by the displayname.
Required Properities:
Photo
Display Name
Username
Job Title
Department
Mobile Phone
Office Phone
Fax
Manager
The first thing we need to do is grab the data that we need from the active directory. We do that with the get-aduser command.
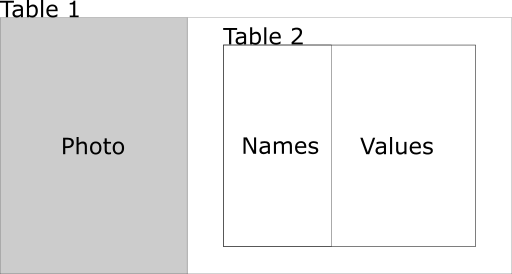
There will be two tables that we will be working with. The first table will be two columns and however many rows we will need. The first column will contain the 128×128 active directory thumbnail photo. The second column will contain the Users information. The second column will contain a table with two columns and 8 rows. The first column will be the name of the value and the second column will be the value itself.
I can do this in two ways. I can start the first table inside the here-string or I can create the table before the here-string. I’m going to create the table before the here-string. This way I have a clear image in my head of the table that I am inputting into the here-string. Notice the UserTable is a here-string as well. So we will refer to the Main HTML here-string as the HTML string from here on out.
Now we have a basic HTML table built. From here on out, we will be creating the rows for this table. Inside each row will be the two columns. The photo column and the data column. The data column will contain the table with the employee data on it. It’s time to start looping through that user’s object we created a while ago. We start off with a simple foreach loop. Inside the loop the logic will go as follows:
Grab the photo from the thumbnail property and save it to the image repo using the username.
Start the new row. Inside the first column of the new row, we check to see if that photo exists. If it does, then we we create an img tag of the file, if it doesn’t then we target the general image file.
The second column we blank out the values for each item.
Then we create the table.
Then we create if statements that creates each row in table 2. if the users object has the property in question for that user, we set the value and create the <tr> accordingly.
Finally we close off the second table and the row.
Then after all of the rows on table 1 is created, we close off the table.
Phew. This is going to be crazy.
The first part is to download the photo in question. If the user’s profile has a thumbnail photo we will download it from AD using the set-content command. (PS5)
The next step is to determine if the file exists. If it does, we want to create the Image URL towards the new user’s image. If not, we want it to go to the placeholder image. All of this is still within the Loop in question.
Now we need to test these variables and fill them up with HTML code. Each one of these will be a row on the table2. The code below is the same for each of these. All you need to do is replace the <value> with the value in question. The one on the left is what you will replace. The one on the right is an example.
Once you create a value for each of these items, it’s time to put it together into the User’s table. AKA table2. We start off by using the $usertable from above combined with a here-string. Remember we are now entering the first table again and creating each row. Here is what the code will look like.
We are building this string. This is what you see the $usertable = $usertable + Here-String. All of this is the single row for the table in question. We loop through all of the users using this method and close out the Loop. Once the loop is closed out what we need to do next is close out the table. We do this by adding a final </table> to the end of the table in question.
$UserTable = $UserTable + "</table>"
The final part is placing this table inside an HTML website. It’s as simple as slipping $UserTable between the two bodies.
Now we have an HTML site. We can further edit this and create a nice CSS code with some java-scripts, but I’m not going to get fancy here. The final thing we have to do is export this html page.
$HTML > <pathtosite>\index.html
This process is basically building inside out. We started by the image and then the data. We built accordingly. Now the script itself.
We use PDQ where I work, and I am lazy. So, I have made a way to set up devices into Different OUs. This way when I am gone, it’s as easy as putting a computer into an OU and walks away. When I image, The image will load the OS and put the computer into the OU for me, which makes it even sweeter. Then PDQ will hit that OU, check the file, and bam, off to the races with the most up to date software. Makes a great hybrid solution.
Here are a few things you will need before we get started.
A Licensed version of PDQ.
A laptop Deployment Package
A general knowledge of how the conditions work in package deployments.
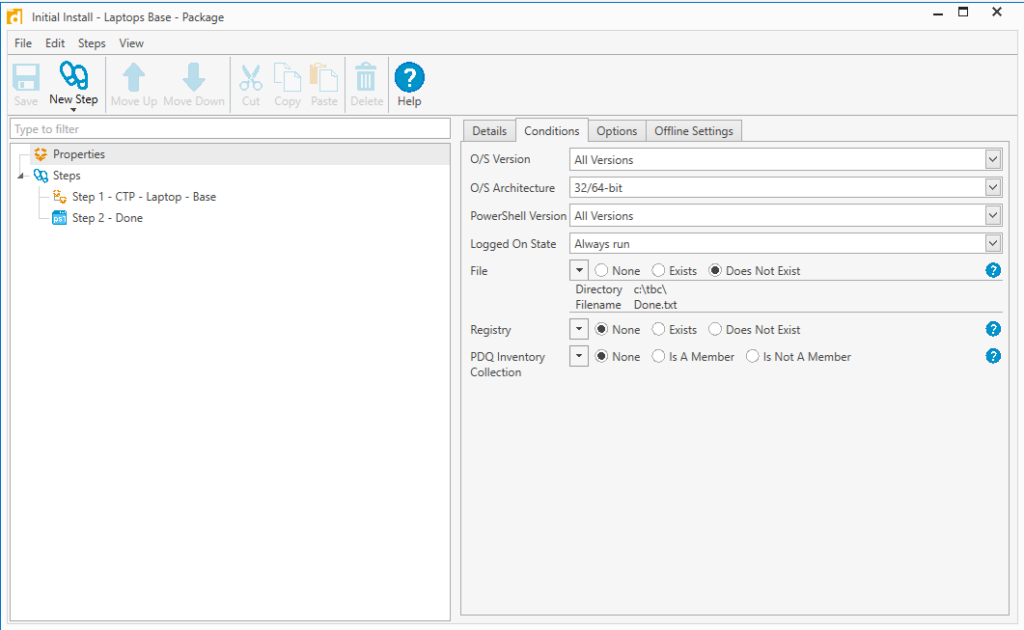
We first make a new package deployment. This package deployment will have the Laptop package deployment nested inside of it. We will place a special condition on this deployment package. On your new package deployment, select properties and then conditions. Under File we will select “Does Not Exist” and put a directory of your choice and a filename of your choice.
Initial Install – Laptop Base
Your first step is the laptop base install. I name my deployments with a CTP if it is complete. The second step is the “Done” step which creates the condition file. This way it will not redeploy, but you can force it by deleting the file.
Now you have the initial install package built, it’s time to build the scheduling.
Right click on the deployment package
Select New Schedule
Under Targets tab, click choose targets
Select Active Directory
Select Containers
Select the OU you want.
Under Triggers select the Interval button
Here you change the Time ranges. we do an hour as it takes 30 minutes for the laptop deployment to go through.
Select the Package tab
Confirm your package is located there.
Under Options
Here you can tell it to stop redeploying if the deployment was successful. We don’t want to do that because we have a condition and we don’t want it to stay in that OU. This is a good way to create a reminder for yourself by having the Notification send you emails.
You’re done.
A quick way to add a computer to the OU while setting it up is the Add-Computer Command.
Add-Computer -DomainName <Your Domain> -OUPath <OU Path for the Initial Install> -NewName <New Computer Name> -Credential (Get-Credential) -restart
This command will add the computer to the OU that you want and restart it. Make sure you have a group policy set to the OU to turn off or Open the ports on the firewall.
We use cookies to ensure that we give you the best experience on our website. If you continue to use this site we will assume that you are happy with it.