If you are new to Microsoft 365 administration, simple room resources are one of the first things people will ask you to fix. Someone double-booked the big conference room. A meeting got auto-declined for no clear reason. The room shows up in Outlook but nobody can actually book it. All of these come down to one object type: the room mailbox.
A room mailbox is a special kind of resource mailbox in Exchange Online. It has a calendar, it has an email address, and it can accept or decline meeting invites on its own. When you book a room in Outlook, you are really sending a meeting request to that mailbox, and the mailbox decides what to do with it.
This post covers how to create and manage simple room resources two ways: through the Exchange admin center, and through PowerShell. The GUI is fine for getting started. PowerShell is where you get the permission controls that actually solve the messy problems.
What a simple room resource actually is
Strip away the marketing and a room mailbox is three things working together:
A mailbox object with its own SMTP address, so it can receive booking requests.
A calendar that holds the bookings.
A set of booking rules, called calendar processing, that decide how the mailbox responds to requests.
There is a sibling object called an equipment mailbox. It works the same way but is meant for things that are not tied to a location, like a projector, a loaner laptop, or a company vehicle. Everything below applies to both. The only real difference is the resource type you pick when you create it.
One rule to memorize early: never make a room mailbox the organizer of a meeting. A room is something you invite, not something that runs the meeting. Add it to the location or attendee field of the invite and let it respond.
Creating simple room resources in the Exchange admin center
The Exchange admin center, or EAC, is the web console for Exchange Online. You get to it at admin.exchange.microsoft.com, or through the main Microsoft 365 admin center by going to Show all > Exchange. You need to be a Global Administrator or have the Exchange recipient management role to do any of this.
Create a room mailbox
In the EAC, go to Recipients > Resources. This page lists every room and equipment mailbox in the tenant.
Click Add a resource. A panel opens on the right and walks you through four steps:
Resource setup. Choose Room or Equipment. For a conference room, pick Room.
General information. Give it a display name, set the email alias, and add the capacity. Capacity matters more than it looks. Outlook’s Room Finder uses it to filter rooms by how many people you are inviting.
Booking options. This is where you decide whether the room accepts meetings automatically, whether it allows conflicting bookings, and how far out people can book it.
Review resource. Confirm the settings and click Create.
Give Exchange a few minutes after you create it. The mailbox and its calendar do not always appear instantly.
Edit booking behavior
Back on the Recipients > Resources page, click the room you just made. A details pane opens. The settings you care about live in two spots:
Under General, you can edit the resource details, capacity, and contact information for the room.
Under Booking, click Manage booking settings. This is the heart of room behavior.
Inside booking settings you can control:
Whether to auto-accept meeting requests or send them to a delegate for approval.
Whether to allow conflicting meetings (almost always leave this off for a real room).
The booking window, which is how many days in advance someone can reserve the room.
The maximum duration for a single booking.
Whether to allow recurring meetings.
Set delegates in the GUI
If you want a person to approve every booking, look for the delegate option inside booking settings. Add the user there, and the room switches from auto-accept to manual approval. Every request will sit in a pending state until that delegate says yes.
That covers the everyday work. The GUI is clean and fast for one room at a time. The trouble starts when you need rules that are more specific than “auto-accept or ask a delegate.” That is where you open PowerShell.
Managing simple room resources with PowerShell
The GUI gives you the common switches. PowerShell gives you all of them, plus the ability to do the same thing to fifty rooms in one command. For permissions especially, PowerShell exposes controls the web console simply does not show you.
A browser window opens for sign-in, including multifactor auth if you have it on, which you should. When you are done, run Disconnect-ExchangeOnline to close the session cleanly.
Create a room mailbox
New-Mailbox -Name "Conf Room - Building A" -Room
You can set the capacity and other properties right after with Set-Mailbox:
Set-Mailbox -Identity "Conf Room - Building A" -ResourceCapacity 12
Room lists are PowerShell only
Here is a detail that catches new admins off guard. A room list is a special distribution group that powers the Room Finder in Outlook. It lets users browse rooms by building. You cannot create a room list in the GUI. You have to use PowerShell.
New-DistributionGroup -Name "Building A Rooms" -RoomList
Add-DistributionGroupMember -Identity "Building A Rooms" -Member "Conf Room - Building A"
If your simple room resources are not showing up grouped by building in Room Finder, a missing room list is usually why.
Calendar processing is where the real control lives
Every booking decision a room makes comes from its calendar processing settings. You read them with Get-CalendarProcessing and change them with Set-CalendarProcessing. Run the Get command first so you can see the current state before you change anything.
Get-CalendarProcessing -Identity "Conf Room - Building A" | Format-List
A solid baseline for a normal conference room looks like this:
AutomateProcessing has three values. AutoAccept books and declines on its own. AutoUpdate adds tentative holds but does not commit. None turns the automation off entirely.
AllowConflicts does what it says. For a physical room, keep it $false so two teams cannot claim the same space.
BookingWindowInDays stops someone from blocking the room a year out.
Make the meeting details readable
By default, a room strips the subject line off accepted meetings and replaces it with the organizer’s name. So the calendar fills up with entries that just say “Booked” or a person’s name, and nobody can tell what is happening in the room. These settings fix that:
DeleteSubject $false keeps the real meeting title. DeleteComments $false keeps the body of the invite. Run these on a shared room and the calendar suddenly becomes useful to look at.
Advanced permission control through PowerShell
This is the part that makes PowerShell worth learning. The GUI gives you “auto-accept” or “send to a delegate.” PowerShell lets you decide who can book the room, who needs approval, and who can see what on the calendar. There are three layers, and they do different jobs.
Layer one: who can book without approval
These settings answer the question “can this person book the room directly, or does it need a sign-off?”
BookInPolicy is a list of users or groups whose in-policy requests get accepted automatically.
AllBookInPolicy set to $true lets everyone book directly as long as the request follows the rules.
RequestInPolicy sends in-policy requests to a delegate for approval instead of auto-accepting.
RequestOutOfPolicy lets specific people submit requests that break the rules (too long, too far out) and have a delegate decide.
A common real-world setup: the whole company can book the room normally, but only the leadership group can book it for longer than the usual limit or outside the normal window.
Set AutomateProcessing to AutoUpdate here. If you leave it on AutoAccept, the room books everything on its own and the delegate never gets a say. The delegate then receives the pending requests and approves or rejects each one from their own Outlook.
You can list more than one delegate. Keep in mind that delegates approve, they do not own the calendar.
Layer three: who can see and edit the calendar
This is a different kind of permission, and it confuses people because it does not live in calendar processing at all. It lives on the calendar folder itself, and you manage it with the mailbox folder permission commands.
Use this when an executive assistant needs to actually open the room calendar, move meetings around, or see full meeting details instead of just free or busy time.
To change an existing permission, use Set-MailboxFolderPermission. To remove one, use Remove-MailboxFolderPermission. The access levels run from least to most access:
AvailabilityOnly shows free or busy time and nothing else.
LimitedDetails adds the subject and location.
Reviewer lets the person read full meeting details.
Editor lets them read, create, and change items on the calendar.
For most people, Reviewer is enough. Hand out Editor only to the person who genuinely needs to rearrange the room’s schedule.
A note on Full Access
You can grant Full Access to a room mailbox with Add-MailboxPermission, but think twice before you do. Full Access means the user can open the entire mailbox, not just the calendar. For room management, a calendar folder permission is almost always the right and safer choice. Give people the least access that solves the problem.
Putting your simple room resources together
A clean setup usually follows the same path. Create the mailbox, set its capacity, drop it into a room list so Room Finder works, set sensible calendar processing so it books well and keeps readable subject lines, then layer on permissions only where a real person needs them.
Start in the GUI while you are learning the objects. Move to PowerShell the moment you need more than one room handled the same way, or any permission setup more specific than auto-accept. The web console is the front door. PowerShell is the whole house.
What we can learn as a person
There is something worth sitting with here, past the cmdlets and the click paths.
A room mailbox works because it has limits. It knows its capacity. It only takes so many bookings, only so far out, only for so long. When a request breaks the rules, it does not feel bad about it. It declines, or it hands the decision to someone else and moves on.
We are worse at this than a conference room.
Most of us run with auto-accept turned on for everything. Every request, every favor, every late “quick thing” gets booked straight into the calendar, conflicts and all. We say yes past our own capacity, then wonder why we feel scraped out by the middle of the week.
You are allowed to set a booking window, have a maximum duration, and decline a request that falls out of policy, and you do not owe anyone a long apology for it.
You are also allowed delegates. The reason we hand approval to someone else is that one person was never meant to carry every decision. Asking for help is not the system failing. It is the system working the way it was built to.
So take some of the load off your shoulders. Figure out what you can actually hold, set the rules that protect it, and let the rest go to someone who has room. The person who guards their capacity is still standing next year. The one who accepts every booking burns out by Thursday.
The room does not run the meeting. It was never supposed to. Neither are you.
FAQ
What is the difference between a room mailbox and a regular shared mailbox?
A room mailbox is built to accept and decline meeting invites through calendar processing rules. A shared mailbox is built for people to read and send mail together. They are different recipient types, and you should not try to use one as the other.
Why does my room calendar only show “Booked” instead of the meeting name?
By default the room deletes the subject and adds the organizer’s name instead. Set DeleteSubject $false and AddOrganizerToSubject $false with Set-CalendarProcessing to keep the real titles.
Why can people see the room in Outlook but not book it?
Check the calendar processing. If AutomateProcessing is set to None, the room will not respond to requests. Also confirm AllBookInPolicy or BookInPolicy actually includes the people trying to book.
Can I create a room list in the Exchange admin center?
No. Room lists exist only in PowerShell. Use New-DistributionGroup with the -RoomList switch, then add your rooms with Add-DistributionGroupMember.
Should I give someone Full Access to manage simple room resources?
Usually not. Use Add-MailboxFolderPermission on the calendar folder with Reviewer or Editor rights instead. Full Access opens the whole mailbox, which is more than calendar management needs.
I’ve been doing this work long enough to watch the same pattern play out over and over. An admin gets handed a problem, sees a cleaner way to solve it, and instead of working the problem inside the structure they were hired into, they go around it. Sometimes that means downloading a tool the company hasn’t vetted, or it means buying a license on a personal card and expensing it later. Sometimes, in the worst cases I’ve seen, it means using the helpdesk team as leverage against management or escalating to outside lawyers to force a policy change.
I want to talk about why that approach is wrong most of the time, when it might be right, and what working inside the system actually looks like day to day.
The job, as I understand it
Our role as system admins is to support the company and grow it. That’s the whole thing. We aren’t here to force the company to our will. We’re here to make the tools work, keep the lights on, and give end users a stable place to do their jobs. When we forget that, the work goes sideways fast.
I see new admins get this backward all the time. They come in with strong opinions about how things should be configured, what the right MDM is, which ticketing system is correct, and they start treating disagreement with management as a problem to route around. It isn’t. Disagreement is normal. The question is what you do with it.
Making changes inside the structure
Most of the meaningful improvements I’ve made for end users happened inside Intune, inside Group Policy, inside the existing licensing. Not by bringing in something new.
Example. A few months back the helpdesk was drowning in BitLocker recovery tickets because users were getting prompted after firmware updates and nobody had documented the recovery key location for them. I didn’t need a new tool. I needed an Intune configuration profile that pinned the recovery key to a self-service portal the user already had access to, and a one-page doc the helpdesk could send. Ticket volume on that issue dropped by about 80% in two weeks. Management was happy. The helpdesk was happy. I didn’t have to fight anyone.
Another one. Printer deployment was a mess. Users were calling in to get drivers installed every time they moved desks. Instead of pitching a third-party print management product (which is what the previous admin had been pushing for, unsuccessfully, for a year), I built out Universal Print through the existing M365 licensing the company already paid for. It wasn’t perfect. It had some quirks. But it was inside what we already owned, so the approval conversation was short.
The pattern is the same in both cases. Find the pain point. Look at what you already have. Configure your way out of the problem before you try to buy your way out. When you do have to buy something, you’ve already shown management you exhaust the existing options first, which makes the next ask credible.
When management gives you a bad instruction
This is the part most admins get wrong, and I’ve gotten it wrong myself more than once.
Sometimes you get an instruction that’s going to cause harm. Maybe it’s a policy that’s going to flood the helpdesk with tickets they can’t resolve, or it’s a security setting that’s going to lock out a department that needs the access. Maybe it’s a rollout timeline that’s not survivable.
The wrong move is to weaponize the helpdesk. I’ve seen admins quietly tell their team to “just follow the policy and let the tickets pile up so management sees the impact.” That’s using your own people as pawns. They get the angry phone calls, they take the heat, and you get to say I told you so at the next staff meeting. It’s cowardly and it damages the team’s trust in you, which you can’t easily get back.
The right move, in my experience, is to push back through the channels the company gives you.
Bring it to management directly, in writing if you can. Lay out the technical reasoning, the expected impact on the helpdesk, and what you’d recommend instead.
If management chooses to continue, ask whether you can take it up the line. Most companies have an escalation path, even if it’s informal. Use it.
If the company doesn’t allow further escalation, or the answer comes back the same, then you implement the instruction.
That last step is the one people choke on. But here’s the thing. If you’ve done steps 1 and 2 honestly, and management has made the call with full information, your job is to execute. You don’t get to overrule the company because you think you know better. That’s not what the role is.
Minimize harm, plan for the recovery
If you do end up implementing something you flagged as harmful, that doesn’t mean you implement it dumbly. You minimize the blast radius, phase the rollout and pre-stage your rollback. You write the helpdesk a runbook before the tickets start coming in, not after.
And you have a backup plan ready for when the issue surfaces. Because it will. And when it does, the person who said here’s what we tried, here’s what happened, here’s how we fix it now is in a very different position than the person who said I told you so. The first one gets trusted with bigger problems. The second one gets quietly worked around.
I’m not saying document everything to cover yourself, exactly. I mean, do that too. But the real reason to document the pushback and the plan is so that when the company is ready to course-correct, you’re the one ready to drive it.
The line
There’s a line, and I want to be clear about where I think it sits.
If you’re being asked to do something illegal, something that violates compliance in a way that puts the company or its customers at real risk, something that’s clearly unethical, you don’t quietly implement it and plan the recovery. You refuse, you document the refusal, and you escalate to legal, compliance, or HR. If those paths don’t exist or are compromised, then yes, external options become real. Whistleblowing exists for a reason. So do regulatory bodies.
But that’s the extreme case. I’ve seen admins reach for outside legal action because management wouldn’t approve a tool they wanted, or because a coworker got a promotion they thought they deserved. That isn’t the line. That’s using legal leverage as a weapon to force the company to do what you want, which is the same failure mode as using the helpdesk as pawns, just with bigger stakes.
The line isn’t I disagree with this decision. The line is this decision causes harm that the company itself, fully informed, would not sanction. Those are very different bars.
What bad actors look like
I want to flag this because I’ve watched it happen. There are people in this field who enjoy the leverage the role gives them, and they look for engineers they can use to do harm to a company they’re frustrated with. They’ll frame sabotage as principled resistance. They’ll talk about “making management feel it” or “letting things break so they learn.” Finally, they will pitch you on going around the structure because the structure isn’t fair.
Some of that frustration is legitimate. Companies do treat IT badly sometimes. Management does make decisions without input that should have been gathered. None of that justifies using your access to cause harm, and none of it justifies pulling your team into a fight they didn’t sign up for.
If someone is pushing you in that direction, they aren’t an ally. They’re a liability, and probably a future legal problem.
The boring conclusion
Most of the time, the job is patient. You configure what you can configure. Ask for what you need to ask for. You document the things you disagreed with so they’re available later when the conversation comes back around. You support the company you work for, even on days when you’d rather not.
It isn’t dramatic. It doesn’t make for good war stories. But over a career, the admins I’ve watched do this consistently are the ones who end up with the authority to actually change things. The ones who tried to force it usually ended up somewhere else, telling a different story about why their last company didn’t appreciate them.
Over the past 5 years, I have heard the conversation of how do we move our AD to the cloud. Oh the cloud, loud, mild, my child, it’s not as easy as you think. There are things in older environments that can tur some people’s feathers if it ever glitch or goes down. I once saw a IIS app stop working with ldap, the app was a proxy for the ceo to look at adult materials while at work…. he wasn’t happy when it said, “Username and password are incorrect.” I wrote about ADDS a while back, and it led to questions finally. How do I know what touches LDAP?
LDAP What is it?
First for the young kids in the room, talking to you Justin. LDAP is a lightweight directory access protocol. It’s an open vendor-neutral protocol designed to access and manage directory information. (Wow, that sounded professional). Basically, it lets you query and interact with things like AD. I have mainly used LDAP for VPN access. Meraki loves LDAP and its group policy-based VPN stuff.
So how does it work?
This is the normal 4-step LDAP process:
Session Connection – Knocks on the door.
Request – Asks for Justin’s distinguished name. We will call him Pastor Justin.
Response – LDAP says, yeppers, we have him.
Completion – The connection is made.
LDAP can do a lot more than just do connection requests. It can add, delete, search, compare, modify, etc. It’s most commonly used for searching. Things like VPNs really love LDAP.
LDAP lives on port 389. So, if you monitor that port, you should get some good traffic.
LDAPS!
LDAP with an s just means secure ldap. It uses ssl or tls to enrypt the data. It lives on port 363. LDAPS can be a challenge to setup with older tech. For example, as400….. That is some old green screen tech there. So, a lot of manufacturing doesn’t use ldaps. It also requires a directory server to establish trust. A lot of smaller companies just don’t have the resources for this. Finally, the over head of traffic on the network. In our area, most companies are ran by a Sir Justin and they just don’t want to dig into it.
HOWEVER, if you can, you should, if you are going to be continuing the use of ldap. With that said, how do you determine what is hitting your ldap server? What touches LDAP?
What touches LDAP
Ok, you know me, it’s time for PowerShell. Firstly, We need to establish which logs. The logs will give us what’s already happened. What’s going on and such. The problem with ldap, is names change, IPs change, mac addresses change. A lot happens.
Ldap Logs
Event Viewer → Applications and Services Logs → Directory Service
This is where you usually see the LDAP diagnostic events people talk about, especially:
2886: server is configured in a way that allows unsigned/simple LDAP binds and is warning you about it.
2887: summary count of how many unsigned LDAP binds happened since the last 24-hour reporting window.
2888: summary count of clients that would be rejected if LDAP signing were required.
2889: the useful one. It can show the client IP and the account identity used for an unsigned LDAP bind attempt, but only after you enable the 16 LDAP Interface Events diagnostic setting to at least Basic.
1644: logs certain LDAP queries, especially expensive, inefficient, or slow ones when diagnostic logging is enabled. Microsoft also notes this event is used for visibility into LDAP activities on domain controllers. AKA the machine behind the machine.
LDAPS logs are the same but you can look for the the security logs and system logs for tls.
Powershell
if you are like me, you hate digging for logs. This is why I like my powershells. They make life easier. Since 2889 is the one that will give us the most useful information, this PowerShell is for that log.
The next way to do is is setup a proxy before the ldap server to see what is hitting it. like a man in the middle. In terms of What touches LDAP, I think this is the best approach. here are hundreds of tutorials out there for that one.
The next thing you can do is look into your firewall logs. look for the ports and marry it to other items.
What can we learn as a person
As we move forward with newer technologies, we have to adapt and adjust. In a world of fast-moving data and AI, things are changing faster than us humans can keep up. This scares people. Older products like LDAP slowly fade into oblivion, and it’s a race to keep up. This speed was going to happen whether we liked it or not. The number of humans who have been on this planet just keeps adding up. Our brains were not designed to keep up with it all. So sometimes, it’s best to target one thing and work on that one thing instead of 1000 things.
The next 15 years is going to be insane. Things will change every day. We will have leaders that will act out because of the chaos. The old ways will die, and if you can’t adapt, then you will fall into the death spiral. This is just history repeating itself. Each time it has happened, it’s gotten more extreme. When the wheel came about, the world changed; it was very small, but it grew. Those who didn’t use the wheel to plow their fields were outdone by those who had them. The chariots changed how we got from place to place. The written word allowed us to share knowledge. The printing press took the written word from a small handful of people to most of the world. The phone and steam engine changed how we connected ideas. The internet and computers gave us… so so much. The nuclear power gave us the ability to jump into something much greater. Each time we move, it’s always been, Power, Communication, and Transportation.
the world of AI
We are now entering a new phase. The last phase interconnected the world in a way that has never happened and created full cultures and markets that never existed before and closed a lot of smaller local items like mom-and-pop shops. It also gave everyone on earth access to It gave us the ability to travel across the world within a week. Now we are here with AI and electric cars. The only thing missing to push us forward is power. Power is also what is costing us the most right now. Within the next 15 years, we will see massive changes. It will take away from so many but give back to so many. when it’s said and done, we are still going to be around each other. It’s important to see each other as we are and not shame each other.
Growing up, I watched my parents do this thing that feels kind of rare now. They didn’t just go to work. They built a work life. Like the kind that bleeds into the community, where people know your name, and your effort leaves marks in places you’ll never fully see.
They built communities where they worked and even changed the town. My mom worked as a bookkeeper at a Bilo and my dad was the guy who made all of the TV stuff happen at a TV station. When they both passed away, we had people we didn’t even know existed come and tell us stories of how their dedications affected their lives.
And I remember standing there thinking, wow. This is the real stuff. This is human relationships. This is impact. Not titles. Not buzzwords. Not “synergy.” Just showing up, being solid, and treating people like people. I want this.
However, it’s 2026 and not the 1990s.
Companies are purchased. Positions end. Entire departments get “restructured” because somebody in a different state wants a spreadsheet to look cleaner. And sometimes management rewards the loudest person, not the most honest one. I hate even typing that, but you know what I mean. We’ve all seen it.
So yeah, it’s easy to see why people job hop. I’ve experienced this myself on a few occasions, and I’m not pleased. Not because I think loyalty should be forced. But because I miss the idea that work could be steady enough to grow relationships. That you could stay somewhere long enough for people to actually know you. Not just your username in Teams.
And then comes the part that makes me want to gently fold my laptop in half.
I hate searching and comparing my resume to the job posting.
It feels like a game where the rules change every time. The job post reads like a wish list written by three different people who never met. Your resume reads like a life you actually lived. And then an ATS robot shows up and decides your future because you didn’t say “stakeholder management” in the correct sacred order.
Meanwhile I’m sitting there with a Diet Dr Pepper, trying to convince myself this is fine. Life is good. This is normal. Totally.
Its not.
But I still want that thing my parents had. The human part. The stories people tell later. The “they helped me” moments. So I’m not trying to win the corporate hunger games here. I’m trying to find a role where I can actually matter, with people who still value being real.
And since I don’t enjoy the resume-vs-job-post cage match…
So, Lets Match it up, using chat gpt.
What MATCH is
Alright. So when I say “Let’s MATCH it up,” I’m not trying to turn job hunting into some hustle culture personality trait. I’m not here to sell you a seven-step morning routine that starts with cold plunges and ends with crying in LinkedIn Premium.
MATCH is way more boring than that.
And that’s why it works.
MATCH is a comparison framework. That’s it. It’s a method to take a job posting and your resume, put them side by side, and stop relying on vibes. Because vibes are how you end up applying for a role you’re perfect for and getting rejected by a robot that thinks you’re underqualified because you said “ticketing system” instead of “ITSM platform.”
When we use MATCH, we’re doing something super simple:
We’re making sure your resume and the job posting are speaking the same language, without you changing who you are or making stuff up.
Because here’s the uncomfortable truth. A lot of job searching is translation. Not lying. Not exaggerating. Just translating. Like if you’ve been doing “keeping the place from catching fire” for five years, but the job post calls that “risk mitigation and operational continuity,” you should not lose points because you did not use their fancy phrase.
MATCH helps you do that translation in a way that still feels like you.
And it’s designed to be used in four places where people usually get stuck, burnt out, or angry. Sometimes all three.
1) Job Posting vs Resume Analysis
This is the “tell me where I stand” step. What’s a strong match? What’s weak? What’s missing? And what’s in the posting that’s implied but never directly said?
2) Resume Tailoring
This is where we take the truth you already have and shape it so it actually lands. Same experience. Cleaner connection. Less “hope they figure it out.”
3) ATS Optimization
This is the part where we stop pretending ATS does not exist. We pull the real keywords and competency signals, and we weave them in naturally, like a normal human. Not like a resume that reads like it was written by a toaster oven.
4) Interview Preparation
This is my favorite use of MATCH, honestly. Because it shows you where you’re weakest before you’re sweating through a “Tell me about a time…” question. You find the gaps, you build stories, you prepare your receipts.
So yeah, MATCH is not magic.
It’s more like a flashlight.
You shine it on the job post. You shine it on your resume. You see what’s real. And then you make smart edits instead of panic edits.
Now let’s break down the acronym itself, because each letter has a job. Once you get it, you will never go back to randomly editing bullets until you hate yourself.
The MATCH acronym
So now that we know MATCH is not a motivational poster, let’s actually break it down. This part matters because each letter is a different kind of thinking. If you skip steps, you end up doing what most people do. You rewrite your resume in a mild panic, throw more words at it, and hope the algorithm feels kindness that day.
MATCH keeps you honest. It also keeps you from spiraling.
M — Map
Mapping is where you stop guessing what the company wants and you make them say it out loud.
You take the job posting and break it down into parts you can actually work with:
The implied expectations are the sneaky ones. This is the stuff they do not say directly but they hint at. Like “fast-paced environment” usually means “we are understaffed and proud of it.” Or “must be able to juggle priorities” means “you will get interrupted every 12 minutes.”
When you Map, you create the benchmark. This is the measuring stick. Without it, you are just editing your resume in the dark.
Mini prompt for M (Map):
Map this job description into five sections:
1) Required skills
2) Preferred skills
3) Core responsibilities
4) Keywords and tools
5) Implied expectations (things not stated directly but strongly suggested)

Job Description:
[Paste job post]
A — Align
Align is where you look at your resume and ask one simple question.
Where do I already match this?
Not where you could match if you had three more certs and a time machine. Where you match now, based on what you have actually done.
This is also where you separate strong matches from partial matches. Strong match means you have done it, you can prove it, and you can talk about it. Partial match means you have some adjacency, but the proof is light or the wording is not clear.
Align is basically the honesty filter. It shows you what is already working so you do not accidentally delete your best stuff while chasing keywords.
Mini prompt for A (Align):
Using the mapped job requirements below, identify where my resume aligns.

Output in three sections:
1) Strong matches (clear evidence)
2) Partial matches (some evidence, needs strengthening)
3) Not present (missing or unclear)

Job Requirements (from Map):
[Paste the mapped list]

Resume:
[Paste resume]
T — Translate
Translate is my favorite, because this is where we stop losing points for wording.
Translation is not lying. It is not inflating. It is taking the real work you did and describing it in the same dialect the job posting uses.
Job posts have a language. Sometimes it is clean and direct. Sometimes it sounds like it was written by a committee that only communicates in buzzwords.
Either way, if the posting says “identity lifecycle management” and your resume says “made accounts and removed accounts,” you are talking about the same thing. The machine does not always know that. The recruiter might not either, especially if they are scanning at warp speed.
Translate means you mirror phrasing, match seniority language, and surface transferable skills. You keep the truth, but you present it in a way that lands.
Mini prompt for T (Translate):
Rewrite my resume bullets to better match the language of the job description.
Do not exaggerate or add experience I do not have.
Keep my original meaning, but mirror the job posting phrasing and seniority level.

Job Description:
[Paste job post]

Resume bullets to rewrite:
[Paste bullets]
C — Close Gaps
Close Gaps is where you look at what is missing and decide what kind of missing it is.
There are two kinds of gaps that matter.
The first is a real gap. You do not have that skill yet. You cannot claim it.
The second is a signal gap. You have done the work, but your resume is not proving it clearly. This one is way more common than people think.
Close Gaps is where you identify:
Missing skills Weak experience signals Missing metrics Experience that should be expanded
Then you decide what to do with it.
Add it, if it is true and relevant. Reframe it, if it exists but is hidden. Remove it, if it distracts from the role you want.
This is the section that saves you from tossing your whole resume into the trash because one posting asked for a tool you used one time in 2019.
Mini prompt for C (Close Gaps):
Identify gaps between the job description and my resume.
For each gap, label it as:
- Real gap (I do not have it)
- Signal gap (I have it but my resume does not show it well)

Then recommend one of these actions:
Add, Reframe, Remove, or Ignore (if low importance)

Job Description:
[Paste job post]

Resume:
[Paste resume]
H — Highlight
Highlight is where we decide what gets the best real estate.
Because the top of your resume is prime land. The first third of the first page is basically beachfront property. That is where the reader decides if they keep going.
Highlight means you prioritize:
Most relevant experience Job-specific metrics Keywords Core competencies
This is where you move the right bullets up, trim the fluff, and make it easy for a recruiter to connect the dots without working overtime.
Highlight is also where you stop treating your resume like a biography. It is not your life story. It is a targeted document meant to get you into a conversation.
A human conversation, ideally. With a person who might someday tell a story about working with you.
Mini prompt for H (Highlight):
Based on the job description, tell me what to highlight on my resume.

1) List the top 8 items I should prioritize (skills, keywords, accomplishments)
2) Tell me what should move to the top of the resume
3) Suggest a revised order for my sections (Summary, Skills, Experience, Projects, etc.)
4) Identify anything that should be trimmed or moved down

Job Description:
[Paste job post]

Resume:
[Paste resume]
Next up is where we put MATCH to work in the four places you listed.
And yes, I will give you copy and paste prompts that are ready to go, plus what good output should look like so you can tell if ChatGPT is being helpful or just being ChatGPT.
MATCH in real life: the 4 core use cases
This is the part where we stop admiring the acronym and actually use it. Because MATCH is cute on paper, but the whole point is that it saves you from that awful feeling of staring at a job post and thinking, “Cool. I have no idea what they want, and I’m apparently unqualified to exist.”
So we are going to use MATCH four different ways. Same framework, different outcome.
And I want you to notice something as we go. This is not just about getting past the ATS. It’s about respecting your own time and energy. Job searching can make you feel disposable. MATCH pulls you back into control. You stop begging for a chance and you start making a case.
1) Job Posting vs Resume Review
This is the “tell me the truth” step.
Before we tailor anything, before we optimize, before we rewrite a single bullet, we compare what they asked for to what you actually have. Line by line. Not emotionally. Not hopefully. Just honestly.
You want the model to:
Map the job post into requirements
Align your resume evidence to each requirement
Translate where your experience exists but your wording is weak
Close gaps by identifying what is missing or unclear
Highlight the strongest parts so you know what to lead with
This is the step that answers the question you are already asking in your head: “Am I even close?”
Copy and paste prompt (Job Posting vs Resume Review using MATCH):
Use the MATCH framework (Map, Align, Translate, Close Gaps, Highlight) to compare this job description to my resume.

M) Map:
- Extract required skills, preferred skills, responsibilities, keywords/tools, and implied expectations.

A) Align:
- For each mapped item, show where my resume provides evidence.
- Mark each item as Strong match, Partial match, or Not present.

T) Translate:
- Suggest wording changes to my existing bullets that better mirror the job posting language.
- Do not add experience I do not have.

C) Close Gaps:
- List gaps and label each as Real gap (I do not have it) or Signal gap (I have it but it is not clear).
- Recommend Add, Reframe, Remove, or Ignore for each gap.

H) Highlight:
- Tell me the top 8 things I should emphasize on my resume for this job.
- Suggest what should move to the top of the resume.

Output format:
1) A comparison table: Job requirement | Resume evidence | Match level | Notes
2) Then the rewritten bullet suggestions
3) Then a short competitiveness summary (Strong fit, Moderate fit, Stretch)

Job Description:
[Paste job post]

Resume:
[Paste resume]
What good output looks like If the output is good, it will feel specific. It will point to exact lines in your resume. It will not just say “You match well.” It will say “This bullet proves it, and this is the missing keyword.”
If the output is bad, it will be vague. It will give you generic career advice. It will try to rewrite your life story. We do not want that.
2) Resume Tailoring
This is where you take the same truth and aim it like a flashlight.
Tailoring does not mean changing who you are. It means choosing what to emphasize so the reader immediately understands why you belong in the room. Most resumes are not “bad.” They are just not targeted. They are written like a general biography instead of a specific argument.
Tailoring is also where you stop treating every bullet equally. Some bullets are doing real work. Some bullets are just taking up space.
Copy and paste prompt (Resume Tailoring using MATCH):
Use the MATCH framework to tailor my resume for this exact job.
Do not exaggerate. Do not invent experience. Keep it honest.

M) Map the job post into:
- Required skills
- Preferred skills
- Responsibilities
- Keywords/tools
- Implied expectations

A) Align my current resume to that map and identify:
- What already supports the job strongly
- What supports it weakly

T) Translate:
- Rewrite my Professional Summary (3 to 4 lines) to match this role.
- Rewrite my top 6 to 10 bullets to mirror the job posting language.
- Keep bullet structure consistent and results-focused.

C) Close Gaps:
- Identify missing signals and suggest what to expand, add, or reframe using my existing experience.

H) Highlight:
- Recommend the best ordering of sections and which items should be in the top third of page one.

Output:
1) Revised Summary
2) Revised Skills or Core Competencies section (if needed)
3) Revised bullets (ready to paste)
4) Notes on what changed and why

Job Description:
[Paste job post]

Resume:
[Paste resume]
How you use the result Take the revised summary and the top bullets first. That is the “prime real estate.” If you only have the energy for one thing, do that. It gives you the biggest return.
3) ATS Optimization
Let’s talk about the robot.
ATS systems are not evil. They are just literal. They scan for signals. They look for keywords, tools, titles, and patterns. Humans do this too, but ATS does it faster and colder and without caffeine.
ATS optimization is not keyword stuffing. Keyword stuffing is how you end up with a resume that reads like a broken toaster manual.
Optimization is making sure the words that matter actually show up in a way that still sounds human.
Copy and paste prompt (ATS Optimization using MATCH):
Use MATCH to optimize my resume for ATS for this job posting.

M) Map:
- Extract the top 20 keywords, tools, and competency phrases from the job post.
- Group them into categories (tools, processes, soft skills, certs, domains).

A) Align:
- Check my resume for each keyword or phrase.
- Mark as Present, Present but weak, or Missing.

T) Translate:
- Rewrite bullets where needed to naturally include missing or weak keywords.
- Keep the statements truthful and specific.
- Do not overuse the same keyword.

C) Close Gaps:
- Identify missing terms that I cannot honestly claim.
- Suggest alternatives that reflect adjacent experience I do have.

H) Highlight:
- Provide a final ATS-friendly Skills/Core Competencies block tailored to this job.

Output:
1) Keyword table with status
2) Revised bullets (ready to paste)
3) ATS Skills block

Job Description:
[Paste job post]

Resume:
[Paste resume]
Small warning that saves pain Do not chase every keyword. Some job posts are written like Christmas lists. Prioritize the recurring themes. If “Active Directory” shows up five times, that matters more than a tool mentioned once.
4) Interview Preparation
This is where MATCH turns into confidence.
Interview prep is not memorizing answers. It is knowing your weak spots and having stories ready, so you are not inventing coherence under pressure.
MATCH helps you identify:
Where your experience is strongest, so you can lead with it
Where you are thin, so you can prepare a clean explanation
Where the job expects something you have not done, so you can position adjacent work
Copy and paste prompt (Interview Preparation using MATCH):
Use the MATCH framework to prepare me for an interview for this role.

M) Map:
- Identify the top responsibilities, required skills, and implied expectations.
- Identify what this role will likely measure in interviews.

A) Align:
- Based on my resume, list my strongest matching areas and why.

T) Translate:
- Convert my strongest bullets into 6 STAR stories (Situation, Task, Action, Result).
- Keep them short and conversational.

C) Close Gaps:
- Identify my weakest areas for this role.
- For each weak area, give me:
  a) a truthful explanation strategy
  b) a bridge statement using related experience
  c) a learning plan answer if asked directly

H) Highlight:
- Provide a list of 10 likely interview questions for this role.
- Tell me which 3 stories I should lead with and why.

Job Description:
[Paste job post]

Resume:
[Paste resume]
How you practice without losing your mind Read your STAR stories out loud once. Fix what sounds weird. Then stop. You are not trying to become a different person. You are trying to become a clearer version of the person who already did the work.
Pro Tips
Here’s where we make MATCH actually feel usable when you’re tired, annoyed, and your brain is doing that thing where it wants to quit forever. These are the little moves that make the whole process less painful and way more consistent.
Ask for a comparison table
Do not let the model ramble. Rambling is how you end up with a pretty paragraph and zero action.
Ask for a simple table like this:
Job Requirement | Resume Evidence | Gap Level
That’s it. It forces clarity. It forces receipts. It also makes it obvious when your resume is missing proof, not experience.
If the job says “automation” and your resume evidence is “helped with scripts sometimes,” the gap level is going to tell on you. That’s a good thing. Better now than in an interview.
Run it twice
First run is analysis. Second run is writing.
If you try to do both in one shot, you usually get a mushy blend of generic advice and half-rewritten bullets. Instead:
Pass 1: Compare and diagnose using MATCH. Pass 2: Rewrite only the sections with the highest impact.
This keeps you from rewriting your whole resume like you are repainting a house because one wall has a scuff mark.
Ask for confidence level and assumptions
This one is huge. Models love to sound confident, even when they are guessing.
So tell it to label:
Confidence level for each match (High, Medium, Low)
Assumptions it had to make (like “I assume you used Jira because you said ticketing”)
Assumptions are where people accidentally drift into stuff they cannot defend. We are not doing that. We are staying clean.
Keep a “truth inventory”
This is the thing that keeps you honest when tailoring starts to feel like fiction writing.
Make a small list for yourself of:
Tools you truly used
Metrics you can defend
Projects you can explain without sweating
Stories you can tell in an interview
Then when MATCH suggests edits, you only accept changes that fit inside your truth inventory. That’s how you stay human. That’s how you avoid becoming the person who “led a global transformation initiative” when you were really just trying to keep the server from screaming.
Also, it makes interviews easier. You are not performing. You are just telling the truth clearly.
And yes, I still recommend doing all of this with a Diet Dr Pepper nearby. Not because it makes the ATS nicer. It just makes you feel slightly less like you are being judged by a spreadsheet.
Closing thoughts
I keep coming back to my parents because it’s the cleanest example I have of what work can look like when it’s human.
They weren’t famous. They weren’t chasing “personal brand.” They just showed up, did the job, treated people right, and stayed long enough for roots to grow. And when they were gone, people showed up with stories. Not about their job titles, but about how they made life easier, how they helped, how they mattered. That is legacy. Quiet, steady, real.
Now we live in a world where companies can act like people are disposable. One acquisition, one reorg, one manager with a weird ego, and suddenly you’re updating your resume on a Tuesday like none of it counted. That messes with you. It makes you question the whole idea of “building something” at work.
But here’s the thing I have to remind myself of, and maybe you need it too.
Even if the system is cold, you don’t have to become cold.
Job searching feels gross sometimes because it turns humans into documents. It turns your lived experience into bullet points. It turns your relationships into “stakeholders.” But under all that noise, what you are really doing is trying to find your people again. A team you can contribute to. A place where your effort is felt. A manager who values truth more than theatrics. Coworkers who remember you as a person, not a resource.
You are human, just like the rest of us. Let’s treat each other as such.
So, here I am looking down at a project to create a new domain and migrate users. Normally this isn’t a bad process. You clone the user on the other domain and have them sign in. Use a tool like Profwiz or ADMT (assuming it works). Then I realize, they are AD synced to Entra/Identity. Oh, this is going to be interesting. So, I pulled out my Diet Dr Pepper and got to work. It’s time to find the Entra ID source anchor attribute.
ms-DS-ConsistencyGuid is the Entra ID source anchor attribute
This little guy is the magic sauce that you are looking for. Back in the day, the syncing attribute was the object guid. This was a problem as many companies had more than one domain with the same account names. So, this little consistency guid matches the Immutable ID in entra. Lets take a look at these two.
On-prem AD user:
Attribute: ms-DS-ConsistencyGuid
Type: GUID stored as binary
Entra ID user:
Attribute: immutableId
Type: Base64-encoded version of that GUID
As long as these values never change, your hybrid identity stays the same. Change it the wrong way, your sync gets ugly. Here is how you can get the information from AD.
If it’s $null, nothing is using it yet, it not, then something is using it.
It’s a GUID field, perfect for unique identity.
It doesn’t change when you move users between OUs.
In the right design, you keep it stable even across forests and migrations.
Microsoft now recommends it specifically as the Entra ID source anchor attribute.
This is important to understand. if these don’t match, you don’t have a sync going on. Lets write a powershell that will check both.
Confirm with powershell
This powershell grabs both and lets us know if they match, if they don’t it tells us.
<#
.SYNOPSIS
    Compare on-prem ms-DS-ConsistencyGuid with Entra/Azure AD ImmutableId.

.DESCRIPTION
    For each user:
      - Reads ms-DS-ConsistencyGuid from AD
      - Converts it to Base64 (what ImmutableId should be)
      - Gets the cloud ImmutableId by UPN
      - Outputs if they match

    NOTE: This script is READ-ONLY. It does NOT change anything.
#>

Import-Module ActiveDirectory
Import-Module MSOnline

Write-Host "Connecting to Entra/Azure AD..."
Connect-MsolService

Write-Host "Getting AD users..."
$adUsers = Get-ADUser -Filter * -Properties userPrincipalName, ms-DS-ConsistencyGuid |
           Where-Object { $_.UserPrincipalName -ne $null }

$result = @()

foreach ($user in $adUsers) {

    $upn = $user.UserPrincipalName

    # Get ms-DS-ConsistencyGuid from AD
    $consistencyBytes = $user.'ms-DS-ConsistencyGuid'
    $consistencyGuid  = $null
    $adAnchorBase64   = $null

    if ($consistencyBytes) {
        $consistencyGuid = [Guid]$consistencyBytes
        $adAnchorBase64  = [Convert]::ToBase64String($consistencyBytes)
    }

    # Get cloud ImmutableId by UPN
    $cloudUser      = Get-MsolUser -UserPrincipalName $upn -ErrorAction SilentlyContinue
    $immutableId    = $null
    $matchStatus    = "Unknown"

    if ($cloudUser) {
        $immutableId = $cloudUser.ImmutableId
    }

    # Work out match status
    if ($adAnchorBase64 -and $immutableId) {
        if ($adAnchorBase64 -eq $immutableId) {
            $matchStatus = "Match"
        } else {
            $matchStatus = "Mismatch"
        }
    }
    elseif ($adAnchorBase64 -and -not $immutableId) {
        $matchStatus = "No ImmutableId in Entra"
    }
    elseif (-not $adAnchorBase64 -and $immutableId) {
        $matchStatus = "No ConsistencyGuid in AD"
    }
    else {
        $matchStatus = "Neither Set"
    }

    $result += [PSCustomObject]@{
        UserPrincipalName   = $upn
        ConsistencyGuid     = $consistencyGuid
        ADSourceAnchorB64   = $adAnchorBase64
        EntraImmutableId    = $immutableId
        MatchStatus         = $matchStatus
    }
}

# Show on screen
$result | Sort-Object MatchStatus, UserPrincipalName | Format-Table -AutoSize

# Optional: save to CSV for review
#$result | Export-Csv .\AnchorComparison.csv -NoTypeInformation
This script will give you a list of all the users and if it matches. Here is a script that will force the user to the immutableid. The check gives you info, and if you don’t check it will set it.
function Set-MsDsConsistencyGuidFromImmutableId {
    <#
    .SYNOPSIS
        Set ms-DS-ConsistencyGuid from Entra/Azure AD ImmutableId for one user.

    .DESCRIPTION
        Given a samAccountName:
          - Look up the on-prem AD user
          - Read ms-DS-ConsistencyGuid
          - Look up the Entra/Azure AD user by UPN
          - If ms-DS-ConsistencyGuid is empty and ImmutableId exists,
            set ms-DS-ConsistencyGuid to the ImmutableId value (decoded from Base64)

        Use -Check to only show what would happen, without making changes.

    .PARAMETER SamAccountName
        The on-prem AD samAccountName of the user.

    .PARAMETER Check
        If supplied, only checks and reports. No changes are made.
    #>

    [CmdletBinding()]
    param(
        [Parameter(Mandatory = $true)]
        [string]$SamAccountName,

        [switch]$Check
    )

    # Make sure AD module is available
    if (-not (Get-Module ActiveDirectory -ListAvailable)) {
        Write-Error "ActiveDirectory module not found. Install RSAT / AD tools first."
        return
    }
    Import-Module ActiveDirectory -ErrorAction Stop

    # Make sure MSOnline module is available
    if (-not (Get-Module MSOnline -ListAvailable)) {
        Write-Error "MSOnline module not found. Install-Module MSOnline first."
        return
    }
    Import-Module MSOnline -ErrorAction Stop

    # Get on-prem user
    $adUser = Get-ADUser -Identity $SamAccountName -Properties userPrincipalName, ms-DS-ConsistencyGuid -ErrorAction SilentlyContinue

    if (-not $adUser) {
        Write-Error "No AD user found with samAccountName '$SamAccountName'."
        return
    }

    $upn = $adUser.UserPrincipalName
    if (-not $upn) {
        Write-Error "User '$SamAccountName' does not have a UPN. Cannot match to Entra."
        return
    }

    # Current AD ConsistencyGuid
    $currentConsistencyBytes = $adUser.'ms-DS-ConsistencyGuid'
    $currentConsistencyGuid  = $null
    $currentConsistencyB64   = $null

    if ($currentConsistencyBytes) {
        try {
            $currentConsistencyGuid = [Guid]$currentConsistencyBytes
            $currentConsistencyB64  = [Convert]::ToBase64String($currentConsistencyBytes)
        }
        catch {
            Write-Warning "Failed to interpret existing ms-DS-ConsistencyGuid as GUID/Base64: $_"
        }
    }

    # Get cloud user and ImmutableId
    $cloudUser = Get-MsolUser -UserPrincipalName $upn -ErrorAction SilentlyContinue
    if (-not $cloudUser) {
        Write-Error "No Entra/Azure AD user found with UPN '$upn'."
        return
    }

    $immutableId = $cloudUser.ImmutableId

    # Decide what to do
    $action = "None"
    $result = "No change"

    if ($currentConsistencyBytes) {
        # Already has a ConsistencyGuid
        $action = "None"
        $result = "ms-DS-ConsistencyGuid already set. Nothing to do."
    }
    elseif (-not $immutableId) {
        $action = "None"
        $result = "Cloud user has no ImmutableId. Cannot set ms-DS-ConsistencyGuid from it."
    }
    else {
        # We CAN set ms-DS-ConsistencyGuid from ImmutableId
        $action = "Set ms-DS-ConsistencyGuid from ImmutableId"

        try {
            $newBytes = [Convert]::FromBase64String($immutableId)
            $newGuid  = [Guid]$newBytes

            if ($Check) {
                $result = "CHECK ONLY: Would set ms-DS-ConsistencyGuid to $newGuid from ImmutableId."
            }
            else {
                Set-ADUser -Identity $adUser.DistinguishedName -Replace @{ 'ms-DS-ConsistencyGuid' = $newBytes }
                $currentConsistencyGuid = $newGuid
                $currentConsistencyB64  = [Convert]::ToBase64String($newBytes)
                $result = "UPDATED: ms-DS-ConsistencyGuid set to $newGuid from ImmutableId."
            }
        }
        catch {
            $action = "Error"
            $result = "Failed to convert ImmutableId '$immutableId' to GUID/bytes: $_"
        }
    }

    # Output a simple summary object
    [PSCustomObject]@{
        SamAccountName            = $SamAccountName
        UserPrincipalName         = $upn
        CurrentConsistencyGuid    = $currentConsistencyGuid
        CurrentConsistencyGuidB64 = $currentConsistencyB64
        CloudImmutableId          = $immutableId
        Action                    = $action
        Result                    = $result
        CheckMode                 = [bool]$Check
    }
}
Notes
if you have two domains, and the Entra ID source anchor attribute is the same in a synced area in both, you will get odd little accounts out of no where. Once you remove one of those into a unsynced ou, this will resolve the issue.
You can force a user to become someone else using the Entra ID source anchor attribute ms-ds-consistencyguid. This isn’t a great thing, but it’s a hack around. So, if you want bob to become philip’s entra account, just change his anchor.
What can we learn as a person
In Entra, the anchor says “this is who I am, no matter where you move me.” In real life, we’ve got those too—just without the GUID. They’re the moments, labels, and stories that quietly tell us who we are: the kid who “wasn’t smart,” the one who always had to fix everything, the person who “always messes things up.” Those anchors don’t sit in a database, but they still decide what we “sync” with: what relationships we accept, what jobs we go for, what kind of treatment we think we deserve.
The tricky part is that a lot of those anchors were never chosen on purpose. They just happened, and we started believing, “This is just who I am.” But an anchor in your life is not a prison; it’s a reference point you’re allowed to outgrow. You might not be able to change what happened, but you can change what it means. “I failed” can become “I learned what I need to avoid next time.” “I grew up in chaos” can become “No wonder I get anxious when things change—and I can still learn how to calm myself and ask for what I need.” Same history, different interpretation.
So it’s worth asking yourself: What have I been using as my anchor? And if you could pick one on purpose, what would it be instead? Maybe something like “I’m learning,” or “I’m allowed to grow,” or “I deserve basic respect, even when I screw up.” In identity systems, once the anchor is stable and correct, all the sync errors start to calm down. In life, when your inner anchor shifts from shame to self-respect, a lot of emotional “sync errors” start to calm down too. The past doesn’t vanish—but it stops being the only thing that gets to name you.
The other day, I was showing a friend how to set up Intune deployments. Then it hit me: I have unique scripts for script detections and things like that here on therandomadmin.com. However, I haven’t really gone through the detection rules for built-in items. I was like, well now I have to fix that. So here we are going to fix that with the Intune Detection Rules. Let’s get started.
Types of Intune Detection Rules
There are three built-in detection types that we will go over today. They are the MSI, File, and Registry.
MSI is like the easy button, (no not the staples one from the commercials… did I just age myself?)
File is my least favorite one, but it works for legacy apps
Registry is my favorite one and it’s the one that I will spend some time on for you all.
Other than the built-in items, there are scripted items which is unique in it’s own rights. You can take a look at how these scripts work here. Andrew has a good tutorial on his blog as well. Today will be all about the built-in items.
The Built-In MSI Rule
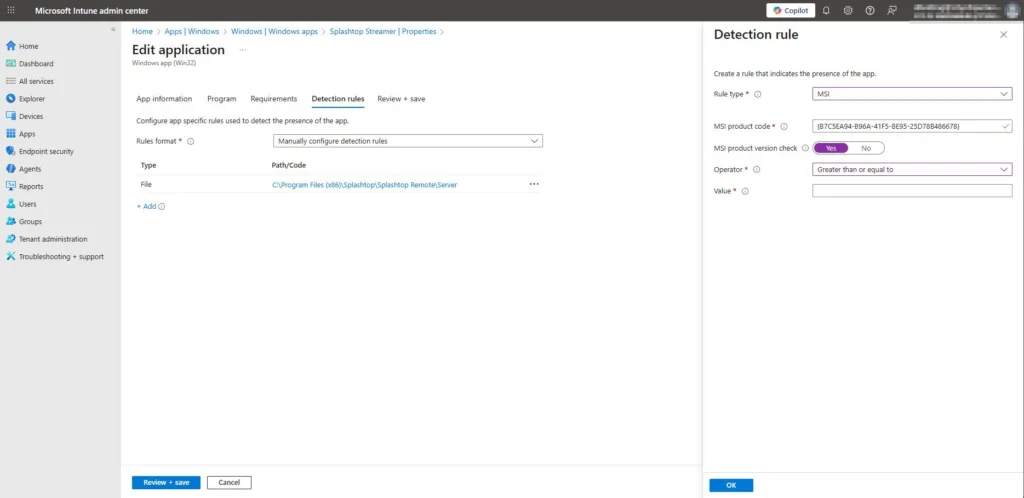
The MSI rule is the easy button of the detection scripts. If you are using an MSI, it will pull the information directly from the MSI. Once you get to the detection rule part you can follow these steps:
Click Add
Select MSI
And click save
Magic, right? The other thing you can do is select “MSI Product Version Check.” Here you can select an operator like “greater than or equal to” and then give it the value. Which is the product version. This helps with auto-updated items. Which I always suggest using. Below is a screenshot.
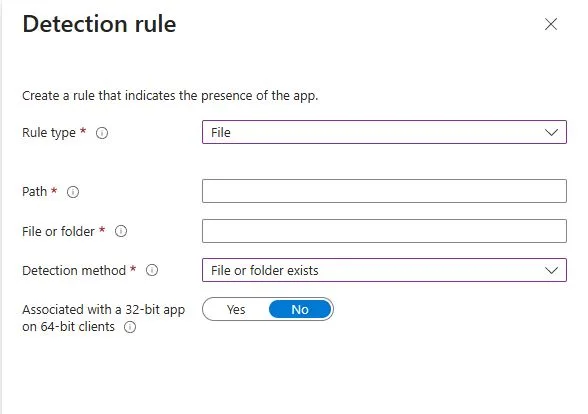
File Detection Rule
Our next built-in detection rule is for files. This is good if you have an app that doesn’t install like normal apps. Older apps or more niche apps are like this. For example. We installed a special Creo app. It installed in the C:\PTC location, and it didn’t add itself to the registry uninstall strings. It didn’t come in an MSI; it was an EXE with custom everything. This app was a pain in the backstracher. So we used the File location rule. Here is how you can set it up.
Inside your detection rule, click Add.
Rule type: File
Path: The folder that you want to check. In this case it was C:\PTC
File or Folder: Here we wanted to see if the creo.exe existed. So, that’s what I put here.
Detection Method: We used file or folder existed.
Greater than or equal to string
As you will learn, I am all about the version numbers. If you select the string (version), you will need to get that version number from the file you are pulling from. You can do this with PowerShell pretty quickly.
Once you have this information, you will then proceed to input it into the value section once you select the string (version) and greater than or equal to options.
Built-In Intune Detection Rule for Registry
The registry key is the most common and the most useful as well. Most apps install themselves in this method. The script below is going to be your best friend. What it does is give you the information you need. Lets break down what each item is so we can look at the script and make this happen. I’m giving this the most focus because it’s the most common.
Registry Type: The type we are using.
Key Path: The path of the uninstall string that we will be using
Value Name: What we are looking for, this case we will be looking for displayversion
Detection Method: Version Comparison
Operator: Greater than or equal to
Value: What value we are looking for
Assocated: Is it a 32 or 64.
Script
So you will have to go digging into the registry for this information. However, this registry area is just confussing and really hard to manually dig through. So powershell is once again, our friend.
All you have to do is replace the app name. It will provide you with everything you need inside the built-in detection rule. This is the output that it provides:
RuleType         : Registry
KeyPath          : HKEY_LOCAL_MACHINE\Software\Microsoft\Windows\CurrentVersion\Uninstall\{6EB73F60-E858-3AF3-913A-0C1783656B42}
ValueName        : DisplayVersion
DetectionMethod  : Version comparison
Operator         : Greater than or equal to
Value            : 143.0.7499.170
AssociatedWith32 : False
This script really makes finding apps easier. If the app installs in another place, good hunting, my friends.
What we can learn as a person
I am still missing my keys. I have the backup fob for my car, but I have no idea where my normal keys are. So no house key right now. Sometimes, I need to backtrace what I have done to find where I am going. Which is ok. This is why I document so much because I don’t have the brain space to remember everything I have done. This is also why this blog post exists. I realized I never once really did explain how to use the built-in tools. Now I have a place to come and get the script I need and anyone else needs. So that will be nice later down the road, and I will thank myself later. Giving myself the little micro successes in the future is what I am going for here. The keys, on the other hand, I didn’t set up a space for them to go with the new desk I have. Thus, they are in the ether somewhere, and when I find them, they will go into my little cubby on my new desk. So, set yourself up for micro successes, whether you know it or not, in the future. This will reduce a lot of stress and anxiety in the future. Remember, 80% of life is the systems that you have put into place. So, let’s make good systems. Then you can set up your own Intune detection rules for your life to detect when you gave yourself successes. Like, when I see the wallet inside the new cubby. I can give myself a little thanks.
We use cookies to ensure that we give you the best experience on our website. If you continue to use this site we will assume that you are happy with it.