I used to work in an environment where the help desk admin spent half their day resetting passwords twice. Once in Active Directory, and then again in Office 365. If they forgot the second reset, the user could not sign in to their email, and the phone would ring. It was a miserable, repetitive cycle that drove everyone crazy. We eventually installed Microsoft Entra Connect to sync the directories, and the help desk team almost cried tears of joy.
Ok, so here is the deal with Microsoft Entra Connect. It is the sync engine that bridges your on-premises Active Directory with Microsoft Entra ID. Today we will build a simple setup guide. We will walk through how to install it, configure permissions, enable writeback, and harden the server so bad actors cannot compromise your domain.
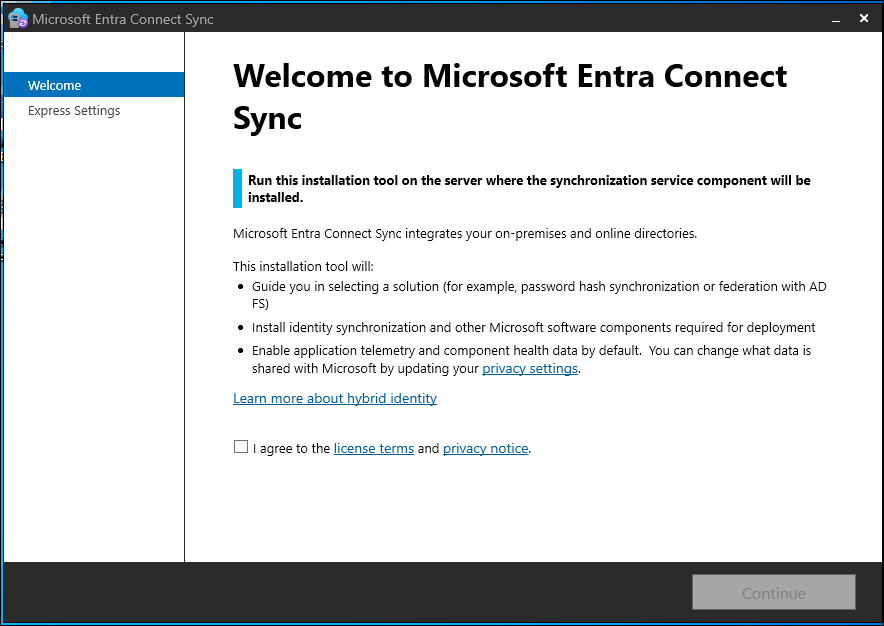
The Microsoft Entra Connect installation welcome screen. Source: Microsoft Learn.
A simple setup guide for Microsoft Entra Connect
To start, download the latest version of the installer from the Microsoft Entra admin center. Before you double-click the file, make sure your server runs TLS 1.2. Microsoft enforces TLS 1.2 for all sync connections now, and the installation will fail if you do not enable this protocol on the server first.
Once you verify your server meets the prerequisites, run the installer:
Accept the license terms on the welcome screen.
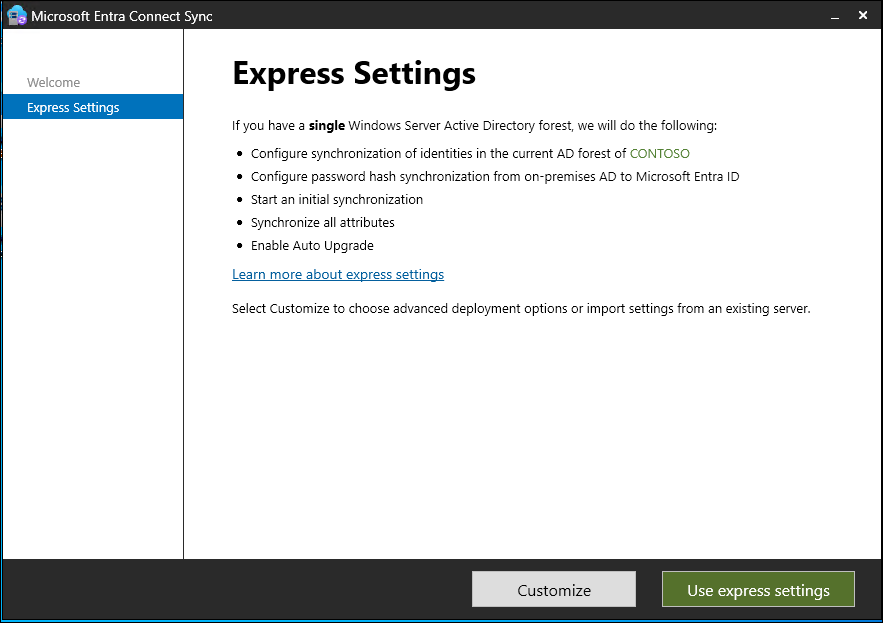
Choose the Use express settings option. Express settings configure password hash synchronization by default, which works perfectly for a single Active Directory forest.
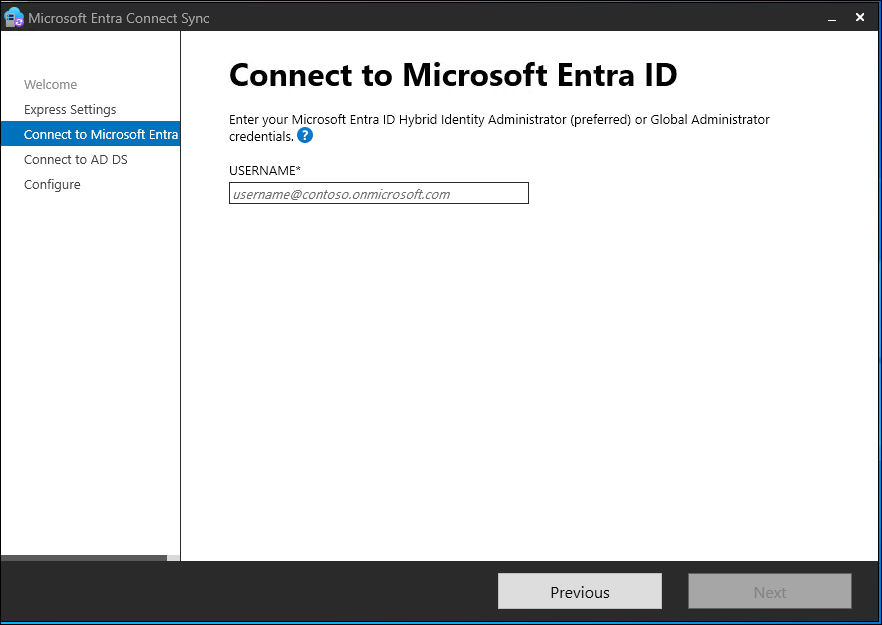
Enter your Entra tenant credentials. You must use an account with the Hybrid Identity Administrator or Global Administrator role.
Enter your on-premises Active Directory Enterprise Admin credentials. The installer needs this level of access to create the dedicated sync account in your domain.
Review the configuration on the ready screen, check the box to start synchronization, and click Install.
Select Express settings to automate the setup process. Source: Microsoft Learn.
Minimum permissions for the Entra Connect user
During the express installation, the wizard automatically creates a user account starting with MSOL_ in your on-premises Active Directory. Microsoft configures this account with the exact permissions needed to read your directory. If you want to use custom settings or pre-create this account, you must configure the permissions yourself.
The sync account needs these minimum permissions at the root of your domain directory:
Replicating Directory Changes. This permission allows the sync service to read changes from your Active Directory domain.
Replicating Directory Changes All. The service account needs this permission to sync password hashes from your domain controllers.
If you enable writeback features later, you must grant write permissions to this account. For example, password writeback requires the account to have Reset Password, Change Password, and Write permissions on the lockoutTime and pwdLastSet attributes for all user objects in your sync scope. You can read the official Microsoft Entra Connect permission guide on Microsoft Learn to see the full list of attribute requirements.
Hardening the Entra Connect server and user access
Microsoft Entra Connect holds the keys to your entire hybrid identity kingdom. If an attacker compromises this server, they can sync malicious changes to the cloud or extract password hashes from your on-premises domain. Hardening this server is not optional.
First, install Entra Connect on a dedicated member server. You must never install this software on a Domain Controller. Installing it on a member server reduces the attack surface and prevents easy privilege escalation if someone gains local admin access to the sync box.
Second, restrict local administrative access. Only allow trusted domain administrators to log in to the sync server. The installer creates a local group called ADSyncAdmins on the server. Make sure you only place authorized users in this group, as anyone in it can modify the synchronization rules and configurations.
Third, secure the synchronization user account. The MSOL_ account does not need domain administrator rights. Do not add this account to the Domain Admins or Enterprise Admins groups. Microsoft restricts access to the sync credentials by default, but you should also monitor the account logs for any unexpected sign-in attempts. You can learn more about securing these configurations in the Microsoft Entra Connect sync hardening guide on Microsoft Learn.
Enabling writeback features
A simple setup guide usually stops at one-way synchronization, where changes only flow from AD to the cloud. But you will want to enable writeback features to make the system truly useful. The most popular option is Password Writeback, which works with Self-Service Password Reset.
To enable Password Writeback:
Launch the Microsoft Entra Connect wizard from your server desktop.
Click Configure and select Customize synchronization options.
Enter your Hybrid Identity Administrator credentials to authenticate.
Proceed through the screens to the Optional Features page.
Check the box for Password writeback and click Next to apply the change.
You must enter your hybrid administrator credentials in the wizard to configure writeback. Source: Microsoft Learn.
Once you turn on this setting in the wizard, go to the Microsoft Entra admin center. Navigate to Protection, click Password reset, and select On-premises integration. Make sure you enable the option to write back passwords to your on-premises directory. This setup allows users to reset their own passwords in Microsoft 365, and the service will update their Active Directory password in real time.
What can we learn as a person
Managing a network without synchronization is exhausting. You push changes to one database, then copy them manually to another, hoping the two systems stay in alignment. If you do not set up writeback, information only flows one way, and the cloud never talks back to your local server. Honestly, our personal lives run into the same problem when we isolate ourselves. We try to handle every project, stress, and anxiety in our own heads without letting anyone else in. Operating in a one-way sync means you carry the entire load alone, and eventually, the systems fall out of alignment.
But the thing is, we need writeback. We must escrow our keys. A few trusted relationships can act as our on-premises integration, allowing support to flow back into our lives when the pressure builds up in our heads. Trying to run everything yourself only leads to a crash. Who acts as your writeback connection? Which person do you allow to push support and feedback back into your life when things get heavy?
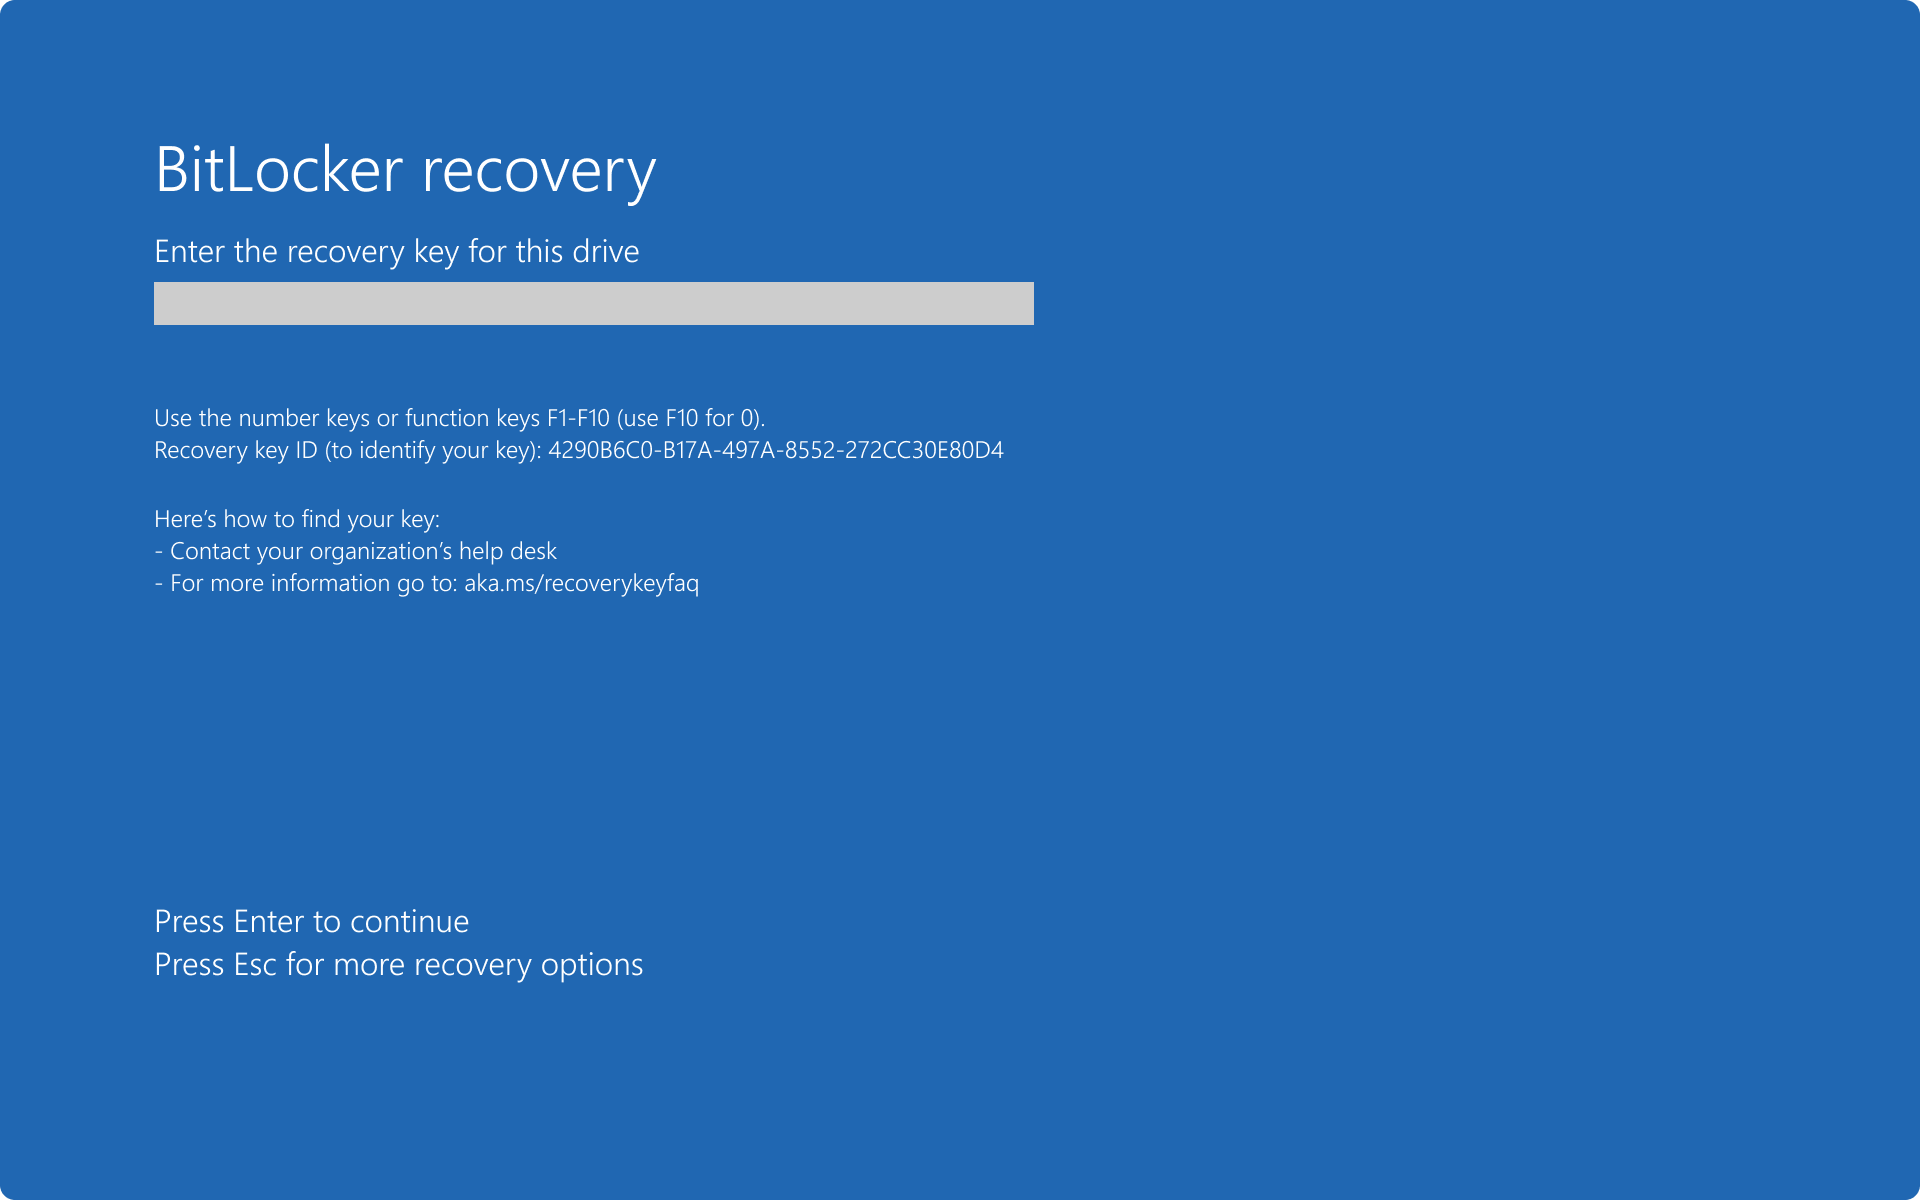
I once had a user call me at 8:00 AM on a Monday in a complete panic. Their screen was bright blue, asking for a 48-digit number they did not know. That was my introduction to the joy of troubleshooting BitLocker keys. They did not have the key. I did not have the key yet. We had to spend an hour digging through old documentation to find the key. It turned out the previous admin wrote it on a sticky note and stuck it under a keyboard in the server closet. Not ideal.
Ok, so here is the deal with BitLocker. If you do not know where your recovery keys are, you do not actually have a backup. We must store those keys in a safe place so we can access them when a user locks themselves out. First, we will look at where the keys live in Active Directory, Microsoft Entra ID, and Intune. Then we will configure the policies to back up the keys automatically.
The dreaded BitLocker recovery screen. Source: Microsoft Learn.
Where to find BitLocker keys
If a machine locks a user out, you need to find the key fast. Depending on how you enrolled and encrypted the device, you can find the key in one of three places. Let's look at how to grab them.
Finding keys in Microsoft Intune
If you manage your devices with Intune, this is the easiest place to look. You need the right permissions, like Help Desk Operator or Endpoint Security Administrator. If your role does not have the Rotate BitLockerKeys permission, you wont see them. You can check the official Intune encryption docs on Microsoft Learn to verify the required roles.
To find the key in the admin center:
Go to the Microsoft Intune admin center.
Select Devices, then click All devices.
Find and click on the locked-out device.
Look under the Monitor section on the left menu and click Recovery keys.
Review the list of key IDs and click Show Recovery Key to view the actual 48-digit key.
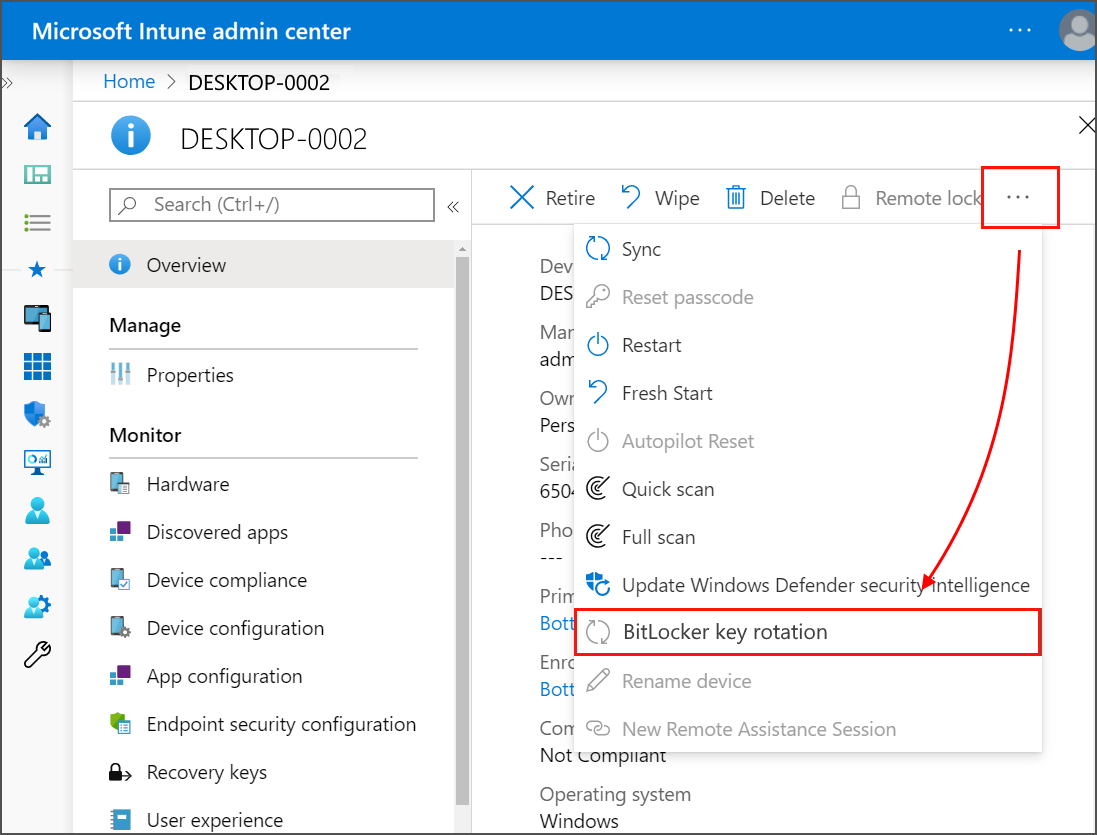
You can also rotate the BitLocker keys directly from the device action menu. Source: Microsoft Learn.
Intune also offers a self-service option. If your users lock themselves out and you do not want them calling the help desk, they can go to the Company Portal website at portal.manage.microsoft.com. Once they sign in, they can select their device and click Get recovery key to retrieve it. This saves a lot of time when dealing with remote users in different time zones.
Finding keys in Microsoft Entra ID
Sometimes you join a device to Entra ID without managing it in Intune. Other times, you might just prefer the Entra portal. Entra ID stores the keys directly on the device object.
Here is how to find them in the Entra portal:
Open the Microsoft Entra admin center.
Navigate to Identity, then Devices, and click All devices.
Search for your device and click on its name.
Look for the BitLocker keys link under the general properties section.
Click the link to view the list of keys and copy the 48-digit recovery password.
Finding keys in Active Directory
Classic domain-joined computers send their keys to your local Active Directory domain controllers. You cannot see them out of the box, however. You must install a special administrative tool to view the keys.
First, make sure you have the BitLocker Recovery Password Viewer installed. It belongs to the Remote Server Administration Tools, which we call RSAT. You can read the Microsoft Learn recovery process guide to see how to install it. On Windows 10 or 11, you go to Settings, then Apps, then Optional features, search for RSAT BitLocker Drive Encryption Administration Utilities, and install it.
Once you install the tool:
Open Active Directory Users and Computers. We call this ADUC.
Find the computer object for the locked machine.
Right-click the computer and select Properties.
Click the BitLocker Recovery tab. If you do not see this tab, you probably forgot to install the RSAT utility, or you lack the required permissions because Microsoft restricts key access to Domain Admins by default.
Review the recovery passwords list, which shows the Backup Date and Password ID for each key.
How to setup BitLocker backups in Entra ID and Intune
Now that we know how to find the keys, let's talk about how to configure automatic backups. If you do not configure your policies to back up the keys, Windows will encrypt the drive but will not save the key anywhere. This is a disaster waiting to happen.
In Intune, you should use the Endpoint Security disk encryption policy for this configuration. It is much cleaner than the old Device Configuration profiles. Microsoft explains this setup in their Intune BitLocker policy guide on Microsoft Learn.
Go to the Microsoft Intune admin center.
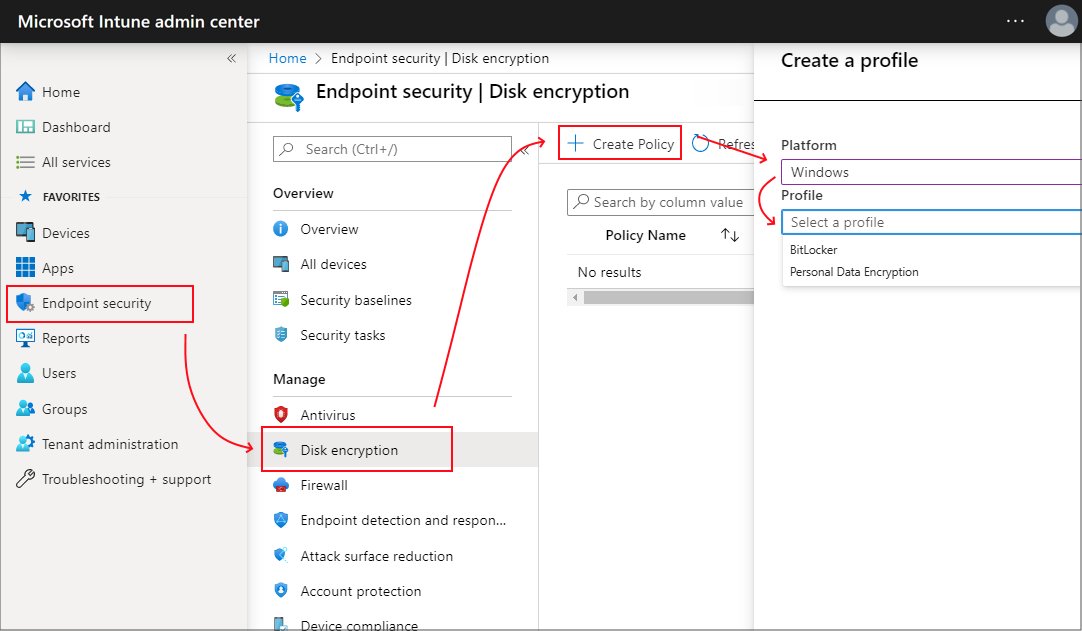
Select **Endpoint security**, then click **Disk encryption**.
Click **Create Policy** and select **Windows 10 and later** as the platform and **BitLocker** as the profile type.
Select the BitLocker profile under Endpoint Security. Source: Microsoft Learn.
In the configuration settings, you want to focus on these critical knobs:
Set **Base Settings > Enable BitLocker** to **Yes**.
Configure the encryption settings under **BitLocker - OS Drive Settings**. If you want silent encryption, set **Compatible TPM Startup** to **Required** and set **Compatible TPM Startup PIN** to **Blocked**. This configuration ensures that the user does not see prompts or need to click buttons during setup.
Turn on **Save BitLocker recovery information to Microsoft Entra ID** by setting it to **Enabled**.
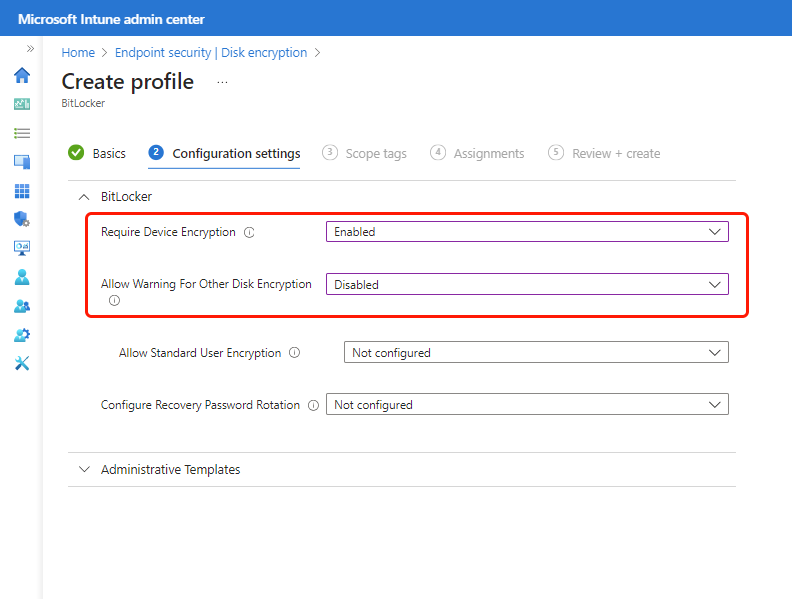
Set **Require device to back up recovery information to Microsoft Entra ID** to **Yes**. This is the most important switch. It prevents Windows from encrypting the drive if it cannot write the key to Entra ID first. If a user is offline, Windows waits for an internet connection and a successful backup before starting the encryption.
Make sure you require the backup to succeed before encryption begins. Source: Microsoft Learn.
How to setup BitLocker backups in Active Directory
For domain-joined environments without Intune, you must use Group Policy. The concept matches the Intune setup, but the menus look different. You can read more about how Active Directory handles this on the Microsoft Learn BitLocker recovery overview.
Open your Group Policy Management Console and edit or create a GPO that applies to your computers. Navigate to this path:
Double-click **Store BitLocker recovery information in Active Directory Domain Services** under the main BitLocker folder and set it to **Enabled**. Check the boxes to store both recovery passwords and key packages.
Navigate to the **Operating System Drives** subfolder.
Double-click **Choose how BitLocker-protected operating system drives can be recovered** and set it to **Enabled**.
Check the box to **Save BitLocker recovery information to AD DS for operating system drives**.
Check the setting that prevents BitLocker from enabling until Active Directory successfully stores the recovery information. If you do not check this, a machine might encrypt itself before it establishes a connection to the domain controller, which will cause you to lose the key.
Once the GPOs apply, domain computers will automatically push new recovery keys to Active Directory. If you already encrypted existing machines before deploying this policy, they will not push their keys automatically. You must run a script on those devices using a tool like PDQ Deploy or a startup script that runs a manage-bde command to force the backup. The command to run is manage-bde -protectors -backup c: -id {your-key-id} to push the key up.
What can we learn as a person
As sysadmins, we spend a lot of time building secure systems. We wrap everything in encryption, hide things behind firewalls, and lock down access. Doing this protects our servers and data from trouble. Honestly, we do the same thing in our personal lives. We encrypt our thoughts, secrets, or struggles to keep them completely to ourselves. This is a good self-defense mechanism. Not everyone deserves access to the inner workings of our brain, and keeping some boundaries is actually healthy for our mental health.
But the thing is, if you encrypt a drive and never back up the key, you are one bad boot away from losing everything. If you lock your thoughts and feelings down so tight that nobody has a copy of the key, what happens when you hit a crisis? What happens when you crash? You lock yourself inside your own head, and nobody can help you get out. We must escrow our keys. A few trusted people in our lives can act as our personal domain admins, holding the recovery keys for when we hit a wall. Who holds your recovery keys? Who do you trust enough to share the things you keep locked away?
Had a ticket land on my desk that just said "my laptop is doing something weird, is it a policy." Thats it. No which policy, no what its doing, just a vague feeling that Intune did something to them. Fair enough honestly, thats a real question and a lot of admins dont actually know how to answer it fast. So heres how you check, both directions.
There are two totally different questions hiding in "is it a policy." One is "what's applied to this specific machine." The other is "which machines have this specific policy." You need both eventually, so lets cover both.
From the device: what's actually applied here
This is the one people ask about most, because its usually a "this one machine is misbehaving" situation.
Intune admin center > Devices > All devices
Select the device (an end user can get the exact device name out of the Company Portal app if you dont already know it)
Select Device configuration
Every profile assigned to that device shows up here with a status. The ones you care about:
Conforms / Succeeded, the device got it and reports back that it matches
Not applicable, the setting doesnt apply to this platform, like an iOS setting showing up against an Android device
Pending, the device hasnt checked in yet, or checked in but hasnt reported status back
Conflict, two policies are fighting over the same setting and Intune cant pick a winner on its own
Error, it failed, and usually comes with an error code worth actually looking up instead of guessing
Select any policy in that list and you get the individual settings inside it and how each one landed on this specific device. If you see a Conflict, select that row and Intune shows you every other profile that also touches that same setting, which is usually the fastest way to actually find the thing fighting with your policy instead of staring at two profiles side by side guessing.
Troubleshooting Panes
Theres also a proper troubleshooting pane built for exactly this, separate from just browsing the device page.
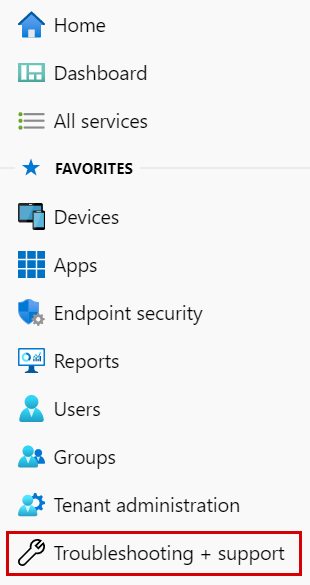
Intune admin center > Troubleshooting + support > Troubleshoot
Select user, pick the person having the issue
Confirm their Intune license shows the green check, sounds dumb but I've genuinely seen "policy isnt applying" turn out to be "user never got licensed"
Under Devices, find their device and check the Managed column says MDM (or EAS/MDM). If it doesnt, the device was never actually enrolled and none of this applies to it yet
The Troubleshoot pane under Troubleshooting + support. Source: Microsoft Learn.
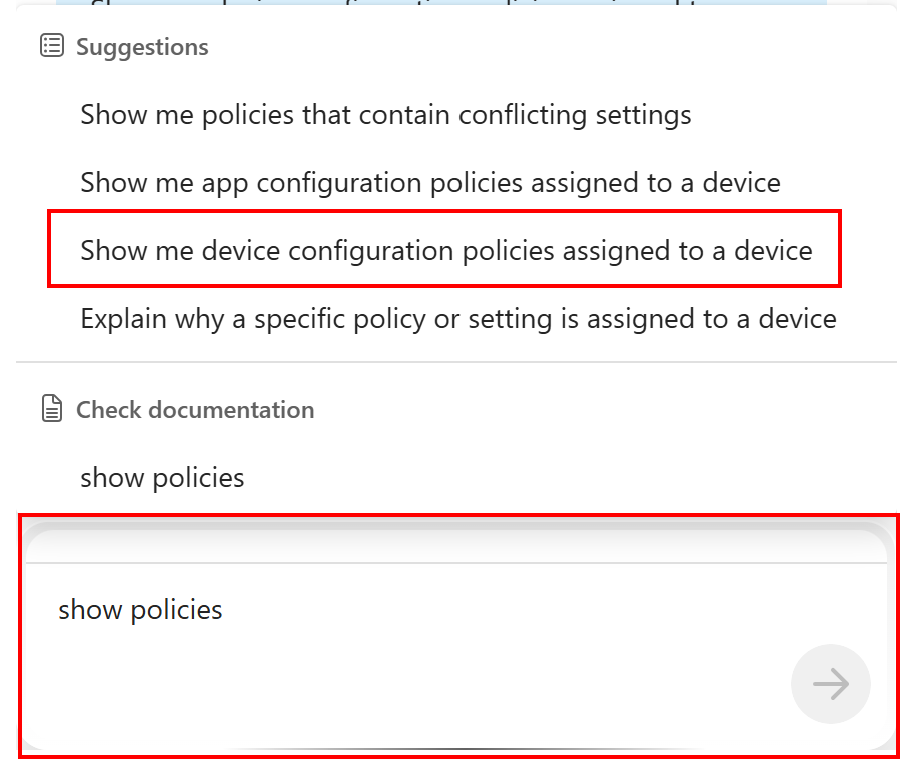
If you've got Copilot in Intune available, theres also a shortcut. Open the device under All devices, select Summarize with Copilot, or in Copilot Chat just type "show policies" and pick the prompt for showing configuration policies assigned to a device. It'll list configuration profiles, compliance policies, and app configuration policies in one shot instead of you clicking through each blade separately.
Copilot listing the policies assigned to a device. Source: Microsoft Learn.
From the policy: which machines actually have this
This is the other direction. Maybe you just changed a policy and want to know how many devices actually picked it up, or you're trying to prove a policy is or isnt the cause of something org wide instead of just one machine.
From here you get three different reports and they are not the same thing, which trips people up constantly:
Device and user check-in status, every device or user that has checked in with this policy, and whether it succeeded, errored, conflicted, or is still pending
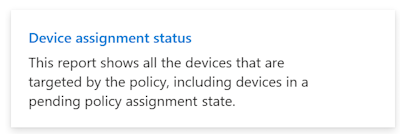
Device assignment status, a report you have to actually generate, shows the latest assignment state per device. This can lag 24 to 48 hours behind recent group membership changes, especially on bigger tenants, so dont panic if a device you just added to the group isnt showing yet
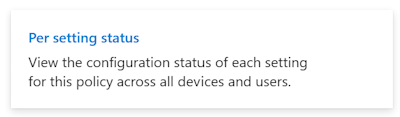
Per setting status, breaks it down to the individual setting level, how many devices report success versus error versus conflict for each specific setting in the policy
It's normal
Its normal, and expected, for the numbers between Device and user check-in status and Device assignment status to not match exactly. They're pulling from slightly different data and refresh on different schedules. Dont treat a mismatch there as a bug, its just how the reporting is built.
Device assignment status report for a policy. Source: Microsoft Learn.Per setting status, broken down to the individual setting level. Source: Microsoft Learn.
Selecting View report under Device and user check-in status gives you the actual list, which devices got it, which users are attached to those devices, and the last time each one checked in. You can select a specific device right from that list too, so this direction and the "from the device" direction eventually meet in the middle.
Putting it together
Vague complaint about one machine, start from the device, Devices > All devices > Device configuration, or the Troubleshoot pane if you want the fuller license and enrollment picture at the same time. Question about a policy's reach across the whole org, start from the policy itself and use the check-in status, assignment status, and per setting status reports. Both paths end up showing you the same underlying data, they just start from opposite ends.
What can we learn as a person
What gets me about the Conflict status is that Intune doesnt just say "something's wrong," it actually shows you every other policy touching that same setting so you can go find the real source. Most of us dont do that for our own conflicts. Something feels off, a mood, a relationship, a habit, and we just label it "stress" and move on, we never drill into the setting details to find the other thing thats actually competing for that same space in us.
And the "pending" status gets me too honestly. Sometimes the fix already got sent, we just havent checked in long enough to report back that it worked. Not everything broken is actually still broken, sometimes its just waiting on us to sync.
So next time something in your life shows up as a conflict, what are the other policies actually competing for that setting? And is there something in you thats already pending, just waiting for you to check back in?
Got asked in a meeting "so is Intune MDM or MAM, just pick one". I said "yes" and the guy actually got a little annoyed at me. Fair reaction honestly, it sounds like a dodge. But its not a dodge, its the actual answer. Intune runs both, at the same time, and they do genuinely different jobs. So lets split this into two halves and actually look at each one.
The short answer
MDM, mobile device management, manages the whole device. MAM, mobile application management, manages just the work apps and the data inside them. Leaving the rest of the device alone. Intune does both, independently or together, and which one you lean on depends on whose device it is and what you're actually trying to protect.
Part one: what MDM actually does
MDM is the "the company owns this device and manages the whole thing" side. A device gets enrolled, either the user does it themselves through Company Portal, or its automatic through Windows Autopilot, Apple Automated Device Enrollment, or Android Enterprise. Once its enrolled, Intune can see and manage settings, security, and apps across the entire device. Lost or stolen, you can wipe the whole thing.
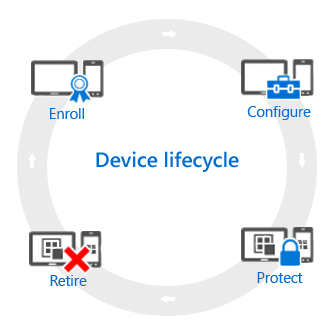
The MDM side generally moves through a lifecycle:
Enroll, get the device registered so it can be managed
Configure, device configuration profiles, Wi-Fi and VPN settings, password requirements, camera restrictions, that kind of thing
Protect, multi-factor authentication, Windows Hello for Business, compliance policies
Retire, wipe or remove the device from management when its done, lost, or reassigned
The MDM device lifecycle. Source: Microsoft Learn.
MDM is what you reach for when users need corporate Wi-Fi or VPN profiles pushed automatically, when a set of apps needs to land on the device without the user hunting for them, or when you're under a regulatory requirement that specifically calls out device level controls like encryption.
Worth knowing, Intune isnt the only MDM out there, and it doesnt have to be. Jamf and Omnissa Workspace ONE are common alternatives, especially in Apple heavy or frontline device shops. A device can only be enrolled in one MDM at a time, but plenty of orgs run Intune for most of the fleet and a different MDM for a specific pool of shared or kiosk devices. If you go that route, Intune partner compliance can still fold third party MDM managed devices into your Conditional Access decisions.
Part two: what MAM actually does
MAM is the "I dont own this device, but I still need to protect my data on it" side. Instead of managing the whole phone, Intune wraps app protection policies around specific apps, Outlook, Teams, the Microsoft 365 apps, and a long list of other supported apps. It controls things like requiring a PIN to open the app, blocking copy and paste out of it into personal apps, and preventing company data from saving to personal storage.
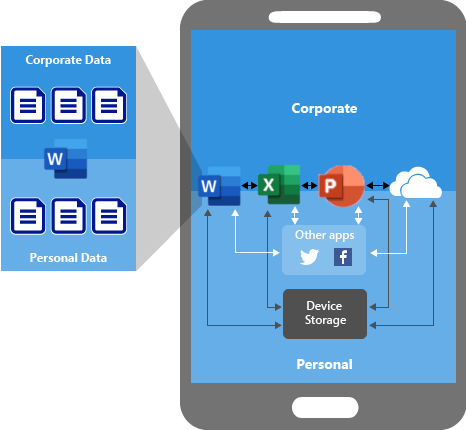
Without any protection in place, data just moves wherever the user drags it, work file into a personal cloud drive, company email pasted into a personal notes app, no real boundary.
Data movement with no app protection policies. Source: Microsoft Learn.
There are two flavors of MAM worth knowing apart:
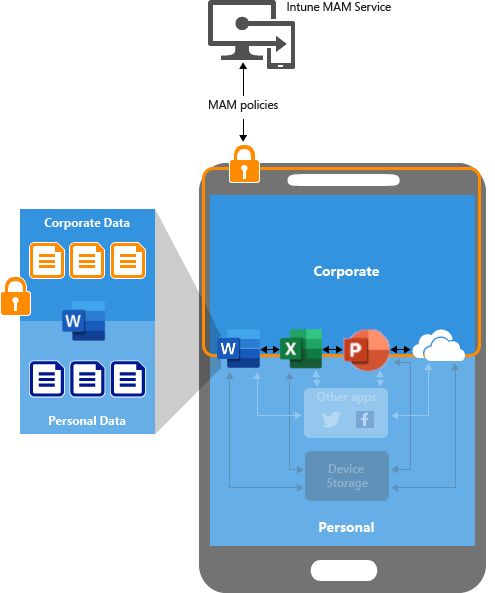
MAM without device enrollment, the device isnt managed at all, maybe its personal, maybe its enrolled in a totally different MDM. Intune only ever touches the managed apps. You lose some things this way, you cant push apps to the device automatically, cant provision certificate profiles, cant hand out Wi-Fi or VPN settings, the user has to grab apps from the store themselves.
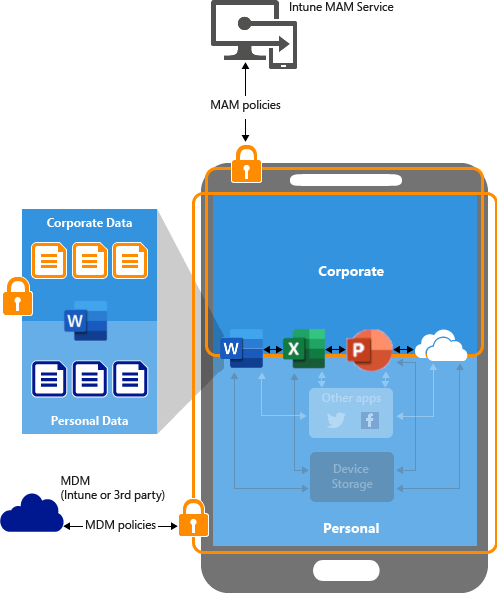
MAM with device management, commonly called MAM plus MDM. The device is already Intune enrolled, and app protection policies get layered on top as an extra safeguard for the apps handling the most sensitive stuff.
MAM layered on top of MDM. Source: Microsoft Learn.MAM without any MDM enrollment at all. Source: Microsoft Learn.
MAM is what you reach for on BYOD, when someone's using their own tablet and absolutely does not want IT managing their whole personal device, and honestly you shouldnt want that responsibility either. Its centered on user identity rather than the device itself, so the same MAM policy applies to that user regardless of what device they picked up.
Just like MDM has alternatives, MAM policies also work alongside Conditional Access to actually enforce things at sign in time, and there are other MAM approaches out there too, though Intune's is the one most tightly wired into Microsoft 365 apps specifically.
Putting it together
Corporate owned device, single user, needs the full set of policies including Wi-Fi, certs, and remote wipe, thats MDM. Personal device, BYOD, and all you actually care about is the company data inside a handful of apps, thats MAM without enrollment. Corporate device that also handles especially sensitive data in one or two apps, thats MDM with MAM stacked on top for that extra layer. Most real orgs end up running a mix of all three depending on who's holding the device.
What can we learn as a person
A computer thinks in ones and zeros. On or off, true or false, MDM or MAM, pick one. And I think a lot of us try to run our own heads the same way, because its simpler, good or bad, safe or dangerous, this person is trustworthy or they're not. But Intune itself doesnt actually work that way even though its running on machines built entirely out of ones and zeros underneath. It holds two different modes at once, applies different rules depending on context, and lets the same device be "managed" in one sense and "not managed" in another, at the same time, without anything breaking.
Reality just doesnt sort into binary as cleanly as we want it to, even the tools built entirely on binary dont actually work that way once you zoom out. Most of the stuff that stresses us out, is this relationship good or bad, was that decision right or wrong, am I doing okay or not, its almost never a clean one or a clean zero. Its usually both, in different contexts, at the same time.
So where are you forcing a one or a zero onto something that's actually running both at once? What would it look like to let it be MDM and MAM instead of picking a side?
Got a ticket that just said "my Android phone wont enroll" with zero other detail. My first question back was "enroll as what." Not being difficult here. Intune actually has five different ways to enroll an Android device. Each one behaves completely differently depending on who owns the phone. So this post is the real answer to how to enroll Android devices in Intune. Its broken down by method, not one generic walkthrough that only fits half the readers.
How to enroll Android devices in Intune: the short version
Personal phone with work stuff on it, user enrolls it themselves, thats a work profile
Company owned phone, one person, work only, admin sets most of it up, thats fully managed
Company owned phone that also allows personal use, thats corporate owned work profile
A stack of shared devices to push through fast, thats where a device enrollment manager account comes in
BYOD: enroll a personal Android device with a work profile
Most enrollment tickets come from this scenario. Someone's using their own personal Android phone and needs email, Teams, whatever else. Intune creates a separate work profile on the device. Its a genuinely separate container with its own icon badge, so personal apps and work apps never mix. IT can see and manage the work side. IT cannot see personal texts, photos, or apps on the other side, and thats not a courtesy, its architecturally separate.
Heres how the end user actually enrolls the device:
Install the Intune Company Portal app from Google Play, or follow the redirect from Outlook or Teams if your org requires enrollment before app access
Open Company Portal and sign in with work credentials
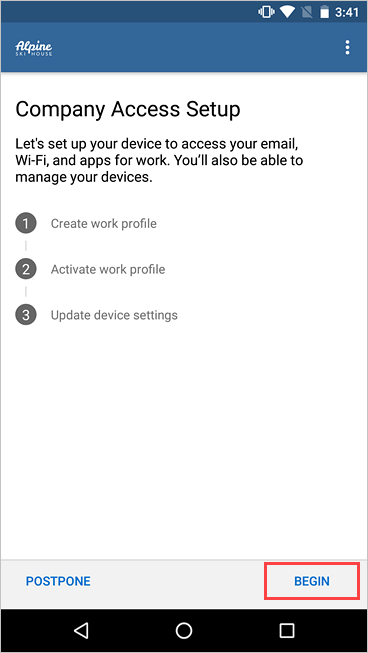
On the Company Access Setup screen, tap Begin
Review the privacy screen showing what the org can and cant see, then tap Continue
Accept Google's terms for creating a work profile
Wait a few minutes while Intune builds the work profile
Sign in again when prompted, this step activates the work profile
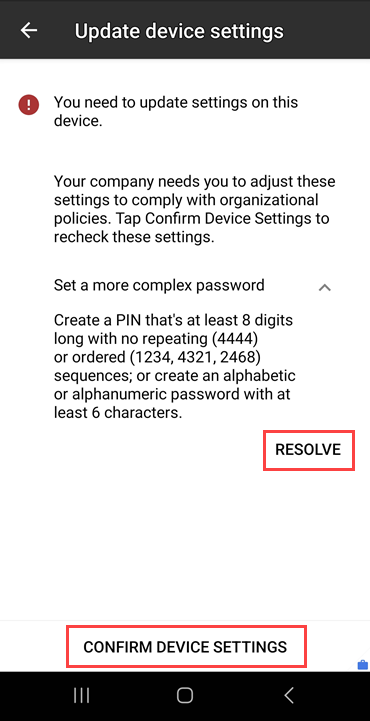
Resolve any device settings Company Portal flags, then tap Confirm Device Settings
Starting BYOD work profile enrollment in Company Portal. Source: Microsoft Learn.
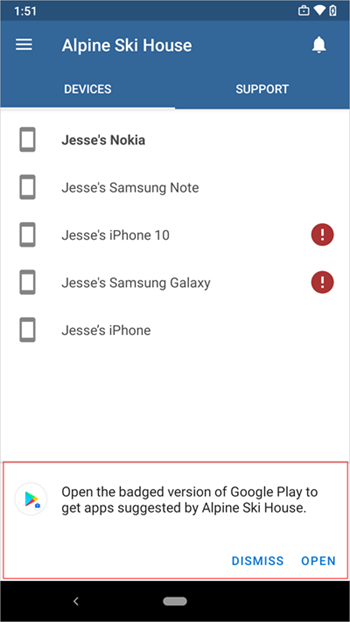
Company Portal prompts the user to check out suggested work apps from a badged version of Google Play once enrollment finishes. They can also grab apps later from the Get Apps menu instead.
Resolving required device settings near the end of BYOD enrollment. Source: Microsoft Learn.Grabbing work apps once the work profile is active. Source: Microsoft Learn.
Worth knowing, this method is genuinely user driven. Admins only restrict it indirectly, usually through Conditional Access requiring enrollment before someone opens Outlook or Teams. Every button press during setup belongs to the end user.
Corporate owned Android devices: three more ways to enroll
These three enrollment types all cover company owned devices, and IT sets each one up before it reaches the user. How much the user does at that point depends entirely on which method you picked.
Fully managed
One person uses the device, work only, no personal use allowed. IT controls the entire device, including blocking uninstalls and factory resets.
Corporate owned with a work profile
The company owns the device, but personal use is still fine. This method separates work and personal data the same way BYOD does, except IT still owns and manages the hardware itself.
Dedicated devices
No user ties to the device at all. Think kiosks, digital signage, ticket printers, inventory scanners, anything shared or standing in a lobby somewhere.
Setting up the enrollment profile
Admins handle the groundwork before any device ships out:
Set MDM authority to Intune, a one time tenant setup
Connect your Intune tenant to your Managed Google Play account
Create an enrollment profile under Devices > Enrollment > Android, and pick the device type
Intune generates a token for that profile, both as a text string and a QR code
Pass the enrollment method along to whoever is setting the device up
How the user actually finishes enrollment
Whoever holds the device, an end user or IT staging it first, completes enrollment through one of these:
QR code, tap the first OOBE screen repeatedly to launch a QR reader, then scan the code. Microsoft recommends this as the default for most scenarios.
Token entry, on the Google sign in screen, type afw#setup instead of a Gmail address, install the Android Device Policy app, then enter the token string by hand. This works well when QR or NFC arent available.
NFC, tap the device against a pre programmed NFC tag.
Google Zero Touch, the closest thing Android has to Windows Autopilot. Provisioning starts the moment the device powers on, no manual code entry at all, but it requires buying devices through an authorized zero touch reseller ahead of time.
Samsung Knox Mobile Enrollment, Samsung's own bulk enrollment path through the Knox Admin Portal.
One gotcha to flag for anyone setting up fully managed or corporate work profile devices. Dont restart the device mid enrollment. Restarting during that window can leave the device looking enrolled in the admin center while it silently misses every policy you assigned.
Kiosks and shared devices: bring in a device enrollment manager
A device enrollment manager account earns its keep on dedicated devices, or really any batch of shared Android hardware. Standard user or admin accounts hit a device cap fast, and things get messy administratively well before you reach real scale. A DEM account skips that problem entirely. Its a dedicated, non personal account whose only job is enrolling devices. It can handle up to 1,000 without touching normal per user limits.
Say you're rolling out 40 dedicated ticket printers or lobby kiosks. You wouldnt enroll each one under a random employee's identity, and you definitely wouldnt use your own personal admin account either. Instead, create something like kiosk-enroll@yourtenant.com, assign it the device enrollment manager role, and hand its credentials to whoever's enrolling the batch. Every device ties back to that one account instead of a real person. That makes cleanup and auditing dramatically easier down the line.
Putting it together
A personal phone gets a work profile through Company Portal, with the user doing everything themselves. A company owned phone used for work only gets fully managed. An admin builds the enrollment profile, and the user just scans a code or types a token. Personal use alongside company ownership calls for corporate owned work profile instead. Nobody owning the device at all means dedicated. A pile of those devices means handing the job to a device enrollment manager account instead of anyone's personal identity.
What can we learn as a person
What sticks with me about the work profile is that the separation isnt something you bolt on after the fact. Intune builds it in from the start. Its a genuinely separate container from day one instead of everything mixing together and getting sorted out later. I think a lot of us handle our own boundaries the opposite way. We let everything blend first, work stress into home life, one relationship's problems into another. Then we try to untangle it after it's already a mess. The work profile only works because the separation happens up front, before anything gets a chance to bleed into the other side.
Where in your life are you letting things share one profile that honestly need their own separate container? What would it look like to build that separation in at the start instead of sorting it out after everything's already tangled together?
Years ago onboarding a new hire meant somebody on IT physically imaging a laptop, installing the fifteen apps by hand, joining it to domain, then shipping it or hand delivering it. Took most of a day per machine if nothing went wrong, which something always did. Now the box just shows up at the person's house, they open it, sign in, and by the time they've cracked open a Dr Pepper the thing is already domain joined and pulling down apps on its own. Thats Autopilot, and its genuinely one of the better tricks Microsoft has pulled off in this space.
What Autopilot actually is
Windows Autopilot is a zero touch deployment system. The device ships straight from the OEM to the end user, no IT hands ever touch it, no custom image gets built. It uses whatever Windows install the manufacturer already put on it. All the actual configuration happens automatically the moment the user turns it on and connects to a network.
From the user's side, this is genuinely almost nothing:
Unbox it, plug it in, turn it on
Pick language, locale, and keyboard if needed
Connect to Wi-Fi or plug in ethernet
Sign in with their work account
Everything after that is automated. The device joins Microsoft Entra ID, enrolls in Intune, and starts pulling down whatever apps and policies you've assigned to it.
How the device even knows what to do
Every device has a hardware hash, basically a fingerprint generated from its hardware. Autopilot registration is just getting that hash into your tenant so Intune recognizes the device the moment it shows up on the network. There are two common ways this happens:
OEM registration, the reseller or manufacturer registers the hash for you at time of purchase. This is the actual zero touch version, you buy it, it ships, its already known before it even arrives.
Manual registration, you run the Get-WindowsAutopilotInfo PowerShell script against the device, which uploads the hash directly, or exports it to a CSV you import into the Intune admin center yourself under Devices > Enrollment > Windows Autopilot > Devices.
Once the hash is in and a deployment profile is assigned to the group that device belongs to, Autopilot has everything it needs.
Setting up a deployment profile
The deployment profile is what actually defines the OOBE experience, this is the part people usually mean when they say "set up Autopilot."
Intune admin center > Devices > Windows > Enrollment > Deployment Profiles
Create Profile > Windows PC
Name it, give it a description
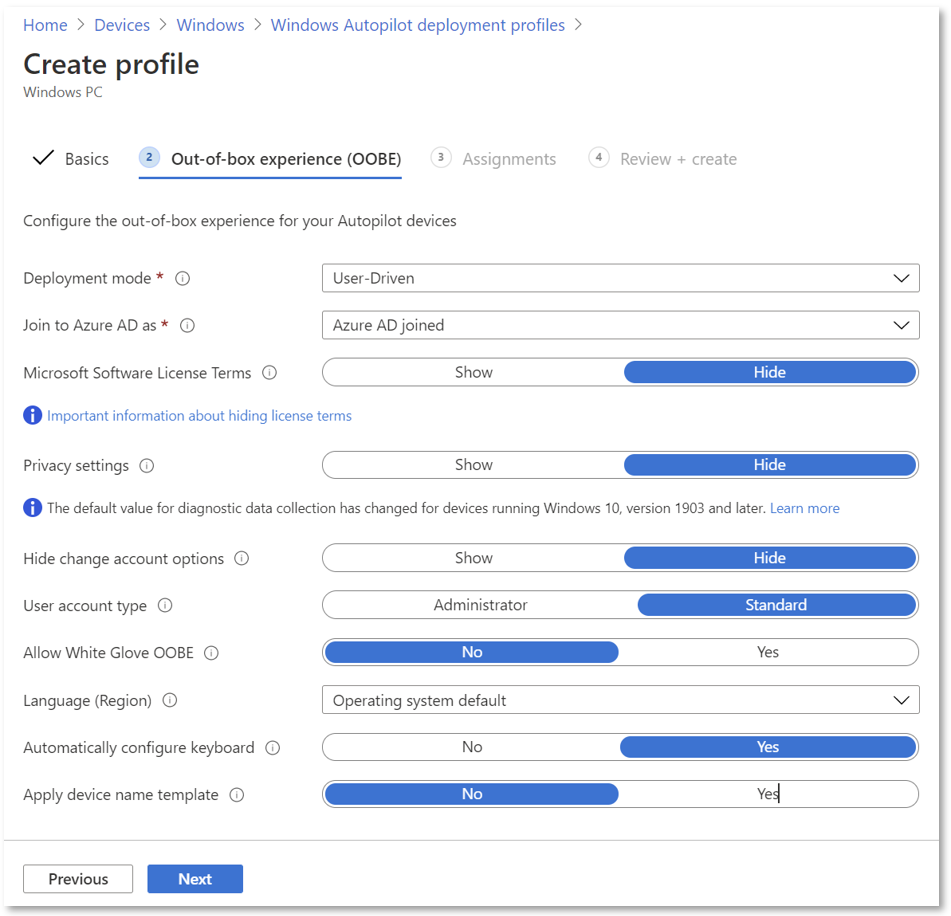
On the Out-of-box experience page, pick your Deployment mode, User-driven for devices tied to a specific person, Self-deploying for devices with no user, like a kiosk, which skips the sign in step entirely
Choose whether the device joins Microsoft Entra ID or Microsoft Entra hybrid join
Configure the OOBE screens, hide or show the EULA, hide or show privacy settings, set the user account type to Standard or Administrator
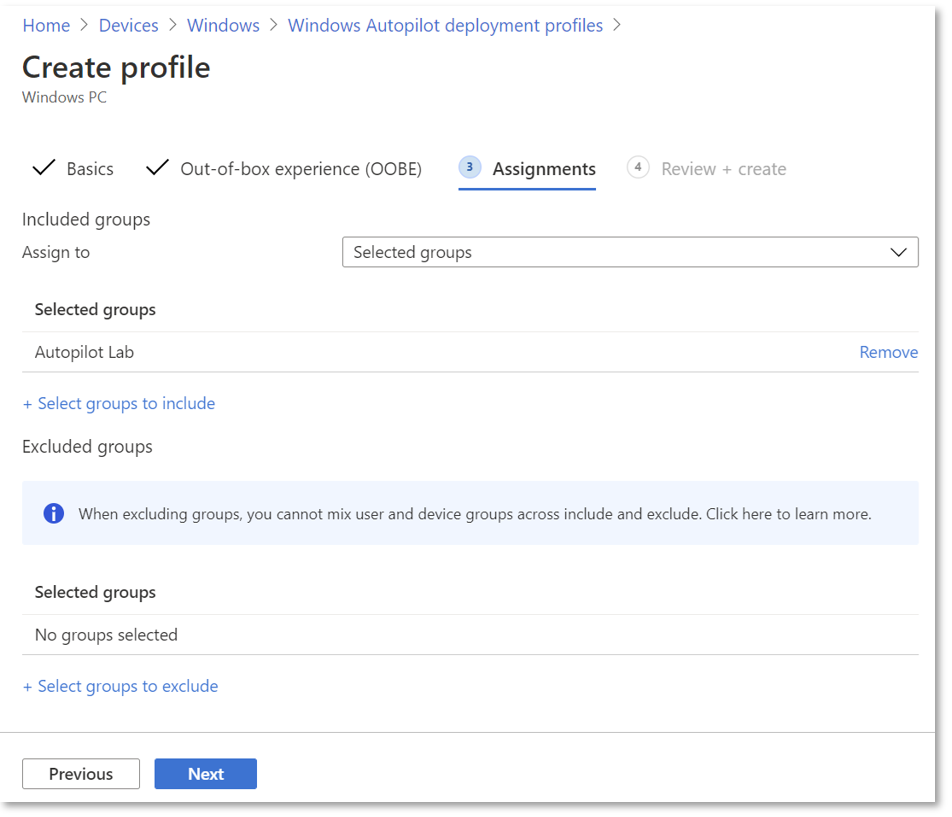
Assign it to the device group that contains your registered hardware hashes
Choosing deployment mode and OOBE settings for an Autopilot profile. Source: Microsoft Learn.Assigning the profile to a device group. Source: Microsoft Learn.
That name template setting is worth calling out specifically. You can set device names automatically during enrollment using macros, %SERIAL% for the hardware serial number, or %RAND:4% for a random four digit string. Saves you from a fleet of laptops all named DESKTOP-7F3K9X2.
The part that installs the company app and sets up the account: the Enrollment Status Page
This is the piece people are usually actually picturing when they imagine Autopilot, a progress screen that shows apps and settings landing on the machine before the user is let loose on it. Thats the Enrollment Status Page, ESP.
ESP runs in two phases:
Device ESP phase, Windows configures itself and installs anything assigned to the device itself, before any user signs in
User ESP phase, once the person signs in with their own account, whatever's assigned to that user, their specific apps, their specific config, gets applied
To set it up:
Intune admin center > Devices > Windows > Enrollment > Enrollment Status Page
Select Default, or create a new profile
Turn on Show app and profile installation progress
Decide if you want Block device use until all apps and profiles are installed, this is the setting that actually stops the user from bailing out to the desktop before your company app finishes installing
Assign it, same as any other profile
The Enrollment Status Page during OOBE. Source: Microsoft Learn.
So the actual flow a new hire experiences: box arrives, they power it on, connect to Wi-Fi, sign in with their work email. Device phase runs quietly for a minute. Then the user phase kicks in, the ESP shows a progress bar while your company app installs and their account gets fully configured. When it hits 100 percent, they're sitting at a working desktop with everything already there. No helpdesk ticket, no IT visit, no imaging.
Worth knowing before you flip it on
Self-deploying mode requires specific hardware, TPM 2.0 and a few other things, since theres no user around to authenticate
Assignment isnt instant, Intune periodically checks assigned groups and it can genuinely take a while depending on group membership and hash sync timing, dont panic if a brand new device doesnt pick up its profile in the first five minutes
If you're going the manual registration route instead of OEM registration, that PowerShell script needs to run either during OOBE itself via Shift+F10 for a command prompt, or from an already set up device
Putting it together
Autopilot is really three pieces working together. The hardware hash tells Intune this device exists and belongs to you. The deployment profile tells it what the OOBE screens should look like and whether a user is involved at all. And the Enrollment Status Page is what actually holds the user back long enough for your company app and their account to finish setting up before they get free rein on the machine. Get those three pieces right and shipping a laptop straight to someone's house stops being a leap of faith.
What can we learn as a person
What gets me about Autopilot is that the device doesnt need anyone standing over it to become useful. It just needs to be registered ahead of time, know where its supposed to end up, and be given a little patience while the pieces land in the right order. Nobody's hovering, nobody's babysitting each step, it just quietly becomes what its supposed to be if you set the groundwork up front.
I think a lot of us wait for someone to hand deliver us fully configured too, wait for a mentor, a plan, someone to walk us through every screen personally, before we believe we can actually become anything. But most of the time the groundwork was already there. We were already registered, so to speak. We just needed to turn on and give the process room to run instead of white knuckling every single step ourselves.
So whats the deployment profile you've already got sitting there, ready to go, that you just havent powered on for yet?
We use cookies to ensure that we give you the best experience on our website. If you continue to use this site we will assume that you are happy with it.